Publicité

Les langues disponibles

Les langues disponibles

Liens rapides

All manuals and user guides at all-guides.com
LESLIE SHOE BENCH
MODEL NO. 168-0078-8
ASSEMBLY INSTRUCTIONS
HAVING TROUBLE?
TOLL-FREE:
1-888-670-6684

Publicité

Table des Matières
loading

Sommaire des Matières pour Canvas 168-0078-8

  • Page 1 All manuals and user guides at all-guides.com LESLIE SHOE BENCH MODEL NO. 168-0078-8 ASSEMBLY INSTRUCTIONS HAVING TROUBLE? TOLL-FREE: 1-888-670-6684...
  • Page 2: Tools Required

    Holiday Decor and Outdoor Living, • Check all screws periodically for tightness. When required, tighten them again. CANVAS makes it easy to refresh your • Do not exceed maximum weight capacity. See page 16. your unique style and the way you live.
  • Page 3: Parts List

    All manuals and user guides at all-guides.com PARTS LIST EXPLODED VIEW ITEM DESCRIPTION QUANTITY Back Rail Top Rail Bottom Bottom Rail Divider Panels Left Side Panel Right Side Panel Bottom Support Back Panel Cushion PARTS LIST EXPLODED VIEW ITEM DESCRIPTION QUANTITY Screws Ø5 x 50 mm Screws Ø4 x 35 mm...
  • Page 4 All manuals and user guides at all-guides.com STEP-BY-STEP INSTRUCTIONS NOTE: Dip the ends of the wood dowels into a bit of glue (7) before inserting STEP 2 them into the holes of the panel. REQUIRES D, E, 3, 4, 5 Attach the BOTTOM RAIL (E) to BOTTOM (D) using WOOD DOWELS STEP 1 Ø7.8 x 30 MM (3), CAMS (5) and CAM BOLTS (4).
  • Page 5 All manuals and user guides at all-guides.com STEP-BY-STEP INSTRUCTIONS STEP 3 STEP 4 REQUIRES A, F, 3, 4, 5, 6 REQUIRES D, F, 1, 3 Attach the DIVIDER PANEL (F) to TOP (A) using WOOD DOWELS Attach BOTTOM (D) to DIVIDER PANEL (F) using WOOD DOWELS Ø7.8 x 30 MM Ø7.8 x 30 MM SCREWS Ø5 x 50 MM...
  • Page 6 All manuals and user guides at all-guides.com STEP-BY-STEP INSTRUCTIONS STEP 5 STEP 6 REQUIRES G, I, 3, 4 REQUIRES A, D, 3 WOOD DOWELS Ø7.8 x 30 MM Insert CAM BOLTS (4) to the LEFT SIDE PANEL (G). Insert (3) to TOP (A) and BOTTOM (D). Insert WOOD DOWELS Ø7.8 x 30 MM (3) to the BOTTOM SUPPORT (I).
  • Page 7 All manuals and user guides at all-guides.com STEP-BY-STEP INSTRUCTIONS STEP 7 STEP 8 REQUIRES G, 5, 6 REQUIRES A, D, J Attach LEFT SIDE PANEL (G) to the body using CAMS (5). Insert the BACK PANEL (J) to the groove on the TOP (A) and BOTTOM (D). Cover the cam holes with the COATED PAPER STICKERS (6).
  • Page 8 All manuals and user guides at all-guides.com STEP-BY-STEP INSTRUCTIONS STEP 9 STEP 10 REQUIRES H, 4 REQUIRES H, I, 5, 6 Insert CAM BOLTS (4) to RIGHT SIDE PANEL (H). Attach BOTTOM SUPPORT (I) to the body using CAMS (5), Attach RIGHT SIDE PANEL (H) to the body using CAMS (5) Cover the cam holes with the COATED PAPER STICKERS (6).
  • Page 9 STEP-BY-STEP INSTRUCTIONS WARRANTY STEP 11 1-YEAR LIMITED WARRANTY This CANVAS™ product carries a one (1 ) year warranty against defects in workmanship REQUIRES A, K and materials. Place the CUSHION (K) on the TOP (A). Trileaf Distribution agrees to replace the defective product free of charge within...
  • Page 10 All manuals and user guides at all-guides.com Exclusively at Canadian Tire...
  • Page 11: Instructions D'assemblage

    All manuals and user guides at all-guides.com BANC RANGE-CHAUSSURES LESLIE NO DE MODÈLE : 168-0078-8 INSTRUCTIONS D’ASSEMBLAGE DES DIFFICULTÉS? NUMÉRO SANS FRAIS : 1 888 670-6684...
  • Page 12: Outils Requis

    OUTILS REQUIS Web pour nous faire part de votre expérience. Nous aimerions voir comment vous donnez vie à la marque CANVAS. Veuillez partager vos photos grâce au mot-clic #MonStyleCANVAS. Tournevis 2 personnes Serrez les vis à la main pour éviter tout dommage.
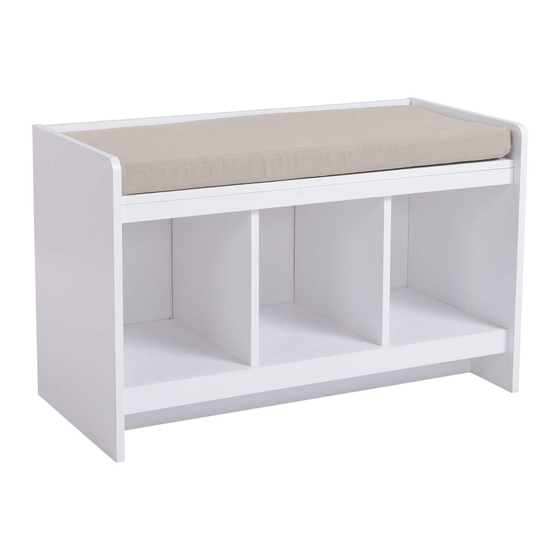
  • Page 13: Liste Des Pièces

    All manuals and user guides at all-guides.com LISTE DES PIÈCES VUE ÉCLATÉE PIÈCE DESCRIPTION QUANTITÉ Dessus Rail arrière Rail supérieur Rail inférieur Panneaux de séparation Panneau latéral gauche Panneau latéral droit Support inférieur Panneau arrière Coussin LISTE DES PIÈCES VUE ÉCLATÉE PIÈCE DESCRIPTION QUANTITÉ...
  • Page 14: Directives Détaillées

    All manuals and user guides at all-guides.com DIRECTIVES DÉTAILLÉES N.B. : Appliquez de la colle (7) sur le bout de chaque goujon en bois avant de ÉTAPE 2 les insérer dans les trous du panneau. NÉCESSITE LES PIÈCES D, E, 3, 4, 5 Fixez le RAIL INFÉRIEUR (E) au BAS (D) à...
  • Page 15 All manuals and user guides at all-guides.com DIRECTIVES DÉTAILLÉES ÉTAPE 3 ÉTAPE 4 NÉCESSITE LES PIÈCES A, F, 3, 4, 5, 6 NÉCESSITE LES PIÈCES D, F, 1, 3 Fixez le PANNEAU DE SÉPARATION (F) au DESSUS (A) à l’aide de GOUJONS EN Fixez le BAS (D) aux PANNEAUX DE SÉPARATION (F) à...
  • Page 16 All manuals and user guides at all-guides.com DIRECTIVES DÉTAILLÉES ÉTAPE 5 ÉTAPE 6 NÉCESSITE LES PIÈCES G, I, 3, 4 NÉCESSITE LES PIÈCES A, D, 3 Insérez des BOULONS À CAME (4) dans le PANNEAU LATÉRAL GAUCHE (G). Insérez des GOUJONS EN BOIS DE Ø7,8 X 30 MM (3) dans le DESSUS (A) et le BAS (D).
  • Page 17 All manuals and user guides at all-guides.com DIRECTIVES DÉTAILLÉES ÉTAPE 7 ÉTAPE 8 NÉCESSITE LES PIÈCES G, 5, 6 NÉCESSITE LES PIÈCES A, D, J Fixez le PANNEAU LATÉRAL GAUCHE (G) aux pièces assemblées à l’aide Insérez le PANNEAU ARRIÈRE (J) dans la rainure du DESSUS (A) et du BAS (D). de CAMES (5).
  • Page 18 All manuals and user guides at all-guides.com DIRECTIVES DÉTAILLÉES ÉTAPE 9 ÉTAPE 10 NÉCESSITE LES PIÈCES H, 4 NÉCESSITE LES PIÈCES H, I, 5, 6 Attachez le SUPPORT INFÉRIEUR (I) au corps du meuble à l'aide des écrous ou CAMS Insérez des BOULONS À...
  • Page 19: Garantie

    Cet article n’est pas garanti contre l’usure ou le bris en raison d’un usage abusif ou inapproprié. NO DE MODÈLE : 168-0078-8 Fabriqué en Chine Importé par : Trileaf Distribution Trifeuil Toronto, Canada M4S 2B8...
  • Page 20 All manuals and user guides at all-guides.com Une exclusivité Canadian Tire...

Table des Matières