Publicité
Les langues disponibles
Les langues disponibles
sauder.com
Library
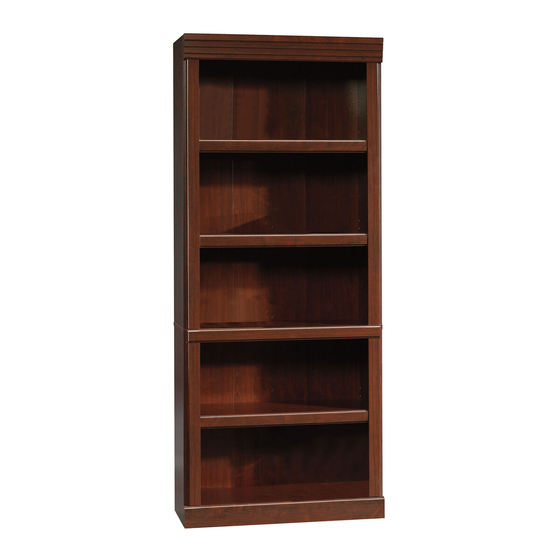
Heritage Hill Collection | Model 102795
Need help? Visit Sauder.com to view video assembly tips or chat with a live rep.
Prefer the phone? Call 1-800-523-3987.
Share your journey!
The stories of your life.
NOTE: THIS INSTRUCTION
BOOKLET CONTAINS IMPORTANT
SAFETY INFORMATION.
PLEASE READ AND KEEP FOR
FUTURE REFERENCE.
English pg 1-16
Français pg 17-20
Español pg 21-24
Lot # 395599
08/11/16
Purchased: __________________
Be sure to give us a ring before
making any returns. 1-800-523-3987
Publicité
Table des Matières

Manuels Connexes pour Sauder Heritage Hill Library 102795


Sommaire des Matières pour Sauder Heritage Hill Library 102795
- Page 1 Heritage Hill Collection | Model 102795 NOTE: THIS INSTRUCTION BOOKLET CONTAINS IMPORTANT SAFETY INFORMATION. Need help? Visit Sauder.com to view video assembly tips or chat with a live rep. PLEASE READ AND KEEP FOR FUTURE REFERENCE. Prefer the phone? Call 1-800-523-3987.
- Page 2 Part Identifi cation No. 2 Phillips Screwdriver Tip Shown Actual Size Hardware Identifi cation Assembly Steps 5-16 Hammer Not actual size Français 14-20 Español 21-24 Scissors Safety 25-26 Tape Measure Warranty Skip the power trip. This time. Page 2 102795 www.sauder.com/services...
-
Page 3: Part Identifi Cation
ADJUSTABLE SHELF (3) SHORT END MOLDING (2) LONG END MOLDING (2) ADJUSTABLE SHELF MOLDING (3) SHELF MOLDING (1) BASE (1) VALANCE (1) AA UPPER END (2) BB FIXED SHELF (1) CC LARGE BACK (1) DD BACK (1) www.sauder.com/services 102795 Page 3... - Page 4 U-CLIP - 1 METAL PIN - 12 RUBBER SLEEVE - 12 TOUCH-UP PEN - 1 BLACK 9/16" LARGE HEAD SCREW - 61 BLACK 1-7/8" FLAT HEAD SCREW - 5 NAIL - 37 CONNECTOR SCREW - 12 Page 4 102795 www.sauder.com/services...
- Page 5 Look for this icon. It means a Step 1 video assembly tip is available at www.sauder.com/services/tips Insert a CONNECTOR SCREW (CS) into each å HIDDEN CONNECTOR (K). Scan this QR code or go to this address: http://qr.sauder.com/?ID=1581 to watch a video on how to assemble your unit.
- Page 6 These holes must be here. r f a D E N w i t H I D i t h f a c E C T l e s S u r Page 6 102795 www.sauder.com/services...
- Page 7 Fasten the FIXED SHELF (BB) to the UPPER ENDS (AA). å Use four BLACK 1-7/8" FLAT HEAD SCREWS (S). These holes must be here. r f a w i t l e s BLACK 1-7/8" FLAT HEAD SCREW (4 used in this step) www.sauder.com/services 102795 Page 7...
- Page 8 H I D i t h f a c E C T S u r These holes must be here. S u r f a c i t h E C T H I D D E N Page 8 102795 www.sauder.com/services...
- Page 9 The END MOLDINGS (E) are off set 1/4" in from the edges of the LOWER ENDS (A2). i t h o E C T f a c S u r D E N H I D Curved edge Curved edge Flat edge Groove Groove www.sauder.com/services 102795 Page 9...
- Page 10 NOTE: The ENDS MOLDINGS should rest against the å SHELF MOLDING. IMPORTANT The END MOLDINGS (F) are off set 1/4" in Curved edge from the edges of the UPPER ENDS (AA). Groove These edges should be even. Curved edge Groove Page 10 102795 www.sauder.com/services...
- Page 11 Fasten the VALANCE (J) to the SHELF (B). Use three å BLACK 9/16" LARGE HEAD SCREW BLACK 9/16" LARGE HEAD SCREWS (T) through the (6 used in this step) ANGLE BRACKETS and into the VALANCE. Wide edge (3 used) www.sauder.com/services 102795 Page 11...
- Page 12 NOTE: Perforations have been provided for access through å farther from this edge. the BACKS. Carefully cut out the holes needed. These holes must line up over the SHELF (BB). NOTE: The lower BACK (DD) overlaps the LARGE BACK (CC). Page 12 102795 www.sauder.com/services...
- Page 13 Fasten nine ANGLE BRACKETS (L) to the ADJUSTABLE SHELVES (C). å Use nine BLACK 9/16" LARGE HEAD SCREWS (T). NOTE: Do not completely tighten the SCREWS at this time. å BLACK 9/16" LARGE HEAD SCREW (9 used in this step) (9 used) www.sauder.com/services 102795 Page 13...
- Page 14 NOTE: There are no pre-drilled holes in the ADJUSTABLE SHELF å MOLDING (G). The SCREWS will tighten into the groove. Repeat this step for the remaining ADJUSTABLE SHELVES (C). å BLACK 9/16" LARGE HEAD SCREW (9 used in this step) Page 14 102795 www.sauder.com/services...
- Page 15 ADJUSTABLE SHELF MOLDINGS and the END MOLDINGS, then adjust the END MOLDINGS in until the gap is closed. Adjust the END MOLDINGS (E and F) tight against the ADJUSTABLE SHELF MOLDINGS (G). Curved edge (12 used) www.sauder.com/services 102795 Page 15...
- Page 16 BLACK 1-7/8" FLAT HEAD SCREW (1 used into a stud in your wall) BLACK 9/16" LARGE HEAD SCREW (1 used into the top of your unit) No load 25 lbs. 25 lbs. 40 lbs. 25 lbs. 50 lbs. Page 16 102795 www.sauder.com/services...
-
Page 17: Liste De Pièces
élément et conserver le livret pour future référence. EXTRÉMITÉ INFÉRIEURE ........2 CONNECTEUR ESCAMOTABLE ....12 Pour contacter Sauder TABLETTE .................2 CONSOLE À ÉQUERRE ........30 en ce qui concerne cet TABLETTE RÉGLABLE ..........3 CONSOLE DE SÉCURITÉ ........1 élément, faire référence... - Page 18 REMARQUE : Les MOULURES D'EXTRÉMITÉ doivent reposer serrer à bloc. contre la BASE. ÉTAPE 4 Fixer la TABLETTE FIXE (BB) aux EXTRÉMITÉS SUPÉRIEURES (AA). Utiliser quatre VIS TÊTE PLATE 48 mm NOIRES (S). Page 18 102795 www.sauder.com/services...
- Page 19 TABLETTES RÉGLABLES (C). Utiliser neuf VIS TÊTE TÊTE LARGE 14 mm NOIRES (T) à travers les CONSOLES À LARGE 14 mm NOIRES (T). ÉQUERRE et dans le LAMBREQUIN. REMARQUE : Ne pas complètement serrer les VIS à ce stade de l'assemblage. www.sauder.com/services 102795 Page 19...
- Page 20 Enfoncer les MANCHONS EN CAOUTCHOUC (P) sur les GOUPILLES EN MÉTAL (O). Insérer les GOUPILLES EN MÉTAL dans les trous choisis dans les EXTRÉMITÉS (A2 et AA). Poser les TABLETTES RÉGLABLES (C) sur les GOUPILLES EN MÉTAL. Page 20 102795 www.sauder.com/services...
-
Page 21: Lista De Partes
EXTREMO INFERIOR ..........2 CONECTOR INVISIBLE ........12 et conserver le livret pour future référence. ESTANTE ................2 SOPORTE ANGULAR ..........30 Pour contacter Sauder ESTANTE AJUSTABLE ..........3 MÉNSULA DE SEGURIDAD .........1 en ce qui concerne cet MOLDURA CORTA DE EXTREMO .......2 CLIP-U ..................1 élément, faire référence... - Page 22 PASO 1 PASO 5 Inserte un TORNILLO CONECTOR (CS) en cada Fije el EXTREMO INFERIOR (A2) al ESTANTE INMÓVIL (BB). CONECTOR INVISIBLE (K). Apriete dos CONECTORES INVISIBLES. Fije el otro ESTANTE (B) al EXTREMO INFERIOR (A2). Apriete dos CONECTORES INVISIBLES. PASO 2 Ensamble la unidad sobre un piso alfombrado o sobre el cartón PASO 6...
- Page 23 PASO 7 PASO 9 Fije nueve SOPORTES ANGULARES (L) a los EXTREMOS Precaución: No coloque la unidad en posición vertical hasta que se SUPERIORES (AA) y al ESTANTE INMÓVIL (BB). Utilice nueve fi je el DORSO. La unidad podría caerse. TORNILLOS NEGROS DE CABEZA GRANDE de 14 mm (T).
- Page 24 PASO 11 PASO 13 Fije la MOLDURA DE ESTANTE AJUSTABLE (G) al ESTANTE Se recomienda que utilice la MÉNSULA DE SEGURIDAD (M) AJUSTABLE (C). Pase tres TORNILLOS NEGROS DE CABEZA para aumentar la estabilidad. Utilice un TORNILLO NEGRO DE GRANDE de 14 mm (T) a través de los SOPORTES y en la ranura CABEZA GRANDE de 14 mm (T) a través de la parte superior de de la MOLDURA.
- Page 25 WARNING Please use your furniture correctly and safely. Improper use can cause safety hazards, or damage to your furniture or household items. Carefully read the following chart. Look out for: What can happen: How to avoid the problem: • Overloaded shelves. •...
- Page 26 Además, el peso y la ubicación del tubo de imagen tienden a causar la inestabilidad de televisores y propensa a volcarse hacia adelante. Page 26 102795 www.sauder.com/services...
-
Page 27: Garantie Limitée De 5 Ans
à compter de la date d'achat la première fois et qui sont signalés à Sauder dans les limites de couverture de la contre tout défaut de matériaux ou de fabrication des composantes de mobilier Sauder. - Page 28 Dear Valued Customer: So, how did it go? Thanks so much for choosing Sauder® furniture. I hope the Set a world record for speed? purchase and assembly process was a positive experience Feeling good about yourself? and you feel good about the furniture you just built. If you Nice.