Publicité
Les langues disponibles
Les langues disponibles
Liens rapides
N
Contents:
Page 1 General information
Valve installation
Thermostat installation
Figures and symbols on the thermostat
Page 2 Temperature setting
Limiting and locking of a setting
Airing of the rooms
Cleaning
Page 3 Replacement of the gland nut
Checklist for faults
Supplier addresses
General information
Thermostatic radiator valves control the room temperature
by modifying the flow of hot water through the radiator.
Often, there is only a minimum requirement for heat (espe-
cially in transition periods) and so the thermostats only
open the valves a small amount. Consequently flow noises
could occur due to high differential pressures. To prevent
these noises, measures should be taken to influence the dif-
ferential pressure; for example by using adjustable circulati-
on pumps, manually adjustable bypass pipes, differential
pressure regulators or differential pressure relief valves.
It is recommended to adjust the temperature of the supply
pipe to the outside temperature, preferably by using a wea-
ther guided temperature controller.
For further information see technical data sheets
"Thermostats" and "Thermostatic radiator valves".
Valve installation
The radiator valve should be installed so that the thermost-
at is in a horizontal position and a good circulation of air is
guaranteed. If this is not possible, a thermostat with remote
sensor or with remote control should be used. It is most
important that capillaries are not kinked or flattened.
The radiator valve is installed in the supply pipe to the
radiator, with the flow in the direction of the arrow.
When using compression fittings, the thread of the fitting
and the compression ring are slightly oiled at works. Do not
use any additional lubricant Do not allow the oil or lubri-
cant to come into contact with the EPDM valve disc. EPDM
is not oil resistant.
When using the compression fittings for thermostatic valves
with female threaded connection (only possible for sizes
DN 10, DN 15 and DN 20), the "Ofix" compression fittings
are to be used in order to guarantee a perfect sealing func-
tion between the pipework and the thermostatic valve.
It is important that the pipes are cut to the correct length at
a right angle to the centre line. The ends of the pipe must
be free of burrs and undamaged.
Reinforcing ring
Compres -
sion ring
Compression nut
Compression fitting
before tightening.
Remove pipe insulation
far enough.
Pipe shape after tigh-
tening.
Valves, controls + systems
Thermostatic radiator valves
Thermostats Uni XH" and "Uni XD"
When using thin walled and very soft pipes, reinforcing
sleeves have to be used. The reinforcing sleeve supports
the pipe and provides the strength to enable the necessary
compression. Reinforcing sleeves cannot be used on pipe
with welded seams. The recommendations of the pipe
manufacturers have to be observed in any case. If neces-
sary, a practical "test" has to be carried out.
The special fittings "Cofit S" may be used for the Oventrop
composition pipe "Copipe". The installation instructions
supplied with the fittings must be observed.
All radiators and pipework must be flushed thoroughly to
prevent any problems caused by welding beads and dirt.
When converting old heating systems, it is recommended
that a plastic strainer should be fitted at the inlet port of all
radiator valves.
Do not fit the thermostat until all building work has been
completed. During construction period, the valve can be
operated with the screwed cap. The screwed cap is not to
be used for permanent shut-off of the valve against system
pressure (e.g. while radiator is removed). In this case pro-
tect the valve outlet with a metal cap.
Thermostat installation
To ensure an easy installation, the handgrip must be ope-
ned to the maximum position (figure "5"). In this position,
the collar nut ("Uni XH") or the squeeze connection ("Uni
XD") of the thermostat may be easily fitted to the valve
body.
Turn the thermostat so that the indicator mark is facing up.
Hold in this position and tighten collar nut without using
excessive force.
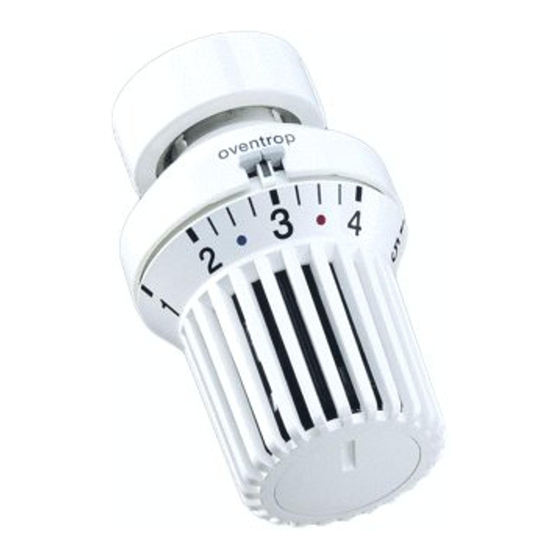
Figures and symbols on the thermostat
= Frost protection symbol
in this position the valve opens automatically when
room temperature drops below 7 °C.
1 = about 12 °C
The minor graduations
2 = about 16 °C
between the figures 2 - 4
3 = about 20 °C
represent a change of room
4 = about 24 °C
temperature of about. 1 °C.
5 = about 28 °C
Installation instructions
Collar nut "Uni XH" or
squeeze connection "Uni XD"
"Lower limiting clip"
"Upper limiting clip"
Indicator mark (with tactile set-
ting device in form of a ridge)
Minor graduation
Graduation figure
Direction "warmer"
Basic setting "3", about 20 °C
(with tactile setting device in
form of a point)
Direction "colder"
Handgrip
Memory disc
1
Publicité

Manuels Connexes pour oventrop Uni XH


Sommaire des Matières pour oventrop Uni XH
- Page 4 Pour informations complémentaires voir informations techniques «Thermostats» et «Robinets thermostatiques». d’abord tourner la poignée vers la gauche jusqu’à butée (chiffre 5). Dans cette position, I’écrou de serrage («Uni XH») Montage du robinet ou la fixation à griffes («Uni XD») du thermostat peuvent faci- Le robinet de radiateur est à...
- Page 5 Marquage d une valeur réglée Le thermostat peut être bloqué sur chaque repère de gra- Votre thermostat Oventrop est équipé d’une pastille de duation, chaque chiffre et la position hors-gel. mémoire facilitant la reproduction de votre température désirée après avoir déréglé la poignée manuelle.
- Page 6 Les impuretés doivent alors être éliminées ou le robi- Les thermostats démontés/défectueux sont repris par le net doit être remplacé. fabricant Oventrop et sont éliminés professionnellement. 21. La protection contre le gel répond. Le symbole corres- pond à une température d’ambiance d’environ 7 °C. Le Check-list pour la réparation de dérangements...