auna KR-500 Mode D'emploi

auna KR-500 Mode D'emploi

Radio de cuisine avec cd et spotify
Masquer les pouces Voir aussi pour KR-500:
Table des Matières

Publicité

Les langues disponibles
  • FR

Les langues disponibles

Liens rapides

Publicité

Table des Matières
loading

Sommaire des Matières pour auna KR-500

  • Page 3: Table Des Matières

    Sehr geehrter Kunde, wir gratulieren Ihnen zum Erwerb Ihres Geräts. Lesen Sie die folgenden Hinweise sorgfältig durch und befolgen Sie diese, um möglichen Schäden vorzubeugen. Für Schäden, die durch Missachtung der Hinweise und unsachgemäßen Gebrauch entstehen, übernehmen wir keine Haftung. INHALT Technische Daten 4 Sicherheitshinweise 5...
  • Page 4: Technische Daten

    TECHNISCHE DATEN Artikelnummer 10031477 Stromversorgung Netzgerät Eingang 100-240V ~ 50/60 Hz Ausgang 5,5 V 2,5 A...
  • Page 5: Sicherheitshinweise

    SICHERHEITSHINWEISE • Lesen Sie vor der Benutzung des Gerätes die Warn- und Sicherheitshinweise. • Bewahren Sie alle Hinweise zum späteren Nachschlagen auf. • Das Gerät darf nicht in der Nähe von Wasser verwendet werden oder mit Feuchtigkeit in Berührung kommen. •...
  • Page 6: Geräteübersicht

    GERÄTEÜBERSICHT...
  • Page 7 LCD-Anzeige runter SELECT zurück Menü Info/ CD/ Mem hoch IR-Sensor für Fernbedienung 10 USB-Anschluss AUX-Anschluss 12 Schlaf 13 Ein/Aus/Standby 14 Funktionswahl 15 Nächster Titel/Sendersuchlauf vor 16 Wiedergabe/Pause/Stoppt 17 PRE-UP/Rechts 18 Timer 19 PRE-DOWN/Links 20 Zurück/ Sendersuchaluf zurück 21 CD-Fach 22 CD-Fach öffnen, schließen 23 Netzkabelanschluss...
  • Page 8 Fernbedienung SLEEP Aktivieren der Schlaffunktion FUNC Funktionswahl: Aktivieren von CD/Radio/Aux/BT Einschalten / in Standby schalten   CD/USB: Titel vor/zurück   / CD/USB: Wiedergabe / Pause /Stopp Pre Up-Down/ Internetradio: Senderspeicher hoch/runter Left-Right CD-MP3: Ordnerwahl hoch/runter Menü: links/rechts wählen Timer Timer einstellen Hoch/runter...
  • Page 9: Montage Und Inbetriebnahme

    MONTAGE UND INBETRIEBNAHME Auspacken • Entpacken Sie alle Teile und entfernen Sie das Schutzmaterial. • Schließen Sie das Gerät erst an die Stromversorgung an, nachdem Sie die Spannung der Stromversorgung überprüft haben und nachdem alle anderen Anschlüsse hergestellt werden. • Verdecken Sie nicht die Lüftungsöff nungen.
  • Page 10 Optionale Tischaufstellung Gummifüße Montageblech Anschluss 1. Schließen Sie den Netzstecker an eine Steckdose an. Das Gerät geht in den Standby-Betrieb und die LCD-Anzeige leuchtet auf. 2. Wenn das Gerät zum ersten Mal in Betrieb geht, erscheint in der Anzeige "STARTING". 3.
  • Page 11: Internetradio

    INTERNETRADIO 1. Im Internetradiobetrieb drücken Sie die Tasten ∧/∨ (8/3), um die Senderliste zu wählen. 2. Mit den Tasten ∧/∨ Sender auswählen und mit SELECT bestätigen. 3. Mit den Tasten ∧/∨ die Suchfilter auswählen wie "Länder, Genres usw." Mit SELECT bestätigen. 4.
  • Page 12: Mp3-Wiedergabe

    Bedienfunktionen Wiedergabe/Pause (  ) drücken, um die Wiedergabe anzuhalten bzw. wieder aufzunehmen. Stopp () drücken, um die Wiedergabe zu beenden. Titel vor/zurück ( ) drücken, um einen Titel vor- oder zurückzuspringen.  MP3-WIEDERGABE 1. Nach dem Durchsuchen des Speichermediums wird die Anzahl der Titel angezeigt.
  • Page 13: Cd-Programmierung

    Bei CD-Wiedergabe Wiedergabemodus Anzeige im Display einen Titel wiederholen alle Titel wiederholen Zufallwiedergabe Bei MP3-Wiedergabe Wiedergabemodus Anzeige im Display einen Titel wiederholen alle Titel wiederholen Titel eines Ordners wiederholen Zufallwiedergabe CD-PROGRAMMIERUNG Bis zu 20 Titel können für die Wiedergabe in einer beliebigen Reihenfolge programmiert werden.
  • Page 14: Usb-Speichermedium Für Mp3-Wiedergabe

    USB-SPEICHERMEDIUM FÜR MP3-WIEDERGABE Anschluss Das Gerät kann MP3-Dateien lesen und wiedergeben, die auf einem USB- Speichermedium gespeichert sind. 1. Versetzen Sie das Radio in den Standby-Modus (oder eine andere Betriebsart außer den USB-Betrieb. 2. Stecken Sie einen USB-Stick mit der Vorderseite nach oben in den Anschluss.
  • Page 15: Weitere Eigenschaften

    WEITERE EIGENSCHAFTEN Schlafmodus Mit dem Schlafmodus schaltet das Radio sich nach einer voreinstellten Zeit 1. Drücken Sie die "Sleep"-Taste, um 15/30/45/60 min zu wählen. Im Display erscheint " z". Nachdem die Zeit abgelaufen ist, geht das Radio automatisch in den Standby-Betrieb. 2.
  • Page 16 3. Mit </> Ja wählen und mit SELECT bestätigen. AUX-Eingang Verbinden Sie das Radio mit einem externen Audiogerät (z. B. einem CD- Player, MP3-Player oder tragbaren Kassettenrekorder). Schließen Sie es an den 3,5-mm-Klinkenanschluss auf der Vorderseite an (Kabel nicht im Lieferumfang enthalten).
  • Page 17: Spotify Connect

    SPOTIFY CONNECT Dein neues Gerät hat Spotify Connect Verwende dein Smartphone, Tablet oder deinen Computer als Fernbedienung für Spotify. Auf spotify.com/connect erfährst du mehr. Lizenzen Die Spotify Software unterliegt Drittanbieter-Lizenzen, die Sie hier finden: https://www.spotify.com/connect/third-party-licenses Alle aufgeführten Marken sind Warenzeichen der jeweiligen Unternehmen. Fehler und Auslassungen ausgenommen und technischen Änderungen unterliegend.
  • Page 18: Batteriewechsel Fernbedienung

    BATTERIEWECHSEL FERNBEDIENUNG Das Batteriefach befindet sich auf der unteren Seite der Fernbedienung. 1. Nehmen Sie die Batteriehalterung heraus, indem Sie die Lasche zur Mitte hin drücken und die Halterung herausziehen. 2. Setzen Sie eine neue Knopfzelle (CR2032) mit dem Pluspol nach oben ein.
  • Page 19: Spezielle Entsorgungshinweise Für Verbraucher In Deutschland

    SPEZIELLE ENTSORGUNGSHINWEISE FÜR VERBRAUCHER IN DEUTSCHLAND Entsorgen Sie Ihre Altgeräte fachgerecht. Dadurch wird gewährleistet, dass die Altgeräte umweltgerecht verwertet und negative Auswirkungen auf die Umwelt und menschliche Gesundheit vermieden werden. Bei der Entsorgung sind folgende Regeln zu beachten: • Jeder Verbraucher ist gesetzlich verpflichtet, Elektro- und Elektronikaltgeräte (Altgeräte) sowie Batterien und Akkus getrennt vom Hausmüll zu entsorgen.
  • Page 20 • Bei einem Vertrieb unter Verwendung von Fernkommunikationsmitteln ist die unentgeltliche Abholung am Ort der Abgabe auf Elektro- und Elektronikgeräte der Kategorien 1, 2 und 4 gemäß § 2 Abs. 1 ElektroG, nämlich „Wärmeüberträger“, „Bildschirmgeräte“ (Oberfläche von mehr als 100 cm²) oder „Großgeräte“ (letztere mit mindestens einer äußeren Abmessung über 50 Zentimeter) beschränkt.
  • Page 21: Hinweise Zur Entsorgung

    Importeur für Großbritannien: Berlin Brands Group UK Ltd PO Box 1145 Oxford, OX1 9UW United Kingdom Hiermit erklärt Chal-Tec GmbH, dass der Funkanlagentyp KR-500 der Richtlinie 2014/53/ EU entspricht. Der vollständige Text der EU- Konformitätserklärung ist unter der folgenden Internetadresse verfügbar: use.berlin/10031477...
  • Page 22 Dear Customer, Congratulations on purchasing this equipment. Please read this manual carefully and take care of the following hints on installation and use to avoid technical damages. Any failure caused by ignoring the items and cautions mentioned in the operation and installation instructions are not covered by our warranty and any liability.
  • Page 23: Technical Data

    TECHNICAL DATA Item number 10031880, 10031894 Power adapter Input 100-240V ~ 50/60 Hz Output 5.5 V 2.5 A...
  • Page 24: Safety Instructions

    SAFETY INSTRUCTIONS • Read the instructions. All safety instructions and guidelines must be read before start device. • Keep the instructions for future use. • The device must not be used near water or be put in contact with moisture. •...
  • Page 25: Product Description

    PRODUCT DESCRIPTION...
  • Page 26 LCD display Volume button Down button Select button Back button Menu button Info/CD mem button Up button Remote sensor 10 USB Socket Aux-in jack 12 Sleep button 13 On/Standby button 14 Function button 15 Skip/Tuning Up button 16 Play/Pause /Stop button 17 Pre-Up/Right button 18 Timer button 19 Pre-down/Left button...
  • Page 27 Remote Control SLEEP Press to select sleep countdown time FUNC Press to select the different function Press to power on / standby the system   Press to select previous / next tracks at CD/USB mode   / CD/USB: press to start playback / pause mode Press and hold a second go to stop mode Pre Up-Down/ In Internet radio mode : press to select preset memory...
  • Page 28: Installation And Getting Started

    INSTALLATION AND GETTING STARTED Unpacking • Unpack all parts and remove protective material. • Do not connect the unit to the mains before checking the main voltage and before all other connections have been made. • Do not cover any vents and make sure that there is a space of several centimetres around the unit for ventilation.
  • Page 29 Connection and getting started 1. Insert the DC plug of provided AC/DC adaptor to the DC jack (23) of the main unit, then connect the AC/DC adaptor to AC outlet. 2. When you fi rst plug the unit into the mains, the display (1) will show “STARTING…”...
  • Page 30: Internet Radio

    10. Select the Skip WPS by Up/Down button (8/3) then press Select button (4) to confirm 11. Enter the password of the router by Up/Down (8/3), Left/Right (19/17) and Select button (4). 12. Once password entered, select “OK” and press Select button (4) to confirm, unit will start to connect to the internet and connect successfully, display will show “Setup wizard completely”.
  • Page 31: Playing Compact Disc

    PLAYING COMPACT DISC Getting started 1. Press Function button to select “CD” mode. 2. Push the CD tray open to open the CD tray. 3. Place a CD with the printed side facing up and then close the CD tray. 4.
  • Page 32 random function, a single track, all the tracks repeat or folder repeat(MP3 only) and random can be played in difference mode as in the table below. Repeat play: You can listen the desired track, folder(for MP3 only) or whole disc repeat by this function Random play: You can listen all the tracks in a random order by this function.
  • Page 33: Cd Programming

    CD PROGRAMMING Up to 20 tracks can be programmed for disc play in any order. Before use, be sure to press hold second the "stop” button. 1. Set in CD mode & stop the CD playback. 2. Press hold the “ Info/CD MEM ” button and “ program ” will appear on LCD display (1).
  • Page 34: More Features

    Remarks • The system can detect and read the file under MP3 format only at USB mode but not other music file format. • If connect the system to MP3 player via the USB socket, due to variances in file system format, some MP3 player may not be able to play via the USB socket.
  • Page 35 Language 1. Press Menu Button (6) to enter menu mode, then press Up/down button (8/3) to select System setting, press Select button (4) to enter. 2. Press Up/down button (8/3) to Language, then press Select button (4) to enter. 3. Press Up/down button (8/3) to select your desired language, then press Select button (4) to confirm.
  • Page 36: Spotify Connect

    SPOTIFY CONNECT Your new device has Spotify Connect built in Use your phone, tablet or computer as a remote control for Spotify. Go to spotify.com/connect to learn how. Licenses The Spotify Software is subject to third party licenses found here: https://www.spotify.com/connect/third-party-licenses All listed brands are trademarks of their companies.
  • Page 37: Battery Replacement (Remote Control)

    BATTERY REPLACEMENT (REMOTE CONTROL) The battery compartment is located on the back of the remote control. 1. Remove the battery compartment door by pressing in on the tab and lifting it off. 2. Insert one (1) CR2032 size batteries into the battery compartment following the polarity markings inside the battery compartment.
  • Page 38: Disposal Considerations

    For Great Britain: Hereby, Chal-Tec GmbH declares that the radio equipment type KR-500 is in compliance with the relevant statutory requirements. The full text of the declaration of conformity is available at the following...
  • Page 39 Chère cliente, cher client, Toutes nos félicitations pour l’acquisition de ce nouvel appareil. Veuillez lire attentivement les instructions suivantes de branchement et d’utilisation afin d’éviter d’éventuels dommages. Le fabricant ne saurait être tenu pour responsable des dommages dus au non-respect des consignes de sécurité...
  • Page 40: Fiche Technique

    FICHE TECHNIQUE Numéro d'article 10031477 Alimentation de l'adaptateur secteur Entrée 100-240V ~ 50/60 Hz Sortie 5,5 V 2,5 A...
  • Page 41: Consignes De Sécurité

    CONSIGNES DE SÉCURITÉ • Avant d'utiliser l'appareil, lisez les consignes de sécurité et les avertissements. • Conservez toutes les recommandations pour pouvoir vous y référer ultérieurement. • L'appareil ne doit pas être utilisé à proximité de l'eau ou être au contact de l'humidité.
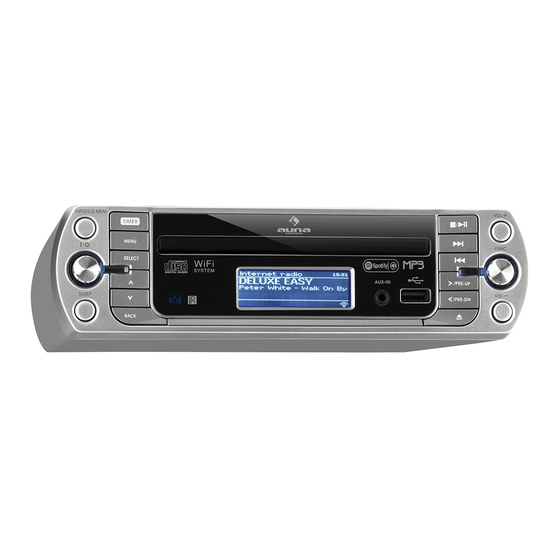
  • Page 42: Aperçu De L'appareil

    APERÇU DE L'APPAREIL...
  • Page 43 Ecran LCD Lecteur CD Volume +/- Retour Menu Info/ CD/ Mem Haut Capteur IR de la télécommande 10 Port USB Prise AUX 12 Mode nuit 13 Marche/arrêt/veille 14 Sélecteur de fonction 15 Titre suivant /recherche de station vers l'avant 16 Lecture/Pause/Stop 17 Pre-up/droite 18 Timer 19 Pre-down/gauche...
  • Page 44 Télécommande SLEEP Activer la fonction d'arrêt automatique. FUNC Sélecteur de fonction : activer CD/Radio/Aux/BT Mise en marche / en veille   CD/USB : titre précédent /suivant   / CD/USB: Pre Up-Down/ radio Internet: mémorisation de station haut/bas Left-Right CD MP3 : choix du dossier haut/bas Menu : gauche/droite Timer...
  • Page 45: Montage Et Mise En Service

    MONTAGE ET MISE EN SERVICE Déballage • Déballez tous les éléments et retirez les matériaux de protection. • Branchez l'appareil sur une prise d'alimentation seulement après en avoir contrôlé la tension et après avoir connecté tous les autres branchements. • N'obstruez pas les ouvertures d'aération et veillez à...
  • Page 46 Montage optionnel sur table Pieds en caoutchouc Plaque de montage Branchement 1. Branchez le câble d'alimentation dans une prise. L'appareil se met en mode veille et l'écran LCD s'allume. 2. Lorsque l'appareil s'allume pour la première fois, l'écran affiche "STARTING". 3.
  • Page 47: Radio

    confirmez par SELECT. La radio se connecte à Internet. Une fois la connexion établie, l'écran affiche. RADIO 1. En mode radio Internet, appuyez sur les touches haut/bas (8/3) pour choisir la "liste des stations". 2. Choisissez votre "station" avec / et confirmez avec SELECT. 3.
  • Page 48: Lecture Des Mp3

    Stop : appuyez sur : pour terminer la lecture. Titre suivant/précédent : appuyez sur: pour passer au titre précédent  ou suivant. LECTURE DES MP3 1. Après avoir parcouru le CD, le lecteur affiche le nombre de titres. L'appareil commence automatiquement la lecture du premier titre. 2.
  • Page 49: Programmation De Cd

    Lecture aléatoire éteint éteint --- Pour la lecture des CD MP3 Mode de lecture Anzeige im Display Répéter un titre Répéter tous les titres Répéter les titres d'un dossier Lecture aléatoire éteint PROGRAMMATION DE CD Vous pouvez programmer une liste de lecture comprenant jusqu'à 20 titres dans l'ordre de votre choix.
  • Page 50: Support Mémoire Usb Pour Lecture De Mp3

    SUPPORT MÉMOIRE USB POUR LECTURE DE Branchement L'appareil peut lire les fichiers MP3 stockés sur un support mémoire USB. 1. Mettez la radio en mode veille (ou autre mode de fonctionnement hormis le mode USB). 2. Branchez une clé USB avec la face avant vers le haut dans le port. Veillez à...
  • Page 51: Caractéristiques Supplémentaires

    CARACTÉRISTIQUES SUPPLÉMENTAIRES Mode nuit En mode nuit, la radio s'éteint toute seule au bout d'une durée choisie. 1. Appuyez sur la touche "Sleep " pour choisir une durée parmi 15/30/45/60 mn. L'écran affiche " z". une fois la durée écoulée, la radio passe automatiquement en mode veille.
  • Page 52 2. Choisissez "paramètres d'usine" avec les touches ∧/∨. 3. Choisissez Oui avec les touches </> et confirmez avec SELECT. Entrée AUX Branchez la radio sur un appareil audio externe (par ex un lecteur de CD, lecteur MP3, lecteur de cassettes portable) par la prise jack 3,5 mm en façade (câble non fourni).
  • Page 53: Conexión A Spotify

    CONEXIÓN A SPOTIFY Este reproductor tiene una conexión a Spotif Usa tu teléfono, tu tablet o tu computadora como control remoto de Spotify. Para más información, entra a spotify.com/connect Licencias El software Spotify está sujeto a los derechos de uso de terceros, que se encuentran en la siguiente página: https://www.spotify.com/connect/third-party-licenses Todas las marcas comerciales mencionadas son marcas comerciales...
  • Page 54: Changement Des Piles De La Télécommande

    CHANGEMENT DES PILES DE LA TÉLÉCOMMANDE Le compartiment à piles se trouve sous la télécommande. 1. Retirez le support de pile en appuyant sur la languette du milieu et en tirant le support de la pile. 2. Installez une nouvelle pile bouton (CR2032) avec le pôle plus vers le haut.
  • Page 55: Conseils Pour Le Recyclage

    PO Box 1145 Oxford, OX1 9UW United Kingdom Le soussigné, Chal-Tec GmbH, déclare que l’équipement radioélectrique du type KR-500 est conforme à la directive 2014/53/UE. Le texte complet de la déclaration UE de conformité est disponible à l’adresse internet suivante : use.berlin/10031477...
  • Page 56 Gentile cliente, La ringraziamo per aver acquistato il nostro prodotto. La preghiamo di leggere attentamente le seguenti istruzioni e di seguirle per evitare eventuali danni. Non ci assumiamo alcuna responsabilità per danni derivati da una mancata osservazione delle avvertenze di sicurezza e da un uso improprio del dispositivo.
  • Page 57: Dati Tecnici

    DATI TECNICI Articolo numero 10031477 Alimentazione Ingresso 100-240V ~ 50/60 Hz Uscita 5,5 V 2,5 A...
  • Page 58: Avvertenze Di Sicurezza

    AVVERTENZE DI SICUREZZA • Prima di utilizzare il dispositivo leggere le avvertenze di sicurezza. • Conservare le istruzioni per consultazioni future. • Non utilizzare il dispositivo vicino ad acqua. Non esporre il dispositivo a umidità. • Non versare liquidi sul dispositivo poiché possono penetrare nelle aperture.
  • Page 59: Descrizione Del Prodotto

    DESCRIZIONE DEL PRODOTTO...
  • Page 60 Display LCD Vano CD Volume + / - Giù Indietro Menu Info / CD / Mem Sensore IR telecomando 10 Porta USB Porta AUX 12 Funzione Sleep 13 On / Off / Standby 14 Selezione funzione 15 Brano successivo / ricerca canali avanti 16 Riproduzione / pausa / stop 17 Pre-up / destra 18 Timer...
  • Page 61 Telecomando SLEEP Attivare la funzione Sleep FUNC Selezione funzione: attivazione CD/Radio/Aux/BT Accensione / passare in modalità standby   CD/USB: brano avanti/indietro   / CD/USB: Pre Up-Down/ Internet radio: memorizzazione canali su/giù Left-Right CD-MP3: selezione cartella su/giù Menu: selezionare sinistra/destra Timer Impostare il timer Hoch/runter...
  • Page 62: Montage E Messa In Funzione

    MONTAGE E MESSA IN FUNZIONE Disimballaggio • Disimballare tutti i componenti e rimuovere il materiale protettivo. • Collegare il dispositivo all'alimentazione solo dopo aver controllato la tensione dell'alimentazione e dopo aver eff ettuato tutti gli altri collegamenti. • Non coprire le aperture di ventilazione e assicurarsi che ci sia spazio libero suff iciente intorno al dispositivo.
  • Page 63 Optionale Tischaufstellung Gummifüße Montageblech Collegamento 1. Inserire il cavo di alimentazione nella presa. Il dispositivo passa in modalità standby e la spia LCD si accende. 2. Quando si accende il dispositivo per la prima volta, sul display compare "STARTING". 3. Dopo alcuni secondi, il dispositivo avvia la procedura guidata di confi gurazione.
  • Page 64: Radio

    RADIO 1. In modalità Internet Radio, premere i tasti su/giù (8/3) per selezionare "Elenco stazioni". 2. Premere / per selezionare "Stazioni" e confermare con SELECT. 3. Utilizzare / per selezionare i metodi di ricerca come "Paesi, generi, ecc" Confermare con SELECT. 4.
  • Page 65: Riproduzione Mp3

    RIPRODUZIONE MP3 1. Dopo aver esplorato il supporto di memorizzazione, verrà visualizzato il numero di brani. Il dispositivo avvia automaticamente la riproduzione del primo brano. 2. Premere i tasti  e per selezionare la cartella. 3. Utilizzare i tasti per selezionare il brano. ...
  • Page 66: Programmazione Cd

    Riproduzione MP3 Modalità di riproduzione Spia sul display Ripetere un brano Ripetere tutti i brani Ripetere il brano di una cartella Riproduzione casuale PROGRAMMAZIONE CD È possibile programmare fino a 20 brani in qualsiasi ordine. Non dimenticare di premere prima il tasto . 1.
  • Page 67: Dispositivo Usb Per La Riproduzione Mp3

    DISPOSITIVO USB PER LA RIPRODUZIONE MP3 Collegamento Il dispositivo può leggere e riprodurre file MP3 memorizzati su un supporto di archiviazione USB. 1. Passare in modalità standby (o in un´altra modalità ad eccezione della modalità USB). 2. Inserire il dispositivo USB nell´apposito attacco con la parte anteriore rivolta verso l'alto.
  • Page 68: Altre Caratteristiche

    ALTRE CARATTERISTICHE Modalità Sleep La modalità Sleep spegne la radio allo scadere di un tempo predefinito. 1. Premere il tasto "Sleep" per selezionare 15/30/45/60 min. Sul display compare " z". Allo scadere del tempo, la radio entra automaticamente in modalità standby. 2.
  • Page 69 Ripristino alle impostazioni di fabbrica 1. Premere MENU e selezionare la voce "Impostazioni di sistema" con ∧/∨ e confermare con SELECT. 2. Utilizzare i tasti / per selezionare la voce "Impostazione di fabbrica". 3. Selezionare Sì con </> e confermare con SELECT. Ingresso AUX Collegare la radio ad un dispositivo audio esterno (ad esempio un lettore CD, un lettore MP3, un registratore portatile) tramite l´attacco da 3,5 mm...
  • Page 70: Spotify Connect

    SPOTIFY CONNECT Il vostro nuovo dispositivo è dotato di Spotify Connect Usa il tuo cellulare, tablet o computer come telecomando remoto per Spotify. Vai su spotify.com/connect per scoprire come. Licenze Il software Spotify è sottoposto a diritti utente di parti terze, consultabili alla pagina web seguente: https://www.spotify.com/connect/third-party-licenses Tutti i marchi indicati sono marchi registrati delle relative aziende.
  • Page 71: Cambiare La Pila Del Telecommando

    CAMBIARE LA PILA DEL TELECOMMANDO Il vano pila si trova nella parte inferiore del telecomando. 1. Rimuovere il portapila spingendo la linguetta verso il centro ed estraendo il portapila. 2. Inserire una nuova pila (CR2032) con il polo positivo rivolto verso l'alto. 3.
  • Page 72: Smaltimento

    PO Box 1145 Oxford, OX1 9UW United Kingdom Il fabbricante, Chal-Tec GmbH, dichiara che il tipo di apparecchiatura radio KR-500 è conforme alla direttiva 2014/53/UE. Il testo completo della dichiarazione di conformità UE è disponibile al seguente indirizzo Internet: use.berlin/10031477...
  • Page 73: Datos Técnicos

    Estimado cliente: Le felicitamos por la adquisición de este producto. Lea atentamente el siguiente manual y siga cuidadosamente las instrucciones de uso con el fin de evitar posibles daños. La empresa no se responsabiliza de los daños ocasionados por un uso indebido del producto o por haber desatendido las indicaciones de seguridad.
  • Page 74 DATOS TÉCNICOS Número de artículo 10031477 Fuente de alimentación Entrada 100-240V ~ 50/60 Hz Salida 5,5 V 2,5 A...
  • Page 75: Indicaciones De Seguridad

    INDICACIONES DE SEGURIDAD • Lea todas las indicaciones de uso y seguridad antes de utilizar el aparato. • Conserve este manual de instrucciones para futuras consultas. • No utilice el aparato cerca del agua y no lo exponga a la humedad. •...
  • Page 76: Vista General Del Aparato

    VISTA GENERAL DEL APARATO...
  • Page 77 Pantalla LCD Unidad lectora de CD Volumen+/- Botón abajo Atrás Menú Información/CD/Memoria Botón arriba Sensor IR para mando a distancia 10 Conexión USB Conexión AUX 12 SLEEP 13 Encendido/Apagado/Standby 14 Selección de funciones 15 Siguiente pista/Siguiente emisora 16 Reproducir/Pausar/Detener 17 Botón arriba/Derecha 18 Temporizador 19 Botón abajo/Izquierda 20 Pista anterior/Emisora anterior...
  • Page 78 Mando a distancia SLEEP Activar el temporizador de apagado FUNC Selección de funciones: Activar CD/Radio/Aux/BT Encender el aparato/modo Standby   CD/USB: Pista anterior/siguiente   / CD/USB: Pre Up-Down/ Radio de internet: Emisora almacenada anterior/ Left-Right siguiente CD/MP3: Elegir carpeta arriba/abajo Menú: Elegir izquierda/derecha Timer Configurar el temporizador...
  • Page 79: Montaje Y Puesta En Funcionamento

    MONTAJE Y PUESTA EN FUNCIONAMENTO Desembalaje • Extraiga todas las piezas y retire el material de protección. • Antes de conectar el aparato a la toma de corriente, compruebe que utilice el voltaje correcto y que haya realizado todas las conexiones. •...
  • Page 80 Instalación opcional encima de una mesa Patas de goma Placa de montaje Conexión 1. Introduzca el cable de alimentación a la toma de corriente. La radio se pone en modo Standby y la pantalla LCD se ilumina. 2. Al poner el aparato en marcha por primera vez, la pantalla indica «STARTING».
  • Page 81: Radio

    12. Después de introducir la contraseña, elija OK y confirme pulsando SELECT. La radio se conectará automáticamente a su red. Si se ha establecido correctamente la conexión, aparece el siguiente mensaje RADIO 1. En modo Radio de internet, pulse Arriba/Abajo (8/3) para elegir «Lista de emisoras».
  • Page 82: Reproducción De Archivos Mp3

    Pista anterior/siguiente: Pulse : para ir a la siguiente pista o a la pista  anterior. REPRODUCCIÓN DE ARCHIVOS MP3 1. Tras reconocer el dispositivo de almacenamiento, en la pantalla aparecerá el número de pistas. El aparato reproduce automáticamente la primera pista.
  • Page 83: Crear Lista De Reproducción De Cd

    Reproducción aleatoria Modo desactivado Para MP3 Wiedergabemodus Anzeige im Display Repetir una pista Repetir todas las pistas Repetir una carpeta Reproducción aleatoria Modo desactivado CREAR LISTA DE REPRODUCCIÓN DE CD Puede programar el orden de reproducción de hasta 20 pistas. Para ello, pulse .
  • Page 84: Reproducción Mp3 Desde Dispositivos Usb

    REPRODUCCIÓN MP3 DESDE DISPOSITIVOS Conexión La radio puede reproducir archivos MP3 almacenados en dispositivos de memoria USB. 1. Seleccione el modo Standby (o cualquier otro modo excepto modo USB). 2. Conecte el lápiz USB al puerto correspondiente con la parte frontal mirando hacia arriba.
  • Page 85: Otras Características

    OTRAS CARACTERÍSTICAS Temporizador de apagado Esta función apaga automáticamente la radio después de transcurrir el tiempo elegido. 1. Pulse el botón «Sleep» para elegir entre 15/30/45/60 minutos. En la pantalla aparecerá " z". Una vez transcurrido el tiempo elegido, la radio entra automáticamente en modo Standby.
  • Page 86 3. Elija con los botones ∧/∨ «Sí» y pulse SELECT para confirmar. Entrada AUX Conecte un dispositivo externo (como reproductores de CD o MP3, grabadoras portátiles, etc.) a la entrada jack de 3,5 mm situada en la parte frontal de la radio (cable no incluido en el envío). Una vez introducido el cable, pulse varias veces el botón FUN y elija el modo AUX.
  • Page 87: Conexión A Spotify

    CONEXIÓN A SPOTIFY Este reproductor tiene una conexión a Spotif Usa tu teléfono, tu tablet o tu computadora como control remoto de Spotify. Para más información, entra a spotify.com/connect Licencias El software Spotify está sujeto a los derechos de uso de terceros, que se encuentran en la siguiente página: https://www.spotify.com/connect/third-party-licenses Todas las marcas comerciales mencionadas son marcas comerciales...
  • Page 88: Cambo De Pilas En El Mando A Distancia

    CAMBO DE PILAS EN EL MANDO A DISTANCIA El compartimento de pilas se encuentra en la parte posterior del mando a distancia. 1. Retire el soporte de pilas presionándolo en el centro y extrayéndolo posteriormente. 2. Coloque una nueva pila de botón (tipo CR2025) con la polaridad + mirando hacia arriba.
  • Page 89: Retirada Del Aparato

    Oxford, OX1 9UW United Kingdom Por la presente, Chal-Tec GmbH declara que el tipo de equipo radioeléctrico KR-500 es conforme con la Directiva 2014/53/UE. El texto completo de la declaración UE de conformidad está disponible en la dirección Internet siguiente: use.berlin/10031477...

Ce manuel est également adapté pour:

10031477

Table des Matières