
Manuels Connexes pour Klarstein MAXIWAVE


Sommaire des Matières pour Klarstein MAXIWAVE
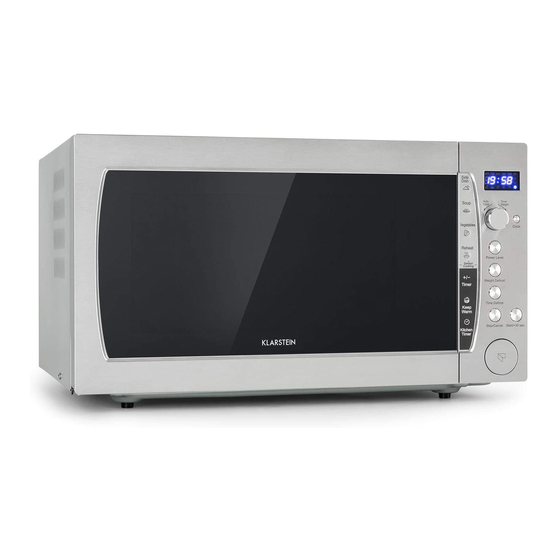
- Page 1 MAXIWAVE Mikrowellenofen Micro Wave Oven Four à micro-ondes Horno microondas Forno a microonde 10034015 www.klarstein.com...
-
Page 3: Table Des Matières
Sehr geehrter Kunde, wir gratulieren Ihnen zum Erwerb Ihres Gerätes. Lesen Sie die folgenden Hinweise sorgfältig durch und befol- gen Sie diese, um möglichen Schäden vorzubeugen. Für Schäden, die durch Missachtung der Hinweise und unsachgemäßen Gebrauch entstehen, übernehmen wir keine Haftung. Scannen Sie den QR-Code, um Zugriff auf die aktuellste Bedienungsanleitung und weitere Informationen rund um das Produkt zu erhalten. -
Page 4: Sicherheitshinweise
SICHERHEITSHINWEISE Lesen Sie sich alle Hinweise sorgfältig durch und bewahren Sie die Bedienungsanleitung zum Nachschlagen gut auf. Um die Gefahr eines Stromschlags bei einer Störung oder Fehlfunktion zu verringern, muss das Gerät an eine geerdete Steckdose angeschlossen werden. Schließen Sie das Gerät nur an Steckdosen an, die der angegeben Spannung des Geräts entsprechen. - Page 5 Um den Drehteller vor Glasbruch zu schützen: • Lassen Sie den Drehteller abkühlen, bevor Sie ihn reinigen. • Stellen Sie kein heißes Essen oder heiße Behälter auf den kalten Drehteller. • Stellen Sie kein gefrorenes Essen oder gefrorene Behälter auf den heißen Drehteller. Allgemeine Sicherheitshinweise •...
- Page 6 VORSICHTSMAßNAHMEN ZUR VERMEIDUNG EINER MÖGLICHEN AUSSETZUNG MIT ÜBERMÄSSIGER MIKROWELLENENENERGIE 1. Versuchen Sie nicht, diesen Ofen bei geöffneter Tür zu betreiben, da ein Öffnen der Tür zu einer schädlichen Belastung durch Mikrowellenenergie führen kann. Es ist wichtig, die Sicherheitsverriegelungen nicht zu umgehen oder zu manipulieren. 2.
-
Page 7: Geräteübersicht
GERÄTEÜBERSICHT Türverriegelung Sichtfenster Walzenring Welle Türöffner Bedienfeld Wellenhalter Glasteller... -
Page 8: Bedienfeld
BEDIENFELD Zubereitungszeit, Leistung, und Uhrzeit werden DISPLAY angezeigt Drücken Sie zum Einstellen der Leistung diese POWER LEVEL Taste Drücken Sie zur Auswahl der Uhrzeitfunktion CLOCK diese Taste. Drücken Sie diese Taste, um die Timerfunktion KITCHEM TIMER zu aktivieren Drücken Sie zum Aktivieren der KEEP WARM Warmhaltefunktion diese Taste. -
Page 9: Installation
INSTALLATION • Stellen Sie sicher, dass alle Verpackungsmaterialien aus dem Geräteinneren entfernt werden. • Überprüfen Sie den Ofen vor der Verwendung auf Schäden, wie beispielsweise eine schiefe oder verbogene Tür, beschädigte Türdichtungen, Dellen und Beulen im Inneren der Mikrowelle oder an der Tür. Falls Schäden vorhanden sind, verwenden Sie das Gerät nicht und kontaktieren Sie den Kundendienst oder in ähnlicher Weise qualifiziertes Personal. -
Page 10: Inbetriebnahme Und Bedienung
INBETRIEBNAHME UND BEDIENUNG Einstellung der Ofenfunktionen • Wenn das Gerät zum ersten Mal eingesteckt wird, ertönt ein Piepgeräusch und der Bildschirm zeigt „01:01“ an. • Während des Einstellungsmodus, wechselt das Gerät in den Wartemodus, wenn innerhalb von 25 Sekunden keine Einstellung vorgenommen wurde. •... - Page 11 Leistungsauswahl durch mehrfaches Drücken der Taste POWER LEVEL. Taste POWER LEVEL Leistung Anzeige 100% P100 P-90 P-80 … … … P-20 P-10 Beispiel: Sie möchten Lebensmittel für 5 Minuten mit einer Leistung von 60 % zubereiten 1. Drücken Sie, zum Einstellen der Leistung 60 %, fünfmal die Taste POWER LEVEL . 2.
- Page 12 Timereinstellung 1. Drücken Sie die Taste KITCHEN TIMER. 2. Drehen Sie zur Zeiteinstellung am Knopf AUTO COOK/TIME/WEIGHT. Die längste einstellbare Zeit beträgt 95 Minuten. 3. Drücken Sie zum Bestätigen die Taste START/+30SEC. Hinweise • Wenn Sie die Timerfunktion abbrechen möchten, drücken Sie zunächst die Taste KITCHEN TIMER.
-
Page 13: Mehrstufiges Garen
MEHRSTUFIGES GAREN Die Mikrowelle kann auf bis zu 3 automatische Kochsequenzen eingestellt werden: Sequenz 1: Mikrowelle und Zubereitung nach Leistung (2 Minuten auf Leistungsstufe 100 %) Sequenz 2: Mikrowelle und Zubereitung nach Leistung (5 Minuten auf Leistungsstufe 60 %). 1. Drücken Sie zum Zurücksetzen der Mikrowelle die Taste STOP/CANCEL. Sequenz 1: 2. - Page 14 Beispiel: Sie möchten Kartoffeln zubereiten 1. Platzieren Sie die Lebensmittel in der Mikrowelle und schließen Sie die Tür der Mikrowelle. Wählen Sie das gewünschte Menü aus. Die Mikrowelle startet sich automatisch eine Sekunde später und auf dem Bildschirm wird „AUTO“ und „COOK“...
-
Page 15: Automatik
AUTOMATIK Bei den folgenden Lebensmitteln oder Zubereitungsmethoden müssen Sie die Leistung und die Zubereitungszeit nicht separat einstellen. Es ist ausreichend, das Lebensmittel, welches Sie zubereiten möchten sowie das Gewicht desselben auszuwählen. Beispiel: Zubereitung von ½ Stück Butter 1. Legen Sie im Standby-Modus die Lebensmittel in die Mikrowelle und schließen Sie die Tür. -
Page 16: Verwendung Von Zubehör
VERWENDUNG VON ZUBEHÖR 1. Die Mikrowellenstrahlung kann kein Metall durchdringen. Verwenden Sie ausschließlich Mikrowellengeeignetes Kochgeschirr und Zubehör. Metallische Essens- und Getränkebehälter dürfen in der Mikrowelle nicht verwendet werden. Dies gilt nicht für explizit vom Hersteller empfohlene und mikrowellengeeignete Metallbehälter. 2. Mikrowellenstrahlung ist nicht dazu in der Lage, Metall zu durchdringen. Metallisches Zubehör oder Geschirr mit Metallrand sollte deshalb nicht verwendet werden. -
Page 17: Reinigung Und Pflege
REINIGUNG UND PFLEGE • Schalten Sie vor der Reinigung die Mikrowelle aus und ziehen Sie den Netzstecker aus der Steckdose. • Halten Sie den Innenraum der Mikrowelle sauber. Wenn Lebensmittel oder Flüssigkeiten die Innenwände verspritzen, entfernen Sie diese mit einem feuchten Tuch. -
Page 18: Hinweise Zur Entsorgung
HINWEISE ZUR ENTSORGUNG Wenn es in Ihrem Land eine gesetzliche Regelung zur Entsorgung von elektrischen und elektronischen Geräten gibt, weist dieses Symbol auf dem Produkt oder auf der Verpackung darauf hin, dass dieses Produkt nicht im Hausmüll entsorgt werden darf. Stattdessen muss es zu einer Sammelstelle für das Recycling von elektrischen und elektronischen Geräten gebracht werden. -
Page 19: Technical Data
Dear Customer, Congratulations on purchasing this equipment. Please read this manual carefully and take care of the following hints to avoid damages. Any failure caused by ignor- ing the items and cautions mentioned in the instruction manual are not covered by our warranty and any liability. -
Page 20: Safety Instructions
SAFETY INSTRUCTIONS Read all the safety and operating instructions carefully and retain them for future reference. Make sure the voltage in your living area corresponding to the one shown on the rating label of the appliance. And the wall socket is properly grounded. To reduce the risk of fire in the oven cavity: •... - Page 21 To prevent the turntable from breaking: • Let the turntable cool down before cleaning. • Do not place hot foods or utensils on the cold turntable. • Do not place frozen foods or utensils on the hot turntable. General Instructions •...
- Page 22 PRECAUTIONS TO AVOID POSSIBLE EXPOSURE TO EXCESSIVE MICROWAVE ENERGY 1. Do not attempt to operate this oven with the door open since open door operation can result in harmful exposure to microwave energy. It is important not to defeat or tamper with the safety interlocks. 2.
-
Page 23: Installation
INSTALLATION • Make sure that all the packing materials are removed from the inside of the door. • WARNING: Check the oven for any damage, such as misaligned or bent door, damaged door seals and sealing surface, broken or loose door hinges and latches and dents inside the cavity or on the door. -
Page 24: Product Description
PRODUCT DESCRIPTION Door Safety Lock System Oven Window Roller Ring Shaft Door Release Button Control Panel Wave Guide Glass Tray... -
Page 25: Control Panel
CONTROL PANEL Cooking time, power, indicators and DISPLAY clock time are displayed. POWER LEVEL Use to set microwave power levels. CLOCK Touch to set CLOCK function. KITCHEM TIMER Touch to set timer function. Touch to set keep warm program. Touch to stop the oven or reset the KEEP WARM oven before setting a program. -
Page 26: Getting Started And Operation
GETTING STARTED AND OPERATION Microwave cooking principles 1. Arrange food carefully. Place thickest areas towards outside of dish. 2. Watch cooking time. Cook for the shortest amount of time indicated and add more as needed. Food severely overcooked can smoke or ignite. 3. -
Page 27: Microwave Cooking
Microwave cooking For microwave cooking, just press POWER LEVEL pad a number of times to choose a cooking power level and then turn the AUTO COOK/TIME/WEIGHT dial to enter cooking time. The longest cooking time is 95 minutes. The oven will start cooking after user press START/+30SEC pad. - Page 28 Setting the timer 1. Press KITCHEM TIMER pad. 2. Turn AUTO COOK/TIME/WEIGHT dial to enter time. The longest time you can set is 95 minutes. 3. Press START/+30SEC pad to confirm. NOTES • If you want to cancel the timer, press KITCHEM TIMER pad, during the display showing the time, press STOP/CANCEL pad.
-
Page 29: Multiple Cooking
MULTIPLE COOKING The microwave oven can set 3 period of microwave cooking program Suppose you want set the following cooking program: Paragraph 1: Microwave and power level cooking (2 minutes at 100% power level); Paragraph 2: Microwave and power level cooking (5 minutes at 60% power level); 1. - Page 30 CANCEL pad. 3. If there is not error, the system will judge the cooking time according the steam which generated by the food in the oven, the cooking time appears on display and begins counting down. You can adjust the cooking time by touching the TIMER +/- pad once and then turn the AUTO COOK /TIME /WEIGHT dial to change the cook time while the sign COOK is twinkling 4.
-
Page 31: Auto Cook
AUTO COOK For food or the following cooking mode, it is not necessary to program the duration and the cooking power. It is sufficient to indicate the type of food that you wish to cook as well as the weight of this food. For example: to cook 1/2 Stick of Butter. -
Page 32: Utensils Guide
UTENSILS GUIDE 1. Microwave cannot penetrate metal. Only use utensils that are suitable for use in microwave ovens. Metallic containers for food and beverages are not allowed during microwave cooking. This requirement is not applicable if the manufacturer specifies size and shape of metallic containers suitable for microwave cooking. 2. -
Page 33: Cleaning And Care
CLEANING AND CARE • Turn off the oven and remove the power plug from the wall socket before cleaning. • Keep the inside of the oven clean. When food splatters or spilled liquids adhere to oven walls, wipe with a damp cloth. Mild detergent may be used if the oven gets very dirty. -
Page 34: Disposal Considerations
DISPOSAL CONSIDERATIONS If there is a legal regulation for the disposal of electrical and electronic devices in your country, this symbol on the product or on the packaging indicates that this product must not be disposed of with household waste. Instead, it must be taken to a collection point for the recycling of electrical and electronic equipment. -
Page 35: Fiche Technique
Chère cliente, cher client, Toutes nos félicitations pour l’acquisition de ce nouvel appareil. Veuillez lire attentivement et respecter les ins- tructions de ce mode d’emploi afin d’éviter d’éventuels dommages. Nous ne saurions être tenus pour responsa- bles des dommages dus au non-respect des consignes et à... -
Page 36: Consignes De Sécurité
CONSIGNES DE SÉCURITÉ Lisez attentivement toutes les instructions et conservez le mode d'emploi pour vous y référer ultérieurement. Pour réduire les risques d'électrocution en cas de dysfonctionnement, l'appareil doit être branché sur une prise de courant mise à la terre. Ne branchez l'appareil que sur des prises correspondant à... - Page 37 Pour protéger le plateau tournant contre les bris de verre : • Laissez le plateau tournant refroidir avant de le nettoyer. • Ne placez pas d'aliments chauds ou de récipients chauds sur le plateau tournant froid. • Ne placez pas d'aliments congelés ou de contenants congelés sur le plateau tournant chaud.
- Page 38 MESURES DESÉCURITÉ POUR NE PAS VOUS EXPOSER À UNE DOSE D'ÉNERGIE EXCESSIVE DE MICRO-ONDES 1. N'essayez pas de faire fonctionner ce four avec la porte ouverte, car son ouverture risquerait de générer une énergie micro-ondes nuisible. Il est important de ne pas contourner ou manipuler les verrous de sécurité.
-
Page 39: Aperçu De L'appareil
APERÇU DE L'APPAREIL Fermeture de la porte Fenêtre de contrôle Anneau tournant Arbre Commande d'ouverture de porte Panneau de commande Guide de micro-ondes Plateau de verre... -
Page 40: Panneau De Commande
PANNEAU DE COMMANDE Le temps de préparation, la puissance et le DISPLAY temps sont affichés Appuyez sur cette touche pour régler la POWER LEVEL puissance Appuyez sur cette touche pour sélectionner la CLOCK fonction d'horloge. Appuyez sur cette touche pour activer la KITCHEM TIMER fonction de minuterie Appuyez sur cette touche pour activer la... -
Page 41: Installation
INSTALLATION • Vérifiez que tous les matériaux d'emballage ont été retirés de l'intérieur de l'appareil. • Avant de l'utiliser, vérifiez que le four ne présente pas de dommages tels qu'une porte tordue ou de travers, des joints d'étanchéité endommagés, des bosses à l'intérieur du four à... -
Page 42: Mise En Marche Et Utilisation
MISE EN MARCHE ET UTILISATION Réglage des fonctions du four • Lorsque vous branchez l'appareil pour la première fois, un bip retentit et l'écran affiche "01:01". • En mode de configuration, si vous n'effectuez aucun réglage dans les 25 secondes, l’appareil passe en mode d’attente. - Page 43 Choix de la puissance par appuis successifs sur la touche POWER LEVEL. Touche POWER LEVEL Puissance Affichage 100% P100 P-90 P-80 … … … P-20 P-10 Exemple : Vous souhaitez chauffer un repas 5 minutes à 60 % de capacité 1.
-
Page 44: Décongélation
Réglage de la minuterie 1. Appuyez sur la touche KITCHEN TIMER. 2. Pour régler l'heure, tournez le bouton AUTO COOK / TIME / WEIGHT. Le plus long temps réglable est de 95 minutes. 3. Appuyez sur la touche START / + 30SEC pour confirmer. Remarques •... -
Page 45: Cuisson Multiple
CUISSON MULTIPLE Le micro-ondes peut être réglé sur 3 séquences de cuisson automatiques : Séquence 1: micro-ondes et préparation selon la puissance (2 minutes au niveau de puissance 100%) Séquence 2: micro-ondes et préparation selon la puissance (5 minutes au niveau de puissance 60 %). -
Page 46: Catégorie D'aliment
tard et "AUTO" et "COOK" apparaissent à l'écran. 2. Au bout d'un certain temps, l'appareil vérifie pendant la préparation s'il y a une erreur. Si tel est le cas, l'appareil s'arrête automatiquement, l'écran affiche le message d'erreur "E0" et l'appareil émet un bip sonore jusqu'à ce que vous appuyiez sur la touche STOP / ANNULER. -
Page 47: Automatique
AUTOMATIQUE Pour les aliments ou les méthodes de préparation suivants, il n'est pas nécessaire de définir la puissance et le temps de préparation séparément. Il suffit de choisir l'aliment que vous voulez préparer et son poids. Exemple : préparation d'1/2 tablette de beurre 1. -
Page 48: Utilisation D'accessoires
UTILISATION D'ACCESSOIRES 1. Le rayonnement micro-ondes ne peut pas pénétrer dans le métal. Utilisez uniquement les ustensiles de cuisson et les accessoires allant au micro-ondes. Les récipients métalliques pour aliments et boissons ne doivent pas être utilisés au micro-ondes. Ceci ne s'applique pas aux emballages en métal explicitement recommandés par le fabricant et compatibles micro-ondes. -
Page 49: Nettoyage Et Entretien
NETTOYAGE ET ENTRETIEN • Éteignez le four à micro-ondes avant de le nettoyer et débranchez le cordon d'alimentation de la prise. • Gardez l'intérieur du four à micro-ondes propre. Si des aliments ou des liquides éclaboussent les parois intérieures, essuyez-les avec un chiffon humide. Si le micro- ondes est très sale, il est recommandé... -
Page 50: Informations Sur Le Recyclage
INFORMATIONS SUR LE RECYCLAGE S‘il existe une réglementation pour l‘élimination ou le recyclage des appareils électriques et électroniques dans votre pays, ce symbole sur le produit ou sur l‘emballage indique que cet appareil ne doit pas être jeté avec les ordures ménagères. -
Page 51: Datos Técnicos
Estimado cliente: Le felicitamos por la adquisición de este producto. Lea atentamente el siguiente manual y siga cuidadosamente las instrucciones de uso con el fin de evitar posibles da- ños. La empresa no se responsabiliza de los daños oca- sionados por un uso indebido del producto o por haber desatendido las indicaciones de seguridad. -
Page 52: Indicaciones De Seguridad
INDICACIONES DE SEGURIDAD Lea atentamente todas las indicaciones y conserve este manual de instrucciones para futuras consultas. Con el fin de reducir el riesgo de una descarga eléctrica en caso de un fallo o mal funcionamiento, conecte el aparato a una toma de corriente de tierra. Conecte el aparato a tomas de corriente que se adecuen a la tensión especificada. - Page 53 Para proteger el plato giratorio de roturas: • Deje que el plato giratorio se enfríe por completo antes de limpiarlo. • No coloque alimentos o recipientes muy calientes sobre el plato giratorio frío. • No coloque alimentos o recipientes congelados sobre el plato giratorio caliente. Instrucciones generales de seguridad •...
- Page 54 PRECAUCIONES PARA EVITAR UNA POSIBLE EXPOSICIÓN A UNA ENERGÍA EXCESIVA DE MICROONDAS 1. No intente operar este horno con la puerta abierta, ya que podría provocar una exposición nociva a la energía de microondas. Es importante que no anule o altere los bloqueos de seguridad. 2.
-
Page 55: Vista General Del Aparato
VISTA GENERAL DEL APARATO Cierres de la puerta Ventana de seguridad Anillo de rotación Eje de rotación Botón de apertura de la puerta Panel de control Guía de ondas Plato giratorio... -
Page 56: Panel De Control
PANEL DE CONTROL Muestra el tiempo de preparación, la potencia DISPLAY y la hora. POWER LEVEL Pulse este botón para ajustar la potencia. CLOCK Pulse este botón para ajustar la hora. KITCHEM TIMER Pulse este botón para activar el temporizador. Pulse este botón para activar la función KEEP WARM Mantener caliente. -
Page 57: Instalación
INSTALACIÓN • Asegúrese de retirar todo el material de embalaje del interior del aparato. • Inspeccione el horno para detectar posibles deterioros, como la puerta curvada, juntas dañadas en la puerta, abolladuras y golpes dentro del microondas o en la puerta. -
Page 58: Puesta En Funcionamiento
PUESTA EN FUNCIONAMIENTO Configurar la función Horno • Al poner el aparato en marcha por primera vez, emite un pitido y en el display parpadea «01:01». • Durante el modo de configuración, si no se realiza ningún ajuste en 25 segundos, el aparato entra en modo Standby. - Page 59 Pulse varias veces el botón POWER LEVEL para aumentar la potencia. Botón POWER LEVEL Potencia Indicador 100% P100 P-90 P-80 … … … P-20 P-10 Ejemplo: Usted desea preparar alimentos durante 5 minutos con una potencia del 60 %. 1. Pulse el botón POWER LEVEL 5 veces para elegir la potencia 60 %. 2.
-
Page 60: Configurar El Temporizador
Configurar el temporizador 1. Pulse el botón KITCHEN TIMER. 2. Gire la perilla AUTO COOK/TIME/WEIGHT para elegir el tiempo. El tiempo máximo configurable es de 95 minutos. 3. Pulse el botón START/+30SEC para confirmar. Indicaciones: • Para cancelar esta función, pulse el botón KITCHEN TIMER. Cuando aparezca la hora en la pantalla, pulse el botón STOP/CANCEL. -
Page 61: Cocción Con Varias Etapas
COCCIÓN CON VARIAS ETAPAS El microondas puede programarse para realizar 3 secuencias de cocción continuadas. Secuencia 1: Cocción en microondas según la potencia (2 minutos a 100 % de potencia) Secuencia 2: Cocción en microondas según la potencia (5 minutos a 60 % de potencia) 1. - Page 62 Ejemplo: Usted desea cocinar patatas. 1. Introduzca los alimentos en el microondas y cierre la puerta. Seleccione el menú deseado. El microondas se pone en marcha automáticamente un segundo después y el display muestra «AUTO» y «COOK». 2. Después de un tiempo, el aparato comprueba durante la preparación si hay algún error.
-
Page 63: Modo Automático
MODO AUTOMÁTICO Para los siguientes alimentos no necesita indicar el nivel de potencia o tiempo de cocción. Concéntrese solamente en lo que desea calentar e introduzca el peso del alimento. Ejemplo: Usted desea preparar ½ porción de mantequilla 1. En modo Standby, introduzca el alimento deseado en el microondas y cierre la puerta. -
Page 64: Indicaciones Sobre La Vajilla
INDICACIONES SOBRE LA VAJILLA 1. La radiación de microondas no puede penetrar el metal. Utilice únicamente utensilios y accesorios de cocina aptos para el microondas. No utilice en el microondas recipientes metálicos para alimentos y bebidas. Esto no se aplica a los recipientes metálicos recomendados explícitamente por el fabricante y adecuados para microondas. -
Page 65: Limpieza Y Cuidado
LIMPIEZA Y CUIDADO • Apague el aparato y desconecte el enchufe de la toma de corriente antes de limpiarlo. • Mantenga el interior del aparato siempre limpio. Si los alimentos o líquidos salpican las paredes interiores, límpielas con un paño húmedo. Si el microondas está... -
Page 66: Retirada Del Aparato
INDICACIONES SOBRE LA RETIRADA DEL APARATO Si en su país existe una disposición legal relativa a la eliminación de aparatos eléctricos y electrónicos, este símbolo estampado en el producto o en el embalaje advierte que no debe eliminarse como residuo doméstico. En lugar de ello, debe depositarse en un punto de recogida de reciclaje de aparatos eléctricos y electrónicos. - Page 67 Gentile Cliente, La ringraziamo per aver acquistato il dispositivo. La preghiamo di leggere attentamente le seguenti istruzioni per l’uso e di seguirle per evitare possibili danni tecnici. Non ci assumiamo alcuna responsabilità per danni scaturiti da una mancata osservazione delle avverten- ze di sicurezza e da un uso improprio del dispositivo.
-
Page 68: Avvertenze Di Sicurezza
AVVERTENZE DI SICUREZZA Leggere attentamente tutte le avvertenze e conservare il manuale per future consultazioni. Per ridurre il rischio di folgorazioni dovuto a guasti o malfunzionamenti, la spina deve essere collegata a una presa elettrica con messa a terra. Collegare il dispositivo solo a prese elettriche con tensione corrispondente a quella del dispositivo. - Page 69 Per evitare che il piatto girevole si rompa: • Lasciare raffreddare il piatto prima di pulirlo. • Non mettere cibo o contenitori bollenti sul piatto freddo. • Non mettere cibo o contenitori congelati sul piatto caldo. Avvertenze di sicurezza generiche: •...
- Page 70 MISURE DI SICUREZZA PER EVITARE UNA POSSIBILE ESPOSIZIONE A ECCESSIVA ENERGIA A MICROONDE 1. Non cercare di utilizzare il forno con lo sportello aperto, dato che aprendo lo sportello può comportare un carico dannoso di energia a microonde. Non cercare di aggirare o manipolare le chiusure di sicurezza.
-
Page 71: Descrizione Del Dispositivo
DESCRIZIONE DEL DISPOSITIVO Chiusura dello sportello Finestrella Anello rotante Trazione Apertura sportello Pannello di controllo Conduttore delle onde Piatto in vetro... -
Page 72: Pannello Di Controllo
PANNELLO DI CONTROLLO Vengono mostrati tempo di preparazione, DISPLAY potenza e ora. POWER LEVEL Per impostare la potenza. CLOCK Per selezionare la funzione ora. KITCHEM TIMER Per attivare la funzione timer. Per attivare la funzione di mantenimento KEEP WARM calore. Per cancellare l’impostazione o resettare il dispositivo prima di impostare un programma STOP/CANCEL... -
Page 73: Installazione
INSTALLAZIONE • Assicurarsi di rimuovere tutti i materiali di imballaggio dall’interno del dispositivo. • Controllare se il forno è danneggiato prima di utilizzarlo, ad es. se lo sportello è storto o piegato, se la guarnizione dello sportello è danneggiata o se ci sono rigonfiamenti o ammaccature all’interno del microonde o sullo sportello. -
Page 74: Messa In Funzione E Utilizzo
MESSA IN FUNZIONE E UTILIZZO Impostare le funzioni del forno • Quando il forno viene collegato all’alimentazione per la prima volta, viene emesso un segnale acustico e lo schermo mostra “01:01”. • Durante la modalità di impostazione, il dispositivo passa in standby se non si imposta nulla entro 25 secondi. -
Page 75: Cottura Rapida
Selezionare la potenza premendo più volte POWER LEVEL. Tasto POWER LEVEL Potenza Indicazione 100% P100 P-90 P-80 … … … P-20 P-10 Esempio: si desidera prepara la pietanza per 5 minuti con una potenza del 60% 1. Premere 5 volte POWER LEVEL per impostare la potenza al 60%. 2. -
Page 76: Avvertenze
Impostazione timer 1. Premere KITCHEN TIMER. 2. Ruotare poi la manopola AUTO COOK/TIME/WEIGHT per impostare il tempo. Il tempo massimo impostabile è di 95 minuti. 3. Premere START/+30SEC per confermare. Avvertenze • Se si desidera interrompere la funzione timer, premere prima KITCHEN TIMER e poi STOP/CANCEL, quando il tempo viene mostrato sullo schermo. -
Page 77: Cottura A Più Livelli
COTTURA A PIÙ LIVELLI Nel microonde possono essere impostate fino a un massimo di 3 sequenze di cottura automatiche: Sequenza 1: microonde e preparazione in base alla potenza (2 minuti a livello 100%). Sequenza 2: microonde e preparazione in base alla potenza (5 minuti a livello 60%). 1. - Page 78 Esempio: si desidera preparare patate 1. Mettere gli alimenti nel microonde e chiudere lo sportello. Selezionare il menu desiderato. Il microonde si attiva automaticamente dopo un secondo e lo schermo mostra “AUTO” e “COOK”. 2. Dopo un po’ di tempo, il dispositivo controlla se ci sono errori durante la preparazione.
-
Page 79: Funzionamento Automatico
FUNZIONAMENTO AUTOMATICO Per i seguenti alimenti o metodi di preparazione non è necessario impostare separatamente tempo di preparazione e potenza. Basta selezionare tipo e peso dell’alimento in questione. Esempio: prepara ½ pezzo di burro 1. In modalità standby, mettere l’alimento nel microonde e chiudere lo sportello. 2. -
Page 80: Utilizzare Accessori
UTILIZZARE ACCESSORI 1. Le microonde non sono in grado di trapassare il metallo. Utilizzare solo stoviglie e accessori adatti a microonde. Contenitori in metallo non devono essere utilizzati nel microonde. Questo non vale per contenitori metalli esplicitamente consigliati dal produttore e adatti a microonde. 2. -
Page 81: Pulizia E Manutenzione
PULIZIA E MANUTENZIONE • Spegnere il microonde e staccare la spina prima della pulizia. • Tenere pulito il vano interno del microonde. Se ci sono schizzi di alimenti o liquidi sulle pareti interne, rimuoverli con un panno umido. Se il microonde è molto sporco, si consiglia di utilizzare un detersivo per piatti delicato. -
Page 82: Smaltimento
AVVISO DI SMALTIMENTO Se nel proprio paese si applicano le regolamentazioni inerenti lo smaltimento di dispositivi elettrici ed elettronici, questo simbolo sul prodotto o sulla confezione segnala che questi prodotti non possono essere smaltiti con i rifiuti normali e devono essere portati a un punto di raccolta di dispositivi elettrici ed elettronici.