Table des Matières

Publicité

Les langues disponibles

Les langues disponibles

Liens rapides

GEBRUIKSAANWIJZING
MODE D'EMPLOI
GEBRAUCHSANWEISUNG
USER MAUAL
DVM-260+

Publicité

Table des Matières
loading

Sommaire des Matières pour Alecto DVM-260+

  • Page 1 GEBRUIKSAANWIJZING MODE D’EMPLOI GEBRAUCHSANWEISUNG USER MAUAL DVM-260+...
  • Page 2 NL: GEBRUIKSAANWIJZING ....4 FR: MODE D’EMPLOI ........ 22 D: GEBRAUCHSANWEISUNG ....40 GB: USER MANUAL ........58...
  • Page 4: Table Des Matières

    INHOUDSOPGAVE INTRODUCTIE ..........................6 FUNCTIEOVERZICHT BABY-UNIT ............................. 6 OUDER-UNIT ..........................7 IKONEN OP HET BEELDSCHERM VAN DE OUDER-UNIT ............8 INSTALLEREN BABY-UNIT (CAMERA) ........................9 OUDER-UNIT ..........................10 GEBRUIKEN IN/UITSCHAKELEN ........................11 OUDER-UNIT ..........................11 MULTI CAMERA ..........................12 AUTOMATISCH NACHTZICHT ...................... 12 MENU GESTUURDE FUNCTIES &...
  • Page 5 TIPS EN WAARSCHUWINGEN ALGEMEEN ............................ 17 INSTALLATIE ..........................17 ONTVANGST-INDICATIE / BUITEN BEREIK MELDING (single camera modus) ......17 VERTRAGING IN BEELD EN GELUID ..................18 VOEDING ............................18 STORINGSVRIJ ..........................18 BEREIK ............................19 AFLUISTEREN/AFTAPPEN ......................19 ONDERHOUD ..........................19 6.10 MILIEU EN AFDANKEN .........................
  • Page 6: Introductie

    Standaard wordt de set inclusief 1 baby-unit (camera) geleverd maar de ouder-unit is geschikt om de beelden van 4 baby-units tegelijk weer te geven. Losse baby-units zijn verkrijgbaar bij de Alecto servicedienst. Zie verder hoofdstuk 5. Naar keuze kunt u continu naar uw baby kijken en luisteren of kunt u de babyfoon automatisch laten inschakelen als de baby gaat huilen of gaat bewegen.
  • Page 7: Ouder-Unit

    OUDER-UNIT: 1. aan/uit druktoets ( 2. beeldscherm 3. uitklapbare antenne 4. menu-druktoets ( 5. ingebouwde microfoon 6. volume hoger tevens toets bij instellen 7. volume lager tevens toets bij instellen 8. terugspreektoets tevens toets bij instellen 9. VOX in/uitschakeltoets tevens toets bij instellen 10.
  • Page 8: Ikonen Op Het Beeldscherm Van De Ouder-Unit

    IKONEN OP HET BEELDSCHERM VAN DE OUDER-UNIT: Tijdens het gebruiken kunnen de volgende ikonen op het beeldscherm worden getoond: geeft aan naar welke camera u kijkt (1~4) geeft de ontvangststerkte weer licht op tijdens het terugspreken geeft aan welk slaapliedje er wordt afgespeeld temperatuurweergave is ingeschakeld - licht blauw op: de minimumwaarde is overschreden - licht rood op: de maximumwaarde is overschreden...
  • Page 9: Installeren

    INSTALLEREN BABY-UNIT: (CAMERA) Voedingsadapter: 1. Verbind een van de meegeleverde 6V voedingsadapters met de aansluiting 6V DC aan de achterzijde van de baby-unit. Naar keuze kunt u de adapter met het lange (3m) of met het korte (1.8m) aansluitsnoer nemen. 2.
  • Page 10: Ouder-Unit

    OUDER-UNIT: Voeding: De ouder-unit kan direct vanuit de meegeleverde oplaadbare batterij gevoed worden of via de mee- geleverde voedingsadapter. Zodra u de voedingsadapter aansluit wordt de batterij opgeladen. Batterij: 1. Open het batterijcompartiment van de ouder-unit door de batterijdeksel aan de achterzijde van de ouder-unit af te klikken.
  • Page 11: Gebruiken

    GEBRUIKEN IN/UITSCHAKELEN: Baby-unit: • Schuif aan de achterzijde de schakelaar op ON om de baby-unit in te schakelen. • Schuif deze schakelaar op OFF om de baby-unit uit te schakelen. Ouder-unit: • Druk gedurende 2 seconden op toets om de ouder-unit in te schakelen. •...
  • Page 12: Multi Camera

    MULTI CAMERA: (zie paragraaf 5.2 voor het aanmelden van extra camera’s) • Standaard wordt het beeld van camera-1 beeldvullend weergegeven. Druk op toets om het beeld van alle aangemelde camera’s weer te geven. De camerabeelden worden na elkaar ververst, bewegingen bij multi-modus worden dus niet zo vloeiend weergegeven als dat het geval is als maar één beeld wordt weergegeven.
  • Page 13: Menu Gestuurde Functies & Instellingen

    MENU GESTUURDE FUNCTIES & INSTELLINGEN: Druk rechtsboven op de ouder-unit op toets om het menu te openen. Het beeld van de ouder-unit ziet er nu als volgt uit: Gebruik de toetsen om de gewenste functie te selecteren en druk op toets om deze functie te openen.
  • Page 14 VOX: • Bij deze optie kunt u het niveau van het geluidgestuurd inschakelen instellen: – Level 1: de baby moet hard huilen voordat de babyfoon inschakelt – Level 2: de babyfoon schakelt in bij normaal huilen van de baby – Level 3: hoge gevoeligheid, de babyfoon schakelt ook bij zwakke geluiden in Feedtimer: •...
  • Page 15: Zoom

    Zoom: • Als u deze functie heeft ingeschakeld, dan verschijnt linksboven in het venster een vergrootglas. – druk op toets om in- en weer uit- te zoomen – gebruik gedurende het inzoomen de toetsen om naar boven / onder / links / rechts te kijken De knopfuncties , , VOX en...
  • Page 16: Systeemuitbreiding Introductie

    De ouder-unit is geschikt om het beeld van 4 camera’s maximaal tegelijk weer te geven. De DVM-260 wordt standaard met 1 camera (baby-unit) geleverd. Uitbreidingscamera’s zijn verkrijg- baar via de serviceafdeling van Hesdo op telefoonnummer 073 6411 355 (NL) of via www.alecto.info (let op: heeft u een DVM-260+, bestel dan de DVM-261+ als uitbreidingscamera)
  • Page 17: Tips En Waarschuwingen

    TIPS EN WAARSCHUWINGEN ALGEMEEN: Lees de gebruikershandleiding goed door en volg alle aanwijzingen op. • Plaats of gebruik de baby-unit(s) of de ouder-unit nooit in een natte of vochtige ruimte of • omgeving. Zorg voor een goede afvloeiing van warmte; bedek nooit de ouder-unit, de baby-unit(s) en/of de •...
  • Page 18: Vertraging In Beeld En Geluid

    VERTRAGING IN BEELD EN GELUID: • De baby-unit stuurt het beeld en geluid in digitale blokjes naar de ouder-unit. De ouder-unit maakt van deze blokjes weer een herkenbaar beeld en een verstaanbaar geluid. Tussen het mo- ment van bewegen en geluid maken en het terugzien / terughoren op de ouder-unit zit daardoor een kleine vertraging.
  • Page 19: Bereik

    Schakel de ouder-unit en de baby-unit weer in. • Als u hierna nog steeds geen beeld of geluid heeft, neem dan contact op met de servicedienst van Alecto op telefoonnummer 073 6411 355 (NL).
  • Page 20: Verklaring Van Conformiteit

    VERKLARING VAN CONFORMITEIT De Alecto DVM-260 voldoet aan de essentiële voorwaarden en voorzieningen zoals omschreven in de Europese richtlijn 1999/5/EC. De verklaring van conformiteit is beschikbaar op de website www.alecto.info Het gebruik is toegestaan in alle landen van de EU.
  • Page 21: Garantie

    GARANTIE Op de Alecto DVM-260 heeft u een garantie van 24 maanden na aankoopdatum. Wij garanderen gedurende die periode de kosteloze herstelling van defecten ontstaan door materiaal- en constructiefouten. Een en ander ter uiteindelijke beoordeling van de importeur. HOE TE HANDELEN: Bemerkt u een defect, raadpleeg dan eerst deze gebruiksaanwijzing. Geeft deze hieromtrent geen uitsluitsel, raadpleeg dan de leverancier van deze beeldbabyfoon of de serviceafdeling van Alecto via www.alecto.info...
  • Page 22 INDEX INTRODUCTION ..........................24 SOMMAIRE DE FONCTIONS UNITE BEBE ..........................24 UNITE PARENTS ........................... 25 SYMBOLE SUR L’ECRAN DE L’UNITE PARENTS ............... 26 INSTALLER UNITE BEBE ..........................27 UNITE PARENTS ........................... 28 UTILISER ALLLUMER / ETEINDRE ........................ 29 UNITE PARENTS ........................... 29 MULTI CAMERA ..........................
  • Page 23 CONSEILES ET AVERTISSEMENTS GENERAL ............................35 INSTALLATION ..........................35 ANNONCE D’INDICATION DE RECEPTION / HORS DE PORTEE ..........35 RETARD DE L’IMAGE ET DU SON....................36 ALIMENTATION ..........................36 SANS INTERFERENCE ......................... 36 PORTEE ............................37 L’ECOUTE / L’ENREGISTREMENT CLANDESTIN ............... 37 ENTRETIENT ..........................
  • Page 24: Introduction

    INTRODUCTION l’intérieur. après vente de Alecto. Voir plus loin au chapitre 5. Au choix vous pouvez regarder et écouter votre bébé en continu ou vous pouvez activer le baby phone automatiquement lorsque le bébé pleur ou bouge. Cette détection de mouvement rend ce système d’observation également très utile en tant que surveillance d’accès ou de détecteur de...
  • Page 25: Unite Parents

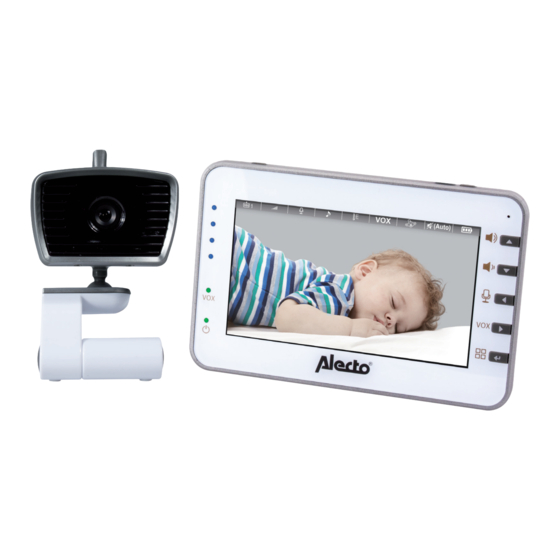
    UNITE PARENTS : 1. bouton poussoir allumer/éteindre ( 2. écran 3. antenne rabattable 4. bouton poussoir menu ( 5. microphone incorporé 6. volume plus fort également touche lors de la 7. volume moins fort également touche lors de la 8. touche répondre également touche lors de la 9.
  • Page 26: Symbole Sur L'ecran De L'unite Parents

    SYMBOLE SUR L’ECRAN DE L’UNITE PARENTS : Lors de l’utilisation l’écran peut montrer les symboles suivants : s’allume lorsque que vous répondez - s’allume en bleu clair : la valeur minimale est dépassée - s’allume en rouge : la valeur maximum est dépassée fonction VOX est activée détection de mouvement est activée - clignote en rouge : la caméra à...
  • Page 27: Installer

    INSTALLER UNITE BEBE : (CAMERA) Adaptateur d’alimentation : 1. Raccordez un des adaptateurs d’alimentation 6V livré avec au raccordement 6V DC à l’arrière de l’unité bébé. Au choix vous pouvez maintenant prendre l’adaptateur avec le long câble de rac- cordement (3m) ou avec le petit câble de raccordement (1.8m). 2.
  • Page 28: Unite Parents

    UNITE PARENTS : Alimentation : L’unité parents être alimenté directement avec les piles rechargeables livrées avec ou via Pile : 1. Ouvrez le compartiment des piles de l’unité parents en décliquant le couvercle des piles à l’arrière de l’unité parents . 3.
  • Page 29: Utiliser Alllumer / Eteindre

    UTILISER ALLLUMER / ETEINDRE : Unité bébé : • Glissez l’interrupteur à l’arrière sur ON pour activer l’unité bébé. • Glissez cet interrupteur sur OFF pour désactiver l’unité bébé. Unité parents : • Appuyez pendant 2 secondes sur la touche pour activer l’unité...
  • Page 30: Multi Camera

    MULTI CAMERA : • les images de toutes les caméras annoncées. Les images de caméra sont rafraichies l’une après l’autre, en mode multi les mouvements ne • Vous pouvez écouter le son de l’image qui est sélectionnée avec un cadre rouge. Utilisez les touches pour écouter le son d’une autre caméra.
  • Page 31: Menu Fonctions Et Configuration Commandes

    MENU FONcTIONS ET CONFIGURATION COMMANDES : Appuyez sur la touche en haut à droite sur l’unité parents pour ouvrir le menu. Maintenant l’image de l’unité parents est comme ceci : Utilisez les touches pour sélectionner la fonction souhaitée et appuyez sur la touche pour ouvrir cette fonction.
  • Page 32: Sensibilité

    Sensibilité : • – 1 : le bébé doit pleurer fort avant que le baby phone ne s’active – 2 : le baby phone s’active lorsque le bébé pleur normalement – 3 : haute sensibilité, le baby phone s’active également lors d’un bruit faible Alarme d’alimentation : •...
  • Page 33: Zoom

    Zoom : • Si vous avez activé cette fonction, une loupe apparaît au dessus à gauche de l’écran.. – appuyez sur la touche pour faire un zoom avant et un zoom arrière – utilisez les touches pendant le zoom avant pour voir vers le haut / le bas / à gauche / à...
  • Page 34: Extension Du Systeme

    1 caméra (unité bébé). Des caméras d’extension sont disponibles au service après vente de Hesdo au numéro de téléphone 03 238 5666 (B) ou via le site web www.alecto.info (ATTENTION : en cas vous avez un DVM-260+moniteur, alors vous devez commander une DVM-261+ caméra.) ANNONCER DE NOUVELLES UNITE BEBE : 1.
  • Page 35: Conseiles Et Avertissements General

    CONSEILES ET AVERTISSEMENTS GENERAL : Lisez attentivement le manuel d’utilisateur et suivez toutes les instructions. • Ne placez ou n’utilisez jamais l’(les) unité(s) bébé ou l’unité parents dans un endroit ou environ • mouillé ou humide. Veillez à ce qu’il y a une bonne aération ; ne recouvrez jamais l’unité parents, l’unité bébé et/ou •...
  • Page 36: Retard De L'image Et Du Son

    RETARD DE L’IMAGE ET DU SON : • L’unité bébé envoie l’image et le son en blocs digitales vers l’unité parents. L’unité parents refait une image reconnaissable et un son compréhensible de ces signaux. Ce pour cela qu’il y a un petit retard entre le moment du mouvement et du son produit et la vision / l’entente sur l’unité...
  • Page 37: Portee

    Réactivez l’unité parents et l’unité bébé. • Si après ceci vous n’avez toujours pas d’image ou de son, prenez alors contact avec le service après vente de Alecto au numéro de téléphone 03 238 5666 (B).
  • Page 38: Declaration De Conformite

    Le Alecto DVM-260 répond aux conditions et équipements essentiels comme décrit dans les directives Européennes 1999/5/EC. La déclaration de conformité est disponible sur le site web www.alecto.info L’utilisation est autorisée dans tous les pays de l’UE. En France, Italie, Russie et en Ukraine l’utilisation est uniquement autorisé à l’intérieure.
  • Page 39: Garantie

    GARANTIE Vous avez une garantie de 24 mois après la date d’achat de Alecto DVM-260. Pendant cette période nous vous garantissons une réparation sans frais des défauts causés par des fautes de COMMENT AGIR HOE TE HANDELEN : Si vous constatez une défaillance, consultez d’abord ce mode d’emploi. Si celui-ci ne vous donne pas de réponses satisfaisantes, consultez alors le fournisseur de ce baby phone image ou le ser-...
  • Page 40 INHALTSVERZEICHNIS GERÄTEBESCHREIBUNG ......................42 FUNKTIONSÜBERSICHT BABY-EINHEIT ..........................42 ELTERN-EINHEIT........................... 43 SYMBOLE AUF DEM BILDSCHIRM VON DER ELTERN-EINHEIT..........44 INSTALATION BABY-EINHEIT (KAMERA) ......................45 ELTERN-EINHEIT........................... 46 NUTZUNG EIN / AUS SCHALTEN ........................47 ELTERN-EINHEIT........................... 47 MULTI KAMERA ..........................48 AUTOMATISCHE NACHTSICHT ....................48 MENU GESTEUERTE FUNKTIONEN &...
  • Page 41 TIPPS UND WARNUNGEN ALLGEMEINES ..........................53 INSTALLATION ..........................53 EMPFANGSANZEIGE / AUSSER REICHWEITE MELDUNG ............53 VERZÖGERUNG IN BILD UND TON ..................... 54 STROMVERSORGUNG ......................... 54 STÖRUNGSFREI ........................... 55 REICHWEITE ..........................55 ABHÖREN/ANZAPFEN ........................55 PFLEGE ............................55 6.10 UMWELT UND ENTSORGUNG ..................... 55 6.11 IM FALL VON KEIN BILD, KEIN TON ....................
  • Page 42: Gerätebeschreibung

    GERÄTEBESCHREIBUNG Das Alecto DVM-260 ist ein Audio / Video Überwachungssystem, welches für dem Hausgebrauch geeignet ist. Standardmäßig wird das Set inklusive 1 Baby-Einheit (Kamera) geliefert, aber die Eltern-Einheit ist geeignet, um Bilder von bis zu 4 Baby-Einheiten zugleich anzuzeigen. Einzelne Baby-Einheiten kön- nen Sie über den Alecto Servicedienst bestellen.
  • Page 43: Eltern-Einheit

    ELTERN-EINHEIT: 1. Ein / Aus Drucktaste ( 2. Bildschirm 3. Ausklappbare Antenne 4. Menu- Drucktaste ( 5. Eingebautes Mikrofon 6. Lautstärke lauter, auch Taste , beim einstellen 7. Lautstärke leiser, auch Taste , beim einstellen 8. Antworttaste, auch Taste , beim einstellen 9.
  • Page 44: Symbole Auf Dem Bildschirm Von Der Eltern-Einheit

    SYMBOLE AUF DEM BILDSCHIRM VON DER ELTERN-EINHEIT: Während der Benutzung können folgende Symbole auf dem Bildschirm angezeigt werden: Zeigt an, welche Kamera Sie gerade beobachten (1-4) Zeigt die Empfangsstärke an Leuchtet während des Antworten auf Temperaturanzeige ist eingeschaltet leuchtet blau auf: der Minimalwert ist unterschritten leuchtet rot auf: der Maximalwert ist überschritten VOX-Funktion ist eingeschaltet Bewegungsdetektor ist eingeschaltet...
  • Page 45: Instalation

    INSTALATION BABY-EINHEIT (KAMERA): Netzteil: 1. Verbinden Sie eins der mitgelieferten 6V Netzteile mit dem Anschluss 6V DC, an der Rückseite von der Baby-Einheit. Je nach Wunsch können Sie das Netzteil mit dem langen (3m) oder mit dem kurzen (1,5m) Anschlusskabel verwenden. 2.
  • Page 46: Eltern-Einheit

    ELTERN-EINHEIT: Stromversorgung: dem mitgelieferten Netzteil mit dem schmalen Stecker. Sobald Sie das Netzteil anschließen wird die Batterie aufgeladen, so dass Sie die Eltern-Einheit auch mobil nutzen können. Batterie: 1. Öffnen Sie das Batteriefach von der Eltern-Einheit, in dem Sie den Batteriefachdeckel auf der Rückseite von der Eltern-Einheit abschieben.
  • Page 47: Nutzung

    NUTZUNG EIN / AUS SCHALTEN: Baby-Einheit: • Schieben Sie auf der Rückseite den Schalter auf ON, um die Baby-Einheit ein zu schalten. • Schieben Sie diesen Schalter auf OFF, um die Baby-Einheit aus zu schalten. Eltern-Einheit: • Drücken Sie für 2 Sekunden auf die Taste , um die Eltern-Einheit ein zu schalten. •...
  • Page 48: Multi Kamera

    MULTI KAMERA: • Standardmäßig wird das Bild von Kamera 1 als Vollbild angezeigt. Drücken Sie auf die Taste , um die Bilder von allen angemeldeten Kameras an zu zeigen. Die Kamerabilder werden nacheinander erneuert, Bewegungen werden deshalb im Multi-Mo- • Sie können den Ton von dem Bild mithören, welches rot umrandet ausgewählt ist.
  • Page 49: Menu Gesteuerte Funktionen & Einstellungen

    MENU GESTEUERTE FUNKTIONEN & EINSTELLUNGEN: Drücken Sie rechts oben bei der Eltern-Einheit auf die Taste , um das Menu zu öffnen. Der Bild- schirm der Eltern-Einheit sieht nun wie folgt aus: Benutzen Sie die Tasten / , um die ge- wünschte Funktion auszuwählen und drücken Sie die Taste , um diese Funktion zu öffnen.
  • Page 50: Detektionsniveau

    Detektionsniveau: • len: – Niedrig: Das Baby muss laut heulen, bevor das Babyfon einschaltet. – Mittel: Das Babyfon schaltet beim normalen Heulen von dem Baby ein. – Fütterungstimer: • Mit dem Fütterungstimer können Sie nach 2, 3, 4, 5 oder 6 Stunden einen Ton erklingen lassen, als Erinnerung, dass Sie zum Beispiel das Baby füttern müssen.
  • Page 51: Zoom

    • Oben im Display leuchtet `‘ (Auto)’` auf, wenn diese Funktion eingeschaltet ist und rechts unten leuchtet das Symbol auf, wenn der Ton tatsächlich ausgeschaltet ist. • Zoom: • Wenn Sie diese Funktion eingeschaltet haben erscheint links oben auf dem Bildschirm ein Vergrößerungsglas.
  • Page 52: Systemerweiterung

    Die Eltern-Einheit ist dazu geeignet, um das Bild von maximal 4 Kameras gleichzeitig anzuzeigen. Die DVM-260 Systeme werden standardmäßig mit 1 Kamera (Baby-Einheit) ausgeliefert. Erweite- rungskameras sind erhältlich bei der Serviceabteilung von Hesdo, über das Internet: www.alecto. info. Achtung, haben Sie einen DVM-260+, erhalten Sie dann einen DVM-261+ als Erweiterungskamera.
  • Page 53: Abmelden Einer Baby-Einheit

    ABMELDEN EINER BABY-EINHEIT: Sie können eine alte Baby-Einheit eigentlich nicht anmelden, aber sobald Sie eine neue Baby-Ein- heit über eine alte Baby-Einheit hinweg anmelden, verfällt die Anmeldung der alten Baby-Einheit. TIPPS UND WARNUNGEN ALLGEMEINES: • Lesen Sie die Gebrauchsanweisung genau durch und folgen Sie allen Anweisungen. •...
  • Page 54: Verzögerung In Bild Und Ton

    • In allen Fällen werden das Bild und der Ton mit derselben Qualität wiedergegeben. • Sobald die Eltern-Einheit kein Signal mehr empfängt von der Baby-Einheit (außerhalb der Reich- weite oder die Baby-Einheit wird ausgeschaltet), erscheint zuerst ` ` (kein Empfang) gefolgt von dem `keine Kamera` Symbol auf dem Bildschirm ( ).
  • Page 55: Störungsfrei

    STÖRUNGSFREI: • Dieses Babyfon wird digital kodiert. Sie werden nie das Signal von anderen Geräten empfan- gen, noch wird das Signal Ihre Baby-Einheit(en) an die Eltern-Einheit von, zum Beispiel, Ihrer Nachbarn angezeigt. • Für den Fall, dass sich die Baby-Einheit(en) oder die Eltern- Einheit in oder in unmittelbarer gestört.
  • Page 56: Im Fall Von Kein Bild, Kein Ton

    Wenn Sie immer noch kein Bild oder Ton haben, kontaktieren Sie bitte die Service-Abteilung Alecto. ERKLÄRUNG ZUR KONFORMITÄT Das Alecto DVM-2600 entspricht den essentiellen Bedingungen und Maß- nahmen, wie sie in der Europäischen Richtlinie 1999/5/EC beschrieben sind. Die Erklärung zur Konformität ist erhältlich auf der Website: www.
  • Page 57: Garantie

    Zustand der Batterie. GARANTIE Auf das Alecto DVM-260 gewähren wir eine Garantie von 24 Monate, nach Ankaufsdatum. Wir garantieren in dieser Zeit die kostenlose Reparatur von Schäden die auf Material- und Konstrukti- onsfehler beruhen. Dies unterliegt der Beurteilung des Importeurs.
  • Page 58 CONTENTS INTRODUCTION ..........................60 FUNCTIONS OVERVIEW BABY-UNIT ............................. 60 PARENT-UNIT ..........................61 ICONS ON THE SCREEN OF THE PARENT UNIT ............... 62 INSTALLATION BABY UNIT ............................ 63 PARENT UNIT ..........................64 HOW TO USE ON/OFF SWITCH ........................... 65 PARENT UNIT ..........................65 MULTIPLE CAMERAS ........................
  • Page 59 TIPS AND WARNINGS GENERAL ............................71 INSTALLATION ..........................71 IN/OUT OF RANGE INDICATOR ....................71 DELAY IN PICTURE AND SOUND ....................72 POWER ............................72 INTERFERENCE FREE ......................... 72 RANGE ............................73 INTERCEPT/LISTEN-IN ......................... 73 CLEANING AND CARE ........................73 6.10 ENVIRONMENT AND DISPOSAL OF THE DEVICE ..............
  • Page 60: Introduction

    INTRODUCTION The Alecto DVM-260 is a wireless audio / video observation monitor, suitable for indoor use. This set includes 1 baby unit (camera), although the parent unit can display images from 4 baby further information see Chapter 5. As an option you can either continuously watch and listen to your baby, or the baby monitor will turn on automatically when the baby cries or starts moving.
  • Page 61: Parent-Unit

    PARENT-UNIT: 1. On/off button ( 2. Display 3. Flip up antenna 4. Menu button ( 5. Built in microphone 6. Volume up, press the button to set the volume 7. Volume down, press the button set the volume 8. Talk back button, press the button to set 9.
  • Page 62: Icons On The Screen Of The Parent Unit

    ICONS ON THE SCREEN OF THE PARENT UNIT: During use, the following icons could show on the camera screen: Indicates which camera you are looking at (1 ~ 4) Indicates the signal of strength Lights up while talking into the monitor using the talk-back function Indicates which lullaby is playing Temperature display is switched on - Lights up blue: minimum levels are exceeded...
  • Page 63: Installation

    INSTALLATION BABY UNIT: (CAMERA) Power Adapter: 1. Connect one of the included 6V power adapters into the power outlet 6V DC located at the back of the baby unit. You can choose either the long (3m) or short (1.8m) power cord. 2.
  • Page 64: Parent Unit

    PARENT UNIT: Power supply: The parent unit can be powered directly from the included rechargeable battery, or from the included power adapter with the small plug. When the power adapter is connected to an electrical outlet the battery will begin charging so that the parent unit can be used cordless. Battery Pack: 1.
  • Page 65: How To Use

    HOW TO USE ON/OFF SWITCH: Baby unit: • To put on, slide the switch located on the back of the baby unit to ON. • To put off, slide the switch located on the back of the baby unit to OFF. Parent unit: •...
  • Page 66: Multiple Cameras

    MULTIPLE CAMERAS: • By default, the image of camera -1 will be shown on the display screen. Press the button show the images of all registered cameras. The images on the camera will reload one after another, and the movement in multi-mode will be more slowed down compared to a full screen image.
  • Page 67: Control Functions & Settings Menu

    CONTROL FUNCTIONS & SETTINGS MENU: Press the button on the parent unit to open the menu. The image displayed on the parent unit will now look like this: Press the keys to select the desired menu function, then press the button to open that selected function.
  • Page 68: Sensitivity

    Sensitivity: • This option allows you to select the level of sound sensitivity to either: – Low: The baby monitor will turn on when the baby cries loudly. – Average: The baby monitor will turn on when the baby cries normally. –...
  • Page 69: Zoom

    Zoom: • If you activate this function, a magnifying glass will appear on the top left of the window – Press the button to zoom in and out. – While zooming press the buttons to move up / down / left / right to see the but- tons function.
  • Page 70: System Expansion

    The parent-unit can display a maximum of 4 cameras at once. The DVM-260 comes with one camera (baby unit). Expansion Cameras can be ordered however through the website at: www.alecto.info (Attention: in case you have a DVM-260+, then you should order a DVM-261+ extension camera)
  • Page 71: Tips And Warnings

    TIPS AND WARNINGS GENERAL • First read the manual carefully and follow all the instructions. • Do not use or place the baby unit (s) or the parent unit in wet or humid environment. • Ensure good ventilation for the heat; never cover the parent unit, the baby unit (s) and /or the power adapter(s) and never place it directly next to a heat source.
  • Page 72: Delay In Picture And Sound

    DELAY IN PICTURE AND SOUND: • The baby unit sends the image and sound in digital blocks to the parent unit. The parent unit makes these digital blocks into a recognisable image and an audible sound again. There will therefore be a slight delay between the time of actual movement and sounds, and the playing back /hear back on the parent unit.
  • Page 73: Range

    RANGE: • within a house; the range is dependent on local conditions. If the units are out of range from each other, the image will “freeze” for a few seconds (no movement) and after a few seconds it will show this icon INTERCEPT/LISTEN-IN: •...
  • Page 74: Declaration Of Conformance

    DECLARATION OF CONFORMANCE The Alecto DVM-260 complies with the essential requirements and provisions declaration of conformance is available on the website WWW.ALECTO.INFO The usage of DVM-260 is allowed in all EU countries. In France, Italy, Russia and the Ukraine only indoor usage is allowed.
  • Page 75: Warranty Information

    Some things are kept for assessment of the importer. Alecto at www.alecto.info TERMINATION OF WARRENTY: For improper use, incorrect connection, leaking and / or incorrect placed batteries, the use of non-original parts or accessories, negligence and damage caused by by third parties, incorrect transporting of the equipment without appropriate packaging and if the and plugs are not covered by the warranty.
  • Page 76 WWW.ALECTO.INFO Service SERVICE@ALECTO.NL NL 073 6411 355 (Lokaal tarief) (Lokaal tarief) BE 03 238 5666 (Tarif local) Help DE 0180 503 0085 (Lokale Festnetzkosten) Hesdo, Australiëlaan 1, 5232 BB, The Netherlands ‘s-Hertogenbosch, V2.2...

Table des Matières