Publicité
Les langues disponibles
Les langues disponibles
Liens rapides
PROFESSIONAL DIGITAL TWO-WAY RADIO
XT660d/XT665d
FULL KEYPAD PORTABLE RADIO
USER GUIDE
en-US
nl-NL
sv-SE
da-DK
nb-NO
tr-TR
de-DE
pl-PL
uk-UA
es-ES
pt-PT
fr-FR
ru-RU
it-IT
fi-FI
JULY 2017
© 2017 Motorola Solutions, Inc. All rights reserved.
@MN003218A01@
MN003218A01-AA
Publicité

Manuels Connexes pour Motorola Solutions XT600d Serie


Sommaire des Matières pour Motorola Solutions XT600d Serie
- Page 1 PROFESSIONAL DIGITAL TWO-WAY RADIO XT660d/XT665d FULL KEYPAD PORTABLE RADIO USER GUIDE en-US nl-NL sv-SE da-DK nb-NO tr-TR de-DE pl-PL uk-UA es-ES pt-PT fr-FR ru-RU it-IT fi-FI JULY 2017 @MN003218A01@ © 2017 Motorola Solutions, Inc. All rights reserved. MN003218A01-AA...
- Page 3 English Contents 2.9 Drop-in Tray Charger LED Indicators..28 2.10 Battery Meter..........29 2.11 Estimated Charging Time......29 Computer Software Copyrights........7 2.12 Charging a Radio and Battery using a Important Safety Information.......... 9 MUC - Optional Accessory........ 30 Handling Precaution............. 11 Chapter 3: Getting Started...........
- Page 4 English 3.13 Accessing Menu Options......39 4.4.2 Selecting Priority Channel from a Scan List..........47 Chapter 4: Advanced Features........41 4.4.3 Removing a Channel from a 4.1 Setting............41 Scan List..........48 4.2 Channel Edit..........42 4.4.4 Adding a Channel to a Scan List... 49 4.2.1 Editing Channel Alias.....42 4.5 Message............
- Page 5 4.10.1 Activating Covert Mode....56 8.5 CTCSS And PL/DPL Codes......78 4.10.2 Deactivating Covert Mode... 56 Appendix A: Motorola Solutions Limited Warranty..85 4.11 Break-In............. 56 A.1 What is Not Covered By the Warranty..85 4.12 Radio ID Direct Call........57 A.2 Warranty Information........85...
- Page 6 English This page intentionally left blank.
- Page 7 English Computer Software Copyrights The Motorola Solutions products described in this manual may include copyrighted Motorola Solutions computer programs stored in semiconductor memories or other media. Laws in the United States and other countries preserve for Motorola Solutions certain exclusive rights for...
- Page 8 English This page intentionally left blank.
- Page 9 Two-Way Radios which contains important operating instructions for safe usage and RF energy awareness and control for Compliance with applicable standards and Regulations. For a list of Motorola Solutions-approved batteries and other accessories, visit the following website: http://www.motorolasolutions.com Send Feedback...
- Page 10 English This page intentionally left blank.
- Page 11 English Handling Precaution CAUTION: Do not disassemble the radio. This could damage radio seals and result in leak paths into XT600d Series Digital Portable radio meets IP55 the radio. Radio maintenance should only be specifications, allowing the radio to withstand adverse field done in service depot that is equipped to test conditions such as being used in rain or dusty environment.
- Page 12 English This page intentionally left blank.
- Page 13 English Introduction This user guide covers the operation of your radios. Your dealer or system administrator may have customized your radio for your specific needs. Check with your dealer or system administrator for more information. You can consult your dealer or system administrator about the following: •...
- Page 14 English This page intentionally left blank.
- Page 15 1 To reduce risk of injury, charge only the rechargeable Operational Safety Guidelines Motorola Solutions-authorized batteries. Charging the other batteries may cause explosion, personal injury, • Turn off the radio while charging. and damage.
- Page 16 English • Connect the equipment to an outlet which is easy to access and near. • For equipment using fuses, replacements must comply with the type and rating specified in the equipment instructions. • Maximum ambient temperature around the power supply equipment must not exceed 40 °C (104 °F).
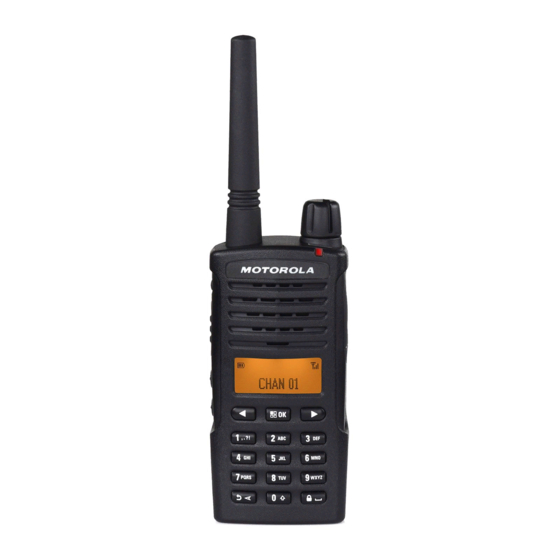
- Page 17 English Radio Overview This chapter explains the buttons and functions to control the radio. Send Feedback...
- Page 18 English Control Buttons The following table explains the functions of each buttons on the radio: Table 1: Control Buttons Reference Table Number Description Antenna For model XT660d/XT665d, the antenna is non-removable. Loop hole for strap Recording Button Press the button to toggle on off the recording transmission feature. See Recording on page for more details.
- Page 19 English Number Description Shows battery status, power-up status, radio call information, and scan status. Speaker Microphone User has to speak clearly into the microphone when sending a message. LCD Display Monochrome Display with Orange color backlight. Menu/OK and Navigation Buttons Press to enter a menu or to confirm selection;...
- Page 20 Battery Latch Battery XT600d Series comes with a Standard Capacity Li-Ion battery. Other batteries may be avail- able. See Table 4: Motorola Solutions Authorized Batteries on page 28 for more details. Table 2: Default Setting for SB1 and SB2 buttons Buttons...
- Page 21 English Short press Press and release rapidly. Long press Press and hold for the programmed duration. Hold down Keep the button pressed. NOTICE: Your dealer or system administrator may have customized your radio for your specific needs. Check with your dealer or system administrator to determine how your radio has been programmed.
- Page 22 English XT660d XT665d Model Label Send Feedback...
- Page 23 The following steps explain how Li-Ion Battery is installed: 25% discharge, lasts even longer. Motorola Solutions batteries are designed specifically to be used with a Motorola Solutions charger and vice versa. Charging batteries with non-Motorola Solutions equipment may lead to battery damage and void the battery warranty.
- Page 24 Single Unit Charger (SUC) 1 Turn the radio off. 2 With the Motorola Solutions logo facing up, fit the tabs (2) at the bottom of the battery into slots (3). Your radio comes with one Drop-in Tray SUC, one power supply (also known as Transformer), and a set of adaptors.
- Page 25 English Your can switch your power supply to suit the adaptors that NOTICE: come with your radio package. Use the adaptor of the The adaptor shown in the pictures are for region you are located at. illustration purposes only. The adaptor you install may be different depending on region.
- Page 26 Slide the radio and remove from the holster. Charging The Radio With radio attached, place battery in a Motorola Solutions approved Drop-in Tray SUC or Multi-Unit Charger (MUC). Charging Radio with the Drop-in...
- Page 27 English 3 Insert the radio into the charger with the radio facing the front, as shown. NOTICE: When charging a battery attached to a radio, turn the radio off to ensure a full charge. See Operational Safety Guidelines on page 15 for more information.
- Page 28 3 Align the slots in the battery with the alignment ribs in Normally, re-po- the Drop-in Tray SUC. sitioning the Battery Faulty Red Fast Blink battery pack will Table 4: Motorola Solutions Authorized Batteries correct this is- sue. Part Number Description Battery temper- PMNN4434_R...
- Page 29 (≤10% when • Confirm that the battery being used with the radio is 100–70% 70–30% blinking) listed in Table 4: Motorola Solutions Authorized Batteries on page 2.11 2.10 Estimated Charging Time Battery Meter The following provides the charging solutions with The battery meter located in the upper left corner of the estimated charging time of the battery.
- Page 30 English 2.12 2 Insert the power cord plug into the MUC’s dual pin Charging a Radio and Battery using connector (1) at the bottom of the MUC. a MUC - Optional Accessory 3 Plug the power cord into an AC outlet. The MUC allows drop-in charging of up to six radios or 4 Turn the radio off.
- Page 31 English Getting Started NOTICE: Do not hold the radio too close to your ear when the volume is high or while adjusting the volume. This section helps you to get familiar with the basic operation of the radio. Radio Display Turning Radio On/Off To turn the radio on, rotate the On/Off/Volume Knob clockwise.
- Page 32 English The following table describes the icons: Icon Description 6.i. The radio is communicating in a Group Icon Description Call. The number of bars (0–3) shown indi- 6.ii. The radio is communicating in a Pri- cates the charge remaining in the bat- vate Call.
- Page 33 English NOTICE: 2 To respond, hold the radio vertically 1 to 2 inches The radio display shown here is for icon location (2.5 to 5 cm) from mouth. Press the PTT button to only. Each radio display may appear differently talk;...
- Page 34 English To establish a proper two-way communication, the Talk Range Channel, Frequency, and Interference Eliminator Codes must be the same on both radios. This depends on your XT600d Series radios have been designed to maximize radio pre-programmed profile: performance and improve transmission range in the field. Channel To avoid interference, it is recommended that the distance Current channel that the radio is using, depending upon...
- Page 35 English Radio Status LED Indication 'Idle' Programming Mode/Channel Mode Blinking red in heartbeat pace. Channel Busy Shows solid orange. Low Battery Blinks orange in heartbeat pace. Scanning Blinking red in fast pace. VOX/iVOX Mode Blinking red in double heartbeats pace. VOX/iVOX PTT Shows solid red to indicate radio is transmitting.
- Page 36 English iVOX Setting up VOX iVOX is only supported without audio accessories The following steps explain how to setup VOX: attach to radio. When iVOX is activated, radio microphone active all the time which radio will automatically transmit upon detecting signal without having user to press the PTT button.
- Page 37 There is a short delay between the time you start PTT button or by removing the audio accessory. talking and when your radio transmits. NOTICE: Contact your Motorola Solutions point of purchase 3.9.3 to order accessories. Adjusting iVOX Sensitivity The sensitivity of the radio's accessory or microphone can 3.9.2...
- Page 38 English Enabling or Disabling Beep Tone Press and navigate to VOX LEVEL. The following steps explain how to enable and disable beep tone: Press and navigate to the suitable sensitivity level. Press and navigate to SETTING. Press to confirm on selection. Press and navigate to BEEP TONE.
- Page 39 English Press and hold for 4 seconds. Press to see the following features: • SETTING Lock icon appears to indicate keypad and side • CHANNEL EDIT buttons are locked. • CONTACTS • SCAN Press and hold for 4 seconds. • MESSAGE •...
- Page 40 English This page intentionally left blank.
- Page 41 English Advanced Features Types of Set- Options Default Value ting • DUTCH Setting • PORTUGUESE • GERMAN In the SETTING menu, there are a few items you are able to directly change the configuration on the radio without • POLISH going through CPS.
- Page 42 English 3 When the display shows the required channel alias, Press and navigate across the list of selections available. press and navigate to CHAN ALIAS. , or to make your selection. Press and enter the required alphabets or numbers. Channel Edit Press to confirm on selection.
- Page 43 English Press and navigate to FREQUENCY. Press and navigate to PL/DPL. Press and navigate through the list of Press and enter the required numbers. frequencies to select. Press to confirm on selection. Press to confirm on selection. The radio displays COMPLETE. The radio displays COMPLETE.
- Page 44 English Private Call 3 Once the radio displays the required Call ID, press A call from an individual radio to another individual the PTT button to make your call. radio. In order to make Private Call, your radio must be programmed to initiate a Private Call.
- Page 45 English Features Description to scroll to ADD NEW and press Initiate Remote Monitor request will REMOTE MON to enter. result in the target radio's microphone and transmitter activated to be re- motely monitored. Enter the new radio ID numbers and press Initiate Radio Enable command will confirm the ID.
- Page 46 English 4.3.5.1 1 Hold the radio vertically 1 to 2 inches (2.5 to 5.0 cm) Editing Quick Contact from your mouth. The following steps explain how to edit quick contact: 2 Press the side button that have been programmed with One Touch Access. Press and navigate to CONTACTS.
- Page 47 English 4.3.5.2 Press and navigate to SCAN. Making a Quick Contact Call The following steps explain how to make a quick contact Press and use to scroll call: through the Scan List. At Home screen, press Once the Scan List is selected, press 2 Press the number through the Alphanumeric 4 Navigate to SET ACTIVE.
- Page 48 English The following steps explain how to select priority channel Removing a Channel from a Scan List from a scan list: The following steps explain how to remove a channel from a scan list: Press and navigate to SCAN. Press and navigate to SCAN.
- Page 49 English Press to confirm on selection. Press to confirm on selection. The radio displays COMPLETE. 4.4.4 Adding a Channel to a Scan List The following steps explain how to add a channel to a scan Message list: NOTICE: This feature is only available in Digital Mode. Press and navigate to SCAN.
- Page 50 English Selections Descriptions Press to confirm on send. Repository of sent messages. User SENT The radio displays a list of contacts in Contact List. can forward or reply the messages here. Scroll to the required contact and press 4.5.1 send. Creating New Text Message The radio displays SENT.
- Page 51 English 4 Scroll through the messages in the inbox. Press Press and navigate to MESSAGE. to select the following actions. Press to enter the Message screen. 5 Perform one of the following: • To create new text message to reply sender, Navigate to QUICK TEXT and press navigate to QUICK REPLY and select NEW TEXT.
- Page 52 English 4.5.4 Press to confirm on selection. Forwarding or Deleting Sent Message The following steps explain how to forward and delete sent message: Recording NOTICE: Press and navigate to MESSAGE. This feature is only available in Digital Mode. Once Voice Recording is activated, every conversation in Press to enter the Message screen.
- Page 53 English 3 Perform one of the following: Scroll through the list of record files and press • To start recording, navigate to START and press to select. or press and hold the Recording button. 5 Perform one of the following: •...
- Page 54 English 4.7.1 Navigate to TIME LEFT and press . The radio Saving Contact from Call Log to display shows the minutes available for recording. Contact List The following steps explain how to save contact from call log to contact list: Call Log Call Log enables user to check the call history of the radio.
- Page 55 English Once the required zone is displayed, press Zone select. A zone is a group of channels. There are four zones available and each zone consist of different channels. The following table shows the arrangement of the channels for Radio Information each zone: Your radio contains information on various general Zone...
- Page 56 English system administrator for more information on this 4.11 configuration. Break-In Break-in allows user to transmit to another user that you 4.10.1 want to talk to. Another user will receive it after the Activating Covert Mode transmission is finished. This feature allows user to gain first priority in transmitting and block other user from The following steps explain how to activate covert mode: transmitting.
- Page 57 English Radio ID Direct Call 3 Perform one of the following: • To break-in successfully, press on the PTT button Direct call is a feature that enables radio to transmit call of the radio with WAIT on the display within 3 using the Radio ID.
- Page 58 English • Check with your dealer or system administrator for more information on this configuration. 4.14 Silent Mode Silent mode is enabled through CPS. Check with your dealer or system administrator for more information on this configuration. There are three selections that can be programmed in CPS: Selections Description...
- Page 59 English Setting up the Radio Setting up using CPS This chapter explains how to set up the radio. NOTICE: Your dealer or system administrator may have customized your radio for your specific needs. Check with your dealer or system administrator to determine how your radio has been programmed.
- Page 60 NOTICE: (*) CPS Programming Cable P/N# HKKN4027_ is an accessory sold separately. Please contact your Motorola Solutions point of purchase for more information. Cloning Radios You can clone XT600d Series radio profiles from one Source radio to a Target radio by using any one of these methods: •...
- Page 61 English 2 Unplug all cables (power supply or USB cables) from the SUCs. 3 Connect the cloning cable with USB Converter, plug one side of the cloning cable's mini USB connector Figure 2: CPS Cable to the first SUC and the other side to the second SUC.
- Page 62 NOTICE: What To Do If Cloning Fails This cloning cable is designed to operate only with compatible Motorola Solutions SUC The radio audible voice will announce “Fail” indicating that RLN6175 and PMLN6394. the cloning process has failed. In the event that the cloning...
- Page 63 English Troubleshooting The following table explains the ways to troubleshoot if the symptom occurred: Symptom and Solutions If... Then... No Power Recharge or replace the Li-Ion battery. Extreme operating temperatures may affect battery life. About Li-Ion Battery on page Hearing other noises or conversation on a chan- Confirm Interference Eliminator Code is set.
- Page 64 English If... Then... Audio quality not good enough Radio settings might not be matching up correctly. Double check frequencies, codes, and bandwidths to make sure they are identical in all radios. Limited talk range Steel and/or concrete structures, heavy foliage, build- ings, or vehicles decrease range.
- Page 65 English If... Then... Obstructions and operating indoors, or in vehicles, may interfere. Change locations. See Talk Range on page Heavy static or interference Radios are too close; they must be at least 5 ft apart. Radios are too far apart or obstacles are interfering with transmission.
- Page 66 English If... Then... Use the CPS to ensure that the VOX Sensitivity level is not set to '0'. Accessory not working or not compatible. VOX and iVOX on page Battery does not charge although it has been Check drop-in tray charger is properly connected and placed in the drop-in charger for a while correspond to a compatible power supply.
- Page 67 English Use and Care This chapter shows the usage of using radio correctly: Precaution Use a soft damp cloth to clean the Do not use alcohol or cleaning solu- Do not immerse in water exterior tions If the radio is submerged in water, Do not use radio until completely Turn radio off and remove batteries Dry with soft cloth...
- Page 68 English This page intentionally left blank.
- Page 69 English Frequency and Code Chart The following tables shows the Digital and Analogue frequency and code chart: Analogue Frequency and Code Charts The charts in this section provide Frequency and Code information. These charts are useful when using the Motorola Solutions XT600d Series two-way radios with other business radios.
- Page 70 English Zone Channel Name Frequency (MHz) Codes CHAN 09 446.00625 121–DPL 754 CHAN 10 446.01875 121–DPL 754 CHAN 11 446.03125 121–DPL 754 CHAN 12 446.04375 121–DPL 754 CHAN 13 446.05625 121–DPL 754 CHAN 14 446.06875 121–DPL 754 CHAN 15 446.08125 121–DPL 754 CHAN 16 446.09375...
- Page 71 English Zone Channel Name Frequency (MHz) Codes CHAN 06 446.06875 1–67.0 Hz CHAN 07 446.08125 1–67.0 Hz CHAN 08 446.09375 1–67.0 Hz CHAN 09 433.07500 1–67.0 Hz CHAN 10 433.30000 1–67.0 Hz CHAN 11 433.55000 1–67.0 Hz CHAN 12 433.80000 1–67.0 Hz CHAN 13 434.05000...
- Page 72 English Digital Frequency and Code Chart The chart in this section provide Frequency and Code information. This chart is useful when using the Motorola Solutions XT600d Series two-way radios with other business radios. Table 9: XT660d Default Channel Frequency and Interference Eliminator Code...
- Page 73 English Zone Channel Name Frequency (MHz) Codes CHAN 28 446.171875 Color code–12 CHAN 29 446.178125 Color code–13 CHAN 30 446.184375 Color code–14 CHAN 31 446.190625 Color code–15 CHAN 32 446.196875 Color code–16 Table 10: XT665d Default Channel Frequency and Interference Eliminator Code Zone Channel Name Frequency (MHz)
- Page 74 English Zone Channel Name Frequency (MHz) Codes CHAN 25 446.053125 Color code–9 CHAN 26 446.059375 Color code–10 CHAN 27 446.065625 Color code–11 CHAN 28 446.071875 Color code–12 CHAN 29 446.078125 Color code–13 CHAN 30 446.084375 Color code–14 CHAN 31 446.090625 Color code–15 CHAN 32 446.096875...
- Page 75 English PMR446 Frequency (MHz) 446.01875 446.06875 446.11875 446.16875 446.03125 446.08125 446.13125 446.18125 446.04375 446.09375 446.14375 446.19375 WARNING: *446.0–446.1 MHz Digital Frequencies for XT660d is only available to be manufactured on or after January 2018. digital PMR446 Frequency (MHz) *446.003125 *446.053125 446.103125 446.153125 *446.009375...
- Page 76 English XT665d Full Frequency List PMR446 Frequency (MHz) 446.00625 446.03125 446.05625 446.08125 446.01875 446.04375 446.06875 446.09375 digital PMR446 Frequency (MHz) 446.003125 446.028125 446.053125 446.078125 446.009375 446.034375 446.059375 446.084375 446.015625 446.040625 446.065625 446.090625 446.021875 446.046875 446.071875 446.096875 LPD433 Frequency (MHz) 433.07500 433.52500 433.97500 434.42500...
- Page 77 English LPD433 Frequency (MHz) 433.17500 433.62500 434.07500 434.52500 433.20000 433.65000 434.10000 434.55000 433.22500 433.67500 434.12500 434.57500 433.25000 433.70000 434.15000 434.60000 433.27500 433.72500 434.17500 434.62500 433.30000 433.75000 434.20000 434.65000 433.32500 433.77500 434.22500 434.67500 433.35000 433.80000 434.25000 434.70000 433.37500 433.82500 434.27500 434.72500 433.40000 433.85000 434.30000...
- Page 78 English CTCSS And PL/DPL Codes Table 11: CTCSS Codes CTCSS CTCSS 67.0 136.5 71.9 141.3 74.4 146.2 77.0 151.4 79.7 156.7 82.5 162.2 85.4 167.9 88.5 173.8 91.5 179.9 94.8 186.2 97.4 192.8 100.0 203.5 103.5 210.7 Table continued… Send Feedback...
- Page 79 English CTCSS CTCSS 107.2 218.1 110.9 225.7 114.8 233.6 118.8 241.8 123.0 250.3 127.3 122 (*) 69.3 131.8 Table 12: PL/DPL Codes Code Code Code Inverted DPL 69 Inverted DPL 70 Inverted DPL 71 Inverted DPL 72 Inverted DPL 73 Inverted DPL 74 Table continued…...
- Page 80 English Code Code Code Inverted DPL 75 Inverted DPL 76 Inverted DPL 77 Inverted DPL 78 Inverted DPL 79 Inverted DPL 80 Inverted DPL 81 Inverted DPL 82 Inverted DPL 83 Inverted DPL 84 Inverted DPL 85 Inverted DPL 86 Inverted DPL 87 Inverted DPL 88 Inverted DPL 89...
- Page 81 English Code Code Code Inverted DPL 91 Inverted DPL 92 Customized PL Inverted DPL 93 Customized PL Inverted DPL 94 Customized PL Inverted DPL 95 Customized PL Inverted DPL 96 Customized PL Inverted DPL 97 Customized PL Inverted DPL 98 Inverted DPL 39 Inverted DPL 99 Inverted DPL 40...
- Page 82 English Code Code Code Inverted DPL 47 Inverted DPL 107 Inverted DPL 48 Inverted DPL 108 Inverted DPL 49 Inverted DPL 109 Inverted DPL 50 Inverted DPL 110 Inverted DPL 51 Inverted DPL 111 Inverted DPL 52 Inverted DPL 112 Inverted DPL 53 Inverted DPL 113 Inverted DPL 54...
- Page 83 English Code Code Code Inverted DPL 63 Inverted DPL 123 Inverted DPL 64 Customized DPL Inverted DPL 65 Customized DPL Inverted DPL 66 Customized DPL Inverted DPL 67 Customized DPL Inverted DPL 68 Customized DPL Send Feedback...
- Page 84 English This page intentionally left blank.
- Page 85 Please return your radio to following the instructions in this user guide. your dealer or retailer to claim your warranty service. Do not return your radio to Motorola Solutions. To be eligible to • Defects or damage from misuse, accident or neglect.
- Page 86 English This page intentionally left blank.
- Page 87 English Accessories Table 15: Cables Part No. Description Table 13: Audio Accessories HKKN4028_ Radio to Radio Cloning Cable HKKN4027_ CPS Programming Cable Part No. Description HKLN4601_ Surveillance kit with in-line microphone Table 16: Chargers and PTT HKLN4599_ D-Style Earpiece with in-line micro- Part No.
- Page 88 English Table 17: Carry Accessories Part No. Description PMLN7655_ XT600d Series Carry Holster PMLN7709_ XT600d Series Leather Carry Case NOTICE: Certain accessories may or may not be available at the time of purchase. Please contact your Motorola Solutions Point of Purchase or visit http:// www.motorolasolutions.com for latest information on...
- Page 89 Dansk Indhold 2.9 LED-indikatorer på drop-in-bakkeoplader..28 2.10 Batterimåler..........29 2.11 Anslået opladningstid........ 29 Ophavsret på computersoftware........7 2.12 Opladning af en radio og et batteri vha. Vigtige sikkerhedsoplysninger........9 en MUC - ekstraudstyr........30 Forholdsregler ved håndtering........11 Kapitel 3: Kom godt i gang.......... 33 Introduktion..............13 3.1 Sådan tændes og slukkes radioen....
- Page 90 Dansk 3.13 Adgang til menuindstillinger.......41 4.4.2 Valg af prioritet kanal fra en scanningsliste......... 50 Kapitel 4: Avancerede funktioner........ 43 4.4.3 Sådan slettes en kanal fra en 4.1 Indstilling............43 scanningsliste......... 51 4.2 Redigering af kanal........44 4.4.4 Tilføjelse af en kanal til en 4.2.1 Redigering af kanalalias....
- Page 91 8.4 XT665d fuld frekvens-liste......80 4.10.2 Deaktivering af skjult tilstand..59 8.5 CTCSS- og PL/DPL-koder......82 4.11 Break-in............. 59 Appendiks A: Motorola Solutions begrænsede garanti................89 4.12 Radio-id ved direkte opkald....... 60 A.1 Hvad er ikke dækket af garantien....89 4.13 Reverse burst..........60 A.2 Garantioplysninger........
- Page 92 Dansk Denne side er med vilje tom.
- Page 93 De Motorola Solutions-produkter, som er beskrevet i denne vejledning, kan indeholde computerprogrammer, som Motorola Solutions har ophavsret på, og som er gemt i halvlederhukommelser eller på andre medier. Lovgivningen i USA og andre lande giver Motorola Solutions visse eksklusive rettigheder til computerprogrammer med ophavsret, inklusive, men ikke begrænset til, eneret til at...
- Page 94 Dansk Denne side er med vilje tom.
- Page 95 RF- energitilstedeværelse og kontrol af overholdelse med gældende standarder og bekendtgørelser. Gå til følgende websted for at se en liste over batterier og andet tilbehør, der er godkendt af Motorola Solutions: http://www.motorolasolutions.com Send feedback...
- Page 96 Dansk Denne side er med vilje tom.
- Page 97 Dansk Forholdsregler ved • Når du skal rengøre radioen, må der ikke anvendes en højtrykssprøjte på radioen, da vandet trænge ind i håndtering radioen. FORSIGTIG: Digital bærbar radio i XT600d-serien overholder IP55- Skil ikke radioen ad. Det kan beskadige radioens specifikationerne, hvilket betyder, at radioen kan modstå...
- Page 98 Dansk Denne side er med vilje tom.
- Page 99 Dansk Introduktion Denne brugervejledning dækker brugen af radioer. Din forhandler eller systemadministrator har muligvis tilpasset radioen til dine specifikke behov. Tjek med din forhandler eller systemadministrator for yderligere oplysninger. Du kan kontakte din forhandler eller din systemadministrator om følgende: • Er din radio programmeret med nogen forudindstillede traditionelle kanaler? •...
- Page 100 Dansk Denne side er med vilje tom.
- Page 101 1 Anvend altid genopladelige batterier, der er godkendt af vedligeholdelse eller rengøring. Motorola Solutions, for at reducere risikoen for ulykker. Opladning af de andre batterier kan forårsage Sikkerhedsretningslinjer for drift eksplosion, personskade og skader.
- Page 102 Dansk • Forbind udstyret til et stik, der er tæt på og nemt at få adgang til. • For udstyr, der anvender sikringer, skal erstatningssikringer være i overensstemmelse med typen og klassifikationen, der fremgår af instruktionerne til udstyret. • Den maksimale temperatur omkring strømforsyningsudstyret må...
- Page 103 Dansk Oversigt over radio I dette kapitel forklares knapperne og funktionerne til betjening af radioen. Send feedback...
- Page 104 Dansk Kontrolknapper I følgende tabel beskrives de funktioner, der hører til de enkelte knapper på radioen: Tabel 1: Referencetabel til kontrolknapper Nummer Beskrivelse Antenne For model XT660d/XT665d kan antennen ikke fjernes. Hul til rem Optageknap Tryk på knappen for at skifte mellem aktivering og deaktivering af transmissionsfunktionen. Optagelse på...
- Page 105 Dansk Nummer Beskrivelse Viser batteristatus, opstartsstatus, oplysninger om opkald til radioen samt scanningsstatus. Højttaler Mikrofon Brugeren skal tale tydeligt ind i mikrofonen ved afsendelse af en besked. LCD-display Monokromt display med orange baggrundslys. Menu/OK- og Navigationsknapper Tryk på for at åbne en menu eller for at bekræfte valget. Tryk og hold nede for at gemme valget i programmeringstilstanden.
- Page 106 Opretter forbindelse til kompatibelt radiotilbehør. Batterilås Batteri XT600d-serien leveres med et standard Li-ion-batteri. Andre batterier kan være tilgængelige. Tabel 4: Godkendte batterier fra Motorola Solutions på side 28 for yderligere detaljer. Tabel 2: Standardindstilling for knapperne SB1 og SB2 Knapper Standardindstilling Tryk kortvarigt på...
- Page 107 Dansk Kort tryk Tryk og slip hurtigt. Langt tryk Tryk og hold nede i det programmerede tidsrum. Hold nede Hold knappen nede. BEMÆRKNING: Din forhandler eller systemadministrator har muligvis tilpasset radioen til dine specifikke behov. Tjek med din forhandler eller systemadministrator for yderligere oplysninger om hvor din radio er blevet programmeret. Radiospecifikationer I følgende tabel forklares radiospecifikationerne: Tabel 3: Radiospecifikationer for XT660d/XT665d...
- Page 108 Dansk XT660d XT665d Modelmærkat Send feedback...
- Page 109 25 % varer endnu længere. I følgende trin forklares, hvordan Li-ion-batteri monteres: Motorola Solutions-batterier er specielt designet til at blive brugt med en Motorola Solutions-oplader og omvendt. Opladning af batterier, der ikke er Motorola Solutions, kan Send feedback...
- Page 110 2 Tryk batteriudløseren ned, og hold den nede. 3 Træk batteriet væk fra radioen. Strømforsyning og drop-in- bakkeoplader til enkelt enhed (SUC) 1 Sluk for radioen. 2 Med Motorola Solutions-logoet opad skal du indsætte tapperne (2) nederst på batteriet i åbningerne (3). Send feedback...
- Page 111 Dansk Din radio leveres med en drop-in-bakkeoplader til SUC, en • Skub adapteren (1) opad for at fjerne den. strømforsyning (også kendt som en transformer) og et sæt BEMÆRKNING: adaptere. Den adapter, der er vist på tegningen, er kun Du kan skifte til den strømforsyning, der passer til de vejledende.
- Page 112 Opladning af radioen Med radio tilsluttet skal du placere batteriet i en drop-in- bakke til SUC eller multioplader (MUC), der er godkendt af Motorola Solutions. Opladning af radio med drop-in- bakke til SUC'en I følgende trin forklares, hvordan en radio oplades ved hjælp af en drop-in-bakke til SUC:...
- Page 113 Dansk 3 Sæt radioen i opladeren, så radioen vender mod forsiden som vist. BEMÆRKNING: Ved opladning af et batteri med radioen monteret skal radioen slukkes for at sikre fuldstændig opladning. Se Sikkerhedsretningslinjer for drift på side 15 for yderligere oplysninger. Opladning af et separat batteri Gør følgende for kun at oplade batteriet: 1 Placer opladeren på...
- Page 114 Oplader Konstant rød 3 Juster åbningerne i batteriet ind efter justeringsribberne i drop-in-bakken til SUC'en. Opladning Konstant grøn fuldført Tabel 4: Godkendte batterier fra Motorola Solutions Normalt er det nok at tage Varenummer Beskrivelse batteriet ud og Blinker hurtigt PMNN4434_R...
- Page 115 Kontroller, om det batteri, der anvendes sammen med Følgende angiver opladningsløsninger med anslået radioen, fremgår af listen i Tabel 4: Godkendte batterier opladningstid for batteriet. Du kan få flere oplysninger i fra Motorola Solutions på side Tabel 14: Batteri på side Standardbatteri 2.10 ≤ 4,5 t...
- Page 116 Dansk Batteri med høj kapacitet ≤ 4,5 t 2.12 Opladning af en radio og et batteri vha. en MUC - ekstraudstyr MUC (multiopladeren) gør det muligt at drop-in-oplade op til seks radioer ad gangen. Batterier kan oplades, mens de sidder i radioerne, eller når de er fjernet og placeret i MUC’en for sig selv.
- Page 117 Dansk 5 Indsæt radioen eller batteriet i opladningslommen (3) med radioen eller batteriet vendende væk fra kontakterne (2). BEMÆRKNING: • Flere oplysninger om betjening af MUC’en er tilgængelige i de instruktionsblade, der fulgte med MUC’en. Se Tilbehør på side 91 for at få...
- Page 118 Dansk Denne side er med vilje tom.
- Page 119 Dansk Kom godt i gang BEMÆRKNING: Hold ikke radioen alt for tæt på øret, når lydstyrken er høj, eller når lydstyrken justeres. I dette afsnit får du et nøjere kendskab til grundlæggende betjening af radioen. Radiodisplay Sådan tændes og slukkes radioen Tænd for radioen ved at dreje knappen Til/Fra/Lydstyrke med uret.
- Page 120 Dansk I følgende tabel beskrives ikonerne: Ikon Beskrivelse 6.ii. Radioen kommunikerer i et privat Ikon Beskrivelse opkald. Antallet af viste bjælker (0-3) angiver Dette er indikatoren for Modtaget den resterende opladning i batteriet. signalstyrke. Antallet af viste bjælker Scanning er aktiveret. (0-3) angiver den modtagende signalstyrke.
- Page 121 Dansk BEMÆRKNING: 2 Svar ved at holde radioen lodret 2,5 til 5 cm fra Dette radiodisplay er kun vist for at vise placeringen munden. Tryk på knappen PTT for at tale, og slip af ikonet. De forskellige radiodisplays kan se den for at lytte.
- Page 122 Dansk For at etablere korrekt tovejskommunikation skal begge Rækkevidde for tale radioer have indstillet den samme kanal, frekvens og interferenseliminatorkode. Dette afhænger af din radios Radioer i XT600d-serien er designet til at maksimere forprogrammerede profil: ydelsen og give en bedre transmissionsrækkevidde i Kanal marken.
- Page 123 Dansk Radiostatus LED-indikation Send (TX)/modtag (RX) Lyser konstant rødt, når radioen sender eller modtager. ”Inaktiv” programmeringstilstand/ Blinker rødt i puls-tempo. kanaltilstand Kanalen er optaget Lyser konstant orange. Lavt batteriniveau Blinker orange i puls-tempo. Scanning Blinker rødt i hurtigt tempo. VOX/iVOX-tilstand (D-PTT-tilstand) Blinker rødt i dobbelt puls-tempo.
- Page 124 Dansk Opsætning af VOX VOX understøttes kun via VOX-kompatibelt tilbehør. I følgende trin forklares, hvordan du konfigurerer VOX: Headset af VOX-typen holder mikrofonen aktiv hele tiden, mens radioen automatisk transmitterer ved registrering af signal, uden at brugeren skal trykke på knappen PTT på...
- Page 125 Der er en kort forsinkelse mellem det tidspunkt, du knappen PTT eller ved at fjerne lydtilbehøret. begynder at tale, og det tidspunkt, hvor radioen BEMÆRKNING: begynder at transmittere. Kontakt det sted, hvor du købte Motorola Solutions, for at bestille tilbehør. 3.9.3 Justering af iVOX-følsomhed 3.9.2 Følsomheden af radioens tilbehør eller mikrofon kan...
- Page 126 Dansk 3.11 Standardværdien er MEDIUM. iVOX kan indstilles til en hvilken som helst værdi af nedenstående værdier: Aktivering eller deaktivering af biptone Tryk på , og naviger til SETTING. I følgende trin forklares, hvordan du aktiverer og deaktiverer biptone: Tryk på , og naviger til VOX LEVEL.
- Page 127 Dansk Tryk på og hold nede i 4 sekunder. Tryk på eller for at se følgende funktioner: • SETTING Låseikon vises for at angive, at tastatur og sideknapper er låst. • CHANNEL EDIT • CONTACTS Tryk på og hold nede i 4 sekunder. •...
- Page 128 Dansk • Tryk på for at afslutte. BEMÆRKNING: Der er automatisk timeout for menutilstanden, hvis der ikke er registreret nogen aktivitet i mere end 10 sekunder. Avancerede funktioner på side 43 for at få flere oplysninger om funktionerne. Send feedback...
- Page 129 Dansk Avancerede funktioner Typer af Indstillinger Standardværdi indstilling • DUTCH Indstilling • PORTUGUESE • GERMAN I menuen INDSTILLING er der et par punkter, der gør det muligt for dig at ændre konfigurationen direkte for radioen • POLISH uden at behøve at gå via CPS. I følgende tabel vises de •...
- Page 130 Dansk Tryk på , og naviger gennem listen af Tryk på , og naviger til den påkrævede kanal. tilgængelige valg. 3 Når displayet viser det ønskede kanalalias, skal du Brug eller til at foretage dit trykke på og derefter navigere til CHAN valg.
- Page 131 Dansk Tryk på , og naviger til den påkrævede kanal. Tryk på , og naviger til den påkrævede kanal. 3 Når displayet viser det ønskede kanalnavn, skal du 3 Når displayet viser det ønskede kanalnavn, skal du trykke på og derefter navigere til RX/TX trykke på...
- Page 132 Dansk opkald, og Alle opkald. Din forhandler eller Tryk på , og naviger til CONTACTS. systemadministrator har muligvis tilpasset radioen til dine specifikke behov. Tjek med din forhandler eller systemadministrator for yderligere oplysninger om hvor din Brug eller til at rulle gennem listen af radio er blevet programmeret.
- Page 133 Dansk 4.3.3 Funktioner Beskrivelse Tilføjelse af ny kontakt til kontaktlisten Send opkaldsalarm til CALL ALERT destinationsradio. I følgende trin forklares, hvordan du tilføjer ny kontakt til kontaktlisten: Start af anmodning om radiokontrol RADIO CHECK vil gøre det muligt for brugeren at afgøre, om destinationsradioen er Tryk på...
- Page 134 Dansk 4.3.4 4 Tryk på knappen programmeret til Adgang med ét Sådan foretages digitalt opkald ved tryk igen for at afslutte overførslen. hjælp af adgang med ét tryk 5 Inden for opkaldets holdetid skal du trykke på Funktionen til adgang med ét tryk gør det muligt for knappen PTT for at besvare det igangværende brugeren at foretage et Gruppeopkald eller Privat opkald til opkald.
- Page 135 Dansk 2 Tryk på tallet på Alfanumerisk tastatur, og tryk på Brug eller til at rulle gennem listen af knappen PTT for at foretage et opkald. valg. Vælg radiokontakterne, og tryk på Scan Med scanning kan du overvåge andre kanaler for at Naviger til QUICK CONTACT, og tryk på...
- Page 136 Dansk I følgende trin forklares, hvordan du vælger prioriteret kanal 3 Når scanningslisten er valgt, skal du trykke på fra scanningslisten: Tryk på , og naviger til SCAN. 4 Naviger til SET ACTIVE. Tryk på , og brug eller for at Tryk på...
- Page 137 Dansk 4.4.3 • Naviger til CANCEL? for at gå tilbage til det forrige Sådan slettes en kanal fra en skærmbillede. scanningsliste Tryk på for at bekræfte valget. I følgende trin forklares, hvordan du fjerner en kanal fra en scanningsliste: 4.4.4 Tilføjelse af en kanal til en Tryk på...
- Page 138 Dansk 5 Rul gennem scanningslisten, og vælg det ønskede Valgmuligheder Beskrivelser kanalalias. Forudindstillet kort QUICK TEXT tekstmeddelelse til hurtig reaktion. Tryk på for at bekræfte valget. Depot over sendte meddelelser. SENT Bruger kan videresende eller Radioen viser COMPLETE. besvare meddelelser herfra. 4.5.1 Meddelelse Oprettelse af en ny tekstmeddelelse...
- Page 139 Dansk Tryk på for at bekræfte send. Naviger til INBOX, og tryk på Radioen viser en liste over kontaktpersoner i 4 Rul gennem meddelelserne i indbakken. Tryk på kontaktlisten. for at vælge følgende handlinger. Rul til den ønskede kontaktperson, og tryk på 5 Gør et af følgende: for at sende.
- Page 140 Dansk 4.5.3 Rul til den ønskede kontaktperson, og tryk på Afsendelse af hurtig tekst for at sende. I følgende trin forklares, hvordan du sender hurtig tekst: Radioen viser SENT. Tryk på , og naviger til MESSAGE. 4.5.4 Videresendelse eller sletning af sendt Tryk på...
- Page 141 Dansk 4.6.1 5 Gør et af følgende: Start af optagelse • Naviger til FORWARD for at videresende en meddelelse til en anden kontakt i kontaktlisten . I følgende trin forklares, hvordan du starter optagelse: • Naviger til DELETE? for at slette. •...
- Page 142 Dansk 4.6.2 Tryk på for at bekræfte valget. Afspilning eller sletning af optagede filer 4.6.3 Kontrol af resterende optagelsestid Tryk på , og naviger til RECORDING. Tryk på , og naviger til RECORDING. Tryk på for at åbne optagelsesskærmbilledet. Tryk på for at åbne optagelsesskærmbilledet.
- Page 143 Dansk BEMÆRKNING: Tryk på for at åbne opkaldslogskærmbilledet. Denne funktion er kun tilgængelig i digital tilstand. 3 Naviger til INCOMING for at få vist en liste over Tryk på , og naviger til CALL LOG. indgående opkald. 4 Når du har fundet kontakten, skal du trykke på Tryk på...
- Page 144 Dansk 3 Når den ønskede zone vises, skal du trykke på Zone for at vælge den. En zone er en gruppe af kanaler. Der er fire tilgængelige zoner, og hver zone består af forskellige kanaler. Følgende tabel viser organiseringen af kanalerne for hver zone: Radiooplysninger Zone Kanaler...
- Page 145 Dansk som normalt. Tjek med din forhandler eller 2 Tryk på den firecifrede adgangskode. systemadministrator for yderligere oplysninger om denne konfiguration. 3 Radioskærmen er tændt. 4.10.1 4.11 Aktivering af skjult tilstand Break-in I følgende trin forklares, hvordan du aktiverer skjult tilstand: Break-in giver brugeren mulighed for at sende til en anden bruger, man vil tale med.
- Page 146 Dansk I følgende trin beskrives funktionsmåden for break-in Varigheden af den begrænsede periode for break-in mellem radioer: programmeres via CPS. 4 De andre brugere, hvis transmissioner blev afbrudt, 1 Under et igangværende gruppeopkald skal du trykke bliver nødt til at vente på, at TOT udløber, før en på...
- Page 147 Dansk Reverse burst fjerner uønsket støj (squelch tail) ved tab af Valgmulighede Beskrivelse bærerregistrering. Brugeren får mulighed for at vælge værdien af Reverse burst med indstillingsområdet Off/ Kun tilbehør til Lyden føres til headset i stedet for 120/180/240. Standardværdien for Reverse burst er 240. højttaler på...
- Page 148 Dansk Denne side er med vilje tom.
- Page 149 Dansk Opsætning af radioen Opsætning vha. CPS I dette kapitel beskrives det, hvordan du opsætter radioen. BEMÆRKNING: Din forhandler eller systemadministrator har muligvis tilpasset radioen til dine specifikke behov. Tjek med din forhandler eller systemadministrator for yderligere oplysninger om hvor din radio er blevet programmeret.
- Page 150 BEMÆRKNING: (*) CPS-programmeringskabel varenummer HKKN4027_ er et tilbehør, der sælges separat. Kontakt Motorola Solutions-købsstedet for at få flere oplysninger. Kloning af radioer Du kan klone profiler for radioer i XT600d-serien fra én kilderadio til en destinationsradio ved hjælp af en af følgende metoder:...
- Page 151 Dansk 2 Frakobl alle kabler (strømforsyning eller USB-kabler) fra SUC’erne. 3 Tilslut kloningskablet med USB-omformer, sæt den ene side af kloningskablets mini-USB-stik i den Figur 2: CPS-kabel første SUC og den anden side i den anden SUC. BEMÆRKNING: Under kloningen strømforsynes SUC’en ikke. Batterierne oplades ikke.
- Page 152 Dansk 7 Når kloningen er gennemført, vil kilderadioens 4 Sørg for, at der ikke er fremmedlegemer i hørbare stemme annoncere enten "successful" eller ladebakken eller på radiokontakterne. "fail". Hvis kilderadioen er en model med display, vises enten Pass eller Fail på displayet (der høres 5 Sørg for, at målradioen er tændt.
- Page 153 Dansk Fejlsøgning I følgende tabel vises metoderne til fejlfinding hvis symptomet opstod: Symptom samt løsninger Hvis... Skal du... Ingen strøm Genoplad eller udskift Li-Ion-batteriet. Ekstreme driftstemperaturer kan påvirke batteritiden. Om Li-Ion-batteriet på side Der høres anden støj eller samtale på en kanal Bekræft, at interferenseliminatorkoden er indstillet.
- Page 154 Dansk Hvis... Skal du... Lydkvaliteten er ikke god nok Radioindstillingerne stemmer muligvis ikke korrekt overens. Dobbelttjek frekvenser, koder og båndbredder for at sikre, at de er ens på alle radioer. Begrænset rækkevidde for tale Stål- og/eller betonstrukturer, kraftigt bladhæng, bygninger og køretøjer reducerer rækkevidden. Sørg for klart udsyn for at give bedre transmission.
- Page 155 Dansk Hvis... Skal du... Forhindringer og indendørs betjening samt betjening i køretøjer kan virke forstyrrende. Skift placeringer. Se Rækkevidde for tale på side Kraftig statisk støj eller interferens Radioer er for tæt på hinanden. De skal være 1,5 m fra hinanden. Radioerne er placeret for langt fra hinanden eller forhindringer forstyrrer transmissionen.
- Page 156 Dansk Hvis... Skal du... Kan ikke aktivere VOX VOX-funktionen kan være indstillet til fra. Brug CPS til at sikre, at følsomhedsniveauet for VOX ikke er indstillet til "0". Tilbehør virker ikke eller er ikke kompatibelt. VOX og iVOX på side Batteriet oplades ikke, selvom det har siddet i Undersøg, om drop-in-bakkeopladeren er korrekt drop-in-opladeren i et stykke tid...
- Page 157 Dansk Brug og pleje I dette kapitel beskrives, hvordan radioen bruges korrekt: Forholdsregel Brug en blød klud til at rengøre Brug ikke alkohol eller Må ikke nedsænkes i vand ydersiden rengøringsmidler Hvis radioen nedsænkes i vand, Brug ikke radioen, før den er helt Sluk radioen, og fjern batterierne Tør med en blød klud tør...
- Page 158 Dansk Denne side er med vilje tom.
- Page 159 Følgende tabeller viser den digitale og analoge frekvens og kodeskemaet: Analoge frekvens- og kodeskemaer Skemaerne i dette afsnit indeholder oplysninger om frekvens og koder. Skemaerne er nyttige, når Motorola Solutions XT600d-seriens tovejsradioer anvendes sammen med andre erhvervsradioer. Tabel 7: XT660d standardkanalfrekvens og interferenseliminatorkode...
- Page 160 Dansk Zone Kanalnavn Frekvens (MHz) Koder CHAN 09 446,00625 121–DPL 754 CHAN 10 446,01875 121–DPL 754 CHAN 11 446,03125 121–DPL 754 CHAN 12 446,04375 121–DPL 754 CHAN 13 446,05625 121–DPL 754 CHAN 14 446,06875 121–DPL 754 CHAN 15 446,08125 121–DPL 754 CHAN 16 446,09375 121–DPL 754...
- Page 161 Dansk Zone Kanalnavn Frekvens (MHz) Koder CHAN 06 446,06875 1-67,0 Hz CHAN 07 446,08125 1-67,0 Hz CHAN 08 446,09375 1-67,0 Hz CHAN 09 433,07500 1-67,0 Hz CHAN 10 433,30000 1-67,0 Hz CHAN 11 433,55000 1-67,0 Hz CHAN 12 433,80000 1-67,0 Hz CHAN 13 434,05000 1-67,0 Hz...
- Page 162 Dansk Digital frekvens- og kodeskema Skemaet i dette afsnit indeholder oplysninger om frekvens og koder. Dette skema er nyttigt, når Motorola Solutions XT600d-seriens tovejsradioer anvendes sammen med andre erhvervsradioer. Tabel 9: XT660d standardkanalfrekvens og interferenseliminatorkode Zone Kanalnavn Frekvens (MHz) Koder...
- Page 163 Dansk Zone Kanalnavn Frekvens (MHz) Koder CHAN 28 446,171875 Farvekode-12 CHAN 29 446,178125 Farvekode-13 CHAN 30 446,184375 Farvekode-14 CHAN 31 446,190625 Farvekode-15 CHAN 32 446,196875 Farvekode-16 Tabel 10: XT665d standardkanalfrekvens og interferenseliminatorkode Zone Kanalnavn Frekvens (MHz) Koder CHAN 17 446,003125 Farvekode-1 CHAN 18 446,009375...
- Page 164 Dansk Zone Kanalnavn Frekvens (MHz) Koder CHAN 25 446,053125 Farvekode-9 CHAN 26 446,059375 Farvekode-10 CHAN 27 446,065625 Farvekode-11 CHAN 28 446,071875 Farvekode-12 CHAN 29 446,078125 Farvekode-13 CHAN 30 446,084375 Farvekode-14 CHAN 31 446,090625 Farvekode-15 CHAN 32 446,096875 Farvekode-16 XT660d fuld frekvens-liste ADVARSEL: * Kun 446,0 - 446,1 MHz analoge frekvenser er tilgængelige som standard.
- Page 165 Dansk PMR446 frekvens (MHz) 446,01875 446,06875 446,11875 446,16875 446,03125 446,08125 446,13125 446,18125 446,04375 446,09375 446,14375 446,19375 ADVARSEL: *446,0 - 446,1 MHz digitale frekvenser for XT660d er kun tilgængelige for produktion i eller efter januar 2018. digital PMR446 frekvens (MHz) *446,003125 *446,053125 446,103125 446,153125...
- Page 166 Dansk XT665d fuld frekvens-liste PMR446 frekvens (MHz) 446,00625 446,03125 446,05625 446,08125 446,01875 446,04375 446,06875 446,09375 digital PMR446 frekvens (MHz) 446,003125 446,028125 446,053125 446,078125 446,009375 446,034375 446,059375 446,084375 446,015625 446,040625 446,065625 446,090625 446,021875 446,046875 446,071875 446,096875 LPD433 frekvens (MHz) 433,07500 433,52500 433,97500 434,42500 433,10000...
- Page 167 Dansk LPD433 frekvens (MHz) 433,17500 433,62500 434,07500 434,52500 433,20000 433,65000 434,10000 434,55000 433,22500 433,67500 434,12500 434,57500 433,25000 433,70000 434,15000 434,60000 433,27500 433,72500 434,17500 434,62500 433,30000 433,75000 434,20000 434,65000 433,32500 433,77500 434,22500 434,67500 433,35000 433,80000 434,25000 434,70000 433,37500 433,82500 434,27500 434,72500 433,40000 433,85000 434,30000...
- Page 168 Dansk CTCSS- og PL/DPL-koder Tabel 11: CTCSS-koder CTCSS CTCSS 67,0 136,5 71,9 141,3 74,4 146,2 77,0 151,4 79,7 156,7 82,5 162,2 85,4 167,9 88,5 173,8 91,5 179,9 94,8 186,2 97,4 192,8 100,0 203,5 103,5 210,7 Tabel fortsat… Send feedback...
- Page 169 Dansk CTCSS CTCSS 107,2 218,1 110,9 225,7 114,8 233,6 118,8 241,8 123,0 250,3 127,3 122 (*) 69,3 131,8 Tabel 12: PL/DPL-koder Kode Kode Kode Inverteret DPL 69 Inverteret DPL 70 Inverteret DPL 71 Inverteret DPL 72 Inverteret DPL 73 Inverteret DPL 74 Tabel fortsat…...
- Page 170 Dansk Kode Kode Kode Inverteret DPL 75 Inverteret DPL 76 Inverteret DPL 77 Inverteret DPL 78 Inverteret DPL 79 Inverteret DPL 80 Inverteret DPL 81 Inverteret DPL 82 Inverteret DPL 83 Inverteret DPL 84 Inverteret DPL 85 Inverteret DPL 86 Inverteret DPL 87 Inverteret DPL 88 Inverteret DPL 89...
- Page 171 Dansk Kode Kode Kode Inverteret DPL 91 Inverteret DPL 92 Tilpasset PL Inverteret DPL 93 Tilpasset PL Inverteret DPL 94 Tilpasset PL Inverteret DPL 95 Tilpasset PL Inverteret DPL 96 Tilpasset PL Inverteret DPL 97 Tilpasset PL Inverteret DPL 98 Inverteret DPL 39 Inverteret DPL 99 Inverteret DPL 40...
- Page 172 Dansk Kode Kode Kode Inverteret DPL 47 Inverteret DPL 107 Inverteret DPL 48 Inverteret DPL 108 Inverteret DPL 49 Inverteret DPL 109 Inverteret DPL 50 Inverteret DPL 110 Inverteret DPL 51 Inverteret DPL 111 Inverteret DPL 52 Inverteret DPL 112 Inverteret DPL 53 Inverteret DPL 113 Inverteret DPL 54...
- Page 173 Dansk Kode Kode Kode Inverteret DPL 63 Inverteret DPL 123 Inverteret DPL 64 Tilpasset DPL Inverteret DPL 65 Tilpasset DPL Inverteret DPL 66 Tilpasset DPL Inverteret DPL 67 Tilpasset DPL Inverteret DPL 68 Tilpasset DPL Send feedback...
- Page 174 Dansk Denne side er med vilje tom.
- Page 175 Defekter eller skade, der opstår som følge af ukorrekt forhandler for at gøre krav på garantiservice. Radioen skal test, drift, vedligeholdelse, justering eller enhver evt. ikke returneres til Motorola Solutions. Før du kan gøre krav ændring eller modificering af produktet. på garantiservice, skal du fremvise købskvitteringen eller et sammenligneligt købsbevis indeholdende datoen for købet.
- Page 176 Dansk Denne side er med vilje tom.
- Page 177 Dansk Tilbehør Tabel 15: Kabler Varenr. Beskrivelse Tabel 13: Lydtilbehør HKKN4028_ Radio til radio-kloningskabel HKKN4027_ CPS-programmeringskabel Varenr. Beskrivelse HKLN4601_ Overvågningssæt med in-line mikrofon Tabel 16: Opladere og PTT HKLN4599_ Ørestykke af D-typen med in-line Varenr. Beskrivelse mikrofon og PTT PMLN6383_ SUC-opladerbakke HKLN4604_ Drejeligt ørestykke med in-line mikrofon...
- Page 178 PMLN7655_ Bærehylster til XT600d-serien PMLN7709_ Bæretaske i læder til XT600d-serien BEMÆRKNING: Visse tilbehørsdele kan muligvis ikke fås på købstidspunktet. Kontakt Motorola Solutions- købsstedet, eller besøg http:// www.motorolasolutions.com for de seneste oplysninger om tilgængelighed af tilbehør eller nye modeller af tilbehør.
- Page 179 Deutsch Inhaltsverzeichnis 2.9 LED-Anzeigen am Schnellladegerät....28 2.10 Akku-Ladeanzeige........29 2.11 Geschätzte Ladezeit........30 Copyright-Hinweis zur Computersoftware......7 2.12 Aufladen von Funkgerät und Akku mit Wichtige Sicherheitshinweise.........9 einem MUC – Optionales Zubehör....30 Sicherheitshinweise für die Handhabung..... 11 Erste Schritte..............33 Einleitung..............13 3.1 Ein-/Ausschalten des Funkgeräts....33 Sicherheitshinweise für Akkus und Ladegeräte...
- Page 180 Deutsch 3.11 Aktivieren oder Deaktivieren des 4.3.5.2 Tätigen eines Signaltons............41 Schnellkontakt-Anrufs....49 3.12 Sperren und Entsperren der Tastatur..41 4.4 Scan............50 3.13 Zugreifen auf Menüoptionen......42 4.4.1 Auswählen einer Scanliste.....50 Erweiterte Funktionen..........43 4.4.2 Auswählen eines Prioritätskanals aus einer Scan-Liste....... 51 4.1 Einstellungen..........
- Page 181 4.10.1 Aktivieren des Tarnmodus... 60 8.4 XT665d – vollständige Frequenzliste..84 4.10.2 Deaktivieren des Tarnmodus..60 8.5 CTCSS- und PL/DPL-Codes....... 86 4.11 Break-in............. 60 Beschränkte Garantie von Motorola Solutions..... 93 4.12 Funkgerät-ID-Direktruf.......61 A.1 Garantieausschluss........93 4.13 Rückwärts-Burst........62 A.2 Garantieinformationen.........93 4.14 Lautlosmodus..........62 Zubehör................
- Page 182 Deutsch Diese Seite wurde absichtlich leer gelassen.
- Page 183 Copyright-Hinweis zur Anwendung der Gesetze beim Verkauf eines Produkts ergeben. Computersoftware Die in diesem Handbuch beschriebenen Motorola Solutions Produkte können durch Copyright geschützte Computerprogramme von Motorola Solutions enthalten, die in Halbleiterspeichern oder anderen Medien gespeichert sind. Nach den Gesetzen der USA und anderer Staaten sind bestimmte exklusive Rechte an der urheberrechtlich geschützten Software, insbesondere die Rechte der...
- Page 184 Deutsch Diese Seite wurde absichtlich leer gelassen.
- Page 185 Energiestrahlung und Produktsicherheit für Handsprechfunkgeräte, das wichtige Bedienungsanweisungen für den sicheren Umgang und HF-Energiesicherheitsinformationen zur Einhaltung der geltenden Normen und Richtlinien enthält. Eine Auflistung der von Motorola Solutions genehmigten Akkus und anderen Zubehörteile finden Sie auf folgender Website: http://www.motorolasolutions.com Feedback senden...
- Page 186 Deutsch Diese Seite wurde absichtlich leer gelassen.
- Page 187 Deutsch Sicherheitshinweise für die • Verwenden Sie zum Reinigen der Außenflächen des Funkgeräts eine verdünnte Lösung aus einem milden Handhabung Spülmittel und frischem Wasser (d. h. ein Teelöffel Spülmittel auf 4 Liter Wasser). Das tragbare Funkgerät der Serie XT600d entspricht der •...
- Page 188 Deutsch Diese Seite wurde absichtlich leer gelassen.
- Page 189 Deutsch Einleitung In diesem Handbuch wird die Bedienung Ihres Funkgeräts beschrieben. Ihr Händler oder Systemadministrator kann Ihr Funkgerät an Ihre speziellen Anforderungen und Bedürfnisse anpassen. Weitere Informationen erhalten Sie von Ihrem Fachhändler oder Systemadministrator. Für folgende Auskünfte setzen Sie sich bitte mit Ihrem Systemadministrator oder Händler in Verbindung: •...
- Page 190 Deutsch Diese Seite wurde absichtlich leer gelassen.
- Page 191 Ersatzteile 1 Um die Verletzungsgefahr zu minimieren, laden Sie nur verfügbar. Die Demontage des Ladegeräts kann zu von Motorola Solutions zugelassene Akkus auf. Das Feuer oder Stromschlägen führen. Aufladen eines anderen Akkus kann Explosionen, 7 Ziehen Sie das Kabel des Ladegeräts vor einer Wartung...
- Page 192 Deutsch • Das Ladegerät ist nicht für die Verwendung im Freien geeignet. Verwenden Sie es nur in trockenen Umgebungen/Bedingungen. • Schließen Sie das Gerät an einen ordnungsgemäß gesicherten und verkabelten Netzanschluss mit der richtigen Spannung an (nur auf dem Produkt angegeben).
- Page 193 Deutsch Übersicht über das Funkgerät In diesem Kapitel werden die Tasten und Funktionen zum Bedienen des Funkgeräts beschrieben. Feedback senden...
- Page 194 Deutsch Steuerungselemente Die folgende Tabelle beschreibt die Funktionen der einzelnen Tasten des Funkgeräts: Tabelle 1: Referenztabelle für Steuerungselemente Nummer Beschreibung Antenne Bei Modell XT660d/XT665d kann die Antenne nicht entfernt werden. Öffnung für Trageschlaufe Aufnahmetaste Drücken Sie die Taste, um die Übertragungsaufzeichnung zu aktivieren/deaktivieren. Weitere Informationen finden Sie unter Aufzeichnungen auf Seite Sendetaste (PTT)
- Page 195 Deutsch Nummer Beschreibung Dient zur Anzeige des Akkustatus, des Einschaltstatus, der Funkrufinformationen und des Scanstatus. Lautsprecher Mikrofon Der Benutzer muss beim Senden einer Nachricht deutlich in das Mikrofon sprechen. LCD-Display Monochrom-Display mit oranger Hintergrundfarbbeleuchtung. Menü/OK- und Navigationstasten Drücken Sie , um ein Menü aufzurufen oder eine Auswahl zu bestätigen; halten Sie die Taste gedrückt, um die Auswahl im Programm-Modus zu speichern.
- Page 196 Deutsch Nummer Beschreibung Drücken Sie für die Zahl Null; halten Sie diese Taste gedrückt, um zwischen Buchstaben, numerischen Zeichen und Sprachauswahlen zu wechseln. In der oberen rechten Ecke auf dem Radiobildschirm wird ABC, abc und 123 angezeigt, um darauf hinzuweisen, welche Art von Zeichen Sie eingeben können. Drücken Sie für ein Leerzeichen, halten Sie diese Taste gedrückt, um alle Tasten außer der PTT-Taste zu sperren oder entsperren.
- Page 197 Deutsch Tasten Standardeinstellung Drücken Sie kurz SB2 Scan Drücken Sie lang SB2 Monitor (Überwachung) Zur Beschreibung der Funktionsweise eines Tastendrucks auf einem Funkgerät: Kurz drücken Taste kurz drücken. Lang drücken Halten Sie die Taste für die vorprogrammierte Zeitdauer gedrückt. Gedrückt halten Halten Sie die Taste gedrückt.
- Page 198 Deutsch Funkgerätspezifikationen In der folgenden Tabelle sind die Funkgerätspezifikationen aufgeführt: Tabelle 3: XT660d/XT665d – Funkgerätspezifikationen XT660d XT665d Frequenzbänder (MHz) PMR446, digital PMR446 PMR446, digital PMR446, LPD 433–434 0,5 für PMR446 und digital PMR446, Sendeleistung (W) 0,01 für LPD Anzahl der Kanäle Antenne Nicht entfernbar Nicht entfernbar...
- Page 199 Akkus (Li-Ion) unterschiedlicher Kapazität geliefert, welche konzipiert. Das Aufladen von Akkus mit anderen Geräten die Akkulebensdauer festlegt. als denen von Motorola Solutions kann den Akku beschädigen und somit die Akku-Garantie außer Kraft setzen. Wann immer möglich, sollte die Akku-Temperatur Über Lithium-Ionen-Akkus bei 25 °C (Raumtemperatur) gehalten werden.
- Page 200 Deutsch 2 Setzen Sie die Laschen (2) an der Unterseite des Einsetzen des Lithium-Ionen-Akkus Akkus so in die Schlitze (3) ein, dass das Motorola Solutions-Logo nach oben zeigt. In den folgenden Schritten wird das Einsetzen des Li-Ionen Akkus erläutert: 3 Drücken Sie die Akkuverriegelung (1) zum Funkgerät hin, bis sie hörbar einrastet.
- Page 201 Deutsch Stromversorgung und Einzel- Schnellladegerät (SUC) Das Funkgerät wird mit einem Einzel-Schnellladegerät (SUC), einem Netzteil (auch als Transformator bezeichnet), und einer Reihe von Adaptern geliefert. • Richten Sie den Adapter (1) mit den Führungsrillen der Sie können Ihr Netzteil passend zu den Adaptern Stromversorgung (2) aus, bis er einrastet.
- Page 202 Aussparungen des Akkus. Schieben Sie das Funkgerät aus dem Holster heraus. Aufladen des Funkgeräts Setzen Sie den Akku bei angeschlossenem Funkgerät in ein von Motorola Solutions genehmigtes Einzel- Schnellladegerät oder Mehrfachladegerät (MUC) ein. Aufladen des Funkgeräts mit dem Einzel-Schnellladegerät In den folgenden Schritten wird erklärt, wie Sie das...
- Page 203 Deutsch 3 Setzen Sie das Funkgerät mit der Vorderseite nach vorne in die Ladestation, wie in der Abbildung dargestellt. HINWEIS: Wenn Sie einen Akku aufladen, der mit dem Funkgerät verbunden ist, schalten Sie das Funkgerät aus, um sicherzustellen, dass der Akku vollständig aufgeladen wird.
- Page 204 Deutsch Tabelle 4: Von Motorola Solutions autorisierte Akkus Teilenummer Beschreibung PMNN4434_R Lithium-Ionen-Akku (Standard) PMNN4453_R Lithium-Ionen-Akku mit hoher Kapazität LED-Anzeigen am Schnellladegerät In der folgenden Tabelle wird der Unterschied der einzelnen Status- und LED-Anzeigen erklärt: 1 Führen Sie die Schritte von...
- Page 205 Stromversorgung verwendet wird. beheben. • Vergewissern Sie sich, dass der mit dem Gerät Der Akku ist zu verwendete Akku in Tabelle 4: Von Motorola Solutions warm oder zu autorisierte Akkus auf Seite 28 aufgeführt wird. kalt, oder es Wartet auf die...
- Page 206 Deutsch Aufladen von Funkgerät und Akku Akku-Ladeanzeige mit einem MUC – Optionales 3 Balken 2 Balken 1 Balken Zubehör 35–0 % (≤ 10 % bei 100–70 % 70–30 % Das MUC ermöglicht schnelles Aufladen von bis zu sechs Blinken) Funkgeräten oder Akkus. Akkus können mit den Funkgeräten oder auch separat im MUC aufgeladen werden.
- Page 207 Deutsch 2 Schließen Sie den Netzkabelstecker am Zweistiftanschluss (1) unten am MUC an. 3 Stecken Sie das Netzkabel in eine Netzsteckdose. 4 Schalten Sie das Funkgerät aus. 5 Setzen Sie das Funkgerät oder den Akku in die Ladeschale (3) so ein, dass das Funkgerät oder der Akku nicht in Richtung der Kontakte (2) zeigt.
- Page 208 Deutsch Diese Seite wurde absichtlich leer gelassen.
- Page 209 Deutsch Erste Schritte Einstellen der Lautstärke Drehen Sie den Ein/Aus/Lautstärke-Regler nach rechts, Dieser Abschnitt hilft Ihnen, sich mit der grundlegenden um die Lautstärke zu erhöhen bzw. nach links, um die Bedienung des Funkgeräts vertraut zu machen. Lautstärke zu verringern. HINWEIS: Halten Sie das Funkgerät bei voller Lautstärke oder Ein-/Ausschalten des Funkgeräts beim Einstellen der Lautstärke nicht an Ihr Ohr.
- Page 210 Deutsch Am Startbildschirm zeigt die erste Zeile des Displays Beschreibung verschiedene Symbole und den Status unterschiedlicher Funktionen an. In der zweiten Zeile werden Menütexte Funkgerät oder dem Zubehör zu angezeigt. drücken. Die folgende Tabelle beschreibt die Symbole: Tastatur und Seiten-Tasten sind gesperrt.
- Page 211 Deutsch Beschreibung Auswählen eines Kanals Das Funkgerät befindet sich momentan Drücken Sie auf dem Startbildschirm zweimal oder im Programmiermodus. 10.i. Der aktuelle Kanal befindet sich im , um zum nächsten Kanal zu navigieren. Analogmodus. Jeder Kanal hat seine eigene Frequenz, seinen eigenen Code zur Eliminierung von Interferenzen und eigene 10.ii Der aktuelle Kanal befindet sich im...
- Page 212 Deutsch Die LED-Anzeige leuchtet rot, wenn das Funkgerät Sprechbereich einen Ruf erhält oder überträgt. Funkgeräte der XT600d-Serie sind für maximale Leistung Siehe Tätigen eines Anrufs aus dem Menü „KONTAKTE“ und für eine Verbesserung des Übertragungsbereichs im auf Seite 46 zum Tätigen eines Rufs. Freien konzipiert.
- Page 213 Deutsch Frequenz Code zur Eliminierung von Interferenzen Die zum Senden/Empfangen verwendete Frequenz. Diese Codes helfen, durch die Wahl von Codekombinationen Störungen zu minimieren. LED-Anzeigen des Funkgeräts In der folgenden Tabelle werden die Status- und LED-Anzeigen erklärt: Funkgerätstatus LED-Anzeige Einschalten Leuchtet 3 Sekunden lang rot. Senden (TX)/Empfangen (RX) Leuchtet rot, wenn das Funkgerät sendet oder empfängt.
- Page 214 Deutsch Funkgerätstatus LED-Anzeige Klon-Modus Blinkt zweimal orange im Herzschlagrhythmus. Klon-Vorgang läuft Leuchtet dauerhaft orange, bis der Klon-Vorgang abgeschlossen ist. Firmware-Flashing Leuchtet dauerhaft grün, wenn das Funkgerät zum Flashing bereit ist; während der Aktualisierung blinkt die LED schnell grün. Die LED erlischt, wenn die Datenübertragung abgeschlossen ist und leuchtet anschließend beim Starten des Funkgeräts 3 Sekunden lang dauerhaft rot.
- Page 215 Empfangen hören Sie auf zu sprechen. VOX kann vorübergehend deaktiviert werden, indem Sie die PTT-Taste drücken oder das Audio-Zubehör entfernen. HINWEIS: Wenden Sie sich an Ihren Motorola Solutions- Händler, wenn Sie Zubehör bestellen möchten. 3.9.2 Einrichten von iVOX 1 Schalten Sie das Funkgerät aus.
- Page 216 Deutsch Der Standardwert ist MEDIUM. iVOX kann wie nachfolgend 1 Schalten Sie das Funkgerät aus. beschrieben auf einen beliebigen Wert festgelegt werden: 2 Drücken und halten Sie die PTT-Taste, während Sie das Funkgerät einschalten, um iVOX zu aktivieren. Drücken Sie , und navigieren Sie zu SETTING.
- Page 217 Deutsch Drücken Sie dazu gleichzeitig die Tasten PTT, SB2 und Sperren und Entsperren der Tastatur SB1, während Sie das Funkgerät einschalten, bis Sie einen Sie können die Tasten sperren, damit die hohen Piepton hören. Funkeinstellungen nicht versehentlich geändert werden. In den folgenden Schritten wird das Sperren und Entsperren 3.11 der Tastatur beschrieben:...
- Page 218 Deutsch 3.13 3 Führen Sie einen der folgenden Schritte aus: Zugreifen auf Menüoptionen • Drücken Sie , um Details der Funktion In den folgenden Schritten wird erklärt, wie Sie auf die aufzurufen. Menüoptionen zugreifen: • Drücken Sie zum Beenden Drücken Sie kurz , um das Menü...
- Page 219 Deutsch Erweiterte Funktionen Art der Optionen Standardwert Einstellung • DUTCH Einstellungen • PORTUGUESE • GERMAN Im Menü EINSTELLUNGEN können Sie einige Elemente des Funkgeräts direkt am Gerät ohne Umweg über das • POLISH CPS konfigurieren. Die folgende Tabelle erläutert die •...
- Page 220 Deutsch Drücken Sie , und navigieren Sie durch die Drücken Sie , und navigieren Sie zu CHANNEL Liste der verfügbaren Optionen. EDIT. Verwenden Sie oder für Ihre Drücken Sie , und navigieren Sie zum Auswahl. gewünschten Kanal. 3 Wenn das Display den gewünschten Kanalnamen Kanal bearbeiten anzeigt, drücken Sie , und navigieren Sie zu...
- Page 221 Deutsch Bearbeiten des Kanalcodes Drücken Sie , und navigieren Sie zu CHANNEL Die folgenden Schritte erklären das Bearbeiten des EDIT. Kanalcodes: Drücken Sie , und navigieren Sie zum Drücken Sie , und navigieren Sie zu CHANNEL gewünschten Kanal. EDIT. 3 Wenn das Display den gewünschten Kanalnamen anzeigt, drücken Sie , und navigieren Sie zu Drücken Sie...
- Page 222 Deutsch Gruppenruf Drücken Sie , um die Auswahl zu bestätigen. Ein Ruf innerhalb der vordefinierten Gruppe. Ein Gruppenruf kann nur durchgeführt werden, wenn Ihr Das Funkgerät zeigt COMPLETE an. Funkgerät als Mitglied dieser Gruppe konfiguriert ist. Rundumruf Ein Ruf, den der Empfänger empfangen, aber nicht Kontakte beantworten kann.
- Page 223 Deutsch 3 Drücken Sie, sobald das Funkgerät die gewünschten Funktionen Beschreibung Ruf-ID anzeigt, die PTT-Taste, um den Ruf zu einem System mit tätigen. Empfangsbestätigung aktiviert ist. Bei Starten der Fernüberwachung REMOTE MON 4.3.2 werden Mikrofon und Sender des Verfügbare Funktionen in den Zielfunkgeräts für die Fernüberwachung aktiviert.
- Page 224 Deutsch 4.3.3 Tätigen eines digitalen Rufs über Hinzufügen eines neuen Kontakts zur Eintastenzugang Kontaktliste Mit der Eintastenzugangs-Funktion können Benutzer In den folgenden Schritten wird erklärt, wie Sie einen bequem Gruppen- oder Einzelrufe an vordefinierte IDs neuen Kontakt zur Kontaktliste hinzufügen: tätigen.
- Page 225 Deutsch 4 Drücken Sie die programmierte Eintastenzugangs- Verwenden Sie oder , um durch die Taste erneut, um die Übertragung zu beenden. Auswahlliste zu scrollen. 5 Drücken Sie innerhalb der Haltezeit des Rufs die 3 Aktivieren Sie die Funkgerät-Kontakte, und drücken PTT-Taste, um den laufenden Ruf zu beantworten.
- Page 226 Deutsch Drücken Sie auf dem Startbildschirm Drücken Sie , und navigieren Sie zu SCAN. 2 Drücken Sie die Nummer auf der Drücken Sie , und blättern Sie mithilfe von alphanumerischen Tastatur, und drücken Sie die PTT-Taste, um einen Ruf zu tätigen. oder durch die Liste.
- Page 227 Deutsch 4.4.2 5 Führen Sie einen der folgenden Schritte aus: Auswählen eines Prioritätskanals aus • Navigieren Sie zu PRIORITY ON, und drücken Sie einer Scan-Liste Der Prioritätsmonitor ermöglicht es dem Funkgerät, • Navigieren Sie zum Beenden der Priorität zu automatisch Übertragungen von Mitgliedern einer Gesprächsgruppe mit höherer Priorität zu empfangen, PRIORITY OFF, und drücken Sie wenn es gerade mit einem anderen Ruf beschäftigt ist.
- Page 228 Deutsch 4 Navigieren Sie zu CURRENT CHAN/andere Kanal- Drücken Sie , und blättern Sie mithilfe von Aliasnamen, die in der Scan-Liste festgelegt sind, oder durch die Liste. und drücken Sie Drücken Sie nach Auswahl der Scan-Liste Navigieren Sie zu DELETE, und drücken Sie 6 Führen Sie einen der folgenden Schritte aus: Navigieren Sie zu ADD, und drücken Sie •...
- Page 229 Deutsch Die Serie XT600d unterstützt die Textnachrichtenfunktion. Drücken Sie , und navigieren Sie zu MESSAGE. Die folgende Tabelle beschreibt die Auswahloptionen und Meldungen: Drücken Sie , um den Meldungsbildschirm Auswahl Beschreibungen aufzurufen. Verwenden Sie die NEW TEXT 3 Navigieren Sie zu NEW TEXT, und drücken Sie alphanumerische Tastatur, um die Texte manuell eingeben.
- Page 230 Deutsch 4.5.2 • Navigieren Sie zur Auswahl aus vorgefertigten Beantworten, Weiterleiten oder kurzen Antworten an den Absender zu QUICK REPLY, und wählen Sie QUICK TEXT. Löschen empfangener Nachrichten • Navigieren Sie zum Weiterleiten einer Nachricht Gehen Sie wie folgt vor, um eine empfangene Nachricht zu an einen anderen Kontakt in der Kontaktliste zu beantworten, weiterzuleiten oder zu löschen: FORWARD.
- Page 231 Deutsch Weiterleiten oder Löschen gesendeter Drücken Sie , um den Meldungsbildschirm Nachrichten aufzurufen. Gehen Sie wie folgt vor, um eine gesendete Nachricht 3 Navigieren Sie zu QUICK TEXT, und drücken Sie weiterzuleiten und zu löschen: Drücken Sie , und navigieren Sie zu MESSAGE. 4 Blättern Sie in der Quick Text-Liste.
- Page 232 Deutsch Aufzeichnung starten • Navigieren Sie zu CANCEL?, um zurück zum vorherigen Bildschirm zu gelangen. In den folgenden Schritten wird erklärt, wie Sie eine • Navigieren Sie zum Anzeigen der Nachricht zu Aufzeichnung starten: REVIEW. Drücken Sie , und navigieren Sie zu Drücken Sie , um die Auswahl zu bestätigen.
- Page 233 Deutsch 4.6.2 • Navigieren Sie zum Löschen zu DELETE?. Wiederholen oder Löschen • Navigieren Sie zu CANCEL?, um zurück zum aufgezeichneter Dateien vorherigen Bildschirm zu gelangen. Drücken Sie , um die Auswahl zu bestätigen. Drücken Sie , und navigieren Sie zu RECORDING.
- Page 234 Deutsch Speichern eines Kontakts aus der Anrufprotokoll Anrufliste in der Kontaktliste Mit dem Anrufprotokoll können Benutzer die Anrufliste des Die folgenden Schritte erklären das Speichern eines Funkgeräts anzeigen. In den folgenden Schritten wird Kontakts aus der Anrufliste in der Kontaktliste: erklärt, wie Sie das Anrufprotokoll öffnen: HINWEIS: Drücken Sie die Taste...
- Page 235 Deutsch Drücken Sie , um die Daten zu speichern. Drücken Sie , und navigieren Sie durch die Liste der Zonen. Zone Drücken Sie , wenn die gewünschte Zone angezeigt wird, um sie auszuwählen. Eine Zone ist eine Gruppe von Kanälen. Vier verschiedene Zonen sind verfügbar, und jede Zone besteht aus verschiedenen Kanälen.
- Page 236 Deutsch 4.10 4.10.2 Tarnmodus Deaktivieren des Tarnmodus Die folgenden Schritte erklären, wie Sie den Tarnmodus Der Tarnmodus wird über CPS aktiviert. Sobald das deaktivieren: Funkgerät im Tarnmodus ist, werden Bildschirm und LED des Funkgeräts ausgeschaltet und der Lautsprecher des Funkgeräts stummgeschaltet. Alle Kommunikations- und Drücken und halten Sie , bis ein Piepton zu Audioanzeigen werden durch Zubehör geleitet.
- Page 237 Deutsch HINWEIS: • Drücken Sie zum Durchführen eines Break-in die Diese Funktion ist nur im digitalen Modus und bei PTT-Taste am Funkgerät, auf dem BREAK Gruppenrufen verfügbar. angezeigt wird, innerhalb von 3 Sekunden. Auf dem Funkgerät mit WAIT wird COMPLETE! Die programmierbare Taste für Break-in und die angezeigt.
- Page 238 Deutsch 4.14 Drücken Sie auf dem Startbildschirm Lautlosmodus Der Lautlosmodus wird über CPS aktiviert. Weitere 2 Geben Sie über die alphanumerische Tastatur die Informationen zu dieser Konfiguration erhalten Sie von Funkgerät-ID ein. Ihrem Systemadministrator oder Händler. 3 Drücken Sie zum Durchführen eines Rufs die Taste Es gibt drei Auswahlmöglichkeiten, die in CPS PTT.
- Page 239 Deutsch Einrichten des Funkgeräts Einrichten mit CPS In diesem Kapitel wird die Einrichtung des Funkgeräts erläutert. HINWEIS: Ihr Händler oder Systemadministrator kann Ihr Funkgerät an Ihre speziellen Anforderungen und Bedürfnisse anpassen. Klären Sie mit Ihrem Händler oder Systemadministrator, wie das Funkgerät konfiguriert wurde.
- Page 240 Deutsch Mit CPS können Sie Frequenzen, PL/DPL-Codes und HINWEIS: andere Funktionen programmieren, wie z. B.: Break-in, Stellen Sie sicher, dass sich der Kabelschalter in Tarn- und Lautlosmodus. CPS ist ein sehr nützliches Tool, der Position „Flash“ oder „CPS-Modus“ befindet. da es den Bedienfeld-Programmiermodus sperren bzw. die Änderung einer bestimmten Funktion des Funkgeräts beschränken kann (um zu vermeiden, dass voreingestellte Klonen eines Funkgeräts mithilfe...
- Page 241 Deutsch • Zwei Einzelladegeräte zum Klonen von XT600d- Serie-Funkgeräten. 2 Ziehen Sie alle Kabel (Netzkabel oder USB-Kabel) von den SUCs ab. Abbildung 2: CPS-Kabel 3 Schließen Sie das Klonkabel am USB-Converter an, stecken Sie ein Ende des Klonkabels mit Mini-USB- Stecker in das erste Einzelladegerät und das andere Ende in das zweite Einzelladegerät.
- Page 242 Deutsch b Lassen Sie die Tasten erst nach 3 Sekunden Vorgehensweise bei wieder los, wenn Sie das akustische Signal fehlgeschlagenem Klonvorgang „Klonen“ hören. Das Funkgerät gibt die akustische Meldung „Fail“ 6 Setzen Sie das Ausgangsfunkgerät in das (Fehlgeschlagen) aus, wenn der Klonvorgang nicht Einzelladegerät ein.
- Page 243 Deutsch 6 Stellen Sie sicher, dass das Ausgangsfunkgerät im Klon-Modus ist. 7 Vergewissern Sie sich, dass beide Funkgeräte dasselbe Frequenzband, dieselbe Region und die gleiche Übertragungsleistung aufweisen. HINWEIS: Dieses Klonkabel wurde speziell für die kompatiblen Einzelladegeräte von Motorola Solutions RLN6175 und PMLN6394_ konzipiert..
- Page 244 Deutsch Diese Seite wurde absichtlich leer gelassen.
- Page 245 Deutsch Fehlerbehebung Die folgende Tabelle erläutert die Möglichkeiten zur Fehlerbehebung, wenn folgende Probleme aufgetreten sind: Fehlermerkmale und Lösungen Wenn ... Dann ... Keine Stromversorgung Laden Sie den Lithium-Ionen-Akku auf, oder ersetzen Sie ihn. Extreme Betriebstemperaturen können die Lebensdauer des Akkus beeinflussen. Siehe Über Lithium-Ionen-Akkus auf Seite Sie hören auf einem Kanal andere Geräusche oder...
- Page 246 Deutsch Wenn ... Dann ... Vergewissern Sie sich, ob für das Funkgerät beim Senden die richtige Frequenz und der richtige Code eingestellt sind. Unzureichende Audio-Qualität Die Einstellungen des Funkgeräts passen möglicherweise nicht zusammen. Überprüfen Sie Frequenzen, Codes und Bandbreiten, um sicherzustellen, dass sie bei allen Funkgeräten identisch sind.
- Page 247 Deutsch Wenn ... Dann ... Siehe Sprechbereich auf Seite Nachricht wird nicht gesendet oder empfangen Stellen Sie sicher, dass die PTT-Taste bei der Übertragung vollständig gedrückt ist. Vergewissern Sie sich, ob die Funkgeräte dieselben Einstellungen für Kanal, Frequenz und Code zur Eliminierung von Interferenzen aufweisen.
- Page 248 Deutsch Wenn ... Dann ... Akkustand niedrig Laden Sie den Lithium-Ionen-Akku auf, oder ersetzen Sie ihn. Sehr hohe Betriebstemperaturen wirken sich auf die Lebensdauer des Akkus aus. Siehe Über Lithium-Ionen-Akkus auf Seite Die LED-Anzeige des Schnellladegeräts blinkt Überprüfen Sie, ob das Funkgerät/der Akku richtig nicht eingesetzt ist.
- Page 249 Deutsch Wenn ... Dann ... Der Akku wird nicht aufgeladen, obwohl er sich Überprüfen Sie, ob das Schnellladegerät richtig an bereits seit einiger Zeit im Schnellladegerät einem kompatiblen Netzteil angeschlossen ist. befindet. Siehe Aufladen des Funkgeräts mit dem Einzel- Schnellladegerät auf Seite 26 Aufladen des Akkus ohne Funkgerät auf Seite Überprüfen Sie die LED-Anzeigen des Ladegeräts,...
- Page 250 Deutsch Diese Seite wurde absichtlich leer gelassen.
- Page 251 Deutsch Verwendung und Pflege In diesem Kapitel wird die korrekte Verwendung des Funkgeräts beschrieben: Vorsichtsmaßnahmen Weiches, angefeuchtetes Tuch zum Keine Alkohole oder andere Reinigen der Außenfläche Nicht in Wasser eintauchen Reinigungslösungen verwenden verwenden Beim Eintauchen des Funkgeräts in Wasser: Tabelle wird fortgesetzt… Feedback senden...
- Page 252 Deutsch Verwenden Sie das Funkgerät Schalten Sie das Funkgerät aus, Mit einem weichen Tuch trocknen solange nicht, bis es vollständig und entfernen Sie die Batterien trocken ist Feedback senden...
- Page 253 Analog-Frequenz- und Codetabellen Die Tabellen in diesem Abschnitt enthalten Informationen zu Frequenzen und Codes. Diese Tabellen sind sehr nützlich, wenn Sie Motorola Solutions-Funkgeräte der XT600d-Serie mit anderen kommerziellen Funkgeräten verwenden. Tabelle 7: XT660d – Standardkanalfrequenz und Code zur Eliminierung von Interferenzen...
- Page 254 Deutsch Zone Kanalname Frequenz (MHz) Codes KAN 09 446,00625 121–DPL 754 KAN 10 446,01875 121–DPL 754 KAN 11 446,03125 121–DPL 754 KAN 12 446,04375 121–DPL 754 KAN 13 446,05625 121–DPL 754 KAN 14 446,06875 121–DPL 754 KAN 15 446,08125 121–DPL 754 KAN 16 446,09375 121–DPL 754...
- Page 255 Deutsch Zone Kanalname Frequenz (MHz) Codes KAN 06 446,06875 1–67,0 Hz KAN 07 446,08125 1–67,0 Hz KAN 08 446,09375 1–67,0 Hz KAN 09 433,07500 1–67,0 Hz KAN 10 433,30000 1–67,0 Hz KAN 11 433,55000 1–67,0 Hz KAN 12 433,80000 1–67,0 Hz KAN 13 434,05000 1–67,0 Hz...
- Page 256 Digital-Frequenz- und Codetabellen Die Tabelle in diesem Abschnitt enthält Informationen zu Frequenzen und Codes. Diese Tabelle ist sehr nützlich, wenn Sie Motorola Solutions-Funkgeräte der XT600d-Serie mit anderen kommerziellen Funkgeräten verwenden. Tabelle 9: XT660d – Standardkanalfrequenz und Code zur Eliminierung von Interferenzen...
- Page 257 Deutsch Zone Kanalname Frequenz (MHz) Codes KAN 28 446,171875 Systemcode – 12 KAN 29 446,178125 Systemcode – 13 KAN 30 446,184375 Systemcode – 14 KAN 31 446,190625 Systemcode – 15 KAN 32 446,196875 Systemcode – 16 Tabelle 10: XT665d – Standardkanalfrequenz und Code zur Eliminierung von Interferenzen Zone Kanalname Frequenz (MHz)
- Page 258 Deutsch Zone Kanalname Frequenz (MHz) Codes KAN 25 446,053125 Systemcode – 9 KAN 26 446,059375 Systemcode – 10 KAN 27 446,065625 Systemcode – 11 KAN 28 446,071875 Systemcode – 12 KAN 29 446,078125 Systemcode – 13 KAN 30 446,084375 Systemcode – 14 KAN 31 446,090625 Systemcode –...
- Page 259 Deutsch PMR446 Frequenz (MHz) 446,01875 446,06875 446,11875 446,16875 446,03125 446,08125 446,13125 446,18125 446,04375 446,09375 446,14375 446,19375 WARNUNG: Digitale Frequenzen von *446,0–446,1 MHz für XT660d sind nur für Geräte mit Fertigung am oder nach dem 1. Januar 2018 verfügbar. digital PMR446 Frequenz (MHz) *446,003125 *446,053125 446,103125...
- Page 260 Deutsch XT665d – vollständige Frequenzliste PMR446 Frequenz (MHz) 446,00625 446,03125 446,05625 446,08125 446,01875 446,04375 446,06875 446,09375 digital PMR446 Frequenz (MHz) 446,003125 446,028125 446,053125 446,078125 446,009375 446,034375 446,059375 446,084375 446,015625 446,040625 446,065625 446,090625 446,021875 446,046875 446,071875 446,096875 LPD433 Frequenz (MHz) 433,07500 433,52500 433,97500 434,42500...
- Page 261 Deutsch LPD433 Frequenz (MHz) 433,17500 433,62500 434,07500 434,52500 433,20000 433,65000 434,10000 434,55000 433,22500 433,67500 434,12500 434,57500 433,25000 433,70000 434,15000 434,60000 433,27500 433,72500 434,17500 434,62500 433,30000 433,75000 434,20000 434,65000 433,32500 433,77500 434,22500 434,67500 433,35000 433,80000 434,25000 434,70000 433,37500 433,82500 434,27500 434,72500 433,40000 433,85000 434,30000...
- Page 262 Deutsch CTCSS- und PL/DPL-Codes Tabelle 11: CTCSS-Codes CTCSS CTCSS 67,0 136,5 71,9 141,3 74,4 146,2 77,0 151,4 79,7 156,7 82,5 162,2 85,4 167,9 88,5 173,8 91,5 179,9 94,8 186,2 97,4 192,8 100,0 203,5 103,5 210,7 Tabelle wird fortgesetzt… Feedback senden...
- Page 263 Deutsch CTCSS CTCSS 107,2 218,1 110,9 225,7 114,8 233,6 118,8 241,8 123,0 250,3 127,3 122 (*) 69,3 131,8 Tabelle 12: PL/DPL-Codes Code Code Code Invertierte DPL 69 Invertierte DPL 70 Invertierte DPL 71 Invertierte DPL 72 Invertierte DPL 73 Invertierte DPL 74 Tabelle wird fortgesetzt…...
- Page 264 Deutsch Code Code Code Invertierte DPL 75 Invertierte DPL 76 Invertierte DPL 77 Invertierte DPL 78 Invertierte DPL 79 Invertierte DPL 80 Invertierte DPL 81 Invertierte DPL 82 Invertierte DPL 83 Invertierte DPL 84 Invertierte DPL 85 Invertierte DPL 86 Invertierte DPL 87 Invertierte DPL 88 Invertierte DPL 89...
- Page 265 Deutsch Code Code Code Invertierte DPL 91 Invertierte DPL 92 Benutzerdefinierte Invertierte DPL 93 Benutzerdefinierte Invertierte DPL 94 Benutzerdefinierte Invertierte DPL 95 Benutzerdefinierte Invertierte DPL 96 Benutzerdefinierte Invertierte DPL 97 Benutzerdefinierte Invertierte DPL 98 Invertierte DPL 39 Invertierte DPL 99 Invertierte DPL 40 Invertierte DPL 100 Invertierte DPL 41...
- Page 266 Deutsch Code Code Code Invertierte DPL 43 Invertierte DPL 103 Invertierte DPL 44 Invertierte DPL 104 Invertierte DPL 45 Invertierte DPL 105 Invertierte DPL 46 Invertierte DPL 106 Invertierte DPL 47 Invertierte DPL 107 Invertierte DPL 48 Invertierte DPL 108 Invertierte DPL 49 Invertierte DPL 109 Invertierte DPL 50...
- Page 267 Deutsch Code Code Code Invertierte DPL 59 Invertierte DPL 119 Invertierte DPL 60 Invertierte DPL 120 Invertierte DPL 61 Invertierte DPL 121 Invertierte DPL 62 Invertierte DPL 122 Invertierte DPL 63 Invertierte DPL 123 Invertierte DPL 64 Benutzerdefinierte DPL Invertierte DPL 65 Benutzerdefinierte DPL Invertierte DPL 66 Benutzerdefinierte DPL...
- Page 268 Deutsch Diese Seite wurde absichtlich leer gelassen.
- Page 269 Defekte oder Schäden, die auf unzulässigen Test oder Betrieb, unzulässige Wartung oder Einstellung oder auf Der autorisierte Motorola Solutions-Händler oder - irgendwelche Änderungen und Modifikationen Vertriebspartner, bei dem Sie Ihr Motorola Solutions- zurückzuführen sind. Funkgerät und/oder das Originalzubehör gekauft haben, •...
- Page 270 Deutsch dem das Kaufdatum hervorgeht. Auf dem Sprechfunkgerät muss außerdem die Seriennummer deutlich erkennbar sein. Die Garantieansprüche werden hinfällig, wenn die Typen- oder Seriennummern auf dem Produkt geändert, entfernt oder ungültig gemacht wurden. Feedback senden...
- Page 271 Deutsch Zubehör Tabelle 15: Kabel Artikelnr. Beschreibung Tabelle 13: Audiozubehör HKKN4028_ R2R-Klonkabel (Funkgerät-zu- Funkgerät) Artikelnr. Beschreibung HKKN4027_ CPS-Programmierkabel HKLN4601_ Überwachungskit mit integriertem Mikrofon und PTT Tabelle 16: Ladegeräte HKLN4599_ D-Style-Ohrhörer mit integriertem Mikrofon und PTT Artikelnr. Beschreibung HKLN4604_ Drehbarer Kopfhörer mit integriertem PMLN6383_ SUC-Ladestation Mikrofon und PTT...
- Page 272 Deutsch Tabelle 17: Tragezubehör Artikelnr. Beschreibung PMLN7655_ Trageholster für XT600d-Serie PMLN7709_ Leder-Tasche für XT600d-Serie HINWEIS: Bestimmte Zubehörteile sind zum Kaufzeitpunkt unter Umständen nicht verfügbar. Wenden Sie sich an Ihren Motorola Händler, oder besuchen Sie http://www.motorolasolutions.com, um aktuelle Informationen zu Zubehör und neuen Zubehörteilen zu erhalten.
- Page 273 Español Contenido 2.8 Carga de una batería independiente... 27 2.9 Indicadores LED de la bandeja de la base de carga.............28 Derechos de autor del software informático....7 2.10 Medidor de batería........29 Información importante sobre seguridad......9 2.11 Tiempo de carga estimado......29 Precauciones de manipulación........
- Page 274 Español 3.10 Restablecimiento de los valores 4.3.5.1 Edición de un contacto predeterminados de fábrica.......40 rápido........... 49 3.11 Activación o desactivación del tono de 4.3.5.2 Realización de una pitido..............41 llamada a un contacto rápido..49 3.12 Bloqueo o desbloqueo del teclado.... 41 4.4 Rastreo............
- Page 275 4.12 Llamada directa mediante el ID de radio...61 8.5 Códigos CTCSS y PL/DPL......86 4.13 Ráfaga inversa.......... 61 Garantía limitada de Motorola Solutions...... 93 4.14 Modo de silencio........62 A.1 ¿Qué no cubre la garantía?......93 Configuración de la radio..........63 A.2 Información sobre la garantía.....
- Page 276 Español Esta página se ha dejado en blanco intencionadamente.
- Page 277 Los productos de Motorola Solutions descritos en el presente manual pueden incluir programas informáticos de Motorola Solutions protegidos por derechos de copyright almacenados en memorias de semiconductores o en otro tipo de medios.
- Page 278 Español Esta página se ha dejado en blanco intencionadamente.
- Page 279 Para obtener una lista de las baterías y otros accesorios aprobados por Motorola Solutions, visite el siguiente sitio web: http://www.motorolasolutions.com Enviar comentarios...
- Page 280 Español Esta página se ha dejado en blanco intencionadamente.
- Page 281 Español Precauciones de y agua dulce (es decir, una cucharadita de detergente por cada 4 litros de agua). manipulación • Al limpiar la radio, no utilice un pulverizador de chorro de alta presión porque podrían producirse filtraciones La radio portátil digital de la serie XT600d cumple las de agua en la radio.
- Page 282 Español Esta página se ha dejado en blanco intencionadamente.
- Page 283 Español Introducción Esta guía del usuario describe el funcionamiento de las radios. Es posible que el distribuidor o el administrador del sistema hayan personalizado la radio para satisfacer sus necesidades específicas. Póngase en contacto con el distribuidor o el administrador del sistema para obtener más información.
- Page 284 Español Esta página se ha dejado en blanco intencionadamente.
- Page 285 1 Para reducir el riesgo de lesión, cargue solo baterías cargador de la toma de CA antes de realizar cualquier recargables autorizadas por Motorola Solutions. La tipo de actividad de mantenimiento o limpieza. carga de otras baterías puede provocar explosiones, lesiones personales y daños.
- Page 286 Español • Desconecte el cargador de la toma de corriente extrayendo el enchufe. • Conecte el equipo a una toma de corriente a la que se pueda acceder fácilmente y que esté cerca. • En los equipos con fusibles, los repuestos deben cumplir con los tipos y categorías detallados en las instrucciones del equipo.
- Page 287 Español Descripción general de la radio Este capítulo explica los botones y las funciones para controlar la radio. Enviar comentarios...
- Page 288 Español Botones de control La siguiente tabla explica las funciones de cada botón de la radio: Tabla 1: Tabla de referencia de los botones de control Número Descripción Antena En el modelo XT660d/XT665d, la antena no puede retirarse. Orificio para correa Botón de grabación Pulse el botón para encender y apagar la función de transmisión de grabación.
- Page 289 Español Número Descripción Muestra información sobre el estado de la batería, el estado de encendido, el estado de rastreo y la información de llamada de radio. Altavoz Micrófono Cuando envíe un mensaje, el usuario debe hablar claramente al micrófono. Pantalla LCD Pantalla monocroma con luz de fondo naranja.
- Page 290 La serie XT600d cuenta con una batería de ion-litio con capacidad estándar. Tiene a su disposición otros tipos de baterías. Si desea obtener información adicional, consulte el Tabla 4: Baterías autorizadas por Motorola Solutions en la página Tabla 2: Valor predeterminado para los botones SB1 y SB2 Botones Configuración predeterminada...
- Page 291 Español Botones Configuración predeterminada Mantenga pulsado SB2 Monitor Para describir cómo funciona cada pulsación en una radio: Pulsación corta Pulse y suelte rápidamente. Pulsación larga Mantenga pulsado durante el tiempo programado. Mantener pulsado Mantenga pulsado el botón. NOTA: Es posible que el distribuidor o el administrador del sistema hayan personalizado la radio para satisfacer sus necesidades específicas.
- Page 292 Español Especificaciones de radio La siguiente tabla explica las especificaciones de la radio: Tabla 3: Especificaciones de la radio XT660d/XT665d XT660d XT665d Bandas de frecuencia (MHz) PMR446, digital PMR446 PMR446, digital PMR446, LPD 433-434 0,5 para PMR446 y digital PMR446, Potencia de transmisión (W) 0,01 para LPD Número de canales...
- Page 293 Las baterías Motorola Solutions se han diseñado específicamente para utilizarse con un cargador de Motorola Solutions y viceversa. La carga de las baterías Las radios de la serie XT600d cuentan con baterías de ion- con equipos que no sean de Motorola puede provocar litio disponibles en distintas capacidades que definen la daños en la batería y anular la garantía.
- Page 294 Español 2 Con el logotipo de Motorola Solutions hacia arriba, Instalación de la batería de ion-litio introduzca las pestañas (2) de la parte inferior de la batería en las ranuras (3). Los siguientes pasos explican cómo se instala la batería de ion-litio: 3 Presione el pestillo de la batería (1) hacia la radio...
- Page 295 Español Fuente de alimentación y bandeja de la base de carga para una unidad (SUC) La radio incluye una bandeja de la base de carga (SUC), una fuente de alimentación (también denominada • Alinee el adaptador (1) con las ranuras de la fuente de transformador) y un conjunto de adaptadores.
- Page 296 Español bandeja de la base de carga (SUC) y fuente de 1 Inserte la radio en la base de la funda. Presione la alimentación similar. radio contra la parte trasera de la funda hasta que los ganchos en la funda se introduzcan en el hueco superior de la batería.
- Page 297 Español 3 Inserte la radio en el cargador con la radio hacia la parte delantera, tal y como se muestra. NOTA: Al cargar una batería acoplada a una radio, apague la radio para garantizar una carga completa. Consulte Directrices de uso seguro en la página 15 para obtener más información.
- Page 298 3 Alinee las ranuras en la batería con la alineación de las Cargando Rojo fijo nervaduras de la bandeja de la base de carga (SUC). Carga Verde fijo Tabla 4: Baterías autorizadas por Motorola Solutions finalizada Normalmente, Número de Descripción reubicando la referencia Batería...
- Page 299 Español Medidor de batería Estado Indicador LED Comentarios Batería agotada El medidor de batería, que se encuentra situado en la esquina superior izquierda de la pantalla de radio, indica el Parpadeo una vez Batería baja nivel de batería de esta. en rojo Nivel de la Parpadeo dos...
- Page 300 Español Batería estándar ≤ 4,5 h Batería de gran capacidad ≤ 4,5 h 2.12 Carga de la radio y la batería utilizando un MUC - Accesorio opcional El MUC permite la carga de hasta un máximo de seis radios o baterías. Las baterías pueden cargarse con las radios o retirarse y situarse en el MUC por separado.
- Page 301 Español 5 Inserte la radio o batería en el compartimento de carga (3) con la radio o batería en dirección opuesta a los contactos (2). NOTA: • Puede obtener más información sobre el funcionamiento del MUC en las hojas de instrucciones que lo acompañan.
- Page 302 Español Esta página se ha dejado en blanco intencionadamente.
- Page 303 Español Introducción Ajuste del volumen Gire el control de encendido/apagado/volumen hacia la Esta sección le ayudará a familiarizarse con el derecha para aumentar el volumen o hacia la izquierda funcionamiento básico de la radio. para disminuirlo. NOTA: No coloque la radio demasiado cerca del oído Encendido/apagado de la radio cuando el volumen sea elevado o cuando lo esté...
- Page 304 Español Icon N.º Descripción Pantalla de la radio El número de barras (0-3) indica la carga restante en la batería. El rastreo está activado. VOX/iVOX está habilitado. Durante la activación, sin accesorios VOX, la radio se encuentra en modo iVOX y 11 12 puede hablar por el micrófono sin necesidad de pulsar PTT.
- Page 305 Español NOTA: Icon N.º Descripción La ilustración de la pantalla de radio que se presenta aquí tiene como único objeto mostrar la 6.ii. La radio se está comunicando en una ubicación de los iconos. La pantalla de cada radio llamada privada. puede tener un aspecto diferente (canal y código) en función de los parámetros preprogramados para Indicador de intensidad de la señal...
- Page 306 Español en modo de recepción, esta muestra el icono de intensidad de señal con barras. 1 Suelte el botón PTT y compruebe si hay actividad vocal. NOTA: Los obstáculos que bloquean la ruta de la señal 2 Para responder, mantenga la radio en posición pueden afectar a la señal entrante.
- Page 307 Español interferencias deben ser idénticos en ambas radios. Esto Código de eliminación de interferencias depende del perfil preprogramado de la radio: Estos códigos ayudan a minimizar las interferencias gracias a la variedad de combinaciones de código. Separación Canal actual que utiliza la radio, depende del modelo. Frecuencia Frecuencia que usa la radio para transmitir/recibir.
- Page 308 Español Estado de la radio Indicación del LED VOX/iVOX PTT Muestra rojo fijo para indicar la radio está transmitiendo. Grabando Rojo y verde parpadeante con el ritmo de los latidos cardíacos. Modo de la programación de CPS Verde parpadeante con el ritmo de los latidos cardíacos. Modo clonación Naranja parpadeante dos veces con el ritmo de los latidos cardíacos.
- Page 309 VOX puede desactivarse temporalmente pulsando el botón PTT o retirando el accesorio de audio. NOTA: Póngase en contacto con el punto de venta de Motorola Solutions para pedir accesorios. 3.9.2 Configuración de iVOX 1 Apague la radio. Los siguientes pasos explican cómo configurar iVOX: 2 Abra la tapa del accesorio.
- Page 310 Español EL valor predeterminado es MEDIUM. iVOX se puede 2 Para activar iVOX, pulse el botón PTT mientras configurar con cualquiera de los siguientes valores: enciende la radio. La pantalla muestra VOX. Pulse y desplácese hasta SETTING. NOTA: Pulse brevemente el botón PTT para desactivar Pulse y desplácese hasta VOX LEVEL.
- Page 311 Español Pulse PTT, SB2 y SB1 a la vez mientras enciende la radio Bloqueo o desbloqueo del teclado hasta que escuche un tono alto. Puede bloquear el teclado para evitar modificar la configuración de la radio de forma accidental. Los 3.11 siguientes pasos explican cómo bloquear y desbloquear el Activación o desactivación del tono...
- Page 312 Español 3.13 3 Realice una de las siguientes acciones: Acceso a las opciones del menú • Para acceder a una función, pulse Los siguientes pasos explican cómo acceder a las opciones del menú: • Para salir, pulse NOTA: Pulse brevemente para acceder al menú. La El modo de menú...
- Page 313 Español Funciones avanzadas Tipo de Opciones Valor configuración predeterminad • Configuración RUSSIAN • DUTCH En el menú SETTING, hay algunos elementos con lo que • PORTUGUESE puede cambiar directamente la configuración de la radio sin tener que pasar por CPS. La siguiente tabla explica la •...
- Page 314 Español Los siguientes pasos explican cómo acceder al menú Edición del alias de canal SETTING y establecer su configuración: Los siguientes pasos explican cómo editar el alias de canal: Pulse y desplácese hasta SETTING. Pulse y desplácese hasta CHANNEL EDIT. Pulse y desplácese por la lista de opciones disponibles..
- Page 315 Español 4.2.2 4.2.3 Edición de la frecuencia de canal Edición del código de canal Los siguientes pasos explican cómo editar la frecuencia de Los siguientes pasos explican cómo editar el código de canal: canal: Pulse y desplácese hasta CHANNEL EDIT. Pulse y desplácese hasta CHANNEL EDIT.
- Page 316 Español a todos, la radio debe estar programada para iniciar Contactos una llamada a todos. Este capítulo explica los diferentes tipos de llamadas y 4.3.1 formas de realizar una llamada. Realización de una llamada desde el A través del menú CONTACTS puede acceder a una lista menú...
- Page 317 Español 4.3.2 Funciones Descripción Funciones disponibles en los Al iniciar la solicitud de REMOTE MON contactos monitorización remota, el micrófono y el transmisor de la radio de destino El acceso al ID de contacto desde la lista de contactos se activarán para la monitorización permite al usuario realizar las siguientes funciones.
- Page 318 Español 4.3.3 Realización de una llamada digital con Adición de un contacto nuevo a la lista acceso de marcación rápida de contactos El acceso de marcación rápida permite al usuario realizar Los siguientes pasos explican cómo agregar un contacto una llamada de grupo o privada a un ID predefinido de nuevo a la lista de contactos: forma cómoda;...
- Page 319 Español 4 Pulse el botón programado One Touch Access de Utilice para desplazarse por la lista nuevo para finalizar la transmisión. de opciones. 5 En el tiempo de espera de la llamada, pulse el botón PTT para responder a la llamada en curso. Seleccione los contactos de la radio y pulse 4.3.5 Desplácese hasta QUICK CONTACT y pulse...
- Page 320 Español En la pantalla de inicio, pulse Pulse y utilice para desplazarse por la lista de rastreo. 2 Pulse el número mediante el teclado alfanumérico y pulse el botón PTT para realizar una llamada. 3 Una vez que la lista de rastreo está seleccionada, pulse Rastreo 4 Desplácese hasta SET ACTIVE.
- Page 321 Español conversación con mayor prioridad automáticamente • Para desactivar la prioridad, desplácese hasta cuando está en otra llamada. PRIORITY OFF y pulse Los siguientes pasos explican cómo seleccionar un canal prioritario en una lista de rastreo: 4.4.3 Eliminación de un canal de una lista de Pulse y desplácese hasta SCAN.
- Page 322 Español 3 Una vez que la lista de rastreo está seleccionada, Desplácese hasta DELETE y pulse pulse 6 Realice una de las siguientes acciones: • Para realizar la eliminación, desplácese hasta Desplácese hasta ADD y pulse DELETE?. 5 Desplácese por la lista de rastreo y seleccione el •...
- Page 323 Español La serie XT600d es compatible con la función de Pulse para acceder al menú de mensajes. mensajería de texto. La siguiente tabla explica las opciones y descripciones de los mensajes: Desplácese hasta NEW TEXT y pulse Selecciones Descripciones 4 Utilice el teclado alfanumérico para introducir el Utilice el teclado alfanumérico para NEW TEXT mensaje de texto.
- Page 324 Español • Para volver a la pantalla anterior, desplácese Pulse y desplácese hasta MESSAGE. hasta CANCEL?. • Para ver el mensaje, desplácese hasta REVIEW. Pulse para acceder al menú de mensajes. Pulse para confirmar la selección. Desplácese hasta INBOX y pulse 4.5.3 4 Desplácese por los mensajes de la bandeja de Envío de mensajes de texto rápidos...
- Page 325 Español Pulse para confirmar el envío. Desplácese por la lista de enviados y pulse para realizar la selección. La radio muestra una lista de contactos en la lista de contactos. 5 Realice una de las siguientes acciones: • Para reenviar un mensaje a otro contacto de la 6 Desplácese hasta el contacto deseado y pulse lista de contactos, desplácese hasta FORWARD.
- Page 326 Español transmisión dura más de 3 minutos, la siguiente grabación La función se encuentra en modo de grabación comienza inmediatamente después de la finalización del inactiva cuando no hay ninguna llamada. Siempre registro anterior. Este proceso se repite hasta que la que la radio detecta una transmisión, el modo de transmisión finaliza y el tiempo de grabación total es de 15 grabación graba la conversación automáticamente.
- Page 327 Español • Para bloquear los archivos grabados, desplácese hasta LOCKED. Registro de llamadas • Para realizar la eliminación, desplácese hasta Call Log permite al usuario comprobar el historial de DELETE?. llamadas de la radio. Los siguientes pasos explican cómo • Para volver a la pantalla anterior, desplácese acceder al registro de llamadas: hasta CANCEL?.
- Page 328 Español 4.7.1 Pulse para guardar los detalles. Cómo guardar un contacto del registro de llamadas en la lista de contactos Los siguientes pasos explican cómo guardar contacto del Zona registro de llamadas en la lista de contactos: Una zona es un conjunto de canales. Existen cuatro zonas disponibles, y cada zona consta de diferentes canales.
- Page 329 Español están apagados, y el altavoz de la radio está en silencio. Pulse y desplácese por la lista de zonas. Todos los indicadores de audio y comunicaciones se realizarán a través de accesorios. Los botones PTT y los demás botones de control funcionarán como de costumbre. Cuando se muestre la zona deseada, pulse Póngase en contacto con el distribuidor o el administrador para realizar la selección.
- Page 330 Español NOTA: Mantenga pulsado hasta que escuche un Esta función solo está disponible en el modo digital tono de pitido. y solo funciona con la llamada de grupo. El distribuidor o el administrador del sistema asigna 2 Pulse la contraseña de cuatro dígitos. el botón programable de interrupción y la duración de la interrupción durante un periodo limitado.
- Page 331 Español • Para realizar la interrupción correctamente, pulse En la pantalla de inicio, pulse el botón PTT de la radio con BREAK en la pantalla en el plazo de 3 segundos; la radio que muestra 2 Utilice el teclado alfanumérico para introducir el ID WAIT cambiará...
- Page 332 Español 4.14 Modo de silencio El modo silencioso se activa mediante CPS. Póngase en contacto con el distribuidor o el administrador del sistema para obtener más información sobre esta configuración. Existen tres opciones que se pueden programar en CPS: Selecciones Descripción DESACTIVADO El modo silencioso está...
- Page 333 Español Configuración de la radio Configuración mediante CPS Este capítulo explica cómo configurar la radio. NOTA: Es posible que el distribuidor o el administrador del sistema hayan personalizado la radio para satisfacer sus necesidades específicas. Consulte con el distribuidor o administrador del sistema cómo se ha programado la radio.
- Page 334 R2R: vende por separado. Para obtener más información, póngase en contacto con su punto de venta Motorola Solutions. Clonación de radios Puede clonar los perfiles de radios de la serie XT600d desde una de origen a una de destino utilizando alguno de estos métodos:...
- Page 335 Español Figura 4: Convertidor USB Instrucciones de uso Los siguientes pasos explican las instrucciones de funcionamiento de la clonación de la radio mediante R2R: 1 Apague las radios y prepare el siguiente equipo: • Una batería completamente cargada en cada radio.
- Page 336 Español NOTA: de origen es un modelo que cuenta con pantalla, Durante el proceso de clonación, el SUC no mostrará el mensaje Pass o Fail en la pantalla va a recibir alimentación alguna. Por lo tanto, (asimismo, oirá un tono en un plazo de 5 segundos). las baterías no se cargarán.
- Page 337 NOTA: Este cable de clonación se ha diseñado para funcionar únicamente con los SUC RLN6175 y PMLN6394 de Motorola Solutions. Al solicitar el cable de clonación, utilice la ref. HKKN4028_. Consulte Accesorios en la página 95 para obtener más...
- Page 338 Español Esta página se ha dejado en blanco intencionadamente.
- Page 339 Español Solución de problemas La siguiente tabla explica los métodos de solución de problemas si se ha producido el síntoma: Síntomas y soluciones Si... Entonces... No hay alimentación Recargue o sustituya la batería de ion litio. Unas temperaturas de funcionamiento extremas pueden afectar a la duración de la batería.
- Page 340 Español Si... Entonces... Asegúrese de que la radio se encuentra en la frecuencia y el código adecuados durante la transmisión. La calidad del sonido no es buena Puede que las configuraciones de la radio no coincidan correctamente. Compruebe de nuevo las frecuencias, los códigos y los anchos de banda para asegurarse de que son idénticos en todas las radios.
- Page 341 Español Si... Entonces... Asegúrese de que las radios cuentan con los mismos valores de configuración en materia de canal, frecuencia y código de eliminación de interferencias. Recargue, sustituya o coloque de nuevo las baterías. Consulte Acerca de la batería de ion-litio en la página Los obstáculos, así...
- Page 342 Español Si... Entonces... El indicador LED de la base de carga no parpadea Compruebe que la radio o batería están insertadas correctamente y los contactos de la batería y del cargador, con el fin de asegurarse de que están limpios y que las clavijas de carga se han insertado correctamente.
- Page 343 Español Si... Entonces... Consulte la Carga de la radio con la bandeja de la base de carga (SUC) en la página 26 y la Carga de una batería independiente en la página Compruebe los indicadores LED del cargador para comprobar si la batería tiene algún problema. Consulte Indicadores LED de la bandeja de la base de carga en la página...
- Page 344 Español Esta página se ha dejado en blanco intencionadamente.
- Page 345 Español Utilización y mantenimiento Este capítulo muestra el uso correcto de la radio: Precauciones Utilice un paño suave húmedo para No utilice alcohol ni soluciones de No la sumerja en agua limpiar el exterior limpieza Si la radio se moja... No utilice la radio hasta que no esté...
- Page 346 Español Esta página se ha dejado en blanco intencionadamente.
- Page 347 Los gráficos de esta sección ofrecen información sobre códigos y frecuencias. Estos son muy útiles cuando se utilizan las radios bidireccionales Motorola Solutions de la serie XT600d con otras radios comerciales. Tabla 7: Frecuencia de canal predeterminada y código de eliminación de interferencias de la serie XT660d...
- Page 348 Español Zona Nombre de canal Frecuencia (MHz) códigos CHAN 08 446,09375 1-67,0 Hz CHAN 09 446,00625 121–DPL 754 CHAN 10 446,01875 121–DPL 754 CHAN 11 446,03125 121–DPL 754 CHAN 12 446,04375 121–DPL 754 CHAN 13 446,05625 121–DPL 754 CHAN 14 446,06875 121–DPL 754 CHAN 15...
- Page 349 Español Zona Nombre de canal Frecuencia (MHz) códigos CHAN 05 446,05625 1-67,0 Hz CHAN 06 446,06875 1-67,0 Hz CHAN 07 446,08125 1-67,0 Hz CHAN 08 446,09375 1-67,0 Hz CHAN 09 433,07500 1-67,0 Hz CHAN 10 433,30000 1-67,0 Hz CHAN 11 433,55000 1-67,0 Hz CHAN 12...
- Page 350 El gráfico de esta sección ofrece información sobre códigos y frecuencias. Este gráfico es muy útil cuando se utilizan las radios bidireccionales Motorola Solutions de la serie XT600d con otras radios comerciales. Tabla 9: Frecuencia de canal predeterminada y código de eliminación de interferencias de la serie XT660d...
- Page 351 Español Zona Nombre de canal Frecuencia (MHz) códigos CHAN 28 446,171875 Código de color-12 CHAN 29 446,178125 Código de color-13 CHAN 30 446,184375 Código de color-14 CHAN 31 446,190625 Código de color-15 CHAN 32 446,196875 Código de color-16 Tabla 10: Frecuencia de canal predeterminada y código de eliminación de interferencias de la serie XT665d Zona Nombre de canal Frecuencia (MHz)
- Page 352 Español Zona Nombre de canal Frecuencia (MHz) códigos CHAN 25 446,053125 Código de color-9 CHAN 26 446,059375 Código de color-10 CHAN 27 446,065625 Código de color-11 CHAN 28 446,071875 Código de color-12 CHAN 29 446,078125 Código de color-13 CHAN 30 446,084375 Código de color-14 CHAN 31...
- Page 353 Español Lista de frecuencias completa de XT660d PRECAUCIÓN: *Solo las frecuencias analógicas de 446,0 a 446,1 MHz están disponibles de forma predeterminada. Las frecuencias analógicas de 446,1 a 446,2 MHz solo se deben utilizar en aquellos países en los que estas frecuencias estén permitidas por las autoridades gubernamentales.
- Page 354 Español Frecuencia digital PMR446 (MHz) *446.009375 *446.059375 446,109375 446,159375 *446.015625 *446.065625 446,115625 446,165625 *446.021875 *446.071875 446,121875 446,171875 *446.028125 *446.078125 446,128125 446,178125 *446.034375 *446.084375 446,134375 446,184375 *446.040625 *446.090625 446,140625 446,190625 *446.046875 *446.096875 446,146875 446,196875 Lista de frecuencias completa de XT665d Frecuencia PMR446 (MHz) 446,00625 446,03125 446,05625...
- Page 355 Español Frecuencia digital PMR446 (MHz) 446,009375 446,034375 446,059375 446,084375 446,015625 446,040625 446,065625 446,090625 446,021875 446,046875 446,071875 446,096875 Frecuencia LPD433 (MHz) 433,07500 433,52500 433,97500 434,42500 433,10000 433,55000 434,00000 434,45000 433,12500 433,57500 434,02500 434,47500 433,15000 433,60000 434,05000 434,50000 433,17500 433,62500 434,07500 434,52500 433,20000 433,65000 434,10000...
- Page 356 Español Frecuencia LPD433 (MHz) 433,35000 433,80000 434,25000 434,70000 433,37500 433,82500 434,27500 434,72500 433,40000 433,85000 434,30000 434,75000 433,42500 433,87500 434,32500 434,77500 433,45000 433,90000 434,35000 433,47500 433,92500 434,37500 433,50000 433,95000 434,40000 Códigos CTCSS y PL/DPL Tabla 11: Códigos CTCSS CTCSS CTCSS 67,0 136,5 71,9 141,3...
- Page 357 Español CTCSS CTCSS 79,7 156,7 82,5 162,2 85,4 167,9 88,5 173,8 91,5 179,9 94,8 186,2 97,4 192,8 100,0 203,5 103,5 210,7 107,2 218,1 110,9 225,7 114,8 233,6 118,8 241,8 123,0 250,3 127,3 122 (*) 69,3 131,8 Enviar comentarios...
- Page 358 Español Tabla 12: Códigos PL/DPL Código Código Código DPL 69 invertido DPL 70 invertido DPL 71 invertido DPL 72 invertido DPL 73 invertido DPL 74 invertido DPL 75 invertido DPL 76 invertido DPL 77 invertido DPL 78 invertido DPL 79 invertido DPL 80 invertido DPL 81 invertido DPL 82 invertido...
- Page 359 Español Código Código Código DPL 84 invertido DPL 85 invertido DPL 86 invertido DPL 87 invertido DPL 88 invertido DPL 89 invertido DPL 90 invertido DPL 91 invertido DPL 92 invertido PL personalizado DPL 93 invertido PL personalizado DPL 94 invertido PL personalizado DPL 95 invertido PL personalizado...
- Page 360 Español Código Código Código DPL 40 invertido DPL 100 invertido DPL 41 invertido DPL 101 invertido DPL 42 invertido DPL 102 invertido DPL 43 invertido DPL 103 invertido DPL 44 invertido DPL 104 invertido DPL 45 invertido DPL 105 invertido DPL 46 invertido DPL 106 invertido DPL 47 invertido...
- Page 361 Español Código Código Código DPL 56 invertido DPL 116 invertido DPL 57 invertido DPL 117 invertido DPL 58 invertido DPL 118 invertido DPL 59 invertido DPL 119 invertido DPL 60 invertido DPL 120 invertido DPL 61 invertido DPL 121 invertido DPL 62 invertido DPL 122 invertido DPL 63 invertido...
- Page 362 Español Esta página se ha dejado en blanco intencionadamente.
- Page 363 El minorista o distribuidor autorizado de Motorola Solutions • Los defectos o daños derivados de un uso incorrecto, que le vendió la radio bidireccional Motorola Solutions o los un accidente o una negligencia. accesorios originales asumirá las reclamaciones de •...
- Page 364 Español Esta página se ha dejado en blanco intencionadamente.
- Page 365 Español Accesorios Tabla 15: Cables Núm. Descripción referencia Tabla 13: Accesorios de audio HKKN4028_ Cable de clonación de radio a radio Núm. Descripción HKKN4027_ Cable de programación CPS referencia HKLN4601_ Kit de vigilancia con micrófono Tabla 16: Cargadores integrado y PTT HKLN4599_ Auricular en forma de D con micrófono Núm.
- Page 366 Español Tabla 17: Accesorios de transporte Núm. Descripción referencia PMLN7655_ Funda de transporte de la serie XT600d PMLN7709_ Funda de transporte de cuero de la serie XT600d NOTA: Es posible que ciertos accesorios no estén disponibles en el momento de la compra. Póngase en contacto con el punto de venta de Motorola o visite http://www.motorolasolutions.com...
- Page 367 Français Sommaire 2.8 Charge d'une batterie autonome....28 2.9 Indicateurs LED du chargeur à support..28 2.10 Indicateur du niveau de la batterie.... 30 Copyrights relatifs aux logiciels informatiques....7 2.11 Durée de charge estimée......30 Informations de sécurité importantes......9 2.12 Charge de la radio et de la batterie avec Précautions d'utilisation..........11 un MUC - accessoire en option......
- Page 368 Français 3.12 Verrouillage et déverrouillage du clavier... 41 4.4.1 Sélection d'une liste de balayage.. 50 3.13 Accès aux options de menu...... 42 4.4.2 Sélection du canal prioritaire dans une liste de balayage..... 50 Chapitre 4: Fonctions avancées........43 4.4.3 Suppression d'un canal d'une 4.1 Configuration..........
- Page 369 4.12 Appel direct avec l'ID de radio....61 8.5 Codes CTCSS et PL/DPL......86 4.13 Inversion rafale.......... 61 Annexe A: Garantie limitée Motorola Solutions...93 4.14 Mode Silencieux........62 A.1 Éléments non couverts par la garantie..93 Chapitre 5: Configuration de la radio......63 A.2 Informations de garantie......
- Page 370 Français Cette page a été laissée vide de manière intentionnelle.
- Page 371 Les produits Motorola Solutions décrits dans ce manuel peuvent inclure des programmes informatiques protégés par copyright de Motorola Solutions et stockés dans des mémoires à semi-conducteurs ou sur tout autre support. La législation des États-Unis, ainsi que celle d'autres pays, réservent à...
- Page 372 Français Cette page a été laissée vide de manière intentionnelle.
- Page 373 à l'exposition aux fréquences radio, ainsi que des informations sur le contrôle de conformité aux normes et réglementations applicables. Pour consulter la liste des batteries et autres accessoires agréés par Motorola Solutions, visitez le site Web : http://www.motorolasolutions.com Envoyer un commentaire...
- Page 374 Français Cette page a été laissée vide de manière intentionnelle.
- Page 375 Français Précautions d'utilisation ATTENTION: Ne tentez jamais de démonter une radio. Toute tentative d'ouverture de la radio peut Les radios portatives numériques série XT600d sont endommager les joints et compromettre son conformes aux spécifications IP55 et peuvent donc résister étanchéité. Toute opération de maintenance doit à...
- Page 376 Français Cette page a été laissée vide de manière intentionnelle.
- Page 377 Français Introduction Ce guide de l'utilisateur explique le fonctionnement de vos radios. Votre revendeur ou administrateur système peut avoir adapté votre radio à vos besoins spécifiques. Consultez votre fournisseur ou administrateur système pour en savoir plus. Vous pouvez consulter votre fournisseur ou votre administrateur système pour obtenir les réponses aux questions suivantes : •...
- Page 378 Français Cette page a été laissée vide de manière intentionnelle.
- Page 379 • le chargeur, endommagé de quelque manière que ce soit. Confiez-le • la batterie, à un technicien de maintenance Motorola Solutions • la radio connectée à la batterie. agréé. 1 Pour réduire le risque de blessure, chargez uniquement 6 Ne démontez pas le chargeur ; il ne peut pas être des batteries rechargeables agréées par...
- Page 380 Français Consignes de sécurité lors du • Assurez-vous que personne ne puisse marcher ou trébucher sur le câble et que le câble ne puisse être ni fonctionnement mouillé, endommagé ou tendu. • Éteignez la radio pendant la charge. • Le chargeur n'est pas adapté à une utilisation en extérieur.
- Page 381 Français Présentation de la radio Ce chapitre présente les boutons et fonctions permettant de contrôler la radio. Envoyer un commentaire...
- Page 382 Français Boutons de commande Le tableau suivant présente les fonctions des boutons de la radio : Tableau 1: Tableau de référence des boutons de commande Nombre Description Antenne Pour les modèles XT660d/XT665d, l'antenne n'est pas amovible. Orifice d'insertion de la dragonne Bouton d'enregistrement Appuyez sur le bouton pour activer ou désactiver la fonction de transmission de l'enregistrement.
- Page 383 Français Nombre Description Indique l'état de la batterie, l'état de mise sous tension, les informations d'appel radio et l'état du balayage. Haut-parleur Microphone L'utilisateur doit parler distinctement dans le microphone lors de l'envoi d'un message. Écran LCD Écran monochrome avec rétroéclairage orange. Boutons de navigation/Menu/OK Appuyez sur pour entrer dans un menu ou confirmer la sélection.
- Page 384 La radio série XT600d est fournie avec une batterie Li-Ion de capacité standard. D'autres batteries peuvent être disponibles. Pour plus d'informations, consultez la section Tableau 4: Batteries agréées par Motorola Solutions à la page Tableau 2: Paramètres par défaut pour les boutons SB1 et SB2 Boutons Paramètre par défaut...
- Page 385 Français Boutons Paramètre par défaut Pression courte sur SB2 Balayage Pression longue sur SB2 Écoute Pour décrire la fonction de chaque pression sur une radio : Pression courte Vous appuyez sur un bouton puis le relâchez immédiatement. Pression longue Vous appuyez sur le bouton et le maintenez enfoncé pendant la durée programmée. Maintien de la touche enfoncée Vous maintenez le bouton enfoncé.
- Page 386 Français Spécifications de la radio Le tableau suivant présente les spécifications de la radio : Tableau 3: Spécifications des radios XT660d/XT665d XT660d XT665d Bande de fréquences (MHz) PMR446, digital PMR446 PMR446, digital PMR446, LPD 433-434 0,5 pour PMR446 et digital PMR446, Puissance d'émission (W) 0,01 pour LPD Nombre de canaux...
- Page 387 Batteries et chargeurs Les batteries Motorola Solutions sont spécialement conçues pour être utilisées avec un chargeur Motorola Solutions et inversement. La charge de batteries Les radios série XT600d offrent des batteries lithium-ion avec un appareil autre que Motorola Solutions peut (Li-Ion), fournies avec différentes capacités qui définissent...
- Page 388 Français 2 Le logo Motorola Solutions orienté vers le haut, Installation d'une batterie Li-Ion placez les languettes (2) situées au bas de la batterie dans les fentes (3). Les étapes suivantes expliquent comment installer une batterie Li-Ion : 3 Appuyez sur le loquet de la batterie (1) vers la radio, jusqu'à...
- Page 389 Français Alimentation et chargeur à support pour unité unique (SUC) Votre radio est fournie avec un chargeur à support SUC, un bloc d'alimentation (également appelé transformateur) et un jeu d'adaptateurs. • Alignez l'adaptateur (1) sur les rainures du bloc Vous pouvez changer de bloc d'alimentation en fonction d'alimentation (2) jusqu'à...
- Page 390 Placez la batterie (fixée à la radio) sur un chargeur à support SUC ou un chargeur pour unités multiples (MUC) agréé Motorola Solutions. 1 Insérez la radio dans la base de l'étui. Poussez la radio contre l'arrière de l'étui, jusqu'à ce que ses...
- Page 391 Français 2 Insérez le connecteur du bloc d'alimentation (1) dans Charge de la radio avec le chargeur le port situé sur le côté du chargeur à support SUC (2). à support SUC 3 Insérez la radio dans le chargeur, face vers l'avant, Les étapes suivantes expliquent comment charger la radio comme illustré.
- Page 392 Français Tableau 4: Batteries agréées par Motorola Solutions Charge d'une batterie autonome Référence Description Pour charger uniquement la batterie, procédez comme PMNN4434_R Batterie Li-Ion standard suit : PMNN4453_R Batterie Li-Ion haute capacité Indicateurs LED du chargeur à support Le tableau suivant présente chaque état et indicateur LED : Tableau 5: Indicateur LED du chargeur État...
- Page 393 Français État Indicateur LED Commentaires État Indicateur LED Commentaires Niveau de Clignote en charge de la repositionneme orange deux fois Batterie Clignotement vert nt de la batterie batterie moyen défectueuse rapide résout Niveau de Clignote en vert généralement charge de la trois fois ce problème.
- Page 394 • Vérifiez que la batterie utilisée est bien répertoriée dans Durée de charge estimée Tableau 4: Batteries agréées par Motorola Solutions à la page La section suivante présente les solutions de charge et les durées de charge estimées de la batterie. Pour plus d'informations, reportez-vous à...
- Page 395 Français six compartiments de charge peut contenir une radio (avec 5 Insérez la radio ou la batterie dans le compartiment ou sans étui) ou une batterie, mais pas les deux à la fois. de charge (3), la radio ou la batterie non tournées vers les contacts (2).
- Page 396 Français Cette page a été laissée vide de manière intentionnelle.
- Page 397 Français Mise en route Réglage du volume Tournez le bouton Marche/Arrêt/Volume dans le sens des Cette section vous aide à vous familiariser avec le aiguilles d'une montre pour augmenter le volume ou dans fonctionnement de base de la radio. le sens inverse des aiguilles d'une montre pour le réduire. REMARQUE: Ne placez pas la radio trop près de votre oreille Mise sous/hors tension de la radio...
- Page 398 Français Icôn N° Description Écran de la radio Le nombre de barres affichées (0 à 3) représente le niveau de charge actuel de la batterie. Le balayage est activé. VOX/iVOX est activé. Pendant l'activation, lorsqu'aucun 11 12 accessoire VOX n'est utilisé, la radio est en mode iVOX et vous pouvez parler dans le microphone sans appuyer sur le bouton PTT.
- Page 399 Français Icôn Icôn N° Description N° Description La radio reçoit au moins un message Indique la fréquence actuelle du canal. texte non lu. Indique le code CTCSS/DPL actuel. 6.i. La radio est en cours de communication dans un appel de REMARQUE: groupe.
- Page 400 Français la LED reste allumée en orange. L'icône de l'indicateur de Réception d'un appel puissance du signal peut aller de 1 (puissance la Les étapes suivantes expliquent comment recevoir un plus faible) à 3 (puissance la plus puissante), selon la appel : couverture de la réception radio.
- Page 401 Français vous obtiendrez une portée de transmission moyenne. Canal Vous ne bénéficierez que d'une portée minimale lorsque Canal actuel que la radio utilise selon le modèle de des feuillages denses et des montagnes obstruent le radio. chemin de communication. Fréquence Pour établir une véritable communication bidirectionnelle, Fréquence utilisée pour émettre et recevoir.
- Page 402 Français État de la radio Indicateur LED Mode VOX/iVOX Double pulsation rouge. VOX/iVOX PTT Rouge fixe pour indiquer que la radio émet. Enregistrement Pulsation rouge et verte. Mode de programmation CPS Pulsation verte. Mode Clonage Double pulsation orange. Clonage en cours Orange fixe jusqu'à...
- Page 403 Pour désactiver temporairement la fonction VOX, appuyez sur le bouton PTT ou retirez l'accessoire audio. REMARQUE: Contactez votre point de vente Motorola Solutions pour commander des accessoires. 1 Éteignez la radio. 2 Ouvrez le couvercle de l'accessoire. Envoyer un commentaire...
- Page 404 Français 3.9.2 Réglage de la sensibilité iVOX Configuration de la fonction iVOX La sensibilité de l'accessoire de la radio ou du microphone Les étapes suivantes expliquent comment configurer la peut être réglée pour s'adapter à différents fonction iVOX : environnements. La sensibilité iVOX peut être programmée avec le logiciel Customer Programming Software (CPS) ou 1 Éteignez la radio.
- Page 405 Français 3.10 3.12 Rétablir les valeurs par défaut Verrouillage et déverrouillage du clavier Cette fonction rétablit toutes les valeurs par défaut des fonctions de la radio. Vous pouvez verrouiller le clavier pour éviter de modifier Appuyez simultanément sur PTT, SB2 et SB1 tout en accidentellement les réglages de votre radio.
- Page 406 Français • CHANNEL EDIT Maintenez le bouton enfoncé pendant • CONTACTS 4 secondes. • SCAN • MESSAGE L'icône de verrouillage disparaît lorsque le clavier et les boutons latéraux sont accessibles. • RECORDING • CALL LOG REMARQUE: • Vous ne pouvez pas verrouiller le bouton PTT à ZONE l'aide de cette fonction.
- Page 407 Français Fonctions avancées Types de Options Valeur par paramètres défaut • DUTCH Configuration • PORTUGUESE • GERMAN Dans le menu SETTING, vous pouvez définir quelques éléments afin de modifier directement la configuration de la • POLISH radio sans passer par le logiciel CPS. Le tableau suivant •...
- Page 408 Français Appuyez sur et parcourez la liste des options Appuyez sur pour accéder à la zone disponibles. souhaitée. 3 Lorsque l'écran affiche l'alias du canal souhaité, Utilisez pour faire votre choix. appuyez sur et accédez à l'option CHAN ALIAS. Modification de canal Appuyez sur et saisissez les lettres ou les chiffres requis.
- Page 409 Français Appuyez sur pour accéder à la zone Appuyez sur et accédez à l'option CHANNEL souhaitée. EDIT. 3 Lorsque l'écran affiche le nom du canal souhaité, Appuyez sur pour accéder à la zone appuyez sur et accédez à l'option RX/TX souhaitée.
- Page 410 Français radio doit être programmée pour lancer un appel Contacts général. Ce chapitre décrit les différents types d'appels et 4.3.1 différentes façons de passer un appel. Appel à partir du menu CONTACTS Par le biais du menu CONTACTS, vous pouvez accéder à Les étapes suivantes expliquent comment passer un appel la liste des contacts.
- Page 411 Français suivantes. Le tableau suivant présente les fonctions Fonctions Description disponibles et leur description : Envoie un nouveau message texte ou SEND message texte rapide. MESSAGE Fonctions Description Permet de supprimer l'ID de contact. DELETE Affiche l'ID de contact. VIEW Définit l'ID de contact actuel comme QUICK 4.3.3...
- Page 412 Français 2 Appuyez sur le bouton latéral programmé pour Saisissez l'alias du contact et appuyez sur l'accès par numérotation rapide. pour confirmer le nouveau nom. La LED rouge s'allume sans clignoter. 4.3.4 3 Attendez que la tonalité Autorisation se termine (si Appel numérique avec accès par elle est activée) et parlez.
- Page 413 Français 4.3.5.1 Appuyez sur pour confirmer la sélection. Modification d'un contact rapide La radio affiche pour indiquer qu'elle est allumée. Les étapes suivantes expliquent comment modifier un contact rapide : 4.3.5.2 Appel de contact rapide Appuyez sur et accédez à CONTACTS. Les étapes suivantes expliquent comment passer un appel de contact rapide : Utilisez...
- Page 414 Français changer de canal. Une fois la conversation terminée, la Appuyez sur pour confirmer la sélection. radio attend 3 secondes avant de reprendre le balayage. La radio affiche pour indiquer qu'elle est allumée. 4.4.1 Sélection d'une liste de balayage REMARQUE: Vous ne pouvez sélectionner qu'un seul groupe à...
- Page 415 Français 3 Une fois la liste de balayage sélectionnée, appuyez Appuyez sur et utilisez pour faire défiler la liste de balayage. 4 Accédez à CURRENT CHAN/d'autres alias de canal 3 Une fois la liste de balayage sélectionnée, appuyez définis dans la liste de balayage et appuyez sur 4 Accédez à...
- Page 416 Français 4.4.4 Ajout d'un canal à une liste de Message balayage REMARQUE: Cette fonction est uniquement disponible en mode Les étapes suivantes expliquent comment ajouter un canal numérique. à une liste de balayage : La série XT600d prend en charge la fonction de messages texte.
- Page 417 Français 4.5.1 6 Faites défiler la liste jusqu'au contact souhaité et Création d'un message texte appuyez sur pour envoyer le message. Les étapes suivantes expliquent comment créer un La radio affiche SENT. message texte : 4.5.2 Appuyez sur et accédez à MESSAGE. Répondre à...
- Page 418 Français Envoi d'un message texte rapide 5 Effectuez l'une des opérations suivantes : • Pour répondre à l'expéditeur par message texte, Les étapes suivantes expliquent comment envoyer un accédez à QUICK REPLY et sélectionnez NEW message texte rapide : TEXT. •...
- Page 419 Français 6 Faites défiler la liste jusqu'au contact souhaité et 5 Effectuez l'une des opérations suivantes : • Pour transférer un message à un autre contact appuyez sur pour envoyer le message. de la liste de contacts, sélectionnez FORWARD. La radio affiche SENT. •...
- Page 420 Français L'opération se répète jusqu'à la fin de la transmission et La fonction est en mode d'enregistrement passif l'enregistrement total est de 15 minutes. lorsqu'il n'y a aucun appel. Lorsque la radio détecte une transmission, le mode d'enregistrement enregistre automatiquement la conversation. 4.6.1 Démarrage de l'enregistrement 4.6.2...
- Page 421 Français • Pour relire l'enregistrement, sélectionnez 3 Accédez à l'option TIME LEFT et appuyez sur PLAYBACK. . Le nombre de minutes disponibles pour • Pour verrouiller les fichiers enregistrés, enregistrement s'affiche sur l'écran de la radio. sélectionnez LOCKED. • Pour supprimer un message, sélectionnez DELETE?.
- Page 422 Français • Pour afficher la liste des appels sortants, accédez Appuyez sur et utilisez le clavier à l'option OUTGOING. alphanumérique pour saisir l'alias du contact. 4.7.1 Enregistrement d'un contact à partir du Appuyez sur pour enregistrer les informations. journal d'appels vers la liste de contacts Les étapes suivantes expliquent comment enregistrer un Zone...
- Page 423 Français Les étapes suivantes expliquent comment sélectionner une 4.10 zone : Mode discret Le mode discret est activé à l'aide du logiciel CPS. Une fois Appuyez sur et accédez à l'option ZONE. que la radio est en mode discret, l'écran et la LED de la radio s'éteignent et le haut-parleur de la radio est coupé.
- Page 424 Français 4.10.2 REMARQUE: Désactivation du mode discret Elle est uniquement disponible en mode numérique et s'applique seulement aux appels de groupe. Les étapes suivantes expliquent comment désactiver le Le bouton programmable d'interruption et la période mode discret : d'interruption autorisée sont définis par votre revendeur ou votre administrateur système.
- Page 425 Français • Pour réussir l'interruption, appuyez sur le bouton 2 Saisissez l'ID de radio à l'aide du clavier PTT de la radio dans les 3 secondes après alphanumérique. l'affichage du message BREAK. La radio indiquant WAIT affiche ensuite COMPLETE!. 3 Appuyez sur le bouton PTT pour lancer un appel. •...
- Page 426 Français 4.14 Mode Silencieux Le mode Silencieux est activé à l'aide du logiciel CPS. Pour plus d'informations, veuillez consulter votre fournisseur ou votre administrateur système. Il existe trois sélections programmables avec le logiciel CPS : Sélections Description Le mode Silencieux est désactivé. Accessoires Le signal audio est dirigé...
- Page 427 Français Configuration de la radio Configuration avec le logiciel CPS Ce chapitre explique comment configurer la radio. REMARQUE: Votre revendeur ou administrateur système peut avoir adapté votre radio à vos besoins spécifiques. Consultez votre revendeur ou administrateur système pour déterminer comment la radio a été programmée.
- Page 428 Voici les types de câbles utilisés pour le clonage R2R : REMARQUE: (*) le câble de programmation CPS HKKN4027_ est un accessoire vendu séparément. Contactez votre point de vente Motorola Solutions pour plus d'informations. Clonage de radios Vous pouvez cloner des profils de radio série XT600d depuis une radio source vers une radio cible à...
- Page 429 Français • deux chargeurs SUC pour le clonage des radios série XT600d. 2 Débranchez tous les câbles (câbles d'alimentation ou USB) des chargeurs SUC. Figure 2: Câble CPS 3 Raccordez le câble de clonage au convertisseur USB, branchez une extrémité du connecteur mini- USB du câble de clonage au premier chargeur SUC et l'autre extrémité...
- Page 430 Français b Patientez 3 secondes avant de relâcher les 2 Vérifiez la connexion du câble de clonage sur les boutons ; vous devez entendre le signal deux chargeurs. « Cloning ». 3 Vérifiez que la batterie est correctement enclenchée 6 Placez la radio source dans le chargeur SUC. sur la radio.
- Page 431 Français REMARQUE: Ce câble de clonage est conçu pour fonctionner exclusivement avec des chargeurs SUC Motorola Solutions compatibles RLN6175 et PMLN6394. Lorsque vous commandez le câble de clonage, indiquez la référence HKKN4028_. Voir Accessoires à la page 95 pour plus d'informations sur les accessoires.
- Page 432 Français Cette page a été laissée vide de manière intentionnelle.
- Page 433 Français Dépannage Le tableau suivant présente les méthodes de dépannage à suivre en fonction des symptômes observés : Symptôme et solutions Si... Alors... Pas d'alimentation Rechargez ou remplacez la batterie au lithium-ion. Des températures de fonctionnement extrêmes peuvent affecter son autonomie. Voir À...
- Page 434 Français Si... Alors... Assurez-vous que la radio utilise les bons code et fréquence lors de la transmission. Qualité audio insuffisante Les paramètres radio peuvent ne pas s'associer correctement. Vérifiez à nouveau les fréquences, codes et bandes passantes pour vous assurer qu'ils sont identiques pour toutes les radios.
- Page 435 Français Si... Alors... Vérifiez que les radios utilisent les mêmes paramètres de canal, fréquence et code de réduction des interférences. Rechargez, remplacez et/ou repositionnez les batteries. Voir À propos de la batterie Li-Ion standard à la page Les obstacles et utilisations en intérieur ou en véhicule peuvent causer des interférences.
- Page 436 Français Si... Alors... Le voyant LED du chargeur à support ne clignote Vérifiez que la radio/batterie est correctement insérée pas. ainsi que les contacts de la batterie/du chargeur afin de vous assurer qu'ils sont propres et que la broche de chargement est correctement insérée. Voir Charge de la radio à...
- Page 437 Français Si... Alors... Vérifiez les indicateurs LED du chargeur pour voir si la batterie présente un problème. Voir Indicateurs LED du chargeur à support à la page Envoyer un commentaire...
- Page 438 Français Cette page a été laissée vide de manière intentionnelle.
- Page 439 Français Utilisation et entretien Ce chapitre explique comment utiliser correctement la radio : Précautions Utilisez un chiffon doux pour N'utilisez jamais d'alcool ni de N'immergez pas l'appareil dans l'eau. nettoyer l'extérieur. détergents. Si la radio est immergée dans l'eau, Éteignez la radio et retirez les N'utilisez pas la radio tant qu'elle Séchez avec un chiffon doux.
- Page 440 Français Cette page a été laissée vide de manière intentionnelle.
- Page 441 Les graphiques de cette section offrent des informations sur les fréquences et codes. Consultez ces tableaux lorsque vous utilisez des radios bidirectionnelles Motorola Solutions série XT600d avec d'autres radios professionnelles. Tableau 7: Fréquence de canal par défaut et code de réduction des interférences pour les radios XT660d...
- Page 442 Français Zone Nom canal Fréquence (MHz) Codes CANAL 08 446.09375 1-67,0 Hz CANAL 09 446.00625 121-DPL 754 CANAL 10 446.01875 121-DPL 754 CANAL 11 446.03125 121-DPL 754 CANAL 12 446.04375 121-DPL 754 CANAL 13 446.05625 121-DPL 754 CANAL 14 446.06875 121-DPL 754 CANAL 15 446.08125...
- Page 443 Français Zone Nom canal Fréquence (MHz) Codes CANAL 05 446.05625 1-67,0 Hz CANAL 06 446.06875 1-67,0 Hz CANAL 07 446.08125 1-67,0 Hz CANAL 08 446.09375 1-67,0 Hz CANAL 09 433.07500 1-67,0 Hz CANAL 10 433.30000 1-67,0 Hz CANAL 11 433.55000 1-67,0 Hz CANAL 12 433.80000...
- Page 444 Le tableau de cette section fournit des informations sur les fréquences et les codes. Consultez ce tableau lorsque vous utilisez des radios bidirectionnelles Motorola Solutions série XT600d avec d'autres radios professionnelles. Tableau 9: Fréquence de canal par défaut et code de réduction des interférences pour les radios XT660d...
- Page 445 Français Zone Nom canal Fréquence (MHz) Codes CANAL 28 446.171875 Code couleur–12 CANAL 29 446.178125 Code couleur–13 CANAL 30 446.184375 Code couleur–14 CANAL 31 446.190625 Code couleur–15 CANAL 32 446.196875 Code couleur–16 Tableau 10: Fréquence de canal par défaut et code de réduction des interférences pour les radios XT665d Zone Nom canal Fréquence (MHz)
- Page 446 Français Zone Nom canal Fréquence (MHz) Codes CANAL 25 446.053125 Code couleur–9 CANAL 26 446.059375 Code couleur–10 CANAL 27 446.065625 Code couleur–11 CANAL 28 446.071875 Code couleur–12 CANAL 29 446.078125 Code couleur–13 CANAL 30 446.084375 Code couleur–14 CANAL 31 446.090625 Code couleur–15 CANAL 32 446.096875...
- Page 447 Français Liste de fréquence complète pour les radios XT660d AVERTISSEMENT: *Seules les fréquences analogiques de 446,0 à 446,1 MHz sont disponibles par défaut. Les fréquences analogiques de 446,1 à 446,2 MHz doivent être utilisées uniquement dans les pays où ces fréquences sont autorisées par les autorités gouvernementales.
- Page 448 Français Fréquence digital PMR446 (MHz) *446.009375 *446.059375 446.109375 446.159375 *446.015625 *446.065625 446.115625 446.165625 *446.021875 *446.071875 446.121875 446.171875 *446.028125 *446.078125 446.128125 446.178125 *446.034375 *446.084375 446.134375 446.184375 *446.040625 *446.090625 446.140625 446.190625 *446.046875 *446.096875 446.146875 446.196875 Liste de fréquence complète pour les radios XT665d Fréquence PMR446 (MHz) 446.00625 446.03125...
- Page 449 Français Fréquence digital PMR446 (MHz) 446.009375 446.034375 446.059375 446.084375 446.015625 446.040625 446.065625 446.090625 446.021875 446.046875 446.071875 446.096875 Fréquence LPD433 (MHz) 433.07500 433.52500 433.97500 434.42500 433.10000 433.55000 434.00000 434.45000 433.12500 433.57500 434.02500 434.47500 433.15000 433.60000 434.05000 434.50000 433.17500 433.62500 434.07500 434.52500 433.20000 433.65000 434.10000...
- Page 450 Français Fréquence LPD433 (MHz) 433.35000 433.80000 434.25000 434.70000 433.37500 433.82500 434.27500 434.72500 433.40000 433.85000 434.30000 434.75000 433.42500 433.87500 434.32500 434.77500 433.45000 433.90000 434.35000 433.47500 433.92500 434.37500 433.50000 433.95000 434.40000 Codes CTCSS et PL/DPL Tableau 11: Codes CTCSS CTCSS CTCSS 67,0 136,5 71,9 141,3...
- Page 451 Français CTCSS CTCSS 79,7 156,7 82,5 162,2 85,4 167,9 88,5 173,8 91,5 179,9 94,8 186,2 97,4 192,8 100,0 203,5 103,5 210,7 107,2 218,1 110,9 225,7 114,8 233,6 118,8 241,8 123,0 250,3 127,3 122 (*) 69,3 131,8 Envoyer un commentaire...
- Page 452 Français Tableau 12: Codes PL/DPL Code Code Code DPL inversé 69 DPL inversé 70 DPL inversé 71 DPL inversé 72 DPL inversé 73 DPL inversé 74 DPL inversé 75 DPL inversé 76 DPL inversé 77 DPL inversé 78 DPL inversé 79 DPL inversé...
- Page 453 Français Code Code Code DPL inversé 84 DPL inversé 85 DPL inversé 86 DPL inversé 87 DPL inversé 88 DPL inversé 89 DPL inversé 90 DPL inversé 91 DPL inversé 92 PL personnalisé DPL inversé 93 PL personnalisé DPL inversé 94 PL personnalisé...
- Page 454 Français Code Code Code DPL inversé 40 DPL inversé 100 DPL inversé 41 DPL inversé 101 DPL inversé 42 DPL inversé 102 DPL inversé 43 DPL inversé 103 DPL inversé 44 DPL inversé 104 DPL inversé 45 DPL inversé 105 DPL inversé...
- Page 455 Français Code Code Code DPL inversé 56 DPL inversé 116 DPL inversé 57 DPL inversé 117 DPL inversé 58 DPL inversé 118 DPL inversé 59 DPL inversé 119 DPL inversé 60 DPL inversé 120 DPL inversé 61 DPL inversé 121 DPL inversé...
- Page 456 Français Cette page a été laissée vide de manière intentionnelle.
- Page 457 A.2 Informations de garantie • Tout défaut ou dommage lié à un test, une utilisation, Le revendeur ou le commerçant agréé Motorola Solutions une intervention de maintenance ou un réglage auprès duquel vous avez acheté votre radio inapproprié ou à toute modification de quelque sorte professionnelle Motorola Solutions et/ou les accessoires que ce soit.
- Page 458 Français La garantie ne s'applique pas si le type ou le numéro de série du produit a été endommagé, effacé, supprimé ou est illisible. Envoyer un commentaire...
- Page 459 Français Accessoires Tableau 15: Câbles Référence Description Tableau 13: Accessoires audio HKKN4028_ Câble de clonage radio à radio HKKN4027_ Câble de programmation CPS Référence Description HKLN4601_ Kit de surveillance avec microphone et Tableau 16: Chargeurs PTT en ligne HKLN4599_ Oreillette en forme de D avec Référence Description microphone et PTT en ligne...
- Page 460 Étui de transport en cuir pour les radios série XT600d REMARQUE: Certains accessoires peuvent ne pas être disponibles au moment de l'achat. Contactez votre point de vente Motorola Solutions ou rendez-vous sur le site http://www.motorolasolutions.com pour obtenir les toutes dernières informations sur la disponibilité...
- Page 461 Italiano Sommario 2.8 Ricarica della sola batteria......28 2.9 Indicatori LED del caricabatteria da tavolo.. 29 2.10 Misuratore del livello delle batterie.... 30 Copyright del software per computer......7 2.11 Tempo di ricarica stimato......31 Informazioni importanti sulla sicurezza......9 2.12 Ricarica della radio e della batteria con Precauzioni per l'utilizzo..........
- Page 462 Italiano 3.9.3 Regolazione della sensibilità 4.3.5.1 Modifica di un contatto iVOX............40 rapido........... 48 3.10 Ripristino delle impostazioni di fabbrica..40 4.3.5.2 Esecuzione di una chiamata rapida......49 3.11 Attivazione o disattivazione del segnale acustico............. 41 4.4 Scansione............49 3.12 Blocco o sblocco della tastiera....41 4.4.1 Selezione di una lista di scansione..........49 3.13 Accesso alle opzioni di menu....
- Page 463 8.4 Elenco di frequenze XT665d completo..84 4.10.2 Disattivazione della modalità 8.5 Codici CTCSS e PL/DPL......86 Covert............. 59 Garanzia limitata Motorola Solutions......93 4.11 Break-In............. 60 A.1 Cosa non è coperto dalla garanzia..... 93 4.12 Chiamata diretta tramite ID radio....61 A.2 Informazioni sulla garanzia......93 4.13 Reverse Burst..........61...
- Page 464 Italiano Pagina lasciata intenzionalmente vuota.
- Page 465 Solutions protetti da copyright salvati in memorie a semiconduttore o altri mezzi. Le leggi degli Stati Uniti d'America e di altri Paesi garantiscono a Motorola Solutions alcuni diritti esclusivi sui programmi per computer protetti da copyright, incluso, senza limitazioni, il diritto esclusivo di copiare o riprodurre in qualsiasi forma il programma.
- Page 466 Italiano Pagina lasciata intenzionalmente vuota.
- Page 467 RF e sul controllo nel rispetto delle norme e dei regolamenti vigenti in materia. L'elenco delle batterie e degli altri accessori approvati da Motorola Solutions è disponibile sul seguente sito Web: http://www.motorolasolutions.com Invia feedback...
- Page 468 Italiano Pagina lasciata intenzionalmente vuota.
- Page 469 Italiano Precauzioni per l'utilizzo • Quando si pulisce la radio, non utilizzare un getto diretto ad alta pressione per evitare infiltrazioni di acqua nella radio. La radio portatile digitale della serie XT600d è conforme alle specifiche IP55, che garantiscono la resistenza della AVVERTENZA: radio in condizioni avverse, quali l'uso sotto la pioggia o in Non disassemblare la radio, onde evitare che...
- Page 470 Italiano Pagina lasciata intenzionalmente vuota.
- Page 471 Italiano Introduzione Il presente manuale dell'utente spiega il funzionamento delle radio. È possibile che il rivenditore o l'amministratore del sistema abbia personalizzato la radio in base alle esigenze specifiche dell'utente. Per ulteriori informazioni, contattare il rivenditore o l'amministratore di sistema. Rivolgersi al rivenditore o all'amministratore di sistema per appurare: •...
- Page 472 Italiano Pagina lasciata intenzionalmente vuota.
- Page 473 Leggere attentamente qualsiasi modo. Consegnarlo a un rappresentante queste istruzioni e conservarle per esigenze future. Prima dell'assistenza tecnica di Motorola Solutions. di utilizzare il caricabatteria, leggere tutte le istruzioni e gli 6 Non disassemblare il caricabatteria, in quanto non può...
- Page 474 Italiano • Per scollegare il caricabatteria dalla tensione di linea, estrarre la spina di alimentazione. • Collegare l'apparecchiatura a una presa elettrica facilmente accessibile e vicina. • Per le apparecchiature che utilizzano fusibili, le parti sostitutive devono rispettare il tipo e la classificazione riportati nelle istruzioni del prodotto.
- Page 475 Italiano Panoramica della radio In questo capitolo vengono descritti i pulsanti e le funzioni per controllare la radio. Invia feedback...
- Page 476 Italiano Pulsanti di controllo Nella tabella seguente vengono spiegate le funzioni di ogni pulsante sulla radio: Tabella 1: Tabella di riferimento dei pulsanti di controllo Numero Descrizione Antenna Per il modello XT660d/XT665d, l'antenna non è rimovibile. Foro per cordino Pulsante di registrazione Premere il pulsante per attivare/disattivare la funzione di trasmissione della registrazione.
- Page 477 Italiano Numero Descrizione Mostra lo stato della batteria, lo stato di accensione, informazioni sulle chiamate radio e lo stato della scansione. Altoparlante Microfono L'utente deve parlare chiaramente nel microfono quando invia un messaggio. Display LCD Display monocromatico con retroilluminazione arancione Pulsanti Menu/OK e di navigazione Premere per accedere a un menu o per confermare la selezione;...
- Page 478 La Serie XT600d viene fornita con una batteria agli ioni di litio a capacità standard. Potrebbero essere disponibili altre batterie. Per ulteriori informazioni, vedere la sezione Tabella 4: Batterie autorizzate Motorola Solutions a pagina Tabella 2: Impostazione predefinita per i pulsanti SB1 e SB2...
- Page 479 Italiano Pulsanti Impostazione predefinita Premere a lungo SB2 Monitoraggio Descrizioni dei diversi modi in cui viene richiesto di premere i pulsanti di una radio: Premere brevemente Premere e rilasciare rapidamente. Premere a lungo Tenere premuto il pulsante per la durata programmata. Tenere premuto Tenere premuto il pulsante.
- Page 480 Italiano Specifiche della radio Nella tabella seguente vengono elencate le specifiche della radio: Tabella 3: Specifiche della radio XT660d/XT665d XT660d XT665d Banda di frequenza (MHz) PMR446, digital PMR446 PMR446, digital PMR446, LPD 433-434 0,5 per PMR446 e digital PMR446, Potenza di trasmissione (W): 0,01 per LPD Numero di canali Antenna...
- Page 481 I caricabatteria veloci litio ricaricabile. La batteria deve essere completamente di Motorola Solutions contengono un circuito di rilevamento caricata prima di utilizzarla per la prima volta per garantire della temperatura per garantire che le batterie vengano capacità...
- Page 482 La procedura seguente spiega come installare la batteria agli ioni di litio: 1 Spegnere la radio. 2 Con il logo Motorola Solutions rivolto verso l'alto, inserire le linguette (2) sul fondo della batteria nelle fessure (3). Invia feedback...
- Page 483 Italiano Alimentatore e caricabatteria a 3 Premere il dispositivo di chiusura della batteria (1) verso la radio finché non scatta in posizione. singola unità (SUC) da tavolo Rimozione di una batteria agli ioni di litio La procedura seguente spiega come rimuovere una batteria agli ioni di litio: La radio viene fornita con un caricabatteria a singola unità...
- Page 484 Italiano Custodia La procedura seguente spiega come utilizzare una • Allineare l'adattatore (1) alle scanalature dell'alimentatore (2) fino a quando non scatta in posizione. • Per rimuovere, far scorrere l'adattatore (1) verso l'alto. NOTA: Le immagini hanno il solo scopo di presentare custodia: l'adattatore.
- Page 485 Ricarica della radio Con radio collegata, posizionare la batteria in un caricabatteria a singola unità (SUC) da tavolo o un caricabatteria multiunità (MUC) Motorola Solutions. Ricarica della radio con il 1 Posizionare il caricabatteria su una superficie piana. caricabatteria a singola unità da...
- Page 486 Italiano 3 Inserire la radio nel caricabatteria con la radio rivolta verso la parte anteriore, come illustrato nella figura. NOTA: Durante la ricarica di una batteria collegata a una radio, spegnere la radio per assicurarsi che la batteria venga ricaricata completamente. Per ulteriori informazioni, vedere Linee guida per un utilizzo sicuro a pagina...
- Page 487 Stato Indicatore LED Commenti scanalature di allineamento presenti sul caricabatteria a Ricarica in singola unità da tavolo. Rosso fisso corso Tabella 4: Batterie autorizzate Motorola Solutions Ricarica Verde fisso completata Numero parte Descrizione Solitamente, è PMNN4434_R Batteria agli ioni di litio standard...
- Page 488 Italiano • Controllare se la batteria utilizzata con la radio è Stato Indicatore LED Commenti elencata in Tabella 4: Batterie autorizzate Motorola Batteria esaurita Solutions a pagina Rosso 2.10 lampeggiante una Batteria scarica volta Misuratore del livello delle batterie Stato del Giallo livello della Il misuratore del livello delle batterie situato nell'angolo in...
- Page 489 Italiano 2.11 Tempo di ricarica stimato Di seguito vengono fornite le soluzioni di ricarica con il tempo di ricarica della batteria stimato. Per ulteriori informazioni, vedere Tabella 14: Batteria a pagina Batteria standard ≤ 4,5 ore Batteria ad alta capacità ≤...
- Page 490 Italiano 5 Inserire la radio o la batteria nel vano di ricarica (3) con la radio o la batteria rivolta dalla parte opposta dei contatti (2). NOTA: • Ulteriori informazioni sul funzionamento del MUC sono disponibili nel foglio di istruzioni fornito con il MUC.
- Page 491 Italiano Operazioni preliminari Regolazione del volume Ruotare la manopola On/Off/Volume in senso orario per Questa sezione fornisce informazioni sul funzionamento di aumentare il volume o in senso antiorario per diminuire il base della radio. volume. NOTA: Non tenere la radio troppo vicino all'orecchio Accensione/spegnimento della radio quando il volume è...
- Page 492 Italiano Icon Descrizione Display della radio Il numero di barre (0 - 3) visualizzato indica la carica residua della batteria. La funzione Scan è abilitata. La funzione VOX/iVOX è attivata. Durante l'attivazione, senza accessori VOX, la radio è in modalità iVOX. In 11 12 questa modalità, è...
- Page 493 Italiano Icon Icon Descrizione Descrizione 6.i. La radio è in comunicazione in una Indica il codice CTCSS/DPL corrente. chiamata di gruppo. NOTA: 6.ii. La radio è in comunicazione in una Il display della radio raffigurato qui ha il solo scopo chiamata privata.
- Page 494 Italiano lampeggia e il LED della radio diventa arancione fisso. Ricezione di una chiamata L'icona dell'indicatore di intensità del segnale della radio La procedura seguente spiega come ricevere una può passare da 1 (più debole) a 3 (più forte) in base chiamata: alla copertura della ricezione radio.
- Page 495 Italiano Se, lungo il percorso, sono presenti boschi o montagne, la Frequenza portata è minima. La frequenza utilizzata per trasmettere o ricevere. Per stabilire una comunicazione ottimale tramite sistemi Codice di esclusione delle interferenze ricetrasmittenti, il canale, la frequenza e i codici di Questi codici consentono di ridurre al minimo le esclusione delle interferenze devono coincidere su interferenze grazie a diverse combinazioni di codici.
- Page 496 Italiano Stato della radio Indicatore LED Scansione Rosso lampeggiante velocemente. Modalità VOX/iVOX Rosso lampeggiante (due volte). VOX/iVOX (PTT) Rosso fisso per indicare che la radio sta trasmettendo. Registrazione Rosso e verde lampeggianti (una volta). Modalità programmazione CPS Verde lampeggiante (una volta). Modalità...
- Page 497 La modalità VOX può essere disattivata temporaneamente premendo il pulsante PTT oppure rimuovendo l'accessorio audio. NOTA: Contattare il punto vendita Motorola Solutions per ordinare gli accessori. 3.9.2 Configurazione della modalità iVOX 1 Spegnere la radio.
- Page 498 Italiano Il valore predefinito è MEDIUM. La sensibilità iVOX può 1 Spegnere la radio. essere impostata su qualsiasi valore come elencato di seguito: 2 Premere e tenere premuto il pulsante PTT durante l'accensione della radio per attivare la modalità iVOX. Premere e selezionare SETTING.
- Page 499 Italiano Premere PTT, SB2 e SB1 contemporaneamente mentre si Blocco o sblocco della tastiera accende la radio fino a quando non si sente un segnale È possibile bloccare la tastiera per evitare la modifica acuto. involontaria delle impostazioni della radio. La procedura seguente spiega come bloccare e sbloccare la tastiera: 3.11 Attivazione o disattivazione del...
- Page 500 Italiano 3.13 3 Eseguire una delle operazioni seguenti: Accesso alle opzioni di menu • Per accedere alla funzione, premere La procedura seguente spiega come accedere alle opzioni di menu: • Per uscire, premere NOTA: Premere brevemente per accedere a Menu. Se non viene rilevata alcuna attività...
- Page 501 Italiano Funzioni avanzate Tipi di Opzioni Valore impostazione predefinito • DUTCH Menu SETTING • PORTUGUESE • GERMAN Nel menu SETTING, alcune opzioni consentono di modificare direttamente la configurazione sulla radio senza • POLISH utilizzare il software CPS. Nella tabella seguente vengono •...
- Page 502 Italiano Premere e scorrere l'elenco di opzioni Premere e selezionare il canale richiesto. disponibili. 3 Quando sul display appare l'alias di canale richiesto, Utilizzare per effettuare la premere e selezionare CHAN ALIAS. selezione. Premere e inserire lettere o numeri richiesti. Modifica del canale Premere per confermare la selezione.
- Page 503 Italiano 3 Quando sul display appare il nome del canale 3 Quando sul display appare il nome del canale richiesto, premere e selezionare RX/TX EDIT. richiesto, premere e selezionare RX/TX EDIT. Premere e selezionare FREQUENCY. Premere e selezionare PL/DPL. Premere e scorrere l'elenco delle frequenze Premere e immettere i numeri necessari.
- Page 504 Italiano rivenditore o all'amministratore di sistema per informazioni Utilizzare per scorrere l'elenco di su come è stata programmata la radio. selezioni disponibili. Chiamata privata Una chiamata effettuata da una singola radio a un'altra 3 Una volta che la radio visualizza l'ID chiamata radio.
- Page 505 Italiano Aggiunta di un nuovo contatto Funzioni Descrizione all'elenco dei contatti La richiesta di controllo della radio RADIO CHECK consente all'utente di determinare se La procedura seguente spiega come aggiungere un nuovo la radio di destinazione è attiva in un contatto all'elenco dei contatti: sistema con conferma di ricezione dopo aver avviato la richiesta.
- Page 506 Italiano 4.3.4 3 Attendere il termine del tono che indica il permesso Chiamata digitale tramite One Touch di parlare (se abilitato) e iniziare a parlare. Access 4 Premere il pulsante programmato One Touch La funzione One Touch Access consente all'utente di Access di nuovo per terminare la trasmissione.
- Page 507 Italiano Premere e selezionare CONTACTS. Nella schermata Home, premere 2 Premere il numero attraverso la tastiera Utilizzare per scorrere l'elenco di Alfanumerica e premere il pulsante PTT per selezioni. effettuare la chiamata. Selezionare i contatti della radio e premere Scansione Selezionare QUICK CONTACT e premere La scansione consente di monitorare altri canali per rilevare le conversazioni.
- Page 508 Italiano La seguente procedura spiega come selezionare il canale Premere e utilizzare di priorità da una lista di scansione: scorrere la lista di scansione. Premere e selezionare SCAN. 3 Una volta selezionata la lista di scansione, premere Premere e utilizzare scorrere la lista di scansione.
- Page 509 Italiano 4.4.3 • Per eliminare, selezionare DELETE?. Rimozione di un canale da una lista di • Per tornare alla schermata precedente, scansione selezionare CANCEL?. La procedura seguente spiega come rimuovere un canale Premere per confermare la selezione. da una lista di scansione: 4.4.4 Premere e selezionare SCAN.
- Page 510 Italiano Selezioni Descrizioni Selezionare ADD e premere Archivio dei messaggi ricevuti. INBOX L'utente può inoltrare o rispondere 5 Scorrere la lista di scansione e selezionare gli alias ai messaggi qui. canale richiesti. Brevi messaggi di testo QUICK TEXT preimpostati per una risposta Premere per confermare la selezione.
- Page 511 Italiano Selezionare NEW TEXT e premere Premere per accedere alla schermata Message. 4 Utilizzare la tastiera Alfanumerica per inserire il messaggio di testo. Selezionare INBOX e premere Premere per confermare l'invio. Scorrere i messaggi nella Inbox. Premere La radio visualizza un elenco di contatti nell'elenco selezionare le seguenti azioni.
- Page 512 Italiano • Per visualizzare un messaggio, selezionare Premere per confermare l'invio. REVIEW. La radio visualizza un elenco di contatti nell'elenco dei contatti. Premere per confermare la selezione. 4.5.3 Scorrere fino al contatto richiesto e premere Invio di messaggi di testo predefiniti per inviare.
- Page 513 Italiano Una volta attivata la funzione Voice Recording, ogni Selezionare SENT e premere conversazione durante la trasmissione verrà registrata. La registrazione termina quando termina la trasmissione. Se la 4 Scorrere l'elenco dei messaggi inviati e premere trasmissione è più lunga di 3 minuti, la registrazione successiva inizia subito dopo la fine della registrazione per selezionare.
- Page 514 Italiano • Per interrompere la registrazione, selezionare Scorrere l'elenco dei file registrati e premere STOP e premere o tenere premuto di per selezionare. nuovo il pulsante Recording. 5 Eseguire una delle operazioni seguenti: La funzione è in modalità di registrazione inattiva quando non è...
- Page 515 Italiano 3 Eseguire una delle operazioni seguenti: Premere per accedere alla schermata • Per visualizzare l'elenco delle chiamate in arrivo, Recording. selezionare INCOMING. • Per visualizzare l'elenco delle chiamate in uscita, Selezionare TIME LEFT e premere . Sul selezionare OUTGOING. display della radio vengono visualizzati i minuti disponibili per la registrazione, 4.7.1...
- Page 516 Italiano 4 Una volta trovato il contatto richiesto, premere Zona Canali 33-64 ZONE 2 per selezionare. 65-96 ZONE 3 La radio visualizza SAVE CONTACT. 97-128 ZONE 4 Premere e utilizzare la tastiera Alfanumerica Di seguito viene spiegato come selezionare una zona: per inserire l'alias del contatto.
- Page 517 Italiano • ID radio Tenere premuto fino a quando non viene • Alias radio rilevato un segnale acustico. • Versione FW 2 Premere il passcode a quattro cifre. Utilizzare per visualizzare informazioni. 3 Lo schermo della radio è spento. 4.10 4.10.2 Modalità...
- Page 518 Italiano 4.11 2 Al termine della chiamata di gruppo, sulla radio che Break-In preme il pulsante Break-in appare WAIT, mentre sull'altra radio appare BREAK. La funzione Break-In consente all'utente di trasmettere a un altro utente con cui desidera parlare. Un altro utente 3 Eseguire una delle operazioni seguenti: riceverà...
- Page 519 Italiano 4.12 inverso scegliendo un valore tra Off/120/180/240. Il valore Chiamata diretta tramite ID radio predefinito della funzione Reverse Burst è 240. • Alcune funzioni disponibili con il software CPS possono La funzione della chiamata diretta consente alla radio di variare in base al modello della radio.
- Page 520 Italiano Pagina lasciata intenzionalmente vuota.
- Page 521 Italiano Configurazione della radio Configurazione tramite CPS In questo capitolo viene descritto come configurare la radio. NOTA: È possibile che il rivenditore o l'amministratore del sistema abbia personalizzato la radio in base alle esigenze specifiche dell'utente. Rivolgersi al rivenditore o all'amministratore di sistema per informazioni su come è...
- Page 522 Italiano CPS consente di programmare le frequenze e i codici PL/ NOTA: DPL, nonché altre funzioni quali: Break-in, Covert Mode e Assicurarsi che il commutatore del cavo si trovi in Silent Mode. CPS è uno strumento molto utile che posizione "Flash" o "CPS mode". consente anche di bloccare la programmazione della radio dal pannello frontale o limitare la modifica di specifiche funzioni della radio (per evitare l'eliminazione accidentale di...
- Page 523 Italiano • Due caricabatteria a singola unità (SUC) per la clonazione di radio della serie XT600d. 2 Scollegare tutti i cavi (alimentatore o cavi USB) dai caricabatteria a singola unità. Figura 2: Cavo CPS 3 Collegare il cavo di clonazione con il convertitore USB, collegare un'estremità...
- Page 524 Italiano b Attendere 3 secondi prima di rilasciare i pulsanti; questa procedura prima di tentare di riavviare il processo di viene emesso un segnale acustico con la parola clonazione: "Cloning". 1 Assicurarsi che le batterie in entrambe le radio siano 6 Posizionare la radio di origine nel caricabatteria.
- Page 525 Italiano NOTA: Questo cavo di clonazione è progettato per funzionare solo con caricabatteria a singola unità Motorola Solutions RLN6175 e PMLN6394. Quando si ordina il cavo di clonazione, utilizzare il numero parte HKKN4028_. Consultare la sezione Accessori a pagina 95 per ulteriori informazioni sugli accessori.
- Page 526 Italiano Pagina lasciata intenzionalmente vuota.
- Page 527 Italiano Troubleshooting Nella tabella seguente vengono descritte le procedure di risoluzione dei problemi se viene rilevato il sintomo: Sintomo e soluzioni Se... Allora... Assenza di alimentazione Ricaricare o sostituire la batteria agli ioni di litio. Temperature di esercizio estreme possono influire sulla durata della batteria.
- Page 528 Italiano Se... Allora... Accertarsi che la radio si trovi sulla frequenza e sul codice corretti durante la trasmissione. Qualità audio insufficiente Le impostazioni delle radio potrebbero non essere definite correttamente. Ricontrollare frequenze, codici e larghezze di banda per accertarsi che siano identici in tutte le radio.
- Page 529 Italiano Se... Allora... Verificare che le radio utilizzino le stesse impostazioni per canale, frequenza e codice di esclusione delle interferenze. Ricaricare, sostituire e/o reinserire le batterie. Vedere Informazioni sulla batteria agli ioni di litio a pagina In caso di ostruzioni o di uso all'interno di veicoli o edifici, possono verificarsi delle interferenze.
- Page 530 Italiano Se... Allora... L'indicatore LED del caricabatteria da tavolo non Verificare che la radio/batteria sia inserita lampeggia correttamente e controllare i contatti della batteria/ caricabatteria per accertarsi che siano puliti e che lo spinotto di caricamento sia inserito correttamente. Vedere Ricarica della radio a pagina Indicatori LED del caricabatteria da tavolo a pagina 29...
- Page 531 Italiano Se... Allora... Controllare gli indicatori LED del caricabatteria per verificare se la batteria ha un problema. Vedere Indicatori LED del caricabatteria da tavolo a pagina Invia feedback...
- Page 532 Italiano Pagina lasciata intenzionalmente vuota.
- Page 533 Italiano Uso e manutenzione In questo capitolo viene descritto come usare la radio correttamente: Precauzione Utilizzare un panno morbido Non utilizzare alcol o altre soluzioni inumidito per pulire la superficie Non immergere in acqua detergenti esterna Se la radio viene immersa in acqua, Spegnere la radio e rimuovere le Non utilizzare la radio finché...
- Page 534 Italiano Pagina lasciata intenzionalmente vuota.
- Page 535 I grafici riportati in questa sezione forniscono informazioni su codici e frequenze. Questi grafici sono utili quando si utilizzano radio ricetrasmittenti della serie XT600d Motorola Solutions con altre radio in commercio. Tabella 7: Frequenza del canale e codice di esclusione delle interferenze predefiniti XT660d...
- Page 536 Italiano Zona Nome canale Frequenza (MHz) Codici CHAN 08 446.09375 1-67,0 Hz CHAN 09 446.00625 121-DPL 754 CHAN 10 446.01875 121-DPL 754 CHAN 11 446.03125 121-DPL 754 CHAN 12 446.04375 121-DPL 754 CHAN 13 446.05625 121-DPL 754 CHAN 14 446.06875 121-DPL 754 CHAN 15 446.08125...
- Page 537 Italiano Zona Nome canale Frequenza (MHz) Codici CHAN 05 446.05625 1-67,0 Hz CHAN 06 446.06875 1-67,0 Hz CHAN 07 446.08125 1-67,0 Hz CHAN 08 446.09375 1-67,0 Hz CHAN 09 433.07500 1-67,0 Hz CHAN 10 433.30000 1-67,0 Hz CHAN 11 433.55000 1-67,0 Hz CHAN 12 433.80000...
- Page 538 Italiano Grafico di codici e frequenze digitali Il grafico riportato in questa sezione fornisce informazioni su codici e frequenze. Questo grafico è utile per l'utilizzo delle radio ricetrasmittenti Motorola XT600d con altre radio in commercio. Tabella 9: Frequenza del canale e codice di esclusione delle interferenze predefiniti XT660d Zona Nome canale Frequenza (MHz)
- Page 539 Italiano Zona Nome canale Frequenza (MHz) Codici CHAN 28 446.171875 Codifica a colori-12 CHAN 29 446.178125 Codifica a colori-13 CHAN 30 446.184375 Codifica a colori-14 CHAN 31 446.190625 Codifica a colori-15 CHAN 32 446.196875 Codifica a colori-16 Tabella 10: Frequenza del canale e codice di esclusione delle interferenze predefiniti XT665d Zona Nome canale Frequenza (MHz)
- Page 540 Italiano Zona Nome canale Frequenza (MHz) Codici CHAN 25 446.053125 Codifica a colori-9 CHAN 26 446.059375 Codifica a colori-10 CHAN 27 446.065625 Codifica a colori-11 CHAN 28 446.071875 Codifica a colori-12 CHAN 29 446.078125 Codifica a colori-13 CHAN 30 446.084375 Codifica a colori-14 CHAN 31 446.090625...
- Page 541 Italiano Frequenza PMR446 (MHz) 446.01875 446.06875 446.11875 446.16875 446.03125 446.08125 446.13125 446.18125 446.04375 446.09375 446.14375 446.19375 ATTENZIONE: *Le frequenze digitali 446.0-446.1 MHz per XT660d sono disponibili solo per dispositivi prodotti a partire da o dopo gennaio 2018. Frequenza digital PMR446 (MHz) *446.003125 *446.053125 446.103125...
- Page 542 Italiano Elenco di frequenze XT665d completo Frequenza PMR446 (MHz) 446.00625 446.03125 446.05625 446.08125 446.01875 446.04375 446.06875 446.09375 Frequenza digital PMR446 (MHz) 446.003125 446.028125 446.053125 446.078125 446.009375 446.034375 446.059375 446.084375 446.015625 446.040625 446.065625 446.090625 446.021875 446.046875 446.071875 446.096875 Frequenza LPD433 (MHz) 433.07500 433.52500 433.97500...
- Page 543 Italiano Frequenza LPD433 (MHz) 433.17500 433.62500 434.07500 434.52500 433.20000 433.65000 434.10000 434.55000 433.22500 433.67500 434.12500 434.57500 433.25000 433.70000 434.15000 434.60000 433.27500 433.72500 434.17500 434.62500 433.30000 433.75000 434.20000 434.65000 433.32500 433.77500 434.22500 434.67500 433.35000 433.80000 434.25000 434.70000 433.37500 433.82500 434.27500 434.72500 433.40000 433.85000 434.30000...
- Page 544 Italiano Codici CTCSS e PL/DPL Tabella 11: Codici CTCSS CTCSS CTCSS 67,0 136,5 71,9 141,3 74,4 146,2 77,0 151,4 79,7 156,7 82,5 162,2 85,4 167,9 88,5 173,8 91,5 179,9 94,8 186,2 97,4 192,8 100,0 203,5 103,5 210,7 Continuazione tabella… Invia feedback...
- Page 545 Italiano CTCSS CTCSS 107,2 218,1 110,9 225,7 114,8 233,6 118,8 241,8 123,0 250,3 127,3 122 (*) 69,3 131,8 Tabella 12: Codici PL/DPL Codice Codice Codice DPL 69 invertito DPL 70 invertito DPL 71 invertito DPL 72 invertito DPL 73 invertito DPL 74 invertito Continuazione tabella…...
- Page 546 Italiano Codice Codice Codice DPL 75 invertito DPL 76 invertito DPL 77 invertito DPL 78 invertito DPL 79 invertito DPL 80 invertito DPL 81 invertito DPL 82 invertito DPL 83 invertito DPL 84 invertito DPL 85 invertito DPL 86 invertito DPL 87 invertito DPL 88 invertito DPL 89 invertito...
- Page 547 Italiano Codice Codice Codice DPL 91 invertito DPL 92 invertito PL personalizzato DPL 93 invertito PL personalizzato DPL 94 invertito PL personalizzato DPL 95 invertito PL personalizzato DPL 96 invertito PL personalizzato DPL 97 invertito PL personalizzato DPL 98 invertito DPL 39 invertito DPL 99 invertito DPL 40 invertito...
- Page 548 Italiano Codice Codice Codice DPL 47 invertito DPL 107 invertito DPL 48 invertito DPL 108 invertito DPL 49 invertito DPL 109 invertito DPL 50 invertito DPL 110 invertito DPL 51 invertito DPL 111 invertito DPL 52 invertito DPL 112 invertito DPL 53 invertito DPL 113 invertito DPL 54 invertito...
- Page 549 Italiano Codice Codice Codice DPL 63 invertito DPL 123 invertito DPL 64 invertito DPL personalizzato DPL 65 invertito DPL personalizzato DPL 66 invertito DPL personalizzato DPL 67 invertito DPL personalizzato DPL 68 invertito DPL personalizzato Invia feedback...
- Page 550 Italiano Pagina lasciata intenzionalmente vuota.
- Page 551 Non restituire la radio a alterazione o modifiche di qualsiasi altro tipo. Motorola Solutions. Per ottenere il servizio di garanzia, è • Rotture o danni alle antenne che non siano causati necessario presentare la ricevuta di acquisto o una prova direttamente da difetti di materiale o lavorazione.
- Page 552 Italiano Pagina lasciata intenzionalmente vuota.
- Page 553 Italiano Accessori Tabella 15: Cavi Numero Descrizione parte Tabella 13: Accessori audio HKKN4028_ Cavo di clonazione da radio a radio Numero Descrizione HKKN4027_ Cavo di programmazione CPS parte HKLN4601_ Kit di sorveglianza con microfono in Tabella 16: Caricabatteria linea e PTT HKLN4599_ Auricolare a D con microfono in linea e Numero...
- Page 554 Custodia da trasporto in pelle serie XT600d NOTA: Alcuni accessori potrebbero non essere disponibili al momento dell'acquisto. Contattare il punto vendita Motorola Solutions o visitare il sito http:// www.motorolasolutions.com per informazioni aggiornate sulla disponibilità degli accessori e sui nuovi modelli di accessori.
- Page 555 Norsk Innhold 2.9 LED-indikatorer for lader med holder..28 2.10 Batterimåler..........29 2.11 Anslått ladetid..........29 Opphavsrett for datamaskinens programvare....7 2.12 Lading av en radio og et batteri ved hjelp Viktig sikkerhetsinformasjon...........9 av en MUC – ekstrautstyr........30 Forholdsregler for håndtering........11 Kapittel 3: Komme i gang..........
- Page 556 Norsk 3.13 Åpne menyalternativer.......39 4.4.2 Velge en prioritert kanal fra skannelisten..........48 Kapittel 4: Avanserte funksjoner........41 4.4.3 Slette en kanal fra skannelisten..48 4.1 Innstilling............41 4.4.4 Legge til en kanal i en 4.2 Kanalredigering........... 42 skanneliste..........49 4.2.1 Redigere kanalalias....... 42 4.5 Melding............50 4.2.2 Redigere kanalfrekvens....
- Page 557 8.4 Full frekvensliste for XT665d....... 76 4.10.1 Aktivere spaningsmodus....56 8.5 CTCSS- og PL/DPL-koder......78 4.10.2 Deaktivere spaningsmodus..56 Tillegg A: Begrenset garanti for Motorola Solutions..85 4.11 Break-in............. 57 A.1 Dette dekker ikke garantien......85 4.12 Direkte anrop med radio-ID....... 58 A.2 Garantiinformasjon........85...
- Page 558 Norsk Denne siden er tom med hensikt.
- Page 559 Motorola Solutions-dataprogrammer lagret på halvlederminner eller andre medier. Lover i USA og andre land sikrer Motorola Solutions visse eksklusive rettigheter til opphavsrettslig beskyttet programvare, inkludert, men ikke begrenset til, eksklusive rettigheter til å kopiere eller reprodusere opphavsrettslig beskyttet programvare i noen som helst form.
- Page 560 Norsk Denne siden er tom med hensikt.
- Page 561 RF-energi, slik at du kan kontrollere at gjeldende standarder og forskrifter overholdes. Du finner en liste over Motorola Solutions-godkjente antenner, batterier og annet tilbehør på følgende nettsted: http://www.motorolasolutions.com...
- Page 562 Norsk Denne siden er tom med hensikt.
- Page 563 Norsk Forholdsregler for • Når du rengjør radioen, må du ikke bruke høytrykksspyler på radioen, da dette kan føre til at vann håndtering lekker inn i radioen. OBS!: Den digitale bærbare radioen i XT600d-serien oppfyller Du må ikke demontere radioen. Dette kan skade IP55-spesifikasjoner, slik at radioen tåler krevende forhold, radioens tetninger og føre til væske kan lekke som bruk i regn eller støvete miljøer.
- Page 564 Norsk Denne siden er tom med hensikt.
- Page 565 Norsk Introduksjon Denne brukerhåndboken beskriver bruk av radioene dine. Forhandleren eller systemadministratoren din kan ha tilpasset radioen etter dine behov. Kontakt forhandleren eller systemadministratoren for å få mer informasjon. Du kan ta kontakt med forhandleren eller systemadministratoren om følgende: • Er radioen programmert med forhåndsinnstilte konvensjonelle kanaler? •...
- Page 566 Norsk Denne siden er tom med hensikt.
- Page 567 7 For å redusere faren for elektrisk støt må du koble laderen fra strømuttaket før vedlikehold eller rengjøring. 1 For å redusere faren for personskade må du bare lade oppladbare Motorola Solutions-godkjente batterier. Retningslinjer for sikker bruk Lading av andre batterier kan føre til eksplosjon, personskade og andre skader.
- Page 568 Norsk • Koble utstyret til et uttak som er enkelt å åpne og nær. • For utstyr med sikringer må utskiftninger være i tråd med typen og rangeringen som er angitt i utstyrsinstruksjonene. • Maksimal romtemperatur rundt strømforsyningsutstyret må ikke overstige 40 °C (104 °F). •...
- Page 569 Norsk Oversikt over radioen Dette kapittelet forklarer knappene og funksjonene for å betjene radioen. Send tilbakemelding...
- Page 570 Norsk Kontrollknapper Den følgende tabellen forklarer funksjonen til alle knappene på radioen: Tabell 1: Referansetabell for kontrollknapper Nummer Beskrivelse Antenne Antennen på XT660d-/XT655d-modellen er ikke flyttbar. Hull for reim Opptaksknapp Trykk på knappen for å slå av/på funksjonen for opptakssending. Se Opptak på...
- Page 571 Norsk Nummer Beskrivelse Viser batteristatus, oppstartsstatus, radioanropsinformasjon og skannestatus. Høyttaler Mikrofon Brukeren må snakke tydelig inn i mikrofonen for å sende en melding. LCD-skjerm Svart/hvitt-skjerm med oransje bakgrunnsbelysning. Meny/OK-knapp og navigasjonsknapper Trykk på for å åpne en meny eller for å bekrefte valget. Trykk på og hold nede for å lagre valget i programmodus.
- Page 572 Kobler til kompatibelt lydtilbehør. Batterilås Batteri XT600d-serien leveres med et litiumionbatteri med standard kapasitet. Andre batterier kan være tilgjengelig. Se Tabell 4: Motorola Solutions-autoriserte batterier på side 28 for flere detaljer. Tabell 2: Standardinnstillingen for knappene SB1 og SB2 Knapper Standardinnstilling Trykk kort på...
- Page 573 Norsk Trykk kort Trykk på og slipp Trykk lenge Trykk på og hold nede i programmert varighet. Hold nede Hold knappen inne. MERKNAD: Forhandleren eller systemadministratoren din kan ha tilpasset radioen etter dine behov. Kontakt forhandleren eller systemadministratoren for å finne ut hvordan radioen din har blitt programmert. Radiospesifikasjoner Den følgende tabellen forklarer radiospesifikasjoner: Tabell 3: Radiospesifikasjoner for XT660d/XT665d...
- Page 574 Norsk XT660d XT665d Modelletikett Send tilbakemelding...
- Page 575 25 % utlading varer enda lenger. De følgende trinnene forklarer hvordan litiumionbatteriet settes inn: Motorola Solutions-batterier er utformet spesielt for å brukes med en Motorola Solutions-lader og omvendt. Lading med utstyr som ikke er fra Motorola Solutions, kan Send tilbakemelding...
- Page 576 1 Slå radioen av. 2 Trykk ned og hold batterilåsen. 3 Trekk batteriet bort fra radioen. 1 Slå radioen av. 2 Hold den med Motorola Solutions-logoen vendt opp, og sett tappene (2) på bunnen av batteriet inn i sporene (3). Send tilbakemelding...
- Page 577 Norsk Strømforsyning og lader for enkel enhet (SUC) med holder Radioen leveres med SUC med holder, én strømforsyning (også kalt transformator) og et sett med adaptere. Du kan stille inn strømforsyningen til å passe til alle • Innrett adapteren (1) etter sporene på strømforsyningen adapterne som følger med radiopakken.
- Page 578 Norsk 2 Du fjerner den ved å løsne krokene på hylsteret fra Hylster de øverste hakkene på batteriet ved hjelp av den øvre fliken på hylsteret. Skyv radioen og fjern den fra De følgende trinnene forklarer hvordan du bruker et hylster: hylsteret.
- Page 579 Norsk 3 Sett radioen i laderen med radioen vendt forover, som vist. MERKNAD: Når du lader et batteri som er tilkoblet en radio, må du slå av radioen for å sikre full lading. Se Retningslinjer for sikker bruk på side 15 for mer informasjon.
- Page 580 Lading ferdig grønn 3 Innrett sporene på batteriet med innrettingsribben i SUC Dette problemet med holder. kan vanligvis løses ved å ta Tabell 4: Motorola Solutions-autoriserte batterier Batterifeil Rød blinking, rask ut batteripakken og sette den inn Delenummer Beskrivelse igjen.
- Page 581 2.11 Anslått ladetid • Kontroller at batteriet som brukes sammen med radioen, er angitt i Tabell 4: Motorola Solutions-autoriserte Den følgende informasjonen inneholder ladeløsninger med batterier på side anslått ladetid for batteriet. Du finner mer informasjon under Tabell 14: Batteri på side 2.10...
- Page 582 Norsk 2.12 2 Sett strømledningen inn i MUC-ens dobbeltpolede Lading av en radio og et batteri ved kontakt (1) i bunnen av MUC. hjelp av en MUC – ekstrautstyr 3 Koble strømledningen til et strømuttak. MUC muliggjør lading av opptil seks radioer eller batterier. 4 Slå...
- Page 583 Norsk Komme i gang MERKNAD: Ikke hold radioen for nær øret når volumet er høyt, eller når du justerer volumet. Denne delen hjelper deg med å bli kjent med radioens grunnleggende funksjoner. Radioskjerm Slå radioen av/på Slå radioen på ved å dreie av-/på-/volumknappen med klokken.
- Page 584 Norsk Den følgende tabellen beskriver ikonene: Nei. Ikon Beskrivelse 6.i. Radioen kommuniserer i et Nei. Ikon Beskrivelse gruppeanrop. Antallet streker (0–3) som vises, 6.ii. Radioen kommuniserer i et privat indikerer hvor mye strøm som er igjen i anrop. batteriet. Skanning er aktivert. Dette er signalstyrkeindikatoren.
- Page 585 Norsk MERKNAD: 2 Besvar anropet ved å holde radioen vertikalt 2,5– Radioskjermen som vises her, er bare tatt med for å 5 cm (1–2 tommer) fra munnen. Trykk på PTT- angi ikonplasseringer. Hver radioskjerm kan ha knappen for å snakke, og slipp knappen for å lytte. forskjellig innhold (kanal og kode), avhengig av LED-indikatoren lyser kontinuerlig rødt når radioen hvilke forhåndsprogrammerte funksjoner som er...
- Page 586 Norsk Kanalen, frekvensen og støyelimineringskodene må være Talerekkevidde de samme på begge radioene for at toveiskommunikasjonen skal fungere optimalt. Dette Radioene i XT600d-serien er utformet for å maksimere avhenger av radioens forhåndsprogrammerte profil: ytelsen og forbedre senderekkevidden i felten. For å unngå Kanal interferens anbefales det at avstanden mellom to radioer er Gjeldende radiokanal, avhengig av radiomodell.
- Page 587 Norsk Radiostatus LED-indikasjon «Inaktiv» programmeringsmodus/ Blinker rødt i pulstempo. kanalmodus Kanal opptatt Viser kontinuerlig oransje. Lavt batterinivå Blinker oransje i pulstempo. Skanning Blinker rødt i raskt tempo. VOX/iVOX-modus Blinker rødt i dobbelt pulstempo. VOX/iVOX PTT Kontinuerlig rødt for å indikere at radioen sender. Opptak Blinker rødt og grønt i pulstempo.
- Page 588 Norsk brukeren må trykke på PTT-knappen på radioen eller Sette opp VOX lydtilbehøret. De følgende trinnene forklarer hvordan du setter opp VOX: iVOX iVOX støttes bare uten lydtilbehør festet til radio. Når iVOX er aktivert, er radiomikrofonen aktiv hele tiden, og radioen vil automatisk sende når den oppdager signal, uten at brukeren må...
- Page 589 VOX kan deaktiveres midlertidig ved å trykke på Det er en kort forsinkelse mellom når du begynner å PTT-knappen eller ved å fjerne lydtilbehøret. snakke, og når radioen sender. MERKNAD: Kontakt Motorola Solutions-forhandleren din for å 3.9.3 bestille tilbehør. Justere iVOX-følsomhet Følsomheten til radiotilbehøret eller mikrofonen kan 3.9.2...
- Page 590 Norsk Aktivere eller deaktivere pipetone Trykk på , og naviger til VOX LEVEL. De følgende trinnene forklarer hvordan du aktiverer og deaktiverer pipetone: Trykk på , og naviger til et passende nivå følsomhetsnivå. Trykk på , og naviger til SETTING. Trykk på...
- Page 591 Norsk Trykk og hold nede i fire sekunder. Trykk på eller for å se de følgende funksjonene: • SETTING Låse-ikonet vises for å indikere at tastaturet og sideknappene er låst. • CHANNEL EDIT • CONTACTS Trykk og hold nede i fire sekunder. •...
- Page 592 Norsk • Trykk på for å avslutte. MERKNAD: Menymodus blir automatisk tidsavbrutt hvis det ikke oppdages noen aktivitet i løpet av ti sekunder. Avanserte funksjoner på side 41 for mer informasjon om funksjonene. Send tilbakemelding...
- Page 593 Norsk Avanserte funksjoner Typer Alternativer Standardverdi innstillinger • DUTCH Innstilling • PORTUGUESE • GERMAN I innstillingsmenyen finner du noen elementkonfigurasjoner du kan endre på radioen uten å gå gjennom CPS. Den • POLISH følgende tabellen forklarer de tilgjengelige innstillingene og •...
- Page 594 Norsk Trykk på , og naviger gjennom listen med Trykk på , og naviger til ønsket kanal. tilgjengelige alternativer. 3 Når skjermen viser ønsket kanalalias, trykker du på Bruk eller for å angi valget ditt. og navigerer til CHAN ALIAS. Trykk på...
- Page 595 Norsk 3 Når skjermen viser ønsket kanalnavn, trykker du på 3 Når skjermen viser ønsket kanalnavn, trykker du på og navigerer til RX/TX EDIT. og navigerer til RX/TX EDIT. Trykk på , og naviger til FREQUENCY. Trykk på , og naviger til PL/DPL. Trykk på...
- Page 596 Norsk Privat anrop Bruk til å bla gjennom listen med Et anrop fra en individuell radio til en annen individuell mulige valg. radio. For å starte et privat anrop må radioen din være programmert til å starte et privat anrop. 3 Når radioen viser den riktige anrops-ID-en, trykker Gruppeanrop du på...
- Page 597 Norsk Funksjoner Beskrivelse Trykk på , og naviger til CONTACTS. mottaksbekreftelse etter at forespørselen er startet. Bruk eller for å bla til ADD NEW, og Hvis forespørsel for ekstern monitor REMOTE MON innledes, blir målradioens mikrofon trykk på for å åpne. og sender aktivert for ekstern overvåking.
- Page 598 Norsk forhandleren eller systemadministratoren for å finne ut MERKNAD: hvordan radioen din har blitt programmert. Denne funksjonen er bare tilgjengelig i digital modus og er kun aktuell for gruppeanrop og private anrop. 1 Hold radioen vertikalt 2,5–5,0 cm (1–2 tommer) fra munnen.
- Page 599 Norsk stopper, venter radioen i tre sekunder før den gjenopptar Trykk på for å bekrefte valget. skanningen. Radioen viser for å angi at aktivering er utført. 4.4.1 Velg en skanneliste 4.3.5.2 De følgende trinnene forklarer hvordan du velger en Foreta et anrop til en hurtigkontakt skanneliste: De følgende trinnene forklarer hvordan du foretar et anrop til en hurtigkontakt:...
- Page 600 Norsk Trykk på for å bekrefte valget. Når skannelisten er valgt, trykker du på Radioen viser for å angi at aktivering er utført. 4 Naviger til CURRENT CHAN / annet kanalalias som er MERKNAD: stilt inn i skannelisten, og trykk på Bare én gruppe er valgt for skanning til ethvert tidspunkt.
- Page 601 Norsk Legge til en kanal i en skanneliste Trykk på , og bruk eller for å bla De følgende trinnene forklarer hvordan du legger til en gjennom skannelisten. kanal i en skanneliste: Når skannelisten er valgt, trykker du på Trykk på , og naviger til SCAN.
- Page 602 Norsk Opprette ny tekstmelding Melding De følgende trinnene forklarer hvordan du oppretter en ny tekstmelding: MERKNAD: Denne funksjonen er bare tilgjengelig i digital modus. Trykk på , og naviger til MESSAGE. XT600d-serien støtter tekstmeldinger. Den følgende tabellen forklarer valg og beskrivelser av melding: Trykk på...
- Page 603 Norsk 4.5.2 • Du kan velge forhåndsangitte korte fraser til å Svare, videresende eller slette mottatt svare avsenderen ved å navigere til QUICK REPLY og velge QUICK TEXT. melding • Hvis du vil videresende en melding til en annen De følgende trinnene forklarer hvordan du kan svare, kontakt i kontaktlisten, navigerer du til FORWARD.
- Page 604 Norsk Naviger til QUICK TEXT, og trykk på Naviger til SENT, og trykk på Bla gjennom hurtigtekstlisten. Trykk på for å Rull gjennom Sendt-listen, og trykk på for å velge. velge. 5 Gjør ett av følgende: Trykk på for å bekrefte sending. •...
- Page 605 Norsk Når taleopptaket er aktivert, blir hvert anrop i sendingen Funksjonen er i inaktiv opptaksmodus når det ikke er spilt inn. Opptaket avsluttes når sendingen slutter. Hvis et anrop. Når radioen oppdager en sending, vil sendingen er lengre enn tre minutter, begynner det neste opptaksmodus automatisk lage et opptak av opptaket umiddelbart etter det forrige opptaket slutter.
- Page 606 Norsk Anropslogg • For å slette må du navigere til DELETE?. • For å gå tilbake til forrige skjermbilde navigerer Brukeren kan benytte anropsloggen til å kontrollere du til CANCEL?. anropshistorikken til radioen. De følgende trinnene forklarer hvordan du åpner en anropslogg: Trykk på...
- Page 607 Norsk 4.7.1 Lagre kontakt fra anropsloggen til Sone kontaktlisten En sone er en gruppe kanaler. Det er fire tilgjengelige soner, og hver sone består av forskjellige kanaler. Den De følgende trinnene forklarer hvordan du lagrer en kontakt følgende tabellen viser kanaloppsettet for hver sone: fra anropsloggen til kontaktlisten: Sone Kanaler...
- Page 608 Norsk vanlig. Kontakt forhandleren eller systemadministratoren Når den ønskede sonen vises, trykker du på for å få mer informasjon om denne konfigurasjonen. for å velge. 4.10.1 Aktivere spaningsmodus Radioinformasjon De følgende trinnene forklarer hvordan du aktiverer spaningsmodus: Radioen din inneholder informasjon om ulike generelle parametere.
- Page 609 Norsk 2 Angi den 4-sifrede koden. 2 Når det pågående gruppeanropet er avsluttet, vil radioen der Break-in-knappen ble trykket på, vise 3 Radioskjermen er på. WAIT, mens den andre radioen viser BREAK. 3 Gjør ett av følgende: 4.11 • For å oppnå vellykket break-in trykker du på PTT- Break-in knappen på...
- Page 610 Norsk 4.12 • Noen av funksjonene som er tilgjengelige med CPS- Direkte anrop med radio-ID programvaren, kan variere avhengig av radiomodellen. • Kontakt forhandleren eller systemadministratoren for å Direkte anrop er en funksjon som gjør at radioen kan sende få mer informasjon om denne konfigurasjonen. et anrop ved hjelp av radio-ID.
- Page 611 Norsk Sette opp radioen Stille inn med CPS Dette kapittelet forklarer hvordan du setter opp radioen. MERKNAD: Forhandleren eller systemadministratoren din kan ha tilpasset radioen etter dine behov. Kontakt forhandleren eller systemadministratoren for å finne ut hvordan radioen din har blitt programmert. Figur 1: Stille inn radioen med CPS For å...
- Page 612 MERKNAD: (*) CPS-programmeringskabel med delenr. HKKN4027_ er tilbehør som selges separat. Kontakt Motorola Solutions-forhandleren din hvis du vil ha mer informasjon. Klone radioer Du kan klone radioprofiler i XT600d-serien fra én kilderadio til en målradio ved hjelp av en av disse metodene: •...
- Page 613 Norsk kloningskabelen til den første SUC og den andre enden til den andre SUC. MERKNAD: Under kloningsprosessen tilføres det ingen Figur 3: Kloningskabel strøm til SUC. Batteriene blir ikke ladet. Bare datakommunikasjon er etablert mellom de to radioene. Figur 4: USB-omformer 4 Skru på...
- Page 614 Norsk med skjerm, viser den enten Pass eller Fail på 5 Kontroller at målradioen er slått på. skjermen (en tone høres innen fem sekunder). 6 Kontroller at kilderadioen er i kloningsmodus. 8 Slå radioene av og på igjen for å avslutte kloningsmodusen når kloningsprosessen er fullført.
- Page 615 Norsk Feilsøking Følgende tabell forklarer metoder for å feilsøke hvis symptomet har oppstått: Symptomer og løsninger Hvis ... Så ... Ingen strøm Lad eller bytt ut litiumionbatteriet. Ekstreme brukstemperaturer kan påvirke batteriets levetid. Om Li-Ion-batteri på side Hører andre lyder eller samtaler på en kanal Bekreft at støyelimineringskoden er angitt.
- Page 616 Norsk Hvis ... Så ... Lydkvaliteten er ikke bra nok Radioinnstillingene samsvarer kanskje ikke. Dobbeltsjekk frekvenser, koder og båndbredde for å sikre at de er identiske for alle radioene. Begrenset talerekkevidde Stål- og/eller betongstrukturer, tett bladverk, bygninger eller kjøretøyer reduserer rekkevidden. Kontroller at du har fri sikt for å...
- Page 617 Norsk Hvis ... Så ... Tung statisk lyd eller støy Radioene er for nære hverandre. De må være minst 1,5 m (5 fot) fra hverandre. Radioene er for langt fra hverandre, eller hindringer forstyrrer sendingen. Talerekkevidde på side Lavt batterinivå Lad eller bytt ut litiumionbatteriet.
- Page 618 Norsk Hvis ... Så ... Tilbehøret fungerer ikke eller er ikke kompatibelt. VOX og iVOX på side Batteriet lades ikke selv om det har stått i Kontroller at ladedokken er koblet riktig til og ladedokken en stund samsvarer med en kompatibel strømforsyning. Lade radio via SUC med holder på...
- Page 619 Norsk Bruk og vedlikehold Dette kapittelet viser riktig bruk av radioen: Forholdsregler Bruk en myk, fuktig klut til å Ikke bruk alkohol eller Må ikke senkes i vann rengjøre utsiden rengjøringsmidler Hvis radioen har ligget i vann: Ikke bruk radioen før den er helt Slå...
- Page 620 Norsk Denne siden er tom med hensikt.
- Page 621 Tabeller for analoge frekvenser og koder Tabellene i denne delen gir frekvens- og kodeinformasjon. Disse tabellene er nyttige når du bruker Motorola Solutions- toveisradioer i XT600d-serien med andre profesjonelle radioer. Tabell 7: Standard kanalfrekvens og støyelimineringskode for XT660d...
- Page 622 Norsk Sone Kanalnavn Frekvens (MHz) Koder KAN 09 446,00625 121–DPL 754 KAN 10 446,01875 121–DPL 754 KAN 11 446,03125 121–DPL 754 KAN 12 446,04375 121–DPL 754 KAN 13 446,05625 121–DPL 754 KAN 14 446,06875 121–DPL 754 KAN 15 446,08125 121–DPL 754 KAN 16 446,09375 121–DPL 754...
- Page 623 Norsk Sone Kanalnavn Frekvens (MHz) Koder KAN 06 446,06875 1–67,0 Hz KAN 07 446,08125 1–67,0 Hz KAN 08 446,09375 1–67,0 Hz KAN 09 433,07500 1–67,0 Hz KAN 10 433,30000 1–67,0 Hz KAN 11 433,55000 1–67,0 Hz KAN 12 433,80000 1–67,0 Hz KAN 13 434,05000 1–67,0 Hz...
- Page 624 Norsk Tabell for digitale frekvenser og koder Tabellene i denne delen gir frekvens- og kodeinformasjon. Denne tabellen er nyttig når du bruker Motorola Solutions XT- seriens toveisradioer med andre profesjonelle radioer. Tabell 9: Standard kanalfrekvens og støyelimineringskode for XT660d Sone...
- Page 625 Norsk Sone Kanalnavn Frekvens (MHz) Koder KAN 28 446,171875 Fargekode-12 KAN 29 446,178125 Fargekode-13 KAN 30 446,184375 Fargekode-14 KAN 31 446,190625 Fargekode-15 KAN 32 446,196875 Fargekode-16 Tabell 10: Standard kanalfrekvens og støyelimineringskode for XT665d Sone Kanalnavn Frekvens (MHz) Koder KAN 17 446,003125 Fargekode-1 KAN 18...
- Page 626 Norsk Sone Kanalnavn Frekvens (MHz) Koder KAN 25 446,053125 Fargekode-9 KAN 26 446,059375 Fargekode-10 KAN 27 446,065625 Fargekode-11 KAN 28 446,071875 Fargekode-12 KAN 29 446,078125 Fargekode-13 KAN 30 446,084375 Fargekode-14 KAN 31 446,090625 Fargekode-15 KAN 32 446,096875 Fargekode-16 Full frekvensliste for XT660d ADVARSEL: *Bare de analoge frekvensene 446,0–446,1 MHz er tilgjengelige som standard.
- Page 627 Norsk PMR446-frekvens (MHz) 446,01875 446,06875 446,11875 446,16875 446,03125 446,08125 446,13125 446,18125 446,04375 446,09375 446,14375 446,19375 ADVARSEL: *De digitale frekvensene 446,0-446,1 MHz for XT660d er bare tilgjengelige for å bli produsert januar 2018 eller senere. digital PMR446-frekvens (MHz) *446,003125 *446,053125 446,103125 446,153125 *446,009375 *446,059375...
- Page 628 Norsk Full frekvensliste for XT665d PMR446-frekvens (MHz) 446,00625 446,03125 446,05625 446,08125 446,01875 446,04375 446,06875 446,09375 digital PMR446-frekvens (MHz) 446,003125 446,028125 446,053125 446,078125 446,009375 446,034375 446,059375 446,084375 446,015625 446,040625 446,065625 446,090625 446,021875 446,046875 446,071875 446,096875 LPD433-frekvens (MHz) 433,07500 433,52500 433,97500 434,42500 433,10000 433,55000 434,00000...
- Page 629 Norsk LPD433-frekvens (MHz) 433,17500 433,62500 434,07500 434,52500 433,20000 433,65000 434,10000 434,55000 433,22500 433,67500 434,12500 434,57500 433,25000 433,70000 434,15000 434,60000 433,27500 433,72500 434,17500 434,62500 433,30000 433,75000 434,20000 434,65000 433,32500 433,77500 434,22500 434,67500 433,35000 433,80000 434,25000 434,70000 433,37500 433,82500 434,27500 434,72500 433,40000 433,85000 434,30000 434,75000...
- Page 630 Norsk CTCSS- og PL/DPL-koder Tabell 11: CTCSS-koder CTCSS CTCSS 67,0 136,5 71,9 141,3 74,4 146,2 77,0 151,4 79,7 156,7 82,5 162,2 85,4 167,9 88,5 173,8 91,5 179,9 94,8 186,2 97,4 192,8 100,0 203,5 103,5 210,7 Tabell forts. … Send tilbakemelding...
- Page 631 Norsk CTCSS CTCSS 107,2 218,1 110,9 225,7 114,8 233,6 118,8 241,8 123,0 250,3 127,3 122 (*) 69,3 131,8 Tabell 12: PL/DPL-koder Kode Kode Kode Invertert DPL 69 Invertert DPL 70 Invertert DPL 71 Invertert DPL 72 Invertert DPL 73 Invertert DPL 74 Tabell forts.
- Page 632 Norsk Kode Kode Kode Invertert DPL 75 Invertert DPL 76 Invertert DPL 77 Invertert DPL 78 Invertert DPL 79 Invertert DPL 80 Invertert DPL 81 Invertert DPL 82 Invertert DPL 83 Invertert DPL 84 Invertert DPL 85 Invertert DPL 86 Invertert DPL 87 Invertert DPL 88 Invertert DPL 89...
- Page 633 Norsk Kode Kode Kode Invertert DPL 91 Invertert DPL 92 Tilpasset PL Invertert DPL 93 Tilpasset PL Invertert DPL 94 Tilpasset PL Invertert DPL 95 Tilpasset PL Invertert DPL 96 Tilpasset PL Invertert DPL 97 Tilpasset PL Invertert DPL 98 Invertert DPL 39 Invertert DPL 99 Invertert DPL 40...
- Page 634 Norsk Kode Kode Kode Invertert DPL 47 Invertert DPL 107 Invertert DPL 48 Invertert DPL 108 Invertert DPL 49 Invertert DPL 109 Invertert DPL 50 Invertert DPL 110 Invertert DPL 51 Invertert DPL 111 Invertert DPL 52 Invertert DPL 112 Invertert DPL 53 Invertert DPL 113 Invertert DPL 54...
- Page 635 Norsk Kode Kode Kode Invertert DPL 63 Invertert DPL 123 Invertert DPL 64 Tilpasset DPL Invertert DPL 65 Tilpasset DPL Invertert DPL 66 Tilpasset DPL Invertert DPL 67 Tilpasset DPL Invertert DPL 68 Tilpasset DPL Send tilbakemelding...
- Page 636 Norsk Denne siden er tom med hensikt.
- Page 637 å kreve garantiservice. Ikke returner radioen modifikasjoner. til Motorola Solutions. For å være kvalifisert for å motta garantiservice må du vise kvittering for kjøpet eller et annet • Brudd eller skader på antenner med mindre dette er tilsvarende kjøpsbevis som er merket med kjøpsdatoen.
- Page 638 Norsk Denne siden er tom med hensikt.
- Page 639 Norsk Tilbehør Tabell 15: Kabler Delenr. Beskrivelse Tabell 13: Lydtilbehør HKKN4028_ Radio-til-radio-kloningskabel HKKN4027_ CPS-programmeringskabel Delenr. Beskrivelse HKLN4601_ Overvåkingssett med kablet mikrofon Tabell 16: Ladere og PTT HKLN4599_ D-formet øretelefon med kablet Delenr. Beskrivelse mikrofon og PTT PMLN6383_ SUC ladeholder HKLN4604_ Dreibar øretelefon med kablet mikrofon 25012026001 100–240 V, 7,5 W, universell, mikro-...
- Page 640 Delenr. Beskrivelse PMLN7709_ Bæreveske i skinn for XT600d-serien MERKNAD: Det kan hende at noe tilbehør ikke er tilgjengelig på kjøpstidspunktet. Kontakt din Motorola Solutions- forhandler eller besøk http:// www.motorolasolutions.com for den nyeste informasjonen om tilgjengelighet for tilbehør og nye tilbehørsmodeller.
- Page 641 Nederlands Inhoud 2.8 Een losse batterij opladen......27 2.9 LED-indicatoren van de oplader....28 2.10 Batterijmeter..........29 Auteursrechten op computersoftware......7 2.11 Geschatte oplaadtijd........30 Belangrijke veiligheidsinformatie........9 2.12 Een portofoon en batterij opladen met Voorzorgsmaatregel............. 11 behulp van een oplader voor meerdere Inleiding................
- Page 642 Nederlands 3.11 Pieptoon in- of uitschakelen...... 40 4.4 Scannen............49 3.12 Het toetsenblok vergrendelen of 4.4.1 Een scanlijst selecteren....49 ontgrendelen............41 4.4.2 Een prioritair kanaal uit een 3.13 Menu-opties raadplegen......41 scanlijst selecteren......... 50 Hoofdstuk 4: Geavanceerde functies......43 4.4.3 Een kanaal uit de scanlijst verwijderen:..........
- Page 643 XT665d.............. 80 4.11 Onderbreking..........59 8.5 CTCSS- en PL/DPL-codes......82 4.12 Directe oproep via portofoon-ID....60 Bijlage A: Beperkte garantie van Motorola Solutions... 89 4.13 Reverse Burst..........61 A.1 Wat door de garantie niet wordt gedekt..89 4.14 Stille modus..........61 A.2 Garantie-informatie........89 Hoofdstuk 5: De portofoon instellen......
- Page 644 Nederlands Deze pagina is bewust leeg gelaten.
- Page 645 Motorola Solutions-producten dan ook niet zonder de uitdrukkelijke, schriftelijke toestemming van Motorola Solutions op welke manier dan ook worden gekopieerd, gereproduceerd, aan reverse-engineering worden onderworpen of worden verspreid. Aan de koop van Motorola Solutions-producten kan...
- Page 646 Nederlands Deze pagina is bewust leeg gelaten.
- Page 647 Deze bevat belangrijke bedieningsinstructies voor veilig gebruik, beperking van blootstelling aan radiogolven en naleving van de relevante normen en regelgeving. Raadpleeg de volgende website voor een lijst met door Motorola Solutions goedgekeurde batterijen en andere accessoires: http://www.motorolasolutions.com Feedback verzenden...
- Page 648 Nederlands Deze pagina is bewust leeg gelaten.
- Page 649 Nederlands Voorzorgsmaatregel schoon water (dat wil zeggen één theelepel reinigingsmiddel voor een liter water). De XT600d-serie digitale draagbare portofoon voldoet aan • Gebruik tijdens het schoonmaken van de portofoon IP55-specificaties, waardoor de portofoon bestand is tegen geen hogedrukspuit op de portofoon; hierdoor kan water schadelijke invloeden van buitenaf zoals gebruik in de in de portofoon binnendringen.
- Page 650 Nederlands Deze pagina is bewust leeg gelaten.
- Page 651 Nederlands Inleiding In deze gebruikershandleiding wordt de werking van uw portofoons beschreven. Uw leverancier of systeembeheerder kan de portofoon hebben aangepast aan uw specifieke eisen. Vraag uw leverancier of systeembeheerder om meer informatie. U kunt uw leverancier of systeembeheerder om de volgende informatie vragen: •...
- Page 652 Nederlands Deze pagina is bewust leeg gelaten.
- Page 653 1 Verminder de kans op letsel door alleen gebruik te verkrijgbaar. Als u de oplader uit elkaar haalt, kan er maken van de oplaadbare, door Motorola Solutions een elektrische schok of brand ontstaan. goedgekeurde batterijen. Het opladen van andere...
- Page 654 Nederlands • De oplader is niet geschikt voor gebruik buitenshuis. Gebruik deze alleen op droge locaties/in droge omstandigheden. • Sluit de oplader aan op een correct bekabelde voedingsbron met zekeringen en het juiste voltage (uitsluitend zoals vermeld op het product). •...
- Page 655 Nederlands Overzicht van de portofoon In dit hoofdstuk wordt uitleg gegeven over de knoppen en functies om de portofoon te bedienen. Feedback verzenden...
- Page 656 Nederlands Bedieningsknoppen In de volgende tabel wordt uitleg gegeven over de functies van elke knop op de radio: Tabel1: Tabel met referentienummers bedieningsknoppen Nummer Beschrijving Antenne De antenne van model XT660d/XT665d kan niet worden verwijderd. Opening voor riem Opnameknop Druk op de knop om de opnametransmissiefunctie aan of uit te schakelen. Zie Opnemen op pagina 55 voor meer details.
- Page 657 Nederlands Nummer Beschrijving Wordt gebruikt om de batterijstatus, de opstartstatus, informatie over de portofoonoproep en de scanstatus aan te geven. Luidspreker Microfoon De gebruiker moet duidelijk in de microfoon spreken wanneer deze een bericht wilt versturen. LCD-display Monochroom display met oranje achtergrondverlichting. Menu/OK-knop en navigatietoetsen Druk op om een menu te openen of een selectie te bevestigen;...
- Page 658 Klepje van de batterij Batterij De XT600d-serie wordt geleverd met een standaardcapaciteit lithium-ionbatterij. Mogelijk zijn er ook andere batterijen beschikbaar. Zie Tabel4: Door Motorola Solutions goedgekeurde batterijen op pagina 28 voor meer details. Tabel2: Standaardinstelling voor SB1- en SB2-knoppen Knoppen...
- Page 659 Nederlands Knoppen Standaardinstelling Lang drukken op SB2 Monitor Om te beschrijven hoe elk keer drukken voor een portofoon werkt: Kort drukken Snel drukken en loslaten. Lang drukken Ingedrukt houden voor de geprogrammeerde duur. Ingedrukt houden Houd de knop ingedrukt. KENNISGEVING: Uw leverancier of systeembeheerder kan de portofoon hebben aangepast aan uw specifieke eisen.
- Page 660 Nederlands Portofoonspecificaties In de volgende tabel wordt uitleg gegeven over de portofoonspecificaties: Tabel3: Portofoonspecificaties voor XT660d/XT665d XT660d XT665d Frequentieband (MHz) PMR446, digital PMR446 PMR446, digital PMR446, LPD 433-434 0,5 voor PMR446 en digital PMR446, Zendvermogen (W) 0,01 voor LPD Aantal kanalen Antenne Kan niet worden verwijderd Kan niet worden verwijderd...
- Page 661 Door op te laden in een apparaat dat niet van sterkten. De sterkte is bepalend voor de levensduur van de Motorola Solutions is, kan de batterij beschadigen en kan batterij. de garantie van de batterij komen te vervallen. Houd indien mogelijk de temperatuur van de batterij op 25 °C...
- Page 662 Nederlands 2 Met de Motorola Solutions-logo naar boven gericht, Lithium-ionbatterij installeren plaatst u de lipjes (2) aan de onderkant van de batterij in de sleuven (3). De volgende stappen leggen uit hoe een lithium-ionbatterij wordt geïnstalleerd: 3 Druk de batterijvergrendeling (1) naar de portofoon toe tot deze op zijn plaats klikt.
- Page 663 Nederlands Voedingsbron en oplader voor één apparaat De portofoon wordt geleverd met een oplader voor één apparaat, een voedingsbron (ook bekend als transformator) en een set adapters. • Lijn de adapter (1) uit met de groeven van de U kunt uw voedingsbron aanpassen aan de adapters die voedingsbron (2) tot deze op zijn plaats klikt.
- Page 664 Schuif de portofoon en neem deze uit de houder. De portofoon opladen Plaats de batterij, met de portofoon aangesloten, in een door Motorola Solutions goedgekeurde oplader voor één of meerdere apparaten. Portofoon opladen met de oplader voor één apparaat De volgende stappen leggen uit hoe de portofoon wordt opgeladen met behulp van een oplader voor één apparaat:...
- Page 665 Nederlands 3 Plaats de portofoon in de oplader met de portofoon naar de voorzijde toe gekeerd, zoals in de afbeelding. KENNISGEVING: Wanneer u een accu wilt opladen die in een radio is geplaatst, schakelt u de radio uit om de accu volledig op te laden.
- Page 666 Nederlands Tabel4: Door Motorola Solutions goedgekeurde batterijen Onderdeelnu Beschrijving mmer PMNN4434_R Standaard lithium-ionbatterij PMNN4453_R Lithium-ionbatterij met hoge capaciteit LED-indicatoren van de oplader 1 Voer stap 3 "Portofoon opladen met de oplader voor In de volgende tabel wordt uitleg gegeven over het verschil één apparaat op pagina...
- Page 667 • Controleer of de batterij van de portofoon is opgenomen opnieuw te plaatsen. Tabel4: Door Motorola Solutions goedgekeurde batterijen op pagina Accutemperatuu r is te hoog of te 2.10 Wacht op Knippert laag of het...
- Page 668 Nederlands meerdere apparaten - optioneel Batterijmeter accessoire 3 streepjes 2 streepjes 1 streepje 35–0% Met de oplader voor meerdere apparaten kunt u maximaal (≤ 10% als de 6 portofoons of batterijen opladen. Portofoons kunnen 100–70% 70–30% meter knippert) samen met de erin geplaatste batterij worden opgeladen, of u kunt de batterij uit de portofoon halen en afzonderlijk in het laadstation plaatsen.
- Page 669 Nederlands 2 Steek de stekker van de stroomkabel in de 2-pins aansluiting (1) onder op het laadstation. 3 Steek de stroomkabel in een stopcontact. 4 Schakel de portofoon uit. 5 Plaats de portofoon of batterij in het laadvak (3). Richt daarbij de portofoon of batterij van de contactpunten (2) af.
- Page 670 Nederlands Deze pagina is bewust leeg gelaten.
- Page 671 Nederlands Aan de slag KENNISGEVING: Houd de portofoon niet te dicht bij uw oor wanneer het volume hoog staat of wanneer u het volume Dit gedeelte helpt u om vertrouwd te raken met het regelt. standaardgebruik van de portofoon. Portofoondisplay De radio in- en uitschakelen Draai de Aan/uit/volume-knop naar rechts om de portofoon in te schakelen.
- Page 672 Nederlands In de volgende tabel worden de pictogrammen beschreven: Pict ogra Beschrijving Pict ogra Beschrijving 6.i. De portofoon communiceert in een groepsoproep. Het aantal streepjes (0–3) geeft het 6.ii. De portofoon communiceert in een huidige batterijniveau aan. privéoproep. Scannen is ingeschakeld. Dit is de indicator voor de ontvangen signaalsterkte.
- Page 673 Nederlands Pict Een oproep ontvangen ogra Beschrijving De volgende stappen leggen uit hoe u een oproep Geeft de huidige CTCSS/DPL-code ontvangt: aan. 1 Laat de PTT-knop los en luister of er wordt KENNISGEVING: gesproken. De portofoondisplay die hier wordt weergegeven, is alleen bedoeld om de locatie van de pictogrammen 2 Als u wilt antwoorden, houdt u de portofoon verticaal aan te geven.
- Page 674 Nederlands streepjes) en blijft de LED van de portofoon oranje gebladerte en door de portofoons binnenshuis of in een branden. Het symbool voor de signaalsterkte-indicator van voertuig te gebruiken. Het optimale bereik wordt verkregen in een vlak, open gebied en kan dan 9 km bedragen. Als er de portofoon kan variëren van 1 (zwakste) tot 6 gebouwen en bomen in de weg staan, wordt er een...
- Page 675 Nederlands LED-indicatoren van de portofoon In de volgende tabel wordt uitleg gegeven over de status van de portofoon en de LED-indicatie: Portofoonstatus LED-indicator Opstarten Brandt 3 seconden lang rood. Verzenden (TX)/ontvangen (RX) Brandt rood als de radio gegevens verzendt of ontvangt. 'Inactieve' programmeermodus/ Knipperend rood op snelheid van hartslag.
- Page 676 Nederlands Portofoonstatus LED-indicator Firmwareflitser Toont ononderbroken groen wanneer de portofoon gereed is voor flitsen; tijdens het flitsen knippert de LED groen in hoog tempo, de LED gaat uit als de gegevensoverdracht klaar is en de LED brandt 3 seconden rood als de portofoon wordt opgestart. 3.9.1 VOX en iVOX VOX instellen...
- Page 677 3.9.3 iVOX-gevoeligheid aanpassen KENNISGEVING: Neem contact op met uw Motorola Solutions- De gevoeligheid van de het accessoire of de microfoon van verkooppunt om accessoires te bestellen. de portofoon kan worden aangepast voor verschillende werkomgevingen. De iVOX-gevoeligheid kan worden 3.9.2...
- Page 678 Nederlands geprogrammeerd met Customer Programming Software Druk tegelijkertijd op PTT, SB2 en SB1 terwijl u de portofoon aanzet totdat u een hoog tjilpgeluid hoort. (CPS) of de -knop. De standaardwaarde is MEDIUM. iVOX kan op elk van de 3.11 volgende waarden worden ingesteld: Pieptoon in- of uitschakelen De volgende stappen leggen uit hoe u de pieptoon in- en Druk op...
- Page 679 Nederlands 3.12 Houd 4 seconden ingedrukt. Het toetsenblok vergrendelen of ontgrendelen Het symbool voor blokkering verdwijnt om aan U kunt het toetsenblok vergrendelen om te voorkomen dat te geven dat het toetsenblok en de knoppen aan de uw portofooninstellingen per ongeluk worden gewijzigd. De zijkant toegankelijk zijn.
- Page 680 Nederlands • CHANNEL EDIT • CONTACTS • SCAN • MESSAGE • RECORDING • CALL LOG • ZONE • RADIO INFO 3 Voer een van de volgende handelingen uit: • Druk op om de functie te openen. • Druk op om de functie te sluiten. KENNISGEVING: De modus Menu wordt automatisch gesloten als er meer dan 10 seconden geen activiteit wordt...
- Page 681 Nederlands Geavanceerde functies Typen Opties Standaardwaar instellingen • DUTCH Instelling • PORTUGUESE • GERMAN Er zijn enkele items in het instellingenmenu waarvan u de configuratie op de portofoon direct kunt wijzigen zonder • POLISH CPS te hoeven gebruiken. In de tabel worden de •...
- Page 682 Nederlands Druk op en blader door de lijst met Druk op en ga naar het gewenste kanaal. beschikbare selecties. 3 Als het display de gewenste kanaalalias weergeeft, Gebruik om uw keuze te drukt u en gaat u naar CHAN ALIAS. maken.
- Page 683 Nederlands 3 Als het display de gewenste kanaalnaam toont, drukt 3 Als het display de gewenste kanaalnaam toont, drukt u op en gaat u naar RX/TX EDIT. u op en gaat u naar RX/TX EDIT. Druk op en ga naar FREQUENCY. Druk op en ga naar PL/DPL.
- Page 684 Nederlands Privéoproep Gebruik om door de lijst met Een oproep van de ene portofoon naar een andere beschikbare selecties te bladeren. portofoon. Om een privéoproep te plaatsen, moet uw portofoon zijn geprogrammeerd om een privéoproep te 3 Als de portofoon de gewenste oproep-ID toont, drukt starten.
- Page 685 Nederlands 4.3.3 Functies Beschrijving Een nieuw contact aan de lijst met Als de gebruiker een aanvraag voor RADIO CHECK contacten toevoegen radiocontrole start, kan deze bepalen of de doelportofoon actief is in een De volgende stappen leggen uit hoe u een nieuwe systeem met ontvangstbevestiging contactpersoon aan de lijst met contacten toevoegt: nadat de aanvraag is gestart.
- Page 686 Nederlands 4.3.4 4 Druk nogmaals op de knop voor toegang met één Een digitale oproep plaatsen via toets om het gesprek te beëindigen. toegang met één toets 5 Druk, als het gesprek in de wacht staat, op de PTT- Met de functie Toegang met één toets kunnen gebruikers knop om het gaande gesprek te beantwoorden.
- Page 687 Nederlands Gebruik om door de lijst selecties te Druk in het startscherm op bladeren. 2 Druk op het nummer via het alfanumerieke toetsenblok en druk op de PTT-knop om een oproep Selecteer de portofooncontacten en druk op te plaatsen. Ga naar QUICK CONTACT en druk op Scannen Gebruik om door de selectielijst te...
- Page 688 Nederlands Een prioritair kanaal uit een scanlijst Druk op en ga naar SCAN. selecteren Met de functie prioriteitsmonitor kan de portofoon Druk op en gebruik om door automatisch een oproep van een lid van een de scanlijst te bladeren. gespreksgroep met een hogere prioriteit ontvangen terwijl deze met een ander gesprek bezig is.
- Page 689 Nederlands • Om prioriteit in te schakelen, gaat u naar Ga naar DELETE en druk op PRIORITY ON en drukt u op 6 Voer een van de volgende handelingen uit: • Om prioriteit uit te schakelen, gaat u naar • Om te verwijderen, gaat u naar DELETE?.
- Page 690 Nederlands 3 Zodra het scannen is geselecteerd, drukt u op Selecties Beschrijvingen Gebruik het alfanumerieke NEW TEXT toetsenblok om de berichten handmatig te typen. Ga naar ADD en druk op Overzicht van ontvangen INBOX berichten. De gebruiker kan hier 5 Blader door de scanlijst en selecteer de gewenste berichten doorsturen of kanaalalias.
- Page 691 Nederlands Druk op om het berichtenscherm te openen. Druk op en ga naar MESSAGE. Ga naar NEW TEXT en druk op Druk op om het berichtenscherm te openen. 4 Gebruik het alfanumerieke toetsenblok om het sms- Ga naar INBOX en druk op bericht in te voeren.
- Page 692 Nederlands • Om terug te gaan naar het vorige scherm, gaat u Druk op om het verzenden te bevestigen. naar CANCEL?. De portofoon geeft een lijst met contacten in de • Om een bericht te bekijken, gaat u naar REVIEW. contactpersonenlijst.
- Page 693 Nederlands transmissie wordt beëindigd. Als de transmissie langer dan 4 Blader door de lijst met verzonden berichten en druk 3 minuten duurt, wordt de volgende opname gestart om te selecteren. onmiddellijk nadat de vorige opname is beëindigd. Dit wordt herhaald tot de transmissie wordt beëindigd, en de 5 Voer een van de volgende handelingen uit: volledige opnametijd is 15 minuten.
- Page 694 Nederlands De functie staat in de inactieve opnamemodus • Om opgenomen bestanden te vergrendelen, gaat wanneer er geen oproep plaatsvindt. Wanneer de u naar LOCKED. portofoon een oproep heeft gedetecteerd, neemt de • Om te verwijderen, gaat u naar DELETE?. opnamemodus het gesprek automatisch op.
- Page 695 Nederlands Een contact uit het oproeplogboek Oproeplogboek opslaan in de lijst met contacten Met het oproeplogboek kan de gebruiker de De volgende stappen leggen uit hoe u een contactpersoon oproepgeschiedenis van de portofoon controleren. De uit het oproeplogboek opslaat in de lijst met contacten: volgende stappen leggen uit hoe u toegang krijgt tot het oproeplogboek: Druk op...
- Page 696 Nederlands Druk op om de details op te slaan. Druk op en ga naar de lijst met zones. 3 Wanneer de vereiste zone wordt weergegeven, drukt Zone u op om te selecteren. Een zone is een groep kanalen. Er zijn vier zones beschikbaar en elke zone bestaat uit verschillende Portofooninformatie kanalen.
- Page 697 Nederlands portofoonscherm en de LED uitgeschakeld en is de Houd ingedrukt totdat u een pieptoon hoort. luidspreker van de portofoon gedempt. Alle communicatie- en audio-indicatoren lopen via de accessoires. PTT- 2 Druk op het viercijferige wachtwoord. knoppen en andere bedieningsknoppen werken zoals gebruikelijk.
- Page 698 Nederlands De volgende stappen beschrijven het gedrag van de onderbreking is verlopen; op de portofoon met onderbreking tussen portofoons: WAIT op het display verschijnt FAIL!. De beperkte duur van de onderbreking kan worden 1 Tijdens een actieve groepsoproep drukt u op de geprogrammeerd via CPS.
- Page 699 Nederlands 4.13 Selecties Beschrijving Reverse Burst De stille modus is uitgeschakeld. KENNISGEVING: Alleen audio- Geluid wordt geleid naar de Deze functie is alleen beschikbaar in de analoge accessoires headset in plaats van naar de modus. luidspreker van de portofoon als oproepen worden ontvangen.
- Page 700 Nederlands Deze pagina is bewust leeg gelaten.
- Page 701 Nederlands De portofoon instellen Instellen met behulp van CPS In dit hoofdstuk wordt uitgelegd hoe u de portofoon instelt. KENNISGEVING: Uw leverancier of systeembeheerder kan de portofoon hebben aangepast aan uw specifieke eisen. Vraag aan uw leverancier of systeembeheerder hoe dit op uw radio is ingesteld. Afbeelding1: De portofoon instellen via CPS Om te programmeren sluit u de XT600d-serie-portofoon (1) aan met behulp van de oplader voor één apparaat (2) en...
- Page 702 Nederlands Met CPS kunt u frequenties, PL/DPL-codes en andere KENNISGEVING: functies programmeren, zoals: Onderbreken, modus Zorg ervoor dat de schakelaar van de kabel in de Verberg en stille modus. CPS is een zeer handig positie 'Flash' of 'CPS-modus' staat. hulpmiddel, omdat hiermee programmering via het voorpaneel van de portofoon kan worden geblokkeerd of het wijzigen van specifieke portofoonfuncties kan worden Portofoon klonen met de portofoon-...
- Page 703 Nederlands • Twee opladers voor één apparaat voor het klonen van portofoons van de XT600d-serie. 2 Koppel eventuele kabels (netsnoeren of USB- kabels) los van de opladers voor één apparaat. Afbeelding2: CPS-kabel 3 Sluit de kloonkabel aan op de USB-converter en sluit het ene uiteinde van de mini-USB-connector van de kloonkabel aan op de eerste oplader voor één apparaat en het andere uiteinde op de tweede...
- Page 704 U hoort "Fail" (mislukt) als het kloonproces is mislukt. Als compatibele opladers voor één apparaat van het klonen mislukt, voert u elk van de volgende stappen uit Motorola Solutions RLN6175 en PMLN6394. voordat u probeert het kloonproces opnieuw te starten: Verwijs naar P/N# HKKN4028_ bij het bestellen van een kloonkabel.
- Page 705 Nederlands Probleemoplossing De volgende tabel geeft uitleg over de manieren om problemen op te lossen als het symptoom zich voordeed: Symptoom en oplossingen Als... Dan... Geen stroom Laad de lithium-ionbatterij op of vervang deze. Een extreme bedrijfstemperatuur kan ervoor zorgen dat de batterij minder lang meegaat.
- Page 706 Nederlands Als... Dan... De geluidskwaliteit is onvoldoende De instellingen van de portofoon zijn niet goed op elkaar afgestemd. Controleer of de frequenties, codes en bandbreedtes van alle portofoons overeenkomen. Beperkt zendbereik Stalen en/of betonnen constructies, dicht gebladerte en gebouwen of voertuigen beperken het bereik. Gebruik een open omgeving om het zendbereik te verbeteren.
- Page 707 Nederlands Als... Dan... Laad de batterijen op, vervang ze of verwissel ze van plaats. Zie Over de lithium-ionbatterij op pagina Obstakels en gebruik binnenshuis of in voertuigen veroorzaken interferentie. Wijzig de locaties. Zie Zendbereik op pagina Zware statische ruis of interferentie De portofoons bevinden zich te dicht bij elkaar;...
- Page 708 Nederlands Als... Dan... Het lampje knippert om aan te geven dat de Lithium-ionbatterij installeren op pagina 24 batterijen bijna leeg zijn, terwijl er nieuwe Over de lithium-ionbatterij op pagina batterijen zijn geplaatst Kan VOX niet activeren Mogelijk is de VOX-functie uitgeschakeld. Gebruik de CPS om te controleren of het VOX- gevoeligheidsniveau is ingesteld op '0'.
- Page 709 Nederlands Gebruik en onderhoud In dit hoofdstuk wordt beschreven hoe de portofoon goed wordt gebruikt: Veiligheidsmaatregel Gebruik een zachte, vochtige doek Dompel de portofoon niet onder in Gebruik geen alcohol of om de buitenkant te reinigen water schoonmaakmiddelen. Als de portofoon wordt ondergedompeld in water, Schakel de portofoon uit en Droog de portofoon met een zachte Gebruik de portofoon pas als deze...
- Page 710 Nederlands Deze pagina is bewust leeg gelaten.
- Page 711 Analoge frequentie- en codetabellen De tabellen in deze sectie geven informatie over de frequenties en bijbehorende codes. Deze tabellen zijn handig wanneer u de Motorola Solutions XT600d-tweerichtingsportofoons gebruikt in combinatie met andere bedrijfsportofoons. Tabel7: Standaard kanaalfrequentie en interferentie-eliminatiecode voor XT660d...
- Page 712 Nederlands Zone Naam van de zender Frequentie (MHz) Codes CHAN 09 446.00625 121-DPL 754 CHAN 10 446.01875 121-DPL 754 CHAN 11 446.03125 121-DPL 754 CHAN 12 446.04375 121-DPL 754 CHAN 13 446.05625 121-DPL 754 CHAN 14 446.06875 121-DPL 754 CHAN 15 446.08125 121-DPL 754 CHAN 16...
- Page 713 Nederlands Zone Naam van de zender Frequentie (MHz) Codes CHAN 06 446.06875 1–67,0 Hz CHAN 07 446.08125 1–67,0 Hz CHAN 08 446.09375 1–67,0 Hz CHAN 09 433,07500 1–67,0 Hz CHAN 10 433,30000 1–67,0 Hz CHAN 11 433,55000 1–67,0 Hz CHAN 12 433,80000 1–67,0 Hz CHAN 13...
- Page 714 Digitale frequentie- en codetabel De tabellen in deze sectie geven informatie over de frequenties en bijbehorende codes. Deze tabel is handig wanneer u de tweerichtingsportofoons van de Motorola Solutions XT600d-serie gebruikt in combinatie met andere bedrijfsportofoons. Tabel9: Standaard kanaalfrequentie en interferentie-eliminatiecode voor XT660d...
- Page 715 Nederlands Zone Naam van de zender Frequentie (MHz) Codes CHAN 28 446.171875 Kleurcode - 12 CHAN 29 446.178125 Kleurcode -13 CHAN 30 446.184375 Kleurcode -14 CHAN 31 446.190625 Kleurcode -15 CHAN 32 446.196875 Kleurcode -16 Tabel10: Standaard kanaalfrequentie en interferentie-eliminatiecode voor XT665d Zone Naam van de zender Frequentie (MHz)
- Page 716 Nederlands Zone Naam van de zender Frequentie (MHz) Codes CHAN 25 446.053125 Kleurcode - 9 CHAN 26 446.059375 Kleurcode - 10 CHAN 27 446.065625 Kleurcode - 11 CHAN 28 446.071875 Kleurcode - 12 CHAN 29 446.078125 Kleurcode -13 CHAN 30 446.084375 Kleurcode -14 CHAN 31...
- Page 717 Nederlands Frequentie PMR446 (MHz) 446.01875 446.06875 446.11875 446.16875 446.03125 446.08125 446.13125 446.18125 446.04375 446.09375 446.14375 446.19375 WAARSCHUWING: *446.0-446.1 MHz digitale frequenties voor XT660d wordt pas beschikbaar in of na januari 2018. Frequentie digital PMR446 (MHz) *446.003125 *446.053125 446.103125 446.153125 *446.009375 *446.059375 446.109375 446.159375...
- Page 718 Nederlands Volledige frequentiebereiklijst voor XT665d Frequentie PMR446 (MHz) 446.00625 446.03125 446.05625 446.08125 446.01875 446.04375 446.06875 446.09375 Frequentie digital PMR446 (MHz) 446.003125 446.028125 446.053125 446.078125 446.009375 446.034375 446.059375 446.084375 446.015625 446.040625 446.065625 446.090625 446.021875 446.046875 446.071875 446.096875 Frequentie LPD433 (MHz) 433.07500 433.52500 433.97500 434.42500...
- Page 719 Nederlands Frequentie LPD433 (MHz) 433.17500 433.62500 434.07500 434.52500 433.20000 433.65000 434.10000 434.55000 433.22500 433.67500 434.12500 434.57500 433.25000 433.70000 434.15000 434.60000 433.27500 433.72500 434.17500 434.62500 433.30000 433.75000 434.20000 434.65000 433.32500 433.77500 434.22500 434.67500 433.35000 433.80000 434.25000 434.70000 433.37500 433.82500 434.27500 434.72500 433.40000 433.85000 434.30000...
- Page 720 Nederlands CTCSS- en PL/DPL-codes Tabel11: CTCSS-codes CTCSS CTCSS 67.0 136.5 71.9 141.3 74.4 146.2 77.0 151.4 79.7 156.7 82.5 162.2 85.4 167.9 88.5 173.8 91.5 179.9 94.8 186.2 97.4 192.8 100.0 203.5 103.5 210.7 Vervolg tabel… Feedback verzenden...
- Page 721 Nederlands CTCSS CTCSS 107.2 218.1 110.9 225.7 114.8 233.6 118.8 241.8 123.0 250.3 127.3 122 (*) 69.3 131.8 Tabel12: PL/DPL-codes Code Code Code Geïnverteerde DPL 69 Geïnverteerde DPL 70 Geïnverteerde DPL 71 Geïnverteerde DPL 72 Geïnverteerde DPL 73 Geïnverteerde DPL 74 Vervolg tabel…...
- Page 722 Nederlands Code Code Code Geïnverteerde DPL 75 Geïnverteerde DPL 76 Geïnverteerde DPL 77 Geïnverteerde DPL 78 Geïnverteerde DPL 79 Geïnverteerde DPL 80 Geïnverteerde DPL 81 Geïnverteerde DPL 82 Geïnverteerde DPL 83 Geïnverteerde DPL 84 Geïnverteerde DPL 85 Geïnverteerde DPL 86 Geïnverteerde DPL 87 Geïnverteerde DPL 88 Geïnverteerde DPL 89...
- Page 723 Nederlands Code Code Code Geïnverteerde DPL 91 Geïnverteerde DPL 92 Aangepaste PL Geïnverteerde DPL 93 Aangepaste PL Geïnverteerde DPL 94 Aangepaste PL Geïnverteerde DPL 95 Aangepaste PL Geïnverteerde DPL 96 Aangepaste PL Geïnverteerde DPL 97 Aangepaste PL Geïnverteerde DPL 98 Geïnverteerde DPL Geïnverteerde DPL 99 Geïnverteerde DPL...
- Page 724 Nederlands Code Code Code Geïnverteerde DPL Geïnverteerde DPL 104 Geïnverteerde DPL Geïnverteerde DPL 105 Geïnverteerde DPL Geïnverteerde DPL 106 Geïnverteerde DPL Geïnverteerde DPL 107 Geïnverteerde DPL Geïnverteerde DPL 108 Geïnverteerde DPL Geïnverteerde DPL 109 Geïnverteerde DPL Geïnverteerde DPL 110 Geïnverteerde DPL Geïnverteerde DPL 111 Geïnverteerde DPL Geïnverteerde DPL 112...
- Page 725 Nederlands Code Code Code Geïnverteerde DPL Geïnverteerde DPL 113 Geïnverteerde DPL Geïnverteerde DPL 114 Geïnverteerde DPL Geïnverteerde DPL 115 Geïnverteerde DPL Geïnverteerde DPL 116 Geïnverteerde DPL Geïnverteerde DPL 117 Geïnverteerde DPL Geïnverteerde DPL 118 Geïnverteerde DPL Geïnverteerde DPL 119 Geïnverteerde DPL Geïnverteerde DPL 120 Geïnverteerde DPL Geïnverteerde DPL 121...
- Page 726 Nederlands Code Code Code Geïnverteerde DPL Geïnverteerde DPL 122 Geïnverteerde DPL Geïnverteerde DPL 123 Geïnverteerde DPL Aangepaste DPL Geïnverteerde DPL Aangepaste DPL Geïnverteerde DPL Aangepaste DPL Geïnverteerde DPL Aangepaste DPL Geïnverteerde DPL Aangepaste DPL Feedback verzenden...
- Page 727 • Defecten of schade door misbruik, ongevallen, of A.2 Garantie-informatie nalatigheid. De geautoriseerde Motorola Solutions-verkoper bij wie u de • Defecten of beschadigingen die het gevolg zijn van Motorola Solutions-tweerichtingsportofoon en/of originele onjuist testen, bedienen, onderhouden of afstellen of accessoires hebt gekocht, accepteert een garantieclaim van aanpassingen of wijzigingen aan het toestel.
- Page 728 Nederlands het type- of serienummer op het product is veranderd, verwijderd of onleesbaar gemaakt. Feedback verzenden...
- Page 729 Nederlands Accessoires Tabel15: Kabels Artikelnr. Beschrijving Tabel13: Audio-accessoires HKKN4028_ Kloonkabel portofoon-naar-portofoon HKKN4027_ CPS-programmeerkabel Artikelnr. Beschrijving HKLN4601_ Bewakingskit met geïntegreerde Tabel16: Opladers microfoon en PTT HKLN4599_ D-stijl oortelefoon met geïntegreerde Artikelnr. Beschrijving microfoon en PTT PMLN6383_ Oplaadstation voor één apparaat HKLN4604_ Draaibare oortelefoon met 25012026001 100–240 V, 7,5 W, universeel, micro-...
- Page 730 PMLN7709_ XT600d-serie, lederen, draagtas KENNISGEVING: Bepaalde accessoires zijn mogelijk niet verkrijgbaar op het moment van aankoop. Neem contact op met uw Motorola Solutions-filiaal of ga naar http:// www.motorolasolutions.com voor actuele informatie over de beschikbaarheid van accessoires en nieuwe modellen accessoires.
- Page 731 polski Spis treści 2.5 Futerał............26 2.6 Ładowanie radiotelefonu......27 2.7 Ładowanie radiotelefonu za pomocą Prawa autorskie do oprogramowania wsuwanej ładowarki jednostanowiskowej..27 komputerowego..............7 2.8 Ładowanie samodzielnego akumulatora..28 Ważne informacje dotyczące bezpieczeństwa....9 2.9 Wskaźniki LED ładowarki wsuwanej... 29 Środki ostrożności............11 2.10 Wskaźnik naładowania akumulatora..
- Page 732 polski 3.9.2 Konfigurowanie funkcji iVOX..40 4.3.4 Inicjowanie wywołania cyfrowego za pomocą przycisku szybkiego 3.9.3 Regulacja czułości funkcji iVOX..40 dostępu........... 50 3.10 Przywracanie domyślnych ustawień 4.3.5 Szybki kontakt........51 fabrycznych............41 4.3.5.1 Edycja szybkiego 3.11 Włączanie i wyłączanie sygnału kontaktu........51 dźwiękowego.............
- Page 733 polski 4.5.3 Wysyłanie krótkich wiadomości 4.14 Tryb cichy..........64 tekstowych..........57 Rozdział 5. Konfiguracja radiotelefonu......67 4.5.4 Przekazywanie lub usuwanie 5.1 Konfiguracja za pomocą oprogramowania wysłanej wiadomości......57 CPS..............67 4.6 Nagrywanie..........58 5.2 Klonowanie radiotelefonów......68 4.6.1 Rozpoczynanie nagrywania...58 5.3 Klonowanie radiotelefonu za pomocą 4.6.2 Odtwarzanie lub usuwanie przewodu do klonowania radiotelefonu z zapisanych plików........59...
- Page 734 polski 8.5 Kody CTCSS i PL/DPL........ 90 Dodatek A. Ograniczona gwarancja firmy Motorola Solutions...............97 A.1 Czego nie obejmuje gwarancja....97 A.2 Informacje dotyczące gwarancji....97 Dodatek B. Akcesoria..........99 Wyślij informację zwrotną...
- Page 735 Motorola Solutions. Wyjątek stanowi zwykła, niewyłączna, wolna od opłat licencja, jaka zgodnie z prawem jest skutkiem transakcji Produkty firmy Motorola Solutions opisane w tym sprzedaży produktu. podręczniku mogą obejmować autorskie oprogramowanie firmy Motorola Solutions umieszczone w pamięci półprzewodnikowej lub na innych nośnikach.
- Page 736 polski Tę stronę celowo pozostawiono pustą.
- Page 737 W celu uzyskania listy zatwierdzonych przez firmę Motorola Solutions akumulatorów oraz innych akcesoriów należy odwiedzić następującą stronę internetową: http://www.motorolasolutions.com Wyślij informację zwrotną...
- Page 738 polski Tę stronę celowo pozostawiono pustą.
- Page 739 polski Środki ostrożności • Podczas czyszczenia radia nie należy natryskiwać strumieni wody bezpośrednio na radio, ponieważ może to doprowadzić do przecieku wody do wnętrza Cyfrowy radiotelefon przenośny z serii XT600d spełnia radiotelefonu. specyfikacje IP55, co pozwala na użytkowanie radia w niekorzystnych warunkach otoczenia, np.
- Page 740 polski Tę stronę celowo pozostawiono pustą.
- Page 741 polski Wprowadzenie Niniejszy podręcznik użytkownika opisuje funkcje Twoich radiotelefonów. Lokalny dystrybutor lub administrator systemu może dostosować radiotelefon zgodnie z Twoimi wymaganiami. Dodatkowych informacji udzieli sprzedawca lub administrator systemu. Skontaktuj się z lokalnym dystrybutorem lub administratorem systemu, aby uzyskać następujące informacje: •...
- Page 742 polski Tę stronę celowo pozostawiono pustą.
- Page 743 7 Przed konserwacją lub czyszczeniem ładowarki należy ciała i uszkodzeń. odłączyć ją od sieci elektrycznej, aby zapobiec 2 Korzystanie z akcesoriów niezalecanych przez firmę porażeniu prądem. Motorola Solutions grozi pożarem, porażeniem prądem lub obrażeniami ciała. Wyślij informację zwrotną...
- Page 744 polski Zalecenia dotyczące bezpiecznej • Moc wyjściowa źródła zasilania nie może przekraczać wartości podanych na etykiecie umieszczonej na obsługi spodzie ładowarki. • Wyłącz radiotelefon podczas ładowania. • Przewód należy umieścić tak, aby nie można było po nim deptać, aby nikt się o niego nie potykał i aby nie był •...
- Page 745 polski Krótkie omówienie Ten rozdział wyjaśnia działanie przycisków i funkcji sterujących radiotelefonu. Wyślij informację zwrotną...
- Page 746 polski Przyciski sterujące Poniższa tabela zawiera funkcje poszczególnych przycisków radiotelefonu: Tabela 1: Tabela referencyjna przycisków sterujących Numer Opis Antena W przypadku modeli XT660d/XT665d, antena jest zamontowana na stałe. Otwór na pasek Przycisk nagrywania Naciśnij przycisk, aby włączyć lub wyłączyć funkcję nagrywania transmisji. Więcej informacji można znaleźć...
- Page 747 polski Numer Opis Wyświetlanie informacji o stanie naładowania akumulatora, zasilenia, połączenia radiowego i skanowania. Głośnik Mikrofon Podczas wysyłania komunikatu należy mówić wyraźnie do mikrofonu. Wyświetlacz LCD Monochromatyczny wyświetlacz z podświetleniem w kolorze pomarańczowym. Przyciski Menu/OK i nawigacji Naciśnij przycisk , aby wyświetlić menu; naciśnij i przytrzymaj, aby zapisać wybór w trybie programowania.
- Page 748 Serię XT600d wyposażono w akumulatory litowo-jonowe o pojemności standardowej. Dostępne są również inne akumulatory. Więcej informacji można znaleźć w części Tabela 4: Certyfikowane akumulatory firmy Motorola Solutions na str. Tabela 2: Ustawienie domyślne dla przycisków SB1 i SB2 Przyciski Ustawienie domyślne Krótkie naciśnięcie przycisku SB1...
- Page 749 polski Przyciski Ustawienie domyślne Krótkie naciśnięcie przycisku SB2 Skanowanie Długie naciśnięcie przycisku SB2 Nasłuch Opis działania każdego typu naciśnięcia przycisków: Krótkie naciśnięcie Naciśnij i od razu zwolnij. Naciśnij i przytrzymaj przycisk Naciśnij i przytrzymaj przez zaprogramowany czas. Przytrzymanie przycisku Naciśnij i przytrzymuj przycisk. UWAGA: Lokalny dystrybutor lub administrator systemu może dostosować...
- Page 750 polski Specyfikacje radiowe Poniższa tabela zawiera dane techniczne radiotelefonu: Tabela 3: Dane techniczne radiotelefonów XT660d/XT665d XT660d XT665d Pasmo częstotliwości (MHz) PMR446, digital PMR446 PMR446, digital PMR446, LPD 433-434 0,5 dla PMR446 i digital PMR446, Moc przesyłania (W) 0,01 dla LPD Liczba kanałów Antena Zamocowana na stałe...
- Page 751 Akumulatory i ładowarki średni zakres rozładowania wynosi 25%, będzie mieć jeszcze większą żywotność. Akumulatory firmy Motorola Solutions zostały Radiotelefony z serii XT600d wyposażono w akumulatory zaprojektowane do użytku w połączeniu z przeznaczoną do litowo-jonowe (Li-Ion) dostępne w różnej pojemności, która nich ładowarką.
- Page 752 Poniższe kroki opisują sposób instalowania akumulatora litowo-jonowego: 1 Wyłącz radiotelefon. 2 Kierując logo firmy Motorola Solutions ku górze, dopasuj wypustki (2) w dolnej części akumulatora do otworów (3). Wyślij informację zwrotną...
- Page 753 polski Zasilacz i wsuwana ładowarka 3 Dociśnij zatrzask komory akumulatora (1) w kierunku radiotelefonu, aż zatrzaśnie się na swoim miejscu. jednostanowiskowa (SUC) Wyjmowanie akumulatora litowo– jonowego Poniższe kroki opisują sposób wyjmowania akumulatora litowo-jonowego: Radiotelefon jest wyposażony w jedną wsuwaną ładowarkę 1 Wyłącz radiotelefon.
- Page 754 polski Futerał Poniższe kroki opisują sposób używania futerału: • Ustaw adapter (1) odpowiednio do rowków zasilacza (2), aż zatrzaśnie się na swoim miejscu. • Aby usunąć adapter (1), wysuń go do góry. UWAGA: Adapter przedstawiony na ilustracjach służy tylko do celów poglądowych. Instalowany adapter może się...
- Page 755 Wysuń radiotelefon i wyjmij go z futerału. Ładowanie radiotelefonu Umieść akumulator wraz z radiotelefonem w zatwierdzonej przez firmę Motorola Solutions wsuwanej ładowarce jednostanowiskowej lub ładowarce wielostanowiskowej MUC. 1 Umieść ładowarkę na płaskiej powierzchni. Ładowanie radiotelefonu za pomocą...
- Page 756 polski 3 Wsuń radiotelefon do ładowarki, tak aby był skierowany do przodu, jak pokazano na ilustracji. UWAGA: Podczas ładowania akumulatora podłączonego do radiotelefonu upewnij się, że jest on wyłączony. Zapewnia to pełne naładowanie. Dodatkowe informacje: Zalecenia dotyczące bezpiecznej obsługi na str. Ładowanie samodzielnego akumulatora 1 Wykonaj...
- Page 757 polski 3 Umieść akumulator tak, aby pasował do wyżłobień Tabela 5: Wskaźnik LED ładowarki wsuwanej ładowarki jednostanowiskowej. Stan Dioda LED Komentarze Światło zielone Tabela 4: Certyfikowane akumulatory firmy Motorola Solutions Włączenie przez ok. 1 sekundę Numer Opis Świeci się na katalogowy Ładowanie czerwono...
- Page 758 • Sprawdź, czy używany akumulator jest wymieniony Stan Dioda LED Komentarze wśród pozycji, które zawiera Tabela 4: Certyfikowane nieprawidłowe akumulatory firmy Motorola Solutions na str. napięcie. 2.10 Akumulator jest pusty Wskaźnik naładowania akumulatora Jedno mignięcie Niski poziom Wskaźnik znajduje się w lewym górnym rogu wyświetlacza...
- Page 759 polski 2.11 Szacowany czas ładowania Poniżej zamieszczono rozwiązania dotyczące ładowania z szacowanym czasem ładowania akumulatora. Informacje dodatkowe: patrz Tabela 14: Akumulator na str. Standardowy akumulator ≤ 4,5 godz. Bateria o dużej pojemności ≤ 4,5 godz. 2.12 Ładowanie radiotelefonu i 1 Umieść ładowarkę wielostanowiskową na płaskiej akumulatora za pomocą...
- Page 760 polski 5 Włóż radiotelefon lub akumulator do gniazda ładowarki (3), tak aby radiotelefon lub akumulator był odwrócony w kierunku od styków (2). UWAGA: • Szczegółowe dane na temat pracy ładowarki wielostanowiskowej są dostępne w dołączonej do niej instrukcji obsługi. Więcej informacji na temat elementów konstrukcyjnych i ich numerów katalogowych zawiera Akcesoria na str.
- Page 761 polski Wprowadzenie Regulacja głośności Obróć pokrętło wł./wył./głośność zgodnie z kierunkiem Ta sekcja umożliwia zapoznanie się z podstawowymi wskazówek zegara, aby zwiększyć głośność lub w operacjami radiotelefonu. przeciwnym, aby zmniejszyć głośność. UWAGA: Podczas regulacji głośności lub podczas Włączanie/wyłączanie radiotelefonu korzystania z dużej głośności urządzenia nie trzymaj go zbyt blisko ucha.
- Page 762 polski Ikon Opis Wyświetlacz radiotelefonu Liczba wyświetlanych pasków (0 – 3) oznacza poziom naładowania akumulatora. Skanowanie jest włączone. Funkcja VOX/iVOX włączona. Podczas aktywacji, bez akcesoriów VOX, 11 12 radiotelefon pracuje w trybie iVOX. Możesz mówić do mikrofonu bez naciskania przycisku PTT. W przypadku zastosowania akcesoriów VOX możesz mówić...
- Page 763 polski Ikon Ikon Opis Opis 6.i. Radiotelefon komunikuje się w ramach Wskaźnik oznacza bieżący kod połączenia grupowego. CTCSS/DPL. 6.ii. Radiotelefon komunikuje się w ramach UWAGA: połączenia prywatnego. Przedstawiony wyświetlacz radiotelefonu prezentuje wyłącznie poglądowe rozmieszczenie ikon. Wyświetlacz każdego radiotelefonu może się Jest to wskaźnik siły odbieranego nieznacznie różnić...
- Page 764 polski Odbieranie połączenia światłem. Ikona wskaźnika siły sygnału może zmienić wartość od 1 (najsłabszy) do 3 (najmocniejszy Poniższe kroki opisują sposób odbierania połączenia: sygnał) w zależności od zasięgu odbioru radiotelefonu. Jeżeli radiotelefon odbiera sygnał, wskaźnik wyświetla ikonę siły sygnału z paskami. 1 Zwolnij przycisk PTT i posłuchaj, czy na kanale nie UWAGA: słychać...
- Page 765 polski dostępny, jeżeli na drodze sygnału znajduje się gęsta Częstotliwość roślinność i góry. Częstotliwość wykorzystywana do nadawania i odbierania. Aby nawiązać poprawną łączność dwukierunkową, kanał, częstotliwość i kody eliminacji zakłóceń muszą być takie Kod eliminatora zakłóceń same w obu radiotelefonach. Zależy to od wstępnie Kody te pomagają...
- Page 766 polski Stan radiotelefonu Zachowanie diody LED Skanowanie Czerwone światło migające w szybkim tempie. Tryb VOX/iVOX Czerwone światło migające w dwukrotnie szybszym tempie niż rytm uderzeń serca. Przycisk PTT VOX/iVOX Dioda świeci na czerwono, sygnalizując, że radiotelefon pracuje w trybie nadawania. Nagrywanie Światło migające na czerwono i zielono w rytmie uderzeń...
- Page 767 polski sygnału bez potrzeby naciskania przez użytkownika Konfigurowanie funkcji VOX przycisku PTT na radiotelefonie lub akcesoriach audio. Poniższe kroki opisują sposób konfiguracji funkcji VOX: Funkcja iVOX Funkcja iVOX jest obsługiwana tylko wtedy, gdy do radiotelefonu nie są podłączone żadne akcesoria audio. Gdy funkcja iVOX jest aktywna, mikrofon radiotelefonu jest aktywny cały czas, a radiotelefon będzie automatycznie nadawać...
- Page 768 UWAGA: 3.9.3 Aby zamówić akcesoria, skontaktuj się z punktem Regulacja czułości funkcji iVOX sprzedaży firmy Motorola Solutions, w którym dokonano zakupu. Czułość akcesoriów radiotelefonu lub mikrofonu można regulować tak, aby dostosować ją do różnych warunków pracy. Czułość funkcji iVOX można regulować za pomocą...
- Page 769 polski Przywracanie domyślnych ustawień Wartość domyślna to MEDIUM. Funkcja iVOX może przyjmować dowolną z poniższych wartości: fabrycznych Ta funkcja powoduje przywrócenie wszystkich funkcji Naciśnij przycisk i przejdź do pozycji radiotelefonu do ustawień domyślnych. SETTING. Naciśnij jednocześnie przyciski PTT, SB2 i SB1 podczas włączania radiotelefonu, do momentu usłyszenia Naciśnij przycisk i przejdź...
- Page 770 polski Naciśnij przycisk i przejdź do pozycji ON/OFF. Naciśnij i przytrzymaj przycisk przez 4 sekundy. Naciśnij , aby włączyć lub wyłączyć sygnał Ikona blokady zniknie, wskazując, że klawiatura dźwiękowy. i przyciski boczne są dostępne. 3.12 UWAGA: Blokowanie i odblokowanie Za pomocą tej funkcji nie można zablokować klawiatury przycisku PTT.
- Page 771 polski • CHANNEL EDIT • CONTACTS • SCAN • MESSAGE • RECORDING • CALL LOG • ZONE • RADIO INFO 3 Wykonaj jedną z następujących czynności: • Aby przejść do funkcji, naciśnij przycisk • Aby wyjść, naciśnij przycisk UWAGA: Tryb Menu zostanie wyłączony automatycznie w przypadku braku aktywności dłuższej niż...
- Page 772 polski Tę stronę celowo pozostawiono pustą.
- Page 773 polski Funkcje zaawansowane Typ ustawienia Opcje Wartość domyślna • DUTCH Ustawienie • PORTUGUESE • GERMAN W menu ustawień, dostępnych jest kilka elementów, za pomocą których można bezpośrednio zmienić konfigurację • POLISH radiotelefonu bez korzystania z oprogramowania CPS. • TURKISH Poniższa tabela zawiera opis dostępnych ustawień i opcji: VOX/iVOX ON/OFF Typ ustawienia...
- Page 774 polski Poniższe kroki opisują sposób przechodzenia do menu Edycja aliasu kanału ustawień i dokonywania konfiguracji: Poniższe kroki opisują sposób edytowania aliasu kanału: Naciśnij przycisk i przejdź do pozycji Naciśnij przycisk i przejdź do pozycji CHANNEL SETTING. EDIT. Naciśnij przycisk i nawiguj po elementach Naciśnij przycisk i przewiń...
- Page 775 polski 4.2.2 Naciśnij przycisk , aby zatwierdzić wybór. Edycja częstotliwości kanału Radiotelefon wyświetla komunikat COMPLETE. Poniższe kroki opisują sposób edytowania częstotliwości kanału: 4.2.3 Edycja kodu kanału Naciśnij przycisk i przejdź do pozycji CHANNEL EDIT. Poniższe kroki opisują sposób edytowania kodu kanału: Naciśnij przycisk i przewiń...
- Page 776 polski Połączenie grupowe Naciśnij przycisk i wprowadź żądane cyfry. Połączenie w ramach wstępnie zdefiniowanej grupy. Aby zainicjować połączenie grupowe, radiotelefon musi być skonfigurowany jako członek tej grupy. Naciśnij przycisk , aby zatwierdzić wybór. Połączenie ogólne Radiotelefon wyświetla komunikat COMPLETE. Połączenie, które odbiorca może tylko odebrać, ale nie może na nie odpowiedzieć.
- Page 777 polski 3 Gdy radiotelefon wyświetla żądane ID połączenia, Funkcje Opis naciśnij przycisk PTT aby nawiązać połączenie. poprzez otrzymanie potwierdzenia po wysłaniu żądania. 4.3.2 Wysłanie żądania zdalnego nasłuchu REMOTE MON Funkcje dostępne w menu Kontakty spowoduje aktywację mikrofonu oraz przekaźnika docelowego Przejście do dowolnego ID kontaktu z listy kontaktów radiotelefonu i umożliwi prowadzenie umożliwia użytkownikowi wykonanie następujących funkcji.
- Page 778 polski 4.3.3 Inicjowanie wywołania cyfrowego za Dodawanie nowego kontaktu do listy pomocą przycisku szybkiego dostępu kontaktów Funkcja szybkiego połączenia pozwala użytkownikowi na Poniższe kroki opisują sposób dodawania nowego kontaktu wygodne nawiązanie połączenia grupowego lub do listy kontaktów: indywidualnego z wstępnie zdefiniowanym identyfikatorem. Tę...
- Page 779 polski 3 Zaczekaj na zakończenie sygnału zezwolenia na Naciśnij przycisk i przejdź do pozycji rozmowę (o ile włączono tę opcję) i zacznij mówić. CONTACTS. 4 Ponownie naciśnij zaprogramowany przycisk Szybkiego dostępu, aby zakończyć transmisję. Użyj przycisków , aby przewinąć listę wyborów. 5 W czasie wstrzymania połączenia naciśnij przycisk PTT, aby odpowiedzieć...
- Page 780 polski 4.3.5.2 4.4.1 Nawiązywanie połączenia za pomocą Wybór listy skanowania szybkiego kontaktu Poniższe kroki opisują sposób wybierania listy skanowania: Poniższe kroki opisują sposób wykonywania połączenia za pomocą szybkiego kontaktu: Naciśnij przycisk i przejdź do pozycji SCAN. Na ekranie głównym naciśnij przycisk Naciśnij przycisk i za pomocą...
- Page 781 polski 4.4.2 5 Wykonaj jedną z następujących czynności: Wybór kanału priorytetowego z listy • Aby włączyć priorytet, przejdź do pozycji skanowania PRIORITY ON i naciśnij przycisk Funkcja monitorowania priorytetu pozwala automatycznie • Aby wyłączyć priorytet, przejdź do pozycji odbierać połączenie od członka grupy rozmówców o wyższym priorytecie w trakcie trwania innego połączenia.
- Page 782 polski 4 Przejdź do pozycji CURRENT CHAN/innego aliasu Naciśnij przycisk i za pomocą przycisków kanału ustawionego na liście i naciśnij przycisk przewijaj listę skanowania. 3 Po wybraniu listy skanowania naciśnij przycisk Przejdź do pozycji DELETE i naciśnij przycisk 6 Wykonaj jedną z następujących czynności: Przejdź...
- Page 783 polski Radiotelefony z serii XT600D obsługują funkcję wysyłania Tworzenie nowej wiadomości tekstowej wiadomości tekstowych. Poniższa tabela zawiera opcje i Poniższe kroki opisują sposób tworzenia nowej wiadomości opisy funkcji wiadomości: tekstowej: Opcje Opisy Naciśnij przycisk i przejdź do pozycji Ręczne wprowadzanie treści NEW TEXT MESSAGE.
- Page 784 polski 6 Przewiń do żądanego kontaktu i naciśnij przycisk 4 Przewijaj listę wiadomości w skrzynce odbiorczej. , aby wysłać. Naciśnij przycisk , aby wybrać jedną z poniższych czynności. Radiotelefon wyświetla komunikat SENT. 5 Wykonaj jedną z następujących czynności: 4.5.2 • Aby utworzyć...
- Page 785 polski 4.5.3 6 Przewiń do żądanego kontaktu i naciśnij przycisk Wysyłanie krótkich wiadomości , aby wysłać. tekstowych Radiotelefon wyświetla komunikat SENT. Poniższe kroki opisują sposób wysłania krótkiej wiadomości tekstowej: 4.5.4 Przekazywanie lub usuwanie wysłanej Naciśnij przycisk i przejdź do pozycji wiadomości MESSAGE.
- Page 786 polski 4.6.1 5 Wykonaj jedną z następujących czynności: Rozpoczynanie nagrywania • Aby przesłać wiadomość do innego kontaktu na liście kontaktów, przejdź do pozycji FORWARD. Poniższe kroki opisują sposób rozpoczynania nagrywania: • Aby usunąć, przejdź do pozycji DELETE?. • Aby powrócić do poprzedniego ekranu, przejdź Naciśnij przycisk i przejdź...
- Page 787 polski 4.6.2 • Aby usunąć, przejdź do pozycji DELETE?. Odtwarzanie lub usuwanie zapisanych • Aby powrócić do poprzedniego ekranu, przejdź plików do pozycji CANCEL?. Naciśnij przycisk , aby zatwierdzić wybór. Naciśnij przycisk i przejdź do pozycji RECORDING. 4.6.3 Sprawdzanie pozostałego czasu zapisu Naciśnij przycisk , aby otworzyć...
- Page 788 polski Zapisywanie kontaktu z dziennika Dziennik połączeń połączeń do listy kontaktów Dziennik połączeń umożliwia użytkownikowi sprawdzenie Poniższe kroki opisują sposób zapisywania kontaktu z historii połączeń radiotelefonu. Poniższe kroki opisują dziennika połączeń do listy kontaktów: sposób uzyskiwania dostępu do dziennika połączeń: UWAGA: Naciśnij przycisk i przejdź...
- Page 789 polski Naciśnij , aby zapisać szczegóły. Naciśnij przycisk i nawiguj po elementach listy stref. 3 Po wyświetleniu żądanej strefy naciśnij przycisk Strefa , aby ją zaznaczyć. Strefa to grupa kanałów. Istnieją cztery dostępne strefy, z których każda składa się z różnych kanałów. Poniższa tabela przedstawia rozmieszczenie kanałów dla każdej Informacje o radiotelefonie strefy:...
- Page 790 polski 4.10 4.10.2 Tryb dyskretny Dezaktywacja trybu dyskretnego Poniższe kroki opisują sposób wyłączania trybu Tryb dyskretny można włączyć za pomocą dyskretnego: oprogramowania CPS. Gdy radiotelefon pracuje w trybie dyskretnym, jego ekran i diody LED są wyłączone, a głośnik wyciszony. Cała komunikacja i powiadomienia Naciśnij i przytrzymaj przycisk do momentu dźwiękowe odbywają...
- Page 791 polski UWAGA: na wyświetlaczu w ciągu 3 sekund, a radiotelefon Ta funkcja jest dostępna tylko w trybie cyfrowym i wyświetli komunikat COMPLETE!. można jej używać tylko w przypadku połączenia • Aby skutecznie użyć funkcji wejścia, naciśnij grupowego. przycisk PTT radiotelefonu z komunikatem BREAK Przycisk programowalny funkcji wejścia i czas na wyświetlaczu w ciągu 3 sekund, a radiotelefon trwania ograniczonego okresu wejścia jest...
- Page 792 polski 4.12 120/180/240. Domyślna wartość Impulsu zwrotnego wynosi Połączenie bezpośrednie za pomocą 240. • Zakres dostępnych funkcji oprogramowania różni się w ID radiotelefonu zależności od modelu urządzenia. Połączenie bezpośrednie to funkcja, która umożliwia • Szczegółowe informacje na temat tej konfiguracji można radiotelefonowi transmisję...
- Page 793 polski Opcje Opis Brak dźwięku Zarówno głośnik radia jak i zestaw słuchawkowy zostaną wyciszone. Wyślij informację zwrotną...
- Page 794 polski Tę stronę celowo pozostawiono pustą.
- Page 795 polski Konfiguracja radiotelefonu Konfiguracja za pomocą oprogramowania CPS Ten rozdział opisuje sposób konfiguracji radiotelefonu. UWAGA: Lokalny dystrybutor lub administrator systemu może dostosować radiotelefon zgodnie z Twoimi wymaganiami. Skontaktuj się ze sprzedawcą lub administratorem systemu, aby ustalić, w jaki sposób został zaprogramowany radiotelefon. Rysunek 1: Konfiguracja radiotelefonu za pomocą...
- Page 796 HKKN4027_, jest akcesorium sprzedawanym Poniżej widoczne są typy przewodów stosowanych do oddzielnie. Skontaktuj się z punktem sprzedaży klonowania typu R2R: produktów Motorola Solutions, aby dowiedzieć się więcej. Klonowanie radiotelefonów Profile radiotelefonu z serii XT600d można sklonować z radiotelefonu źródłowego do docelowego, korzystając z jednej z poniższych metod:...
- Page 797 polski Rysunek 4: Przejściówka USB Instrukcje obsługi Poniższe kroki zawierają instrukcje dotyczące klonowania radiotelefonu za pomocą R2R: 1 Wyłącz radiotelefony i przygotuj następujące wyposażenie: • Obydwa urządzenia korzystają z w pełni naładowanych akumulatorów. • Dwie ładowarki jednostanowiskowe do klonowania radiotelefonów z serii XT600D. 2 Odłącz wszystkie przewody (zasilacze lub przewody USB) od ładowarek jednostanowiskowych.
- Page 798 polski UWAGA: komunikat Pass lub Fail (w ciągu 5 sekund będzie Podczas procesu klonowania ładowarka rozlegnie się sygnał dźwiękowy). jednostanowiskowa nie pobiera prądu. Akumulatory nie będą w tym czasie 8 Po zakończeniu procedury klonowania ponownie ładowane. Pomiędzy radiotelefonami będą uruchom radiotelefony, aby opuścić tryb klonowania. przekazywane wyłącznie dane.
- Page 799 UWAGA: Ten przewód do klonowania jest przeznaczony do używania tylko ze zgodnymi ładowarkami jednostanowiskowymi RLN6175 i PMLN6394 firmy Motorola Solutions. Podczas zamawiania przewodu do klonowania, skorzystaj z jego numeru katalogowego: HKKN4028_. Zobacz Akcesoria na str. 99, aby uzyskać więcej informacji na temat akcesoriów.
- Page 800 polski Tę stronę celowo pozostawiono pustą.
- Page 801 polski Rozwiązywanie problemów Poniższa tabela zawiera opis sposobów rozwiązywania problemów w przypadku danego objawu: Objawy i rozwiązania Jeśli... To... Brak zasilania Naładuj lub wymień akumulator litowo-jonowy. Praca w bardzo niskich / wysokich temperaturach może mieć wpływ na długość pracy akumulatora. Zobacz Informacje o akumulatorze litowo-jonowym na str.
- Page 802 polski Jeśli... To... Zbyt niska jakość dźwięku Ustawienia radiotelefonu mogły zostać źle dopasowane. Dokładnie sprawdź czy częstotliwości, kody i pasma są identyczne dla wszystkich urządzeń. Ograniczony zasięg rozmowy Konstrukcje stalowe, betonowe, gęsta roślinność, duża liczba budynków czy pojazdów mogą powodować zmniejszony zasięg. Aby poprawić jakość nadawania, poszukaj miejsca o jak najmniejszej liczbie przeszkód pomiędzy osobami korzystającymi z radiotelefonów.
- Page 803 polski Jeśli... To... Upewnij się, że wszystkie radiotelefony mają te same ustawienia dla kanału, częstotliwości i kodu eliminacji zakłóceń. Naładuj, wymień akumulatory lub popraw ich ułożenie. Zobacz Informacje o akumulatorze litowo- jonowym na str. Przeszkody i praca wewnątrz budynków czy pojazdów może powodować...
- Page 804 polski Jeśli... To... Dioda LED ładowarki nie miga Sprawdź, czy akumulator lub radiotelefon zostały prawidłowo podłączone. Zobacz, czy styki akumulatora/ładowarki są czyste i przylegają prawidłowo. Patrz Ładowanie radiotelefonu na str. Wskaźniki LED ładowarki wsuwanej na str. 29 instalowanie akumulatora litowo–jonowego na str. Pomimo włożenia nowych akumulatorów świeci Patrz instalowanie akumulatora litowo–jonowego na...
- Page 805 polski Jeśli... To... Patrz Ładowanie radiotelefonu za pomocą wsuwanej ładowarki jednostanowiskowej na str. 27 Ładowanie samodzielnego akumulatora na str. Sprawdź działanie kontrolek ładowarki, aby upewnić się, czy nie wystąpił problem z akumulatorem. Zobacz Wskaźniki LED ładowarki wsuwanej na str. Wyślij informację zwrotną...
- Page 806 polski Tę stronę celowo pozostawiono pustą.
- Page 807 polski Użytkowanie i konserwacja Niniejszy rozdział przedstawia prawidłowy sposób użytkowania radiotelefonu: Środki ostrożności Do czyszczenia należy używać Nie używaj alkoholu ani środków Nie zanurzaj w wodzie. miękkiej, wilgotnej ściereczki. czyszczących Jeżeli radiotelefon znalazł się w wodzie, Nie należy używać radiotelefonu do Wyłącz radiotelefon i wyjmij Wytrzyj miękką...
- Page 808 polski Tę stronę celowo pozostawiono pustą.
- Page 809 Tabele kodów i częstotliwości analogowych Tabele umieszczone w tym rozdziale zawierają informacje o częstotliwościach i kodach. Wykresy te są użyteczne podczas korzystania z radiotelefonu z serii XT600d firmy Motorola Solutions do komunikacji z innymi radiotelefonami przemysłowymi. Tabela 7: Domyślna częstotliwość kanału i kod eliminacji zakłóceń radiotelefonów z serii XT660d Strefa Nazwa kanału...
- Page 810 polski Strefa Nazwa kanału Częstotliwość (MHz) Kody CHAN 07 446,08125 1–67,0 Hz CHAN 08 446,09375 1–67,0 Hz CHAN 09 446,00625 121–DPL 754 CHAN 10 446,01875 121–DPL 754 CHAN 11 446,03125 121–DPL 754 CHAN 12 446,04375 121–DPL 754 CHAN 13 446,05625 121–DPL 754 CHAN 14 446,06875...
- Page 811 polski Strefa Nazwa kanału Częstotliwość (MHz) Kody CHAN 04 446,04375 1–67,0 Hz CHAN 05 446,05625 1–67,0 Hz CHAN 06 446,06875 1–67,0 Hz CHAN 07 446,08125 1–67,0 Hz CHAN 08 446,09375 1–67,0 Hz CHAN 09 433,07500 1–67,0 Hz CHAN 10 433,30000 1–67,0 Hz CHAN 11 433,55000...
- Page 812 Tabela umieszczona w tym rozdziale zawiera informacje o częstotliwościach i kodach. Wykres ten jest użyteczny podczas korzystania z radiotelefonu XT600d firmy Motorola Solutions do komunikacji z innymi radiotelefonami przemysłowymi. Tabela 9: Domyślna częstotliwość kanału i kod eliminacji zakłóceń radiotelefonów z serii XT660d Strefa Nazwa kanału...
- Page 813 polski Strefa Nazwa kanału Częstotliwość (MHz) Kody CHAN 28 446,171875 Kod koloru – 12 CHAN 29 446,178125 Kod koloru – 13 CHAN 30 446,184375 Kod koloru – 14 CHAN 31 446,190625 Kod koloru – 15 CHAN 32 446,196875 Kod koloru – 16 Tabela 10: Domyślna częstotliwość...
- Page 814 polski Strefa Nazwa kanału Częstotliwość (MHz) Kody CHAN 25 446,053125 Kod koloru – 9 CHAN 26 446,059375 Kod koloru – 10 CHAN 27 446,065625 Kod koloru – 11 CHAN 28 446,071875 Kod koloru – 12 CHAN 29 446,078125 Kod koloru – 13 CHAN 30 446,084375 Kod koloru –...
- Page 815 polski Częstotliwość PMR446 (MHz) 446,01875 446,06875 446,11875 446,16875 446,03125 446,08125 446,13125 446,18125 446,04375 446,09375 446,14375 446,19375 OSTRZEŻENIE: * Częstotliwości cyfrowe 446,0–446,1 MHz dla radiotelefonów z serii XT660d są dostępne do produkcji wyłącznie od stycznia 2018 r. lub po tym terminie. Częstotliwość...
- Page 816 polski Pełna lista częstotliwości radiotelefonów z serii XT665d Częstotliwość PMR446 (MHz) 446,00625 446,03125 446,05625 446,08125 446,01875 446,04375 446,06875 446,09375 Częstotliwość digital PMR446 (MHz) 446,003125 446,028125 446,053125 446,078125 446,009375 446,034375 446,059375 446,084375 446,015625 446,040625 446,065625 446,090625 446,021875 446,046875 446,071875 446,096875 Częstotliwość LPD433 (MHz) 433,07500 433,52500 433,97500...
- Page 817 polski Częstotliwość LPD433 (MHz) 433,17500 433,62500 434,07500 434,52500 433,20000 433,65000 434,10000 434,55000 433,22500 433,67500 434,12500 434,57500 433,25000 433,70000 434,15000 434,60000 433,27500 433,72500 434,17500 434,62500 433,30000 433,75000 434,20000 434,65000 433,32500 433,77500 434,22500 434,67500 433,35000 433,80000 434,25000 434,70000 433,37500 433,82500 434,27500 434,72500 433,40000 433,85000 434,30000...
- Page 818 polski Kody CTCSS i PL/DPL Tabela 11: Kody CTCSS CTCSS CTCSS 67,0 136,5 71,9 141,3 74,4 146,2 77,0 151,4 79,7 156,7 82,5 162,2 85,4 167,9 88,5 173,8 91,5 179,9 94,8 186,2 97,4 192,8 100,0 203,5 103,5 210,7 Ciąg dalszy tabeli… Wyślij informację...
- Page 819 polski CTCSS CTCSS 107,2 218,1 110,9 225,7 114,8 233,6 118,8 241,8 123,0 250,3 127,3 122 (*) 69,3 131,8 Tabela 12: Kody PL/DPL Odwrócony kod DPL 69 Odwrócony kod DPL 70 Odwrócony kod DPL 71 Odwrócony kod DPL 72 Odwrócony kod DPL 73 Odwrócony kod DPL 74 Ciąg dalszy tabeli…...
- Page 820 polski Odwrócony kod DPL 75 Odwrócony kod DPL 76 Odwrócony kod DPL 77 Odwrócony kod DPL 78 Odwrócony kod DPL 79 Odwrócony kod DPL 80 Odwrócony kod DPL 81 Odwrócony kod DPL 82 Odwrócony kod DPL 83 Odwrócony kod DPL 84 Odwrócony kod DPL 85 Odwrócony kod DPL 86 Odwrócony kod DPL 87...
- Page 821 polski Odwrócony kod DPL 91 Odwrócony kod DPL 92 Niestandardowy kod Odwrócony kod DPL 93 Niestandardowy kod Odwrócony kod DPL 94 Niestandardowy kod Odwrócony kod DPL 95 Niestandardowy kod Odwrócony kod DPL 96 Niestandardowy kod Odwrócony kod DPL 97 Niestandardowy kod Odwrócony kod DPL 98 Odwrócony kod DPL Odwrócony kod DPL 99...
- Page 822 polski Odwrócony kod DPL Odwrócony kod DPL Odwrócony kod DPL Odwrócony kod DPL Odwrócony kod DPL Odwrócony kod DPL Odwrócony kod DPL Odwrócony kod DPL Odwrócony kod DPL Odwrócony kod DPL Odwrócony kod DPL Odwrócony kod DPL Odwrócony kod DPL Odwrócony kod DPL Odwrócony kod DPL Odwrócony kod DPL...
- Page 823 polski Odwrócony kod DPL Odwrócony kod DPL Odwrócony kod DPL Odwrócony kod DPL Odwrócony kod DPL Odwrócony kod DPL Odwrócony kod DPL Odwrócony kod DPL Odwrócony kod DPL Odwrócony kod DPL Odwrócony kod DPL Odwrócony kod DPL Odwrócony kod DPL Odwrócony kod DPL Odwrócony kod DPL Odwrócony kod DPL...
- Page 824 polski Odwrócony kod DPL Odwrócony kod DPL Odwrócony kod DPL Odwrócony kod DPL Odwrócony kod DPL Odwrócony kod DPL Odwrócony kod DPL Odwrócony kod DPL 122 Odwrócony kod DPL Odwrócony kod DPL Odwrócony kod DPL Niestandardowy kod Odwrócony kod DPL Niestandardowy kod Odwrócony kod DPL Niestandardowy kod...
- Page 825 Nie zwracaj • Zniszczenia lub uszkodzenia anten, chyba że jest to radiotelefonu do firmy Motorola Solutions. Aby móc spowodowane wadami materiałowymi lub niewłaściwym skorzystać z serwisu gwarancyjnego, należy przedstawić wykonawstwem. paragon lub porównywalny zastępczy dowód opatrzony datą...
- Page 826 polski Tę stronę celowo pozostawiono pustą.
- Page 827 polski Akcesoria Tabela 14: Akumulator Numer Opis części Tabela 13: Akcesoria audio PMNN4434_ Standardowy akumulator litowo–jonowy Numer Opis PMNN4453_ Akumulator litowo-jonowy o wysokiej części pojemności HKLN4601_ Zestaw nadzoru z wbudowanym mikrofonem i przyciskiem PTT Tabela 15: Przewody HKLN4599_ Słuchawka douszna D-kształtna z wbudowanym mikrofonem i przyciskiem Numer Opis...
- Page 828 Niektóre akcesoria mogą być niedostępne w chwili 58012029006 110-240 V, zasilacz ładowarki z zakupu. Skontaktuj się z punktem sprzedaży firmy przełącznikiem trybu pracy w Motorola Solutions lub przejdź pod adres http:// standardzie UK/HK www.motorolasolutions.com, aby uzyskać 58012029004 110-240 V, zasilacz ładowarki z najnowsze informacje na temat dostępności...
- Page 829 Português Índice 2.8 Carregar uma bateria solta......27 2.9 Indicadores LED do carregador de encaixe.............. 28 Direitos de autor de software informático.......7 2.10 Medidor da bateria........30 Informações importantes de segurança......9 2.11 Tempo de carregamento previsto....30 Precaução de utilização..........11 2.12 Carregar um rádio e uma bateria Introdução..............
- Page 830 Português 3.11 Ativar ou desativar o sinal sonoro..... 41 4.4 Procura............50 3.12 Bloquear ou desbloquear o teclado...41 4.4.1 Selecionar uma lista de procura..50 3.13 Aceder às opções do Menu.......41 4.4.2 Selecionar o canal prioritário numa lista de procura......50 Capítulo 4: Funcionalidades avançadas.....
- Page 831 4.10.2 Desativar o Modo furtivo....59 8.5 Códigos CTCSS e PL/DPL......84 4.11 Interrupção..........60 Anexo A: Garantia limitada da Motorola Solutions..91 4.12 Chamada direta com o ID do rádio....61 A.1 Casos não protegidos pela garantia... 91 4.13 Inversão de fase........61 A.2 Informações sobre a garantia.....
- Page 832 Português Esta página foi deixada em branco de propósito.
- Page 833 Motorola Solutions. Além disso, a compra de produtos Motorola Solutions não garantirá, direta ou implicitamente, por exceção ou de outra forma, qualquer licença sobre os direitos de autor, as patentes ou os pedidos de patente da Motorola Solutions, exceto a licença normal e não exclusiva de utilização,...
- Page 834 Português Esta página foi deixada em branco de propósito.
- Page 835 RF, a fim de respeitar as normas e os regulamentos aplicáveis. Para obter uma lista de baterias e outros acessórios aprovados pela Motorola Solutions, visite o seguinte website: http://www.motorolasolutions.com Enviar comentários...
- Page 836 Português Esta página foi deixada em branco de propósito.
- Page 837 Português Precaução de utilização • Ao limpar o rádio, não utilize um jato de pulverização de alta pressão no rádio, uma vez que isso pode causar uma fuga de água para o interior do rádio. O rádio digital portátil da Série XT600d cumpre as características técnicas IP55, permitindo que o rádio ATENÇÃO: suporte condições de campo adversas, como, por...
- Page 838 Português Esta página foi deixada em branco de propósito.
- Page 839 Português Introdução Este manual do utilizador aborda o funcionamento dos seus rádios. O seu distribuidor ou administrador de sistemas poderá ter personalizado o rádio em função das suas necessidades específicas. Consulte o seu distribuidor ou administrador de sistemas para obter mais informações. Pode consultar o revendedor ou o administrador de sistemas para obter mais informações sobre as seguintes questões:...
- Page 840 Português Esta página foi deixada em branco de propósito.
- Page 841 2 A utilização de acessórios não recomendados pela Diretrizes de segurança operacional Motorola Solutions pode resultar em incêndio, choque elétrico ou ferimentos. • Desligue o rádio durante o carregamento. 3 Para reduzir os danos na ficha e no cabo de •...
- Page 842 Português • Ligue o carregador em redes elétricas com cablagem adequada, sistema de corte adequado e tensão correta (conforme especificado no produto). • Desligue da linha de tensão removendo a ficha da tomada. • Ligue o equipamento a uma tomada elétrica de fácil acesso e próxima.
- Page 843 Português Visão geral do rádio Este capítulo explica os botões e funções para controlar o rádio. Enviar comentários...
- Page 844 Português Botões de controlo A seguinte tabela explica as funções de cada um dos botões do rádio: Tabela 1: Tabela de referência dos botões de controlo Número Descrição Antena A antena do modelo XT660dXT665d não é removível. Orifício para a fita Botão de gravação Prima o botão para ativar ou desativar a funcionalidade de transmissão da gravação.
- Page 845 Português Número Descrição Indica o estado da bateria, estado ligado/desligado, informações sobre a chamada de rádio e estado de procura. Altifalante Microfone O utilizador tem de falar claramente para o microfone ao enviar uma mensagem. Ecrã LCD Ecrã monocromático com retroiluminação a laranja Botões Menu/OK e de navegação Prima para aceder a um menu ou confirmar a seleção;...
- Page 846 A Série XT600d inclui uma Bateria de iões de lítio padrão. Podem estar disponíveis outras baterias. Consulte Tabela 4: Baterias autorizadas pela Motorola Solutions na página 28 para obter mais informações. Tabela 2: Predefinição para os botões SB1 e SB2 Botões...
- Page 847 Português Botões Predefinição Prima continuamente SB2 Monitorizar Para descrever o modo como cada pressão funciona num rádio: Pressão breve Prima e liberte rapidamente. Pressão longa Prima e mantenha premido pela duração programada. Manter premido Mantenha o botão premido. AVISO: O seu distribuidor ou administrador de sistemas poderá ter personalizado o rádio em função das suas necessidades específicas.
- Page 848 Português Características técnicas do rádio A seguinte tabela explica as características técnicas do rádio: Tabela 3: Características técnicas do rádio XT660d/XT665d XT660d XT665d Banda de frequência (MHz) PMR446, digital PMR446 PMR446, digital PMR446, LPD 433-434 0,5 para PMR446 e digital PMR446, Potência de transmissão (W) 0,01 para LPD Número de canais...
- Page 849 Motorola Solutions e vice-versa. Carregar baterias que não Os rádios da Série XT600d são fornecidos com baterias de sejam Motorola Solutions pode causar danos na bateria e iões de lítio (Li-Ion) com capacidades distintas que definem invalidar a garantia da mesma. Sempre que possível, a vida útil da bateria.
- Page 850 Português 2 Com o logótipo da Motorola Solutions voltado para Instalar a bateria de iões de lítio cima, encaixe as patilhas (2) na parte inferior da bateria nas ranhuras (3). Os seguintes passos explicam como é instalada a bateria de iões de lítio: 3 Pressione o trinco da bateria (1) em direção ao rádio...
- Page 851 Português Fonte de alimentação e monocarregador de encaixe (SUC) O rádio é fornecido com um SUC de encaixe, uma fonte de alimentação (também designada por transformador) e um conjunto de adaptadores. • Alinhe o adaptador (1) com as ranhuras da fonte de Pode mudar a fonte de alimentação para que se adeque alimentação (2) até...
- Page 852 Carregar o rádio Com o rádio ligado, coloque a bateria num SUC de encaixe ou num carregador de unidades múltiplas (MUC) aprovado pela Motorola Solutions. Carregar o rádio através do SUC de encaixe Os seguintes passos explicam como o rádio é carregado através de um SUC de encaixe:...
- Page 853 Português 3 Introduza o rádio no carregador com o rádio voltado para a frente, conforme apresentado. AVISO: Quando pretender carregar uma bateria instalada num rádio, desligue o rádio para garantir o carregamento completo. Consulte Diretrizes de segurança operacional na página 15 para obter mais informações.
- Page 854 Português Tabela 4: Baterias autorizadas pela Motorola Solutions Número de Descrição peça PMNN4434_R Bateria de iões de lítio padrão PMNN4453_R Bateria de iões de lítio de alta capacidade Indicadores LED do carregador de encaixe 1 Execute passo 3 "Carregar o rádio através do SUC A seguinte tabela explica a diferença de cada estado e...
- Page 855 Português Estado Indicador LED Comentários Estado Indicador LED Comentários Verde Carga Verde fixo Bateria com intermitente três completa carga elevada vezes Normalmente, o Vermelho reposicionamen Bateria Se NÃO existir indicação LED: intermitente to da bateria avariada rápido resolve este • Verifique se introduziu corretamente o rádio com problema.
- Page 856 Confirme que a bateria que está a utilizar com o rádio Tempo de carregamento previsto está listada em Tabela 4: Baterias autorizadas pela Motorola Solutions na página As informações abaixo oferecem soluções de carregamento com uma estimativa do tempo de carregamento da bateria. Para obter mais informações 2.10...
- Page 857 Português 5 Insira o rádio ou a bateria no compartimento de carregamento (3) com o rádio ou a bateria voltado para o lado oposto dos contactos (2). AVISO: • Pode obter mais informações sobre o funcionamento do MUC nas Folhas de instruções fornecidas com o MUC.
- Page 858 Português Esta página foi deixada em branco de propósito.
- Page 859 Português Início Ajustar o volume Rode o botão On/Off/Volume no sentido dos ponteiros do Esta secção ajuda-o a familiarizar-se com o funcionamento relógio para aumentar o volume e no sentido contrário para básico do rádio. diminuir o volume. AVISO: Não coloque o rádio muito próximo do ouvido Ligar/desligar o rádio quando o volume está...
- Page 860 Português Ícon N.º Descrição Ecrã do rádio O número de barras apresentadas (0– 3) indica a carga restante da bateria. A procura está ativa. O VOX/iVOX está ativo. Durante a ativação (sem os acessórios VOX), o rádio está em modo iVOX e pode falar 11 12 diretamente para o microfone sem premir o botão PTT.
- Page 861 Português AVISO: Ícon N.º Descrição O ecrã de rádio aqui ilustrado destina-se apenas à apresentação da localização dos ícones. Cada ecrã 6.ii. O rádio está numa chamada privada. de rádio pode ter um aspeto diferente (canal e código) com base nas funcionalidades pré- programadas disponíveis no modelo ou região.
- Page 862 Português AVISO: Os obstáculos que se encontrem a bloquear o 1 Liberte o botão PTT e verifique se existe atividade caminho do sinal podem afetar o sinal recebido. de voz. 2 Para responder, mantenha o rádio na vertical a 2,5 a 5 cm de distância da boca.
- Page 863 Português Canal Código de eliminação de interferências O canal atualmente utilizado pelo rádio, consoante o Estes códigos ajudam a minimizar as interferências modelo do rádio. fornecendo uma seleção de combinações de códigos. Frequência A frequência utilizada para transmitir/receber. Indicadores LED do rádio A seguinte tabela explica o estado do rádio e da indicação LED: Estado do rádio Indicação LED...
- Page 864 Português Estado do rádio Indicação LED Gravação Vermelho e verde intermitentes em pulsação. Modo de programação CPS Verde intermitente em pulsação. Modo de clonagem Laranja intermitente duas vezes em pulsação. Clonagem em curso Laranja fixo até que a clonagem termine. Transferência de firmware Fica verde fixo quando o rádio estiver pronto para transferir;...
- Page 865 O sistema VOX pode ser temporariamente desativado premindo o botão PTT ou removendo o acessório de áudio. AVISO: Contacte o seu ponto de venda Motorola Solutions para encomendar acessórios. 3.9.2 Configurar o iVOX 1 Desligue o rádio.
- Page 866 Português O valor predefinido é MEDIUM. O iVOX pode ser definido 2 Prima e mantenha premido o botão PTT enquanto para qualquer valor apresentado abaixo: liga o rádio para ativar o iVOX. O ecrã apresenta VOX. Prima e navegue até SETTING. AVISO: Se premir brevemente o botão PTT, o iVOX é...
- Page 867 Português 3.11 Prima e mantenha premido durante 4 Ativar ou desativar o sinal sonoro segundos. Os seguintes passos explicam como ativar e desativar o sinal sonoro: O ícone de cadeado é apresentado para indicar que o teclado e os botões laterais estão bloqueados. Prima e navegue até...
- Page 868 Português • Para sair, prima Prima continuamente para aceder ao Menu. O rádio exibe opções de funcionalidade. AVISO: O modo Menu para automaticamente se não for detetada atividade durante mais de 10 segundos. Prima para ver as seguintes Consulte Funcionalidades avançadas na página funcionalidades: para obter mais informações sobre as •...
- Page 869 Português Funcionalidades avançadas Tipos de Opções Valor definição predefinido • DUTCH Configuração • PORTUGUESE • GERMAN No menu SETTING, existem alguns itens que podem alterar diretamente a configuração no rádio sem passar • POLISH pelo CPS. A seguinte tabela explica as Definições e •...
- Page 870 Português Os seguintes passos explicam como aceder ao menu Editar o pseudónimo do canal SETTING e efetuar a configuração: Os seguintes passos explicam como editar o pseudónimo do canal: Prima e navegue até SETTING. Prima e navegue até CHANNEL EDIT. Prima e navegue pela lista de seleções disponíveis.
- Page 871 Português 4.2.2 4.2.3 Editar a frequência do canal Editar o código do canal Os seguintes passos explicam como editar a frequência do Os seguintes passos explicam como editar o código do canal: canal: Prima e navegue até CHANNEL EDIT. Prima e navegue até...
- Page 872 Português Chamada para todos Contactos Uma chamada que o destinatário só pode receber, mas à qual não pode responder. Para efetuar uma Chamada Este capítulo explica os diferentes tipos de chamadas e para todos, o rádio tem de estar programado para formas de efetuar uma chamada.
- Page 873 Português 4.3.2 Funcionalida Descrição Funcionalidades disponíveis nos contactos Iniciar o pedido de Monitor remoto REMOTE MON resultará na monitorização remota do Aceder a cada ID de contacto da Lista de contactos microfone e do transmissor ativados permite utilizar as seguintes funcionalidades. A seguinte do rádio de destino.
- Page 874 Português Acesso com um toque programados. O seu distribuidor ou Prima e navegue até CONTACTS. administrador de sistemas poderá ter personalizado o rádio em função das suas necessidades específicas. Consulte o seu distribuidor ou administrador de sistemas para Utilize para percorrer até ADD NEW determinar a forma como o seu rádio foi programado.
- Page 875 Português 4.3.5 Navegue até QUICK CONTACT e prima Contacto rápido O Contacto rápido permite efetuar uma chamada privada Utilize para percorrer a lista de premindo uma tecla de contacto rápido atribuída. seleções e selecione o número para o Contacto AVISO: rápido.
- Page 876 Português 4 Navegue até SET ACTIVE. Procura A Procura permite-lhe monitorizar outros canais para Prima para confirmar a seleção. detetar conversas. Quando o rádio deteta uma O rádio apresenta para indicar que a ativação foi transmissão, interrompe a procura e permanece no canal efetuada.
- Page 877 Português Remover um canal de uma lista de Prima e utilize para procura: percorrer a Lista de procura. Os seguintes passos explicam como remover um canal de 3 Depois de a Lista de procura estar selecionada, uma lista de procura: prima Prima e navegue até...
- Page 878 Português • Para retroceder para o ecrã anterior, navegue até 5 Percorra a Lista de procura e selecione o CANCEL?. pseudónimo do canal pretendido. Prima para confirmar a seleção. Prima para confirmar a seleção. O rádio apresenta COMPLETE. 4.4.4 Adicionar um canal a uma lista de procura Mensagem Os seguintes passos explicam como adicionar um canal a...
- Page 879 Português Seleções Descrições Navegue até NEW TEXT e prima Repositório de mensagens INBOX recebidas. O utilizador pode 4 Utilize o teclado alfanumérico para introduzir a reencaminhar ou responder a mensagem de texto. mensagens aqui. Mensagem de texto breve QUICK TEXT Prima para confirmar o envio.
- Page 880 Português Prima para aceder ao ecrã de mensagens. Prima para confirmar a seleção. 4.5.3 Navegue até INBOX e prima Enviar uma mensagem de texto rápida 4 Percorra as mensagens na caixa de entrada. Prima Os seguintes passos explicam como enviar uma para selecionar as seguintes ações.
- Page 881 Português • Para reencaminhar uma mensagem para outro Percorra até ao contacto pretendido e prima contacto na Lista de contactos, navegue até para enviar. FORWARD. O rádio apresenta SENT. • Para eliminar, navegue até DELETE?. • Para retroceder para o ecrã anterior, navegue até CANCEL?.
- Page 882 Português 4.6.1 Reproduzir ou eliminar ficheiros Iniciar uma gravação gravados Os seguintes passos explicam como iniciar uma gravação: Prima e navegue até RECORDING. Prima e navegue até RECORDING. Prima para aceder ao ecrã Recording. Prima para aceder ao ecrã Recording. Navegue até...
- Page 883 Português AVISO: Prima para confirmar a seleção. Esta funcionalidade só está disponível no Modo digital. 4.6.3 Verificar o tempo de gravação restante Prima e navegue até CALL LOG. Prima para aceder ao ecrã Call Log. Prima e navegue até RECORDING. 3 Execute um dos seguintes procedimentos: Prima para aceder ao ecrã...
- Page 884 Português Zona Canais Prima para aceder ao ecrã Call Log. ALL ZONE (Predefinição) 1-128 3 Navegue até INCOMING para ver a lista de 1-32 ZONE 1 chamadas recebidas. 33-64 ZONE 2 4 Quando o contacto pretendido for encontrado, prima 65-96 ZONE 3 para selecionar.
- Page 885 Português Seguem-se as informações gerais do rádio: Prima e mantenha premido até ouvir um sinal • ID do rádio sonoro. • Pseudónimo do rádio 2 Introduza o código de quatro dígitos. • Versão de FW 3 O ecrã do rádio está desligado. Utilize para ver informações.
- Page 886 Português 4.11 2 Quando a chamada de grupo em curso for Interrupção terminada, o rádio que premiu o botão Break-in apresenta WAIT, enquanto o outro rádio apresenta A Interrupção permite ao utilizador transmitir para outro BREAK. utilizador com quem pretenda falar. Outro utilizador receberá...
- Page 887 Português 4.12 intervalo de definições de Desligado/120/180/240. O valor Chamada direta com o ID do rádio predefinido da Inversão de fase é 240. • Algumas das funcionalidades disponíveis no software A chamada direta é uma funcionalidade que permite ao CPS podem variar consoante o modelo do rádio. rádio transmitir uma chamada utilizando o ID do rádio.
- Page 888 Português Seleções Descrição Sem áudio O altifalante e o auscultador estão sem som. Enviar comentários...
- Page 889 Português Configurar o rádio Configurar utilizando o CPS Este capítulo explica como configurar o rádio. AVISO: O seu distribuidor ou administrador de sistemas poderá ter personalizado o rádio em função das suas necessidades específicas. Consulte o seu distribuidor ou administrador de sistemas para determinar a forma como o seu rádio foi programado.
- Page 890 AVISO: (*) O cabo de programação P/N# HKKN4027_ é um acessório vendido em separado. Contacte o seu ponto de venda Motorola Solutions para obter mais informações. Clonar rádios Pode clonar perfis de rádio da Série XT600d a partir de um Rádio de origem para um Rádio de destino utilizando...
- Page 891 Português • Dois SUC para clonagem de rádios da Série XT600d. 2 Desligue todos os cabos (de alimentação ou cabos USB) dos SUC. Figura 2: Cabo CPS 3 Ligue o cabo de clonagem com Conversor USB, ligue uma extremidade da ficha mini-USB do cabo de clonagem ao primeiro SUC e o outro lado ao segundo SUC.
- Page 892 Caso a clonagem falhe, Este cabo de clonagem foi concebido apenas efetue os seguintes passos antes de tentar iniciar para funcionar com SUC Motorola Solutions novamente o processo de clonagem: RLN6175 e PMLN6394. 1 Certifique-se de que as baterias dos dois rádios Quando encomendar o Cabo de clonagem, indique P/N# estão totalmente carregadas.
- Page 893 Português Resolução de Problemas A seguinte tabela explica as formas de resolver problemas, em caso de ocorrência do sintoma: Sintomas e soluções Se... Então... Sem alimentação Recarregue ou substitua a bateria de iões de lítio. Temperaturas de funcionamento extremas podem afetar a vida útil da bateria.
- Page 894 Português Se... Então... Certifique-se de que o rádio se encontra na frequência correta e que o código está correto quando transmitir. A qualidade de áudio não é suficientemente boa As definições do rádio podem não estar a corresponder corretamente. Volte a verificar as frequências, códigos e larguras de bandas em todos os rádios para se certificar de que são iguais.
- Page 895 Português Se... Então... Confirme que os rádios se encontram nas mesmas definições de Canal, Frequência e Código de eliminação de interferências. Recarregue, substitua e/ou reposicione as baterias. Consulte Acerca da bateria de iões de lítio na página Obstruções e operação em espaços fechados ou em veículos podem causar interferências.
- Page 896 Português Se... Então... A luz LED do carregador de encaixe não pisca Verifique se o rádio/bateria estão corretamente encaixados e verifique os contactos da bateria/ carregador para se certificar de que estão limpos e de que o pino de carregamento está inserido corretamente.
- Page 897 Português Se... Então... Verifique os indicadores LED do carregador para verificar se a bateria tem um problema. Consulte Indicadores LED do carregador de encaixe na página Enviar comentários...
- Page 898 Português Esta página foi deixada em branco de propósito.
- Page 899 Português Utilização e cuidados Este capítulo apresenta a utilização correta do rádio: Precaução Utilize um pano macio e húmido Não utilize álcool ou soluções de Não mergulhe em água para limpar o exterior limpeza Se o rádio for mergulhado em água, Não utilize o rádio até...
- Page 900 Português Esta página foi deixada em branco de propósito.
- Page 901 As tabelas nesta secção oferecem informações relativas às frequências e códigos. Estas tabelas são úteis na utilização de rádios de duas vias Motorola Solutions XT600d com outros rádios empresariais. Tabela 7: Frequência do canal predefinida e Código de eliminação de interferências XT660d...
- Page 902 Português Zona Nome do canal Frequência (MHz) Códigos CHAN 08 446,09375 1-67,0 Hz CHAN 09 446,00625 121-DPL 754 CHAN 10 446,01875 121-DPL 754 CHAN 11 446,03125 121-DPL 754 CHAN 12 446,04375 121-DPL 754 CHAN 13 446,05625 121-DPL 754 CHAN 14 446,06875 121-DPL 754 CHAN 15...
- Page 903 Português Zona Nome do canal Frequência (MHz) Códigos CHAN 05 446,05625 1-67,0 Hz CHAN 06 446,06875 1-67,0 Hz CHAN 07 446,08125 1-67,0 Hz CHAN 08 446,09375 1-67,0 Hz CHAN 09 433,07500 1-67,0 Hz CHAN 10 433,30000 1-67,0 Hz CHAN 11 433,55000 1-67,0 Hz CHAN 12...
- Page 904 A tabela nesta secção oferece informações relativas às frequências e códigos. Esta tabela é útil na utilização de rádios de duas vias Motorola Solutions da Série XT600d com outros rádios empresariais. Tabela 9: Frequência do canal predefinida e Código de eliminação de interferências XT660d...
- Page 905 Português Zona Nome do canal Frequência (MHz) Códigos CHAN 28 446,171875 Código de cor-12 CHAN 29 446,178125 Código de cor-13 CHAN 30 446,184375 Código de cor-14 CHAN 31 446,190625 Código de cor-15 CHAN 32 446,196875 Código de cor-16 Tabela 10: Frequência do canal predefinida e Código de eliminação de interferências do XT665d Zona Nome do canal Frequência (MHz)
- Page 906 Português Zona Nome do canal Frequência (MHz) Códigos CHAN 25 446,053125 Código de cor-9 CHAN 26 446,059375 Código de cor-10 CHAN 27 446,065625 Código de cor-11 CHAN 28 446,071875 Código de cor-12 CHAN 29 446,078125 Código de cor-13 CHAN 30 446,084375 Código de cor-14 CHAN 31...
- Page 907 Português Frequência PMR446 (MHz) 446,01875 446,06875 446,11875 446,16875 446,03125 446,08125 446,13125 446,18125 446,04375 446,09375 446,14375 446,19375 AVISO: *As Frequências digitais 446,0-446,1 MHz do XT660d estão apenas disponíveis para fabrico em ou após janeiro de 2018. Frequência digital PMR446 (MHz) *446,003125 *446,053125 446,103125 446,153125...
- Page 908 Português Lista de frequências completa do XT665d Frequência PMR446 (MHz) 446,00625 446,03125 446,05625 446,08125 446,01875 446,04375 446,06875 446,09375 Frequência digital PMR446 (MHz) 446,003125 446,028125 446,053125 446,078125 446,009375 446,034375 446,059375 446,084375 446,015625 446,040625 446,065625 446,090625 446,021875 446,046875 446,071875 446,096875 Frequência LPD433 (MHz) 433,07500 433,52500 433,97500...
- Page 909 Português Frequência LPD433 (MHz) 433,17500 433,62500 434,07500 434,52500 433,20000 433,65000 434,10000 434,55000 433,22500 433,67500 434,12500 434,57500 433,25000 433,70000 434,15000 434,60000 433,27500 433,72500 434,17500 434,62500 433,30000 433,75000 434,20000 434,65000 433,32500 433,77500 434,22500 434,67500 433,35000 433,80000 434,25000 434,70000 433,37500 433,82500 434,27500 434,72500 433,40000 433,85000 434,30000...
- Page 910 Português Códigos CTCSS e PL/DPL Tabela 11: Códigos CTCSS CTCSS CTCSS 67,0 136,5 71,9 141,3 74,4 146,2 77,0 151,4 79,7 156,7 82,5 162,2 85,4 167,9 88,5 173,8 91,5 179,9 94,8 186,2 97,4 192,8 100,0 203,5 103,5 210,7 Continuação da tabela… Enviar comentários...
- Page 911 Português CTCSS CTCSS 107,2 218,1 110,9 225,7 114,8 233,6 118,8 241,8 123,0 250,3 127,3 122 (*) 69,3 131,8 Tabela 12: Códigos PL/DPL Código Código Código DPL 69 Invertido DPL 70 Invertido DPL 71 Invertido DPL 72 Invertido DPL 73 Invertido DPL 74 Invertido Continuação da tabela…...
- Page 912 Português Código Código Código DPL 75 Invertido DPL 76 Invertido DPL 77 Invertido DPL 78 Invertido DPL 79 Invertido DPL 80 Invertido DPL 81 Invertido DPL 82 Invertido DPL 83 Invertido DPL 84 Invertido DPL 85 Invertido DPL 86 Invertido DPL 87 Invertido DPL 88 Invertido DPL 89 Invertido...
- Page 913 Português Código Código Código DPL 91 Invertido DPL 92 Invertido PL personalizado DPL 93 Invertido PL personalizado DPL 94 Invertido PL personalizado DPL 95 Invertido PL personalizado DPL 96 Invertido PL personalizado DPL 97 Invertido PL personalizado DPL 98 Invertido DPL 39 Invertido DPL 99 Invertido DPL 40 Invertido...
- Page 914 Português Código Código Código DPL 47 Invertido DPL 107 Invertido DPL 48 Invertido DPL 108 Invertido DPL 49 Invertido DPL 109 Invertido DPL 50 Invertido DPL 110 Invertido DPL 51 Invertido DPL 111 Invertido DPL 52 Invertido DPL 112 Invertido DPL 53 Invertido DPL 113 Invertido DPL 54 Invertido...
- Page 915 Português Código Código Código DPL 63 Invertido DPL 123 Invertido DPL 64 Invertido DPL Personalizado DPL 65 Invertido DPL Personalizado DPL 66 Invertido DPL Personalizado DPL 67 Invertido DPL Personalizado DPL 68 Invertido DPL Personalizado Enviar comentários...
- Page 916 Português Esta página foi deixada em branco de propósito.
- Page 917 • Quebras ou danos nas antenas, exceto quando garantia. Não envie o rádio para a Motorola Solutions. De resultem diretamente de defeitos dos materiais ou de modo a poder usufruir dos serviços previstos na garantia, fabrico.
- Page 918 Português Esta página foi deixada em branco de propósito.
- Page 919 Português Acessórios Tabela 15: Cabos N.º de peça Descrição Tabela 13: Acessórios de áudio HKKN4028_ Cabo de clonagem rádio para rádio HKKN4027_ Cabo de programação CPS N.º de peça Descrição HKLN4601_ Kit de vigilância com microfone Tabela 16: Carregadores integrado e PTT HKLN4599_ Auricular em D com microfone N.º...
- Page 920 Capa de transporte em couro da Série XT600d AVISO: Alguns acessórios podem não estar disponíveis no momento de compra. Contacte o seu Ponto de venda Motorola Solutions ou visite http:// www.motorolasolutions.com para obter as informações mais recentes sobre a disponibilidade de acessórios e novos modelos de acessórios.
- Page 921 Русский Содержание 2.5 Чехол............27 2.6 Зарядка радиостанции......27 2.7 Зарядка с использованием Авторские права на компьютерное программное одноместного зарядного устройства с обеспечение..............7 подставкой............27 Важная информация по безопасности....... 9 2.8 Зарядка аккумулятора отдельно от Меры предосторожности при эксплуатации.....11 радиостанции........... 28 Введение..............
- Page 922 Русский 3.7 Диапазон переговоров.......38 4.3.1 Выполнение вызова из меню КОНТАКТОВ.......... 50 3.8 Светодиодные индикаторы радиостанции........... 39 4.3.2 Функции, доступные в меню "Контакты"..........51 3.9 VOX и iVOX..........41 4.3.3 Добавление нового контакта в 3.9.1 Настройка VOX......41 список контактов........52 3.9.2 Настройка iVOX......42 4.3.4 Выполнение...
- Page 923 Русский 4.5.1 Создание нового текстового 4.12 Прямой вызов по ИД радиостанции..66 сообщения..........57 4.13 Обратный импульс........67 4.5.2 Ответ, пересылка или 4.14 Беззвучный режим........67 удаление полученного сообщения..58 Глава 5. Настройка радиостанции......69 4.5.3 Отправка быстрого текстового 5.1 Настройка с помощью CPS....... 69 сообщения..........
- Page 924 Русский A.1 Гарантия не распространяется на:..97 A.2 Гарантийная информация......97 Приложение B. Аксессуары........99 Отправить отзыв...
- Page 925 Русский Авторские права на Кроме того, приобретение изделий Motorola Solutions не приведет прямо, косвенно, процессуально или каким- компьютерное либо иным образом к передаче лицензии на авторские программное обеспечение права, патенты или запатентованные приложения Motorola Solutions, кроме обычной неисключительной лицензии на использование, которая возникает по...
- Page 926 Русский Данная страница намеренно оставлена пустой.
- Page 927 радиостанций". Он содержит важные инструкции по эксплуатации и технике безопасности, а также информацию по воздействию радиочастотной энергии и контролю соответствия применимым стандартам и нормативам. Для ознакомления со списком аккумуляторов и других аксессуаров, утвержденных компанией Motorola Solutions, посетите следующий веб- сайт: http://www.motorolasolutions.com Отправить отзыв...
- Page 928 Русский Данная страница намеренно оставлена пустой.
- Page 929 Русский Меры предосторожности бытового моющего средства и пресную воду (т. е. чайная ложка моющего средства на четыре литра при эксплуатации воды). • При очистке радиостанции не направляйте на нее Портативная радиостанция серии XT600d сильную струю воды, это может вызвать попадание соответствует...
- Page 930 Русский Данная страница намеренно оставлена пустой.
- Page 931 Русский Введение В данном руководстве пользователя описаны принципы эксплуатации радиостанций. Ваш дилер или системный администратор могли внести изменения в настройки вашей радиостанции, исходя из конкретных задач. Для получения дополнительной информации обратитесь к дилеру или системному администратору. Вы можете получить консультацию дилера или системного...
- Page 932 Русский Данная страница намеренно оставлена пустой.
- Page 933 взрыву и, как следствие, травмам и материальному ущербу. безопасности при 2 Использование аксессуаров, не рекомендованных обращении с компанией Motorola Solutions, может стать причиной возгорания, поражения электрическим током или аккумуляторами и травм. зарядными устройствами 3 Для снижения уровня повреждений вилки и кабеля...
- Page 934 Русский 6 Не разбирайте зарядное устройство: оно не • Подключайте оборудование к электрической подлежит ремонту, и запасные детали к нему не розетке, к которой обеспечен свободный доступ или предусмотрены. Разборка зарядного устройства которая располагается рядом с устройством. может привести к поражению электрическим током •...
- Page 935 Русский Обзор радиостанции В данной главе описываются кнопки и функции, позволяющие управлять радиостанцией. Отправить отзыв...
- Page 936 Русский Кнопки управления В следующей таблице описываются функции каждой кнопки радиостанции. Таблица 1: Справочная таблица по кнопкам управления Номер Описание Антенна В модели радиостанции XT665d антенна не снимается. Отверстие для ремешка Кнопка записи Нажмите кнопку, чтобы включить/выключить функцию записи передачи. Для получения дополнительной...
- Page 937 Русский Номер Описание Индикатор Предназначена для отображения состояния аккумулятора, состояния включения питания, информации о радиовызове и состояния сканирования. Динамик Микрофон При отправке сообщения пользователю необходимо четко говорить в микрофон. ЖК-дисплей Монохромный дисплей с оранжевой подсветкой. Кнопки меню/ОК и навигационные кнопки Нажмите...
- Page 938 Русский Номер Описание Нажмите для ввода цифры "0"; нажмите и удерживайте эту кнопку, чтобы переключиться с ввода текста на ввод цифр, выбора символов и языка. В правом верхнем углу дисплея радиостанции отображается ABC, abc и 123, указывая на доступные для ввода символы. Нажмите...
- Page 939 Русский Кнопки Настройка по умолчанию Длительное нажатие кнопки SB1 Объявление уровня заряда аккумулятора Короткое нажатие кнопки SB2 Сканирование Длительное нажатие кнопки SB2 Мониторинг Описание каждого способа нажатия кнопок на радиостанции: Короткое нажатие Нажмите и быстро отпустите кнопку. Длительное нажатие Нажмите и удерживайте кнопку в течение запрограммированного времени. Удерживание...
- Page 940 Русский Технические характеристики радиостанций В следующей таблице приведены технические характеристики радиостанций. Таблица 3: Технические характеристики радиостанций XT665d XT665d Диапазон частот (МГц) PMR446, digital PMR446, LPD 433-434 0,5 для PMR446 и digital PMR446, Мощность передачи (Вт) 0,01 для LPD Количество каналов Антенна...
- Page 941 прослужит еще дольше. ионные аккумуляторы различной емкости, от которой Аккумуляторы Motorola Solutions предназначены зависит срок службы аккумулятора. специально для использования с зарядными устройствами Motorola Solutions и наоборот. Использование зарядных устройств сторонних Сведения о литий-ионном производителей для зарядки аккумуляторов может аккумуляторе...
- Page 942 Русский Ниже указано время работы от литий-ионного аккумулятора с мощностью передачи в 0,5 Вт в режиме экономии аккумулятора. Стандартный 20 ч Аккумулятор повышенной емкости 28 ч Установка литий-ионного аккумулятора Ниже приведены инструкции по установке литий- ионного аккумулятора. 1 Выключите питание радиостанции. 2 Расположите...
- Page 943 Русский Блок питания и одноместное 3 Нажмите на фиксатор аккумулятора (1) и задвиньте аккумулятор в радиостанцию до зарядное устройство с подставкой защелкивания фиксатора. (SUC) Извлечение литий-ионного аккумулятора Ниже приведены инструкции по извлечению литий- ионного аккумулятора. В комплект поставки радиостанции входит одно 1 Выключите...
- Page 944 Русский В случае приобретения дополнительного зарядного устройства или блока питания (2) убедитесь в том, что они аналогичны уже имеющемуся у вас одноместному зарядному устройству с подставкой и блоку питания. • Совместите адаптер (1) с выемками на блоке питания (2) и вставьте его в блок питания до щелчка. •...
- Page 945 радиостанцию вверх и выньте ее из чехла. Зарядка радиостанции Не вынимая аккумулятор из радиостанции, поместите его в одноместное зарядное устройство с подставкой или многоместное зарядное устройство, одобренное к использованию компанией Motorola Solutions. Зарядка с использованием одноместного зарядного устройства с подставкой Следующие шаги объясняют, как выполняется зарядка...
- Page 946 Русский расположена лицевой стороной к пользователю, как показано на рисунке. УВЕДОМЛЕНИЕ: При зарядке аккумулятора, подключенного к радиостанции, выключите радиостанцию, чтобы обеспечить полный заряд аккумулятора. Более подробную информацию см. в разделе Указания по безопасной эксплуатации на стр. Зарядка аккумулятора отдельно от радиостанции Чтобы...
- Page 947 Русский Таблица 4: Аккумуляторы, одобренные компанией Motorola Solutions Номер по Описание каталогу PMNN4434_R Стандартный литий-ионный аккумулятор PMNN4453_R Литий-ионный аккумулятор повышенной емкости 1 Выполните шаги шаг 3 из раздела "Зарядка с использованием одноместного зарядного устройства с подставкой на стр. 27". 2 Установите аккумулятор в подставку внутренней...
- Page 948 Русский Светодиодный Состояние Комментарии Светодиодные индикаторы индикатор зарядного устройства с положения аккумулятора подставкой позволяет решить В следующей таблице приведены все состояния проблему. устройства и соответствующие им режимы работы светодиодного индикатора. Аккумулятор перегрет или Таблица 5: Светодиодный индикатор зарядного Ожидание переохлажден, Медленно...
- Page 949 2.11 • Убедитесь, что аккумулятор, используемый в Приблизительное время зарядки устройстве, указан в Таблица 4: Аккумуляторы, одобренные компанией Motorola Solutions на стр. Ниже перечислены зарядные устройства с указанием приблизительного времени зарядки аккумулятора. Для 2.10 получения дополнительной информации см. Таблица 12: Аккумулятор на стр.
- Page 950 Русский Стандартный аккумулятор ≤ 4,5 ч Аккумулятор повышенной емкости ≤ 4,5 ч 2.12 Зарядка радиостанции и аккумулятора с использованием многоместного зарядного устройства — дополнительный аксессуар 1 Поставьте многоместное зарядное устройство на Многоместное зарядное устройство позволяет ровную поверхность. заряжать до шести радиостанций или аккумуляторов одновременно.
- Page 951 Русский 5 Установите радиостанцию или аккумулятор в разъем для зарядки (3) передней панелью от контактов (2). УВЕДОМЛЕНИЕ: • Подробную информацию о работе многоместного зарядного устройства см. в прилагающихся к устройству инструкциях. Более подробную информацию о запасных частях и их номерах см. в разделе Аксессуары...
- Page 952 Русский Данная страница намеренно оставлена пустой.
- Page 953 Русский Начало работы Для выключения радиостанции поворачивайте регулятор Вкл./Выкл./Громкость против часовой стрелки до тех пор, пока не услышите щелчок. Информация, приведенная в этом разделе, поможет вам получить представление о базовых принципах эксплуатации радиостанции. Регулировка громкости Чтобы увеличить громкость, поверните регулятор Вкл./ Включение/выключение...
- Page 954 Русский Ном Зна Описание Дисплей радиостанции ер чок Количество штрихов (0–3) показывает оставшийся уровень заряда аккумулятора. Включена функция сканирования. Функция VOX/iVOX активирована. Если аксессуары VOX не 11 12 подключены, при активации этой функции радиостанция работает в режиме iVOX и можно говорить в микрофон, не...
- Page 955 Русский Ном Зна Ном Зна Описание Описание ер чок ер чок Получено как минимум одно 10.ii. Текущий канал в цифровом режиме. непрочитанное текстовое сообщение. Отображает частоту текущего 6.i. Выполняется групповой вызов. канала. Отображает текущий код CTCSS/ ЦЧЛ. 6.ii. Выполняется частный вызов. УВЕДОМЛЕНИЕ: Представленный...
- Page 956 Русский У каждого канала есть свои настройки частоты, кода Индикаторы уровня сигнала и устройства для исключения помех и сканирования. занятости канала Когда на частоте наблюдается активность, мигает Прием вызова значок уровня сигнала (без штрихов), а светодиодный индикатор радиостанции горит оранжевым цветом. Ниже...
- Page 957 Русский покрытия радиостанции составляет 16 250 м², одинаковые настройки канала, частоты и кодов 13 этажей или 9 км на ровной местности. устройства для исключения помех. Это зависит от профиля, который был предварительно Диапазон переговоров зависит от рельефа местности. запрограммирован на радиостанции: Кроме...
- Page 958 Русский Статус радиостанции Светодиодный индикатор Передача (TX)/Прием (RX) Постоянно горит красным, когда радиостанция выполняет передачу или прием. Режим программирования "неактивного" Постоянно мигает красным. состояния/режима канала Канал занят Горит оранжевым. Низкий заряд аккумулятора Постоянно мигает оранжевым. Сканирование Быстро мигает красным. Режим VOX/iVOX Дважды...
- Page 959 Русский Настройка VOX VOX и iVOX Ниже приведены инструкции по настройке VOX. В данной главе описываются способы настройки и регулировки чувствительности VOX/iVOX. VOX доступна только на аксессуарах с поддержкой функции VOX. Микрофоны гарнитур с функцией VOX остаются активными в течение всего времени, при...
- Page 960 PTT или отсоединив аксессуар. говорить, и моментом, когда радиостанция УВЕДОМЛЕНИЕ: начинает передачу, есть небольшой промежуток Чтобы заказать аксессуары, обратитесь по месту времени. покупки продукции Motorola Solutions. 3.9.3 3.9.2 Регулировка чувствительности iVOX Настройка iVOX Чувствительность аксессуаров или микрофона Ниже приведены инструкции по настройке iVOX.
- Page 961 Русский пользовательского программирования (CPS) или кнопки Сброс до заводских настроек С помощью этой функции можно восстановить заводские настройки для всех функций радиостанций. По умолчанию установлено значение MEDIUM. Можно установить любой из уровней чувствительности iVOX, Нажмите одновременно кнопки PTT, SB2 и SB1 во указанных...
- Page 962 Русский Нажмите , чтобы включить или отключить Нажмите и удерживайте в течение тональный сигнал "beep". 4 секунд. Если клавиатура или боковые кнопки доступны, 3.12 Блокировка или разблокировка на дисплее отсутствует значок блокировки клавиатуры УВЕДОМЛЕНИЕ: С помощью этой функции нельзя заблокировать Вы...
- Page 963 Русский • CHANNEL EDIT • CONTACTS • SCAN • MESSAGE • RECORDING • CALL LOG • ZONE • RADIO INFO 3 Выполните одно из следующих действий. • Чтобы войти в меню функции, нажмите • Чтобы выйти из меню, нажмите кнопку УВЕДОМЛЕНИЕ: После...
- Page 964 Русский Данная страница намеренно оставлена пустой.
- Page 965 Русский Дополнительные функции Типы Параметры Значение по настройки умолчанию • DUTCH Настройка • PORTUGUESE • В меню НАСТРОЕК есть несколько элементов, GERMAN параметры которые можно изменять непосредственно • POLISH на радиостанции без использования CPS. В следующей • TURKISH таблице приведены настройки и опции: VOX/iVOX ON/OFF Типы...
- Page 966 Русский Нажмите и перейдите к нужному элементу Нажмите и перейдите к элементу CHANNEL в списке доступных вариантов. EDIT. Используйте или для выбора Нажмите и прокрутите до нужного канала. нужного элемента. 3 Когда на дисплее отображается нужный псевдоним канала, нажмите и перейдите к Редактирование...
- Page 967 Русский Изменение кода канала Нажмите и перейдите к элементу CHANNEL Ниже приведены инструкции по изменению кода EDIT. канала. Нажмите и прокрутите до нужного канала. Нажмите и перейдите к элементу CHANNEL 3 Когда на дисплее отображается нужный код EDIT. канала, нажмите и...
- Page 968 Русский Общий вызов Контакты Вызов, который получатель может только принимать, но не может отвечать на него. Для В данной главе описываются различные типы вызовов выполнения общего вызова радиостанция должна и способы осуществления вызова. быть запрограммирована на инициирование общего вызова. Доступ к списку контактов можно получить через меню КОНТАКТОВ.
- Page 969 Русский 4.3.2 Функции Описание Функции, доступные в меню системе, получая подтверждения "Контакты" после отправки запроса. После вводе каждого идентификатора контакта из REMOTE MON Инициализация запроса на списка контактов пользователю становятся доступны выполнение удаленного перечисленные ниже функции. В следующей таблице мониторинга позволяет активировать...
- Page 970 Русский 4.3.3 Выполнение цифрового вызова с Добавление нового контакта в помощью функции доступа одним список контактов нажатием Ниже приведены инструкции по добавлению нового Функция доступа одним нажатием позволяет контакта в список контактов. пользователю с легкостью выполнять групповой или частный вызов на предварительно заданный идентификатор.
- Page 971 Русский УВЕДОМЛЕНИЕ: 2 Нажмите боковую кнопку, для которой была Эта функция доступна только в цифровом запрограммирована функция доступа одним режиме и может быть использована только при нажатием. выполнении группового и частного вызовов. Светодиодный индикатор загорится ровным красным цветом. 4.3.5.1 Редактирование быстрого контакта 3 Дождитесь...
- Page 972 Русский Сканирование Используйте или для прокрутки списка доступных вариантов и выберите номер Сканирование позволяет выполнять мониторинг каналов для обнаружения переговоров. Когда для быстрого контакта. радиостанция обнаруживает передачу, сканирование прекращается и радиостанция останавливается на Нажмите , чтобы подтвердить выбор. активном канале. Это дает пользователю возможность слушать...
- Page 973 Русский Ниже приведены инструкции по выбору приоритетного 3 После выбора списка сканирования нажмите канала из списка сканирования. Нажмите и перейдите к элементу SCAN. 4 Перейдите к элементу SET ACTIVE. Нажмите кнопку и используйте или Нажмите , чтобы подтвердить выбор. На дисплее радиостанции появится значок , для...
- Page 974 Русский 4.4.3 • Чтобы удалить, перейдите к элементу Удаление канала из списка DELETE?. сканирования • Чтобы вернуться на предыдущий экран, перейдите к элементу CANCEL?. Ниже приведены инструкции по удалению канала из списка сканирования. Нажмите , чтобы подтвердить выбор. Нажмите и перейдите к элементу SCAN. 4.4.4 Добавление...
- Page 975 Русский Выбираемые Описания Перейдите к элементу ADD и нажмите элементы NEW TEXT Используйте буквенно- 5 Прокрутите список сканирования и выберите цифровую клавиатуру для ввода нужный псевдоним канала. текстовых сообщений вручную. INBOX Хранилище полученных Нажмите , чтобы подтвердить выбор. сообщений. В этом разделе На...
- Page 976 Русский Ответ, пересылка или удаление Нажмите и перейдите к элементу MESSAGE. полученного сообщения Ниже приведены инструкции по отправке ответа, Нажмите , чтобы перейти на экран пересылке и удалению полученного сообщения. сообщений. 3 Перейдите к элементу NEW TEXT и нажмите Нажмите и...
- Page 977 Русский • Чтобы выбрать одно из готовых коротких Нажмите и перейдите к элементу MESSAGE. сообщений для отправки ответа отправителю, перейдите к элементу QUICK REPLY и выберите QUICK TEXT. Нажмите , чтобы перейти на экран • Для переадресации сообщения другому сообщений. контакту...
- Page 978 Русский 4.5.4 • Чтобы удалить, перейдите к элементу Пересылка и удаление DELETE?. отправленного сообщения • Чтобы вернуться на предыдущий экран, перейдите к элементу CANCEL?. Ниже приведены инструкции по пересылке и удалению • Чтобы просмотреть сообщение, перейдите к отправленного сообщения. элементу REVIEW. Нажмите...
- Page 979 Русский 4.6.1 4.6.2 Инициализация записи Воспроизведение или удаление записанных файлов Ниже приведены инструкции по инициализации записи. Нажмите и перейдите к элементу Нажмите и перейдите к элементу RECORDING. RECORDING. Нажмите , чтобы перейти на экран записей Нажмите , чтобы перейти на экран записей 3 Перейдите...
- Page 980 Русский • Чтобы удалить, перейдите к элементу Журнал вызовов DELETE?. Журнал вызовов позволяет пользователю • Чтобы вернуться на предыдущий экран, просматривать историю вызовов радиостанции. Ниже перейдите к элементу CANCEL?. приведены инструкции для получения доступа к журналу вызовов. Нажмите , чтобы подтвердить выбор. УВЕДОМЛЕНИЕ: Эта...
- Page 981 Русский 4.7.1 Нажмите , чтобы сохранить сведения. Сохранение контакта из журнала вызовов в список контактов Ниже приведены инструкции по сохранению контакта из Зона журнала вызовов в список контактов. Зона — это группа каналов. Существует четыре доступных зоны, при этом каждая зона состоит из Нажмите...
- Page 982 Русский Скрытый режим Нажмите и перейдите к соответствующему варианту в списке зон. Скрытый режим включается с помощью CPS. Когда радиостанция работает в скрытом режиме, экран и светодиодный индикатор радиостанции полностью 3 Когда на дисплее отобразится нужная зона, выключены, динамик радиостанции отключен. Для нажмите...
- Page 983 Русский 4.10.2 УВЕДОМЛЕНИЕ: Выключение скрытого режима Эта функция доступна только в цифровом режиме и может быть использована только при Ниже приведены инструкции по выключению скрытого выполнении группового вызова. режима. Программируемая кнопка разрыва связи и продолжительность ограниченного периода разрыва связи назначаются дилером или Нажмите...
- Page 984 Русский • Для успешного выполнения разрыва связи истечения периода действия таймера нажмите кнопку PTT на радиостанции, на выключения (TOT) перед выполнением любой дисплее которой отображается сообщение передачи. WAIT, и удерживайте ее нажатой в течение 3 секунд. На дисплее радиостанции 4.12 отобразится...
- Page 985 Русский 4.13 Беззвучный режим Обратный импульс Беззвучный режим включается с помощью CPS. Для УВЕДОМЛЕНИЕ: получения дополнительной информации о данной Эта функция доступна только в аналоговом конфигурации обратитесь к дилеру или системному режиме. администратору. Обратный импульс исключает ненужный шум (остатки Существуют три варианта режима, которые могут быть шумоподавления) во...
- Page 986 Русский Данная страница намеренно оставлена пустой.
- Page 987 Русский Настройка радиостанции Настройка с помощью CPS В данной главе приведены инструкции по настройке радиостанции. УВЕДОМЛЕНИЕ: Ваш дилер или системный администратор могли внести изменения в настройки вашей радиостанции, исходя из конкретных задач. Чтобы узнать запрограммированные настройки радиостанции, обратитесь к дилеру или системному...
- Page 988 (*) Кабель программирования CPS, номер по (дополнительный аксессуар) каталогу HKKN4027_, приобретается отдельно. За подробной информацией обратитесь по Ниже показаны типы кабелей, используемых для месту покупки продукции Motorola Solutions. клонирования R2R. Клонирование радиостанций Вы можете провести клонирование профилей радиостанций серии XT600d с исходной радиостанции...
- Page 989 Русский Рисунок 4: Преобразователь USB Инструкции по эксплуатации Ниже приведены инструкции по выполнению клонирования радиостанций с использованием R2R: 1 Выключите радиостанции и подготовьте следующее оборудование: • Полностью заряженные аккумуляторы для каждой радиостанции. • Два одноместных зарядных устройства для клонирования радиостанций серии XT600d. 2 Отключите...
- Page 990 Русский УВЕДОМЛЕНИЕ: голосовым уведомлением: "successful" Во время процесса клонирования ("успешно") или "fail" ("ошибка"). Если исходная одноместные зарядные устройства не радиостанция оснащена дисплеем, на нем нужно подключать к сети электропитания. отобразится сообщение Pass или Fail (в течение Аккумуляторы не будут заряжаться. 5 секунд...
- Page 991 УВЕДОМЛЕНИЕ: Кабель для клонирования предназначен для использования только с совместимыми одноместными зарядными устройствами RLN6175 и PMLN6394 от Motorola Solutions. При заказе кабеля для клонирования используйте номер по каталогу HKKN4028_. Более подробную информацию об аксессуарах см. в Аксессуары на стр. Отправить отзыв...
- Page 992 Русский Данная страница намеренно оставлена пустой.
- Page 993 Русский Поиск и устранение неисправностей В следующей таблице приведены способы устранения ошибок в случае возникновения неисправности. Неисправность и решения Если... То... Нет питания Зарядите или замените литий-ионный аккумулятор. Использование аккумулятора при температурах вне допустимого диапазона может привести к сокращению срока его службы. См.
- Page 994 Русский Если... То... Измените настройки частот или кодов на всех радиостанциях. Убедитесь, что радиостанция при передаче работает на правильной частоте и с правильным кодом. Плохое качество аудиосигнала Возможно, настройки радиостанции заданы неверно. Перепроверьте настройки частот, кодов и полос пропускания и убедитесь, что они одинаковы...
- Page 995 Русский Если... То... лучшее проникновение сигнала сквозь препятствия. См. Диапазон переговоров на стр. Не удается передать или принять сообщение Убедитесь, что при передаче вы полностью нажимаете кнопку PTT. Убедитесь, что все радиостанции имеют одинаковые настройки канала, частоты и кода устройства для исключения помех Перезарядите...
- Page 996 Русский Если... То... См. Диапазон переговоров на стр. Низкий заряд аккумулятора Зарядите или замените литий-ионный аккумулятор. Использование аккумулятора при температурах вне допустимого диапазона приводит к сокращению срока его службы. См. Сведения о литий-ионном аккумуляторе на стр. Индикаторы зарядного устройства с Убедитесь, что...
- Page 997 Русский Если... То... С помощью CPS убедитесь, что значение уровня чувствительности VOX не равно "0". Аксессуар не работает или не совместим с радиостанцией. См. VOX и iVOX на стр. Аккумулятор не заряжается, хотя находится в Убедитесь, что зарядное устройство с подставкой зарядном...
- Page 998 Русский Данная страница намеренно оставлена пустой.
- Page 999 Русский Использование и уход В данной главе рассматриваются принципы правильного использования радиостанции. Меры предосторожности Для чистки наружных Не допускается применение поверхностей пользуйтесь мягкой Не погружайте устройство в воду спирта или чистящих средств тканью, смоченной водой Если радиостанция попала в воду: Выключите...
- Page 1000 Русский Данная страница намеренно оставлена пустой.
- Page 1001 Таблицы кодов и аналоговых частот Таблицы в этом разделе предоставляют информацию о частотах и кодах. Они применяются, когда приемопередающие радиостанции Motorola Solutions серии XT600d используются с прочими корпоративными радиостанциями. Таблица 7: Частота канала и код устройства XT665d для исключения помех по умолчанию...