OVE ERICA Manuel D'utilisation
Liens rapides
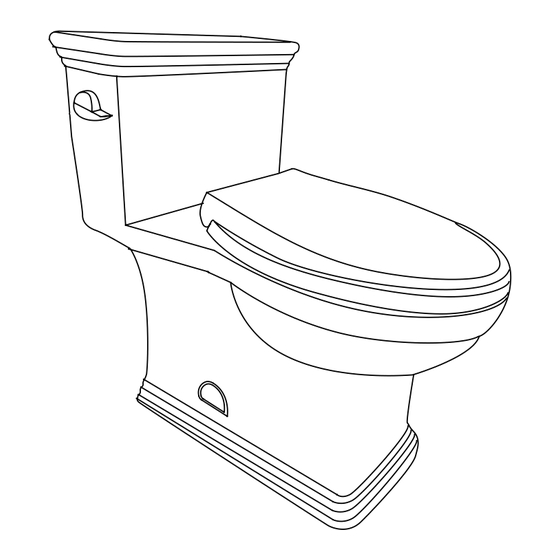
6 11/16" [170]
11 1/4" [285]
12" [305]
OVE 2018-03-28
INSTALLATION MANUAL | MANUEL D'INSTALLATION | MANUAL DE INSTALACIÓN
28 3/4" [730]
28" [710]
18 5/16" [465]
12 7/8" [326]
Questions, problems, need help?
Call our customer service department at
1-866-839-2888, 9 a.m. - 5 p.m., EST, Monday - Friday
Questions, problèmes ou besoin d'aide?
Contactez notre service à la clientèle au
1-866-839-2888, du lundi au vendredi de 9h00 à 17h00 HNE.
Preguntas, problemas o necesita ayuda?
Llame a nuestro departamento de servicio al cliente al
1-866-839-2888, 9 am. – 5 pm., HDE, Lunes a Viernes.
6" [150]
2-ø5/8" [2-ø16]
ø3 3/8" [ø85]
17 1/2" [445]
5 1/2" [141]
9 13/16" [250]
14" [355]
ERICA
Flush | Chasse | Descarga
1.28 gal | 4.8 L
ø2" [ø51]
Measures: inch [millimeter]
Mesures: pouce [millimètre]
Medidas: pulgadas [milímetros]

Manuels Connexes pour OVE ERICA


Sommaire des Matières pour OVE ERICA
- Page 1 ERICA INSTALLATION MANUAL | MANUEL D’INSTALLATION | MANUAL DE INSTALACIÓN Flush | Chasse | Descarga 1.28 gal | 4.8 L 6” [150] 2-ø5/8” [2-ø16] ø2” [ø51] ø3 3/8” [ø85] 28 3/4” [730] 17 1/2” [445] 28” [710] 6 11/16” [170] 18 5/16”...
- Page 2 PART LIST LISTE DES PIÈCES LISTA DE PIEZAS PART # QUANTITY # DE PIÈCE DESCRIPTION DESCRIPTION DESCRIPCIÓN QUANTITÉ PARTE # CANTIDAD Flush valve Valve de chasse Válvula de descarga Fill valve Valve de remplissage Válvula de llenado Toilet Toilette Inodoro Hole cover Couvercle pour trou Cubierta del orificio...
- Page 3 INSTALLATION INSTALLATION INSTALACIÓN A. Ensure that your water inlet pipe and your floor discharge drain are installed according to bellow drawing. These are minimum measurements, the toilet can be installed if your actual measurements are longer than below. TIP: Align 2 pieces of masking tape with the center of the drain, this will help you position the toilet in future steps. B.
- Page 4 INSTALLATION INSTALLATION INSTALACIÓN A. Position the toilet onto the floor flange, making sure the fixing bolts are aligned with the toilet’s holes. B. Using an adjustable wrench, reach beside the toilet and tightly screw the nut to the fixing bolts. Cover the hole with the provided cover. TIP: Soak the plastic cover in hot water (40°C) for 1min before installing it.
- Page 5 INSTALLATION INSTALLATION INSTALACIÓN A. Install the seat cover with its fixing hardware and with its decorative caps. Before tightening, move the pegs front and back to yield the desired seat position. B. Insert the seat onto the toilet by pushing the two buttons and securing it to the fixing pegs. A.
- Page 6 CARE AND MAINTENANCE TRAITEMENT ET ENTRETIEN CUIDADO Y MANTENIMIENTO REPAIRS All replacement parts are available at any plumbing retailer. Please contact your local plumbing retailer for help. MAINTENANCE AND CARE For general cleaning, use mild, nonabrasive soap and warm water. Do not use abrasive cleaners (such cleaners contain sand or silica that will scratch the ceramic finish).
- Page 7 Product modification: OVE reserves the right to change, modify or improve the Products without obligation to incorporate such changes in Products previously sold or installed. Authority and Modification: The retail seller is not the agent of OVE and is not authorized to vary or modify the terms of the Limited Warranty. In addition, the retail seller cannot bind OVE or make any representations or promises about the Product that are binding on OVE.