Télécharger Imprimer la page

Publicité

Les langues disponibles
  • FR

Les langues disponibles

  • FRANÇAIS, page 12

Liens rapides

Grandstream Networks, Inc.
126 Brookline Ave, 3rd Floor
Boston, MA 02215
Voice: (617) 566-9300
Fax: (617) 249-1987
www.grandstream.com
GXP2130 Enterprise IP Phone
Quick Start Guide
For Warranty and RMA information, please visit www.grandstream.com

Publicité

loading

Sommaire des Matières pour Grandstream Networks GXP2130

  • Page 1 Grandstream Networks, Inc. 126 Brookline Ave, 3rd Floor Boston, MA 02215 Voice: (617) 566-9300 Fax: (617) 249-1987 www.grandstream.com GXP2130 Enterprise IP Phone Quick Start Guide For Warranty and RMA information, please visit www.grandstream.com...
  • Page 2 Content English................1 简体中文................7 Español................13 Français................19 Deutsch................25 Italiano................31 Русскй................37...
  • Page 3 It is Your responsibility to purchase SIP-compliant Internet telephone service, The GXP2130 is a state-of-the-art enterprise grade IP phone that features up to 3 lines, 2.8 inch TFT Color LCD, 4 XML programmable context-sensitive soft keys, properly configure the GXP2130 to use that service,...
  • Page 4 3. Pull out the tab on from the handset cradle (See figure below). 4. Rotate the tab and plug it back into the slot with the extension up to hold the To setup the GXP2130, follow the steps below: handset while the phone is mounted on the wall (See figure below).
  • Page 5 Outbound Proxy, SIP User ID, SIP Auth ID and SIP Password. PHONE CONFIGURATION: 4. Follow MENU options to configure the basic features of the phone. For example: the IP address if using a static IP. For details, please check GXP2130 User Manual. Configure the GXP2130 using Web Browser: 5.
  • Page 6 操作会导致话机本身的程序损坏,进而导致设备无法启动。 心(急救服务)以及各种紧急服务的紧急通话服 务。用户必须自行设定紧急通话功能。用户必 警告 请使用设备包装中的电源,因为使用其他没有经过认证的替代电源适配器 有可能对设备造成损害。 须自行购买SIP兼容的网络电话服务,正确的 设定GXP2130使用该服务,并定期测试您的 产品概览: 配置以确保GXP2130如预期工作,否则请购 GXP2130是一款新一代企业级IP电话。GXP2130具有3个SIP账号,3条线路通 买传统无线或有线电话服务来拨打紧急通话。 讯,2.8英寸LCD显示屏,4个可编辑XML应用程序软按键。GXP2130有2个 10/100/1000Mbps自适应交换式以太网接口(支持PoE供电),支持EHS功能以 及最多四方会议,具有优异的高清晰语音质量和丰富完备的电话功能。它支持自 动化的个人多媒体信息服务、自动配置、先进的安全隐私保护设置。它广泛兼容 Grandstream Networks 公司的GXP2130不支 其它第三方SIP设备及主要SIP/NGN/IMS平台。对于追求品质的企业用户来说, GXP2130将是理想的选择。 持紧急通话服务。 Grandstream Networks 公 设备包装清单: 司、其管理者和员工以及其相关机构对此所造 成的任何索赔、损失或者损害都不负有任何法 律追究责任。在此,您将无权对任何以及所有 由于无法通过GXP2130拨打紧急电话以及没 有遵照前段文字描述而造成紧急通话失败的事 件提出诉讼。 GXP2130 话机(1台) 电话手柄(1个) 电源适配器 (1个) 网线 (1根) 手柄连线(1根)...
  • Page 7 安装电话 (桌面支架): 安装电话: 将桌面支架插入电话背面的支架插槽中。用户可以使用两排插槽中的一排,不同 的插槽用于不同的倾斜角度。 电话的连接: 墙体支架与桌 面支架插槽 DC 12 HEADSET HANDSET DC 12 HEADSET HANDSET 安装电话 (墙体支架): 1. 将墙体支架插入电话背面的支架插槽中; 2. 通过墙孔将电话固定在墙上; PC端口 手柄 网络连接端口 5V电源 耳机 3. 如下图所示,将话机手柄槽下方的扣机零件取出; 4. 将该零件倒转,然后重新插入原处。此时零件凸出处在外,当电话使用墙体支 架固定在墙上时,手柄可以垂直地稳定扣入手柄槽中,不会滑落。 连线步骤: 话机手柄插槽 1. 用手柄连线连接电话手柄和电话主机; 2. 用网线连接电话的网络接口和外部网络接口(如:集线器或交换机上的RJ-45网 凸出处向上 络接口); 3.
  • Page 8 会议 免提 耳机 发送 静音 标准键盘 多功能按键 1. 当电话处于空闲状态,按下菜单/确定按键进入菜单选项; 通过键盘配置GXP2130: 2. 使用方向选择按键 “上”“下”“左”“右”选择菜单选项; 1. 确保电话处于空闲状态; 3. 按下菜单/确定按键确定选项; 2. 按下菜单/确定按键进入菜单选项;. 4.当有来电进入,提起电话手柄、使用免提键或者电话处于菜单状态中60秒之 选择菜单->话机->SIP->账号,输入SIP服务器、SIP用户名、密码等账号信息, 后,电话将自动退出菜单选项。 注册新的SIP账号; 电话的配置: 4. 在菜单选项中进行电话其他设置,如设置电话的静态IP地址。请参考GXP2130 产品用户手册获得更多详细配置信息; 通过WEB浏览器配置GXP2130: 5. 如有其他需要的设置,请联系您的服务提供商。 1. 请确保电话的电源及网络连接; 2. 话机待机时,按下“上”方向键,此时电话屏幕显示话机IP地址; 3. 在您电脑浏览器中输入话机IP地址; 3.如右图所示,请输入密码登陆。默认管理员用户名和密码是“admin”;默认终 端用户名是“user”,密码是“123”。 备注:欲获取详细的话机使用信息,请在以下链接中下载用户手册: http://www.grandstream.com/support...
  • Page 9 PoE integrado, conferencias de voz de 4 vías y Electronic Hook Switch (EHS). acceso a servicios de emergencia. El GXP2130 ofrece calidad de audio en HD tanto en auricular y el altavoz, cuenta con las principales funcionalidades de telefonía de última generación, información personalidad y aprovisionamiento automatizado para facilitar su...
  • Page 10 2. Coloque el teléfono en la pared utilizando los orificios; 3. Halé la lengüeta de la horquilla del auricular. (Ver figura abajo); Para configurar el GXP2130, siga los pasos detallados abajo: 4. Coloque la lengüeta en la misma ranura de tal manera que soporte el auricular.
  • Page 11 Configurando el GXP2130 utilizando un Navegador Web: teléfono. Por ejemplo: La dirección IP, en el caso de usar una dirección IP estatica. Para mayor información consulte el manual de usuario del GXP2130. 1. Asegure que su teléfono este conectado a la red y tenga electricidad.
  • Page 12 
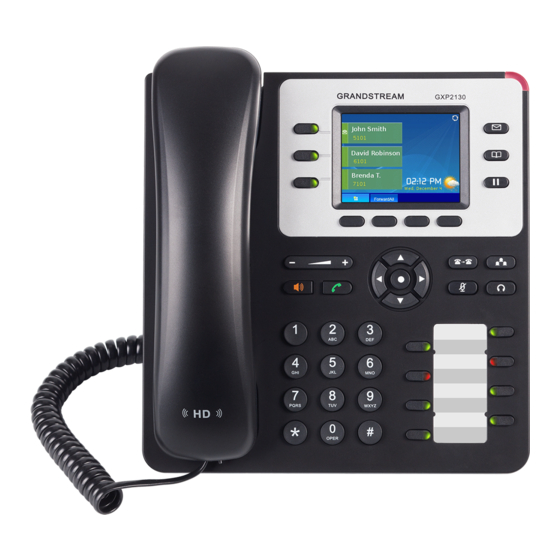
Gigabit, PoE intégré, conférence à 4 participants, et crochet commutateur pour utiliser ce service, et de tester périodiquement votre électronique (EHS). Le GXP2130 offre une qualité audio HD en utilisant le combiné ou le haut-parleur, des fonctionnalités de téléphonie à la pointe de la technologie, configuration pour vous assurer qu’elle fonctionne comme...
  • Page 13 2. Attachez le téléphone au mur via la fente de fixation murale. 3. Tirez la languette du support du combiné (Voir figure ci-dessous). Pour installer le GXP2130, suivez les instructions ci-dessous : 4. Pivotez la languette et rebranchez-la dans la fente en gardant son appui vers le haut pour tenir le combiné...
  • Page 14 4. Suivez les options du MENU pour configurer les fonctionnalités de base du téléphone. Par exemple: l’adresse IP si vous utilisez une adresse IP statique. Pour plus de détails, veuillez vérifier le manuel d’utilisation du GXP2130; 1. Vérifiez que votre téléphone est sous tension et connecté à Internet.
  • Page 15 Verantwortung des Nutzers, einen SIP-konformen ÜBERBLICK: Internet-Telefon-Service zu buchen, der die Nutzung der Das GXP2130 ist ein neues, wegweisendes IP-Business-Telefon für bis zu drei örtlichen und überregionalen Notrufnummern sicherstellt. SIP-Identitäten. Ausgestattet ist das Modell mit einem 2,8“ Farb-LCD Display,...
  • Page 16 TELEFONINSTALLATION: Installation des Telefons (Wandmontage) Zur Nutzung des Telefons am Tisch, führen Sie bitte den mitgelieferten Standfuß in die auf der Rückseite des Telefons vorgesehene Montagesteckplätze ein. ANSCHLUSSMÖGLICHKEITEN AM TELEFON: Eingebauter Steckplatz für die Wandhalterung und den Standfuß DC 12 HEADSET HANDSET Anschluss für die...
  • Page 17 4. Über die MENÜ Optionen können Sie die Basisfunktionen des Telefons konfigurieren, wie z.B. die Einstellung der IP Adresse, wenn eine statische (feste) IP Adresse genutzt wird. Weitere Konfigurationsdetails finden Sie im Konfiguration des GXP2130 via Web-Browser: Benutzerhandbuch des GXP2130. 5. Bitte kontaktieren Sie Ihren Internet-Service-Provider, um weitere, für die Konfiguration notwendige, Einstellungen zu erfahren.
  • Page 18 PANORAMICA: accordi supplementari per accedere ai Servizi di GXP2130 è un telefono IP altamente tecnologico, di livello enterprise, che mette emergenza. E’ a Vostra esclusiva responsabilità a disposizione fino a 3 linee, un TFT LCD 2,8” a colori, 4 tasti funzione sensibili...
  • Page 19 Porta ricevitore 3. Estrarre l’aletta dal ricevitore (si veda la figura di seguito). Per impostare il GXP2130, seguire la seguente procedura: 4. Ruotare l’aletta e riposizionarla nell’alloggiamento con l’estensione verso l’alto in modo da poter sostenere il telefono mentre è montato a parete (si veda la figura di seguito).
  • Page 20 CONFIGURAZIONE DEL TELEFONO: 4. Seguire le opzioni del MENU per configurare le impostazioni di base del telefono. Configurazione del GXP2130 mediante un browser web: Alcuni esempi: l’indirizzo IP se si usa un IP statico. Per ulteriori informazioni, consultare il manuale utente di GXP2130.
  • Page 21 либо больницы, правоохранительные органы, отделения встроенной программы и вызвать неправильную работу устройства. медицинской помощи (“Экстренная (-ые) Служба (-ы)”), или ВНИМАНИЕ: Используйте только блок питания, входящий в комплект поставки GXP2130. Использование неподходящего блока питания может какие-либо другие Экстренные службы. Следует выполнить вызвать повреждение устройства. дополнительные...
  • Page 22 3. Вытащите контакт из гнезда трубки (См. рисунок ниже). 4. Поверните контакт и вставьте его обратно в гнездо расширением вверх, Для установки GXP2130, следуйте инструкциям: когда телефон прикреплен к стене (См. рисунок ниже). 1. Соедините трубку с телефоном с помощью телефонного шнура.
  • Page 23 телефона. Например, IP address, если Вы используете статический IP. За 1. Убедитесь, что Ваш телефон включен и подключен к Интернет. подробностями обращайтесь к Пользовательской Инструкции GXP2130. 2. Нажмите кнопку UP, чтобы увидеть IP-адрес. 5. Пожалуйста, обращайтесь к Вашему поставщику услуг Интернет- телефонии...