Johnson Level & Tool 1888-1900 Mode D'emploi
19" digital angle locator and ruler
Liens rapides
19" Digital Angle Locator and Ruler
Model No. 1888-1900
Instruction Manual
Congratulations on your choice of this Digital Angle Locator and Ruler.
We suggest you read this instruction manual thoroughly before using
the instrument. Save this instruction manual for future use.
Table of Contents
1. Kit Contents
5. Using the Product
2. Features and Functions
6. Technical Specifications
3. Location of Parts/Components
7. Care and Handling
4. Operating Instructions
8. Product Warranty
©2013 Johnson Level & Tool
Localisateur d'angle et règle numérique 19 po
Modèle n
o
1888-1900
Mode d'emploi
Nous vous félicitons d'avoir choisi ce localisateur d'angle et règle
numérique. Nous vous suggérons de lire attentivement ce mode
d'emploi avant d'utiliser cet appareil. Conservez ce mode d'emploi
pour pouvoir vous y référer ultérieurement.
Table des matières
1. Contenu de la trousse
5. Utilisation de l'appareil
2. Caractéristiques et fonctions
6. Spécifications techniques
3. Emplacement des pièces et
7. Entretien et manipulation
composants
8. Garantie du produit
4. Consignes d'utilisation
©2013 Johnson Level & Tool
Localizador de ángulos digital y regla 19"
Modelo 1888-1900
Manual de instrucciones
Felicitaciones por la compra de este localizador de ángulos digital y
regla. Le sugerimos leer este manual de instrucciones antes de
utilizar el producto. Guarde este manual para consultarlo en el futuro.
Tabla de contenido
1. Contenido del kit
5. Utilización del producto
2. Características y funciones
6. Especificaciones técnicas
3. Ubicación de partes / componentes
7. Cuidado y manejo
4. Instrucciones de operación
8. Garantía del producto
©2013 Johnson Level & Tool
1. Kit Contents
Description
19" Digital Angle Locator and Ruler
3V CR2032 Lithium Battery
Instruction Manual
2. Features and Functions
• Digitally displays angle
• Angle display in degrees
• Working range of angle measurement 0-999°
• Automatic shut-off
• Stainless steel scale in fraction of an inch and millimeters
• Easy two button operation
• Zero button sets any point to zero
• Lock function enables blades to lock at any angle
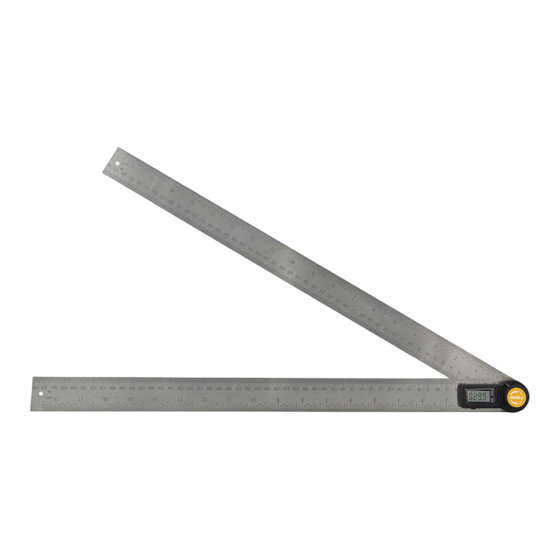
3. Location of Part/Components
19"
Hang Holes
Battery
Compartment
19"
1. Contenu de la trousse
Description
Localisateur d'angle et règle numérique 19 po
Pile au lithium CR2032 3 V
Mode d'emploi
2. Caractéristiques et fonctions
• Affichage numérique des angles
• Mesure d'angle en degrés
• Étendue de mesure d'angle de 0 à 999°
• Arrêt automatique
• Échelle en acier inoxydable en fractions de pouce et
en millimètres
• Utilisation facile à deux touches
• Touche de remise à zéro permettant de fixer le zéro dans
n'importe quelle position
• Fonction de verrouillage permettant de verrouiller les
lames à n'importe quel angle
3. Emplacement des pièces et composants
19 po
Trou de
suspension
Compartiment
de la pile
19 po
1. Contenido del Kit
Descripción
Localizador de ángulos digital y regla 19"
Batería de litio CR2032 3V
Manual de instrucciones
2. Características y funciones
• Visualización digital de ángulos
• Mediciones de ángulos en grados
• Rango de trabajo para medición de ángulos 0-999°
• Apagado automático
• Escala en acero inoxidable en fracciones de pulgada
y milímetros
• Operación fácil a 2 botones
• Botón cero restablece las medidas a cero
• Mecanismo de bloqueo permite bloquear las reglas en el
ángulo deseado
3. Ubicación de partes / componentes
19"
Orificio para
colgar
Compartimiento
de la batería
19"
4. Operating Instructions
Battery Installation
Qty.
1
1. To open the battery compartment, push the button located
1
below the LCD. The top edge of the battery compartment will
1
appear above the LCD. (Pic 1)
2. Pull the battery compartment out. (Pic 2)
3. Insert the battery (3V CR2032 Lithium Battery) with the
negative side facing up. (Pic 3)
4. Push the battery compartment back into the unit until the
battery compartment is flush with the LCD. (Pic 4)
Note: Always remove the battery before storing the instrument.
1.
5. Using the Product
On/Off Button
1. Push the ON/OFF button once to turn the unit on.
Ruler
2. Push the ON/OFF button again to turn the unit off.
Note: Moving the ruler blades with the unit turned off will turn
LCD Display
on the unit. To turn the unit completely off, hold the on/off
button in for 4 seconds.
Locking Knob
4. Consignes d'utilisation
Insertion de la pile
Qté
1
1. Pour ouvrir le compartiment de la pile, appuyez sur le bouton
1
situé sous l'écran. Le bord supérieur du compartiment de la
1
pile apparaîtra au-dessus de l'écran (Figure 1).
2. Retirez le compartiment de la pile en tirant (Figure 2).
3. Insérez la pile (pile au lithium CR2032 3 V) en orientant le
pôle négatif versle haut (Figure 3).
4. Insérez le compartiment de la pile dans l'appareil et appuyez
pour que le compartiment ne dépasse plus de l'écran (Figure 4).
Remarque : Retirez toujours la pile avant de ranger l'appareil.
Poussez
1.
5. Utilisation de l'appareil
Touche marche/arrêt (ON/OFF)
1. Appuyez une fois sur la touche de marche/arrêt pour mettre
l'appareil en marche.
2. Appuyez de nouveau sur la touche marche/arrêt pour
éteindre l'appareil.
Règle
Remarque : Si vous déplacez les lames de la règle alors que
l'appareil est éteint, l'appareil se mettra en marche. Pour
Écran à CL
éteindre complètement l'appareil, tenez la touche marche/arrêt
Bouton de
enfoncée pendant 4 secondes.
verrouillage
4. Instrucciones de operación
Instalación de la batería
Cantidad
1
1. Para abrir el compartimiento de la batería, presione el botón
1
ubicado debajode la pantalla LCD. El borde posterior del
1
compartimiento aparecerá sobre lapantalla LCD (fig. 1).
2. Retire el compartimiento (fig. 2).
3. Inserte la batería de litio CR2032 3V con el lado negativo
hacia arriba (fig. 3).
4. Inserte el compartimiento de batería (fig. 4).
Nota: Retire siempre la batería antes de guardar el instrumento.
Presionar
1.
5. Utilización del producto
Botón de encendido/apagado
1. Presione el botón ON/OFF una vez para encender la unidad.
2. Presione el botón ON/OFF de nuevo para apagar la unidad.
Regla
Nota: Si mueve las reglas con la unidad apagada, la unidad se
encenderá. Para apagar por completo la unidad, mantenga
Pantalla LCD
presionado el botón ON/OFF por 4 segundos.
Perilla de
bloqueo
2.
3.
4.
Tirez
Pôle
Poussez
négatif
4.
2.
3.
Sacar
Polo
Presionar
negativo
3.
4.
2.

Manuels Connexes pour Johnson Level & Tool 1888-1900


Sommaire des Matières pour Johnson Level & Tool 1888-1900
- Page 1 LCD. The top edge of the battery compartment will Instruction Manual 19" Digital Angle Locator and Ruler appear above the LCD. (Pic 1) Model No. 1888-1900 2. Pull the battery compartment out. (Pic 2) 2. Features and Functions 3. Insert the battery (3V CR2032 Lithium Battery) with the •...
- Page 2 Zero Button 6. Technical Specifications 8. Product Warranty Johnson Level & Tool offers a one year limited warranty on each 1. With the unit turned on, press the zero button at any point to Working Angle Range: 0° to 999.9° its products.