Table des Matières
Publicité
Les langues disponibles
Les langues disponibles
Liens rapides
Remove Unit From Carton
Assemble The Unit
2
1 1
Remove all contents from
Slide the ends of the middle
the carton.
shaft over the ends of both
lower shafts and align the
holes. Insert bolts into the
two holes. Install a washer
and knob onto each bolt.
Tighten the knobs securely.
Keep the cables to the front
of the unit.
Assemble The Unit
5
6
Remove the oil plug from the
Place unit on a level surface
crankcase, and pour the
and fill fuel tank. DO NOT
entire bottle of oil into the fill
overfill.
hole.
Start The Unit
Primer Bulb
10 X
1 9
10
Press primer bulb 10 times,
Stand in the starting
or until fuel is visible
position.
IMPORTANT: READ OPERATOR'S MANUAL THOROUGHLY AND FOLLOW THE SAFE OPERATION PRACTICES WHILE OPERATING THE UNIT.
NEED HELP?
PART NO. 769-06075 P00
Operator's Manual
3
4
Align the holes on the upper
Pull the starter rope through
shaft with the holes on the
the eye hook.
middle shaft. Insert bolts
into the two holes. Install a
Insert the cables into the cable
washer and knob onto each
restraints on the lower and
bolt. Tighten the knobs
upper shafts.
securely. Make sure the "V"
bend in the handle is
pointing up.
Start The Unit
Red Cold Weather
Start Lever
7
8
For cold weather conditions
DO NOT squeeze the
(below 40°F), push the red
throttle.
cold weather start lever
down to the closed position.
DO NOT push this lever
down if the temperature is
above 40°F.
Red Cold Weather
Start Lever
11
12
Pull the starter rope in a
For cold weather conditions
controlled motion until the
(below 40°F), pull the red
unit starts.
cold weather start lever
back up to the open position
Wait 60 seconds.
after the unit starts.
CALL 1-800-828-5500 IN U.S. OR 1–800–668–1238 IN CANADA
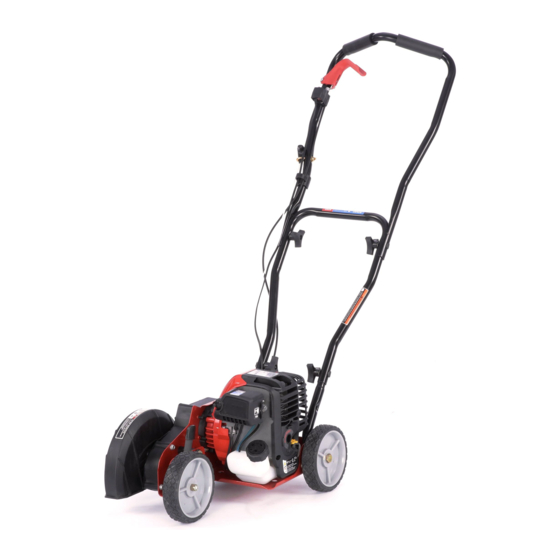
TB516 EC
4-Cycle Lawn Edger
NO TOOLS REQUIRED!
Handle
Throttle
Control
Cold Weather
Start Lever
On/Off
Control
Spark Plug
Starter
Rope Grip
DIDN'T START?
IF the engine does not start,
go back to step 9.
IF the engine stops while
Edger Blade
squeezing the throttle, go
back to step 10.
13
Tip the unit back so the
blade does not touch the
ground. Squeeze the throttle
control and allow the engine
to warm up for 30 to 60
seconds. The unit may be
used during this time.
Oil Fill
Fuel Cap
Plug
Air Filter
Cover
Red
Primer
Bulb
Depth
Adjustment Lever
Blade Shield
(09/10)
Publicité
Chapitres
Table des Matières
Dépannage

Manuels Connexes pour Troy-Bilt FastGuide TB516 EC

Sommaire des Matières pour Troy-Bilt FastGuide TB516 EC
- Page 1 TB516 EC 4-Cycle Lawn Edger Operator’s Manual Remove Unit From Carton Assemble The Unit NO TOOLS REQUIRED! Handle Throttle Control Oil Fill Fuel Cap Plug Air Filter Remove all contents from Slide the ends of the middle Align the holes on the upper Pull the starter rope through Cover the carton.
-
Page 2: Table Des Matières
TABLE OF CONTENTS SAFETY INFORMATION Service Information ..............2 WHILE OPERATING Safety Information . -
Page 3: Oil And Fuel Information
Gasoline is extremely flammable. Ignited vapors may explode. Always stop the engine procedures take your unit to a Troy-Bilt or other qualified service dealer. and allow it to cool before filling the fuel tank. Do not smoke while filling the tank. Keep sparks and open... -
Page 4: Cleaning And Storage
MAINTENANCE AND REPAIR INSTRUCTIONS OPTIONAL ACCESSORY IDLE SPEED ADJUSTMENT ELECTRIC STARTER AND POWER START BIT™ FEATURES Idle Adjustment Screw This unit can be started with an optional Electric Starter or Power Start Bit™ (Items Sold Separately!). If choosing to WARNING: The blade may spin during idle speed adjustments. - Page 5 TB516 EC Coupe-bordures à 4 temps Manuel de l’utilisateur Retirer l’appareil du carton Assembler l’appareil Aucun outil nécessaire ! Poignée Manette des gaz Bouchon de Bouchon Couvercle du remplissage / d’essence Faites glisser les extrémités du Alignez les trous du manche Tirez sur le cordon de Retirez tous les éléments du logement de...
- Page 6 TABLE DES MATIÈRES INFORMATIONS SUR LA SECURITÉ Informations sur l’entretien et le service après-vente ........6 •...
-
Page 7: Informations Sur L'huile Et Le Carburant
• Videz le réservoir et faites marcher le moteur jusqu'à ce qu'il soit à sec avant d'entreposer l'appareil. effectués dans un magasin Troy-Bilt ou chez un concessionnaire agréé. REMARQUE : Veuillez lire la déclaration EPA/Californie fournie avec l'appareil pour obtenir une liste complète des AVERTISSEMENT : L'essence est extrêmement inflammable et les vapeurs qui s'en dégagent... -
Page 8: Nettoyage Et Rangement
ENTRETIEN ET RÉPARATIONS ACCESSOIRE EN OPTION AJUSTEMENT DU RALENTI FONCTIONNALITÉS DÉMARREUR ÉLECTRIQUE ET POWER START BIT™ Vis de réglage du ralenti Cet appareil peut être démarré à l’aide des fonctionnalités Démarreur Électrique ou Power Start Bit™ disponibles en AVERTISSEMENT : Il est possible que la lame tourne durant option (Articles vendus séparément). - Page 9 TB516 EC Recortador de bordes de 4 tiempos Manual del Operador Sacar la unidad de la caja Ensamblado de la unidad ¡No se necesitan herramientas! Manubrio Gatillo del regulador Tapón Tapa del Cubierta del del aceite combustible Saque todo el contenido de Deslice los extremos del eje Alinee los agujeros del eje Tire de la cuerda de arranque a...
- Page 10 TABLA DE CONTENIDO INFORMACIÓN SOBRE SEGURIDAD Información sobre servicio ............10 •...
-
Page 11: Información Sobre Aceite Y Combustible
NOTA: Es posible que algunos procedimientos de mantenimiento requieran herramientas o habilidades especiales. Si no está seguro sobre estos procedimientos, lleve la unidad a un Troy-Bilt o a otro proveedor • Use un aditivo de combustible estabilizador de gasolina de servicio calificado. -
Page 12: Limpieza Y Almacenamiento
INSTRUCCIONES DE MANTENIMIENTO Y REPARACIÓN ACCESORIO OPCIONAL AJUSTE DE LA VELOCIDAD DE MARCHA EN VACÍO CARACTERÍSTICAS DEL ARRANCADOR ELÉCTRICO Y POWER START BIT™ Tornillo de ajuste de mínima Esta unidad puede arrancarse con un opcional arrancador eléctrico o Power Start Bit™ (Se vende por separado). Si ADVERTENCIA: La cuchilla puede girar durante los ajustes de decide arrancar la unidad utilizando uno de estos sistemas de arranque o tiene alguna pregunta, comuníquese con su... - Page 13 NOTES...
- Page 14 NOTES...
- Page 15 NOTES...
- Page 16 Damage resulting from the installation or use of any accessory or attachment not approved by Troy-Bilt for use with the product(s) covered by this manual will void your warranty as to any resulting damage.