
Manuels Connexes pour JUMO di eco


Sommaire des Matières pour JUMO di eco
- Page 1 Digitales Anzeigeinstrument Digital Indicator Indicateur numérique B 701540.0 Betriebsanleitung Operating Instructions Notice de mise en service 2020-04-17/00440457...
- Page 2 Funktionsübersicht Anzeige wechselt > 3 Sekunden Istwertanzeige Sekunden Timeout (gleichzeitig) oder Code eingeben vergrößern vergrößern verkleinern verkleinern oder 30 Sekunden Timeout Bedienerebene Parameterebene Freigabeebene Hier können die in der Freigabe- Hier können alle Parameter Parameter festlegen, die in der Parameter ebene freigegebenen verändert werden.
-
Page 3: Table Des Matières
Inhalt Geräteausführung identifizieren ..........4 Montage . -
Page 4: Geräteausführung Identifizieren
Benutzer jederzeit zugänglichen Platz auf. Bitte unterstützen Sie uns, diese Betriebs- anleitung zu verbessern. Bei technischen Rückfragen Service-Hotline: Telefon: +49 661 6003-300 oder +49 661 6003-653 Telefax: +49 661 6003-9696300 oder +49 661 6003-881653 E-Mail: Service@jumo.net Lieferumfang 1 Dichtung 1 Befestigungsrahmen 1 Betriebsanleitung... - Page 5 (1) Grundtyp 701540/ JUMO di eco (2) Grundtypergänzung Ausführung werkseitig eingestellt, konfigurierbar innerhalb der Messeingangsgruppe nach Kundenangaben konfiguriert Messeingangsgruppe Pt 100 in Zweileiterschaltung Pt 1000 in Zweileiterschaltung KTY2X-6 Fe-CuNi „J“ Fe-CuNi „L“ NiCr-Ni „K“ 0 ... 20 mA 4 ... 20 mA 0 ...
-
Page 6: Montage
Montage Befestigungsrahmen °C Rastnasen 68,5 Frontrahmenmaß: 76mm x 36 mm +2,5 Schalttafelausschnitt: 69 mm x 28,5 mm Dicht-an-dicht-Einbau Abstand der Geräte £ 75 bis max. 40°C 10mm horizontal, Umgebungstemperatur: 15mm vertikal Federbügel Befestigungsrahmen vom Gerät abziehen. Gerät von vorne in den Schalttafelausschnitt einsetzen und auf korrekten Sitz der Frontrahmendichtung achten. Befestigungsrahmen von hinten auf Gehäuse aufschieben, bis die Federbügel unter Spannung stehen und die Rastnasen oben und unten eingerastet sind. -
Page 7: Elektrischer Anschluss
Elektrischer Anschluss 3.1 Installationshinweise Bei der Wahl des Leitungsmaterials, bei der Installation, bei der Absicherung und beim elektrischen Anschluss des Gerätes sind die Vorschriften der VDE 0100 „Bestimmungen über das Errichten von Starkstromanlagen mit Nennspannungen unter 1000 V“ oder die jeweiligen Landesvorschriften zu beachten. Der elektrische Anschluss darf nur von Fachpersonal durchgeführt werden. -
Page 8: Anschlussplan
3.2 Anschlussplan Der elektrische An- schluss darf nur von Fachpersonal durch- geführt werden! -
Page 9: Gerät In Betrieb Nehmen
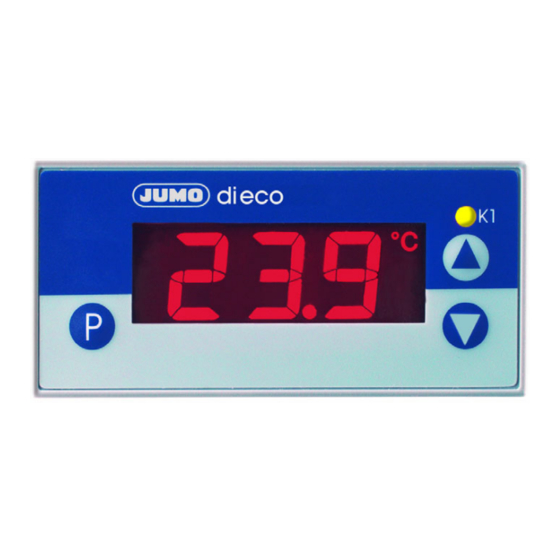
Gerät in Betrieb nehmen 4.1 Anzeige- und Bedienelemente LC-Display 13 mm hohe 3-stellige Segmentanzeige und Symbole für Temperatureinheit, h, min und s mit roter Hintergrundbe- leuchtung Schaltstel- LED K1 leuchtet, wenn der Istwert größer als AL ist. lungsanzeige LED K1 erlischt, wenn der Istwert kleiner als AL ist. Tasten Programmieren Parameterwert vergrößern... -
Page 10: Bedienerebene
4.2 Bedienerebene Timeout: Wird 30 Sekunden lang keine Taste bedient, schaltet das Gerät automatisch in die Temperaturanzeige zu- rück, siehe Funktionsübersicht auf der ersten Innenseite. In der Bedienerebene können die in der Freigabeebene freigegebenen Parameter angezeigt und verändert werden. Taste drücken (nur kurz drücken). -
Page 11: Gerätefunktionen Einstellen (Parameterebene)
4.3 Gerätefunktionen einstellen (Parameterebene) Timeout: Wird 60 Sekunden lang keine Taste bedient, schaltet das Gerät automatisch in die Temperaturanzeige zu- rück, siehe Funktionsübersicht auf der ersten Innenseite. In der Parameterebene werden Gerätefunktionen und Werte eingestellt. Taste 3 Sekunden lang drücken und es erscheint abwechselnd Code 72 für den Zugang zur Parameterebene mit den Tasten einstellen. - Page 12 Anzeigerparameter Wertebereich (werkseitige Parameter Bedeutung Einstellung fett) Alarmwert (Grenzwert für Relais und LED) ... 0 … Ein Messwert wird als Alarm gewertet, wenn - der aktuelle Wert größer ist als Alarmwert + ½ Hysterese - ununterbrochen länger ansteht, als unter Alarmunterdrückungzeits konfiguriert.
- Page 13 Wertebereich (werkseitige Parameter Bedeutung Einstellung fett) obere Alarmgrenzwert -350 ... +500 ... +999°C/ dient zusammen mit zur Begrenzung des Wertebereiches des °F Alarmwertes Alarmunterdrückungszeit 0 ... 60min Für diese Zeit wird ein Alarm nicht als Alarm gewertet. Im Display blinkt die LED K1.
- Page 14 Wertebereich (werkseitige Parameter Bedeutung Einstellung fett) Eingang Angeschlossener Messwertgeber in Zweileiterschaltung Pt 100: Pt 1000: Messeingangsgruppe 1 bei Typ: 701540/X11-XX KTY2X-6: oder Messeingangsgruppe 2 bei Typ: 701540/X21-XX Fe-CuNi „J“ : Fe-CuNi „L“: NiCr-Ni „K“: oder Messeingangsgruppe 3 bei Typ: 701540/X31-XX 0(4) ...
- Page 15 Wertebereich (werkseitige Parameter Bedeutung Einstellung fett) Ω Leitungsabgleichwiderstand 0,0 ... 99,9 in Dieser Wert dient zur Kompensation des Widerstands der Fühlerleitung und ist abhängig von der Leitungslänge. Für eine bestmögliche Temperaturmessung muss hier der ohmsche Wider- stand der Fühlerleitung bei kurzgeschlossenem Fühler eingegeben werden. Wenn der Gesamtwiderstand am Messeingang (Messwertgeberwider- Ω...
-
Page 16: Bedienrechte Vergeben (Freigabeebene)
4.4 Bedienrechte vergeben (Freigabeebene) Timeout: Wird 60 Sekunden lang keine Taste bedient, schaltet das Gerät automatisch in die Istwertanzeige zurück, siehe Funktionsübersicht auf der ersten Innenseite. Die Einstellung in der Freigabeebene legt Bedienrechte fest, die darüber entscheiden, ob ein Parameter in der Be- dienebene erscheint, editiert werden kann oder gar nicht erscheint. -
Page 17: Technische Daten
Technische Daten Messeingang Bezeichnung Messbereich Messgenauigkeit Erkennung von ... Umgebungstempe- Fühlerkurz- Fühlerbruch ratureinfluss schluss 0,1%/ ≤100ppm/K Widerstands- Pt 100 DIN EN 60751 -200 … +600°C wird erkannt wird erkannt thermometer 0,1%/ ≤100ppm/K Pt 1000 DIN EN 60751 -200 … +600°C wird erkannt wird erkannt 1%/ ≤100ppm/K... - Page 18 Messeingang Bezeichnung Messbereich Messgenauigkeit Erkennung von ... Umgebungstempe- Fühlerkurz- Fühlerbruch ratureinfluss schluss 0,1%/ ≤100ppm/K Strom 0 ... 20 mA -2 ... 22 mA skalierbar mit oder Kundentabelle 0,1%/ ≤100ppm/K 4 ... 20 mA 2,4 ... 21,6 mA wird erkannt wird erkannt skalierbar mit ≤...
- Page 19 Umwelteinflüsse Umgebungstemperaturbereich 0 ... +55°C, bei Dicht-an-Dicht Montage: 0 ... +40°C Lagertemperaturbereich -40 ... +70°C ≤ 75% rel. Feuchte ohne Betauung Klimafestigkeit Reinigung und Pflege Die Frontplatte kann mit handelsüblichem Wasch-, Spül- und Reinigungsmitteln der Frontplatte gesäubert werden. Kein Lösungsmittel, wie z. B. Spiritus, Waschbenzin, P1 oder Xylol, verwenden.
-
Page 20: Setup Programm
Elektrische Daten Datensicherung EEPROM Anschlussart Schraubklemmen für Drahtquerschnitte bis max. 4 mm eindrähtig und bis max. 2,5 mm feinstdrähtig. EN 61326 - Störaussendung Klasse B - Störfestigkeit Industrie-Anforderung Einsatzbedingungen Das Gerät ist als Einbaugerät ausgelegt. Elektrische Sicherheit nach DIN EN 61 010, Teil 1, Überspannungskategorie III, Verschmutzungsgrad 2 5.1 Setup Programm Das Programm und das Interface mit Adapter sind als Zubehör erhältlich und bieten folgende Möglichkeiten:... -
Page 21: Alarmmeldungen
Alarmmeldungen In der Temperaturanzeige können folgende Alarmmeldungen angezeigt werden: Fehleranzeige Ursache Abhilfe Anzeigeüberlauf Sensor und Anschlussleitung auf Beschädigung Der Wert ist zu groß und liegt oder Kurzschluss überprüfen außerhalb des Messbereichs. Überprüfen, ob der richtige Sensor eingestellt oder angeschlossen ist Anzeigeunterlauf Kapitel 4 „Gerät in Betrieb nehmen“... - Page 24 JUMO GmbH & Co. KG JUMO JUMO Mess- und Regelgeräte Ges.m.b.H. Mess- und Regeltechnik AG Hausadresse: Moritz-Juchheim-Straße 1 Pfarrgasse 48 Seestrasse 67, Postfach 36039 Fulda, Germany 1230 Wien, Austria 8712 Stäfa, Switzerland Lieferadresse: Telefon: +43 1 610610 Telefon: +41 44 928 24 44 Mackenrodtstraße 14...
- Page 25 Digital Indicator B 701540.0 Operating Instructions 2020-04-17...
- Page 26 Overview of operation...
- Page 27 Contents Instrument identification ........... 4 Mounting .
-
Page 28: Instrument Identification
Instrument identification The nameplate is glued to the bottom of the instrument. The supply voltage that is connected must correspond to the voltage specified on the nameplate. All necessary settings are described in these Operating Instructions. If any difficulties should still arise dur- ing start-up, you are asked not to carry out any unauthorized manipulations on the unit. - Page 29 (1) Basic type 701540/ JUMO di eco (2) Basic type extension Version factory-set, configurable within the measurement input group configured to customer specification Measurement input group Pt100 in 2-wire circuit Pt 1000 in 2-wire circuit KTY2X-6 Fe-Con J Fe-Con L...
-
Page 30: Mounting
Mounting Pull off mounting frame from instrument. Insert the instrument from the front into the panel cut-out and make sure that the bezel seal is seated correctly. From the back, push mounting frame onto the housing until the spring clips are under tension and the snap-in lugs have engaged at top and bottom. -
Page 31: Electrical Connection
Electrical connection 3.1 Installation notes The choice of cable, the installation, the fusing and the electrical connection of the instrument must conform to the requirements of VDE 0100 “Regulations on the Installation of Power Circuits with nominal voltages below 1000 V” or the appropriate local regulations. The electrical connection must only be carried out by qualified personnel. -
Page 32: Connection Diagram
3.2 Connection diagram electrical connection must only be carried out by qualified personnel ! -
Page 33: Commissioning The Instrument
Commissioning the instrument 4.1 Displays and controls LC display 3-digit segment display, 13 mm high, with symbols for tem- perature unit, h, min and s, with red background lighting Status display LED K1 lights up when present value is larger than AL. LED K1 goes out when present value is smaller than AL. -
Page 34: Operating Level
4.2 Operating level Time-out: If no key is pressed for 30 seconds, then the instrument automatically switches back to the temperature dis- play, see Overview of operation on the front inside page. The parameters that have been enabled at the enabling level can be displayed and modified at the operating level. Press (only briefly). -
Page 35: Setting The Instrument Functions (Parameter Level)
4.3 Setting the instrument functions (parameter level) Time-out: If no key is pressed for 60 seconds, the instrument automatically switches back to temperature display, see Overview of operation on the front inside page. The instrument functions and values are set at the parameter level. Press for 3 seconds and will appear in alternation. - Page 36 Indicator parameters Value range Parameter Meaning (factory-setting in bold) Alarm value (limit for relay and LED) to 0 to A measured value is considered to be an alarm if - present value is larger than alarm value + ½ hysteresis - has been continuously present for longer than configured under the alarm suppression time An alarm is reset if...
- Page 37 Value range Parameter Meaning (factory-setting in bold) Alarm suppression time 0 to 60min An alarm is not considered to be an alarm for this period. The LED K1 flashes in the display. If an alarm is present for longer than , then it is considered to be an alarm, the LED K1 lights up and the relay is switched in accordance with the parameter...
- Page 38 Value range Parameter Meaning (factory-setting in bold) Input Sensor connected in 2-wire circuit Pt100: Pt1000: Measurement input group 1 on Type: 701540/X11-XX KTY2X-6: Measurement input group 2 on Type: 701540/X21-XX Fe-Con J : Fe-Con L: NiCr-Ni K: Measurement input group 3 on Type: 701540/X31-XX 0(4) to 20 mA: Measurement input group 4 on Type: 701540/X41-XX 0 to +10 V:...
- Page 39 Value range Parameter Meaning (factory-setting in bold) Ω Lead compensation resistance 0.0 to +99.9 in This value is used to compensate the resistance of the probe lead and is de- pendent on the lead length. For best temperature measurement results, the resistance value of the probe lead has to be entered here (with short-circuited probe).
-
Page 40: Allocating User Rights (Enabling Level)
4.4 Allocating user rights (enabling level) Time-out: If no key is pressed for 60 seconds, the instrument automatically switches back to the process value display, see Overview of operation on the front inside page. The setting at the enabling level defines user rights which determine whether a parameter is shown at the operating level, can be edited or is not shown at all. -
Page 41: Technical Data
Technical data Meas. input Designation Meas. range Meas. accuracy Recognition of ... ambient Probe short- Probe break temperature error circuit 0.1%/ ≤100ppm/°C RTD tempe- Pt100 EN 60 751 -200 to +600°C recognized recognized rature probe 0.1%/ ≤100ppm/°C Pt1000 EN 60 751 -200 to +600°C recognized recognized... - Page 42 Meas. input Designation Meas. range Meas. accuracy Recognition of ... ambient Probe short- Probe break temperature error circuit 0.1%/ ≤100ppm/°C Current 0 to 20 mA -2 to +22 mA scalable with or customer table 0.1%/ ≤100ppm/°C 4 to 20 mA 2.4 to 21.6 mA recognized recognized...
- Page 43 Ambient conditions Ambient temperature range 0 to +55°C, with side-by-side mounting: 0 to +40°C Storage temperature range -40 to +70°C ≤ 75% rel. humidity, no condensation Climatic conditions Cleaning and care of the The front panel can be cleaned with all the usual cleaning and rinsing agents. front panel Do not use solvents such as methylated spirit, white spirit, P1 or xylene.
-
Page 44: Setup Program
Electrical data Data backup EEPROM Connection screw terminals for wire cross-sections up to 4 mm solid wire and up to 2.5 mm stranded wire EN 61 326 - interference emission Class B - immunitiy to interference to industrial requirements Operating conditions The instrument is designed as a panel-mounting unit. -
Page 45: Alarm Messages
Alarm messages The following alarm messages may appear in the temperature display: Error message Cause Elimination Display overrun Check sensor and connecting cable for damage The value is too large and is or short-circuit outside the range. Check whether the correct sensor has been set or connected Display underrun Chapter 4 “Commissioning the instrument”... - Page 48 JUMO GmbH & Co. KG JUMO Instrument Co. Ltd. JUMO Process Control, Inc. Street adress: JUMO House 6733 Myers Road Moritz-Juchheim-Straße 1 Temple Bank, Riverway East Syracuse, NY 13057, USA 36039 Fulda, Germany Harlow, Essex CM20 2DY, UK Delivery address:...
- Page 49 Jdi eco Indicateur numérique B 701540.0 Notice de mise en service 2020-04-17...
- Page 50 Aperçu des fonctions L’affichage change > 3 secondes Affichage de la température secondes Timeout (simultanément) Entrer code Incrémenter Incrémenter Décrémenter Décrémenter Ou 30 secondes Timeout Niveau “Utilisateur” Niveau “déverrouillage” Niveau “Paramétrage” Tous les paramètres peuvent être Les paramètres libérés au niveau Définir les paramètres qui seront “Déverrouillage”...
- Page 51 Sommaire Identification de l’appareil ..........4 Montage .
-
Page 52: Identification De L'appareil
Téléphone : 03 87 37 53 00 Télécopieur : 03 87 37 89 00 e-mail : info@jumo.net (0,40 € /min) Service soutien à la vente : 0892 700 733 Livraison 1 notice de mise en service 1 cadre de fixation... - Page 53 (1) Type de base 701540/ JUMO di eco (2) Extension au type de base Exécution réglage d’usine, configurable à l’intérieur du groupe d’entrées de mesure Configuration spécifique Groupe d’entrées de mesure Pt 100 en montage 2 fils Pt 1000 en montage 2 fils KTY2X-6 Fe-CuNi „J“...
-
Page 54: Montage
Montage Cadre de fixation °C Encoches 68,5 76mm x 36 mm Dimensions du cadre frontal +2,5 Découpe du tableau 69 mm x 28,5 mm Montage côte-à-côte 10mm horizontal, £ 75 15mm vertical Température ambiante : jusqu’à 40°C max. Etrier de fixation Retirer le cadre de fixation. -
Page 55: Raccordement Électrique
Raccordement électrique 3.1 Instructions à propos de l’installation Veuillez respecter la réglementation en vigueur aussi bien pour le choix du matériel des lignes, pour l’installation, que pour le raccordement électrique de l’appareil. Le raccordement électrique ne doit être effectué que par du personnel qualifié. La compatibilité... -
Page 56: Schéma De Raccordement
3.2 Schéma de raccordement Le raccordement électrique ne doit être effectué que par du personnel qualifié ! Type 701540/XX1-31: Type 701540/XX1-XX Alimentation et l’entrée de mesure n’ont Relais K1 pas une séparation galvanique! AC 250V/10A Alimentation Ö suivant plaque signal tique é... -
Page 57: Mise En Service De L'appareil
Mise en service de l’appareil 4.1 Affichage et commande Indicateur Indicateur à 3 chiffres de 13 mm de hauteur avec symboles pour l’unité de température, h, min et s avec rétroéclairage rouge Indication de LED K1 s’allume quand relais K1 est excité. l’état de LED K1 s’éteint quand relais K1 est désexcité. -
Page 58: Niveau "Utilisateur
" 4.2 Niveau "Utilisateur Time out : Lorsqu’aucune touche n’est actionnée pendant 30 s, l’appareil réaffiche automatiquement la température, voir "Aperçu des fonctions". Les paramètres débloqués au niveau "Déverrouillage" peuvent être affichés et modifiés au niveau "Utilisateur". Appuyer sur la touche (brièvement). -
Page 59: Régler Les Fonctions De L'appareil (Niveau De Paramétrage)
4.3 Régler les fonctions de l’appareil (niveau de paramétrage) Time out : Lorsqu’aucune touche n’est actionnée pendant 60 s, l’appareil réaffiche automatiquement la température, voir "Aperçu des fonctions". Fonctions de l’appareil et valeurs sont réglées au niveau "Paramétrage". Appuyer pendant 3 s sur la touche s’affiche en alternance Entrer le code 72 pour avoir accès au niveau "Paramétrage"... - Page 60 Paramètres de l’indicateur Plage des valeurs Paramètre Signification (reglage d’usine en gras) Valeur de l’alarme (valeur limite pour relais et LED) à 0 à Une valeur mesurée est jugée alarme lorsque - la valeur actuelle est supérieure à la valeur de l’alarme + ½...
- Page 61 Plage des valeurs Paramètre Signification (reglage d’usine en gras) Limite supérieure de la température de l’alarme -350 à +500 à +999°C/ sert avec à limiter la plage de valeurs de la valeur de l’alarme °F Délai de suppression de l’alarme 0 à...
- Page 62 Plage des valeurs Paramètre Signification (reglage d’usine en gras) Entrée Capteur raccordé en montage 2 fils Pt 100 : Pt 1000 : Groupe d’entrées de mesure 1 pour type : 701540/X11-XX KTY2X-6 : Groupe d’entrées de mesure 2 pour type : 701540/X21-XX Fe-CuNi „J“...
- Page 63 Plage des valeurs Paramètre Signification (reglage d’usine en gras) Ω Résistance de tarage de ligne 0,0 à +99,9 en Cette valeur sert à compenser la résistance de la ligne du capteur et dépend de la longueur de la ligne. Pour mesurer la température au mieux, il faut saisir ici la résistance ohmique de la ligne du capteur lorsque celui-ci a court-circuité.
-
Page 64: Attribution Des Codes D'accès (Niveau "Déverrouillage")
4.4 Attribution des codes d’accès (niveau "Déverrouillage") Time out : Lorsqu’aucune touche n’est actionnée pendant 60 secondes, l’appareil réaffiche automatiquement la température, voir "Aperçu des fonctions". La configuration au niveau "Déverrouillage" définit les droits d’accès qui déterminent, si un paramètre apparait au niveau "Utilisateur", s’il peut être édité... -
Page 65: Caractéristiques Techniques
Caractéristiques techniques Entrée de Désignation Etendue de mes- Précision de mesu- Détection de ... mesure Court-circuit Rupture de Influence de la de sonde sonde température ambi- ante 0,1%/ ≤100ppm/K Sonde à rési- Pt 100 EN 60751 -200 à +600°C détecté détectée stance 0,1%/ ≤100ppm/K... - Page 66 Entrée de Désignation Etendue de mes- Précision de mesu- Détection de ... mesure Court-circuit Rupture de Influence de la de sonde sonde température ambi- ante 0,1%/ ≤100ppm/K Courant 0 à 20 mA -2 à 22 mA mise à l’échelle avec ou tableau spécifique 0,1%/ ≤100ppm/K...
- Page 67 Influences de l’environnement Plage de la temp. ambiante 0 à +55°C, pour montage bord à bord : 0 à +40°C Plage température de stockage -40 à +70°C ≤ 75% humidité relative sans condensation Résistance climatique Nettoyage et entretien de la La plaque avant peut être nettoyée avec un produit de lavage et de rinçage courant.
-
Page 68: Logiciel Setup
Caractéristiques électriques Sauvegarde des données EEPROM Type de raccordement Bornes à vis pour section de fil jusqu’à 4 mm max. unifilaire et 2,5 mm max. pour fil extra fin. EN 61326 - Emission de parasites Classe B - Résistance aux parasites Normes industrielles Conditions d’utilisation Das Gerät ist als Einbaugerät ausgelegt. -
Page 69: Messages D'erreur
Messages d’erreur Les messages d’erreur suivants restent affichés jusqu’à ce que la cause soit supprimée : Message d’erreur Cause Aide Dépassement sup. de capacité Vérifier que le capteur et le câble de raccorde- d’affichage ment ne soient pas endommagés ou court-cir- La valeur est trop grande et se cuités situe en dehors de l’étendue de... - Page 72 JUMO GmbH & Co. KG JUMO Régulation SAS Adresse : 7 rue des Drapiers Moritz-Juchheim-Straße 1 B.P. 45200 36039 Fulda, Allemagne 57075 Metz Cedex 3, France Adresse de livraison : Téléphone : +33 3 87 37 53 00 Mackenrodtstraße 14 Télécopieur :...