
Manuels Connexes pour Olympus P-11


Sommaire des Matières pour Olympus P-11
- Page 1 DIGITAL PHOTO PRINTER P-11 Instruction Manual ENGLISH Manuel d’utilisation FRANÇAIS Bedienungsanleitung DEUTSCH Manual de instrucciones ESPAÑOL...
- Page 2 Thank you for purchasing the P-11 Digital Photo Printer. Read this manual carefully prior to use to ensure optimum performance. For customers in North and South America For customers in USA Declaration of Conformity Product Name : Digital Photo Printer...
-
Page 3: Table Des Matières
Contents Introduction Safety precautions ..................4 Care and storage ..................9 What this printer can do ................10 Checking the accessories ................ 11 Identifying the parts.................. 12 Preparation Connecting the power supply and turning on/off the printer..... 14 Loading the ink ribbon cartridge............... 16 Loading paper .................. -
Page 4: Introduction
Introduction Safety precautions Various icons are used in this manual to indicate correct product use, and help prevent property damage and injury to you and others. The meanings of these icons are described below. Icon Description Failure to follow instructions indicated by this WARNING icon may lead to serious injury or death. - Page 5 Do not use the printer if it emits smoke, unusual smells, strange sounds, or becomes unusually warm. Use under these conditions may cause fire or electric shock. Turn off and unplug the printer. Then contact your nearest Olympus service center. Should any liquid or foreign objects get into the printer, unplug...
- Page 6 DO NOT: pull on the cord to unplug it, bend the cord excessively, or place heavy objects on the cord. If the power cord is damaged, contact your nearest Olympus service center. Do not disassemble or modify the printer The printer has both hot and high voltage parts on the inside.
- Page 7 Safety precautions WARNING Do not use the printer in the following places Unstable or inclined surfaces. Outdoors (particularly on beaches, etc.), or places that expose the printer to excessive dust or debris. Places subject to rain, dripping, or enclosed places where condensation could occur such as inside a plastic bag.
- Page 8 Safety precautions CAUTION Do not put the printer on an unstable surface Do not put the printer on an unstable surface such as a shaky table. Injury may result from the printer being dropped or falling. This could also damage the printer or cause the printer to malfunction. Do not touch the non-user-serviceable parts inside the printer Doing so may cause injury or burns.
-
Page 9: Care And Storage
Care and storage Protect against moisture condensation Moisture condensation is water vapor in the air that becomes liquid, and collects on the printer surface. This phenomenon occurs under the following conditions. The room in which the printer is placed is rapidly heated or cooled. The printer is directly subjected to cool air, such as from an air conditioner. -
Page 10: What This Printer Can Do
If you connect a computer to the printer using a commercially available USB cable, you can print pictures stored on the computer. We recommend using OLYMPUS Master or OLYMPUS Master Plus for easy printing and management of your digital pictures. -
Page 11: Checking The Accessories
Checking the accessories When unpacking the printer, make sure that the following accessories are included. If any accessories are missing, contact your nearest Olympus service center. AC adapter (1) Power cord (1) Paper tray (1) Conversion tray (for 3.5" × 5") (1) (This tray is in the paper tray.) -
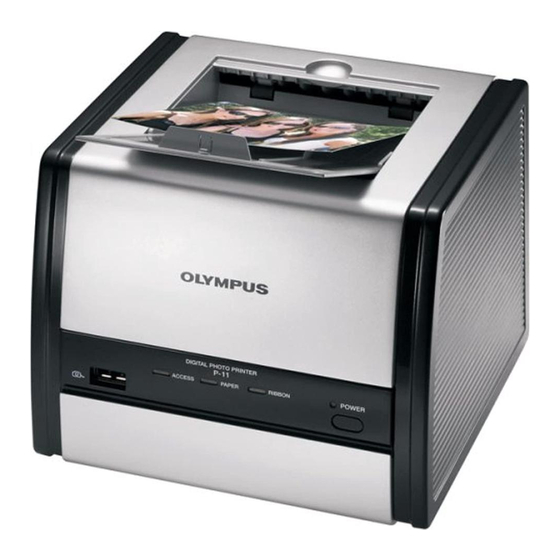
Page 12: Identifying The Parts
Identifying the parts Front Paper output tray RIBBON indicator ( P.30) P.24, 27) PAPER indicator ( P.30) ACCESS indicator ( P.30) Paper eject section POWER indicator P.30) POWER button P.15) DC-IN terminal ( P.14) Paper tray door P.19, 22) PictBridge connector P.23) Cartridge slot... - Page 13 Identifying the parts Paper tray Conversion tray (for 3.5" × 5") Tray cover P.20, 21) P.20) Tray cover tab P.20)
-
Page 14: Preparation
Preparation Connecting the power supply and turning on/off the printer Remove the left side cover of the printer. Connect the power cord to the AC adapter and insert the power plug into an outlet. Power plug Connect the DC plug to the DC-IN terminal of the printer and set the cord in the guide on the printer as shown in the picture. - Page 15 Connecting the power supply and turning on/off the printer Attach the side cover. If this is your first time using the printer, load the ink ribbon cartridge before you attach the side cover. See page 16. “Loading the ink ribbon cartridge” Press the POWER button.
-
Page 16: Loading The Ink Ribbon Cartridge
Loading the ink ribbon cartridge About the print pack You need the supplied starter kit or an optional print pack for printing. Always use the ink ribbon cartridge together with the paper supplied in the same pack. Do not reuse paper that has been printed on or fed through the printer. - Page 17 Loading the ink ribbon cartridge Insert the ink ribbon cartridge all the way. Remove the protective material from the cartridge slot and insert the ink ribbon cartridge. The RIBBON indicator blinks and an error will be generated if you do not press from the center of the ink ribbon cartridge to slide it all the way until you hear a clicking sound.
- Page 18 Loading the ink ribbon cartridge Note Do not touch the inside of the cartridge slot because it may be very hot. The print packs are either for 4 × 6 or 3.5" × 5" printing. Use an ink ribbon cartridge for 4 × 6 printing when printing on 4 × 6 paper and use an ink ribbon cartridge for 3.5"...
-
Page 19: Loading Paper
Loading paper Removing the paper tray from the printer Open the paper tray door by pulling it towards you. Hold the part indicated by “PULL” and pull towards you. PULL... -
Page 20: Loading Paper Into The Paper Tray
Loading paper Loading paper into the paper tray Note Always use specialty paper. Using paper other than specialty paper such as inkjet printer paper may cause a printer failure such as paper becoming jammed or sticking to the ink ribbon. Do not touch the print surface (the blank, glossy surface) when handling paper. - Page 21 Loading paper Load paper into the paper tray so that the print surface is facing down. Remove the protective sheet before loading paper. Up to 50 sheets can be loaded. Print surface facing down Close the cover of the paper tray. Be careful not to trap paper between the cover and tray.
-
Page 22: Inserting The Paper Tray Into The Printer
Loading paper Inserting the paper tray into the printer Open the paper tray door by pulling it towards you. Insert the paper tray all the way. PULL Insert the paper tray until it locks into place with a click. When removing the paper tray, hold the part indicated by “PULL” and pull towards you. -
Page 23: Printing
Information about PictBridge compatible digital cameras is also available on the Olympus web site. Default printer settings when using PictBridge is used are as follows. Paper size: Size of the paper loaded in the printer. -
Page 24: Using The Digital Camera To Control The Print Operation
Printing pictures from a digital camera Open the paper output tray of the printer. Open the paper output tray before you use the printer. If it is not open when the printer is used, paper may be jammed or the printer may be damaged. When the printer is not in use, keep the paper output tray closed to prevent dust and foreign objects from entering. - Page 25 Printing pictures from a digital camera After printing begins, the ACCESS indicator on the printer blinks. When printing is finished, the indicator turns off. For details on operating the digital camera, refer to the instruction manual for the digital camera. After printing is complete, turn off the digital camera and printer before disconnecting the USB cable.
-
Page 26: Printing Pictures From A Computer
Printing pictures from a computer We recommend using OLYMPUS Master (supplied with every Olympus digital camera), OLYMPUS Master Plus, Olympus Studio or other image processing application to print pictures stored on your computer. Note Pictures not taken with a digital camera must be printed from a computer. - Page 27 Printing pictures from a computer Insert one plug of the USB cable into the computer’s USB port, and the other plug into the USB connector on the back of the printer. Be sure to pass the cable through the guide. Attach the side cover.
-
Page 28: Printing
If [Edged] (bordered) is selected for [Print Area] on the [Paper] tab, the picture size will be smaller but the whole picture will be printed. Furthermore, you can achieve the desired composition for printing without edges if you use image editing software such as OLYMPUS Master to trim the picture. -
Page 29: Printer Settings
Printing pictures from a computer Printer settings You can set the paper size, copy count, and color adjustment settings on the [Paper] and [Graphics] tabs of the Printing Preferences window. [Paper] tab [Graphics] tab The following items can be selected on the [Paper] tab. Item Description Paper Size... -
Page 30: For Your Reference
— simulta- cation error PictBridge compatible. neously Turn the printer off and on, then retry printing. — If the error persists, consult your nearest Olympus service center. ACCESS, Blinking Internal Consult your nearest Olympus RIBBON, simulta- problem service center. —... -
Page 31: Troubleshooting
Troubleshooting Before sending your printer for service, check the following to try to resolve the problem. If the problem persists, contact your nearest Olympus service center. Problem Cause·status Resolution Page Cannot turn the The AC adapter is not Connect the AC adapter printer on. -
Page 32: If Paper Is Jammed
Look through the paper tray door opening to see if there is any jammed paper visible at the back. If jammed paper is visible, go to Step 5. If jammed paper is not visible, contact your nearest Olympus service center for repairs. Set the printer on its rear so that the front of the printer is facing up. -
Page 33: If The Ink Ribbon Cartridge Is Removed During Printing
Troubleshooting After the paper has moved partway, you will then be able to remove it through the paper tray door opening. Turn the printer on. Reinsert the paper tray. If operation is normal, the paper jam has been successfully cleared and you can continue printing. -
Page 34: Replenishing The Paper Supply And Replacing The Ink Ribbon Cartridge
Replenishing the paper supply and replacing the ink ribbon cartridge If paper runs out during printing The PAPER indicator blinks slowly. Replenish the paper supply in the paper tray. The remaining copies will automatically continue to be printed. The ink ribbon normally ends at the same time the paper in a print pack is used up, so please replace the ink ribbon cartridge at the same time. -
Page 35: About The Print Pack (Ink Ribbon Cartridge And Paper)
About the print pack (ink ribbon cartridge and paper) Always use print packs specified by Olympus. The print packs are either for 4 × 6 or 3.5" × 5" paper. The print pack for 4 × 6 printing contains 4 × 6 paper and an ink ribbon cartridge for 4 ×... - Page 36 Olympus is not responsible for print discoloration or fading. If you experience problems Olympus will replace each defective product with a new one if the defect was caused by a problem during manufacture. Olympus assumes no liability for any defects not related to manufacturing.
-
Page 37: Specifications
Specifications Printer Printing Method Sublimation dye transfer printing 4-pass printing (Yellow/Magenta/Cyan and protective overcoat layer) Resolution 310 dpi × 310 dpi Print Paper Size 3.5" × 5" Paper : 89 (H) × 127 (V) mm (3.5" × 5") 4 × 6 Paper : 100 (H) ×... -
Page 38: Service And Maintenance
If necessary, please consult your nearest Olympus service center. Olympus is not responsible for any damages (costs or lost profits) as the result of device malfunction. When sending a product for repair, enclose documentation indicating device problem or malfunction, and place the device in the original box and the original packaging material. -
Page 39: Definition Of Terms
Definition of terms DPOF (Digital Print Order Format) Recording format for automatic printing of digital camera data. Prints can easily be created from a media card at DPOF compatible photo shops or on printers by specifying the desired images, and number of copies. - Page 40 Nous vous remercions pour l’achat de cette imprimante photo numérique P-11. Veuillez lire soigneusement ce manuel avant la mise en service afin de garantir des performances optimales. Pour les utilisateurs en Amérique du Nord et du Sud Pour les utilisateurs aux États-Unis Déclaration de conformité...
- Page 41 Sommaire Introduction Consignes de sécurité................42 Entretien et rangement................47 Possibilités de cette imprimante............... 48 Contrôle des accessoires................. 49 Identification des composants..............50 Préparation Branchement de l’alimentation et mise en marche/arrêt de l’imprimante....................52 Chargement de la cartouche de ruban encreur ........54 Chargement du papier ................
-
Page 42: Introduction
Introduction Consignes de sécurité Différents symboles sont utilisés dans ce manuel pour indiquer l’utilisation correcte du produit et pour contribuer à éviter tout dommage aux biens et aux personnes. Ces symboles sont décrits ci-dessous. Symbole Description Le non-respect des instructions AVERTISSEMENT signalées par ce symbole peut entraîner des lésions graves et même la mort. - Page 43 Une utilisation dans cet état risque de provoquer un incendie ou une électrocution. Éteignez l’imprimante et débranchez le cordon d’alimentation en prenant garde de ne pas toucher les fils éventuellement apparents. Contactez ensuite le centre S.A.V. OLYMPUS le plus proche.
- Page 44 électrocution. Pour éviter d’endommager le cordon d’alimentation, NE PAS : tirer sur le cordon pour le débrancher, le plier excessivement ou placer des objets lourds dessus. Si le cordon est endommagé, contactez le centre S.A.V. OLYMPUS le plus proche. Ne pas démonter ni modifier l’imprimante L’imprimante contient à...
- Page 45 Consignes de sécurité AVERTISSEMENT N’utilisez pas l’imprimante avec un adaptateur secteur ou un cordon d’alimentation autre que celui spécifié/fourni N’utilisez pas l’adaptateur secteur ou le cordon d’alimentation fournis avec d’autres appareils Assurez-vous de la présence d’une tension correcte Une tension incorrecte risque d’endommager des composants de l’imprimante.
- Page 46 Consignes de sécurité ATTENTION N’installez pas l’imprimante sur une surface instable N’installez pas l’imprimante sur une surface instable comme une table branlante. Une chute risquerait d’endommager l’imprimante ou de provoquer un mauvais fonctionnement. Ne touchez pas les composants non accessibles à l’utilisateur à...
-
Page 47: Entretien Et Rangement
Entretien et rangement Protection contre la condensation La condensation est provoquée par la vapeur d’eau présente dans l’air qui devient liquide et s’accumule sur la surface de l’imprimante. Ce phénomène se produit dans les conditions suivantes. Chauffage ou rafraîchissement rapide de la pièce dans laquelle l’imprimante est installée. -
Page 48: Possibilités De Cette Imprimante
Si vous branchez un ordinateur à l’imprimante avec un cordon USB du commerce, vous pouvez imprimer les images stockées sur l’ordinateur. Nous vous recommandons d’utiliser OLYMPUS Master ou OLYMPUS Master Plus pour faciliter l’impression et la gestion de vos photos numériques. -
Page 49: Contrôle Des Accessoires
Contrôle des accessoires Au déballage de l’imprimante, vérifier la présence des accessoires suivants. Si l’un des accessoires est manquant, contactez n’importe quel centre S.A.V. Olympus. Adaptateur secteur (1) Cordon d’alimentation (1) Bac d’alimentation (1) Bac d’adaptation (pour format 89 mm × 127 mm) (Ce bac se trouve dans le bac d’alimentation.) -
Page 50: Identification Des Composants
Identification des composants Avant Bac de sortie du Voyant RIBBON (Ruban) ( P.68) papier Voyant PAPER (Papier) ( P.68) P.62, 65) Voyant ACCESS (Accès) ( P.68) Section Voyant POWER d’éjection du (Marche/Arrêt) papier P.68) Bouton POWER (Marche/Arrêt) P.53) Prise d’alimentation secteur ( P.52) Volet du bac... -
Page 51: Bac D'alimentation
Identification des composants Bac d’alimentation Bac d’adaptation (pour format Capot du bac 89 mm × 127 mm) 58, 59) Languette du capot du bac... -
Page 52: Préparation
Préparation Branchement de l’alimentation et mise en marche/arrêt de l’imprimante Retirez le cache latéral gauche de l’imprimante. Raccordez le cordon d’alimentation à l’adaptateur secteur et insérez la fiche d’alimentation dans une prise secteur. Fiche d’alimentation Raccordez la fiche CC à la prise DC-IN de l’imprimante et placez le cordon dans le guide sur l’imprimante comme illustré. -
Page 53: Arrêt De L'imprimante
Branchement de l’alimentation et mise en marche/arrêt de l’imprimante Remettez le cache latéral en place. Si vous utilisez l’imprimante pour la première fois, chargez la cartouche de ruban encreur avant de fixer le capot latéral. Voir page 54 “Chargement de la cartouche de ruban encreur” Appuyez sur le bouton POWER. -
Page 54: Chargement De La Cartouche De Ruban Encreur
Chargement de la cartouche de ruban encreur À propos du kit d’impression Pour l’impression, vous avez besoin du kit de démarrage fourni ou d’un kit d’impression en option. Utilisez toujours la cartouche de ruban encreur et le papier fournis dans le même kit. Ne réutilisez pas de papier qui a déjà... -
Page 55: Enlever La Cartouche De Ruban Encreur
Chargement de la cartouche de ruban encreur Insérez la cartouche de ruban encreur à fond. Libérez le logement de cartouche d’encre de sa protection et insérez la cartouche de ruban encreur. Le voyant RIBBON clignote et une erreur se produit si vous n’appuyez pas fermement au centre de la cartouche de ruban encreur pour l’insérer à... - Page 56 Chargement de la cartouche de ruban encreur Remarque Ne touchez pas l’intérieur du logement de la cartouche d’encre, il risque d’être très chaud. Les kits d’impression sont conçus pour un format de papier 100 mm × 148 mm ou 89 mm × 127 mm. Utilisez une cartouche de ruban encreur pour tirage 100 mm ×...
-
Page 57: Chargement Du Papier
Chargement du papier Retrait du bac d’alimentation de l’imprimante Ouvrez le volet du bac d’alimentation en le tirant vers vous. Maintenez la partie marquée “PULL” et tirez-la vers vous. PULL (Tirer) -
Page 58: Chargement Du Papier Dans Le Bac D'alimentation
Chargement du papier Chargement du papier dans le bac d’alimentation Remarque Utilisez toujours du papier spécial. L’utilisation d’un papier différent tel que du papier pour imprimante jet d’encre peut provoquer une défaillance de l’imprimante (bourrage ou adhérence du papier au ruban encreur). - Page 59 Chargement du papier Chargez le papier dans le bac avec la surface d’impression vers le bas. Retirez la feuille de protection avant de charger le papier. Vous pouvez charger jusqu’à 50 feuilles. Surface d’impression au-dessous Fermez le capot du bac d’alimentation. Veillez à...
-
Page 60: Insertion Du Bac D'alimentation Dans L'imprimante
Chargement du papier Insertion du bac d’alimentation dans l’imprimante Ouvrez le volet du bac d’alimentation en le tirant vers vous. Enfoncez le bac d’alimentation à fond. PULL (Tirer) Insérez le bac d’alimentation jusqu’à entendre un bruit de verrouillage. Pour retirer le bac d’alimentation, maintenez la partie marquée “PULL” et tirez vers vous. -
Page 61: Impression
Reportez-vous au manuel d’utilisation de l’appareil photo numérique pour plus d’informations sur l’impression. Des informations sur les appareils photo numériques compatibles PictBridge sont également disponibles sur le site Web OLYMPUS. En mode PictBridge, les paramètres d’impression par défaut sont les suivants : Format du papier : Format du papier chargé... -
Page 62: Commande De L'impression Depuis L'appareil Photo Numérique
Impression des photos depuis un appareil numérique Ouvrez le bac de sortie du papier de l’imprimante. Ouvrez le bac de sortie du papier avant d’utiliser l’imprimante. S’il n’est pas ouvert lorsque l’imprimante est utilisée, un bourrage de papier peut se produire et l’imprimante risque d’être endommagée. - Page 63 Impression des photos depuis un appareil numérique Exemple d’écran d’appareil photo numérique Les écrans et les commandes des menus peuvent varier en fonction de l’appareil. IMPRESSION FACILE IMPRESSION SPÉCIALE QUITTE SELECT Vous pouvez sélectionner les fonctions suivantes sur cet écran : [IMPRESSION FACILE] Cette fonction offre une méthode rapide et aisée pour réaliser un tirage...
-
Page 64: Impression Des Photos À Partir D'un Ordinateur
Impression des photos à partir d’un ordinateur Nous recommandons d’utiliser OLYMPUS Master (fourni avec chaque appareil photo numérique Olympus), OLYMPUS Master Plus, Olympus Studio ou une autre application de traitement d’image pour imprimer les images enregistrées sur votre ordinateur. Remarque Les photos non prises avec un appareil photo numérique doivent être... - Page 65 Impression des photos à partir d’un ordinateur Insérez une fiche du câble USB dans le port USB de l’ordinateur et branchez l’autre fiche dans le connecteur USB à l’arrière de l’imprimante. Assurez-vous de bien faire passer le câble à travers le guide. Remettez le cache latéral en place.
-
Page 66: Impression
Cliquez sur [Imprimer] dans le menu Fichier et sélectionnez [OLYMPUS P-11] dans la boîte de dialogue d’impression. Remarque La procédure d’accès à la fonction [Imprimer] et la sélection de l’imprimante varient en fonction de l’application. -
Page 67: Paramètres D'impression
Impression des photos à partir d’un ordinateur Paramètres d’impression Les onglets [Papier] et [Graphiques] de la fenêtre des préférences d’impression vous permettent de définir le format du papier, le nombre d’exemplaires et d’effectuer le réglage des couleurs. Onglet [Papier] Onglet [Graphiques] Vous pouvez sélectionner les paramètres suivants sur l’onglet [Papier]. -
Page 68: Pour Votre Information
PictBridge. RIBBON Éteignez puis rallumez l’imprimante et (Ruban) faites une nouvelle tentative d’impression. — Si l’erreur persiste, consultez le centre S.A.V. OLYMPUS le plus proche. ACCESS, Clignotement Problème Consultez le centre S.A.V. RIBBON, simultané interne OLYMPUS le plus proche. -
Page 69: En Cas De Difficultés
En cas de difficultés Avant de renvoyer votre imprimante en réparation, vérifiez les points suivants pour essayer de résoudre le problème. Si le problème persiste, contactez le centre S.A.V. OLYMPUS le plus proche. Problème Cause·État Solution Page Impossible de mettre L’adaptateur secteur... -
Page 70: En Cas De Bourrage Du Papier
à l’arrière. Si le papier coincé est visible, allez à l’étape 5. Si le papier coincé n’est pas visible, contactez le centre S.A.V. OLYMPUS le plus proche. Positionnez l’imprimante sur son dos de manière à ce que l’avant soit dirigé... -
Page 71: En Cas De Retrait De La Cartouche De Ruban Encreur Pendant L'impression
En cas de difficultés Vous pourrez sortir le papier par le volet du bac d’alimentation après l’avoir glissé sur une certaine distance. Allumez l’imprimante. Remontez le bac d’alimentation dans son emplacement. Si le fonctionnement est normal, le bourrage a complètement disparu et vous pouvez poursuivre votre impression. -
Page 72: Ajout De Papier Dans Le Bac D'alimentation Et Remplacement De La Cartouche De Ruban Encreur
Ajout de papier dans le bac d’alimentation et remplacement de la cartouche de ruban encreur Si le papier vient à épuisement pendant l’impression Le voyant PAPER (Papier) clignote lentement. Ajoutez du papier dans le bac d’alimentation. Les exemplaires restant seront automatiquement imprimés. -
Page 73: À Propos Du Kit D'impression (Cartouche De Ruban Encreur Et Papier)
Papier 89 mm × 127 mm P-L40 Achat de kits d’impression Pour les utilisateurs en Europe Vous trouverez le distributeur de consommables P-11 le plus proche en vous connectant au site suivant : http://www.olympus-europa.com/printerpaper Pour les utilisateurs en Amérique du Nord et du Sud Les kits d’impression sont disponibles chez votre revendeur... -
Page 74: Conditions De Stockage
Évitez les emplacements en plein soleil, exposés à de fortes températures ou des taux d’humidité élevés ou qui sont à la portée des enfants. OLYMPUS n’est pas responsable de la décoloration de l’altération des tirages. Si vous rencontrez des problèmes Tout problème résultant d’un défaut de fabrication par OLYMPUS... -
Page 75: Spécifications
Spécifications Imprimante Méthode d’impression Impression en 4 passes par transfert des couleurs par sublimation (Jaune/Magenta/Cyan et pellicule de protection) Résolution 310 dpi × 310 dpi Format du papier Papier au format 89 mm × 127 mm : 89 (H) × 127 (V) mm d’impression Papier au format 100 mm ×... - Page 76 Spécifications Adaptateur secteur Type Régulateur à découpage Tension d’entrée 100 - 120 V AC ou 220 - 240 V AC 50/60 Hz (le type d’adaptateur secteur et la tension varient suivant la région) Tension de sortie 24 V CC, 2,5 A La conception et les spécifications sont sujettes à...
-
Page 77: Service Après-Vente Et Entretien
Un service après-vente pourra éventuellement être assuré même après cette période. En cas de besoin, consultez le centre S.A.V. OLYMPUS le plus proche. OLYMPUS n’est pas responsable des éventuels dommages (coûts ou pertes financières) provoqués par un défaut de fonctionnement de l’appareil. -
Page 78: Définitions
Définitions DPOF (Digital Print Order Format) Format d’enregistrement permettant l’impression automatique des données d’un appareil photo numérique. Vous pouvez très facilement effectuer des tirages à partir d’une carte mémoire auprès d’un magasin photo ou sur des imprimantes qui reconnaissent le format DPOF en sélectionnant les photos souhaitées et le nombre d’exemplaires. - Page 79 MEMO...
- Page 80 Wir bedanken uns für den Kauf dieses digitalen Fotodruckers P-11. Lesen Sie bitte diese Anleitung vor Inbetriebnahme des Druckers aufmerksam durch, um eine optimale Funktion zu gewährleisten. Für Kunden in Nord- und Südamerika Für Kunden in den USA Betriebserlaubnis Produktname...
- Page 81 Inhalt Einleitung Sicherheitshinweise ................. 82 Pflege und Aufbewahrung................ 87 Was dieser Drucker leistet ............... 88 Überprüfen der Zubehörteile ..............89 Bezeichnung der Teile ................90 Vorbereitung Anschließen der Stromversorgung und Ein-/Ausschalten des Druckers....................92 Einlegen der Farbbandkassette ............... 94 Einlegen von Druckpapier ................ 97 Entnehmen des Papierfachs aus dem Drucker ..........
-
Page 82: Einleitung
Einleitung Sicherheitshinweise In dieser Anleitung werden verschiedene Symbole verwendet, um auf den korrekten Gebrauch des Produkts hinzuweisen und Sachschäden oder Verletzungen vorzubeugen. Die Bedeutung dieser Symbole ist im Folgenden angegeben. Warnsymbol Erläuterung Bei Nichtbefolgen der durch dieses Symbol gekennzeichneten Anweisungen ACHTUNG besteht die Gefahr schwerer Verletzungen mit Todesfolge! - Page 83 Geräuschen oder ungewöhnlich starker Wärmeentwicklung nicht benutzen. Andernfalls besteht Stromschlag- und/oder Feuergefahr. Den Drucker unverzüglich ausschalten und den Netzstecker ziehen. Wenden Sie sich an die nächstgelegene OLYMPUS- Kundendienstvertretung. Falls Flüssigkeit oder Fremdkörper in das Innere des Druckers eindringen, unverzüglich den Netzstecker ziehen.
- Page 84 Sie das Kabel NICHT übermäßig und stellen Sie KEINE schweren Gegenstände auf das Kabel. Falls am Netzkabel Schäden festgestellt werden, wenden Sie sich bitte an die nächstgelegene OLYMPUS-Kundendienstvertretung. Den Drucker nicht zerlegen oder umbauen. Im Drucker befinden sich sowohl heiße als auch Hochspannung führende Teile.
- Page 85 Sicherheitshinweise ACHTUNG Den Drucker niemals an Orten betreiben, die folgende Besonderheiten aufweisen: Geneigte Flächen oder instabile Unterlagen. Im Freien (insbesondere nicht an Stränden etc.) oder an Orten, an denen der Drucker viel Staub oder Fremdkörpern ausgesetzt ist. Orte, an denen Nässe (Regen etc.) oder Feuchtigkeit (auch Kondensationsfeuchtigkeit, z.
- Page 86 Sicherheitshinweise VORSICHT Den Drucker niemals auf einer instabilen Fläche aufstellen. Den Drucker niemals auf einer instabilen Unterlage (wackeliger Tisch etc.) platzieren. Durch Fallenlassen oder Herunterfallen des Druckers können Verletzungen verursacht werden. Hierdurch kann der Drucker zudem beschädigt werden oder eine Störung des Druckers auftreten. Niemals die nicht benutzerseitig zu wartenden Teile im Druckerinneren berühren.
-
Page 87: Pflege Und Aufbewahrung
Pflege und Aufbewahrung Vor Kondensationsniederschlag schützen Kondensationsniederschlag tritt auf, wenn sich in der Luft enthaltener Wasserdampf verflüssigt und sich am Drucker anlagert. Dies geschieht wenn: Der Raum, in dem sich der Drucker befindet, rasch aufgeheizt oder gekühlt wird. Der Drucker direkt kalter Luft ausgesetzt wird, z. B. von einer Klimaanlage. Der Drucker von einem Ort mit niedriger Umgebungstemperatur an einen Ort mit hoher Umgebungstemperatur gebracht wird. -
Page 88: Was Dieser Drucker Leistet
Computer anschließen, können Sie Abzüge von Bildern anfertigen, die auf dem Computer gespeichert sind. Für das schnelle und mühelose Drucken und das Verwalten Ihrer Digitalbilder empfehlen wir den Einsatz von OLYMPUS Master oder OLYMPUS Master Plus. Qualitativ hochwertiger Ausdruck mit Laminierung Durch qualitativ hochwertigen Ausdruck mit Laminierung erhält man... -
Page 89: Überprüfen Der Zubehörteile
Überprüfen der Zubehörteile Vergewissern Sie sich beim Auspacken des Druckers, dass die folgenden Zubehörteile im Lieferumfang enthalten sind. Falls eines der Zubehörteile fehlen sollte, wenden Sie sich bitte umgehend an eine OLYMPUS-Kundendienstvertretung. Netzteil (1) Netzkabel (1) Papierfach (1) Formatwechselfach (für 89 mm × 127 mm) (1) (Dieses Fach befindet sich im Papierfach.) -
Page 90: Bezeichnung Der Teile
Bezeichnung der Teile Vorderseite Papierausgabefach RIBBON-Anzeige ( S. 108) S. 102, 105) PAPER-Anzeige ( S. 108) ACCESS-Anzeige ( S. 108) Papierausgabe- POWER-Anzeige bereich S. 108) POWER-Taste S. 93) Gleichspannungseingang (DC-IN) ( S. 92) Kassettenfach S. 97, 100) PictBridge-Anschluss S. 101) Farbbandkas- settenfach Riegel... - Page 91 Bezeichnung der Teile Papierfach Formatwechselfach (für 89 mm × 127 mm) S. 98, 99) Fachabdeckung S. 98) Fachabde- ckungsriegel S. 98)
-
Page 92: Vorbereitung
Vorbereitung Anschließen der Stromversorgung und Ein-/Ausschalten des Druckers Die linke Seitenabdeckung des Druckers abnehmen. Das Netzkabel an das Netzteil anschließen und den Netzstecker in eine Haushaltssteckdose stecken. Netzstecker Den Stecker des Gleichspannungskabels am Gleichspannungseingang (DC-IN) des Druckers anschließen und das Kabel wie in der Abbildung gezeigt in die Führung am Drucker einlegen. - Page 93 Anschließen der Stromversorgung und Ein-/Ausschalten des Druckers Die Seitenabdeckung wieder anbringen. Wenn Sie den Drucker zum ersten Mal verwenden, die Farbbandkassette einsetzen, bevor die Seitenabdeckung geschlossen wird. Siehe Seite 94. „Einlegen der Farbbandkassette“ Die POWER-Taste drücken. Die POWER-Anzeige leuchtet auf und der Drucker wird eingeschaltet. Vorsicht Schalten Sie zum Anschließen einer Digitalkamera zunächst den Drucker ein.
-
Page 94: Einlegen Der Farbbandkassette
Einlegen der Farbbandkassette Informationen zum Print-Pack Zum Ausdrucken ist das mitgelieferte Starter-Kit oder ein gesondert erhältliches Print-Pack erforderlich. Stets die in einem Print-Pack enthaltene Farbbandkassette und das Druckpapier zusammen verwenden. Verwenden Sie kein bereits bedrucktes Papier oder Papier nochmals, dass bereits durch den Drucker eingezogen wurde. Die Seitenabdeckung abnehmen. -
Page 95: Entnehmen Der Farbbandkassette
Einlegen der Farbbandkassette Die Farbbandkassette vollständig einschieben. Entfernen Sie das Verpackungsmaterial vom Farbbandkassettenfach und legen Sie die Farbbandkassette ein. Wenn die Farbbandkassette nicht durch Drücken gegen die Mitte der Kassette vollständig eingeschoben wird, bis ein Klicken zu hören ist, blinkt die RIBBON-Anzeige und es wird eine Fehlermeldung erzeugt. Siehe Seite 108. - Page 96 Einlegen der Farbbandkassette Vorsicht Berühren Sie nicht die Innenseite des Fachs für die Farbbandkassette, sie kann sehr heiß sein. Die Print-Packs sind entweder für 100 mm × 148 mm-Ausdrucke oder 89 mm × 127 mm- Ausdrucke vorgesehen. Verwenden Sie für Ausdrucke auf 100 mm × 148 mm-Fotopapier eine Farbbandkassette für Ausdrucke mit 100 mm ×...
-
Page 97: Einlegen Von Druckpapier
Einlegen von Druckpapier Entnehmen des Papierfachs aus dem Drucker Die Papierfachöffnung durch Ziehen in Ihre Richtung öffnen. Das durch „PULL“ gekennzeichnete Teil ergreifen und in Ihre Richtung ziehen. PULL (Ziehen) -
Page 98: Einlegen Von Druckpapier In Das Papierfach
Einlegen von Druckpapier Einlegen von Druckpapier in das Papierfach Vorsicht Ausschließlich das spezielle Druckpapier verwenden. Wird anderes Papier als das spezielle Druckpapier verwendet, wie beispielsweise Papier für Tintenstrahldrucker, kann es zu Druckerstörungen kommen wie z.B. Papierstau oder Papier, das am Farbband festklebt. Das Druckpapier vorsichtig handhaben und insbesondere darauf achten, die bedruckbare Seite (unbedruckte glänzende... - Page 99 Einlegen von Druckpapier Papier mit der bedruckbaren Seite nach unten in das Papierfach einlegen. Das Deckblatt entfernen bevor das Papier eingelegt wird. Es können bis zu 50 Blatt eingelegt werden. Bedruckbare Papierseite nach unten Die Papierfachabdeckung schließen. Darauf achten, dass kein Druckpapier zwischen Abdeckung und Fach eingeklemmt wird.
-
Page 100: Einsetzen Des Papierfachs In Den Drucker
Einlegen von Druckpapier Einsetzen des Papierfachs in den Drucker Die Papierfachöffnung durch Ziehen in Ihre Richtung öffnen. Das Papierfach vollständig einschieben. PULL (Ziehen) Das Papierfach einschieben, bis es hörbar einrastet. Zum Entfernen des Papierfachs, das durch „PULL“ gekennzeichnete Teil ergreifen und in Ihre Richtung ziehen. Die Papierfachöffnung nach dem Einsetzen des Papierfachs schließen. -
Page 101: Drucken
Digitalkameratyp unterschiedlich. Schlagen Sie für Einzelheiten über das Ausdrucken in der Bedienungsanleitung der Digitalkamera nach. Informationen über PictBridge-kompatible Digitalkameras finden Sie auch auf der Website von OLYMPUS. Folgende Standardeinstellungen gelten für Verwendung von PictBridge: Papierformat: gleiches Format wie das im Drucker eingelegte Papier Anzahl der Kopien: 1 Randloser Ausdruck. -
Page 102: Verwendung Der Digitalkamera Zur Steuerung Des Druckvorgangs
Ausdrucken von Bildern der Digitalkamera Papierausgabefach des Druckers öffnen. Papierausgabefach des Druckers öffnen, bevor der Drucker verwendet wird. Wird der Drucker verwendet, ohne das Ausgabefach zu öffnen, kann es zu Papierstau oder Schäden am Drucker kommen. Wenn der Drucker nicht verwendet wird, das Papierausgabefach geschlossen lassen, um das Eindringen von Staub und Fremdkörpern zu vermeiden. - Page 103 Ausdrucken von Bildern der Digitalkamera Beispiel einer Anzeige an der Digitalkamera Bildschirmanzeigen und Menüpunkte können abhängig vom Digitalkameratyp unterschiedlich sein. EINF. DRUCK INDIVID. DRUCK ZURÜCK WÄHLEN Auf diesem Bildschirm können folgende Funktionen ausgewählt werden. [EINF. DRUCK] Durch Auswahl dieser Option kann schnell und einfach ein Abzug des auf dem LCD-Monitor der Kamera angezeigten Bilds ausgedruckt werden.
-
Page 104: Bilder Von Einem Computer Aus Drucken
Bilder von einem Computer aus drucken Für das Ausdrucken von auf Ihrem Computer gespeicherten Bildern empfehlen wir den Einsatz von OLYMPUS Master (gehört zum Lieferumfang jeder Olympus Digitalkamera), OLYMPUS Master Plus, Olympus Studio oder einem anderen Bildbearbeitungsprogramm. Vorsicht Bilder, die nicht mit einer Digitalkamera aufgenommen wurden, müssen von einem Computer aus gedruckt werden. - Page 105 Bilder von einem Computer aus drucken Stecken Sie einen Stecker des USB-Kabels in den USB- Anschluss des Computers und den anderen Stecker des Kabels in den USB-Anschluss auf der Rückseite des Druckers ein. Denken Sie daran, das Kabel in die Führung einzulegen. Die Seitenabdeckung wieder anbringen.
-
Page 106: Drucken
Bilder digitale Bildbearbeitungssoftware (oder ein anderes Bildbearbeitungsprogramm). Wählen Sie im Menü „Datei“ den Befehl [Drucken] und wählen Sie im Drucker-Dialogfeld als Drucker [OLYMPUS P-11]. Vorsicht Das Verfahren zur Auswahl von [Drucken] und des Druckers sind abhängig vom verwendeten Programm verschieden. Schlagen Sie in der Bedienungsanleitung des von Ihnen genutzten Programms nach. - Page 107 Bilder von einem Computer aus drucken Druckereinstellungen Sie können das Papierformat, die Anzahl der Kopien sowie Einstellungen zur Farbkorrektur in den Registerkarten [Papier] und [Grafik] im Fenster der Druckereigenschaften einstellen bzw. vornehmen. Registerkarte [Papier] Registerkarte [Grafik] Folgende Punkte können auf der Registerkarte [Papier] ausgewählt werden. Punkt Erläuterung Papierformat...
-
Page 108: Zu Ihrer Information Wenn Anzeigen Blinken Oder Ständig Leuchten
Digitalkamera PictBridge-kompatibel ist. Den Drucker aus- und wieder einschalten und Ausdruck erneut starten. Falls die Störung hierdurch nicht — behoben werden kann, wenden Sie sich an die nächstgelegene OLYMPUS- Kundendienstvertretung. ACCESS, Blinken Internes Wenden Sie sich an die nächstgelegene RIBBON,... -
Page 109: Fehlersuche
Fehlersuche Überprüfen Sie zur Lösung des Problems Folgendes, bevor Sie den Drucker zur Reparatur einschicken. Wenn das Problem fortbesteht, wenden Sie sich an die nächstgelegene OLYMPUS-Kundendienstvertretung. Problem Ursache·Status Lösung Seite Drucker kann nicht Das Netzteil ist nicht Das Netzteil einwandfrei eingeschaltet werden. -
Page 110: Wenn Ein Papierstau Aufgetreten Ist
Wenn das gestaute Papier auf der Rückseite sichtbar ist, mit Schritt 5 fortfahren. Wenn das gestaute Papier nicht sichtbar ist, wenden Sie sich zur Reparatur an die nächstgelegene OLYMPUS- Kundendienstvertretung. Stellen Sie den Drucker auf die Rückseite, so dass die Vorderseite des Druckers nach oben weist. -
Page 111: Wenn Die Farbbandkassette Während Des Druckens Entnommen Wird
Fehlersuche Nachdem Sie das Papier ein Stück vorgeschoben haben, können Sie es durch die Papierfachöffnung entfernen. Den Drucker einschalten. Das Papierfach wieder in der Papierfachöffnung einsetzen. Wenn der Drucker normal funktioniert, wurde der Papierstau erfolgreich beseitigt und Sie können mit dem Druckvorgang fortfahren. -
Page 112: Auffüllen Des Papiervorrats Und Austausch Der Farbbandkassette
Auffüllen des Papiervorrats und Austausch der Farbbandkassette Wenn der Papiervorrat während des Druckens erschöpft ist Die PAPER-Anzeige blinkt langsam. Füllen Sie den Papiervorrat im Papierfach auf. Der Druckvorgang für die restlichen Kopien wird automatisch fortgesetzt. Normalerweise ist das Farbband gleichzeitig mit dem in einem Print- Pack enthaltenen Papier aufgebraucht. -
Page 113: Informationen Zum Print-Pack (Farbbandkassette Und Druckpapier)
P-L40 Kauf von Print-Packs Für Kunden in Europa Bitte besuchen Sie die nachstehende URL und wählen Sie den Händler für P-11 Verbrauchsmaterialien, der Ihrem Ort am nächsten liegt. http://www.olympus-europa.com/printerpaper Für Kunden in Nord- und Südamerika Print-Packs erhalten Sie bei Ihrem örtlichen Händler oder besuchen Sie http://www.olympusamerica.com/store. - Page 114 Kindern liegen. OLYMPUS übernimmt keine Verantwortung für Verfärbung oder Ausbleichen der Ausdrucke. Bei Auftreten von Problemen Wenn ein Problem durch einen Fertigungsfehler auftritt, ersetzt Ihnen OLYMPUS die gleiche Menge des fehlerhaften Produkts. Für andere Fälle übernimmt OLYMPUS keine Verantwortung.
-
Page 115: Technische Daten
Technische Daten Drucker Druckverfahren Thermosublimationsdruck. 4-fach-Durchlauf (Gelb/Magenta/Cyan und Laminierung) Auflösung 310 dpi × 310 dpi Druckpapierformat 89 mm × 127 mm-Fotopapier: 89 (B) × 127 (H) mm 100 mm × 148 mm-Fotopapier: 100 (B) × 148 (H) mm Maximal bedruckbare 1) Wurde randloser Ausdruck gewählt Fläche •... - Page 116 Technische Daten Netzteil Schaltregler Eingangsspannung Wechselstrom 100 - 120 V oder Wechselstrom 220 - 240 V 50/60 Hz (Netzteiltyp und Versorgungsspannung sind regional unterschiedlich) Ausgangsspannung Gleichstrom 24 V, 2,5 A Änderungen der technischen Daten und der Konstruktion jederzeit ohne Vorankündigung vorbehalten.
-
Page 117: Kundendienst Und Wartung
Reparatur innerhalb eines Jahres ab dem Kaufdatum. Reparaturen nach Ablauf des Garantiezeitraums sind ggf. kostenpflichtig. OLYMPUS bemüht sich darum, für einen Zeitraum von 5 Jahren nach Auslauf der Herstellung dieses Produkts, Ersatzteile bereit zu halten. Der Kundendienst für dieses Gerät ist daher normalerweise während dieses Zeitraums verfügbar. -
Page 118: Erklärung Der Fachbegriffe
Erklärung der Fachbegriffe DPOF (Digital Print Order Format) Speicherformat für das automatische Ausdrucken von Daten der Digitalkamera. Ausdrucke können mühelos von einer Speicherkarte bei Fotogeschäften mit DPOF-kompatibler Ausrüstung oder auf DPOF- kompatiblen Druckern ausgedruckt werden, indem die gewünschten Bilder und die Anzahl der Abzüge angegeben werden. PictBridge Ein gemeinsamer Standard, der zum direkten Anschluss einer Digitalkamera an einen Drucker zum Ausdrucken von Bildern... - Page 119 MEMO...
- Page 120 Gracias por comprar la impresora de fotos digitales P-11. Lea atentamente este manual antes de utilizarla, para asegurarse de que el rendimiento es óptimo. Para los clientes de Norte y Sudamérica Para los clientes de Estados Unidos Declaración de conformidad...
- Page 121 Índice Introducción Precauciones de seguridad..............122 Cuidado y almacenamiento..............127 Funciones de esta impresora..............128 Comprobación de los accesorios ............129 Identificación de las piezas ..............130 Preparación Conexión de la fuente de alimentación, y encendido y apagado de la impresora ....................
-
Page 122: Introducción
Introducción Precauciones de seguridad En el presente manual se emplean varios iconos para indicar el uso correcto del producto, y evitar daños materiales y lesiones a usted o a terceras personas. El significado de esos iconos se describe a continuación. Icono Descripción Si no se siguen las instrucciones... - Page 123 Si utiliza la impresora en este caso, podrían producirse incendios o descargas eléctricas. Apague la impresora y desenchufe el cable de alimentación con cuidado de no tocar los cables que queden al descubierto. Luego póngase en contacto con su centro de servicio OLYMPUS más cercano.
- Page 124 Si precisa asistencia técnica o reparaciones, póngase en contacto con el centro de servicio OLYMPUS más cercano. No coloque líquidos cerca de la impresora Si entran líquidos en la impresora, pueden producirse incendios o descargas eléctricas.
- Page 125 Precauciones de seguridad ADVERTENCIA No utilice la impresora con un adaptador de CA o un cable de alimentación que no sean los especificados/suministrados No utilice el adaptador de CA o el cable de alimentación adjuntos con ningún otro dispositivo Utilice el voltaje correcto Un voltaje incorrecto podría dañar las piezas de la impresora.
- Page 126 Precauciones de seguridad PRECAUTIÓN No coloque la impresora en superficies inestables No coloque la impresora sobre una superficie inestable, por ejemplo sobre una mesa poco firme. Si se cae la impresora, podría provocar lesiones. La impresora podría también estropearse o tener un funcionamiento defectuoso.
-
Page 127: Cuidado Y Almacenamiento
Cuidado y almacenamiento Proteja la impresora de la condensación de la humedad La condensación de la humedad significa que el vapor de agua en el aire se convierte en líquido y se adhiere a la superficie de la impresora. Este fenómeno se produce por una de las situaciones siguientes: si la habitación en la que está... -
Page 128: Funciones De Esta Impresora
Si conecta un ordenador a una impresora mediante un cable USB, disponible en el mercado, puede imprimir imágenes almacenadas en el ordenador. Recomendamos utilizar OLYMPUS Master u OLYMPUS Master Plus para imprimir y administrar fácilmente las imágenes digitales. Impresión revestida de alta calidad La impresión revestida de alta calidad garantiza la conservación de las... -
Page 129: Comprobación De Los Accesorios
Cuando desembale la impresora, asegúrese de que se incluyen los accesorios siguientes. Si falta alguno de los accesorios, póngase en contacto con un centro de servicio autorizado de Olympus. Adaptador de CA (1) Cable de alimentación (1) Bandeja del papel (1) Bandeja de conversión... -
Page 130: Identificación De Las Piezas
Identificación de las piezas Parte delantera Indicador RIBBON ( P. 148) Bandeja de salida del papel Indicador PAPER ( P. 148) P. 142, 145) ndicador ACCESS ( P. 148) Sección de expulsión del papel Indicador POWER P. 148) Botón POWER P. - Page 131 Identificación de las piezas Bandeja del papel Bandeja de conversión (para 89 mm × 127 mm) Tapa de la P. 138, 139) bandeja P. 138) Lengüeta de la tapa de la bandeja P. 138)
-
Page 132: Preparación
Preparación Conexión de la fuente de alimentación, y encendido y apagado de la impresora Retire la cubierta lateral izquierda de la impresora. Conecte el cable de alimentación al adaptador de CA e inserte el enchufe del cable de alimentación en una toma de corriente. Enchufe del cable de alimentación... - Page 133 Conexión de la fuente de alimentación, y encendido y apagado de la impresora Monte la cubierta lateral. Si es la primera vez que utiliza la impresora, cargue el cartucho de cinta entintada antes de montar la cubierta lateral. Consulte la página 134. “Carga del cartucho de cinta entintada” Presione el botón POWER.
-
Page 134: Carga Del Cartucho De Cinta Entintada
Carga del cartucho de cinta entintada Acerca del paquete de impresión Para imprimir necesita el kit de iniciación que se suministra o un paquete de impresión opcional. Utilice siempre el cartucho de cinta entintada junto con el papel que se suministra en el mismo paquete. No reutilice papel impreso o que haya pasado por la impresora. - Page 135 Carga del cartucho de cinta entintada Inserte hasta el fondo el cartucho de cinta entintada. Retire el material de protección de la ranura para el cartucho e inserte el cartucho de cinta entintada. Si no presiona el centro del cartucho de cinta entintada para deslizarlo hasta el fondo, hasta que se oiga un sonido que indica que ha encajado en su lugar, el indicador RIBBON parpadeará...
- Page 136 Carga del cartucho de cinta entintada Nota No toque el interior de la ranura del cartucho, porque puede estar muy caliente. Los paquetes de impresión son para impresiones de 100 mm × 148 mm o de 89 mm × 127 mm. Utilice un cartucho de cinta entintada para impresiones de 100 mm ×...
-
Page 137: Carga Del Papel
Carga del papel Extracción de la bandeja del papel de la impresora Abra la bandeja del papel tirando de ella hacia usted. Sujete la parte indicada como “PULL” y tire hacia usted. PULL (Tirar) -
Page 138: Carga Del Papel En La Bandeja Del Papel
Carga del papel Carga del papel en la bandeja del papel Nota Utilice siempre papel especial. Si utiliza otro papel, tal como papel de impresora inkjet, puede provocar en la impresora averías tales como que el papel se atasque o se pegue a la cinta entintada. No toque la superficie de impresión (la superficie blanca, brillante) mientras manipula el papel. - Page 139 Carga del papel Cargue el papel en la bandeja con la superficie de impresión orientada hacia abajo. Antes de cargar el papel, retire la hoja de protección. Puede cargar como máximo 50 hojas. Superficie de impresión orientada hacia abajo Cierre la tapa de la bandeja del papel. Tenga cuidado de no atrapar el papel entre la tapa y la bandeja.
-
Page 140: Inserción De La Bandeja Del Papel En La Impresora
Carga del papel Inserción de la bandeja del papel en la impresora Abra la puerta de la bandeja del papel tirando de ella hacia usted. Inserte hasta el fondo la bandeja del papel. PULL (Tirar) Inserte la bandeja del papel hasta oír el sonido que indica que ha encajado en su lugar. -
Page 141: Impresión
Para ver información detallada sobre la impresión, consulte el manual de instrucciones de la cámara digital. En la página web de Olympus encontrará información acerca de las cámaras digitales compatibles con PictBridge. La configuración predeterminada de la impresora cuando se utiliza PictBridge es la siguiente. -
Page 142: Uso De La Cámara Digital Para Controlar El Proceso De Impresión
Impresión de imágenes desde cámaras digitales Abra la bandeja de salida del papel de la impresora. Abra la bandeja de salida del papel antes de usar la impresora. Si no está abierta al usar la impresora, puede que se atasque el papel o se dañe la impresora. - Page 143 Impresión de imágenes desde cámaras digitales Una vez iniciada la impresión, el indicador ACCESS de la impresora comienza a parpadear. Cuando termina la impresión, el indicador se apaga. Para ver información detallada sobre el funcionamiento de la cámara digital, consulte el manual de instrucciones de la cámara digital.
-
Page 144: Impresión De Imágenes Desde Un Ordenador
Impresión de imágenes desde un ordenador Recomendamos utilizar OLYMPUS Master (que se suministra con todas las cámaras digitales Olympus), OLYMPUS Master Plus, Olympus Studio u otra aplicación de procesado de imágenes para imprimir las imágenes almacenadas en el ordenador. Nota Las imágenes que no se hayan tomado con una cámara digital deben... - Page 145 Impresión de imágenes desde un ordenador Introduzca una clavija del cable USB en el puerto USB del ordenador, y la otra clavija en el conector USB de la parte trasera de la impresora. No olvide pasar el cable por la guía. Monte la cubierta lateral.
-
Page 146: Impresión
Seleccione [Imprimir] en el menú Archivo y seleccione como impresora [OLYMPUS P-11] en el cuadro de diálogo Imprimir. Nota El procedimiento para seleccionar [Imprimir] y la impresora varía según la aplicación. - Page 147 Impresión de imágenes desde un ordenador Parámetros de configuración de la impresora Puede establecer el tamaño de papel, la cuenta de copias y ajustes de color en las pestañas [Papel] y [Gráficos] de la ventana Preferencias de impresión. Pestaña [Papel] Pestaña [Gráficos] En la pestaña [Papel] puede seleccionar los elementos siguientes.
-
Page 148: Para Su Referencia
— contacto con su centro de servicio OLYMPUS más cercano. ACCESS, Parpadean Problema Póngase en contacto con su RIBBON, simultá- interno centro de servicio OLYMPUS más — PAPER neamente cercano. * Cuando logra establecerse la comunicación, se apaga la luz. -
Page 149: Solución De Problemas
Solución de problemas Antes de mandar a reparar la impresora, compruebe los puntos siguientes para intentar resolver el problema. Si el problema persiste, póngase en contacto con el centro de servicio OLYMPUS más cercano. Problema Causa·Estado Solución Página La impresora no se... -
Page 150: Si El Papel Está Atascado
Si el papel atascado está visible, vaya al paso 5. Si el papel atascado no está visible, póngase en contacto con el centro de servicio OLYMPUS más cercano para reparar la impresora. Coloque la impresora sobre su... -
Page 151: Si Retira El Cartucho De Cinta Entintada Durante La Impresión
Solución de problemas Cuando el papel se haya desplazado parcialmente, podrá sacarlo por la puerta de la bandeja del papel. Encienda la impresora. Vuelva a colocar la bandeja del papel en la puerta de la bandeja del papel. Si el funcionamiento parece normal, el atasco ha desaparecido y puede seguir imprimiendo. -
Page 152: Adición De Papel Y Sustitución Del Cartucho De Cinta Entintada
Adición de papel y sustitución del cartucho de cinta entintada Si se acaba el papel durante la impresión El indicador PAPER parpadeará lentamente. Coloque más papel en la bandeja. Seguirán imprimiéndose de forma automática las copias que falten. La cinta entintada suele acabarse a la vez que se termina el papel del paquete de impresión, así... -
Page 153: Acerca Del Paquete De Impresión (Cartucho De Cinta Entintada Y Papel)
Acerca del paquete de impresión (cartucho de cinta entintada y papel) Utilice siempre los paquetes de impresión especificados por OLYMPUS. Los paquetes de impresión son para papel de 100 mm × 148 mm o de 89 mm × 127 mm. El paquete de impresión para impresiones de 100 mm ×... - Page 154 Si detecta problemas Si el problema se debe a un defecto de fabricación de OLYMPUS, se le restituirá al usuario la misma cantidad del nuevo producto. OLYMPUS no asume ningún tipo de responsabilidad en otras...
-
Page 155: Especificaciones
Especificaciones Impresora Método de impresión Impresión por transferencia seca sublimada, impresión en 4 pasadas (amarillo/magenta/azul verdoso y capa de recubrimiento protector) Resolución 310 dpi × 310 dpi Tamaño de papel de Papel de 89 mm × 127 mm: 89 (H) × 127 (V) mm impresión Papel de 100 mm ×... - Page 156 Especificaciones Adaptador de CA Tipo Regulador de conmutación Tensión de entrada CA 100 - 120 V o CA 220 - 240 V 50/60 Hz (el tipo de adaptador de CA y la tensión varían según la zona) Tensión de salida CC 24 V, 2,5 A El diseño y las especificaciones están sujetos a cambios sin previo aviso.
-
Page 157: Asistencia Técnica Y Mantenimiento
Si tiene preguntas acerca de asistencia técnica, o en el caso de un problema del dispositivo, póngase en contacto con el centro de servicio OLYMPUS más cercano. Si el problema se ha producido usando este dispositivo de acuerdo con el manual de instrucciones, la garantía limitada cubre la reparación gratuita durante el año... -
Page 158: Glosario
Glosario DPOF (Digital Print Order Format) Formato de grabación para impresión automática de datos de cámaras digitales. Las impresiones pueden crearse fácilmente desde una tarjeta multimedia en establecimientos fotográficos o impresoras compatibles con el formato DPOF, especificando las imágenes deseadas y el número de copias. - Page 159 MEMO...
- Page 160 MEMO...
- Page 161 MEMO...
- Page 162 MEMO...
- Page 163 MEMO...
- Page 164 Our phone customer support is available from 8 am to 10 pm (Monday to Friday) ET E-Mail: distec@olympus.com Olympus software updates can be obtained at: http://www.olympus.com/digital Premises:Wendenstrasse 14-18, 20097 Hamburg, Germany Tel: +49 40-23 77 3-0 / Fax: +49 40-23 07 61...