Utilitech 7105-06 Mode D'emploi
Table des Matières
Les langues disponibles
Les langues disponibles
Liens rapides
ATTACH YOUR RECEIPT HERE
Serial Number _______________ Purchase Date ______________
Questions, problems, missing parts? Before returning to your retailer, call our customer
service department at 1-866-994-4148, 8 a.m. - 6 p.m., EST, Monday - Thursday,
8 a.m. - 5 p.m., EST, Friday.
AB1778
TM
READ AND SAVE THESE INSTRUCTIONS
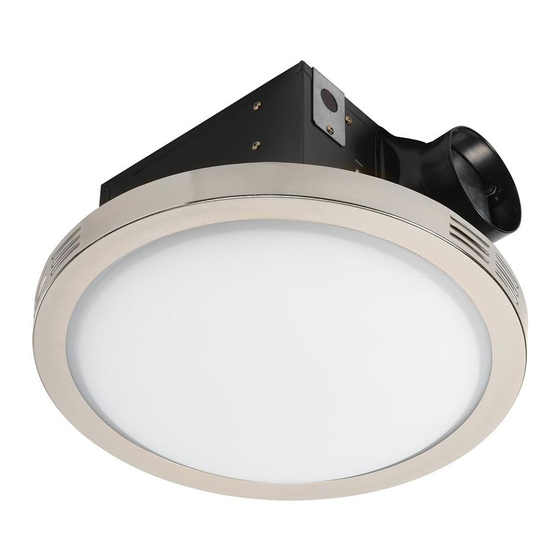
DECORATIVE
VENTILATION FAN
WITH LED LIGHT
Français p. 13
ITEM #1074715
MODEL #7105-06
Español p. 25
Chapitres
Table des Matières
Dépannage

Manuels Connexes pour Utilitech 7105-06

Sommaire des Matières pour Utilitech 7105-06
- Page 13 ARTICLE #1074715 VENTILATEUR DÉCORATIF AVEC LUMINAIRE À DEL MODÈLE #7105-06 JOIGNEZ VOTRE REÇU ICI Numéro de série _____________ Date d’achat ________________ Des questions, des problèmes, des pièces manquantes? Avant de retourner l’article au détaillant, appelez notre service à la clientèle au 1 866 994-4148, entre 8 h et 18 h (HNE) du lundi au jeudi, ou entre 8 h et 17 h (HNE) le vendredi.
- Page 14 TABLE DES MATIÈRES Caractéristiques du produit.......................14 Contenu de l’emballage et quincaillerie incluse ................15 Consignes de sécurité ........................16 Préparation ............................16 Instructions pour l’assemblage dans une nouvelle construction ............18 Instructions pour l’assemblage dans une construction existante ............21 Entretien ............................24 Dépannage ............................24 Garantie ............................24 CARACTÉRISTIQUES DU PRODUIT CARACTÉRISTIQUES CARACTÉRISTIQUES...
-
Page 15: Contenu De L'emballage Et Quincaillerie Incluse
CONTENU DE L’EMBALLAGE PIÈCE DESCRIPTION QUANTITÉ Boîtier du ventilateur Panneau à DEL Bordure Globe en verre Support I Support II Support III Raccord pour conduit QUINCAILLERIE INCLUSE (grandeur ne pas réelle) Vis à bois Longue vis à Petite vis à Rondelle longue métaux... -
Page 16: Consignes De Sécurité
CONSIGNES DE SÉCURITÉ VEUILLEZ LIRE ET CONSERVER CES INSTRUCTIONS. Assurez-vous de lire et de comprendre l’intégralité du présent manuel avant de tenter d’assembler, d’installer ou d’utiliser l’article. Fermez toujours l’alimentation électrique avant d’effectuer l’entretien du ventilateur, du moteur ou de la boîte de jonction. - Page 17 PRÉPARATION Outils nécessaires pour l’assemblage (non inclus) : marteau, tournevis à tête plate, ruban à conduits, tournevis cruciforme et couteau à lame rétractable. Outils utiles (non inclus) : perceuse électrique et forets. AVERTISSEMENT : Avant de commencer l’installation, coupez l’électricité à partir du disjoncteur. Retirez soigneusement l’appareil de la boîte.
-
Page 18: Instructions Pour L'assemblage Dans Une Nouvelle Construction
INSTRUCTIONS POUR L’ASSEMBLAGE DANS UNE NOUVELLE CONSTRUCTION AVANT L’INSTALLATION : Coupez l’alimentation électrique. Consultez toutes les mesures de sécurité. Fixez le raccord pour conduit (H) au boîtier du ventilateur (A). Insérez le support I (E) dans l’ouverture du côté du raccord pour conduit. - Page 19 INSTRUCTIONS POUR L’ASSEMBLAGE DANS UNE NOUVELLE CONSTRUCTION Fixez les supports (E et F) au boîtier du ventilateur (A) à l’aide des petites vis à métaux (CC). Quincaillerie Utilisée Petites vis à métaux Retirez le couvercle de la boîte de câblage (5.1). Passez Fils d e Raccord les fils de la maison à...
- Page 20 INSTRUCTIONS POUR L’ASSEMBLAGE DANS UNE NOUVELLE CONSTRUCTION Fixez le panneau à DEL (B) au boîtier du ventilateur (A) à l’aide de 4 vis à métaux longues (BB) et des rondelles en métal (DD). Quincaillerie Utilisée Longue vis à métaux Rondelle métallique Choisissez la bordure (C) qui s’agence le mieux avec votre pièce.
-
Page 21: Instructions Pour L'assemblage Dans Une Construction Existante
INSTRUCTIONS POUR L’ASSEMBLAGE DANS UNE CONSTRUCTION EXISTANTE VOUS DEVEZ AVOIR ACCÈS AU GRENIER AVANT L’INSTALLATION : coupez l’alimentation électrique. Consultez toutes les mesures de sécurité. Mesurez l’ouverture pour vous assurer qu’elle est assez grande pour accueillir le boîtier du nouveau ventilateur (22,86 cm x 22,86 cm). - Page 22 INSTRUCTIONS POUR L’ASSEMBLAGE DANS UNE CONSTRUCTION EXISTANTE Fixez le boîtier du ventilateur (A) aux solives avec les supports (E, F et G) à l’aide de vis à bois longues (AA). Remarque : Le fond du carter du ventilateur doit être au niveau du fond du plafond.
- Page 23 INSTRUCTIONS POUR L’ASSEMBLAGE DANS UNE CONSTRUCTION EXISTANTE Branchez le panneau LED (B) dans le boîtier du ventilateur (A). Branchez les connecteurs de fil (trous deux et trous) du moteur du ventilateur dans le boîtier du ventilateur. Trous Connecteur Trous 10. Fixez le panneau à DEL (B) au boîtier du ventilateur (A) à l’aide de 4 vis à...
-
Page 24: Entretien
ENTRETIEN AVERTISSEMENT : Coupez l’alimentation électrique avant d’effectuer l’entretien. Lisez les CONSIGNES DE SÉCURITÉ avant de commencer. Vous devez procéder à un entretien au moins une fois par année. • Nettoyez la grille à l’aide de savon doux et d’eau, et essuyez-la avec un linge. •...