Publicité
Les langues disponibles
Les langues disponibles
Liens rapides
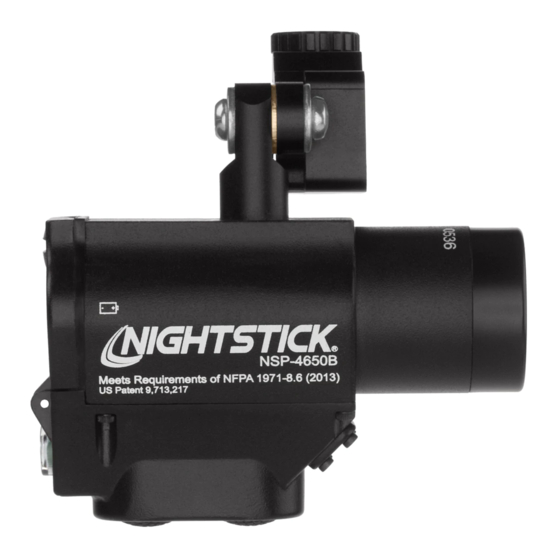
Nightstick NSP-4650B Helmet Light at BrightGuy.
com
Instruction Manual
NSP-4650B
THANK YOU FOR SELECTING THE NIGHTSTICK NSP-4650 HELMET
MOUNTED MULTI-FUNCTION DUAL-LIGHT™ FLASHLIGHT!
PLEASE SAVE THESE INSTRUCTIONS
Please read these instructions before using your Nightstick NSP-4650.
They include important assembly and operating instructions.
PACKAGE CONTENTS
1 – NSP-4650 Helmet Mounted Multi-Function Dual-Light Flashlight
2 – CR-123 Lithium Batteries
2 – 5/16" - 18 x 1/4" Brim Mounting Allen Set Screws (installed in mount)
– for Fire Helmets
2 – 5/16" - 18 x 3/8" Brim Mounting Allen Set Screws (loose) – for Hard
Hats
1 – 5/32" Allen Wrench
WARNINGS
NOT FOR USE ABOVE HAZARDOUS LOCATIONS
DO NOT use in explosive atmospheres, near fl ammable liquids, or where
explosion proof lamps are required.
DO NOT use in the proximity of vehicles or equipment when there is a risk
of fl ammable liquids coming into contact with the fl ashlight.
DO NOT expose the batteries to water or salt water, or allow the batteries
to get wet.
DO NOT store the batteries with metallic objects that may cause a short
circuit.
Immediately discontinue use of the batteries if they emit an unusual smell,
feel hot, change color, change shape or appear abnormal in any way.
Keep out of the reach of children.
Bayco Products, Inc. • 640 South Sanden Blvd. • Wylie, TX 75098 • 1-800-233-2155 • 1-469-326-9400 • www.mynightstick.com
APPLICATION
The NSP-4650B Helmet Mounted Multi-Function Dual-Light™ Flashlight
is a single self-contained flashlight, a floodlight and a Dual-Light mode
flashlight designed for attaching to virtually any Fire Helmet or Hard Hat.
Both the fl ashlight and the fl oodlight have user-selectable brightness
levels and each be operated independently or at the same time. In high-
brightness mode, the fl ashlight produces 220 Lumens and is distance rated
at 183 meters. The light is IP-X7 waterproof and is drop rated at 2 meters.
The Helmet Mounted Multi-Function Dual-Light Flashlight can be attached
to either side of virtually any Fire Helmet or Hard Hat and provides a wide
range of adjustability options. This adjustability allows the user to best
position the light for purposes of providing clearance around face shields,
goggles or other potential obstructions while still allowing the fl oodlight to
point in a downward direction regardless of the angle of the brim of the helmet.
INSTALLING BATTERIES INTO THE 4650
Image 1
To install the included CR-123 Lithium Batteries in the 4650, begin by
unscrewing the screw on the battery compartment door. (Image 1)
Insert both batteries into the battery compartment paying attention to the
battery orientation marked on the back of the battery compartment door.
(Image 2)
Re-install the battery compartment screw by pressing the door fully closed
and then tightening the screw until it is hand tight. CAUTION: Do not cross-
tread or strip the screw threads. (Image 3)
Test the operation of the light (see OPERATION below).
ADJUSTING THE ORIENTATION AND/OR ANGLE OF THE MOUNT
Image 4
The mount on the top of the light is designed to be adjustable in terms of
which side of the helmet it can be mounted to. Additionally, adjustments to
the angle of the light can be made to refi ne the angle of the beam in relation
to the helmet. Out of the packaging, the mount is set up for attachment to the
right side of the helmet. If the light needs to be mounted to the other side of
the helmet or if the angle of the light needs to be adjusted, use the following
steps to make those adjustments:
Using the included 5/32" Allen Wrench, loosen and then remove the Angle
Lock Socket Head Cap Screw and separate the Mount from the rest of the
assembly. (Image 4)
If the angle of the light needs to be adjusted, loosen the Angle Adjustment
Socket Head Cap Screw found below the Mount using the 5/32" Allen
Wrench, adjust the angle as needed and then tighten the Angle Adjustment
Socket Head Cap Screw completely. (Image 5)
Reinsert the Mount into the rest of the assembly and reinstall the Angle
Lock Socket Head Cap Screw paying close attention to the fact that the
Mount is positioned correctly based on the side of the helmet that the light is
to be mounted to. (Image 6)
INS-NSP-4650-16
Image 2
Image 3
Image 5
Image 6
Publicité

Manuels Connexes pour NightStick NSP-4650B


Sommaire des Matières pour NightStick NSP-4650B
- Page 3 Si la lampe doit être ajustée de l’autre côté du casque Veuillez lire ces instructions avant d’utiliser votre lampe de poche ou si l’angle de la lampe a besoin d’être réglé, utiliser les étapes suivantes Nightstick NSP-4650. Elles contiennent des informations importantes sur pour effectuer ces ajustements. l’utilisation et l’assemblage.