Table des Matières
Publicité
Liens rapides
Assembly Instructions
Instructions pour l'assemblage
SAFETY WARNING
!
1.
Follow the information on the warnings appearing on the upper bunk end structure and on
the carton. Do not remove warning label from bed.
2.
Always use the recommended size mattress or mattress support, or both, to help prevent
the likelihood of entrapment or falls.
3.
Surface of mattress must be at least 5 in. (127 mm) below the upper edge of guardrails.
4.
Do not allow children under 6 years of age to use the upper bunk.
5.
Periodically check and ensure that the guardrail, ladder, and other components are in their
proper position, free from damage, and that all connectors are tight.
6.
Do not allow horseplay on or under the bed and prohibit jumping on the bed.
7.
Prohibit more than one person on upper bunk.
8.
Always use the ladder for entering and leaving the upper bunk.
9.
Do not use substitute parts. Contact the manufacturer or dealer for replacement parts.
10.
Use of a night light may provide added safety precaution for a child using the upper bunk.
11.
Always use guardrails on both long sides of the upper bunk. If the bunk bed will be placed
next to the wall, the guardrail that runs the full length of the bed should be placed against
the wall to prevent entrapment between the bed and wall.
12.
The use of water or sleep flotation mattresses is prohibited.
13.
STRANGULATION HAZARD–Never attach or hang items to any part of the bunk bed
that are not designed for use with the bed; for example, but not limited to hooks, belts
and jump ropes.
14.
Keep these instructions for future reference.
SIZE OF MATTRESS AND FOUNDATION:
Use only mattress, which is 37 1/2" - 38 1/2" wide and 74"-75" long on upper bunk (twin size.)
Use only mattress, which is 53"-54" wide and 74"-75" long on the lower bunk (full size.)
Ensure that the thickness of the mattress does not exceed 6" and that the mattress surface is
at least 5" (127mm) below upper edge of guardrails.
WARNING:
Adult Assembly Required. This package contains small parts. Keep away from children.
Replacement Parts:
Replacement parts, including additional guardrails may be obtained from any
Night & Day Furniture Dealer.
Certified:
This bunk bed conforms to all applicable consumer product safety standards
16 CFR PARTS 1213, 1500, 1513 and ASTM F-1427
Page 1 de 14
Page 1 of 14
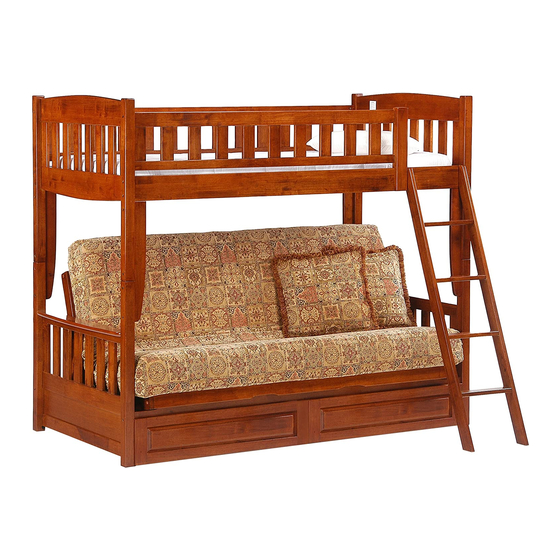
Cinnamon Futon Bunk Bed
Lits Superposés Futon «Canelle»
TM
Note about Warning Labeling
The warning label on your bunk bed headboard is
there by law, and by law is not to be removed. The
adhesive used is difficult to peel off, will tear the paper
leaving a residue that is difficult to clean. We
recommend that you leave it where it is.
N&D 1018F
Publicité
Table des Matières

Manuels Connexes pour Night & Day Furniture Canelle

Sommaire des Matières pour Night & Day Furniture Canelle
- Page 1 Cinnamon Futon Bunk Bed Assembly Instructions Lits Superposés Futon «Canelle» Instructions pour l’assemblage N&D 1018F SAFETY WARNING Follow the information on the warnings appearing on the upper bunk end structure and on the carton. Do not remove warning label from bed.
- Page 2 Cinnamon Futon Bunk Bed Assembly Instructions Lits Superposés Futon «Canelle» Instructions pour l’assemblage N&D 1018F AVERTISSEMENT DE SÉCURITÉ Suivre la mise en garde aparaissant sur la structure du lit du haut et sur le carton. Ne pas enlever l’avertissement apparaissant sur le lit.
- Page 3 Cinnamon Futon Bunk Bed Assembly Instructions Lits Superposés Futon «Canelle» Instructions pour l’assemblage N&D 1018F Parts list: Box 1 - Head/Footboard: Box 2 - Futon Decks & Stretchers: Box 3 - Guard Rails & Ladder: Liste des pièces: Boîte 1 - Tête et pied de lit: Boîte - Châssis de futon et rail d’étirement:...
-
Page 4: Table Des Matières
Cinnamon Futon Bunk Bed Assembly Instructions Lits Superposés Futon «Canelle» Instructions pour l’assemblage N&D 1018F Hardware Hardware in Box 2: Quincaillerie: Quincaillerie dans la boîte 2: Échelle 1: 1 Échelle 1: 1 Scale 1: 1 Scale 1: 1 100mm Bolts... - Page 5 «Canelle» Cinnamon Futon Bunk Bed Lits Superposés Futon N&D 1018F Attach the Lower Stretchers to the Lower Frame Be sure the Stretchers are the correct way up! Attacher les rails d’étirement du bas au châssis du bas S’assurer que les rails d’étirement sont placés correctement.
- Page 6 «Canelle» Cinnamon Futon Bunk Bed Lits Superposés Futon N&D 1018F Rest the Top Rollers against the Leg. Carefully lift the Back Deck into position. Lever soigneusement le châssis du dossier Appuyer les tiges du haut contre la patte. Place the Bottom Rollers onto the back en position.
- Page 7 «Canelle» Cinnamon Futon Bunk Bed Lits Superposés Futon N&D 1018F Lift the Seat Deck in vertically, so the Pins meet with the Rubber Hook the Seat Deck onto Pull the Seat over the "Snap Point." Snapper. The head of the Snapper should fit between both Pins.
- Page 8 «Canelle» Cinnamon Futon Bunk Bed Lits Superposés Futon N&D 1018F Attach the Stretchers and Rear Guard Rail to the Upper Bunk Attacher le rail d’étirement et le rail de protection arrière au lit supérieur Tap Wooden Dowels into the ends of the Stretchers and Rear Guard Rail. Using 80mm Bolts and Barrel Nuts, attach these to the Upper Bunk, carefully noting Left and Right hand sides.
-
Page 9: Vis (80Mm) X
«Canelle» Cinnamon Futon Bunk Bed Lits Superposés Futon N&D 1018F Attach the Reversible Guard Rail to the Upper Bunk Attacher le guarde réversible au lit supérior • Ladder on the RIGHT: • Ladder on the LEFT: • Échelle sur la gauche: •... -
Page 10: Vis (40Mm) X
«Canelle» Cinnamon Futon Bunk Bed Lits Superposés Futon N&D 1018F Bolt the Slats to the Stretchers Fix the Remaining Slats with screws Visser les lattes aux rails d’étirement Fixer les lattes qui restent avec les vis Lay the Slats inside the Stretchers as shown below, and Bolt in Use the 30mm Wood Screws to fix the remaining slats to place with the 30mm Threaded Wood Bolts (total 4 Bolts). - Page 11 «Canelle» Cinnamon Futon Bunk Bed Lits Superposés Futon N&D 1018F Fit the Upper Bunk onto the Lower Bunk Fit the Brackets to the Legs Ajuster le lit du haut au lit du bas Fixer les supports aux pattes Fit the Metal Tubes into the tops of the legs.
-
Page 12: 40Mm Bolts
«Canelle» Cinnamon Futon Bunk Bed Lits Superposés Futon N&D 1018F Attach the Ladder to the Upper Stretcher Assemble the Ladder Attacher l’échelle à la rail du haut Assembler l'échelle Use the 16mm Wood Screws to fix the Ladder in place. - Page 13 Disassembly: How to Remove the Futon Seat Démontage: Comment désassembler le siège du futon N&D 1018F From the Bed position, lift the Seat. Lift the Seat all the way. Push the Seat over the "Snap Point." De la position lit, lever le siège. Lever le siège au complet.
- Page 14 Disassembly: How to Remove the Futon Back Démontage: Comment désassembler le dossier du futon N&D 1018F Lift the Back Deck up. Lift Back Deck so the Top Roller is clear of the Back Leg. Lever le dossier du châssis vers le haut. Lever le dossier du châssis pour que les tiges du haut se libèrent des pattes arrières.