
Manuels Connexes pour Aube Technologies EConnect TA7210


Sommaire des Matières pour Aube Technologies EConnect TA7210
- Page 1 Operating Manual TA7210 EConnect™ Wireless Programmable/Non-programmable Thermostat...
- Page 2 Operating Manual Before you begin Do you know your thermostat configuration? To know whether your new thermostat is configured in programmable mode or non-programmable mode, look for the time and day display on the thermostat screen. If the time and day appear on the screen, the thermostat is configured as a programmable thermostat.
-
Page 3: Table Des Matières
EConnect™ TA7210 Table of contents Non-programmable Programmable configuration configuration Basic operation Thermostat display in non-programmable mode......4 Setting the temperature..............5 Countdown mode (Décompte) ...........6 Programmable mode Thermostat display in programmable mode .......8 ... -
Page 4: Thermostat Display In Non-Programmable Mode
Operating Manual Thermostat display in non-programmable mode If your thermostat is configured in programmable mode, see Heating Indicator more description on page 8. The number of flames depends on the heating intensity. The image disappears when heating stops. Set temperature Indoor temperature (room temperature) Lock... -
Page 5: Setting The Temperature
EConnect™ TA7210 Setting the temperature Set temperature Press to set the temperature. -
Page 6: Countdown Mode (Décompte)
Operating Manual Countdown mode Press Décompte (Countdown) to set a new temperature and to select the time you wish to hold this temperature setting. The thermostat will return to its previous or programmed temperature setting at the end of the countdown time. The countdown time is selectable from 15 minutes to 14 days. The Countdown mode is not available when the thermostat is locked. - Page 7 EConnect™ TA7210 Countdown mode (cont’d) The countdown time changes in real time to show the remaining time. Press Annuler any time to You can change the countdown cancel the Countdown mode. time and temperature any time.
-
Page 8: Thermostat Display In Programmable Mode
Operating Manual Thermostat display in programmable mode The thermostat displays the current time and day when the thermostat is configured in programmable mode. When the thermostat is following the schedule, it also displays the current period of the schedule: Réveil (Wake), Départ (Leave), Retour (Return) or Sommeil (Sleep). -
Page 9: Following The Heating Schedule
EConnect™ TA7210 Following the heating schedule Exécute l’horaire (Run Schedule) appears on the screen when the thermostat is following the programmed schedule. Your thermostat has been programmed with an energy-saving schedule which can reduce your heating expenses by as much as 33%. Monday to Friday Saturday and Sunday (Lu, Ma, Me, Je &... - Page 10 Operating Manual Setting the time and the date Select Date & heure. Set the minutes. Press Menu. Set the hour. * Copie will appear only if the thermostat is linked to a remote control or an outdoor sensor.
-
Page 11: Setting The Time And The Date
EConnect™ TA7210 Setting the time and the date (cont’d) Enable/disable Set the month. Set the day Set the year. Automatic of the month Daylight Saving*. *. When this function is enabled, the thermostat switches to daylight savings time on the second Sunday of March and to normal time on the first Sunday of November. -
Page 12: Modifying The Heating Schedule
Operating Manual Modifying the heating schedule Press Menu. Select the day or Select Horaire. Select the period you the group* you wish to modify. wish to modify. * The groups are: Lu-Ve (Monday-Friday), Sa-Di (Saturday-Sunday) and Lu-Di (Monday-Sunday). Selecting a group will apply the changes to all the days within that group. - Page 13 EConnect™ TA7210 Modifying the heating schedule (cont’d) Select another period Set the When all changes are Set the time or press Sortir to go temperature. done, press Sortir (15-minute to the day selection until you return to the intervals) menu (step 3).
-
Page 14: Temporary Hold (Maintien Temporaire)
Operating Manual Temporary Hold (Maintien temporaire) Use Temporary Hold (Maintien temporaire) mode to temporarily bypass the schedule and set a new temperature. The thermostat will hold the new temperature during the current period. The thermostat will resume the heating schedule when the next period starts or if you press Annuler (Cancel). ... -
Page 15: Permanent Hold (Maintien Permanent)
EConnect™ TA7210 Permanent Hold (Maintien permanent) Use Permanent Hold (Maintien permanent) mode to bypass the schedule and set a new temperature for an indefinite period of time. To resume the heating schedule, press Annuler (Cancel). At any time, you can press Press until the desired Press Permanent. -
Page 16: Copying The Heating Schedule
Operating Manual Copying the heating schedule Use the Copie function to transmit the schedule settings of this thermostat to other EConnect™ wireless thermostats in your house. This function is available only if the thermostat is connected to a remote control or to an outdoor sensor. The schedule settings are transmitted to any other thermostats connected to the same remote control or outdoor sensor. - Page 17 EConnect™ TA7210 Copying the heating schedule (cont’d) Patientez flashes when the SUCC appears when the Press Sortir twice to return schedule settings are transmitted transmission is completed. to the home screen. to the other thermostats (this can last up to 2 minutes).
-
Page 18: Advanced Setup
Operating Manual Advanced setup Setup functions Default setting Options °C °C / °F Temperature and time formats * 12h / 24h Programmable mode (Horaire) *** On (Oui) On/Off (Oui/Non) Adaptive Intelligent Recovery (Horaire Anticipé) ** On (Oui) On/Off (Oui/Non) You can set the temperature display unit in °C or °F. You can set the time display format in 12-hour or 24-hour (military time) if the thermostat is in programmable mode. - Page 19 EConnect™ TA7210 Accessing the advanced setup menu Press this button for 5 From the advanced setup Advanced setup menu seconds to access the menu, press advanced setup menu. select the setup functions and press Ok. Adaptive Intelligent °C / °F 12h / 24h * Programmable mode Recovery *...
-
Page 20: Replacing The Batteries
Operating Manual Replacing the batteries Thermostat Install 2 new alkaline AA batteries when Piles faibles (Low batteries) warning starts flashing. It is recommended to replace batteries once a year, or when you will be away for more than a month. To access the batteries, pull the thermostat from its mounting plate. -
Page 21: In Case Of Difficulty
EConnect™ TA7210 In case of difficulty / Error codes Heating system does not respond • Check circuit breaker and reset if necessary “Signal Perdu” appears on the screen • The thermostat has lost communication with the wireless network (usually due to power outage). Otherwise, check circuit breaker and reset if necessary. -
Page 22: Three-Year Limited Warranty
Operating Manual Three-year limited warranty Honeywell warrants this product, excluding battery, to be free from defects in the workmanship or materials, under normal use and service, for a period of three (3) years from the date of purchase by the consumer. If at any time dur- ing the warranty period the product is determined to be defective or malfunctions, Honeywell shall repair or replace it (at Honeywell's option). -
Page 23: Regulatory Information
EConnect™ TA7210 Regulatory information FCC Compliance Statement (Part 15.19) (USA only) • Connect the equipment into an outlet on a circuit different from This device complies with Part 15 of the FCC Rules. Operation is that to which the receiver is connected. subject to the following two conditions: •... - Page 24 Automation and Control Systems Honeywell International Inc. Honeywell Limited 1985 Douglas Drive North 705 Montrichard Golden Valley, MN 55422 Saint-Jean-sur-Richelieu, Quebec, J2X 5K8 http://yourhome.honeywell.com www.aubetech.com 69-2473EF-01 06-11 © 2011 Honeywell International Inc. ® U.S. Registered Trademark. All rights reserved. Printed in USA...
- Page 25 Mode d’emploi TA7210 EConnect Thermostat programmable/non-programmable sans fil...
- Page 26 Mode d’emploi Avant de commencer Savez-vous la configuration de votre thermostat ? Pour savoir si votre nouveau thermostat est configuré en mode programmable ou en mode non programmable, vérifier si l’heure et le jour sont affichés à l’écran. S’ils apparaissent, cela signifie que le thermostat est configuré...
- Page 27 EConnect TA7210 Table des matières Configuration Configuration non programmable programmable Utilisation de base Affichage en mode non-programmable ........4 Réglage de la température............5 Mode Décompte .................6 Mode programmable Affichage en mode programmable ..........8 ...
-
Page 28: Affichage En Mode Non-Programmable
Mode d’emploi Affichage en mode non-programmable Si votre thermostat est configuré Indicateur de chauffage en mode programmable, voir Le nombre de flammes dépend de plus de description à la page 8. l'intensité du chauffage. L'image disparaît lorsque le chauffage s’arrête. Température de consigne Température intérieure (température de la pièce) -
Page 29: Réglage De La Température
EConnect TA7210 Réglage de la température Température de consigne Appuyer sur pour régler la température. -
Page 30: Mode Décompte
Mode d’emploi Mode Décompte Appuyer sur Décompte pour régler une nouvelle température et de sélectionner la durée de maintien de la nouvelle température. Le thermostat retournera à son réglage de température précédent ou programmé à la fin du compte à rebours. La période de décompte est réglable de 15 minutes à 14 jours. Le mode Décompte n'est pas accessible lorsque le thermostat est verrouillé. - Page 31 EConnect TA7210 Mode Décompte (suite) Le compte à rebours change en temps réel pour indiquer le temps restant. Vous pouvez modifier la Appuyez sur Annuler en période de décompte et la tout temps pour annuler température en tout temps. le mode Décompte.
-
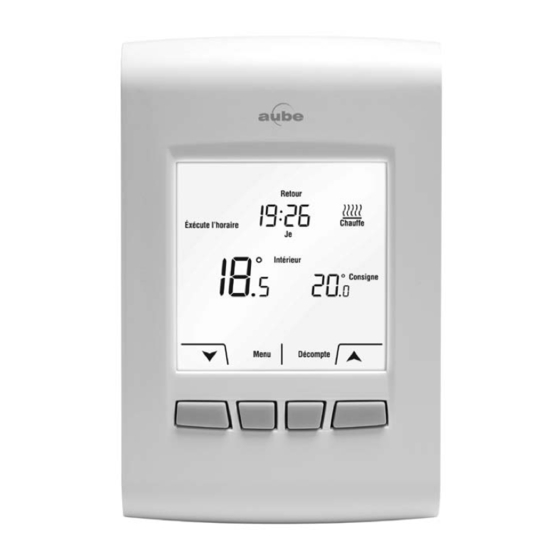
Page 32: Affichage En Mode Programmable
Mode d’emploi Affichage en mode programmable Le thermostat affiche l’heure et le jour lorsqu’il est configuré en mode programmable. Lorsque le thermostat suit l’horaire de chauffage, il affiche aussi la période en cours: Réveil, Départ, Retour ou Sommeil. La période n’est pas affichée lorsque vous placez le thermostat en Maintien temporaire ou en Maintien permanent. -
Page 33: Utilisation De L'horaire De Chauffage
EConnect TA7210 Utilisation de l’horaire de chauffage Le message Exécute l’horaire apparaît à l'écran lorsque le thermostat suit l'horaire programmé. Un horaire écoénergétique a été programmé dans votre thermostat, vous permettant ainsi de réduire votre facture d’électricité jusqu’à 33%. lundi à vendredi samedi et dimanche (Lu, Ma, Me, Je et Ve) (Sa et Di) -
Page 34: Réglage De L'heure Et Du Jour
Mode d’emploi Réglage de l’heure et du jour Régler l’heure. Régler les minutes. Appuyer sur Menu. Sélectionner Date & Heure. * La fonction Copie n'apparaît que si le thermostat est relié à une télécommande ou une sonde extérieure. - Page 35 EConnect TA7210 Réglage de l’heure et du jour (suite) Régler le mois. Activer/désactiver Régler le jour du mois. Régler l’année. l’heure d’été automatique. * Lorsque cette fonction est activée, le thermostat passe à l’heure d’été (avancée) le deuxième dimanche de mars et à...
-
Page 36: Modification De L'horaire De Chauffage
Mode d’emploi Modification de l’horaire de chauffage Appuyer sur Menu. Sélectionner Horaire. Sélectionner le Sélectionner la jour ou le groupe* période à modifier. à modifier. * Les groupes sont: Lu-Ve, Sa-Di et Lu-Di. Lorsque vous sélectionnez un groupe, les changements seront apportés à... - Page 37 EConnect TA7210 Modification de l’horaire de chauffage (suite) Une fois tout changement Sélectionner une autre Régler l’heure Régler la fait, appuyer sur Sortir période ou appuyer (intervalles de température. jusqu’à ce que vous sur Sortir pour passer 15 minutes).
-
Page 38: Maintien Temporaire
Mode d’emploi Maintien temporaire Utiliser le mode Maintien temporaire pour déroger temporairement à l’horaire en réglant une nouvelle température. La nouvelle température sera maintenue pendant la période en cours. Le thermostat retournera à l'horaire de chauffage lorsque la période suivante débutera ou si vous appuyez sur Annuler. ... -
Page 39: Maintien Permanent
EConnect TA7210 Maintien permanente Utiliser le mode Maintien permanent pour déroger à l’horaire et régler une nouvelle température pendant une période indéfinie. Pour revenir à l'horaire de chauffage, appuyez sur Annuler. En tout temps, vous pouvez appuyer Appuyer sur jusqu’à... -
Page 40: Copie De L'horaire De Chauffage
Mode d’emploi Copie de l’horaire de chauffage Utiliser la fonction Copie pour transmettre l’horaire du thermostat aux autres thermostats sans fil EConnect votre résidence. Cette fonction n’est disponible que si le thermostat est relié à une télécommande ou une sonde extérieure. Les réglages de l’horaire sont transmis à... - Page 41 EConnect TA7210 Copie de l’horaire de chauffage (suite) Patientez clignote pendant SUCC (Succès) apparaît une Appuyer deux fois sur Sortir que les réglages de l’horaire fois la transmission complétée. pour revenir à l’écran sont transmis aux autres d’accueil.
-
Page 42: Fonctions Avancés
Mode d’emploi Fonctions avancés Fonctions de configuration Réglage par défaut Option °C °C / °F Format de la température et de l’heure * 12h / 24h Mode programmable (Horaire) *** Oui / Non Horaire Anticipé ** Oui / Non Vous pouvez choisir d’afficher la température en ° C ou ° F. Vous pouvez choisir afficher l’heure en format 12 heures ou format 24 heures si le thermostat est en mode programmable. - Page 43 EConnect TA7210 Menu des fonctions avancés Dans le menu des fonctions Menu des fonctions avancés Appuyez sur ce bouton avancés, appuyez sur pendant 5 secondes pour sélectionner les fonctions pour accéder au menu avancés et appuyez sur Ok. des fonctions avancés. Horaire anticipé...
-
Page 44: Remplacement Des Piles
Mode d’emploi Remplacement des piles Thermostat Installer 2 piles alcalines AA neuves lorsque l’avertissement Piles faibles se met à clignoter à l'écran. Il est recommandé de remplacer les piles une fois par an, ou lorsque vous vous absentez pendant plus d'un mois. Pour accéder aux piles, tirer le thermostat de son socle. -
Page 45: En Cas De Difficulté
EConnect TA7210 En cas de difficulté / Codes d’erreur Le système de chauffage ne répond • Vérifier le disjoncteur et le réenclencher au besoin. • Le thermostat a perdu la communication avec le réseau sans fil (habituellement après une panne de courant). Sinon, vérifier le disjoncteur et le réenclencher au besoin. -
Page 46: Garantie Limitée De 3 Ans
Mode d’emploi Garantie limitée de 3 ans Honeywell garantit ce produit, à l'exception des piles, contre tout vice de fabrication ou de matière dans la mesure où il en est fait une utilisation et un entretien convenables, et ce, pour trois (3) ans à partir de la date d'achat par le consommateur. En cas de défectuosité... -
Page 47: Information Sur La Réglementation
E-Connect TA7210 Information sur la réglementation Déclaration de conformité à la FCC (partie 15,19) (États-Unis seulement) MIM, thermostat et sonde extérieure Cet appareil est conforme à la Partie 15 des règles de la FCC. Le Pour être conformes aux limites d’exposition aux radiofréquences établies par fonctionnement de ce système est assorti aux deux conditions suivantes : la FCC et Industrie Canada pour le grand public/l’exposition non contrôlée, la L’appareil ne peut causer d’interférences nuisibles, et... - Page 48 Solutions de régulation et d’automatisation Honeywell International Inc. Honeywell Limitée 1985 Douglas Drive North 705 Montrichard Golden Valley, MN 55422 Saint-Jean-sur-Richelieu, Québec, J2X 5K8 http://yourhome.honeywell.com www.aubetech.com 69-2473EF-01 06-11 © 2011 Honeywell International Inc. ® Marque déposée aux É.-U. Tous droits réservés. Imprimé...