Table des Matières
Publicité
Liens rapides
OPERATING INSTRUCTIONS
INSTRUCCIONES DE MANEJO
MODE D'EMPLOI
WARNING
TO REDUCE THE RISK OF FIRE OR
ELECTRIC SHOCK, DO NOT EXPOSE
THIS APPLIANCE TO RAIN OR
MOISTURE.
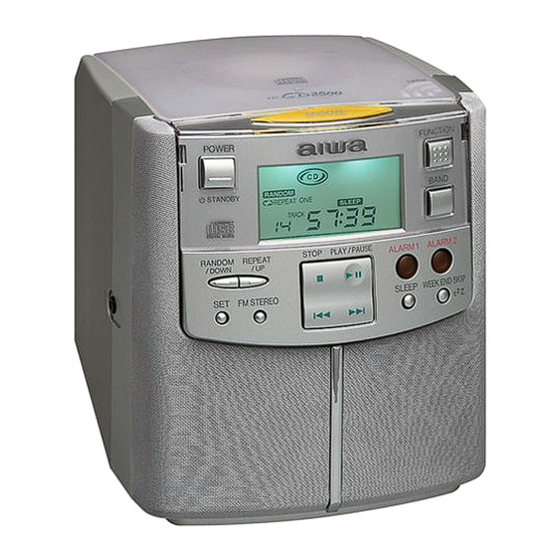
FR-CD2500
RADIO RECEIVER
RECEPTOR DE RADIO
OWNER'S RECORD
For your convenience, record the model number (you will find it
on the rear of the unit) and serial number (you will find it in the
battery compartment) in the space provided below. Please refer
to them when you contact your AIWA dealer in case of difficulty.
Model No.
FR-CD2500
Serial No.
U
Publicité
Table des Matières

Manuels Connexes pour Aiwa FR-CD2500


Sommaire des Matières pour Aiwa FR-CD2500
- Page 1 (you will find it in the WARNING battery compartment) in the space provided below. Please refer TO REDUCE THE RISK OF FIRE OR to them when you contact your AIWA dealer in case of difficulty. ELECTRIC SHOCK, DO NOT EXPOSE Model No. FR-CD2500 THIS APPLIANCE TO RAIN OR MOISTURE.
- Page 2 PRECAUTIONS English All the safety and operating instructions should be read before the appliance is operated. The safety and operating instructions should be retained for future reference. All warnings and CAUTION cautions on the appliance and in the operating instructions should be adhered to.
- Page 3 PRECAUCIONES PRECAUTIONS Español Français Todas las instrucciones de seguridad y de funcionamiento Toutes les instructions relatives à la sécurité et au deben leerse antes de hacer funcionar el aparato. Guarde las fonctionnement doivent être lues avant la mise en service de instrucciones de seguridad y de funcionamiento para su l’appareil.
- Page 4 English PRECAUTIONS NOTE FOR USE IN THE U.S.A. 7 Condensation — Moisture may form on the CD pickup lens This equipment has been tested and found to comply with when: the limits for a Class B digital device, pursuant to Part 15 of –...
- Page 5 Español Français PRECAUCIONES PRECAUTIONS 7 Condensación — Puede condensarse la humedad en la 7 Condensation — De l’humidité peut se former sur la lentille lente receptora del disco compacto cuando: de lecture de CD quand: – Se mueve la unidad de un lugar frío a uno caliente –...
- Page 6 English PRECAUTIONS 3 AC power cord – When disconnecting the AC power cord, pull it out by the AC power plug. Do not pull the cord itself. – Never handle the AC power plug with wet hands, as this could result in fire or shock. –...
- Page 7 Español Français PRECAUCIONES PRECAUTIONS 3 Cable de corriente 3 Câble d’alimentation CA – Para desconectar el cable de corriente, tire tomando el – Pour débrancher le câble d’alimentation électrique CA, enchufe en la mano. Nunca tire del cable. tirer sur la prise. Ne jamais tirer sur le câble lui-même. –...
- Page 8 English PRECAUTIONS Damage Requiring Service Have the units serviced by a qualified service technician if: – The AC power cord or plug has been damaged – Foreign objects or liquid have gotten inside the unit – The unit has been exposed to rain or water –...
- Page 9 Español Français PRECAUCIONES PRECAUTIONS Desperfectos que requieren servicio técnico Dégâts demandant des réparations Solicite la reparación de su aparato el servicio técnico Faire réparer l’appareil par un technicien qualifié si: autorizado en los siguientes casos: – Le câble ou la prise d’alimentation électrique est détérioré –...
-
Page 10: Backup Function
BACKUP FUNCTION English If the AC power supply is interrupted, the clock display goes off and the alarm setting is canceled. To back up the clock and alarm, insert a 6F22 battery in the battery compartment on the rear of the unit. → A •... -
Page 11: Fonction D'alimentation De Secours
FUNCION DE RESPALDO FONCTION D’ALIMENTATION Español Français DE SECOURS Si se corta la fuente de corriente alterna, se apaga la indicación del reloj y se cancela la alarma. Para mantener el En cas de coupure de courant, l’affichage d’horloge disparaît respaldo del reloj la alarma, instale una pila 6F22 en el et le réglage d’alarme est annulé. -
Page 12: Setting The Clock
SETTING THE CLOCK English 1 Connect the AC power cord to a wall outlet a. The clock display begins flashing. If the clock is not BAND/ displayed correctly, disconnect the AC cord and remove the SUMMER T./ backup battery if inserted. Then, connect the AC cord and D.S.T. -
Page 13: Ajuste Del Reloj
AJUSTE DEL RELOJ MISE A L’HEURE DE L’HORLOGE Español Français 1 Branchez le cordon secteur à une prise murale a. 1 Conecte el cable eléctrico en el tomacorriente de la pared a. L’affichage de l’horloge se met à clignoter. Si l’horloge n’est La pantalla del reloj empieza a destellar. -
Page 14: Radio Reception
RADIO RECEPTION English 1 Press POWER 6 STANDBY/ON to turn on the power. 2 Press FUNCTION repeatedly until is displayed. 3 Press BAND to select AM or FM. 4 Press UP or DOWN to tune in to a station. The frequency display changes to the clock display after about 10 seconds. -
Page 15: Reception Radio
RECEPCION DE LA RADIO RECEPTION RADIO Español Français 1 Presione POWER 6 STANDBY/ON para conectar el 1 Appuyez sur POWER 6 STANDBY/ON pour mettre sous aparato. tension. 2 Presione FUNCTION varias veces hasta que aparezca 2 Appuyez plusieurs fois sur FUNCTION jusqu’à l’affichage de 3 Presione BAND para seleccionar AM o FM. - Page 16 English RADIO RECEPTION For better reception FM: Extend the FM wire antenna fully. AM: Turn the unit to find the position which gives the best reception. Note Do not connect the FM wire antenna to an external antenna.
-
Page 17: Para Una Mejor Recepción
Español Français RECEPCION DE LA RADIO RECEPTION RADIO Para una mejor recepción Pour améliorer la réception FM: Extienda completamente la antena de cable FM. FM: Déployez complètement l’antenne-fil FM. AM: Gire el aparato para encontrar la posición donde la AM: Tournez l’appareil pour trouver la position offrant la recepción sea la mejor posible. - Page 18 PRESETTING STATIONS → A English Up to a total of 40 stations can be preset. 1 Tune in to a station (See page 14). 2 Press MEMORY/SET. CHANNEL and preset number flashes for about 10 seconds. 3 While the preset number is flashing, press r or t to select the preset number.
- Page 19 PROGRAMACION DE PREREGLAGE DE Español Français EMISORAS → A STATIONS → A Puede programarse un total de 40 emisoras. 40 stations maximum sont préréglables. 1 Sintonice una emisora (Vea la página 15). 1 Accordez une station (voir la page 15). 2 Presione MEMORY/SET.
- Page 20 CD PLAYING → A English 1 Press OPEN to open the disc compartment. 2 Place a disc in the center with the label side facing up and close the disc compartment. 3 Press POWER 6 STANDBY/ON to turn on the power. 4 Press FUNCTION repeatedly until is displayed.
- Page 21 LECTURE DE CD → A REPRODUCCION DE Español Français DISCOS COMPACTOS → A 1 Appuyez sur OPEN pour ouvrez le logement du disque. 2 Placez un disque au centre, l’étiquette dirigée vers le 1 Oprima OPEN para abra el compartimiento del disco. haut et refermez le logement du disque.
- Page 22 English CD PLAYING Note • The unit may not play a CD-R/RW disc that is recorded on personal computers or some kinds of CD-R/RW recorders because of differences in recording platforms. • Do not attach any seal or label to either side (the recordable RANDOM side or the labeled side) of a CD-R/RW disc.
- Page 23 Español Français REPRODUCCION DE DISCOS COMPACTOS LECTURE DE CD Nota Remarques • Puede ser no posible reproducir discos CD-R/RW grabados • L’appareil peut ne pas lire un disque CD-R/RW enregistré en un ordenador personal o en algunos tipos de grabadores sur un ordinateur personnel ou avec certains enregistreurs de CD-R/RW en este aparato debido a que existen CD-R/RW à...
-
Page 24: Program Play
English CD PLAYING Program play Up to 32 tracks can be programmed for program play. 1 Insert a disc and press FUNCTION to select CD. 2 Press MEMORY/SET. STOP 3 Select the desired track by pressing r or t. a track number b program number 4 Press MEMORY/SET. -
Page 25: Reproducción Programada
Español Français REPRODUCCION DE DISCOS COMPACTOS LECTURE DE CD Reproducción programada Lecture programmée Se pueden programar hasta 32 canciones para la Jusqu’à 32 plages peuvent être programmées pour la lecture reproducción programada. programmée. 1 Coloque un disco y presione FUNCTION para 1 Insérez un disque et appuyez sur FUNCTION pour seleccionar CD. -
Page 26: Alarm Setting
ALARM SETTING English The radio, buzzer or CD automatically sounds at the designated time every day. You can set two different alarm times, one in ALARM 1 and one in ALARM 2. Before setting • Set the clock (See page 12) and day of the week. If they are not set, you cannot set alarm times. -
Page 27: Ajuste De La Alarma
AJUSTE DE LA ALARMA REGLAGE DU REVEIL Español Français La radio, alarma o disco compacto suena automáticamente a La radio, un signal sonore ou un CD se fait automatiquement la hora especificada todos los días. entendre chaque jour à l’heure préréglée. Se pueden ajustar dos horas de alarma diferentes, una en la Il est possible de régler deux heures d’alarme différentes: ALARM 1 y otra en la ALARM 2. - Page 28 English ALARM SETTING To set the alarm time in ALARM 2 Press ALARM 2 in step 1. The alarm 2 indicator flashes, and go to step 2, 3 and 4. SNOOZE When the preset time comes, the radio, buzzer or CD sounds.
- Page 29 Español Français AJUSTE DE LA ALARMA REGLAGE DU REVEIL Para ajustar la hora de la alarma en ALARM 2 Pour régler l’heure d’ALARM 2 Presione ALARM 2 en el paso 1, Destella el indicador de Appuyez sur ALARM 2 à l’étape 1. L’indicateur d’alarme 2 alarma 2 y vaya al paso 2, 3 y 4.
- Page 30 English ALARM SETTING Note • The radio, buzzer or CD automatically turns off after about 1 hour. • The buzzer volume is fixed and cannot be set with the volume control. • The buzzer sound of ALARM 1 and ALARM 2 are different. •...
- Page 31 Español Français AJUSTE DE LA ALARMA REGLAGE DU REVEIL Notas Remarques • La radio, alarma o disco compacto se desconecta • La radio, le signal sonore ou le CD s’arrête automatiquement automáticamente después de sobre 1 hora. au bout de 1 heure environ. •...
-
Page 32: Sleep Timer Setting
SLEEP TIMER SETTING English You can use the sleep timer to turn the radio off or to stop playing back a disc automatically after up to 90 minutes. • Before setting, tune in to a station or stop CD play at your desired track. -
Page 33: Ajuste Del Temporizador Para Dormir
AJUSTE DEL Español REGLAGE DE LA Français TEMPORIZADOR PARA DORMIR MINUTERIE D’ARRET DIFFERE Se puede utilizar el temporizador para dormir para Vous pouvez utiliser la minuterie d’arrêt différé pour que la desconectar automáticamente la radio o parar la reproducción radio s’éteigne ou que la lecture de disque s’arrête de un disco hasta 90 minutos después. - Page 34 SPECIFICATIONS English <Tuner section> Frequency range FM: 87.5 – 108 MHz (100 kHz steps) AM: 530 – 1,710 kHz (10 kHz steps) Antennas FM wire antenna Ferrite bar antenna for AM <CD player section> Tracking system 3-beam laser Laser pickup Semiconductor laser D/A conversion 8-times oversampling digital filter...
-
Page 35: Fiche Technique
ESPECIFICACIONES FICHE TECHNIQUE Español Français <Sección del sintonizador> <Section Tuner> Gama de frecuencias FM: 87,5 – 108 MHz (Intervalos Plage de fréquences FM: 87,5 – 108 MHz (pas de de 100 kHz) 100 kHz) AM: 530 – 1.710 kHz (Intervalos AM: 530 –... - Page 36 8B-RD3-901-01 001213AYO-OX Printed in Hong Kong...