Daikin EKSRDS2A Manuel D'utilisation

Daikin EKSRDS2A Manuel D'utilisation

Masquer les pouces Voir aussi pour EKSRDS2A:
Table des Matières

Publicité

Les langues disponibles
  • FR

Les langues disponibles

  • FRANÇAIS, page 48

Liens rapides

Operating and
installation instructions
Solar pressure station
Operating and installation instructions
English
Solar pressure station
Bedienungs- und Installationsanleitung
Deutsch
Solar-Druckstation
Manuel d'utilisation
Français
Solaire station de pression
Manuale di istruzioni
Italiano
Solare gruppo a pressione
Installatie- en Gebruiksaanwijzing
Nederlands
Zonne Drukstation
Manual de instalação e de operação
Portugues
Estação de impressão solares
Kullanım Kılavuzu ve Cihazı Çalıştirma talimatları
Türkçe
Solar - Pompa ve emniyet gruba
EKSRDS2A

Publicité

Table des Matières
loading

Sommaire des Matières pour Daikin EKSRDS2A

  • Page 1 Solaire station de pression Manuale di istruzioni Italiano Solare gruppo a pressione Installatie- en Gebruiksaanwijzing Nederlands Zonne Drukstation Manual de instalação e de operação Portugues Estação de impressão solares Kullanım Kılavuzu ve Cihazı Çalıştirma talimatları Türkçe Solar - Pompa ve emniyet gruba EKSRDS2A...
  • Page 3 Operating and installation instructions Solar pressure station Operating and installation instructions English Solar pressure station EKSRDS2A...
  • Page 4: Table Des Matières

    Venting the system ................19 Maintenance....................20 Maintenance intervals ..............20 Troubleshooting ..................20 Replacing the circulation pump............21 Decommissioning, disposal................ 22 Returning the device .................. 22 Warranty..................... 22 EKSRDS2A Operating and installation instructions DAIKIN Solar pressure station 4P699231-1 – 2022-06...
  • Page 5: About These Operating Instructions

    About these operating instructions About these operating instructions These operating instructions describe the solar pump assembly "EKSRDS2A" (also referred to as "product" in these operating instructions). These operating instructions are part of the product. • You may only use the product if you have fully read and understood these operating instructions.
  • Page 6: Information On Safety

    This symbol alerts to hazardous electrical voltage. If this symbol is used in a safety message, there is a hazard of electric shock. EKSRDS2A Operating and installation instructions DAIKIN Solar pressure station 4P699231-1 – 2022-06...
  • Page 7: Intended Use

    The product must never be used in the following cases and for the following purposes: • Operation with swimming pool water • Use with adherent, corrosive or flammable fluids • Operation outside of the the permissible temperatures and pressures EKSRDS2A Operating and installation instructions DAIKIN Solar pressure station 4P699231-1 – 2022-06...
  • Page 8: Qualification Of Personnel

    Only perform work on and with the product which is explicitly described in these operating instructions. Do not make any modifications to the product which are not described in these operating instructions. EKSRDS2A Operating and installation instructions DAIKIN Solar pressure station 4P699231-1 – 2022-06...
  • Page 9: Transport And Storage

    Store the product in a clean and dry environment. • Verify that the product is protected against shocks and impact during transport and storage. Failure to follow these instructions can result in equipment damage. EKSRDS2A Operating and installation instructions DAIKIN Solar pressure station 4P699231-1 – 2022-06...
  • Page 10 O. Vent valve with hand wheel P. Ball valve, can be shut off, with thermometer red and gravity brake Fig. 1: EKSRDS2A, flow and return with filling and flushing valves and vent pot EKSRDS2A Operating and installation instructions DAIKIN Solar pressure station...
  • Page 11: Product Description

    Product description Dimensions Fig. 2: EKSRDS2A (in mm) Function The product is a pre-assembled, tightness-tested and heat-insulated solar pump assembly with all required safety and functional components. Both ball valves can be shut off and contain a thermometer and a gravity brake.
  • Page 12: Technical Data

    Safety group assembly Connection for expansion vessel G¾ for flex pipe, flat-sealing with union nut Diaphragm safety valve 6 bar Pressure gauge Ø 63 mm, 0 ... 10 bar EKSRDS2A Operating and installation instructions DAIKIN Solar pressure station 4P699231-1 – 2022-06...
  • Page 13: Mounting

    1. Remove the upper insulation. 2. Hold the product to the wall and align it with a level 3. Draw two marks. 4. Drill a hole (Ø 10 mm) each. EKSRDS2A Operating and installation instructions DAIKIN Solar pressure station 4P699231-1 – 2022-06...
  • Page 14 7. Connect the pipes of the solar circuit to the connections of the product (see chapter "Connecting the product"). 8. Refit the upper insulation. Fig. 3: EKSRDS2A EKSRDS2A Operating and installation instructions DAIKIN Solar pressure station 4P699231-1 – 2022-06...
  • Page 15: Connecting The Product

    1. Connect the pipes of the solar circuit to the connections of the product. 2. Connect the pipe or flex pipe of the expansion vessel to the safety group assembly. EKSRDS2A Operating and installation instructions DAIKIN Solar pressure station 4P699231-1 – 2022-06...
  • Page 16: Retrofitting The Product

    Verify that the degree of protection against electric shock (protection class, double insulation) is not reduced by the type of electrical installa- tion. Failure to follow these instructions will result in death or serious injury. EKSRDS2A Operating and installation instructions DAIKIN Solar pressure station 4P699231-1 – 2022-06...
  • Page 17 - Observe the operating instructions of the solar controller. Use a shielded cable 3 x 1.5 mm² and up to Ø 10 mm to extend the connec- tion cable. EKSRDS2A Operating and installation instructions DAIKIN Solar pressure station 4P699231-1 – 2022-06...
  • Page 18: Commissioning

    Prerequisite for commissioning is a complete installation of all hydraulic and electrical components. Commissioning the product EKSRDS2A is filled via the filling and flushing valves at the flow meter. 1. Verify tightness of the components of the system. - Adapt the test pressure and the test duration to the corresponding installation and the corresponding operating pressure.
  • Page 19 10.Set the two ball thermometers to 0° position. 11. Fit the upper part of the insulation onto the product. 12.Make sure the pipe insulation reaches into the corresponding recess of the insulation of the product. EKSRDS2A Operating and installation instructions DAIKIN Solar pressure station 4P699231-1 – 2022-06...
  • Page 20: Operation

    1. If the diaphragm safety valve has responded, check the system. 2. Remove the cause before recommissioning the system. Reading mark at flow meter The lower edge of the float is the reading mark at the flow meter. EKSRDS2A Operating and installation instructions DAIKIN Solar pressure station 4P699231-1 – 2022-06...
  • Page 21: Venting The System

    1. Put the hose of the vent valve (E) into a collection receptacle. 2. Open valve (D). - The separated air escapes from the vent pot. 3. Close the valve (D) as soon as solar liquid escapes. EKSRDS2A Operating and installation instructions DAIKIN Solar pressure station 4P699231-1 – 2022-06...
  • Page 22: Maintenance

    Observe the information blocked by deposits in of the pump manufac- the bearings turer Circulation pump pol- Clean the circulation luted pump Circulation pump defec- Replace the circulation tive pump EKSRDS2A Operating and installation instructions DAIKIN Solar pressure station 4P699231-1 – 2022-06...
  • Page 23: Replacing The Circulation Pump

    4. Open the shut-off at the flow meter and set the blue ball valve to 0° posi- tion. 5. Fill and vent the system. 6. Connect the circulation pump to supply voltage. EKSRDS2A Operating and installation instructions DAIKIN Solar pressure station 4P699231-1 – 2022-06...
  • Page 24: Decommissioning, Disposal

    The manufacturer's warranty for this product is 24 months after the date of purchase. This warranty shall be good in all countries in which this product is sold by the manufacturer or its authorised dealers. EKSRDS2A Operating and installation instructions DAIKIN Solar pressure station 4P699231-1 – 2022-06...
  • Page 25 Bedienungs- und Installationsanleitung Solar-Druckstation Bedienungs- und Installationsanleitung Deutsch Solar-Druckstation EKSRDS2A...
  • Page 26 Ablesekante am Durchflussmesser ..........18 Anlage entlüften ................19 Wartung...................... 20 Wartungsintervalle ................20 Störungsbeseitigung .................. 20 Umwälzpumpe tauschen..............21 Außerbetriebnahme und Entsorgung ............22 Rücksendung ..................... 22 Gewährleistung ..................22 EKSRDS2A Bedienungs- und Installationsanleitung DAIKIN Solar-Druckstation 4P699231-1 – 2022-06...
  • Page 27: Über Diese Betriebsanleitung

    Über diese Betriebsanleitung Über diese Betriebsanleitung Diese Betriebsanleitung beschreibt die Solarpumpengruppe „EKSRDS2A“ (im Folgenden auch „Produkt“). Diese Betriebsanleitung ist Teil des Pro- dukts. • Sie dürfen das Produkt erst benutzen, wenn Sie die Betriebsanleitung vollständig gelesen und verstanden haben. •...
  • Page 28: Informationen Zur Sicherheit

    Nichtbeachtung einen schweren oder tödlichen Unfall oder Sachschäden zur Folge haben kann. HINWEIS HINWEIS macht auf eine möglicherweise gefährliche Situation aufmerk- sam, die bei Nichtbeachtung Sachschäden zur Folge haben kann. EKSRDS2A Bedienungs- und Installationsanleitung DAIKIN Solar-Druckstation 4P699231-1 – 2022-06...
  • Page 29: Bestimmungsgemäße Verwendung

    Sie entsprechend dem Ergebnis alle erforderlichen Sicher- heitsmaßnahmen. Berücksichtigen Sie dabei auch die möglichen Folgen eines Einbaus oder einer Integration des Produkts in ein System oder in eine Anlage. EKSRDS2A Bedienungs- und Installationsanleitung DAIKIN Solar-Druckstation 4P699231-1 – 2022-06...
  • Page 30: Vorhersehbare Fehlanwendung

    Veränderungen am Produkt Führen Sie ausschließlich solche Arbeiten an und mit dem Produkt durch, die in dieser Betriebsanleitung beschrieben sind. Nehmen Sie keine Verände- rungen vor, die in dieser Betriebsanleitung nicht beschrieben sind. EKSRDS2A Bedienungs- und Installationsanleitung DAIKIN Solar-Druckstation 4P699231-1 – 2022-06...
  • Page 31: Transport Und Lagerung

    • Lagern Sie das Produkt nur in trockener, sauberer Umgebung. • Stellen Sie sicher, dass das Produkt bei Transport und Lagerung stoß- geschützt ist. Nichtbeachtung dieser Anweisungen kann zu Sachschäden führen. EKSRDS2A Bedienungs- und Installationsanleitung DAIKIN Solar-Druckstation 4P699231-1 – 2022-06...
  • Page 32: Produktbeschreibung

    M. Isolation N. Entlüftertopf O. Entlüftungshahn mit Handrad P. Kugelhahn, absperrbar, mit Ther- mometer rot und Schwerkraft- bremse Abbildung 1: EKSRDS2A, Vor- und Rücklauf mit Befüll- und Spülhähnen und Entlüf- tertopf EKSRDS2A Bedienungs- und Installationsanleitung DAIKIN Solar-Druckstation 4P699231-1 – 2022-06...
  • Page 33: Abmessungen

    Produktbeschreibung Abmessungen Abbildung 2: EKSRDS2A (in mm) Funktion Das Produkt ist eine vormontierte, dichtheitsgeprüfte und wärmegedämmte Solarpumpengruppe mit allen erforderlichen Sicherheits- und Funktionsbau- teilen. Beide Kugelhähne sind absperrbar und enthalten Thermometer und Schwer- kraftbremse. Zulassungsdokumente, Bescheinigungen, Erklärungen Siehe Anleitung des Membran-Sicherheitsventils.
  • Page 34: Technische Daten

    Pumpenseitig mit Flansch und Über- wurfmutter G1½ Anzeigebereich 0 ... 120 °C Sicherheitsgruppe Anschluss für Ausdehnungsgefäß G¾ für Wellrohr flachdichtend mit Überwurfmutter Membran-Sicherheitsventil 6 bar Manometer Ø 63 mm, 0 ... 10 bar EKSRDS2A Bedienungs- und Installationsanleitung DAIKIN Solar-Druckstation 4P699231-1 – 2022-06...
  • Page 35: Montage

    1. Entfernen Sie die obere Isolierung. 2. Halten Sie das Produkt an die Wand und richten Sie es mit einer Wasser- waage aus 3. Zeichnen Sie zwei Markierungen an. EKSRDS2A Bedienungs- und Installationsanleitung DAIKIN Solar-Druckstation 4P699231-1 – 2022-06...
  • Page 36 Unterlegscheibe und Mutter. 7. Verbinden Sie die Rohrleitungen des Solarkreises mit den Anschlüssen des Produkts (siehe Kapitel "Produkt anschließen"). 8. Setzen Sie die obere Isolierung wieder auf. Abbildung 3: EKSRDS2A EKSRDS2A Bedienungs- und Installationsanleitung DAIKIN Solar-Druckstation 4P699231-1 – 2022-06...
  • Page 37: Produkt Anschließen

    C. Wellrohr flachdichtend Abbildung 4: Anschluss Wellrohr G¾ 1. Verbinden Sie die Rohrleitungen des Solarkreises mit den Anschlüssen des Produkts. 2. Verbinden Sie das Rohr oder Wellrohr des Ausdehnungsgefäßes mit der Sicherheitsgruppe. EKSRDS2A Bedienungs- und Installationsanleitung DAIKIN Solar-Druckstation 4P699231-1 – 2022-06...
  • Page 38: Produkt Nachrüsten

    • Stellen Sie sicher, dass durch die Art der elektrischen Installation der Schutz gegen elektrischen Schlag (Schutzklasse, Schutzisolierung) nicht vermindert wird. Nichtbeachtung dieser Anweisungen führt zu Tod oder schweren Ver- letzungen. EKSRDS2A Bedienungs- und Installationsanleitung DAIKIN Solar-Druckstation 4P699231-1 – 2022-06...
  • Page 39 Solarregelung an. - Beachten Sie dabei die Anleitung der Solarregelung. Verwenden Sie für eine Verlängerung der Anschlussleitung ein geschirmtes Kabel mit maximal 3 x 1,5 mm² und maximal Ø 10 mm. EKSRDS2A Bedienungs- und Installationsanleitung DAIKIN Solar-Druckstation 4P699231-1 – 2022-06...
  • Page 40: Inbetriebnahme

    Voraussetzung für die Inbetriebnahme ist eine vollständige Installation aller hydraulischen und elektrischen Komponenten. Produkt in Betrieb nehmen Die EKSRDS2A wird über die Befüll- und Spülhähne am Durchflussmesser befüllt. 1. Prüfen Sie die Bauteile der Anlage auf Dichtheit. - Prüfdruck und die Prüfdauer müssen der jeweiligen Anlage und dem jeweiligen Betriebsdruck angepasst sein.
  • Page 41 10.Bringen Sie die beiden Thermometer-Kugelhähne in 0°-Stellung. 11. Setzen Sie das Oberteil der Isolation auf das Produkt. 12.Führen Sie die Isolation der Rohrleitungen bis in die Aussparungen der Isolation des Produkts. EKSRDS2A Bedienungs- und Installationsanleitung DAIKIN Solar-Druckstation 4P699231-1 – 2022-06...
  • Page 42: Betrieb

    1. Prüfen Sie nach dem Auslösen des Membran-Sicherheitsventils die Anlage. 2. Beseitigen Sie die Ursache, bevor die Anlage wieder in Betrieb genom- men wird. Ablesekante am Durchflussmesser Die Unterkante des Schwebekörpers ist die Ablesekante am Durchfluss- messer. EKSRDS2A Bedienungs- und Installationsanleitung DAIKIN Solar-Druckstation 4P699231-1 – 2022-06...
  • Page 43: Anlage Entlüften

    1. Führen Sie den Schlauch des Entlüftungshahns (E) in ein Auffanggefäß. 2. Öffnen Sie das Ventil (D). - Die abgeschiedene Luft entweicht aus dem Entlüftertopf. 3. Schließen Sie das Ventil (D) wieder, sobald Solarflüssigkeit austritt. EKSRDS2A Bedienungs- und Installationsanleitung DAIKIN Solar-Druckstation 4P699231-1 – 2022-06...
  • Page 44: Wartung

    Umwälzpumpe durch Beachten Sie die Anga- Ablagerungen in den ben des Pumpenher- Lagern blockiert stellers Umwälzpumpe ver- Reinigen Sie die schmutzt Umwälzpumpe Umwälzpumpe defekt Tauschen Sie die Umwälzpumpe EKSRDS2A Bedienungs- und Installationsanleitung DAIKIN Solar-Druckstation 4P699231-1 – 2022-06...
  • Page 45: Umwälzpumpe Tauschen

    4. Öffnen Sie die Absperrung am Durchflussmesser und bringen Sie den blauen Kugelhahn in 0°-Stellung. 5. Befüllen und entlüften Sie die Anlage. 6. Schließen Sie die Umwälzpumpe an die Versorgungsspannung an. EKSRDS2A Bedienungs- und Installationsanleitung DAIKIN Solar-Druckstation 4P699231-1 – 2022-06...
  • Page 46: Außerbetriebnahme Und Entsorgung

    3. Entsorgen Sie das Produkt. Rücksendung Vor einer Rücksendung Ihres Produkts müssen Sie sich mit uns in Verbin- dung setzen (customercare@daikin.de). Gewährleistung Der Hersteller übernimmt für dieses Produkt eine Gewährleistung von 24 Monaten ab Kaufdatum. Sie kann in allen Ländern in Anspruch genom- men werden, in denen dieses Produkt vom Hersteller oder seinen autorisier- ten Händlern verkauft wird.
  • Page 47 Manuel d’utilisation Solaire station de pression Manuel d’utilisation Français Solaire station de pression EKSRDS2A...
  • Page 48 Intervalles de maintenance .............. 20 Suppression des dérangements ..............20 Remplacement de la pompe de circulation........21 Mise hors service et élimination ..............22 Retour ......................22 Garantie ..................... 22 EKSRDS2A Manuel d’utilisation DAIKIN Solaire station de pression 4P699231-1 – 2022-06...
  • Page 49: La Présente Notice Technique

    La présente notice technique La présente notice technique Cette notice technique contient la description de la groupe pompe solaire "EKSRDS2A" (dénommé ci-après "produit"). Cette notice technique fait par- tie du produit. • Utilisez le produit seulement après que vous aurez lu et compris intégra- lement la notice technique.
  • Page 50: Informations Sur La Sécurité

    Ceci est le pictogramme général de mise en garde. Il signale un risque de blessure et de dommage matériel. Res- pectez toutes les consignes de sécurité afin d'éviter des accidents mortels, des blessures ou des dommages maté- riels. EKSRDS2A Manuel d’utilisation DAIKIN Solaire station de pression 4P699231-1 – 2022-06...
  • Page 51: Usage Normal

    Le produit ne doit, en particulier, pas être utilisé dans les cas suivants : • Fonctionnement avec l'eau de piscine • Fonctionnement avec des fluides collants, corrosifs ou inflammables • Fonctionnement en dehors des températures et pressions admissibles EKSRDS2A Manuel d’utilisation DAIKIN Solaire station de pression 4P699231-1 – 2022-06...
  • Page 52: Qualification Du Personnel

    En travaillant sur le produit et avec celui-ci, effectuez exclusivement les opé- rations décrites dans cette notice technique. N'effectuez pas de modifica- tions non décrites dans cette notice technique. EKSRDS2A Manuel d’utilisation DAIKIN Solaire station de pression 4P699231-1 – 2022-06...
  • Page 53: Transport Et Stockage

    Stockez le produit dans un lieu sec et propre. • Assurez-vous que le produit est à l'abri des chocs pendant le transport et le stockage. La non-observation de ces instructions peut causer des dommages matériels. EKSRDS2A Manuel d’utilisation DAIKIN Solaire station de pression 4P699231-1 – 2022-06...
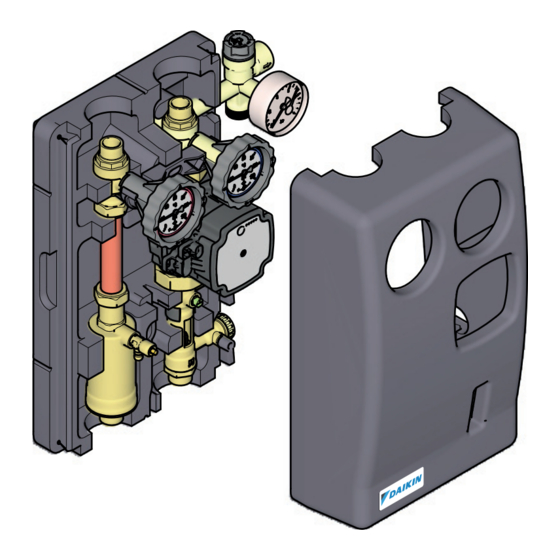
  • Page 54: Description Du Produit

    O. Vanne de purge avec roue P. Vanne à sphère, verrouillable avec thermomètre rouge et frein à commande par gravité Figure 1: EKSRDS2A, départ et retour avec robinets de remplissage et de rinçage et dispositif de purge EKSRDS2A Manuel d’utilisation DAIKIN Solaire station de pression 4P699231-1 –...
  • Page 55: Dimensions

    Description du produit Dimensions Figure 2: EKSRDS2A (en mm) Fonctionnement Le produit est un groupe de pompe prémonté avec isolation thermique, test d'étanchéité effectué, avec tous les éléments nécessaires de sécurité et de fonctionnement. Les deux vannes à sphère sont verrouillable et contiennent un thermomètre et un frein à...
  • Page 56: Caractéristiques Techniques

    Groupe de sécurité Raccord vase d'expansion G¾ pour tube ondulé, à joint plat avec écrou-raccord Soupape de sécurité à membrane 6 bars Manomètre Ø 63 mm, 0 ... 10 bar EKSRDS2A Manuel d’utilisation DAIKIN Solaire station de pression 4P699231-1 – 2022-06...
  • Page 57: Montage

     Assurez-vous que les chevilles jointes conviennent au montage au mur prévu. 1. Retirez l'isolation supérieure. 2. Placez le produit sur le mur et alignez-le avec une nivelle 3. Marquez deux points de repère. EKSRDS2A Manuel d’utilisation DAIKIN Solaire station de pression 4P699231-1 – 2022-06...
  • Page 58 écrou respectivement. 7. Raccordez la tuyauterie du circuit solaire avec les raccords aux raccords du produit (voir chapitre "Raccordement du produit"). 8. Remontez l'isolation supérieure. Figure 3: EKSRDS2A EKSRDS2A Manuel d’utilisation DAIKIN Solaire station de pression 4P699231-1 – 2022-06...
  • Page 59: Raccordement Du Produit

    Figure 4: Raccordement du tube ondulé G¾ 1. Raccordez la tuyauterie du circuit solaire avec aux raccords du produit. 2. Raccordez le tube ou le tube ondulé du vase d'expansion au groupe de sécurité. EKSRDS2A Manuel d’utilisation DAIKIN Solaire station de pression 4P699231-1 – 2022-06...
  • Page 60: Installation Ultérieure Du Produit

    Assurez-vous que le degré de protection contre les chocs électriques (classe de protection, isolation double) ne soit pas réduit par le type de l'installation électrique. La non-observation de ces instructions entraîne la mort ou des bles- sures graves. EKSRDS2A Manuel d’utilisation DAIKIN Solaire station de pression 4P699231-1 – 2022-06...
  • Page 61 à travers le chemin de câble et branchez-la au régulateur solaire. - Respectez la notice technique du régulateur solaire. Pour rallonger le câble de raccordement, servez-vous d'un câble blindé de 3 x 1,5 mm² et Ø 10 mm max. EKSRDS2A Manuel d’utilisation DAIKIN Solaire station de pression 4P699231-1 – 2022-06...
  • Page 62: Mise En Service

    La condition préalable à la mise en service est une installation complète de tous les composants hydrauliques et électriques. Mise en service du produit EKSRDS2A est remplit aux vannes de remplissage et de rinçage sur le débit- mètre. 1. Vérifiez l'étanchéité des composants de l'installation.
  • Page 63 10.Mettez les deux vannes à sphère avec thermomètre sur la position 0°. 11. Placez la partie supérieure de l'isolation sur le produit. 12.Introduisez l'isolation des conduites rigides jusque dans les évidements de l'isolation du produit. EKSRDS2A Manuel d’utilisation DAIKIN Solaire station de pression 4P699231-1 – 2022-06...
  • Page 64: Service

    2. Éliminez la cause avant de remettre le système en service. Bord de relevé sur le débitmètre Le bord inférieur du flotteur est le bord de relevé sur le débitmètre. EKSRDS2A Manuel d’utilisation DAIKIN Solaire station de pression 4P699231-1 – 2022-06...
  • Page 65: Purge D'air De L'installation

    1. Dirigez le tuyau de la vanne de purge (E) vers un réservoir collecteur. 2. Ouvrez la soupape (D). - L'air séparé s'échappe du dispositif de purge. 3. Refermez la soupape (D) dès que le liquide solaire s'échappe. EKSRDS2A Manuel d’utilisation DAIKIN Solaire station de pression 4P699231-1 – 2022-06...
  • Page 66: Maintenance

    Pompe de circulation Nettoyez la pompe de encrassée circulation Pompe de circulation Remplacez la pompe de défectueuse circulation EKSRDS2A Manuel d’utilisation DAIKIN Solaire station de pression 4P699231-1 – 2022-06...
  • Page 67: Remplacement De La Pompe De Circulation

    4. Ouvrez l'arrêt sur le débitmètre et mettez la vanne à sphère bleue sur la position 0°. 5. Remplissez et purgez d'air l'installation. 6. Branchez la pompe de circulation à l'alimentation. EKSRDS2A Manuel d’utilisation DAIKIN Solaire station de pression 4P699231-1 – 2022-06...
  • Page 68: Mise Hors Service Et Élimination

    La garantie du fabricant sur ce produit est de 24 mois à compter de la date d'achat. La garantie peut être invoquée dans tous les pays dans lesquels ce produit est vendu par le fabricant ou par ses revendeurs agréés. EKSRDS2A Manuel d’utilisation DAIKIN Solaire station de pression 4P699231-1 – 2022-06...
  • Page 69 Manuale di istruzioni Solare gruppo a pressione Manuale di istruzioni Italiano Solare gruppo a pressione EKSRDS2A...
  • Page 70 Manutenzione..................... 20 Intervalli di manutenzione ..............20 Riparazione guasti ..................20 Sostituire la pompa di circolazione ..........21 Smontaggio e smaltimento................. 22 Rispedizione al fornitore................22 Garanzia..................... 22 EKSRDS2A Manuale di istruzioni DAIKIN Solare gruppo a pressione 4P699231-1 – 2022-06...
  • Page 71: Su Queste Istruzioni Per L'uso

    Su queste Istruzioni per l'uso Su queste Istruzioni per l'uso Queste Istruzioni per l'uso descrivono il gruppo di circolazione solare "EKSRDS2A" (nel prosieguo anche "prodotto"). Le presenti Istruzioni per l’uso costituiscono parte del prodotto. • L'utilizzo del prodotto è permesso soltanto dopo aver letto e capito com- pletamente le Istruzioni per l'uso.
  • Page 72 Rispettate sem- pre le indicazioni corredate del simbolo di avvertimento per evitare incidenti con conseguenze anche fatali, lesioni fisi- che e danni materiali. EKSRDS2A Manuale di istruzioni DAIKIN Solare gruppo a pressione 4P699231-1 – 2022-06...
  • Page 73: Informazioni Sulla Sicurezza

    • per la circolazione di fluidi collosi, corrosivi o infiammabili • esercizio in eccesso o in difetto dei limiti indicati di temperatura e pres- sione EKSRDS2A Manuale di istruzioni DAIKIN Solare gruppo a pressione 4P699231-1 – 2022-06...
  • Page 74: Qualifica Del Personale

    Modifiche del prodotto Eseguite esclusivamente i lavori con e al prodotto descritti nelle Istruzioni per l'uso. Non apportate modifiche al prodotto che non sono descritte nelle Istru- zioni per l'uso. EKSRDS2A Manuale di istruzioni DAIKIN Solare gruppo a pressione 4P699231-1 – 2022-06...
  • Page 75: Trasporto E Magazzinaggio

    Immagazzinate il prodotto solo in ambiente asciutto e pulito. • Assicuratevi che il prodotto sia prodotto contro urti durante il trasporto e il magazzinaggio. La mancata osservanza di queste indicazioni può causare danni mate- riali. EKSRDS2A Manuale di istruzioni DAIKIN Solare gruppo a pressione 4P699231-1 – 2022-06...
  • Page 76: Descrizione Del Prodotto

    P. Valvola di intercettazione, serra- bile, con termometro rosso e rite- gno anti-circolazione naturale. Figura 1: EKSRDS2A, mandata e ritorno, con rubinetti di riempimento e lavaggio e degassatore di carico EKSRDS2A Manuale di istruzioni DAIKIN Solare gruppo a pressione...
  • Page 77: Dimensioni

    Descrizione del prodotto Dimensioni Figura 2: EKSRDS2A (in mm) Funzionamento Il prodotto è un gruppo di circolazione solare pre-assemblato, testato erme- ticamente e coibentato, dotato di tutti i componenti funzionali e di sicurezza necessari. Ambedue le valvole di intercettazione sono bloccabile e contengono termo- metro e ritegno anti-circolazione naturale.
  • Page 78: Specifiche Tecniche

    Raccordo per vaso di espansione G¾ con guarnizione piana e dado a risvolto per tubo corrugato Valvola di sicurezza a membrana 6 bar Manometro Ø 63 mm, 0 ... 10 bar EKSRDS2A Manuale di istruzioni DAIKIN Solare gruppo a pressione 4P699231-1 – 2022-06...
  • Page 79: Montaggio

     Assicuratevi che i tasselli a corredo siano adatti al muro previsto. 1. Sfilare la parte superiore della coibentazione. 2. Tenere il prodotto a parete e controllarne la posizione con una livella a bolla d'aria. EKSRDS2A Manuale di istruzioni DAIKIN Solare gruppo a pressione 4P699231-1 – 2022-06...
  • Page 80 7. Avvitare le tubature del circuito solare agli attacchi del prodotto (vedere il Cap. "Collegare il prodotto"). 8. Reinserire la parte superiore della coibentazione. Figura 3: EKSRDS2A EKSRDS2A Manuale di istruzioni DAIKIN Solare gruppo a pressione 4P699231-1 – 2022-06...
  • Page 81: Collegare Il Prodotto

    Figura 4: Attacco tubo corrugato G¾ 1. Collegare i tubi del circuito solare agli attacchi del prodotto. 2. Collegare il tubo o il tubo corrugato del vaso di espansione al gruppo di sicurezza. EKSRDS2A Manuale di istruzioni DAIKIN Solare gruppo a pressione 4P699231-1 – 2022-06...
  • Page 82: Ampliamento Del Prodotto

    Assicurare che il tipo di installazione elettrica non riduca la protezione elettrica (classe di protezione, isolamento protettivo). La mancata osservanza di queste indicazioni causa lesioni mortali, gravi o danni materiali. EKSRDS2A Manuale di istruzioni DAIKIN Solare gruppo a pressione 4P699231-1 – 2022-06...
  • Page 83 - Attenersi alle istruzioni per l'uso della regolazione solare. Per prolungare il cavo di allacciamento utilizzare un cavo schermato con max.3 x 1,5 mm² e max. Ø 10 mm. EKSRDS2A Manuale di istruzioni DAIKIN Solare gruppo a pressione 4P699231-1 – 2022-06...
  • Page 84: Messa In Funzione

    La completa installazione di tutti i componenti idraulici ed elettrici è condi- zione necessaria per la messa in funzione. Messa in funzione del prodotto Il gruppo EKSRDS2A viene riempito con le valvole di riempimento e svuota- mento dell'indicatore di portata. 1. Verificare la tenuta dei componenti dell'impianto - La pressione di prova e la durata della prova devono essere adattate al relativo impianto e alla relativa pressione d'esercizio.
  • Page 85 10.Posizionare entrambe le valvole a sfera con termometro in posizione 0°. 11. Inserire la parte superiore della coibentazione sul gruppo. 12.Isolare le tubazioni di collegamento fino alle aperture della coibentazione del prodotto. EKSRDS2A Manuale di istruzioni DAIKIN Solare gruppo a pressione 4P699231-1 – 2022-06...
  • Page 86: Operazione

    2. Rimediare alla causa dell'errore prima di rimettere in operazione l'impianto. Bordo di lettura sul flussometro Il bordo inferiore del galleggiante è il bordo di lettura sul flussometro. EKSRDS2A Manuale di istruzioni DAIKIN Solare gruppo a pressione 4P699231-1 – 2022-06...
  • Page 87: Sfiatare L'impianto

    1. Condurre il tubo del rubinetto di spurgo (E) in un recipiente di raccolta. 2. Aprire la valvola (C). - L'aria fuoriesce dal degassatore. 3. Non appena comincia a fuoriuscire liquido solare, richiudere la valvola (D). EKSRDS2A Manuale di istruzioni DAIKIN Solare gruppo a pressione 4P699231-1 – 2022-06...
  • Page 88: Manutenzione

    Pompa di circolazione Pulire la pompa di circo- imbrattata. lazione. Pompa di circolazione Sostituire la pompa di difettosa. circolazione. EKSRDS2A Manuale di istruzioni DAIKIN Solare gruppo a pressione 4P699231-1 – 2022-06...
  • Page 89: Sostituire La Pompa Di Circolazione

    4. Aprire la valvola di intercettazione sul flussometro e riposizionare la val- vola a sfera sullo 0°. 5. Riempire, e sfiatare l’impianto. 6. Collegare la tensione di alimentazione alla pompa di circolazione. EKSRDS2A Manuale di istruzioni DAIKIN Solare gruppo a pressione 4P699231-1 – 2022-06...
  • Page 90: Smontaggio E Smaltimento

    Per questo apparecchio il produttore estende una garanzia di 24 mesi dalla data d’acquisto. La garanzia è valida in tutti i paesi nei quali l’apparecchio viene venduto dal produttore stesso o da distributori/rivenditori da esso auto- rizzati. EKSRDS2A Manuale di istruzioni DAIKIN Solare gruppo a pressione 4P699231-1 – 2022-06...
  • Page 91 Installatie- en Gebruiksaanwijzing Zonne Drukstation Installatie- en Gebruiksaanwijzing Nederlands Zonne Drukstation EKSRDS2A...
  • Page 92 Afleesrand op de debietmeter............18 Installatie ontluchten ................ 19 Onderhoud ....................20 Onderhoudsintervallen..............20 Oplossen van storingen ................20 Circulatiepomp vervangen ............... 21 Buitenbedrijfstelling en afvalverwijdering ........... 22 Retourneren ....................22 Garantie ..................... 22 EKSRDS2A Installatie- en Gebruiksaanwijzing DAIKIN Zonne Drukstation 4P699231-1 – 2022-06...
  • Page 93: Over Deze Gebruiksaanwijzing

    Over deze gebruiksaanwijzing Over deze gebruiksaanwijzing Deze gebruiksaanwijzing beschrijft de zonnepompgroep „EKSRDS2A“ (hierna ook „product“). Deze gebruiksaanwijzing is deel van het product. • U mag het product pas gebruiken als u de gebruiksaanwijzing geheel doorgenomen en begrepen hebt. • Zorg ervoor dat de gebruiksaanwijzing voor alle werkzaamheden aan en met het product op ieder tijdstip beschikbaar is.
  • Page 94: Informatie Omtrent De Veiligheid

    AANWIJZING AANWIJZING maakt attent op een mogelijke gevaarlijke situatie die bij het negeren ervan materiële schade tot gevolg kan hebben. EKSRDS2A Installatie- en Gebruiksaanwijzing DAIKIN Zonne Drukstation 4P699231-1 – 2022-06...
  • Page 95: Reglementair Gebruik

    EKSRDS2A Installatie- en Gebruiksaanwijzing DAIKIN Zonne Drukstation 4P699231-1 – 2022-06...
  • Page 96: Voorzienbaar Verkeerd Gebruik

    Veranderingen aan het product Voer alleen werkzaamheden aan en met het product uit die in deze gebruiks- aanwijzing worden beschreven. Voer geen veranderingen uit die niet in deze gebruiksaanwijzing worden beschreven. EKSRDS2A Installatie- en Gebruiksaanwijzing DAIKIN Zonne Drukstation 4P699231-1 – 2022-06...
  • Page 97: Transport En Opslag

    Bewaar het product alleen in een droge, schone omgeving. • Zorg ervoor dat het product tijdens het transport en de opslag beschermd is tegen stoten. Het negeren van deze aanwijzingen kan materiële schade veroorza- ken. EKSRDS2A Installatie- en Gebruiksaanwijzing DAIKIN Zonne Drukstation 4P699231-1 – 2022-06...
  • Page 98: Productbeschrijving

    M. Isolatie N. Ontluchtingspot O. Ontluchtingskraan met handwiel P. Kogelkraan, afsluitbaar, met ther- mometer rood en zwaartekracht- Afbeelding 1: EKSRDS2A, Voorloop en terugloop met vul- en spoelkranen en onluch- tingspot EKSRDS2A Installatie- en Gebruiksaanwijzing DAIKIN Zonne Drukstation 4P699231-1 – 2022-06...
  • Page 99: Afmetingen

    Productbeschrijving Afmetingen Afbeelding 2: EKSRDS2A (in mm) Functie Het product is een voorgemonteerde, op dichtheid gecontroleerde en warm- tegeïsoleerde zonnepompgroep met alle noodzakelijke veiligheids- en func- tionele onderdelen. Beide kogelkranen kunnen afgesloten worden en bevatten een thermometer en een zwaartekrachtrem.
  • Page 100: Technische Gegevens

    Aan de pompzijde met flens en war- telmoer G1½ Weergavebereik 0 ... 120°C Veiligheidsgroep Aansluiting voor expansievat G¾ voor ribbelbuis vlakdichtend met wartelmoer Membraan-veiligheidsventiel 6 bar Manometer Ø 63 mm, 0 ... 10 bar EKSRDS2A Installatie- en Gebruiksaanwijzing DAIKIN Zonne Drukstation 4P699231-1 – 2022-06...
  • Page 101: Montage

     Zorg ervoor dat de meegeleverde pluggen geschikt zijn voor de beoogde muur. 1. Verwijder de bovenste isolatie. 2. Houd het product tegen de muur aan en lijn het met een waterpas uit. 3. Teken twee markeringen af. EKSRDS2A Installatie- en Gebruiksaanwijzing DAIKIN Zonne Drukstation 4P699231-1 – 2022-06...
  • Page 102 7. Verbind de buisleidingen van het zonnecircuit met de aansluitingen van het product (zie hoofdstuk "Product aansluiten"). 8. Plaats de bovenste isolatie weer. Afbeelding 3: EKSRDS2A EKSRDS2A Installatie- en Gebruiksaanwijzing DAIKIN Zonne Drukstation 4P699231-1 – 2022-06...
  • Page 103: Product Aansluiten

    Afbeelding 4: Aansluiting ribbelbuis G¾ 1. Verbind de buisleidingen van het zonnecircuit met de aansluitingen van het product. 2. Verbind de buis of de ribbelbuis van het expansievat met de veiligheids- groep. EKSRDS2A Installatie- en Gebruiksaanwijzing DAIKIN Zonne Drukstation 4P699231-1 – 2022-06...
  • Page 104: Product Namonteren

    Zorg ervoor dat door de soort elektrische installatie de bescherming tegen een elektrische schok (beschermingsklasse, elektrische isolatie) niet verminderd wordt. Het negeren van deze aanwijzing heeft de dood of ernstig letsel tot gevolg. EKSRDS2A Installatie- en Gebruiksaanwijzing DAIKIN Zonne Drukstation 4P699231-1 – 2022-06...
  • Page 105 - Neem hierbij de gebruiksaanwijzing van de zonneregeling in acht. Gebruik voor een verlenging van de aansluitkabel een afgeschermde kabel met maximaal 3 x 1,5 mm² en maximaal Ø 10 mm. EKSRDS2A Installatie- en Gebruiksaanwijzing DAIKIN Zonne Drukstation 4P699231-1 – 2022-06...
  • Page 106: Inbedrijfstelling

    Product in bedrijf stellen De EKSRDS2A wordt via de vul- en spoelkranen aan de debietmeter gevuld. 1. Controleer de bouwdelen van de installatie op dichtheid. - Controledruk en duur van de controle moeten op de betreffende instal- latie en de betreffende bedrijfsdruk zijn aangepast.
  • Page 107 10.Draai de twee thermometer-kogelkranen naar 0°-stand. 11. Plaats het bovenste gedeelte van de isolatie op het product. 12.Leid de isolatie van de buisleidingen tot in de openingen van de isolatie van het product. EKSRDS2A Installatie- en Gebruiksaanwijzing DAIKIN Zonne Drukstation 4P699231-1 – 2022-06...
  • Page 108: Werking

    2. Verhelp de oorzaak voordat de installatie weer in bedrijf wordt gesteld. Afleesrand op de debietmeter De onderste rand van het zweefli- chaam is de afleesrand op de debiet- meter. EKSRDS2A Installatie- en Gebruiksaanwijzing DAIKIN Zonne Drukstation 4P699231-1 – 2022-06...
  • Page 109: Installatie Ontluchten

    1. Leid de slang van de ontluchtingskraan (E) in een opvangbak. 2. Open het ventiel (D). - De afgescheiden lucht komt uit de ontluchtingspot vrij. 3. Sluit het ventiel (D) weer zodra er zonnevloeistof vrijkomt. EKSRDS2A Installatie- en Gebruiksaanwijzing DAIKIN Zonne Drukstation 4P699231-1 – 2022-06...
  • Page 110: Onderhoud

    Sluit de voeding aan Circulatiepomp door Neem de vermeldingen afzettingen in de lagers van de pompfabrikant in geblokkeerd acht Circulatiepomp vervuild Reinig de circulatie- pomp Circulatiepomp defect Vervang de circulatie- pomp EKSRDS2A Installatie- en Gebruiksaanwijzing DAIKIN Zonne Drukstation 4P699231-1 – 2022-06...
  • Page 111: Circulatiepomp Vervangen

    - Gebruik nieuwe afdichtingen. 4. Open de afsluiter aan de debietmeter en draai de blauwe kogelkraan naar 0°-stand. 5. Vul en ontlucht de installatie. 6. Sluit de circulatiepomp op de voeding aan. EKSRDS2A Installatie- en Gebruiksaanwijzing DAIKIN Zonne Drukstation 4P699231-1 – 2022-06...
  • Page 112: Buitenbedrijfstelling En Afvalverwijdering

    De fabrikant verleent op dit product een garantie van 24 maanden vanaf de aankoopdatum. De garantie geldt in alle landen waarin dit product door de fabrikant of zijn geautoriseerde dealers wordt verkocht. EKSRDS2A Installatie- en Gebruiksaanwijzing DAIKIN Zonne Drukstation 4P699231-1 – 2022-06...
  • Page 113 Manual de instalação e de operação Estação de impressão solares Manual de instalação e de operação Portugues Estação de impressão solares EKSRDS2A...
  • Page 114 Intervalos de manutenção..............20 Resolução de avarias................. 20 Substituir a bomba de circulação............. 21 Colocação fora de serviço e eliminação ............ 22 Devolução ....................22 Garantia ..................... 22 EKSRDS2A Manual de instalação e de operação DAIKIN Estação de impressão solares 4P699231-1 – 2022-06...
  • Page 115: Sobre Este Manual De Instruções

    Sobre este manual de instruções Sobre este manual de instruções Este manual de instruções descreve o grupo de bombas solares "EKSRDS2A" (de seguida também referido como "produto"). Este manual de instruções faz parte do produto. • Apenas pode utilizar o produto depois de ler e compreender na íntegra o manual de instruções.
  • Page 116: Informações Referentes À Segurança

    INDICAÇÃO INDICAÇÃO chama a atenção para uma situação potencialmente perigosa que poderá causar danos materiais, em caso de incumprimento. EKSRDS2A Manual de instalação e de operação DAIKIN Estação de impressão solares 4P699231-1 – 2022-06...
  • Page 117: Utilização De Acordo Com A Finalidade

    ções especificadas no manual de instruções, de acordo com os dados técni- cos especificados e em conformidade com todas as disposições, normas e regras de segurança aplicáveis no local de utilização. EKSRDS2A Manual de instalação e de operação DAIKIN Estação de impressão solares 4P699231-1 – 2022-06...
  • Page 118: Utilização Indevida Razoavelmente Previsível

    Execute no produto e com o produto apenas os trabalhos descritos neste manual de instruções. Não efetue quaisquer alterações que não se encon- trem descritas neste manual de instruções. EKSRDS2A Manual de instalação e de operação DAIKIN Estação de impressão solares 4P699231-1 – 2022-06...
  • Page 119: Transporte E Armazenamento

    Armazene o produto apenas num ambiente seco e limpo. • Certifique-se de que o produto está protegido contra choques durante o transporte e o armazenamento. O incumprimento destas instruções pode causar danos materiais. EKSRDS2A Manual de instalação e de operação DAIKIN Estação de impressão solares 4P699231-1 – 2022-06...
  • Page 120: Descrição Do Produto

    P. Válvula de esfera, com fecho, com termómetro, vermelha e tra- vão com ação de gravidade Ilustração 1: EKSRDS2A, Ida- e retorno com válvulas de enchimento e lavagem e recipiente de purga EKSRDS2A Manual de instalação e de operação DAIKIN Estação de impressão solares...
  • Page 121: Dimensões

    Descrição do produto Dimensões Ilustração 2: EKSRDS2A (em mm) Função O produto é um sistema de bombas solares pré-montado, estanque e com isolamento térmico com todos os componentes de segurança e componen- tes funcionais necessários. Ambas as válvulas de esfera podem ser fechadas e incluem um termómetro e um travão com ação de gravidade.
  • Page 122: Dados Técnicos

    G¾ para tubo corrugado de junta são plana com porca de capa Válvula de segurança de membrana 6 bar Manómetro Ø 63 mm, 0 ... 10 bar EKSRDS2A Manual de instalação e de operação DAIKIN Estação de impressão solares 4P699231-1 – 2022-06...
  • Page 123: Montagem

    1. Remova o isolamento da parte de cima. 2. Encoste o produto à parede e alinhe-o com a ajuda de um nível de água 3. Trace duas marcas. EKSRDS2A Manual de instalação e de operação DAIKIN Estação de impressão solares 4P699231-1 – 2022-06...
  • Page 124 7. Ligue os tubos do circuito solar às ligações do produto (ver o capítulo "Ligar o produto"). 8. Volte a colocar o isolamento superior. Ilustração 3: EKSRDS2A EKSRDS2A Manual de instalação e de operação DAIKIN Estação de impressão solares 4P699231-1 – 2022-06...
  • Page 125: Ligar O Produto

    1. Ligue os tubos do circuito solar às ligações do produto. 2. Ligue o tubo ou tubo corrugado do reservatório de expansão ao sistema de segurança. EKSRDS2A Manual de instalação e de operação DAIKIN Estação de impressão solares 4P699231-1 – 2022-06...
  • Page 126: Reequipar O Produto

    Certifique-se de que o tipo de instalação elétrica não reduz a proteção contra choques elétricos (classe de proteção, isolamento de proteção). O incumprimento destas instruções causa morte ou ferimentos gra- ves. EKSRDS2A Manual de instalação e de operação DAIKIN Estação de impressão solares 4P699231-1 – 2022-06...
  • Page 127 - Tenha em consideração o manual do controlador solar. Para uma extensão do cabo de ligação, utilize um cabo blindado com, no máximo, 3 x 1,5 mm² e, no máximo, Ø 10 mm. EKSRDS2A Manual de instalação e de operação DAIKIN Estação de impressão solares 4P699231-1 – 2022-06...
  • Page 128: Ativação

    O requisito para a ativação é a instalação completa de todos os componen- tes hidráulicos e elétricos. Ativar o produto O EKSRDS2A é enchido através das válvulas de enchimento e lavagem no caudalímetro. 1. Verifique se os componentes da instalação estão estanques.
  • Page 129 10.Coloque ambas as válvulas de esfera com termómetro na posição de 0°. 11. Coloque a parte superior do isolamento no produto. 12.Encaminhe o isolamento dos tubos até aos entalhes do isolamento do produto. EKSRDS2A Manual de instalação e de operação DAIKIN Estação de impressão solares 4P699231-1 – 2022-06...
  • Page 130: Funcionamento

    2. Elimine a causa antes de colocar novamente a instalação em funciona- mento. Linha de leitura no caudalímetro O bordo inferior do flutuador é a linha de leitura no caudalímetro. EKSRDS2A Manual de instalação e de operação DAIKIN Estação de impressão solares 4P699231-1 – 2022-06...
  • Page 131 2. Abra a válvula (D). - O ar separado sai do recipiente de purga. 3. Feche novamente a válvula (D) assim que começar a sair fluido solar. EKSRDS2A Manual de instalação e de operação DAIKIN Estação de impressão solares 4P699231-1 – 2022-06...
  • Page 132: Purgar A Instalação

    Bomba de circulação Limpe a bomba de cir- suja culação Bomba de circulação Substitua a bomba de avariada circulação EKSRDS2A Manual de instalação e de operação DAIKIN Estação de impressão solares 4P699231-1 – 2022-06...
  • Page 133: Substituir A Bomba De Circulação

    4. Abra o dispositivo de bloqueio no caudalímetro e coloque a válvula de esfera azul na posição de 0°. 5. Encha e purgue a instalação. 6. Ligue a bomba de circulação à tensão de alimentação. EKSRDS2A Manual de instalação e de operação DAIKIN Estação de impressão solares 4P699231-1 – 2022-06...
  • Page 134: Colocação Fora De Serviço E Eliminação

    A garantia pode ser acionada em todos os países onde este produto é comercializado pelo fabricante ou pelos seus distribuidores autorizados. EKSRDS2A Manual de instalação e de operação DAIKIN Estação de impressão solares 4P699231-1 – 2022-06...
  • Page 135 Kullanım Kılavuzu ve Cihazı Çalıştirma talimatları Solar - Pompa ve emniyet gruba Kullanım Kılavuzu ve Cihazı Çalıştirma talimatları Türkçe Solar - Pompa ve emniyet gruba EKSRDS2A...
  • Page 136 Bakım aralıkları ................20 Arıza giderme..................... 20 Sirkülasyon pompasını değiştirin ............. 21 İşletimden çıkarma ve imha etme .............. 22 İade etme ....................22 Garanti ....................... 22 EKSRDS2A Kullanım Kılavuzu ve Cihazı Çalıştirma talimatları DAIKIN Solar - Pompa ve emniyet gruba 4P699231-1 – 2022-06...
  • Page 137: Bu Kullanım Kılavuzu Hakkında

    Bu kullanım kılavuzu hakkında Bu kullanım kılavuzu hakkında Bu kullanım kılavuzu "EKSRDS2A“ solar pompa grubunu tanımlamaktadır (aşağıda "Ürün“ olarak adlandırılacaktır). Bu kullanım kılavuzu ürünün bir parçasıdır. • Ürünü yalnızca kullanım kılavuzunun tamamen okuduktan ve anladıktan sonra kullanabilirsiniz. • Ürünle ve ürünle ilgili tüm çalışmalar için kullanım kılavuzunun her zaman mevcut olduğundan emin olun.
  • Page 138 Bu uyarı sembolüdür. Yaralanma ve maddi hasar riskini gös- terir. Ölüm, yaralanma ve maddi hasarı önlemek için bu uyarı sembolü ile bağlantılı olarak açıklanan tüm talimatları dikkate alın. EKSRDS2A Kullanım Kılavuzu ve Cihazı Çalıştirma talimatları DAIKIN Solar - Pompa ve emniyet gruba 4P699231-1 – 2022-06...
  • Page 139: Güvenlik Ile Ilgili Bilgiler

    • Yüzme havuzu suyu ile çalışma • Yapışkan, aşındırıcı veya yanıcı ortamlarla çalışma • İzin verilen sıcaklıklarda ve basınçlarda çalışma Personelin yetkinlikleri EKSRDS2A Kullanım Kılavuzu ve Cihazı Çalıştirma talimatları DAIKIN Solar - Pompa ve emniyet gruba 4P699231-1 – 2022-06...
  • Page 140: Kişisel Koruyucu Donanım

    çıkabileceğini de dikkate alın. Üründe değişiklikler Sadece bu kullanım kılavuzunda açıklanan ürün üzerinde ve ürünle ilgili çalışmaları gerçekleştirin. Bu kullanım kılavuzunda açıklanmayan herhangi bir değişiklik yapmayın. EKSRDS2A Kullanım Kılavuzu ve Cihazı Çalıştirma talimatları DAIKIN Solar - Pompa ve emniyet gruba 4P699231-1 – 2022-06...
  • Page 141: Taşıma Ve Depolama

    Ürünü sadece kuru, temiz çevre koşullarında depolayın. • Taşıma ve depolama sırasında ürünün çarpmaya karşı korumalı oldu- ğundan emin olun. Bu talimatların dikkate alınmaması maddi hasarlara neden olabilir. EKSRDS2A Kullanım Kılavuzu ve Cihazı Çalıştirma talimatları DAIKIN Solar - Pompa ve emniyet gruba 4P699231-1 – 2022-06...
  • Page 142: Ürün Tanımlaması

    N. Havalandırma haznesi O. El çarklı havalandırma valfi P. Küresel vana, kapatılabilir, kırmızı termometreli ve ağırlık etkili frenle Şekil 1: EKSRDS2A, doldurma ve yıkama vanaları ve havalandırma haznesi ile giriş ve çıkış EKSRDS2A Kullanım Kılavuzu ve Cihazı Çalıştirma talimatları DAIKIN Solar - Pompa ve emniyet gruba...
  • Page 143: Ölçümler

    Her iki küresel vana kapatılabilir ve termometreler ve ağırlık etkili frenler içe- rebilir. Kayıt belgeleri, sertifikalar, beyanlar Membran-emniyet valfi için talimatlara bakın. Bir sirkülasyon pompası ile çalışırken, pompa üreticisinin talimatlarına bakın. EKSRDS2A Kullanım Kılavuzu ve Cihazı Çalıştirma talimatları DAIKIN Solar - Pompa ve emniyet gruba 4P699231-1 – 2022-06...
  • Page 144: Teknik Veriler

    Genleşme kabı için bağlantı Flanş ve başlıklı somunu ile pompa tarafında G1½ Membran-emniyet vanası 6 bar Manometre Ø 63 mm, 0 ... 10 bar EKSRDS2A Kullanım Kılavuzu ve Cihazı Çalıştirma talimatları DAIKIN Solar - Pompa ve emniyet gruba 4P699231-1 – 2022-06...
  • Page 145: Montaj

    4. (Ø 10 mm) bir delik açın. 5. Ürünü ekteki dübeller ve vidalarla sabitleyin. - uzun tespit cıvatası, üstte - kısa tespit cıvatası, altta EKSRDS2A Kullanım Kılavuzu ve Cihazı Çalıştirma talimatları DAIKIN Solar - Pompa ve emniyet gruba 4P699231-1 – 2022-06...
  • Page 146 6. Ürünü alt yalıtımla monte edin ve bir yıkayıcı ve somunla sabitleyin. 7. Solar devrenin boru hatlarını ürünün bağlantıları (bkz. Bölüm "Ürünü bağ- lama") ile bağlayın. 8. Üst izolasyonu değiştirin. Şekil 3: EKSRDS2A EKSRDS2A Kullanım Kılavuzu ve Cihazı Çalıştirma talimatları DAIKIN Solar - Pompa ve emniyet gruba 4P699231-1 – 2022-06...
  • Page 147: Ürünü Bağlama

    Şekil 4: Oluklu boru G¾ bağlantısı 1. Solar devresinin borularını ürünün bağlantılarına bağlayın. 2. Genleşme kabının borusunu veya oluklu borusunu güvenlik grubuna bağ- layın. EKSRDS2A Kullanım Kılavuzu ve Cihazı Çalıştirma talimatları DAIKIN Solar - Pompa ve emniyet gruba 4P699231-1 – 2022-06...
  • Page 148: Ürüne Donanım Eklenmesi

    Elektrik tesisatı tipinin elektrik çarpmasına karşı korumayı azaltmadığın- dan emin olun (koruma sınıfı, koruyucu izolasyon). Bu talimatlara uyulmaması ölüm veya ciddi yaralanma ile sonuçlanır. EKSRDS2A Kullanım Kılavuzu ve Cihazı Çalıştirma talimatları DAIKIN Solar - Pompa ve emniyet gruba 4P699231-1 – 2022-06...
  • Page 149 - Solar ayarı talimatlarına dikkat edin. Bağlantı kablosunu uzatmak için maksimum 3 x 1,5 mm ² ve maksimum Ø 10 mm korumalı bir kablo kullanın. EKSRDS2A Kullanım Kılavuzu ve Cihazı Çalıştirma talimatları DAIKIN Solar - Pompa ve emniyet gruba 4P699231-1 – 2022-06...
  • Page 150: Devreye Alma

    Tüm hidrolik ve elektrikli bileşenlerin tam montajı devreye alma için bir ön koşuldur. Ürünü çalıştırma EKSRDS2A debi ölçerde doldurma ve yıkama vanaları üzerinden doldurulur. 1. Sistem parçalarında sızıntı olup olmadığını kontrol edin. - Test basıncı ve test süresi ilgili sisteme ve ilgili çalışma basıncına uyar- lanmalıdır.
  • Page 151 10.Her iki termometre küresel vanalarını 0° konumuna getirin. 11. İzolasyonun üst kısmını ürüne yerleştirin. 12.Boru hatlarının izolasyonunu ürün izolasyonu girintilerine kadar sevk edin. EKSRDS2A Kullanım Kılavuzu ve Cihazı Çalıştirma talimatları DAIKIN Solar - Pompa ve emniyet gruba 4P699231-1 – 2022-06...
  • Page 152: İşletim

    1. Membran-emniyet valfi tetiklendikten sonra sistemi kontrol edin. 2. Sistem tekrar işletime alınmadan önce nedeni ortadan kaldırın. Debi ölçerdeki okuma kenarı Şamandıranın alt kenarı, debi ölçer- deki okuma kenarıdır. EKSRDS2A Kullanım Kılavuzu ve Cihazı Çalıştirma talimatları DAIKIN Solar - Pompa ve emniyet gruba 4P699231-1 – 2022-06...
  • Page 153: Sistemi Havalandırma

    1. Havalandırma valfi (E) hortumunu bir toplama kabına yerleştirin. 2. Valfi açın (D). - Ayrılan hava havalandırma deliğinden kaçar. 3. Solar sıvısı çıkınca (D) valfini tekrar bağlayın. EKSRDS2A Kullanım Kılavuzu ve Cihazı Çalıştirma talimatları DAIKIN Solar - Pompa ve emniyet gruba 4P699231-1 – 2022-06...
  • Page 154: Bakım

    Pompa üreticisi tarafın- tarafından bloke edilen dan sağlanan bilgilere sirkülasyon pompası dikkat edin Sirkülasyon pompası Sirlülasyon pompasını kirli temizleyin Sirkülasyon pompası Sirkülasyon pompasını arızalı değiştirin EKSRDS2A Kullanım Kılavuzu ve Cihazı Çalıştirma talimatları DAIKIN Solar - Pompa ve emniyet gruba 4P699231-1 – 2022-06...
  • Page 155: Sirkülasyon Pompasını Değiştirin

    4. Debi ölçerdeki kapatma vanasını açın ve mavi küresel vanayı 0 ° konu- muna getirin. 5. Sistemi doldurun ve havalandırın. 6. Sirkülasyon pompasını besleme voltajına bağlayın. EKSRDS2A Kullanım Kılavuzu ve Cihazı Çalıştirma talimatları DAIKIN Solar - Pompa ve emniyet gruba 4P699231-1 – 2022-06...
  • Page 156: İşletimden Çıkarma Ve Imha Etme

    Üretici, bu ürün için satın alma tarihinden itibaren 24 ay garantiyi üstlenir. Bu, ürünün üretici veya yetkili satıcıları tarafından satıldığı tüm ülkelerde kullanı- labilir. EKSRDS2A Kullanım Kılavuzu ve Cihazı Çalıştirma talimatları DAIKIN Solar - Pompa ve emniyet gruba 4P699231-1 – 2022-06...
  • Page 160 4P699231-1 2022.06...

Table des Matières