Publicité
Liens rapides
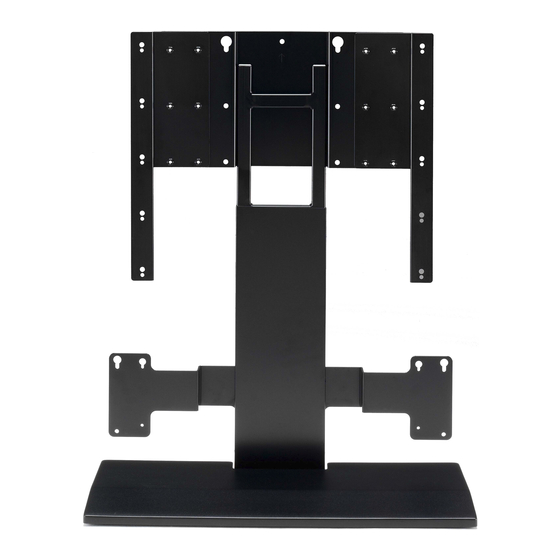
Integrated TV/Soundbar Pedestal
Socle intégré pour téléviseur et projecteur de son
YTS-T500
SAFETY PRECAUTION
1
The installation of this unit demands carefully performed work, so take
care in terms of safety during the installation. Read this install manual
carefully prior to starting the assembly and installation work. Yamaha
shall not bear any responsibility for any accidents or injury that occur due
to careless assembly, installation or use of this product.
2
Install this unit on a flat and stable place that can support sufficient
weight. If you install this unit in an unstable place, such as on a carpet or
a straw mat, place a board under the unit. If installed in a poor location,
your TV/speaker may tip over or fall off the stand, resulting in personal
injury.
3
When you install this unit, take measures to prevent it from falling over
by attaching wire or the L bracket.
4
Do not install the unit against a sliding door, a partition or other place that
is not sturdy enough.
5
Be sure that the installation is performed by two or more people. When
moving the unit, lift it up from the base board and carry. If you lift it up
by other than the base board, it may damage this unit.
6
Be sure to use all of the screws and/or mounting hardware indicated in the
install manual. Tighten screws securely in every location as directed.
7
Do not lean on or place objects on the corner of your TV/speaker.
8
Do not rattle or hit the unit.
9
Do not make any alterations to parts or use any broken parts.
10 Do not install in a humid or dusty place, or where your TV/speaker would
be subject to steam or oily smoke.
11 Install this unit in a well-ventilated, cool, dry and clean place. For
minimum clearances for proper ventilation, refer to the owner's manual
of your TV/speaker.
12 Mount your TV/speaker properly. If not, your TV/speaker may tip over or
fall off the stand, resulting in personal injury.
13 Do not use on a wet or waxed floor. If this product is used in such a
location, it may stick to the floor.
14 Install in a place that does not get too hot. Installing it under direct
sunlight or close to a heater may result in bubbling, peeling or
discoloration of painted surfaces.
15 Do not apply cellophane tape or other adhesive materials to painted
surfaces, as the paint may peel.
16 Use a dry cloth to remove dust or dirt. If the unit is very dirty, wet the
cloth in a neutral detergent diluted with water and wring it out well before
wiping the unit. Note that if products like benzene, paint thinner or
household wax are used, they may cause the paint to fade and/or damage
the finish.
17 Do not drop a sharp object on this unit, as damage may result.
Install Manual
Manuel d'installation
Installationsanleitung
Installationsanvisningar
18 This install manual provides explanations of important precautions to
take to avoid any accidents, as well as how to assemble and install the
unit. During installation, also refer to the owner's manuals of your TV and
speaker, and attain a good understanding of them before proceeding
according to their directions.
19 After reading, keep this manual in a safe place for future reference.
COMPATIBLE TV
Compatible TV size: up to 52-inch, under 45 kg
Compatible distance between mounting holes on the rear panel of the TV
(W × H)*
20 × 20
30 × 20
40 × 30
40 × 40
* Compliant with VESA Mounting Interface Standard and with the distance
between mounting holes described above.
The diameter of the screws should be up to 8 mm (the diameter of the supplied
screws are 5 mm, 6 mm, 8 mm).
Before installation, read the owner's manual of your TV or measure
the distance of the mounting holes on the rear panel of your TV, and
check if your TV is possible to install. Note that even if the distance
of the mounting holes of your TV is the same as the distance
described above, there may be a case that you cannot install your TV
if there is a projection or input/output terminal in the way of the
bracket attachment area or if the bracket blocks the ventilation of the
TV.
COMPATIBLE SPEAKER
This product is compatible with the following speaker models.
(As of October, 2009)
YSP-4000, YSP-5100/4100, YAS-81/71, YHT-S1400/S400
Printed in Malaysia
WU17410-1
G
Manuale d'installazione
Manual de instalación
Installatiehandleiding
Руководство по установке
unit = cm
30 × 30
40 × 20
50 × 20
60 × 40
i
En
Publicité

Manuels Connexes pour Yamaha YTS-T500


Sommaire des Matières pour Yamaha YTS-T500
- Page 1 19 After reading, keep this manual in a safe place for future reference. care in terms of safety during the installation. Read this install manual carefully prior to starting the assembly and installation work. Yamaha shall not bear any responsibility for any accidents or injury that occur due to careless assembly, installation or use of this product.
- Page 2 (M5 × 16) × 7 (M5 × 16) × 7 (M5 × 20) × 8 SUPPLIED PARTS Make sure you have all of the following items. : Pedestal × 1 : Base board × 1 (M6 × 16) × 8 (M6 ×...
- Page 3 ASSEMBLING/MONTAGE English Français Before Assembling Avant le montage • y indicates a tip for your operation. • Le symbole y appelle votre attention sur un conseil d’utilisation. • In the MEMO box, note down dimensions and the number (on the mounting •...
- Page 4 ASSEMBLING/MONTAGE Blanket, etc. Couverture, etc. TV stand Support TV English Français 2 Installing the TV 2 Installation du téléviseur Note Remarque Also refer to the owner’s manual of your TV. Consultez également le mode d’emploi du téléviseur. Remove the TV stand. Retirez le support TV.
- Page 5 ASSEMBLING/MONTAGE When using Screws checked in 2-2-2 Lors de l’utilisation de Vis définies à l’étape 2-2-2 When using Lors de l’utilisation de English Français Attach Fixez The holes for vary depending on the screw Le nombre de trous que possèdent varie selon les vis checked in step 2-2-2.
- Page 6 ASSEMBLING/MONTAGE i.e. When using YSP-4100 Par ex., lors de l’utilisation de YSP-4100 English Français Check the location to attach and the TV. Vérifiez l’emplacement de montage de le téléviseur. 1 Place over mounting hole A on so that the hole on aligns with mounting hole A on 1 Placez sur le trou de montage A de...
- Page 7 ASSEMBLING/MONTAGE When the X checked in 2-2-1 is other than 60 cm Lorsque la distance X mesurée à l’étape 2-2-1 n’est pas de 60 cm Only when the X checked in 2-2-1 is 60 cm Uniquement lorsque la distance X mesurée à l’étape 2-2-1 est de 60 cm English Français...
- Page 8 ASSEMBLING/MONTAGE i.e. When X checked in 2-2-1 is 40 cm Par ex., lorsque la distance X mesurée à l’étape 2-2-1 est de 40 cm English Français Attach Fixez à 1 Hang on the screws you tightened temporarily in step 1 Accrochez aux vis que vous avez provisoirement serrées à...
- Page 9 ASSEMBLING/MONTAGE YSP-4000 YSP-4000 YSP-5100/4100 YSP-5100/4100 YAS-81/71 YAS-81/71 YHT-S1400/S400 YHT-S1400/S400 YHT-S1400/S400 YAS-81/71 English Français 3 Installing the speaker 3 Installation du haut-parleur Notes Remarques • Before mounting the speaker to the pedestal, complete the cable • Avant d’installer le haut-parleur sur le socle, vous devez raccorder les câbles.
- Page 10 ASSEMBLING/MONTAGE English Français 4 Bundling the cables and positioning the 4 Regroupement des câbles et pedestal positionnement du socle Bundle the cables. Regroupez les câbles. 1 Insert into the holes of your choice on the right and left 1 Insérez dans les trous de votre choix situés de part et d’autre de 2 Bundle the cables with...
- Page 11 Sicherheitshinweise. Lesen Sie diese Installationsanleitung vor Beginn Fernsehgeräts und Lautsprechers zu Rate. Lesen Sie diese sorgfältig der Montage- und Installationsarbeiten sorgfältig durch. Yamaha ist nicht durch, um ein gutes Verständnis zu entwickeln und gemäß den verantwortlich für jegliche Sach- oder Personenschäden aufgrund einer Anweisungen vorzugehen.
- Page 12 (M5 × 16) × 7 (M5 × 16) × 7 (M5 × 20) × 8 LIEFERUMFANG Überprüfen Sie, ob Sie die folgenden Teile erhalten haben. : Ständer × 1 : Sockel × 1 (M6 × 16) × 8 (M6 × 20) × 4 (M8 ×...
- Page 13 19 Förvara bruksanvisningen nära till hands för framtida referens när du har säkerheten under monteringen. Läs dessa installationsanvisningar innan läst den. du börjar monterings- och installationsarbetet. Yamaha tar inget ansvar för eventuella olyckor eller skador som kan uppstå genom oaktsamhet under montering, installation och användning av denna produkt.
- Page 14 (M5 × 16) × 7 (M5 × 16) × 7 (M5 × 20) × 8 MEDFÖLJANDE DELAR Kontrollera att du har följande detaljer. : Sockel × 1 : Bottenplatta × 1 (M6 × 16) × 8 (M6 × 20) × 4 (M8 ×...