Publicité

Les langues disponibles
  • FR

Les langues disponibles

Liens rapides

CRONOTERMOSTATO DIGITALE DA PARETE
WALL MOUNTING DIGITAL CHRONOTHERMOSTAT
CHRONOTHERMOSTAT DIGITAL POUR MONTAGE EN SAILLIE
DIGITAL RAUMTHERMOSTATUHR WANDMONTAGE
CRONOTERMOSTATO DIGITAL DE SUPERFICIE
PE - DECRNN034 12/10
Modello giornaliero
Modello settimanale
Daily model
Weekly model
.
Modèle journalier
Modèle hebdomadaire
Modell mit Tagesprogramm
Modell mit Wochenprogramm
Modelo diario
Modelo semanal

Publicité

Table des Matières
loading

Sommaire des Matières pour CALEFFI 618

  • Page 1 CRONOTERMOSTATO DIGITALE DA PARETE WALL MOUNTING DIGITAL CHRONOTHERMOSTAT CHRONOTHERMOSTAT DIGITAL POUR MONTAGE EN SAILLIE DIGITAL RAUMTHERMOSTATUHR WANDMONTAGE CRONOTERMOSTATO DIGITAL DE SUPERFICIE Modello giornaliero Modello settimanale Daily model Weekly model Modèle journalier Modèle hebdomadaire Modell mit Tagesprogramm Modell mit Wochenprogramm Modelo diario Modelo semanal PE - DECRNN034 12/10...
  • Page 2 DATI TECNICI - ISTRUZIONI PER L’INSTALLAZIONE Pagina 3 - Italiano MODO D’IMPIEGO - AVVERTENZE TECHNICAL DATA - INSTALLATION GUIDELINES Page 14 - English USER INSTRUCTIONS - WARNINGS DONNÉES TECHNIQUES - NORMES D’INSTALLATION Page 25 - Français MODE D’EMPLOI - AVERTISSEMENTS TECHNISCHE DATEN - NORMEN FÜR DIE INSTALLATION - Deutsch Seite 36...
  • Page 3: Dati Tecnici

    1 - DATI TECNICI Tensione di alimentazione: n° 2 pile alcaline Stilo 1,5 V tipo AA LR6 (consigliate pile DURACELL o ENERGIZER) Autonomia: 2 anni Autonomia dall’accensione del simbolo pile scariche: 1 mese Tipo di azione, disconnessione ed apparecchio: 1 / BU / Elettronico Software: classe A Tensione impulsiva nominale:...
  • Page 4: Dimensioni D'ingombro

    4 - FISSAGGIO DELLA BASE A PARETE 2 - DIMENSIONI D’INGOMBRO “ Disattivare la tensione di rete del dispositivo da pilotare “ Fissare con le viti la base: a muro, alla scatola da incasso tonda o rettangolare utilizzando le opportune coppie di fori . “...
  • Page 5: Collegamenti Elettrici

    5 - COLLEGAMENTI ELETTRICI Collegamento di un programmatore telefonico per Importante: l’installazione ed il collegamento elettrico dei dispositivi controllo remoto ed apparecchiature devono essere eseguiti da personale qualificato I morsetti del cronotermostato sono predisposti per il ed in conformità alle norme e leggi vigenti. Il costruttore non si assu- collegamento di un programmatore telefonico con contatto me alcuna responsabilità...
  • Page 6 6 - FISSAGGIO O RIMOZIONE DEL CRONOTERMOSTATO DALLA BASE Applicare il coperchietto copri cavi inserendo il dentino nell’apposita cava della base, quindi fissarlo con una leggera pressione nei ganci . Per rimuovere il cronotermostato Per rimuovere il coperchietto utilizzare un piccolo cacciavite dalla base a parete, afferrarlo facendo leva in successione su ciascun gancio .
  • Page 7 8 - VISTA GENERALE, LEGENDA DISPLAY E FUNZIONI TASTI Tasto impostazione: ore-minuti Commutatore - tipo modalità di funzionamento o visual. Temperatura ambiente Visualizzazione del tipo (vedere dettaglio nel riquadro sotto) di funzionamento in corso: Comfort Attivazione tramite (5 ÷ 30 °C) Riduzione programmatore telefonico Manopola reg.
  • Page 8 9 - RESET 10 - PROGRAMMAZIONE “ Alla prima accensione o nel caso in AUTOMATICO Posizionare il commutatore su funzionamento cui il cronotermostato presentasse del- IMPORTANTE: eseguire l’operazione di RESET le visualizzazioni anomale, errato fun- Dopo alcuni secondi il display visualizza lampeggianti, zionamento, ecc., inserire una sottile inserire ora e minuti attuali come descritto di seguito.
  • Page 9 Copia del programma su più giorni MODIFICA IMPOSTAZIONI PROGRAMMATE (solo per modello settimanale) “Dopo avere eseguito la programmazione del giorno è possibile Modifica ora attuale copiarla ( copy ) sul giorno successivo premendo “ Tenere premuto il tasto fino al lampeggio dell’ora corrente contemporaneamente i tasti “...
  • Page 10 11 - VISUALIZZAZIONE/MODIFICA DELLE Ruotare leggermente la 1° manopola desiderata (tramite manopole): TEMPERATURE DI SET comfort o riduzione) per COMFORT / t RIDUZIONE visualizzare il valore di temperatura di Set corrente Normalmente il display visualizza la temperatura ambiente rilevata ed entrare nella procedura di regolazione.
  • Page 11 12 - LIMITAZIONE (BLOCCO) DEL SET MAX DI TEMPERATURA COMFORT E/O RIDUZIONE In alcuni casi particolari di installazione del cronotermostato, ad esempio in edifici pubblici, alberghi ecc., potrebbe essere utile limitare i set di temperatura max in modo da evitare impostazioni errate da parte di personale non autorizzato.
  • Page 12 14 - FUNZIONAMENTO PROPORZIONALE Le impostazioni dei microinterruttori (Dip-switch) In alternativa al differenziale è possibile regolare la temperatura in posti sul retro del cronotermostato, devono essere modo proporzionale (Dip 3 in posizione ON); questo sistema effettuate da personale qualificato. permette di risparmiare sui consumi energetici ed anche 13 - DIFFERENZIALE DI TEMPERATURA sull’usura del bruciatore limitandone le accensioni.
  • Page 13: Avvertenze

    15 - SCALA DI TEMPERATURA °C o °F 16 - AVVERTENZE “Si raccomanda di leggere attentamente il presente libretto ATTENZIONE: istruzioni di installazione ed uso e conservarlo per future il cronotermostato è predisposto in fabbrica per consultazioni. operare in scala Celsius (gradi centigradi) e può “Le figure presenti nel manuale raffigurano il display con essere modificata dall’installatore o utente impostazione della scala delle temperature in °C (gradi...
  • Page 14: Technical Data

    1 - TECHNICAL DATA Power: 2 alkaline Penlight batteries 1.5 V type AA LR6 (DURACELL or ENERGIZER batteries recommended) Autonomy: 2 years Autonomy from the flat battery (Symbol lighting up): 1 month Type of action, disconnection and device: 1 / BU / Electronic Software: Class A Rated impulse voltage:...
  • Page 15: Overall Dimensions

    4 - ATTACHING THE BASE TO THE WALL 2 - OVERALL DIMENSIONS “ Switch off mains power to device “Using screws, attach the base to the wall, to the round or rectangular built-in box using the appropriate pairs of holes . A “...
  • Page 16: Electrical Connections

    5 - ELECTRICAL CONNECTIONS Connecting a phone programmer for remote control The terminals of the chronothermostat are fitted for Important: Installation and electrical connections of devices and ap- connecting a phone programmer with a normally open contact. pliances must be carried out by skilled people and in compliance with current regulations.
  • Page 17 6 - ATTACHING OR REMOVING THE CHRONOTHERMOSTAT FROM THE BASE Fit the cable cover on by inserting the tooth into the slot the base, then secure it by lightly pressing on the hooks Use a small screwdriver to remove the cover by levering on each To remove the chronothermostat hook in succession from the base on the wall, grip it...
  • Page 18 8 - GENERAL VIEW, DISPLAY LEGEND AND KEY FUNCTIONS Settings button: hours-minutes Switch - operation mode type Display of the type of or Room temperature display (see details in box below) operation in progress: Comfort (5 ÷ 30 °C) Economy Turning on with the phone programmer Comfort temp.
  • Page 19 9 - RESET 10 - PROGRAMMING When switching on for the first time “ AUTOMATIC Set the switch on operation or if the chronothermostat shows anom- IMPORTANT: do a RESET alous displays or improper functioning, After a few seconds, the device shows blinking, enter the etc., insert a thin rod (max 1 mm) into the current hours and minutes as described below.
  • Page 20: Changing Settings

    CHANGING SETTINGS Copying the program to other days (weekly model only) “ Changing the current time After programming the day you can copy it (copy) onto the next day by pressing simultaneously buttons “ Keep button pressed until the current time blinks “If you want to set other programs, choose the day with the “...
  • Page 21 11 - DISPLAY/MODIFY SET Slightly turn the desired knob 1° comfort or economy) to (via knobs): TEMPERATURES v i e w t h e c u r r e n t S e t temperature values and access COMFORT / t ECONOMY adjustment procedures.
  • Page 22 12 - COMFORT AND/OR ECONOMY TEMPERATURE MAX SET LIMIT (LOCKED SETTING) In some particular installations, for instance in public offices, hotels, etc., it may be useful to lock the chronothermostat temperature settings to avoid incorrect settings being entered by unauthorised personnel. It will then be possible to lock the maximum Set temperature values (comfort and/or economy) as Move the switch to t follows:...
  • Page 23 14 - PROPORTIONAL OPERATION The settings of the microswitches (dip-switches) As an alternative to the differential, it is possible to adjust the on the back of the chronothermostat must be made temperature proportionally (Dip 3 ON); this system enables by qualified personnel. saving on energy consumption and also on the wear of the burner by limiting the number of ignitions.
  • Page 24 15 - TEMPERATURE SCALE °C or °F 16 - WARNINGS “Please read this instruction booklet carefully and keep it for ATTENTION: future reference. the chronothermostat is preset to operate in Celsius degrees and can be modified by the “The figures shown in the manual depict the display with installer or an expert user to function in settings in C°...
  • Page 25: Données Techniques

    1 - DONNÉES TECHNIQUES (piles DURACELL ou ENERGIZER conseillées) Tension d'alimentation : n° 2 piles alcalines rondes de 1,5 V type AA LR6 Autonomie : 2 ans Autonomie après l'affichage du symbole piles déchargées : 1 mois Type d'action, déconnexion et appareil : 1 / BU / Électronique Logiciel : classe A...
  • Page 26: Dimensions Hors Tout

    4 - FIXATION DE LA BASE POUR POSE EN SAILLIE 2 - DIMENSIONS HORS-TOUT “ Couper l’alimentation secteur de dispositif à commander “Fixer la base avec les vis: au mur, à la boîte à encastrer ronde ou rectangulaire en utilisant les couples de trous correspondants A. “...
  • Page 27: Branchements Électriques

    5 - BRANCHEMENTS ÉLECTRIQUES Raccordement d'un programmateur téléphonique Important : l'installation et le branchement électrique des dispositifs et pour commande à distance des appareils doivent être effectués par du personnel qualifié, confor- Les bornes du chronothermostat permettent deraccorder mément aux normes et aux réglementations en vigueur. Le fabricant un programmateur téléphonique doté...
  • Page 28: Fixation Ou Retrait Du Chronothermostat De La Base

    6 - FIXATION OU RETRAIT DU CHRONOTHERMOSTAT DE LA BASE Appliquer le cache sur les câbles en insérant la dent dans l'encoche de la base, puis le fixer en exerçant une légère pres- sion dans les crochets Pour retirer le chronothermostat Pour ôter le cache, utiliser un petit tournevis en faisant levier sur de la base en saillie, le saisir chaque crochet .
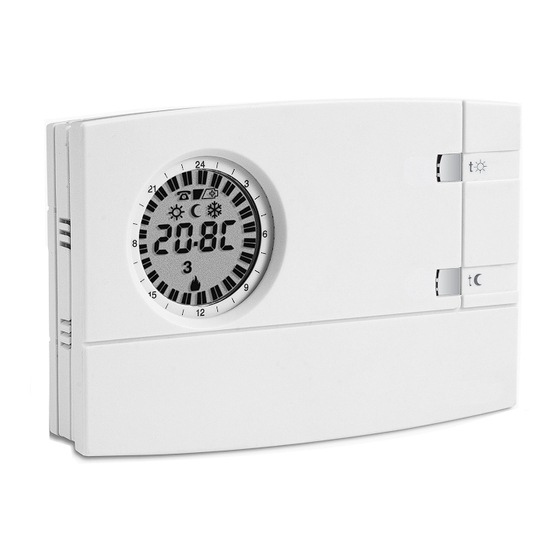
  • Page 29: Vue Générale Légende Des Indications Affichées Et Fonctions Des Touches

    8 - VUE GÉNÉRALE LÉGENDE DES INDICATIONS AFFICHÉES ET FONCTIONS DES TOUCHES Bouton de paramétrage : Affichage du type de Commutateur (voir les détails dans le heures-minutes ou visuel. cadre ci-dessous) fonctionnement en cours : Température ambiante Confort (5 ÷ 30 °C) Réduction Bouton rotatif Activation à...
  • Page 30: Réinitialisation

    10 - PROGRAMMATION 9 - RÉINITIALISATION “ Mettre le commutateur sur fonctionnement AUTOMATIQUE À la première mise sous tension ou en cas d'anomalies au niveau de l'affichage ou IMPORTANT: RÉINITIALISER le chronothermostat. du fonctionnement du chronothermostat Après quelques secondes, clignote à l'écran. Entrer l'heure etc., introduire une pointe fine (1 mm de dia- et les minutes actuelles en procédant comme décrit ci-après.
  • Page 31: Modification Des Réglages

    Copie du programme sur plusieurs jours (seulement MODIFICATION DES RÉGLAGES pour modèle hebdomadaire) Modification de l'heure actuelle “ Après avoir programmé le jour, il est possible de le copier (copy) “ Appuyer sur la touche jusqu' a u clignotement de l' h eure courante sur le jour suivant en appuyant simultanément sur les touches “...
  • Page 32: Affichage/Modification Des Températures Du Paramètre Confort / T Réduction

    11 - Tourner légèrement le bouton AFFICHAGE/MODIFICATION DES TEMPÉRATURES 1° souhaité ( confort ou DU PARAMÈTRE (à l'aide du bouton rotatif): réduction) pour afficher les CONFORT / t RÉDUCTION valeurs de température de Paramètres courants et entrer En règle générale, l'écran affiche la température ambiante relevée dans la procédure de réglage.
  • Page 33: Limite (Blocage) Du Réglage Max De Température Confort Et/Ou Réduction

    12 - LIMITE (BLOCAGE) DU RÉGLAGE MAX DE TEMPÉRATURE CONFORT ET/OU RÉDUCTION Dans certains cas particuliers d'installation du chronothermostat, comme par exemple les édifices publics, les hôtels, etc., il pourrait être utile de limiter les paramètres de température max, pour éviter des paramètres erronés effectués par du personnel non autorisé. Vous pourrez donc limiter les valeurs de Réglages (confort et/ou réduction) de température max comme suit : Déplacer le commutateur sur t Touche 23h...
  • Page 34: Différentiel De Température

    14 - FONCTIONNEMENT PROPORTIONNEL La programmation des commutateurs Dip (Dip- Au lieu du mode différentiel, il est possible de régler la switch) situés au dos du chronothermostat doit température en mode proportionnel (Dip 3 sur ON) ; ce système être confiée à du personnel qualifié. permet des économies d'énergie et réduit l'usure du brûleur en limitant sa durée de fonctionnement.
  • Page 35: Échelle De Température °C Ou °F

    15 - ÉCHELLE DE TEMPÉRATURE °C ou °F 16 - AVERTISSEMENTS “Lire attentivement le présent livret d’instructions d'utilisation ATTENTION : le chronothermostat a été réglé en et le conserver pour toute consultation ultérieure. usine pour utiliser les degrés Celsius (degrés “Les figures présentes dans le manuel représentent l'écran centigrades) et peut être modifié...
  • Page 36: Technische Daten

    1 - TECHNISCHE DATEN empf. Marken DURACELL oder ENERGIZER Betriebsspannung: 2 Stk. Alkali-Stabbatterien 1,5 V Typ AA LR6 ( Netzunabhängigkeit, Betriebsdauer: 2 Jahre Netzunabhängigkeit ab dem Erscheinen des Symbols Batterien entladen: 1 Monat Zu- und Abschaltung, Gerät: 1 / BU / Elektronisch Softwareklasse: Klasse A Nenn-Impulsspannung:...
  • Page 37 4 - BEFESTIGEN DER GRUNDPLATTE AN DER WAND 2 - ABMESSUNGEN “ Die zu steuernde Vorrichtung vom Stromnetz trennen “ Die Grundplatte an der Wand, der runden oder rechteckigen Einbaudose durch die passenden Löcherpaare anschrauben. “ Sollte die Wand, an der die Grundplatte des Zeitthermostats befes- tigt werden muss, aus Metall sein, sind die zwei Schrauben mit den zu diesem Zweck vorgesehenen Isolierscheiben zu versehen.
  • Page 38: Elektrische Anschlüsse

    5 - ELEKTRISCHE ANSCHLÜSSE Anschluss einer Telefonschaltung für Fernsteuerung Wichtig: die Installation und der elektrische Anschluss der Geräte muss Die Klemmen des Zeitthermostats dienen zum durch qualifiziertes Fachpersonal und im Einklang mit den geltenden Nor- Anschließen einer Telefonschaltung mit in Ruhestellung offenem men und gesetzlichen Bestimmungen ausgeführt werden.
  • Page 39: Einlegen / Auswechseln Der Batterien

    6 - BEFESTIGEN / ABNEHMEN DES THERMOSTATS VON DER GRUNDPLATTE Die Kabelabdeckung anbringen; dazu den Zahn in die Vertiefung der Grundplatte setzen und die Abdeckung durch leichtes Drücken auf die Haken einrasten lassen. Zum Abnehmen der Abdeckung einen kleinen Schraubendreher Zum Abnehmen des Thermostats an den Haken ansetzen.
  • Page 40 8 - ANSICHT, LEGENDE DISPLAY UND TASTENFUNKTIONEN Einstelltaste: Stunden-Minuten Umschalter- Wechselschalter - Betriebsmodus Anzeige des aktuellen oder Anz. der Umgebungstemperatur (für Details siehe Kasten unten) Betriebsmodus: Komfort (5 ÷ 30 °C) Aktivierung über Nacht Telefonschaltung Drehknopf Frostschutz Sollwerttemperatur (mit blinkender Anzeige) Komfort Anzeige des eingeschalteten...
  • Page 41 9 - RESET 10 - PROGRAMMIERUNG Beim ersten Einschalten oder wenn “ AUTOMATISCHEN Den Umschalter auf Betrieb stellen der Zeitthermostat eigenartige Anzeigen WICHTIG: einen RESET vornehmen hat oder falsch funktioniert usw., einen Nach einigen Sekunden blinkt auf dem Display und nun kann max.
  • Page 42: Ändern Der Einstellungen

    Kopieren des Programms für mehrere Tage ÄNDERN DER EINSTELLUNGEN (Nur bei Modell mit Wochenprogrammierung) Ändern der aktuellen Uhrzeit “ Nach der Programmierung des Tages kann man diese “ Halten Sie die Taste solange drücken, bis die laufende Einstellung auf den nächsten Tag kopieren (copy): dazu drückt Uhrzeit blinkt.
  • Page 43 11 - Den gewünschten Drehknopf ANZEIGE/ÄNDERUNG DER 1° Komfort oder Abnahme) SOLLWERTTEMPERATUREN (mittels Drehknopf): leicht drehen, um den aktuellen KOMFORT / t ABNAHME Temperatursollwert anzeigen l a s s e n u n d d e n N o r m a l e r w e i s e z e i g t d a s D i s p l a y d i e g e m e s s e n e Einstellvorgang zu beginnen.
  • Page 44 12 - BEGRENZUNG (SPERRE) DES MAX. TEMPERATURSOLLWERTES KOMFORT UND/ODER ABNAHME In besonderen Fällen der Installation der Raumthermostatuhr, z.B. in öffentlichen Gebäuden, Hotels, usw., könnte es nützlich sein, die max. Temperatursollwerte zu begrenzen, um falsche Einstellungen von Seiten nicht autorisierten Personals zu verhindern. Es ist nun möglich, die max.
  • Page 45 14 - PROPORTIONALBETRIEB Die Einstellungen der Mikroschalter (Dip-switch) auf Als Alternative zum Differentialmodus kann die Temperatur auch der Geräterückseite dürfen nur von einem Fachmann proportional geregelt werden (Dip 3 in Stellung ON); mit diesem vorgenommen werden. System kann man den Energieverbrauch reduzieren und auch den Verschleiß...
  • Page 46 15 - TEMPERATURSKALA °C oder °F 16 - HINWEISE “Bitte lesen Sie diese Installations- und ACHTUNG: Die Raumthermostatuhr ist im Werk Gebrauchsanleitungen aufmerksam und bewahren Sie sie für den Betrieb in Grad Celsius eingestellt und sorgfältig auf, um später darin nachschlagen zu können. kann vom Installateur oder erfahrenen Nutzer in “Die Abbildungen der Anleitung stellen das Display mit Grad Fahrenheit (°F) umgewandelt werden.
  • Page 47: Datos Técnicos

    1 - DATOS TÉCNICOS (se recomiendan pilas DURACELL o ENERGIZER) 2 pilas alcalinas de 1,5 V tipo AA LR6 Tensión de alimentación: 2 años Autonomía: 1 mes Autonomía desde el encendido del símbolo pilas agotadas: 1 / BU / Electrónico Tipo de acción, desconexión y aparato: de Clase A Software:...
  • Page 48: Dimensiones Máximas

    4 - FIJACIÓN DE LA BASE DE PARED 2 - DIMENSIONES MÁXIMAS “ Desactive la tensión de red del dispositivo que desea controlar. “ Fije con los tornillos la base: a la pared, a la caja empotrable redon- da o rectangular utilizando los pares de orificios . “...
  • Page 49: Conexiones Eléctricas

    5 - CONEXIONES ELÉCTRICAS Conexión de un programador telefónico para Importante: la instalación y la conexión eléctrica de los dispositivos control remoto y equipos deben ser realizadas por personal cualificado y conforme Los bornes del cronotermostato están predispuestos para con las normas y leyes en vigor. El fabricante declina cualquier res- la conexión de un programador telefónico con contacto ponsabilidad sobre el uso de productos que deben seguir normas normalmente abierto.
  • Page 50: Colocación O Sustitución De Las Pilas

    6 - FIJACIÓN O DESMONTAJE DEL CRONOTERMOSTATO DE LA BASE Coloque la tapa cubrecables insertando la pestaña en la ranura de la base y fíjela presionando ligeramente los ganchos . P a r a d e s m o n t a r e l Para desmontar la tapa, haga palanca con un pequeño cronotermostato de la base destornillador en cada uno de los ganchos .
  • Page 51 8 - VISTA GENERAL, LEYENDA DE LA PANTALLA Y FUNCIÓN DE LAS TECLAS Tecla configuración: horas-minutos Conmutador - modo de funcionamiento Visualización del tipo de o visual. Temperatura ambiente (ver detalle en cuadro de abajo) funcionamiento en curso: Comfort Activación mediante el (5 ÷...
  • Page 52: Programación

    10 - PROGRAMACIÓN 9 - REINICIALIZACIÓN “ AUTOMÁTICO Sitúe el conmutador en funcionamiento La primera vez que se enciende el cro- notermostato o si presenta signos anor- IMPORTANTE: realizar l’operación de RESET males o un funcionamiento incorrecto etc., Al cabo de unos segundos la pantalla muestra que parpadea, inserte una varilla fina (máx 1 mm) en el especifique la hora y minutos actuales como se describe a continuación.
  • Page 53: Modificación De Los Ajustes

    Copia del programa en varios días MODIFICACIÓN DE LOS AJUSTES (sólo para el modelo semanal) “Después de haber efectuado la programación del día, es posible Modificación de la hora actual “ copiarla (Copy) en el día sucesivo presionando Mantener presionada la tecla hasta que parpadee la al mismo tiempo las teclas...
  • Page 54 11 - VISIALIZACIÓN/MODIFICACIÓN DE LAS G i r a r b r e v e m e n t e l a 1° respectiva rueda ( confort o (con las ruedas): TEMPERATURAS DE SET reducción) para visualizar CONFORT / t REDUCCIÓN el valor de la temperatura de Set actual e iniciar el ajuste.
  • Page 55 12 - LIMITACIÓN (BLOQUEO) DEL SET MÁX DE TEMPERATURA CONFORT Y/O REDUCCIÓN En algunos casos de instalación del cronotermostato, por ejemplo en edificios públicos, hoteles, etc., es importante limitar el set de temperatura para evitar configuraciones equivocadas por parte de personal no autorizado. Se pueden limitar los valores de Set (confort / reducción) de temperatura como sigue: Mover el conmutador a t Tecla h23...
  • Page 56: Diferencial De Temperatura

    14 - FUNCIONAMIENTO PROPORCIONAL La configuración de los microinterruptores (Dip- switch) situados en la parte posterior del Como alternativa al diferencial, la temperatura se puede regular cronotermostato, debe llevarla a cabo personal en modo proporcional (Dip 3 en la posición ON); este sistema cualificado.
  • Page 57 15 - ESCALA DE TEMPERATURA °C o °F 16 - ADVERTENCIAS “Lea atentamente este manual de instrucciones y ATENCIÓN: consérvelo para futuras consultas. El cronotermostato viene programado de fábrica para el funcionamiento en escala Celsius (grados “Las figuras contenidas en este manual muestran la pantalla centígrados) pero el instalador o el usuario la con la configuración de la escala de las temperaturas en ºC pueden modificar en grados Fahrenheit (°F).
  • Page 58 SMALTIMENTO DI VECCHI APPARECCHI ELETTRICI ED ELETTRONICI (direttiva europea 2002/96/CE) Questo simbolo sul prodotto o sul suo imballo indica che questo prodotto non può essere trattato come rifiuto domestico. Al contrario, dovrà essere portato ad un punto di raccolta determinato per il riciclaggio degli apparecchi elettrici ed elettronici, come ad esempio: - punti vendita, nel caso si acquisti un prodotto nuovo simile a quello da smaltire - punti di raccolta locali (centri di raccolta rifiuti, centri locali di riciclaggio, ecc...).
  • Page 59 ENTSORGUNG VON GEBRAUCHTEN ELEKTRISCHER UND ELEKTRONISCHER GERÄTEN (EU-Richtlinie 2002/96/EG) Dieses Symbol auf dem Produkt oder seiner Verpackung weist darauf hin, dass dieses Produkt nicht als normaler Haushaltsabfall zu behandeln ist, sondern an einer Annahmestelle für dal Recycling von elektrischen oder elektronischen Geräten abgegeben werden muss, wie zum Beispiel: - an den Verkaufsstellen, falls Sie ein ähnliches Neugerät kaufen.

Table des Matières