Publicité

Les langues disponibles

Les langues disponibles

Liens rapides

DMX240 Controller
Ref. nr.: 154.090
INSTRUCTION MANUAL
V2.1

Publicité

Table des Matières
loading

Sommaire des Matières pour Beamz DMX240

  • Page 1 DMX240 Controller Ref. nr.: 154.090 INSTRUCTION MANUAL V2.1...
  • Page 3 ENGLISH Congratulations to the purchase of this Beamz product. Please read this manual thoroughly prior to using the product in order to benefit fully from all features. Read the manual prior to using the product. Follow the instructions in order not to invalidate the warranty. Take all precautions to avoid fire and/or electrical shock.
  • Page 4: Unpacking Instruction

    UNPACKING INSTRUCTION CAUTION! Immediately upon receiving the product, carefully unpack the carton, check the contents to ensure that all parts are present, and have been received in good condition. Notify the shipper immediately and retain packing material for inspection if any parts appear damage from shipping or the package itself shows signs of mishandling.
  • Page 5 OVERVIEW 1. Fixture buttons (1 – 12) 11. Tap Sync/Display Used to select relevant fixture for control. Used to create a standard beat or to change the values display between % and 255. 2. Scene buttons (1-8) Press the scene buttons to load or stored your scenes. 12.
  • Page 6: Rear View

    REAR VIEW 1. Audio in 5.DMX In 0.1V – 1Vp-p This connector accepts your DMX input signals. 2.Midi in 6. DC Input Receives MIDI data. DC 9 – 12V, 300mA 3. DMX Polarity select Make sure the polarity of your fixture. 7.
  • Page 7: Programming Scenes

    1.2 PROGRAMMING SCENES 1. Enter Program mode. 2. Press the Fixtures button to turn on its fader control, which is indicated by the lit LED. You may select several scanners at a time by tapping of these Fixtures buttons, so you can assign several fixtures at a time with this unit.
  • Page 8 EXAMPLE: Program 8 scenes with channel 1-8 at full in sequence into bank 2 and assign these scenes to fixtures 2. 1. Program enable. 2. Tap the Scanner 2 button to turn on its fader control. 3. Tap the Page Select button to select Page A. 4.
  • Page 9: Delete All Scenes

    1.5 SCENE COPY 1. Program enable. 5. Tap the MIDI/Rec button. 2. Tap the Bank Up/Down button to select the bank that contains the scene you wish to copy. 3. Select the scene you want to 6. Tap the Scene button you wish to copy by tapping its Scene button.
  • Page 10: Programming Chases

    1.8 BANK COPY 1. Program enable. 2. Tap the Bank Up/Down button to select the bank you wish to copy. 3. Tap the MIDI/Rec button. 4. Tap the Bank Up/Down button to select the bank you wish to copy to. 5.
  • Page 11: Delete A Step

    5. Tap the MIDI/Rec Copy button, all LEDs and the Segment Display will flash three times briefly indicating all 8 scenes in this bank have been programmed into this chase. 2.2 ADD A STEP 1. Program enable. 2. Select the chase you wish to add a step to. 3.
  • Page 12: Delete All Chases

    2.4 DELETE A CHASE 1. Select the chase you wish to delete. 2. Press and hold down the Auto/Del button. Tap the Chase button while holding down the Auto/Del button, all LEDs and the Segment Display will flash three times briefly indicating this chase has been deleted.
  • Page 13 7. While pressing the mode button, tap the Scene button, all LEDs should flash briefly indicating the D MX channel is assigned. (Scene button 1 stands for DMX channel 1, Scene button 2 stands for DMX channel 2, and so on. 8.
  • Page 14 2. Apply the power again, tap the TAP/Display button to change between Fade time and assign fade time, the LCD reads Only X/Y ALL CH FD Time FD Time 3. Press the Mode and TAP/Display buttons at a time to store your setting into memory.
  • Page 15: Auto Mode

    3.7 SET UP NEW LOGO 1. Turn the power off. 2. Press and hold down the fixture 6 and fixture 12 buttons at a time. Apply the power again while pressing the two buttons, then release the two buttons. 3. Tap the Fixture 6(or 12) button to move the cursor to the left (or right). 4.
  • Page 16: Music Mode

    3. After selecting the bank of scenes you wish to run, you can use the Speed slider (or Tap Sync/ Display button) and Fade Time slider to adjust the scenes to your desired effect. Hints: The Tap Sync button is used to set the speed by tapping the button several times, the last two taps will define the speed with a maximum of 10 minutes.
  • Page 17 5.2 AUTO MODE 1. Tap the Auto/Del button to activate Auto mode. The auto LED lights indicating music mode is active. 2. Select your desired chase by tapping one of the six Chase buttons. A second tap of this button will deactivate this function. 3.
  • Page 18 Esta garantía no es aplicable en caso de accidente o daños ocasionados por uso indebido del aparato o mal uso del mismo. Beamz no se hace responsable de daños personales causados por el no seguimiento de las normas e...
  • Page 19: Instrucciones De Desembalaje

    INSTRUCCIONES DE DESEMBALAJE ATENCIÓN! Inmediatamente después de recibir un dispositivo, desempaque cuidadosamente la caja de cartón, compruebe el contenido para asegurarse de que todas las partes están presentes, y se han recibido en buenas condiciones. Notifique inmediatamente al transportista y conserve el material de embalaje para la inspección por si aparecen daños causados por el transporte o el propio envase muestra signos de mal manejo.
  • Page 20: Vista Frontal

    VISTA FRONTAL 1. Botones fijos (1 – 12) 11. Tap Sync/Display Se utiliza para seleccionar el accesorio a controlar. Se utiliza para crear un compás estándar o para cambiar la visualización de valores entre% y 255. 2. Botones Escenas (1-8) 12.
  • Page 21 1.0 GUIA OPERACIONES GENERAL Esta unidad le permite programar 12 escáneres de 16 canales DMX, 30 bancos de 8 escenas programables, 6 persecuciones de 240 escenas programadas utilizando 8 faders y otros botones de función. Con el uso de dos jog wheels, usted puede controlar fácilmente el Pan o Tilt de los accesorios.
  • Page 22 6. Pulse en el botón Arriba / Abajo para seleccionar el banco en el que desea almacenar su escena. Hay total de 30 bancos para seleccionar, puede almacenar hasta 8 escenas en cada banco. 7. Toque el botón Escena para almacenar su escena, todos los LEDs y la pantalla del segmento parpadearán tres veces brevemente indicando esta operación, entonces la pantalla del segmento mostrará...
  • Page 23 6. Presiona el botón Escena que corresponde a la escena que está editando. Esta acción sobrescribirá la escena seleccionada. NOTA: Asegúrese de seleccionar la misma escena en los pasos 3 y 6, de lo contrario puede grabar accidentalmente en una escena existente. 1.4 COPIA DE ESCANER Esta función le permite copiar los ajustes de un escáner a otro.
  • Page 24: Borrar Una Escena

    1.6 BORRAR UNA ESCENA 1. Pulse el botón Escena deseado para seleccionar la escena que desea eliminar 2. Presione y mantenga presionado el botón Auto / Del. Mientras mantiene presionado el botón Auto / Del, toque el botón Escena que almacena la escena que desea eliminar.
  • Page 25 2.0 PROGRAMANDO PERSECUCIONES Debe programar escenas antes de que pueda programar persecuciones, esta función le permite almacenar hasta 240 escenas en una persecución. 1. Activar programa. 2. Toque el botón Chase para seleccionar la persecución a programar. Cada vez que puede seleccionar una persecución solamente.
  • Page 26 6. Toque de nuevo el botón Tap Sync / Display, la pantalla de segmento muestra la persecución, la escena y el banco actuales. Crear una escena deseada y grabar como un nuevo paso o seleccionar una escena programada que desea agregar a esta persecución. Sugerencias: Puede presionar el botón Sincronizar / Pantalla para cambiar el modo de visualización entre el paso y el banco.
  • Page 27 3.0 ASIGNAR/INVERTIR CANAL DMX 3.1 ASIGNAR CANAL DMX Activar programa. 2. Presione los botones Fine y Mode a la vez, el LED Assign se encenderá indicando que el modo Assign está activo. 3. Utilice el botón Arriba / Abajo para cambiar entre la panorámica y la inclinación, las luces LED correspondientes que indican esta selección, 4.
  • Page 28 5. Pulse el botón del escáner para seleccionar el escáner. 6. Pulse el botón de selección de página para seleccionar la página A o la página 7. Mientras presiona el botón de modo, toque el botón Escena, todos los LEDs parpadearán brevemente indicando que el canal DMX está...
  • Page 29 3.5 BORRAR TODOS LOS CANALES DMX 1. Desconecte la alimentación. 2. Presione los botones Mode y Auto / Del a la vez. 3. Mientras presiona los dos botones, vuelva a aplicar la alimentación, todos los LEDs parpadearán brevemente, indicando que todos los canales DMX asignados o invertidos están borrados.
  • Page 30 4.0 ESCENAS EN REPRODUCCIÓN 4.1 MODO MANUAL 1. Cuando se enciende la unidad, esta unidad entra en el modo Manual automáticamente. 2. Asegúrese de que los indicadores de activación automática y de disparo de música en la pantalla de segmento están apagados. 3.
  • Page 31 2. Utilice el botón Arriba / Abajo para seleccionar el banco que contiene las escenas que desea ejecutar. Las escenas que haya seleccionado se perseguirán en orden secuencial de acuerdo con los ritmos musicales detectados por el micrófono incorporado. 3. Toque el botón Música / Bank Copy de nuevo para salir del modo de Música. 5.0 PERSECUCIONES EN REPRODUCCIÓN Debe programar escenas antes de ejecutar persecuciones.
  • Page 32 6.0 OPERACIÓN MIDI 6.1 AJUSTES CANAL MIDI 1. Presione y mantenga presionado el botón MIDI / Rec durante tres segundos,Los dos últimos dígitos de la pantalla del segmento parpadearán para indicar MIDI La configuración del canal está lista. 2. Utilice el botón Arriba / Abajo para seleccionar el canal DMX 01-16 Asignar al canal MIDI.
  • Page 33 La garantie deviendrait également caduque en cas d’accidents ou dommages causes par une utilisation inappropriée de l’appareil ou un non respect des consignes présentes dans cette notice. Beamz ne pourrait être tenu responsable en cas de dommages matériels ou corporels causés par un non respect...
  • Page 34: Deballage

    DEBALLAGE ATTENTION ! Immédiatement après réception, vérifiez le contenu du carton et assurez-vous que tous les éléments sont bien présents et en bon état. Si besoin, faites les réserves nécessaires si le matériel ou les cartons sont endommagés. SI l’appareil doit être retourné, faites-le dans l’emballage d’origine.
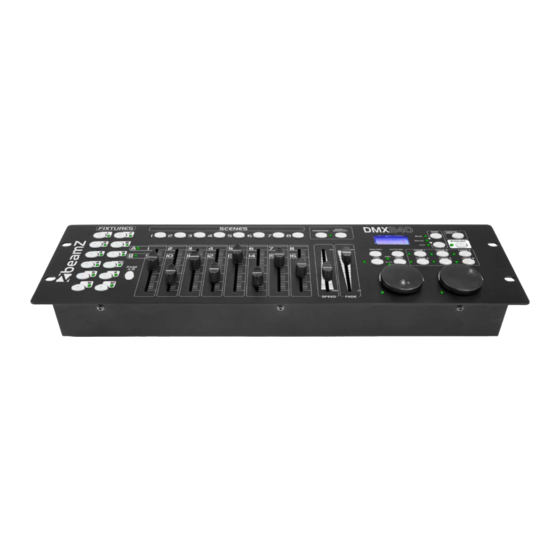
  • Page 35: Face Avant

    FACE AVANT 1. Touches Fixture (1 – 12) Touches pour sélectionner l'appareil à gérer. 11. Touche Tap Sync/Display Pour créer un beat standard ou pour charger les valeurs 2. Touches Scene (1-8) d'affichage entre % et 255. Appuyez sur les touches Scene pour charger les scènes ou les mémoriser.
  • Page 36: Face Arriere

    FACE ARRIERE 1. Audio in 5.DMX In 0.1V – 1Vp-p Prise pour les signaux d'entrée DMX 2.Midi in 6. DC Input Reçoit les données MIDI DC 9 – 12V, 300mA 3. DMX Polarity select 7. USB Vérifiez la polarité de l'appareil. Port USB pour brancher une lampe USB 4.
  • Page 37: Programmation De Scenes

    1.2 PROGRAMMATION DE SCENES 1. Activez le mode Programmation. 2. Appuyez sur la touche Fixtures pour activer son réglage, signalé par la LED. Vous pouvez sélectionner plusieurs appareils en appuyant sur les touches correspondantes ; vous pouvez ainsi assigner plusieurs appareils à cette console. 3.
  • Page 38: Editer Une Scene

    EXEMPLE: Programmation de 8 scènes avec les canaux 1 à 8 dans la banque 2 et assignation de ces scènes aux appareils 2. 1. Activez le mode Programmation. 2. Appuyez sur la touche Scanner 2 pour activer son réglage. 3. Appuyez sur la touche Page Select pour sélectionner Page A. 4.
  • Page 39: Copier Une Scene

    NOTE: Assurez-vous de sélectionner la même scène aux points 3 et 6, sinon, vous pouvez, par inadvertance, écraser une scène existante. 1.4 COPIE DE REGLAGES Cette fonction vous permet de copier les réglages d'un appareil sur un autre. 1. Appuyez sur la touche Scanner que vous voulez copier et maintenez-la enfoncée. 2.
  • Page 40: Effacer Toutes Les Scenes

    1.7 EFFACER TOUTES LES SCENES Cette fonction réinitialise tous les canaux DMX sur 0. 1. Une fois l'appareil éteint, maintenez les touches Program et Bank enfoncées en même temps. 2. Rallumez l'appareil, toutes les scènes sont effacées. 1.8 COPIER UNE BANQUE 1.
  • Page 41: Programmer Une Banque De Scenes Dans Un Chase

    3. Sélectionnez une scène dans la banque qui contient les scènes mémorisées (voir point Programmation scènes). 4. Appuyez sur la touche MIDI/Rec. 5. Répétez les points 3-4 jusqu'à atteindre l'effet voulu. Vous pouvez mémoriser jusqu'à 240 scènes dans un chase. 2.1 PROGRAMMER UNE BANQUE DE SCENES DANS UN CHASE 1.
  • Page 42 2.3 EFFACER UN STEP 1. Activez le mode Programmation. 2.Sélectionnez le chase dans lequel vous voulez effacer le Step. 3. Appuyez sur la touche Tap Sync/Display ; l'affichage indique les steps. 4. Appuyez sur la touche Bank Up/Down pour aller au step à effacer. 5.
  • Page 43 5. Appuyez sur le bouton correspondant à l'appareil à sélectionner. 6. Activez la touche de sélection de page pour choisir entre page A ou page B. 7. En appuyant sur la touche Mode, appuyez sur la touche Scene : toutes les LEDs doivent clignoter brièvement indiquant que le canal DMX est assigné.
  • Page 44: Duree De Transition

    3.3 DUREE DE TRANSITION 1. Eteignez l'appareil, appuyez en même temps sur les touches Mode et TAP/Display. 2. Rallumez l'appareil ; appuyez sur la touche TAP/Display pour commuter entre Fade time et assign fade time, l'affichage LCD indique ALL CH Only X/Y FD Time FD Time...
  • Page 45: Regler Un Nouveau Logo

    3. Appuyez sur la touche Scanner qui contient le canal Pan et Tilt, l'affichage LCD indique le Pan et Tilt. 3.7 REGLER UN NOUVEAU LOGO 1. Eteignez l'appareil. 2. Appuyez et maintenez enfoncées, en même temps, les touches des appareils 6 et 12. Rallumez tout en appuyant sur les deux touches puis relâchez-les.
  • Page 46: Mode Musique

    2. Utilisez la touche Bank Up/Down pour sélectionner une banque de scènes. 3. Après avoir sélectionné la banque de scènes à faire défiler, vous pouvez utiliser le réglage de vitesse (ou la touche Tap Sync/Display) et le fader Fade Time pour régler les scènes sur l'effet voulu.
  • Page 47: Mode Manuel

    5.0 CHASES Vous devez programmer les scènes avant de faire défiler les chases. 5.1 MODE MANUEL 1. Lorsque l'appareil est allumé, il est automatiquement en mode Manuel.. 2. Sélectionnez le chase voulu en activant une des six touches Chase. Par une seconde pression, vous désactivez la fonction.
  • Page 48 6.2 IMPLEMENTATION Cet appareil reçoit des signaux Note On qui permettent de faire défiler 15 banques (01-15) de scènes et 6 chases de scènes. En plus, la fonction Blackout peut être activée par un signal MIDI. Banque Numéro Note Fonction Banque 1 00 à...
  • Page 49: Declaration Of Conformity

    7602 KM – ALMELO +31(0)546589299 +31(0)546589298 The Netherlands Product number: 154.090 Product Description: DMX 240 Controller Trade Name: BEAMZ Regulatory Requirement: EN 55013:2001+A1:2003+A2:2006 EN 61000-3-2:2006+A1:2009+A2:2009; EN 61000-3-3:2008 EN 55020: 2007+A11:2011 EN61000-4-2:2009; -4-3:2006+A1:2008+A2:2010; -4-4:2012; -4-5:2006; -4-6:2009; -4-8:2010; -4-11:2004 EN 61347-1:20008+A1:2011+A2:2013 EN 61347-2-13:2006+AC:2010 I hereby declare that the product meets the requirements stated in Directives 2014/35/EU and 2014/30/EU and conforms to the above mentioned Declarations.
  • Page 50 Specifications and design are subject to change without prior notice.. www.tronios.com Copyright © 2016 by TRONIOS the Netherlands...

Ce manuel est également adapté pour:

154.090

Table des Matières