Publicité

Les langues disponibles

Les langues disponibles

Liens rapides

DVA72BT
Moniceiver
10005540
www.auna-multimedia.com

Publicité

Table des Matières
loading

Sommaire des Matières pour auna multimedia DVA72BT

  • Page 1 DVA72BT Moniceiver 10005540 www.auna-multimedia.com...
  • Page 2: Sicherheitshinweise Und Gewährleistung

    Sehr geehrter Kunde, zunächst möchten wir Ihnen zum Erwerb Ihres Gerätes gratulieren. Bitte lesen Sie die folgenden Anschluss- und Anwendungshinweise sorgfältig durch und befolgen Sie diese um möglichen technischen Schäden vorzubeugen. Sicherheitshinweise und Gewährleistung • Diese Bedienungsanleitung dient dazu, Sie mit der Funktionsweise dieses Produktes vertraut zu ma- chen.
  • Page 3: Technische Daten

    Technische Daten Artikelnummer 10005540 Stromversorgung DC 12V Abmessungen 178 x 100 x 162mm DVD-Laufwerksdaten Format DVD/VCD/JPEG/MP4/MP3/WMA/CD Videosystem NTSC Audiosystem 24 bit / 96KHz Einzugssystem automatisch Einbauwinkel 0 bis +/-30° Videosignaldaten Seitenverhältnis 16:9 und 4:3 Ausgangsleistung Composite: 1.0 ± 0,2V p-p; Ladungsimpedanz: 75Ω Horizontale Auflösung Audiosignaldaten Audioausgang (analog)
  • Page 4 Einbauhinweise • Wählen Sie einen Einbauort, an dem das Gerät den Fahrer nicht behindert. • Schließen Sie die Kabel testweise an und testen das Gerät bevor Sie das Gerät endgültig fi xieren. • Verwenden Sie nur das mitgelieferte Montagezubehör. • Sollten Sie Veränderung an Ihrem Fahrzeug vornehmen bzw.
  • Page 5 Verkabelung Anschluss A Anschluss B Lautsprecher hinten rechts Lautsprecher hinten rechts Lautsprecher vorn rechts Dauerplus 12V Lautsprecher vorn rechts Autom. Antenne Lautsprecher vorn links Lautsprecher vorn links Zündplus 12V Lautsprecher hinten links Erde GRD Lautsprecher hinten links...
  • Page 6 Anschluss der Handbremse...
  • Page 7 Bedienelement anbauen • Setzen Sie das Bedienelement zuerst auf der linken Seite ein (1). (Notiz: Die Ausbuchtung muss hierbei auf den Haken treffen.) • Drücken Sie dann die rechte Seite an das Gerät bis ein Klicken zu hören ist (2). Achtung: Fassen Sie hierbei nicht an die Kontakte, da dieses zu Kontaktfehlern führen kann.
  • Page 8 Anschluss-Skizze Achtung: Eine Erdung (Handbremse B-) muss angeschlossen sein, um Bilder wiederzugeben. Ist das Kabel nicht angeschlossen, wird „PARKING BRAKE“ angezeigt.
  • Page 9: Disk Einlegen/Auswerfen

    Fernbedienung vorbereiten • Drücken Sie den Batteriehalter wie auf den Bild zu sehen (1) und ziehen Sie diesen heraus (2). • Ersetzen Sie die Batterie. Beachten Sie hierbei die richtige Polung (3). • Setzen Sie den Batteriehalter wieder in die Fernbedienung ein (4). Gebrauch der Fernbedienung Halten Sie die Fernbedienung in Richtung des Geräts.
  • Page 10: Auf Werkseinstellungen Zurücksetzen

    Monitor ein-/ausfahren und einstellen • Drücken Sie „OPEN“ am Bedienelement und der Monitor wird automatisch ausgefahren. • An einer gewissen Position schwenkt der Monitor nach oben und stoppt in der Vertikalen. • Sobald der Monitor gestoppt hat, können Sie mittels der Taste (19) auf der Fernbedienung schrittweise den Winkel einstellen.
  • Page 11: Bedienelemente

    Bedienelemente...
  • Page 12 Monitor ein-/ausfahren Öffnen / AF Lange drücken, um AF zu aktivieren. Siehe RDS Kurz drücken für folgende Einstelllungen (im Radio-Modus gedrückt halten): Bass, Treble, Balance, SWF VOL, SWF FREQ. Drehen, um die Einstellung vorzunehmen / Lautstärke ändern. Vol/Einstellungen/SEL (=Auswahl) Im Radio-Modus drücken Sie SEL kurz, um zwischen manuellem und auto- matischem Scan-Modus zu wählen.
  • Page 13: Reset-Taste

    Diskwiedergabe: Drücken Sie zum Pausieren diese Taste. Zum Fortsetzen der Wiedergabe drücken Sie erneut diese Taste. Radiomodus: Auf diesen Tasten können Sie für jedes einzelne Frequenzband (FM1, FM2, FM3, AM1, AM2) je 6 Sender insgesamt 30 Sender speichern. • Sender speichern •...
  • Page 14 Fernbedienung...
  • Page 15 Ein/Aus/MOD: Drücken, um das Gerät einzu- 1 CLK: Uhrzeit anzeigen schalten. Drücken und halten, um das Gerät aus- zuschalten. 2 PAIR: BT-Verbindung herstellen Play/Pause STOP: Einmal drücken, um Wiedergabe zu pau- sieren. Zweimal drücken, um die CD vom Anfang 17 MUTE: Stummschaltung ein-/ausschalten abzuspielen.
  • Page 16: Bedienung

    Bedienung Radiowiedergabe Berühren Sie das RADIO-Symbol auf dem Touchscreen. Tippen Sie im Radio-Modus auf , um den Bild- schirm zu verdunkeln (1x = halbdunkel; 2x = Display aus; tippen Sie auf eine beliebige Stelle, um den Bild- schirm wieder auf normale Helligkeit zu bringen. Zwischen den Frequenzbändern wählen Mit dem Band Symbol können Sie das Frequenzband wählen (FM1, FM2, FM3, MW1 und MW2).
  • Page 17 Zwischen Lokal und Distanz Modus wählen Drücken Sie LO/DX um LOC zu wählen für lokale Sender mit schwachen Interferenzen. Drücken Sie LO/DX um DX zu wählen für entfernte Sender mit starken Signalen. Senderspeicher Sie können bis zu 30 Sender auf den 5 verfügbaren „Bändern“ speichern (jeweils 6 pro Band). Die Sender können unter FM1, FM2, FM3, AM1 und AM2 abgelegt werden.
  • Page 18 Scan-Funktion Durch kurzes Drücken des APS Symbols/Knopfes durchläuft das Radio jeden voreingestellten Sender in FM und MW und spielt diesen kurz an. RDS-Funktion Drücken Sie im Hauptmenü , um das EInstellungsmenü aufzurufen. Es erscheint das hier abgebildete Display: Mögliche Einstellungen: Beachten Sie, dass die Optionen sich auf mehrere Seiten (Pfeiltasten zum Blättern) befinden können.
  • Page 19 Generelle Steuerung der Medienwiedergabe (DVD, VCD, USB, Stummschaltung Alternativfrequenz ein/aus Play/Pause Schneller Vor-/Rücklauf Nächster / Voriger Track Intro-Funktion Repeat-Funktionen Leiser/Lauter Zufällige Reihenfolge Loudness ein/aus Zurück zum vorigen Menü Subwoofer ein/aus Freisprechen / BT Telefonie Verkehrsmeldungen ein/aus Bildschirm verdunkeln...
  • Page 20 Notiz: Während der JPEG-Wiedergabe können Sie mit den Richtungstasten (FB) das Bild drehen (Pfeil oben = Bild invertieren, Pfeil unten = Bild spiegeln, Pfeil links = Bild nach links drehen, Pfeil rechts = Bild nach rechts drehen). Wiedergabemodi: Drücken Sie hierzu während der Wiedergabe „RPT, RDM, INT“. Wiederholungsmodi: Drücken Sie hierzu wiederholt RPT.
  • Page 21 BT- Verbindung und Bedienung Pairing und Verbindung Bevor Sie zum ersten Mal ein BT Gerät als Freisprecheinrichtung für ein BT-fähiges Handy verwenden, muss dieses wie folgt verpaart und verbunden werden. • Während der Verwendung des BT Gerätes, bewahren Sie das BT Handy max. 3 Meter vom Auto A/V System entfernt auf.
  • Page 22 Funktionen: Mikrofon-Stummschaltung Liste der verpassten Anrufe Leiser/Lauter Kontakte Tonausgabe wechseln (Tele- Das Ziffernfeld aufrufen fon/Moniceiver) Ausgehenden/Eingehenden Verbindung unterbrechen Anruf anzeigen BT Music Durch Drücken von BT Music im Source Menü oder Drücken des Modus Knopfes wird die BT Music Ober- fläche wie folgt aufgerufen: Bitte beachten Sie: •...
  • Page 23 Die Bedienflächen zeigen jeweils die bereits oben beschriebenen Funktionen und sind analog zur Steue- rung anderer Medien zu bedienen:...
  • Page 24 USB - Anschluss und Bedienung • Verbinden Sie das USB-Speichermedium wir hier zu sehen mit dem USB-Anschluss Starten Sie die Wiedergabe über den Touchscreen oder mit der Fernbedienung. Mit den Richtungstasten und ENTER eine Datei auswählen und wiedergeben. Mit den Pfeiltasten , sowie den Tasten für schnellen Vor- und Rücklauf und PLAY/PAUSE und STOP navigieren sie komfortabel durch Ihre mobile Musikdatenbank.
  • Page 25 SD/MMC-Modus starten Wechseln Sie nach dem Einlegen durch Drücken vom MODE zum SD/MMC-Modus. MP3/WMA/JPEG/MPEG4-Wiedergabe Das Gerät unterstützt die Wiedergabe von MP3/WMA/JPEG/MPEG4. Legen Sie eine Disk, ein USB- oder ein SD-Medum ein, erscheint untenstehendes Menü. Die Wiedergabe des ersten Titels beginnt automatisch. Berühren Sie zur Wiedergabe der anderen Modi (MP3/WMA/JPEG/MPEG4) das entsprechende Symbol.
  • Page 26: Systemeinstellungen

    Einstellungen • Drücken Sie während der Medienwiedergabe die Einstellungstaste. • Das obige Einstellungsmenü wird angezeigt. • Wählen Sie mittels Richtungstasten den gewünschten Punkt. • Drücken Sie zum Verlassen EXIT auf dem Bildschirm oder SETUP auf der Fernbedienung. Systemeinstellungen...
  • Page 27: Spracheinstellungen

    TV System Stellen Sie hier das Farbformat (PAL/NTSC/AUTO) des Zusatzbildschirms ein. Screen Saver Unter diese Punkt können Sie den Bildschirmschoner ein-/ausschalten. TV Type Stellen Sie je nach Bildschirm das Seitenverhältnis ein: Normal/PS (für 4:3 TV), Normal/LB (für 4:3 TV), Wide (für 16:9 TV) Password Hier können Sie das Passwort der Kindersicherung ändern (Standard: 0000).
  • Page 28: Uhrzeit Einstellen

    Einstellung des TFT-Monitors • Berühren Sie während der Wiedergabe, um das Hauptmenü aufzurufen: Die Tasten am unteren Rand des Hauptmenüs: Gerät ausschalten. Einstellungsmenü aufrufen. Monitor nach oben bewegen. Monitor ein-/ausfahren. Monitor nach unten bewegen. Disk auswerfen Einstellungen Tippen Sie auf „SYSTEM“, wählen Sie mit den Pfeil- tasten (oben/unten) den Einstellungspunkt und nehmen Sie die Einstellungen mit den Pfeiltasten (rechts/links) vor.
  • Page 29 Klangeinstellungen Tippen Sie auf „SOUND“, wählen Sie mit den Pfeiltasten (oben/unten) den Einstellungspunkt und nehmen Sie die Einstellungen mit den Pfeiltasten (rechts/links) vor. Mögliche Einstellungen: Treble, Bass, Balance, Fade, Subwoofer (ein/aus), Loudness (ein/aus), Radio LOC/DX: LOC/DC, Radio Stereo (Stereo/Mono), Buzzer (ein/aus). Tippen Sie „EQ“...
  • Page 30 Fehlerbehebung SYMPTOM URSACHE LÖSUNG Zündung ausgeschaltet Zündung einschalten Kein Strom Sicherung defekt Sicherung ersetzen Disk im Player Disk entfernen Disk mit bedruckter Seite nach Disk falschherum eingelegt Disk wird nicht eingezogen/aus- oben einlegen geworfen Disk verschmutzt Disk reinigen bzw. ersetzen Temperatur in Auto zu hoch Innenraum abkühlen lassen Falsches Farbsystem aktiv...
  • Page 31: Konformitätserklärung

    Konformitätserklärung Hersteller: Chal-Tec GmbH, Wallstraße 16, 10179 Berlin, Deutschland Dieses Produkt entspricht den folgenden Europäischen Richtlinien: 2011/65/EU (RoHS) 1999/5/EG (R&TTE)
  • Page 32: Important Safety Advice

    Dear Customer, Congratulations on purchasing this product. Please read and follow these instructions, in order to avoid damaging the item. We do not cover any damages that may arise from improper use of the item or the disregard of the safety instructions. Important Safety Advice •...
  • Page 33: Technical Data

    Technical Data Article no. 10006700 General Radio Frequency coverage FM: 87.5 - 108 MHz Power supply 12 V DC (11 V-15 V) FM / MW MW: 522 - 1620 KHz Power consump- FM: 10.7 MHz <15A tion MW: 450 KHz FM: 15 dBu (S/N=30dB) Signal system Composite-Video 1.0 Vp-p 75 Ω...
  • Page 34: Din Front/Rear-Mount

    Installation • Choose the mounting location where the unit will not interfere with the normal driving. • Before finally installing the unit, connect the wiring temporarily and make sure it is all connected up properly and the unit and the system work properly. •...
  • Page 35 If you want to take CHASSIS out of the SLIDE BRACKET HOUSING, first remove the PLASTIC TRIM OUT of the both sides away, then insert the two KEY PLATE into left and right side of chassis as above illustration. How To Remove And Install The Front Panel When detaching or attaching the control panel, be careful not to damage the connectors on the back of the control panel and on the panel holder.
  • Page 36 ATTACHING THE FRONT PANEL • First, insert the left side of the front panel into the main unit (See (1)). ( Note: the Hollow ” point on the front panel must be attached into the “Bulge” point of the unit . ) •...
  • Page 37: Connection Diagram

    Connection Diagram Note: the earth connection cable (parking brake B-) must be connected in order for pictures to be played back to the monitor. If the cable has not been correctly connected, the message “PARKING BRAKE” appears on the monitor.
  • Page 38: Power On/Off

    Preparing the Remote Control • First push to inside as the direction indicated by the arrow (See 1) and then Remove the battery holder as the direction indicated by the arrow (See 2). • Replace the battery Set a new battery property with (+)side up as illustrated (See 3). •...
  • Page 39: Reset Factory Settings

    OPEN/CLOSE MONITOR AND ANGLE ADJUSTMENT • Touch OPEN button on front panel. The monitor will draw out automatically . • When the monitor draws out to a certain location, it will turn upward automatically and stop at vertical position . •...
  • Page 40: Control Panel

    Control Panel...
  • Page 41 Press to slide monitor in/out. Open / AF Hold to activate / deactivate AF. In normal mode, the VOL knob is used to change the volume. Press SEL (in radio mode: press and hold) to switch between BASS, TREBLE, BALANCE, SWF VOL, and SWF FRQ. Vol/SEL After switching to the desired parameter, change the value rotating the VOL knob or press VOL+/-.
  • Page 42 Disc playback:: Press for PLAY/PAUSE Radio: Press repeatedly to cycle through the preset stations set within the currently played band. • To store a station • Select one of the frequency bands (FM1, FM2, FM3, AM(MW1), / CH 1-6 AM2(MW2)). Press repeatedly to select the desired storage position.
  • Page 43: Remote Control

    Remote Control...
  • Page 44 On/off/MOD: Press to turn the unit ON, press 1 CLK: Press to view the clock. and hold to turn the unit OFF. Press briefly to se- lect a desired work source. 2 PAIR: BT pairing / answer call Play/Pause STOP: Stop playback. Press twice to start play- 17 MUTE: Press to mute / unmute back from the beginning of the inserted medium.
  • Page 45 Usage Radio Touch the RADIO ICON in main menu to enter the RA- DIO mode: Selecting The Frequency Band Touch the BAND icon to select the band. The display will show in turn: (FM1, FM2, FM3, MW1 und MW2). When an FM stereo broadcast is hard to receive, press ST/MO button on the remote control to select the MONO or STEREO mode.
  • Page 46 Automatic Preset Setup In Radio Mode, touch and keep (for more than 2 ’ S) the screen of “ APS ” range to active automatic stati- on storage.The radio searches within the current fre- quency band, e.g. FM1, for the stron- ger signal level until the search cycle has finished .
  • Page 47 Control of Media Playback (DVD, VCD, USB, SD) Mute Alternative frequency on / off Play/Pause Fast forward / rewind Next / Previous Intro function Repeat functions VOL +/- Shuffle play Loudness on / off Back to prev/top menu Subwoofer on / off Hands free / BT tel mode Traffic Announcements on / off Dim screen...
  • Page 48 Please Note: When displaying JPEG image fi les, you can turn the currently shown image with the direction icons (UP = invert image; DOWN = mirror image; LEFT = turn image left; RIGHT = turn image right). Playback modes: press „RPT, RDM, INT“ on the touch screen or on the RC Repeat modes: Press PRT repeatedly to cycle through the repeat modes.
  • Page 49 Answering incoming calls After you hear the ring tone, a incoming telephone number will be displayed on the monitor. Press answer the call ( /PAIR on the RC). Call transfer Transfer the current call back to your phone by pressing or PAIR (RC).
  • Page 50 BT Music Press BT in the source menu or use MODE to switch to the BT music menu. Please note: Returning back to BT music playback after a interruption (due to a incoming call or the like) is not possible with all mobile phones. Please read the manual of your cell phone befor using BT. Use all buttons and functions correspondingly to the general media control functions.
  • Page 51 USB - Connection and Operation • Connect your USB device to the front panel USB port . If it is properly connected, the device will be mounted and start playing automatically. Control the playback using the touch screen or via the RC. Choose the desired track using the direction buttons, hitting ENTER to confi rm playing the at the time highlighted fi le.
  • Page 52 Change to SD/MMC mode by pressing MODE repeatedly. When you insert a memory card with readable files stored, it will start playing automatically. Example: MP3 mode 1 Current file type (filter) 2 Currently playing 3 Current mode (here: music) 4 Change to: images 5 Change to: movies &...
  • Page 53: System Setup

    System Setup • Press SETUP in the main menu, or on the RC. • This screen will appear. • Use the direction buttons (ENTER to confirm selection) or the touch screen to enter the sub menus. • Press EXIT to leave the menu (or SETUP on the RC). System Settings...
  • Page 54: Language Settings

    TV System Select the color profile for the screen (PAL/NTSC/AUTO). Screen Saver Switch the screen saver on/off. TV Type Choose the screen ratio (Normal/PS = 4:3; Normal/ LB = 4:3 TV; Wide = 16:9 TV) Password Change the password for parental control following the prompted steps (Standard: 0000).
  • Page 55 Main Menu / Setup Menu TFT Monitor Adjustment: Touch the screen to enter the home menu, the message like following as: The touch buttons on the base of the touch monitor: Switch off SETUP: enter the settings menu. Adjust the monitor angle Open/close the monitor Adjust the monitor angle Eject Button: eject any inserted discs.
  • Page 56: Audio Adjustment

    AUDIO ADJUSTMENT Touch “SOUND“ on the setting menu, touch the arrow ICONS (up/down) to select the adjustment item, touch the arrow ICONS (left/right) to adjust the selectment item, it depends on your habit to setup the data. Adjustable: Treble, Bass, Balance, Fade, Subwoofer (on/off), Loudness (on/off), Radio LOC/DX: LOC/DC, Radio Stereo (Stereo/Mono), Buzzer (on/off).
  • Page 57 Trouble Shooting SYMPTOME CAUSE SOLUTION The car ignition is not switched on. Switch the ignition on. No power The fuse is blown Replace fuse Remove the disc in the player, Presence of disc inside the player. then put a new one Inserting the disc in reverse direc- Insert the compact disc with the tion...
  • Page 58: Environment Concerns

    Environment Concerns According to the European waste regulation 2012/19/EU this symbol on the product or on its packaging indicates that this product may not be treated as household waste. Instead it should be taken to the appropriate collection point for the recycling of electrical and electronic equipment.
  • Page 59: Consignes De Sécurité Et Garantie

    Chère cliente, cher client, Toutes nos félicitations pour l’acquisition de ce nouvel appareil. Veuillez lire attentivement les instructions suivantes de branchement et d’utilisation afin d’éviter d’éventuels dommages. Consignes de sécurité et garantie • Ce mode d‘emploi est destiné à vous familiariser avec le fonctionnement de ce produit. Conservez-le toujours en lieu sûr pour pouvoir y accéder à...
  • Page 60: Fiche Technique

    Fiche technique Numéro d‘article 10005540 Alimentation DC 12V Dimensions 178 x 100 x 162mm Caractéristiques du lecteur de DVD Format DVD/VCD/JPEG/MP4/MP3/WMA/CD Format de vidéo NTSC Format audio 24 bit / 96KHz Insertion automatique Angle de montage 0 à +/-30° Caractéristiques du signal vidéo Format d'image 16:9 und 4:3 Puissance de sortie...
  • Page 61 Instructions d‘installation • Choisissez un emplacement où l‘appareil ne gênera pas le conducteur. • Faites un test de branchement des câbles et essayez l‘appareil avant de le fi xer défi nitivement. • Utilisez uniquement les accessoires de montage fournis. • Si vous devez apporter des modifi cations à votre véhicule ou si vous devez percer des trous, consultez d‘abord le fabricant de votre véhicule.
  • Page 62 Câblage Branchement A Branchement B enceinte arrière droite enceinte arrière droite enceinte avant droite 12 V continu plus enceinte avant droite antenne automatique enceinte avant gauche enceinte avant gauche allumage plus enceinte arrière gauche terre enceinte arrière gauche...
  • Page 63: Branchement Du Frein À Main

    Branchement du frein à main...
  • Page 64 Installation de l‘élément de commande • Insérer d‘abord l‘élément de commande sur le côté gauche (1). (Nota : le renflement doit joindre le cro- chet ici.) • Poussez ensuite le côté droit de l‘appareil jusqu‘à ce que vous entendiez un clic (2). Attention : Ne touchez pas les contacts car cela peut provoquer des faux contacts.
  • Page 65: Schéma De Branchement

    Schéma de branchement Attention : Une masse (frein à main B-) doit être connectée pour que la lecture des images soit possible. Si le câble n‘est pas connecté, „PARKING BRAKE“ s‘aff iche.
  • Page 66: Fonctions De Base Et Réglages

    Préparation de la télécommande • Appuyez sur le support de pile comme indiqué sur l‘image (1) et retirez-le (2). • Remplacez la pile. Faites attention à respecter la polarité (3). • Replacez le support de la pile dans la télécommande (4). Utilisation de la télécommande Dirigez la télécommande vers l‘appareil.
  • Page 67: Déployer / Rétracter Le Moniteur Et Réglages

    Déployer / rétracter le moniteur et réglages • Appuyez sur “OPEN” sur l’élément de commande pour déployer le moniteur automatiquement. • À un moment donné, le moniteur se met à basculer verticalement puis s’arrête. Dès que le moniteur s’arrête, vous pouvez régler l’angle d’inclinaison pas à pas avec la télécommande (19). •...
  • Page 68: Eléments De Commande

    Eléments de commande...
  • Page 69 Déployer / rétracter le moniteur Ouvrir / AF Appui long pour activer AF. Voir RDS Appuyez brièvement pour les paramètres suivants (maintenez appuyé en mode radio) : Bass, Treble, Balance, SWF VOL, SWF FREQ. Tournez pour effectuer les réglages / modifier le volume. Vol/paramètres/SEL (=sélection) En mode radio, appuyez brièvement sur SEL pour choisir entre les modes...
  • Page 70 Lecture de disque : Appuyez sur ce bouton pour mettre en pause. Pour reprendre la lecture, ap- puyez à nouveau sur ce bouton. Mode radio : A l‘aide de ces touches vous pouvez mémoriser jusqu‘à 6 stations pour chaque bande de fréquence (FM1, FM2, FM3, AM1, AM2) pour un total de 30 stations.
  • Page 71: Télécommande

    Télécommande...
  • Page 72 marche/arrêt/MOD : appuyez pour allumer 1 CLK : affiche l'heure l‘appareil. Appuyez et maintenez pour éteindre. 2 PAIR : établir une connexion BT Play/Pause STOP : appuyez une fois pour mettre la lecture en pause. Appuyez deux fois pour lire un CD de- 17 MUTE: activer et désactiver la fonction muet.
  • Page 73: Fonctionnement

    Fonctionnement Écoute de la radio Touchez l‘icône RADIO sur l‘écran tactile. En mode Radio, appuyez sur pour diminuer la luminosité de l‘écran (1x = luminosité 50% ; 2x = écran éteint ; appuyez n‘importe où pour ramener l‘écran à la luminosité normale. Choisir parmi les bandes de fréquences Vous pouvez choisir la bande de fréquences à...
  • Page 74: Mémorisation De Station

    Choisir entre les modes local et distant Appuyez sur LO/DX pour choisir LOC pour les stations locales avec des interférences limitées. Appuyez sur LO/DX pour choisir DX pour les stations distantes avec un signal fort. Mémorisation de station Vous pouvez mémoriser jusqu‘à 30 stations sur 5 „bandes“ disponibles“ (6 par bande). Les stations à mé- moriser peuvent être choisies sur les bandes FM1, FM2, FM3, AM1 et AM2.
  • Page 75: Fonction Rds

    Fonction scan Un bref appui sur le symbole/bouton APS parcourt toutes les stations mémorisées en FM et MW et les lit pendant un court moment. Fonction RDS Dans le menu principal, appuyez sur pour accéder au menu des réglages. L‘écran suivant apparaît : Réglages possibles : Notez que les options peuvent se trouver sur plusieurs pages (flèches de défilement).
  • Page 76: Contrôles Généraux Pour La Lecture Multimédia (Dvd, Vcd, Usb, Sd)

    Contrôles généraux pour la lecture multimédia (DVD, VCD, USB, SD) Fréquence alternative activée/ Fonction muet désactivée Play/Pause Avance/retour rapide Tite suivant/précédent Fonction intro Fonctions Repeat Moins fort/plus fort Ordre aléatoire Loudness activé/désactivé Vers le menu précédent Subwoofer activé/désactivé Mains libres / téléphone BT Information trafic activé/désac- Baisser la luminosité...
  • Page 77 Nota : Pendant la lecture JPEG, vous pouvez utiliser les touches directionnelles (FB) pour faire pivoter l‘image (flèche vers le haut = image inversée, flèche vers le bas = image miroir, flèche vers la gauche = rotation vers la gauche, flèche vers la droite = rotation vers la droite). Modes de lecture : Pour ce faire, appuyez sur pendant la lecture sur „RPT, RDM, INT“.
  • Page 78: Connexion Bt Et Fonctionnement

    Connexion BT et fonctionnement Appairage et connexion Avant d‘utiliser pour la première fois un téléphone portable compatible BT en tant qu‘appareil mains libres, celui-ci doit être appairé et connecté comme suit. • Lorsque vous utilisez le périphérique BT, conservez le téléphone mobile BT à 3 mètres maximum du système A/V de voiture.
  • Page 79 Fonctions : Micro coupé Liste des appels manqués Moins fort/plus fort Contacts Modifier la sortie son (Télépho- Afficher le pavé numérique ne/Autoradio multimédia) Afficher les appels sortants/ Couper la connexion entrants Musique BT Appuyez sur BT Music dans le menu Source ou appuyez sur le bouton Mode pour faire apparaître l‘interface BT Music comme suit : Veuillez noter : •...
  • Page 80 Les interfaces de commande montrent chacune les fonctions déjà décrites ci-dessus et s‘utilisent de la manière que pour contrôler d‘autres médias :...
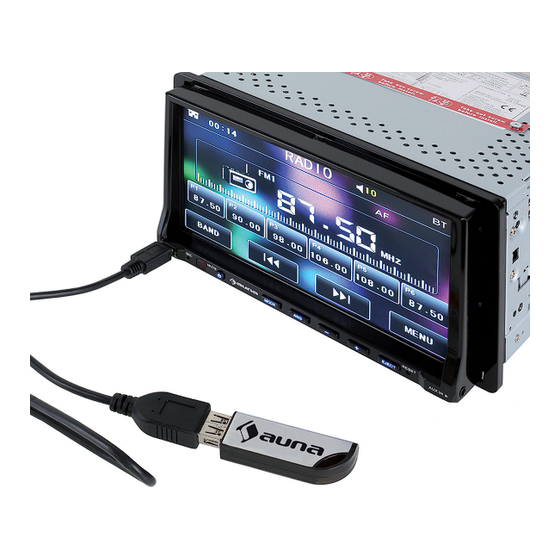
  • Page 81: Port Usb Et Fonctionnement

    Port USB et fonctionnement • Branchez le support de données USB sur le port USB tel qu‘illustré ici. Lancez la lecture via l‘écran tactile ou la télécommande. Utilisez les touches fl échées et ENTER pour sélecti- onner et lire un fi chier. Avec les touches fl échées ainsi que les boutons d‘avance/retour rapide et PLAY/PAUSE et STOP, naviguez confortablement à...
  • Page 82 Démarrer le mode SD/MMC Après avoir inséré la carte, passez en mode SD/MMC en appuyant sur MODE. Lecture de MP3/WMA/JPEG/MPEG4 L‘appareil prend en charge la lecture de MP3/WMA/JPEG/MPEG4. Insérez un disque, un support USB ou SD pour faire apparaître le menu ci-dessous. La lecture de la première piste démarre automatiquement. Touchez l‘icône correspondante pour lire les autres modes (MP3/WMA/JPEG/MPEG4).
  • Page 83: Paramètres Système

    Réglages • Appuyez sur le bouton de réglage pendant la lecture du média. • Le menu de configuration ci-dessus est affiché. • Utilisez les touches de direction pour sélectionner le point désiré. • Appuyez sur EXIT sur l‘écran ou sur SETUP sur la télécommande pour quitter. Paramètres système...
  • Page 84: Paramètres De Langue

    Système TV Paramétrez ici le format de couleur (PAL/NTSC/AUTO) de l‘écran supplémentaire. Screen Saver Cet item vous permet d‘activer ou désactiver l‘économiseur d‘écran. TV Type Ajuster la proportion d‘image en fonction de l‘écran : Normal/PS (pour TV 4:3), Normal/LB (pour TV 4:3), Wide (pour TV 16:9) Password Vous pouvez modifier ici le mot de passe du ver-...
  • Page 85: Paramétrage Du Moniteur Tft

    Paramétrage du moniteur TFT • Pendant la lecture, touchez pour accéder au menu principal : boutons en bas du menu principal : Eteindre l‘appareil. Afficher le menu des paramètres. Déplacer le moniteur vers le haut. Rétracter ou déployer le moniteur. Déplacer le moniteur vers le bas.
  • Page 86: Paramètres Du Son

    Paramètres du son Appuyez sur „SOUND“, utilisez les touches fléchées (haut/bas) pour sélectionner le paramètre et effectuez les réglages avec les touches fléchées (droite/gauche). Réglages possibles : Treble, Bass, Balance, Fade, Subwoofer (activé/dé- sactivé), Loudness (activé/désactivé), Radio LOC/ DX: LOC/DC, Radio Stéréo (Stéréo/Mono), Buzzer (activé/désactivé).
  • Page 87: Résolution Des Problèmes

    Résolution des problèmes SYMPTÔME CAUSE SOLUTION Contact coupé Mettre le contact Pas de courant Fusible défectueux Remplacer le fusible Disque présent dans le lecteur Retirer le disque Insérez le disque avec la face im- Disque inséré à l'envers primée vers le haut Le disque n'est pas aspiré...
  • Page 88: Déclaration De Conformité

    Déclaration de conformité Fabricant : Chal-Tec GmbH, Wallstraße 16, 10179 Berlin, Allemagne Ce produit est conforme aux directives européennes suivantes : 2011/65/UE (RoHS) 1999/5/CE (R&TTE)

Ce manuel est également adapté pour:

10005540

Table des Matières