Table des Matières

Publicité

Les langues disponibles

Les langues disponibles

Liens rapides

B
AS5160 & AS5160T / AS516TO
AS5160 & AS5160T
Nilfisk Inc.
9435 Winnetka Avenue North
Minneapolis, MN 55445
www.usviper.com
Model: 50000401 / 50000406 / 50000539
USER MANUAL
AS516TO
VS12002
Rev 01
17APR 2018

Publicité

Table des Matières
loading

Sommaire des Matières pour Viper AS5160

  • Page 1 AS5160 & AS5160T / AS516TO USER MANUAL AS516TO AS5160 & AS5160T Model: 50000401 / 50000406 / 50000539 Nilfisk Inc. 9435 Winnetka Avenue North VS12002 Minneapolis, MN 55445 Rev 01 www.usviper.com 17APR 2018...
  • Page 2 TABLE OF CONTENTS ENGLISH USER MANUAL……………………………………………… 1-27 28-54 FRANÇAIS MANUEL UTILISATEUR…………………………………… ESPAÑOL INSTRUCCIONES DE USO………………………………… 55-81...
  • Page 3: Table Des Matières

    USER MANUAL ENGLISH TABLE OF CONTENTS INTRODUCTION ........................... 2 GUIDE PURPOSE AND CONTENTS ........................2 HOW TO KEEP THIS GUIDE ........................... 2 DECLARATION OF CONFORMITY ........................2 ACCESSORIES AND MAINTENANCE ........................2 CHANGE AND IMPROVEMENT ..........................2 SCOPE OF APPLICATION............................2 MACHINE IDENTIFICATION DATA ........................
  • Page 4: Introduction

    USER MANUAL ENGLISH INTRODUCTION CAUTION! Some general and detailed machine information is not included in this guide. ® ® Please refer to Instruction for Use Manual on supplied CD-ROM reading by Adobe Reader NOTE The numbers in brackets refer to the components shown in Machine Description chapter. GUIDE PURPOSE AND CONTENTS The purpose of this Quick Start Guide is to provide the operator with all basic information to use the machine prop- erly.
  • Page 5: Transport And Unpacking

    USER MANUAL ENGLISH TRANSPORT AND UNPACKING When the carrier delivers the machine, make sure the packaging and machine are both whole and undamaged. If any damaged, make the carrier know the damage and before accepting the goods, reserve the right in compensation of the damage.
  • Page 6: General Safety Instruction

    USER MANUAL ENGLISH GENERAL SAFETY INSTRUCTION Specific warnings and cautions to inform about potential damages to people and machine are shown below. DANGER!  This machine must be operated by trained and authorized personnel according to guidance of the manual. ...
  • Page 7 USER MANUAL ENGLISH  Do not lean liquid containers on the machine, use the relevant can holder.  To avoid damaging the floor, do not allow the brush/pad to operate while the machine is stationary.  In case of fire, use a dry powder fire extinguisher. Do not use liquid fire extinguishers. ...
  • Page 8: Machine Description

    USER MANUAL ENGLISH MACHINE DESCRIPTION MACHINE STRUCTURE (as shown in Figure 1) 1. Recovery tank lid 19. Front wheels on fixed axle (A). 2. Can holder Driving wheels (B) 3. Handlebar 20. Brush/pad-holder 4. Control panel 21. Brush/pad-holder deck 5. Serial number plate/technical data 22.
  • Page 9: Control Panel

    USER MANUAL ENGLISH CONTROL PANEL (as shown in Figure 2) 33. Machine backward switch (B) 49. Charging green LED 34. Safe switch 50. Security cover of charging jack 35. Ignition key (0 - I) 51. Overload protector of brush 36. Discharged battery warning light (red) 52.
  • Page 10: Technical Parameters

    The red LED of charger flashing may be caused by charger internal short circuit. TECHNICAL PARAMETERS Model Parameter Type Units AS5160 AS5160T AS5160TO Packing dimensions (L X W X H) mm/Inches (1370 x 600 x 1220 mm) / (54 x 24 x 48 Inches)
  • Page 11: Wiring Diagram

    USER MANUAL ENGLISH WIRING DIAGRAM (ONLY FOR DISC MACHINE WITHOUT TRACTION) RD-BK RD-BK BN-BK BU-BK COMPONENTS GAUGE 24V BATTERIES RED/6AWG BATTERY CHARGER RED/10AWG CONTROL PANEL BOARD RED/20AWG ELECTROMAGNETIC SWITCH 24V (BRUSH MOTOR) BLACK/6AWG RELAY 24V (VACUUM MOTOR) BLACK/10AWG LOW POWER CIRCUIT FUSE BLACK/12AWG CIRCUIT BREAKER (BRUSH MOTOR) BLACK/20AWG...
  • Page 12 USER MANUAL ENGLISH WIRING DIAGRAM (ONLY FOR DISC MACHINE WITH TRACTION) COMPONENTS GAUGE 24V BATTERIES RED/6AWG BATTERY CHARGER RED/10AWG CONTROL PANEL BOARD RED/20AWG ELECTRONIC BOARD (TRACTION SYSTEM) BLACK/6AWG ELECTROMAGNETIC SWITCH 24V (BRUSH MOTOR) BLACK/10AWG RELAY 24V (VACUUM MOTOR) BLACK/12AWG RELAY 24V (TRACTION SYSTEM) BLACK/14AWG LOW POWER CIRCUIT FUSE BLACK/20AWG...
  • Page 13 USER MANUAL ENGLISH WIRING DIAGRAM (ONLY FOR ORBITAL MACHINE) RD-BK RD-BK BU-BK BN-BK GN-BK BU-BK GN-BK COMPONENTS GAUGE CODE Description 24V BATTERIES RED/6AWG VS10262 BATTERY CHARGER RED/10AWG VS13201 CONTROL PANEL BOARD RED/12AWG VS13215 ELECTRONIC BOARD (TRACTION SYSTEM) RED/20AWG 9095127000 ELECTROMAGNETIC SWITCH 24V (BRUSH MOTOR) RED/14AWG VS10201 RELAY 24V (VACUUM MOTOR)
  • Page 14: Operating Guide

    USER MANUAL ENGLISH OPERATING GUIDE WARNING! On some points of the machine there are some adhesive plates indicating: - DANGER - WARNING - CAUTION - CONSULTATION While reading this Manual, the operator must pay particular attention to the symbols shown on the plates. Do not cover these plates for any reason and immediately replace them if damaged.
  • Page 15: Battery Installation And Battery Typesetting (Wet Or Gel/ Agm)

    USER MANUAL ENGLISH BATTERY INSTALLATION AND BATTERY TYPESETTING (WET OR GEL/ AGM) According to the type of batteries (WET or GEL/AGM), set the machine and electronic board of the battery charger as follows: (only for disc machine) WET BATTERIES (NOTE: Turn the DIP switch 1 and 2 both to “OFF”.
  • Page 16: According To The Type Of Batteries (Wet Or Gel / Agm) Set The Machine

    USER MANUAL ENGLISH Battery charger setting (for disc machines with on-board battery charger) Remove the screws (A, B, C, D, Figure 4.1). Open the charger and find the sw1 (E, Figure 4.1). Set the switches as the table of (Figure 4.1). 10.
  • Page 17: Battery Installation

    USER MANUAL ENGLISH Battery installation 1. Open the recovery tank cover (1) and check that the recovery tank (25) is empty; otherwise empty it with the drain hose. (22) 2. Close the recovery tank cover (1). 3. Overturn the recovery tank (25) carefully. 4.
  • Page 18: Adjusting The Balance Of Squeegee

    USER MANUAL ENGLISH PAD INSTALLATION AND UNINSTALLATION (only for orbital machine) Lift the deck by pressing the switch (46). Install and uninstall the pad (A, Figure 5.1) ADJUSTING THE BALANCE OF SQUEEGEE Install the squeegee and screw up the nut (H), then connect the vacuum hose (G) to the squeegee.
  • Page 19: Stopping The Machine

    USER MANUAL ENGLISH  (only for machine with traction) by pushing the machine with the hands on the handlebar (E) and by pressing the switch (F). If necessary, the forward speed can be adjusted with the adjuster (H). NOTE D C B To move the machine forward, press either the left or right switch (F) or both.
  • Page 20: Tank Emptying

    USER MANUAL ENGLISH CAUTION! To avoid any damage to the floor surface, turn off the brushes/pad-holders when the machine stops in one place. Figure 9 Battery discharge during operation C B A Until the green warning light (A, Figure 10) stays on, the batteries allow the machine to work normally.
  • Page 21: After Using The Machine

    USER MANUAL ENGLISH CAUTION! If the vacuum system turns off accidentally (for example, when the float is activated because of a sudden machine movement), to resume the operation: turn off the vacuum system by pressing the switch (D, Figure 10), then open the cover (C, Figure 11) and check that the float inside the grid (A) has gone down to the water level.
  • Page 22: Machine Long Inactivity

    USER MANUAL ENGLISH MACHINE LONG INACTIVITY If the machine is not going to be used for more than 30 days, proceed as follows: Perform the procedures shown in After Using the machine paragraph. Disconnect the battery connector (54). FIRST PERIOD OF USE After the first 8 hours, check the machine fastening and connecting parts for proper tightening and check the visible parts for wear and leakage.
  • Page 23: Battery Charging

    USER MANUAL ENGLISH BATTERY CHARGING NOTE Charge the batteries when the yellow (F, Figure 14) or red warning light (G) turns on, or when finishing cleaning. CAUTION! Keeping the batteries charged make their life last longer. CAUTION! When the batteries are discharged, charge them as soon as possible, as that condition makes their life shorter.
  • Page 24: Brush/Pad Cleaning

    USER MANUAL ENGLISH Battery charging with battery charger installed on the machine Connect the battery charger cable (A, Figure 15) to the electrical mains (G) (the electrical mains voltage and frequency must be compatible with the battery charger values shown on the machine serial number plate (F). When the battery charger is connected to the electrical mains, all machine functions are automatically cut off.
  • Page 25: Squeegee Cleaning

    USER MANUAL ENGLISH SQUEEGEE CLEANING NOTE The squeegee must be clean and its blades must be in good conditions in order to get a good drying. CAUTION! It is advisable to wear protective gloves when cleaning the squeegee because there may be sharp debris.
  • Page 26: Squeegee Blade Check And Replacement

    USER MANUAL ENGLISH SQUEEGEE BLADE CHECK AND REPLACEMENT Clean the steel or the aluminum squeegee, as shown in the previous paragraph. Check that the edges (E, Figure 20) of the front blade (C) and the edges (F) of the rear blade (D) lay down on the same level, along their length;...
  • Page 27: Tank And Vacuum Grid With Float Cleaning, And Cover Gasket Check

    USER MANUAL ENGLISH TANK AND VACUUM GRID WITH FLOAT CLEANING, AND COVER GASKET CHECK Drive the machine on a level floor. Ensure that the machine is off and the ignition key (54) has been removed. Turn the recovery tank lid (A, Figure 21) 90 degree position where it can be took off from the tank, and then take down the float ball filter (P) from the tank.
  • Page 28: Machine Working Hour Check

    USER MANUAL ENGLISH MACHINE WORKING HOUR CHECK Turn the ignition key (A, Figure 22) to "I". Press the switch (B), the hour meter (C) begins to work and it at the same time shows the total number of working hours (scrubbing/drying) performed by the machine.
  • Page 29: Accessories/Options

    USER MANUAL ENGLISH ACCESSORIES/OPTIONS In addition to the standard components, the machine can be equipped with the following accessories/options, according to the machine specific use: For further information concerning the above-mentioned optional accessories, contact an authorized Retailer. ACCESSORIES/OPTIONS See “Parts List” section GEL/AGM batteries Pads of different materials TROUBLESHOOTING...
  • Page 30 MANUEL UTILISATEUR FRANÇAIS TABLE DES MATIÈRES INTRODUCTION ......................... 29 BUT ET CONTENU DU GUIDE ..........................29 COMMENT CONSERVER CE GUIDE ........................29 DÉCLARATION DE CONFORMITÉ ........................29 ACCESSOIRES ET ENTRETIEN ..........................29 CHANGEMENT ET AMÉLIORATION ........................29 CHAMP D'APPLICATION ............................29 DONNÉES D'IDENTIFICATION DE LA MACHINE .....................
  • Page 31: Introduction

    MANUEL UTILISATEUR FRANÇAIS INTRODUCTION MISE EN GARDE! Certaines informations générales et détaillées de la machine ne figurent pas dans ce guide. ® Veuillez vous reporter au Manuel utilisateur sur le CD-ROM fourni, avec lecture par Adobe ® Reader REMARQUE Les chiffres entre parenthè ses renvoient aux é lé ments pré senté s dans le chapitre Description de la Machine.
  • Page 32: Transport Et Déballage

    MANUEL UTILISATEUR FRANÇAIS TRANSPORT ET DÉBALLAGE À la livraison s'assurer que l'emballage et la machine sont intacts et en bon é tat. En cas de dommage, porter à la connaissance du transporteur les dommages et avant d'accepter les marchandises, effectuer des ré serves. Suivre attentivement les instructions sur l'emballage, lors du dé...
  • Page 33: Consignes Générales De Sécurité

    MANUEL UTILISATEUR FRANÇAIS CONSIGNES GÉNÉRALES DE SÉCURITÉ Les avertissements et les mises en garde spé cifiques, pour informer des dommages potentiels aux personnes et à la machine, sont indiqué s ci-dessous. DANGER!  Cette machine doit ê tre utilisé e par un personnel qualifié selon les conseils du manuel. ...
  • Page 34 MANUEL UTILISATEUR FRANÇAIS  Ne pas incliner de ré cipients de liquide sur la machine, utiliser le porte-boî te pertinent.  Pour é viter d'endommager le sol, ne pas laisser la brosse/le disque fonctionner alors que la machine est à l'arrê t. ...
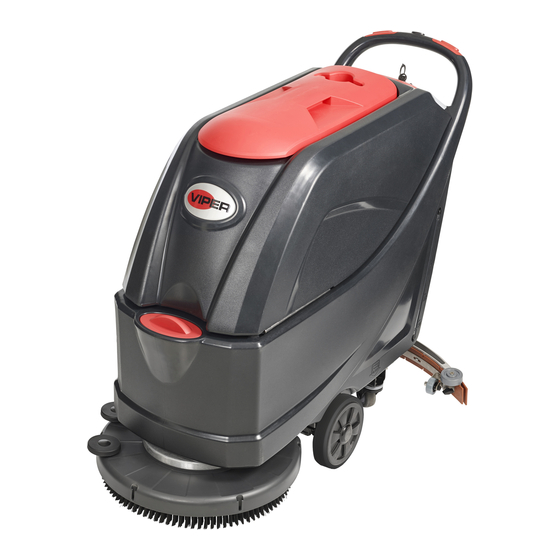
  • Page 35: Description De La Machine

    MANUEL UTILISATEUR FRANÇAIS DESCRIPTION DE LA MACHINE STRUCTURE DE LA MACHINE (comme repré senté sur la Figure 1) Couvercle du ré servoir de ré cupé ration 19. Roues avant sur l'essieu fixe (A). Porte-gobelet Roues motrices (B) Poigné e 20. Brosse/Support du disque Tableau de bord 21.
  • Page 36: Panneau De Commande

    MANUEL UTILISATEUR FRANÇAIS PANNEAU DE COMMANDE (comme repré senté sur la Figure 2) 33. Commutation recul de la machine (B) 49. Té moin LED vert de chargement 34. Interrupteur de sé curité 50. Prise de charge 35. Clé de contact (0 - I) 51.
  • Page 37: Paramètres Techniques

    Le clignotement du voyant LED rouge du chargeur peut ê tre causé par le court-circuit interne du chargeur. PARAMÈTRES TECHNIQUES Modè le Type de paramè tre Unité s AS5160 AS5160T AS5160TO Dimensions d'emballage (L X l X H) mm / pouces (1370 x 600 x 1220 mm) / (54 x 24 x 48 pouces)
  • Page 38: Schéma De Câblage

    MANUEL UTILISATEUR FRANÇAIS SCHÉMA DE CÂBLAGE (UNIQUEMENT POUR LA MACHINE À DISQUE SANS TRACTION) RD-BK RD-BK BN-BK BU-BK COMPOSANTS JAUGE BATTERIES DE 24V ROUGE/6AWG CHARGEUR DE BATTERIES ROUGE/10AWG PANNEAU DE COMMANDE ROUGE/20AWG COMMUTATEUR ÉLECTROMAGNÉTIQUE DE 24V (MOTEUR DE NOIRE/6AWG LA BROSSE) RELAIS DE 24V (MOTEUR DE L'ASPIRATEUR) NOIR/10AWG FUSIBLE DU FAIBLE CIRCUIT ÉLECTRIQUE...
  • Page 39: Schéma De Câblage (Uniquement Pour La Machine À Disque Avec Traction)

    MANUEL UTILISATEUR FRANÇAIS SCHÉMA DE CÂBLAGE (UNIQUEMENT POUR LA MACHINE À DISQUE AVEC TRACTION) COMPOSANTS JAUGE BATTERIES DE 24V ROUGE/6AWG CHARGEUR DE BATTERIES ROUGE/10AWG PANNEAU DE COMMANDE ROUGE/20AWG CIRCUIT ÉLECTRONIQUE (SYSTÈME DE TRACTION) NOIRE/6AWG COMMUTATEUR ÉLECTROMAGNÉTIQUE DE 24V (MOTEUR NOIR/10AWG DE LA BROSSE) RELAIS DE 24V (MOTEUR DE L'ASPIRATEUR) NOIR/12AWG...
  • Page 40: Schéma De Câblage (Uniquement Pour La Machine Orbitale)

    MANUEL UTILISATEUR FRANÇAIS SCHÉMA DE CÂBLAGE (UNIQUEMENT POUR LA MACHINE ORBITALE) RD-BK RD-BK BU-BK BN-BK GN-BK BU-BK GN-BK COMPOSANTS JAUGE Clé CODE Description BATTERIES DE 24 V ROUGE/6 AWG VS10262 CHARGEUR DE BATTERIES ROUGE/10 AWG VS13201 PANNEAU DE COMMANDE ROUGE/12 AWG VS13215 CIRCUIT ÉLECTRONIQUE (SYSTÈME DE TRACTION) ROUGE/20 AWG...
  • Page 41: Guide D'utilisation

    MANUEL UTILISATEUR FRANÇAIS GUIDE D'UTILISATION AVERTISSEMENT! Àcertains endroits de la machine il y a des plaques adhé sives indiquant: — DANGER! —AVERTISSEMENT! —ATTENTION! —CONSULTATION En lisant ce manuel, l'opé rateur doit prê ter une attention particuliè re aux symboles figurant sur les plaques. Ne pas couvrir ces plaques pour une raison quelconque et les remplacer immé...
  • Page 42: Installation Des Batteries Et Réglage Du Type De Batterie (Avec Entretien Ou Gel/Agm)

    MANUEL UTILISATEUR FRANÇAIS INSTALLATION DES BATTERIES ET RÉGLAGE DU TYPE DE BATTERIE (AVEC ENTRETIEN OU GEL/AGM) Selon le type de batteries (AVEC ENTRETIEN ou GEL/AGM), ré gler la machine et le circuit é lectronique du chargeur de batterie comme suit: (uniquement pour la machine à disque) BATTERIES AVEC ENTRETIEN (REMARQUE: Mettre les commutateurs DIP 1 et 2 sur "OFF".)
  • Page 43: Selon Le Type De Batteries (Avec Entretien Ou Gel/Aga) Regler La Machine

    MANUEL UTILISATEUR FRANÇAIS Ré glage du chargeur de batterie (pour les machines à disque avec chargeur de batterie embarqué ) Retirer les vis (A, B, C, D, Figure 4.1). Ouvrir le chargeur et localiser sw1(E, Figure 4.1). Ré gler les commutateurs selon le tableau de (Figure 4.1). 10.
  • Page 44: Installation Et Désinstallation De La Brosse / Du Support De Disque

    MANUEL UTILISATEUR FRANÇAIS Installation de la batterie Ouvrir le couvercle du ré servoir de ré cupé ration (1) et vé rifier si le ré servoir de ré cupé ration (25) est vide; sinon, le vider avec le tuyau de vidange (22). Fermer le couvercle du ré...
  • Page 45: Ajustement De L"Équilibre De L' Embouchure

    MANUEL UTILISATEUR FRANÇAIS INSTALLATION ET DÉSINSTALLATION DU TAMPON (uniquement pour la machine orbitale) Soulever le pont en appuyant sur l'interrupteur (46). Installer et dé sinstaller le tampon (A, Figure 5.1) AJUSTEMENT DE L’ÉQUILIBRE DE L' EMBOUCHURE 1. Installer l'embouchure et visser l'é crou (H), puis raccorder le tuyau d'aspiration (G) à...
  • Page 46: Ajuster Le Niveau Du Pont Orbital (Uniquement Pour La Machine Orbitale)

    MANUEL UTILISATEUR FRANÇAIS • (uniquement pour les machines avec traction) en poussant la machine avec les mains sur la poigné e (E) et en appuyant sur le commutateur (F). Si né cessaire, la vitesse d'avancement peut ê tre ré glé e avec le dispositif de ré...
  • Page 47: Vidange Du Réservoir

    MANUEL UTILISATEUR FRANÇAIS MISE EN GARDE ! Pour é viter d'endommager les sols, ne pas faire fonctionner la brosse en rotation lorsque la machine est arrê té e ; en particulier si l'on travaille avec la fonction "extra-pression" activé e. Figure 9 Decharge de la batterie pendant le fonctionnement C B A...
  • Page 48: Après Utilisation De La Machine

    MANUEL UTILISATEUR FRANÇAIS MISE EN GARDE ! système d’aspiration s'éteint accidentellement (par exemple, lorsque le flotteur est activé en raison d'un mouvement soudain de la machine), pour reprendre l'opération: désactiver le système d’aspiration en appuyant sur le commutateur (D, Figure 10), puis retirer le couvercle (C, Figure 11) et vé...
  • Page 49: Longue Inactivité De La Machine

    MANUEL UTILISATEUR FRANÇAIS LONGUE INACTIVITÉ DE LA MACHINE Si la machine n‟est pas utilisée pendant plus de 30 jours, procéder comme suit: 1. Effectuer les procé dures indiqué es dans le paragraphe "Aprè s Utilisation de la Machine". 2. Dé brancher le connecteur de la batterie (54). PREMIÈRE PÉRIODE D'UTILISATION Aprè...
  • Page 50: Chargement Des Batteries

    MANUEL UTILISATEUR FRANÇAIS CHARGEMENT DES BATTERIES REMARQUE Charger les batteries lorsque le té moin lumineux LED jaune (F, Figuer 14) ou rouge (G) s'allume, ou lorsque le nettoyage est terminé . MISE EN GARDE ! Garder les batteries chargé es augmente leur duré...
  • Page 51: Nettoyage De La Brosse/Du Disque

    MANUEL UTILISATEUR FRANÇAIS Charge de la batterie avec un chargeur inté gré 7. Brancher le câ ble du chargeur de batterie (A, Figure 15) au ré seau é lectrique (G) (la tension du ré seau é lectrique et la fré quence doivent ê tre compatibles avec les valeurs du chargeur de batterie figurant sur la plaque signalé...
  • Page 52: Nettoyage De L'embouchure

    MANUEL UTILISATEUR FRANÇAIS NETTOYAGE DE L‘EMBOUCHURE REMARQUE L’embouchure doit être propre et ses lamelles doivent ê tre en bonnes conditions afin d'obtenir un bon sé chage MISE EN GARDE ! Il est conseillé de porter des gants de protection lors du nettoyage de l’embouchure, car il peut y avoir des dé...
  • Page 53: Vérification Et Remplacement De La Lamelle De L"Embouchure

    MANUEL UTILISATEUR FRANÇAIS VÉRIFICATION ET REMPLACEMENT DE LA LAMELLE DE L’EMBOUCHURE 1. Nettoyer l‟embouchure en acier ou en aluminium, comme indiqué dans le paragraphe pré cé dent. 2. Vé rifier que les bords (E, Figure 20) de la lamelle avant (C) et les bords (F) de la lamelle arriè...
  • Page 54: Nettoyage Du Réservoir Et De La Grille D'aspiration Avec Le Flotteur, Vérification Du Joint De Couvercle

    MANUEL UTILISATEUR FRANÇAIS NETTOYAGE DU RÉSERVOIR ET DE LA GRILLE D'ASPIRATION AVEC LE FLOTTEUR, VÉRIFICATION DU JOINT DE COUVERCLE 1. Conduire la machine sur un sol nivelé . 2. Faire en sorte que la machine soit é teinte et que la clé de contact (54) soit retiré e. 3.
  • Page 55: Vérification Des Heures De Travail De La Machine

    MANUEL UTILISATEUR FRANÇAIS VÉRIFICATION DES HEURES DE TRAVAIL DE LA MACHINE 1. Tourner la clé de contact (A, Figure 22) sur "I". 2. Appuyer sur le commutateur (B) et lire sur le compteur horaire nombre total d'heures travail (lavage/sé chage) effectué es par la machine. 3.
  • Page 56: Accessoires/Options

    MANUEL UTILISATEUR FRANÇAIS ACCESSOIRES/OPTIONS En plus des composants standards, la machine peut ê tre é quipé e des accessoires/options suivants, selon l'utilisation spé cifique de la machine: Pour de plus amples informations concernant les accessoires optionnels mentionné s ci-dessus, contacter un distributeur agré...
  • Page 57 INSTRUCCIONES DE USO ESPAÑOL TABLA DE CONTENIDOS INTRODUCCIÓN ........................... 56 PROPÓSITO Y CONTENIDOS DE ESTA GUÍ A .......................56 CÓMO GUARDAR ESTA GUÍ A ..........................56 DECLARACIÓN DE CONFORMIDAD ........................56 ACCESORIOS Y MANTENIMIENTO ........................56 CAMBIOS Y MEJORAS ..............................56 ÁMBITO DE APLICACIÓN ............................56 DATOS DE IDENTIFICACIÓN DE LA MÁQUINA ....................56 TRANSPORTE Y DESEMBALAJE ..........................57 SEGURIDAD...........................
  • Page 58: Introducción

    INSTRUCCIONES DE USO ESPAÑOL INTRODUCCIÓN ¡ PRECAUCIÓN! Parte de la informació n general y detallada no está incluida en esta guí a. Por favor refié rase al Manual de Instrucciones para el Uso proporcionado en CD-ROM para lectura con Adobe® Reader®. NOTA Los nú...
  • Page 59: Transporte Y Desembalaje

    INSTRUCCIONES DE USO ESPAÑOL TRANSPORTE Y DESEMBALAJE Cuando el transportista entrega la má quina, asegú rese de que el embalaje y la má quina se encuentran enteros y sin dañ os. En caso de cualquier dañ o, avise el transportista sobre el dañ o y, antes de aceptar las mercancí as, resé rvese el derecho a ser indemnizado por el dañ...
  • Page 60: Instrucciones Generales De Seguridad

    INSTRUCCIONES DE USO ESPAÑOL INSTRUCCIONES GENERALES DE SEGURIDAD Advertencias y precauciones especí ficas para informar acerca de los posibles dañ os a las personas y a la má quina se muestran a continuació n. ¡ PELIGRO!  Esta má quina debe ser operado por personal capacitado y autorizado de acuerdo con las directrices del manual.
  • Page 61 INSTRUCCIONES DE USO ESPAÑOL  En caso de mal funcionamiento de la má quina, asegú rese de que la causa no es la falta de mantenimiento. Si hace falta, solicite la asistencia del personal autorizado o se un Centro de Servicio autorizado.
  • Page 62: Descripción De La Máquina

    INSTRUCCIONES DE USO ESPAÑOL DESCRIPCIÓN DE LA MÁQUINA CONSTRUCCIÓN DE LA MÁQUINA (como se indica en Figura 1) Tapa del depó sito de recogida 19. Ruedas delanteras en eje fijo (A). Recogedor de polvo Ruedas motrices (B) Manillar 20. Portacepillos/porta-discos Panel de control 21.
  • Page 63: Panel De Control

    INSTRUCCIONES DE USO ESPAÑOL PANEL DE CONTROL (como se indica en la Figura 2) 33. Interruptor de retroceso de la má quina (B) 49. LED verde de carga 34. Interruptor de seguridad 50. Cubierta de seguridad del conector de carga 35.
  • Page 64: Parámetros Técnicos

    El parpadeo del LED rojo puede ser causado por un cortocircuito interno en el cargador. PARÁMETROS TÉCNICOS Modelo Tipo de Pará metro Units AS5160 AS5160T AS5160TO Dimensiones del paquete (L X W X H) mm/Pulgadas (1370 x 600 x 1220 mm) / (54 x 24 x 48 Pulgadas) Altura de la Má...
  • Page 65: Diagrama De Cableado

    INSTRUCCIONES DE USO ESPAÑOL DIAGRAMA DE CABLEADO (SOLO PARA MÁQUINA DE DISCOS SIN TRACCIÓN) RD-BK RD-BK BN-BK BU-BK COMPONENTES INDICADOR BATERÍ AS DE 24V ROJO/6AWG CARGADOR DE BATERÍ A ROJO/10AWG TABLERO DEL PANEL DE CONTROL ROJO/16AWG INTERRUPTOR ELECTROMAGNÉTICO DE 24V (MOTOR DEL CEPILLO) ROJO/20AWG RELÉ...
  • Page 66 INSTRUCCIONES DE USO ESPAÑOL DIAGRAMA DE CABLEADO (SOLO PARA MÁQUINA DE DISCOS CON TRACCIÓN) COMPONENTES INDICADOR BATERÍ AS DE 24V ROJO/6AWG CARGADOR DE BATERÍ A ROJO/10AWG TABLERO DEL PANEL DE CONTROL ROJO/16AWG TABLERO ELECTRÓNICO (SISTEMA DE TRACCIÓN) ROJO/20AWG INTERRUPTOR ELECTROMAGNÉTICO DE 24V (MOTOR DEL NEGRO/6AWG CEPILLO) RELÉ...
  • Page 67 INSTRUCCIONES DE USO ESPAÑOL DIAGRAMA DE CABLEADO (SOLO PARA MÁQUINA ORBITAL) RD-BK RD-BK BU-BK BN-BK GN-BK BU-BK GN-BK COMPONENTES INDICADOR CÓDIGO Descripció n 24V BATERÍ AS ROJO/6AWG VS10262 CARGADOR DE BATERÍ AS ROJO/10AWG VS13201 PANEL DE CONTROL ROJO/12AWG VS13215 PANEL ELECTRÓNICO (SISTEMA DE TRACCIÓN) ROJO/20AWG INTERRUPTOR ELECTROMAGNÉTICO DE 24V 9095127000...
  • Page 68: Guí A De Funcionamiento

    INSTRUCCIONES DE USO ESPAÑOL GUÍ A DE FUNCIONAMIENTO ¡ ADVERTENCIA! En algunos lugares de la má quina se encuentran algunas placas adhesivas que indican: — ¡ PELIGRO — ¡ ADVERTENCIA — ¡ PRECAUCIÓN — CONSULTA Durante la lectura de este manual, el operario debe prestar especial atenció n a los sí mbolos que aparecen en las placas.
  • Page 69: Instalación De La Baterí A Y Configuración Del Tipo De Baterí A (Húmedao De Gel/Agm)

    INSTRUCCIONES DE USO ESPAÑOL INSTALACIÓN DE LA BATERÍ A Y CONFIGURACIÓN DEL TIPO DE BATERÍ A (HÚMEDA O DE GEL/AGM) Segú n el tipo de baterí as (HÚMEDAS O DE GEL/AGM), configure el aparato y el tablero electró nico del cargador de baterí...
  • Page 70: Según El Tipo De Baterí As (Húmeda O Gel/Agm) Configure La Máquina

    INSTRUCCIONES DE USO ESPAÑOL Ajuste de cargador de baterí a (para má quinas de disco con cargador de baterí a a bordo) Retirar los tornillos (A, B, C, D, Figura 4.1). Abrir el cargador y encontrar el sw1 (E, Figura 4.1). Ajuste los interruptores como en la tabla (Figura 4.1).
  • Page 71: Montaje Y Desmontaje Del Portacepillos/Porta-Discos

    INSTRUCCIONES DE USO ESPAÑOL Instalació n de la baterí a Abra la tapa del depó sito de recogida (1) y comprueba si el depó sito de recogida (25) está vací o; de lo contrario vací elo mediante la manguera de desagü e. (22) Cierre la tapa del depó...
  • Page 72: Ajustar El Balance De La Boquilla De Aspiración

    INSTRUCCIONES DE USO ESPAÑOL INSTALACIÓN Y DESMONTAJE DE ALMOHADILLA (solo para má quina orbital) Eleve la cubierta pulsando el interruptor (46). Instale y desmonte la almohadilla (A, Figura 5.1) AJUSTAR EL BALANCE DE LA BOQUILLA DE ASPIRACIÓN Instale la boquilla de aspiració n y enrosque la tuerca (H), luego conecte la manguera de aspiració...
  • Page 73: Parar La Má Quina

    NOTA Figura 8.1 Para el fregado/secado correcto de los suelos en los lados de las paredes, Viper sugiere aproximarse a las paredes con el lado derecho de la má quina (A y B, Figura 9) como se indica en la figura.
  • Page 74: Vaciar Los Depósitos

    INSTRUCCIONES DE USO ESPAÑOL ¡ PRECAUCIÓN! Para evitar cualquier dañ o a la superficie del suelo, apague los portacepillos/porta-discos cuando la má quina se detiene en un lugar, especialmente cuando la funció n de presió n extra está activa. Figura 9 Descarga de la baterí...
  • Page 75: Después De Usar La Máquina

    INSTRUCCIONES DE USO ESPAÑOL ¡ PRECAUCIÓN! Si el sistema de aspiració n se apaga accidentalmente (por ejemplo, cuando el flotador se activa debido a un movimiento brusco de la má quina), para reanudar la operació n: apague el sistema de aspiració n pulsando el interruptor (D, Figura 10), a continuació...
  • Page 76: Inactividad Prolongada De La Máquina

    INSTRUCCIONES DE USO ESPAÑOL INACTIVIDAD PROLONGADA DE LA MÁQUINA Si la má quina no va a ser utilizado durante má s de 30 dí as, proceda de la siguiente manera: 1. Realice los procedimientos que se muestran en el apartado Despué s de usar la má quina. 2.
  • Page 77: Cargar La Baterí A

    INSTRUCCIONES DE USO ESPAÑOL CARGAR LA BATERÍ A NOTA Cargue las baterí as cuando se ilumina la luz de aviso amarilla (F, Figura 14) o la roja (G), o al terminar la limpieza. ¡ PRECAUCIÓN! El mantener las baterí as cargadas prolongará su vida ú...
  • Page 78: Limpiar El Cepillo/Discos

    INSTRUCCIONES DE USO ESPAÑOL Cargar las baterí as con un cargador instalado en la má quina 7. Conecte el cable del cargador de baterí as (A, Figura 15) a la red elé ctrica (G) (la frecuencia y el voltaje de la red elé ctrica debe ser compatible con los valores del cargador de baterí...
  • Page 79: Limpieza De Los Labios

    INSTRUCCIONES DE USO ESPAÑOL LIMPIEZA DE LOS LABIOS NOTA La boquilla deben estar limpia igual que los labios de goma deben estar en buenas condiciones con el fin de conseguir un buen secado. ¡ PRECAUCIÓN! Es aconsejable usar guantes de protecció n al limpiar la escobilla de goma, ya que puede haber escombros cortantes.
  • Page 80: Inspección Y Cambio De Las Láminas De La Boquilla De Aspiración

    INSTRUCCIONES DE USO ESPAÑOL INSPECCIÓN Y CAMBIO DE LAS LÁMINAS DE LA BOQUILLA DE ASPIRACIÓN 1. Limpie el escurridor de acero o de aluminio, tal y como se indica en el apartado anterior. 2. Compruebe si los bordes (E, Figura 20) de la lá mina delantera (C) y los bordes (F) de la lá...
  • Page 81: Rejilla Del Depósito Y De La Aspiración Con Limpieza Del Flotador Einspección De La Junta De La Tapa

    INSTRUCCIONES DE USO ESPAÑOL REJILLA DEL DEPÓSITO Y DE LA ASPIRACIÓN CON LIMPIEZA DEL FLOTADOR E INSPECCIÓN DE LA JUNTA DE LA TAPA Conduzca la má quina a una superficie nivelada. Asegú rese que la má quina está apagada y la llave de ignició n (54) ha sido retirada. Gire la tapa del tanque de recuperació...
  • Page 82: Registro De Las Horas Funcionamiento De La Máquina

    INSTRUCCIONES DE USO ESPAÑOL REGISTRO DE LAS HORAS FUNCIONAMIENTO DE LA MÁQUINA 1. Gire la llave de ignició n (A, Figura 22) a la posició n « I» . 2. Pulse el interruptor (B) y compruebe el cronó metro (C) para ver el nú...
  • Page 83: Accesorios/Opciones

    INSTRUCCIONES DE USO ESPAÑOL ACCESORIOS/OPCIONES Ademá s de los componentes está ndar, la má quina puede equiparse con los siguientes accesorios/opciones, de acuerdo con su uso especí fico: Para má s informació n sobre los accesorios opcionales mencionados anteriormente, pó ngase en contacto con un distribuidor autorizado.
  • Page 84 Nilfisk Inc. 9435 Winnetka Avenue North Minneapolis, MN 55445 www.usviper.com...

Ce manuel est également adapté pour:

As5160tAs516to500004015000040650000539

Table des Matières