Table des Matières

Publicité

Les langues disponibles
  • FR

Les langues disponibles

  • FRANÇAIS, page 72

Liens rapides

BCS-717
XV-BD717W
S-BD707T
S-BD707SW
BCS-313
XV-BD717W
S-BD303
P/NO: MFL67205104
It
N
Eng
E
E
E
Fra
F
F
Deu
D
D
Itali
It
Eng
E
It
Ned
N
Fra
F
N
Esp
E
Deu
D
E
Itali
It
Ned
N
Esp
E

Publicité

Table des Matières
loading

Sommaire des Matières pour Pioneer BCS-717

  • Page 1 BCS-717 XV-BD717W S-BD707T Itali S-BD707SW BCS-313 XV-BD717W S-BD303 Itali P/NO: MFL67205104...
  • Page 2: Safety Information

    Getting Started Safety Information CAUTION: This product is a class 1 laser product CAUTION classified under the Safety of laser products, IEC60825-1:2007. RISK OF ELECTRIC SHOCK To ensure proper use of this product, please read DO NOT OPEN this owner’s manual carefully and retain it for future CAUTION: TO REDUCE THE RISK OF ELECTRIC reference. Shall the unit require maintenance, SHOCK DO NOT REMOVE COVER (OR BACK) NO contact an authorized service center. USER-SERVICEABLE PARTS INSIDE REFER SERVICING Use of controls, adjustments or the performance of TO QUALIFIED SERVICE PERSONNEL. procedures other than those specified herein may result in hazardous radiation exposure. This lightning flash with arrowhead To prevent direct exposure to laser beam, do not try symbol within an equilateral triangle to open the enclosure. Visible laser radiation when is intended to alert the user to the open. DO NOT STARE INTO BEAM. presence of uninsulated dangerous voltage within the product’s CAUTION concerning the Power Cord enclosure that may be of sufficient magnitude to Most appliances recommend they be placed upon constitute a risk of electric shock to persons.
  • Page 3: Getting Started

    Getting Started Information for users on collection and disposal This device is equipped with a portable battery or accumulator. of old equipment and used batteries Safety way to remove the battery or the battery from the equipment: Remove the old battery or battery pack, follow the steps in reverse order than the assembly. To prevent contamination of the environment and bring on possible threat to human and animal health, the Symbol examples old battery or the battery put it in the appropriate for batteries container at designated collection points. Do not dispose of batteries or battery together with These symbols on the products, packaging, and/ other waste. It is recommended that you use...
  • Page 4 Getting Started Notes on Copyrights For Wireless product European Union Notice PIONEER hereby declares that y Because AACS (Advanced Access Content this/these product(s) is/are in System) is approved as content protection compliance with the essential system for Blu-ray Disc format, similar to use of requirements and other relevant provisions of CSS (Content Scramble System) for DVD format, Directive 1999/5/EC, 2004/108/EC, 2006/95/EC certain restrictions are imposed on playback, and 2009/125/EC.
  • Page 5 Getting Started Important Notice for TV colour system The colour system of this player differs according to currently playing discs. For example, when the player plays the disc recorded in the NTSC colour system, the image is output as an NTSC signal. Only the multi system colour TV can receive all signals output from the player. y If you have a PAL colour system TV, you will see just distorted images when using discs or video contents recorded in NTSC. y The multi system colour TV changes the colour system automatically according to input signals. In case that the colour system is not changed automatically, turn it off and then on to see normal images on screen. y Even if the disc recorded in NTSC colour system are well displayed on your TV, these may not be recorded correctly on your recorder.
  • Page 6: Table Des Matières

    Operating Front panel Rear panel 40 General Playback 40 – Using [HOME] menu 40 – Playing a Disc Connecting 40 – Playing a file on a disc/USB device Assemble the speakers – Playing Blu-ray 3D disc – Speaker Setup for BCS-717 – Enjoying BD-Live™ – Speaker Setup for BCS-313 42 – Playing a file on a network server Wall mounting the center speaker 43 – Basic operations for video and audio – Before mounting content Additional notes on speaker 43 – Basic operations for photo content 20 Positioning the system 43 – Using the disc menu...
  • Page 7 Table of Contents 48 – Options while viewing a photo 70 Important Information Relating to 48 – Listening to music while slide show Network Services 49 On-Screen display 70 Software License Notice 49 – Displaying content information on- screen 50 – Playing from selected time 50 – Hearing a different audio 50 – Selecting a subtitle language 50 – Watching from a different angle – Changing the TV Aspect Ratio – Changing subtitle code page – Changing the Picture Mode 52 Audio CD Recording 53 Playing the iPod 53 – Enjoying iPod on the screen 54 – Enjoying the iPod IN mode...
  • Page 8: Introduction

    Getting Started Introduction Playable Discs and symbols used in this manual Media/Term Logo Symbol Description y Discs such as movies that can be purchased or rented. y “Blu-ray 3D” discs y BD-R/RE discs that are recorded in BDAV format. Blu-ray y BD-R/RE discs that contain Movie, Music or Photo files. y ISO 9660+JOLIET, UDF and UDF Bridge format y Discs such as movies that can be purchased or rented. y Video mode and finalized only DVD-ROM y Supports the dual layer disc also DVD-R DVD-RW Finalized AVCHD format DVD+R DVD+RW y DVD±R/RW discs that contain Movie, Music or (8 cm /...
  • Page 9: About The "7" Symbol Display

    Getting Started Note About the “7” Symbol Display y Depending on the conditions of the “7” may appear on your TV display during recording equipment or the CD-R/RW (or operation and indicates that the function explained DVD±R/RW) disc itself, some CD-R/RW (or in this owner’s manual is not available on that DVD±R/RW) discs cannot be played on the specific media. unit. y Depending on the recording software & the finalization, some recorded discs (CD-R/RW, DVD±R/RW, BD-R/RE) may not be playable. y BD-R/RE, DVD±R/RW and CD-R/RW discs recorded using a personal computer or a DVD or CD Recorder may not play if the disc is damaged or dirty, or if there is dirt or condensation on the player’s lens. y If you record a disc using a personal computer, even if it is recorded in a compatible format, there are cases in which it may not play because of the settings of the application software used to create the disc. (Check with the software publisher for more detailed information.) y This player requires discs and recordings to meet certain technical standards in order to achieve optimal playback quality. y Pre-recorded DVDs are automatically set to these standards. There are many different types of recordable disc formats (including...
  • Page 10: Supplied Accessories

    Getting Started Supplied Accessories Accessories of speaker box (S-BD707SW) Video cable (1) Remote control (1) Speaker cable (1) Large non-skid pads Accessories of speaker box Battery (1) FM antenna (1) (S-BD303) iPod cradle (1) Small non-skid pads Colour-coded Speaker cables (6) Accessories of speaker box (S-BD707T) Large non-skid pads (1) Screws (12) Colour-coded Speaker cables (5) Speaker stand bases (4) Small non-skid pads Middle non-skid pads...
  • Page 11: File Compatibility

    Getting Started File compatibility Movie files File File Codec Format Audio Format Subtitle Location Extension “.avi”, “.divx”, DIVX3.xx, DIVX4.xx, Dolby Digital, SubRip (.srt / .txt), SAMI (.smi), “.mpg”, “.mpeg”, DIVX5.xx, DIVX6.xx DTS, MP3, SubStation Alpha (.ssa/.txt), “.mkv”, “.mp4”, (Standard playback WMA, AAC, MicroDVD (.sub/.txt), VobSub Disc, “.asf”, “.wmv”, only), XVID, MPEG1 SS, (.sub), SubViewer 1.0 (.sub), “.m4v” (DRM H.264/MPEG-4 AVC, SubViewer 2.0 (.sub/.txt), TMPlayer free) MPEG2 PS, MPEG2 TS, (.txt), DVD Subtitle System (.txt) VC-1 SM (WMV3) “.avi”, “.divx”, DIVX3.xx, DIVX4.xx, Dolby Digital, SubRip (.srt / .txt), SAMI (.smi), “.mpg”, “.mpeg”,...
  • Page 12: Avchd (Advanced Video Codec High Definition)

    Getting Started Note AVCHD (Advanced Video y The file name is limited to 180 characters. Codec High Definition) y Maximum files/folder: Less than 2 000 y This player can playback AVCHD format discs. (total number of files and folders) These discs are normally recorded and used in y Depending on the size and number of the camcorders. files, it may take several minutes to read the y The AVCHD format is a high definition digital contents on the media. video camera format. y File compatibility may differ depending on y The MPEG-4 AVC/H.264 format is capable of the server. compressing images at higher efficiency than y The file requirements on page 11 are not that of the conventional image compressing always compatible. There may have some format. restrictions by file features and media y This player can playback AVCHD discs using server’s ability. “x.v.Colour” format.
  • Page 13: Certain System Requirements

    Getting Started Certain System Requirements Compatibility Notes For high definition video playback: y Because BD-ROM is a new format, certain disc, digital connection and other compatibility issues y High definition display that has COMPONENT or are possible. If you experience compatibility HDMI input jacks. problems, please contact an authorized y BD-ROM disc with high definition content. Customer Service Center. y HDMI or HDCP capable DVI input on your display y This unit allows you to enjoy functions such device is required for some content (as specified as picture-in-picture, secondary audio and by disc authors). Virtual packages, etc., with BD-ROM supporting For playing files on your PC’s share folder via your BONUSVIEW (BD-ROM version 2 Profile 1 version home network, the PC requires below. 1.1/ Final Standard Profile). Secondary video and audio can be played from a disc compatible with y Windows® XP (Service Pack 2 or higher), the picture-in-picture function. For the playback Windows Vista® (no Service Pack required) method, refer to the instructions in the disc. Windows 7® (no Service Pack required) y Viewing high-definition content and up- y 1.2 GHz Intel® Pentium® III or AMD converting standard DVD content may require a Sempron™ 2200+ processors...
  • Page 14: Remote Control

    Getting Started Remote control X USB REC: Records an audio • • • • • • • • • a • • • • • • • INPUT/TUNER: Changes MUTE: Mute the unit. input mode. SOUND: Selects a sound effect 1 (STANDBY/ON): Switches the mode. player ON or OFF. VOL +/- : Adjusts speaker B OPEN/CLOSE: Opens and volume. closes the disc tray. • • • • • • • • • c • • • • • • • HDMI IN: Changes input mode to HDMI IN directly.
  • Page 15: Front Panel

    Getting Started Front panel STANDBY/ON OPEN/CLOSE FUNCTION TUNE VOLUME PORTABLE IN 500 mA a Disc Tray c Display Window b Operation buttons d Remote Sensor g h i j k 1 (STANDBY/ON) Button e PORTABLE IN STANDBY/ON OPEN/CLOSE FUNCTION Switches the player ON or OFF. f USB Port TUNE B (OPEN/CLOSE)
  • Page 16: Connecting

    Connecting Assemble the speakers For center speaker: Use the supplied adhesive to attach four small pads to the base of center speaker. Speaker Setup for BCS-717 Preparing the speakers middle non-skid pads 1. Attach the non-skid pads to the base of each small non-skid pads speaker stand bases, the subwoofer and the center speaker. For speaker stand bases: Use the supplied adhesive to attach four middle pads to the base (bottom) of each speaker middle non-skid pads stand base. middle non-skid pads small non-skid pads small non-skid pads 2. Attach the speaker stand bases to the stems...
  • Page 17 Plastic catch y Do not connect any speakers other than those supplied to this system. > Caution y Do not connect the supplied speakers to any amplifier other than the one supplied y The plastic catch is not a mounting fixture, and the speaker should not be hung directly with this system. Connection to any other from the wall using this catch. Always use a amplifier may result in malfunction or fire. cord when stabilizing the speaker. y Please connect the speaker cable of y Pioneer disclaims all responsibility for any subwoofer (purple) to orange of the player. losses or damage resulting from improper y These speaker terminals carry HAZARDOUS Mounting screw assembly, installation, insufficient strength LIVE voltage. To prevent the risk of electric 5 mm (not supplied) of the installation materials, misuse, or shock when connecting or disconnecting Mounting screw natural disasters. the speaker cables, disconnect the power...
  • Page 18: Speaker Setup For Bcs

    Connecting Speaker Setup for BCS-313 For center speaker: Use the supplied adhesive to attach four small pads to the base of center speaker. Preparing the speakers 1. Attach the non-skid pads to the base of each speaker. For speakers: small non-skid pads small non-skid pads Use the supplied adhesive to attach four small small non-skid pads small non-skid pads pads to the base (bottom) of each speaker. small non-skid pad small non-skid pads For subwoofer: small non-skid pads small non-skid pads 2. Connect the wires to the player.
  • Page 19: Wall Mounting The Center Speaker

    > Caution switch of the television set OFF, and turn it ON after 15 min. to 30 min. If the problem persists, place the y If you are unsure of the qualities and speaker system away from the television set. strength of the wall, consult a professional thick cord for advice. The subwoofer is not magnetically shielded and so should not be placed near a TV or monitor. y Pioneer is not responsible for any accidents Plastic catch Magnetic storage media (such as floppy discs and or damage that result from improper tape or video cassettes) should also not be kept installation. close to the subwoofer. Do not attach the front/surround speakers and subwoofer to a wall or ceiling. They may fall off and cause injury. Mounting screw 5 mm (not supplied) 10 mm 5 mm to 7 mm...
  • Page 20: Positioning The System

    Connecting > Caution Positioning the system y Be careful to make sure children do not put their hands or any objects into the The following illustration shows an example of *subwoofer duct. positioning the system. Note that the illustrations *subwoofer duct: A hole for plentiful bass in these instructions differ from the actual unit for sound on subwoofer cabinet (enclosure). explanation purposes. y Place the center speaker at a safe distance For the best possible surround sound, all the from the child’s reach. speakers other than the subwoofer should be Otherwise it may result in the speaker falling placed at the same distance from the listening down and causing personal injury and/or position ( property damage. y The speakers contain magnetic parts, so colour irregularity may occur on the TV screen or PC monitor screen. Please use the speakers away from the TV screen or PC monitor screen. Front left speaker (L)/ Front right speaker (R): Place the front speakers to the sides of the monitor or screen and as flush with the screen surface as possible.
  • Page 21: Connecting To Your Tv

    Connecting Connecting to Your TV HDMI Connection If you have a HDMI TV or monitor, you can connect it to this player using a HDMI cable (Type A, High Make one of the following connections, depending Speed HDMI™ Cable with Ethernet). Connect the on the capabilities of your existing equipment. HDMI jack on the player to the HDMI jack on a y HDMI connection (page 21) HDMI compatible TV or monitor. y Component Video connection (page 23) y Video connection (page 23) Note Rear of the unit y Depending on your TV and other equipment you wish to connect, there are various ways you could connect the player. Use only one of the connections described in this manual. y Please refer to the manuals of your TV, stereo system or other devices as necessary to make the best connections. y Make sure the player is connected directly HDMI to the TV. Tune the TV to the correct video cable input channel. y Do not connect your player via your VCR. The image could be distorted by the copy protection system.
  • Page 22: Arc (Audio Return Channel) Function

    Connecting Note ARC (Audio Return Channel) y If a connected HDMI device does not accept function the audio output of the player, the HDMI device’s audio sound may be distorted or The ARC function enables an HDMI capable TV to may not output. send the audio stream to HDMI OUT of this player. y When you use HDMI connection, you can To use this function: change the resolution for the HDMI output. - Your TV must support the ARC function and (Refer to “Resolution Setting” on page 24.) the ARC of this player must be set to On (Initial y Select the type of video output from the setting is “Off”). HDMI OUT jack using [HDMI Color Setting] - The setting method of ARC may differ depending option on the [Setup] menu (see page 32). on the TV. For details about ARC function, refer y Changing the resolution when the to your TV manual. connection has already been established - You must use the HDMI cable (Type A, High may result in malfunctions. To solve the Speed HDMI™ Cable with Ethernet). problem, turn off the player and then turn it - You must connect with the HDMI IN of TV that on again.
  • Page 23: Component Video Connection

    Connecting Component Video Connection Video Connection Connect the COMPONENT VIDEO OUT jacks on the Connect the VIDEO OUT jack on the player to the player to the corresponding input jacks on the TV video in jack on the TV using a video cable. You can using component video cable. You can hear the hear the sound through the system’s speakers. sound the through the system’s speaker. Rear of the unit Rear of the unit Video cable Component video cable Note When you use COMPONENT VIDEO OUT connection, you can change the resolution for the output. (Refer to “Resolution setting” on page 24.)
  • Page 24: Resolution Setting

    Connecting Antenna connection Resolution Setting The player provides several output resolutions for HDMI OUT and COMPONENT VIDEO OUTPUT jacks. Connect the supplied antenna for listening to the You can change the resolution using [Setup] menu. radio. 1. Press HOME MENU (n). 2. Use A/D to select the [Setup] and press ENTER (b). The [Setup] menu appears. 3. Use W/S to select [DISPLAY] option then press D to move to the second level. 4. Use W/S to select the [Resolution] option then press ENTER (b) to move to the third level. Rear of the unit 5. Use W/S to select the desired resolution then press ENTER (b) to confirm your selection. Note Note y If your TV does not accept the resolution After connecting the FM wire antenna, keep you have set on the player, you can set it as horizontal as possible. Be sure to fully resolution to 576p as follows: extend the FM wire antenna. 1. Press B to open the disc tray. 2 Press Z (STOP) for more than 5 seconds. y Since several factors affect the resolution of video output, see “Video Output Resolution”...
  • Page 25: Connections With External Device

    Connecting Connections with PORTABLE IN connection external device You can enjoy the sound from your portable audio player through the speakers of this system. Connect the headphones (or line out ) jack of the portable audio player into the PORTABLE IN socket AUX Connection of this unit. And then select the [PORTABLE] option by pressing INPUT/TUNER and ENTER (b). You can enjoy the sound from an external You can also use the FUNCTION button on the front component through the speakers of this system. panel to select the input mode. Connect the analog audio output jacks of your component into the AUX L/R (INPUT) on this unit. And then select the [AUX] option by pressing VOLUME INPUT/TUNER and ENTER (b). You can also use the FUNCTION button on the front PORTABLE IN panel to select the input mode. 500 mA Rear of the unit MP3 Player, etc... White To the audio output jacks of your component (TV, VCR, etc.)
  • Page 26: Optical In Connection

    Connecting OPTICAL IN connection HDMI IN 1/2 connection You can enjoy the sound from your component You can enjoy the pictures and sound from your with a digital optical connection through the component through this connection. speakers of this system. Connect the HDMI OUT jack of your component Connect the optical output jack of your component into the HDMI IN 1 or 2 jack on this unit. And then into the OPTICAL IN jack on the unit. And then select the [HDMI IN 1/2] option by pressing INPUT/ select the [OPTICAL] option by pressing INPUT/ TUNER and ENTER (b). TUNER and ENTER (b). Or press OPTICAL to select You can also use the FUNCTION button on the front directly. panel to select the input mode. You can also use the FUNCTION button on the front panel to select the input mode. Rear of the unit Rear of the unit To the HDMI OUT jack of your component (set-top box, digital satellite receiver, video game To the digital machine, etc.) optical output jack of your component Note y You cannot change the video resolution in the HDMI IN 1/2 mode. Change the video resolution of the connected component.
  • Page 27: Connecting To Your Home Network

    Connecting Connecting to your Home Network Broadband service This player can be connected to a local area network (LAN) via the LAN port on the rear panel or the internal wireless module. By connecting the unit to a broadband home network, you have access to services such as BD- LIVE interactivity and Online content services. Wired network connection Router Using a wired network provides the best performance, because the attached devices connect directly to the network and are not subject to radio frequency interference. Please refer to the documentation for your network device for further instructions. Connect the player’s LAN port to the corresponding port on your Modem or Router using a PC and/or DLNA certified server commercially available LAN or Ethernet cable. Note y When plugging or unplugging the LAN cable, hold the plug portion of the cable. When unplugging, do not pull on the LAN cable but unplug while pressing down on the lock. y Do not connect a modular phone cable to the LAN port. Rear of the unit y Since there are various connection configurations, please follow the specifications of your telecommunication carrier or internet service provider.
  • Page 28: Wired Network Setup

    Connecting Note Wired Network Setup If there is no DHCP server on the network and If there is a DHCP server on the local area network you want to set the IP address manually, select (LAN) via wired connection, this player will [Static] then set [IP Address], [Subnet Mask], automatically be allocated an IP address. After [Gateway] and [DNS Server] using W/S/ making the physical connection, a small number of A/D and numerical buttons. If you make a home networks may require the player’s network mistake while entering a number, press CLEAR setting to be adjusted. Adjust the [NETWORK] to clear the highlighted part. setting as follow. 4. Select [OK] and press ENTER (b) to apply Preparation network settings. Before setting the wired network, you need to 5. The player will ask you to test the network connect the broadband internet to your home connection. Select [OK] and press ENTER (b) to network. complete the network connection. 1. Select [Connection Setting] option in the 6. If you select [Test] and press ENTER (b) at [Setup] menu then press ENTER (b). step 5 above, the network connection status is displayed on the screen. You can also test it on the [Connection Status] in the [Setup] menu. 2. The [Connection Setting] menu appear on the screen. Use W/S to select the [Wired] and press ENTER (b).
  • Page 29: Wireless Network Connection

    Connecting Note Wireless Network Connection Available frequency range and channels for Another connection option is to use an Access Point 5 GHz band are listed as below. But, there or a wireless router. The network configuration and may have the differences and restrictions connection method may vary depending on the depending on the country. Try setting your equipment in use and the network environment. access point with other channel if you have This player is equipped with an IEEE 802.11n (Dual- difficulties in wireless network connection. band, 5 GHz and 2.4 GHz band) wireless module, Area Frequency Range which also supports the 802.11a/b/g standards. For the best wireless performance, we recommend North 5.15-5.25 GHz (ch. 36-48), using a IEEE 802.11n certified Wi-Fi network (access America 5.725-5.825 GHz (ch. 149-161), point or wireless router). 5.825- 5.850 (ch.165) Europe, UAE 5.15-5.25 GHz (ch. 36-48) VOLUME Others 5.15-5.25 GHz (ch. 36-48), PORTABLE IN 500 mA 5.725-5.825 GHz (ch. 149-161), 5.825- 5.850 (ch.165) Wireless Wireless Network Setup Communication...
  • Page 30 Connecting [Manual] – Your access point may not be 2. The [Connection Setting] menu appear on the screen. Use W/S to select [Wireless] and press broadcasting its access point name (SSID). ENTER (b). Check your router settings through your computer and either set your router to 3. Select [Yes] and press ENTER (b) to continue. broadcast SSID, or manually enter the access The new connection settings reset the current point name (SSID) in [Manual]. network settings. [Push Button] – If your access point or 4. The player scans the all available access points wireless router that supports the Push Button or wireless routers within range and display Configuration method, select this option and them as a list. Use W/S to select an access press the Push Button on your access point or point or wireless router on the list, and then wireless router within 120 counts. You do not press ENTER (b). need to know the access point name (SSID) and security code of your access point or wireless router. 5. Use W/S/A/D to select the IP mode between [Dynamic] and [Static]. Normally, select [Dynamic] to allocate an IP address automatically. Note If you have security on your access point or If there is no DHCP server on the network and wireless router, verify that the WEP or WPA key you want to set the IP address manually, select that was entered into the player matches the...
  • Page 31 Connecting Notes on Network Connection: y A DSL modem is required to use DSL service and a cable modem is required to use cable modem y Many network connection problems during service. Depending on the access method of and set up can often be fixed by re-setting the subscriber agreement with your ISP, you may not router or modem. After connecting the player be able to use the internet connection feature to the home network, quickly power off and/ contained in this player or you may be limited or disconnect the power cable of the home to the number of devices you can connect at network router or cable modem. Then power on the same time. (If your ISP limits subscription to and/or connect the power cable again. one device, this player may not be allowed to y Depending on the internet service provider (ISP), connect when a PC is already connected.) the number of devices that can receive internet y The use of a “Router” may not be allowed or its service may be limited by the applicable terms usage may be limited depending on the policies of service. For details, contact your ISP. and restrictions of your ISP. For details, contact y Our company is not responsible for any your ISP directly. malfunction of the player and/or the internet y The wireless network operate at 2.4 GHz connection feature due to communication radio frequencies that are also used by other errors/malfunctions associated with your household devices such as cordless telephone,...
  • Page 32: Usb Device Connection

    Connecting Note USB device connection y This player supports USB flash drive/ external HDD formatted in FAT16, FAT32 and This player can play movie, music and photo files NTFS when accessing files (music, photo, contained in the USB device. movie). However, for BD-LIVE and Audio CD recording, only FAT16 and FAT32 formats Playback content in the USB are supported. Use the USB flash drive/ external HDD formatted in either FAT16 or device FAT32 when using BD-LIVE and Audio CD recording. 1. Insert a USB device to the USB port until it fits into place. y The USB device can be used for the local storage for enjoying BD-LIVE discs with Internet. VOLUME y This unit can support up to 8 partitions of the USB device. PORTABLE IN y Do not extract the USB device during 500 mA operation (play, etc.).
  • Page 33: Settings

    System Setting Settings [DISPLAY] Menu TV Aspect Ratio Adjust the Setup Settings Select a TV aspect ratio option according to your TV type. You can change the settings of the player in the [Setup] menu. [4:3 Letter Box] 1. Press HOME MENU (n). Select when a standard 4:3 TV is connected. Displays theatrical images with masking bars above and below the picture. [4:3 Pan Scan] Select when a standard 4:3 TV is connected. Displays pictures cropped to fill your TV screen. Both sides of the picture are cut off. 2. Use A/D to select the [Setup] and press ENTER [16:9 Original] (b). The [Setup] menu appears. Select when a 16:9 wide TV is connected. The 4:3 picture is displayed with an original 4:3 aspect ratio, with black bars appearing at the left and right sides. [16:9 Full] Select when a 16:9 wide TV is connected. The 4:3 picture is adjusted horizontally (in a linear proportion) to fill the entire screen.
  • Page 34 System Setting Resolution HDMI Color Setting Sets the output resolution of the Component and Select the type of output from the HDMI OUT jack. HDMI video signal. Refer to page 24 and 65 for For this setting, please refer to the manuals of your details about the resolution setting. display device. [Auto] [YCbCr] If the HDMI OUT jack is connected to Select when connecting to a HDMI display TVs providing display information (EDID), device. automatically selects the resolution best suited [RGB] to the connected TV. Select when connecting to a DVI display [1080p] device. Outputs 1080 lines of progressive video. 3D Mode [1080i] Select the type of output mode for Blu-ray 3D disc Outputs 1080 lines of interlaced video. playback. [720p] [Off] Outputs 720 lines of progressive video. Blu-ray 3D disc playback will output as 2D [576p] mode like a normal BD-ROM disc playback. Outputs 576 lines of progressive video. [On] [576i] Blu-ray 3D disc playback will output as 3D Outputs 576 lines of interlaced video.
  • Page 35: [Language] Menu

    System Setting [LANGUAGE] Menu [AUDIO] Menu Display Menu Speaker Setup Select a language for the [Setup] menu and on- To obtain the best possible sound, use the speaker screen display. setup display to specify the volume of the speakers you have connected and their distance from your Disc Menu/Disc Audio/ listening position. Use the test to adjust the volume of the speakers to the same level. Disc Subtitle Select the language you prefer for the audio track (disc audio), subtitles, and the disc menu. [Original] Refers to the original language in which the disc was recorded. [Other] Press ENTER (b) to select another language. Use number buttons then press ENTER (b) [Speaker] to enter the corresponding 4-digit number Select a speaker that you want to adjust. according to the language code list on page [Volume] Adjust the output level of each speaker. [Off] (Disc Subtitle only) Turn off Subtitle.
  • Page 36: [Lock] Menu

    System Setting HD AV Sync [LOCK] Menu Sometimes Digital TV encounters a delay between The [LOCK] settings affect only Blu-ray Disc and picture and sound. If this happens you can DVD playback. compensate by setting a delay on the sound so To access the any features in [LOCK] settings, you that it effectively ‘waits’ for the picture to arrive: this must enter the 4-digit security code you have is called HD AV Sync. Use W/S to scroll up and created. down through the delay amount, which you can If you have not entered a password yet, you are set at anything between 0 and 300 ms. prompted to do so. Enter a 4-digit password twice, and press ENTER (b) to create a new password. Password You can create or change the password. [None] Enter a 4-digit password twice, and press ENTER (b) to create a new password. DRC (Dynamic Range Control) [Change] Enter the current password and press ENTER This function allows you to listen to a movie at a (b). Enter a 4-digit password twice, and press lower volume without losing clarity of sound. ENTER (b) to create a new password. [Off] If you forget your password Turns off this function.
  • Page 37: [Network] Menu

    System Setting DVD Rating [NETWORK] Menu Blocks playback of rated DVD based on their The [NETWORK] settings are needed to use the BD- content. (Not all discs are rated.) Live and Online content services. [Rating 1-8] Connection Setting Rating one (1) has the most restrictions and If your home network environment is ready to rating eight (8) is the least restrictive. connect the player, the player needs to be set the wired or wireless network connection for network [Unlock] communication. (See “Connecting to your Home If you select [Unlock], parental control is not Network” on pages 27-31.) active and the disc plays in full. Connection Status Blu-ray Disc Rating If you want to check the network status on this Set an age limit of BD-ROM play. Use number player, select the [Connection Status] options and buttons to input an age limit for BD-ROM viewing. press ENTER (b) to check whether a connection to the network and the internet have been [255] established. All BD-ROM can be played. BD-LIVE connection [0-254] You can restrict Internet access when BD-LIVE Prohibits play of BD-ROM with corresponding...
  • Page 38: [Others] Menu

    System Setting [OTHERS] Menu Initialize [Factory Set] ARC (Audio Return Channel) You can reset the player to its original factory You can set ARC (Audio Return Channel) function settings. [On] or [Off ]. The ARC function enables an HDMI capable TV to send the audio stream to HDMI OUT [BD-LIVE Storage Clear] of this player. Refer to page 22 for details about this Initializes the BD-LIVE contents from the function. connected USB storage. Note DivX® VOD If you reset the player to its original factory ABOUT DIVX VIDEO: DivX® is a digital video format settings using [Factory Set] option, you have created by DivX, Inc. This is an official DivX Certified® to set all the activation for the Online services device that plays DivX video. Visit divx.com for more and network settings again. information and software tools to convert your files into DivX video. ABOUT DIVX VIDEO-ON-DEMAND: This DivX Software Information Certified® device must be registered in order to play Displays the current software version.
  • Page 39: Sound Effect

    System Setting Sound Effect You can select a suitable sound mode. Press SOUND repeatedly until the desired mode appears on the front panel display or the TV screen. The displayed items for the equalizer maybe different depending on sound sources and effects. [Mode 1]: Gives you suitable sound setting with connecting small type of speakers (S-BD303). [Mode 2]: Gives you suitable sound setting with connecting tall type of speakers (S-BD707T). [Bypass]: Software with multichannel surround audio signals is played according to the way it was recorded. [Bass Blast]: Reinforce the bass sound effect from front left and right speaker and subwoofer. [PL ll Movie]: Performs Pro Logic ll movie mode decoding to the input signal and produces five full-bandwidth output channels from 2 channel sources. This setting is ideal for watching videos of overdubbed or old movies. This mode is available only to 2 channel sources. [PL ll Music]: Performs Pro Logic ll music mode decoding to the input signal and produces five full-bandwidth output channels from 2 channel sources. This setting is ideal for normal stereo sources such as CD. This mode is available only to 2 channel sources. [Clear Voice]: This mode makes voice sound clear, improving the quality of voice sound. [Game]: You can enjoy more virtual sound while playing video games.
  • Page 40: Operating

    Operating General Playback Playing a Disc 1. Press B (OPEN/CLOSE), and place a disc on the Using [HOME] menu disc tray. The home menu appears when you press HOME 2. Press B (OPEN/CLOSE) to close the disc tray. MENU (n). Use W/S/A/D to select a category For the most Audio CD, BD-ROM and and press ENTER (b). DVD-ROM discs, playback starts automatically. 3. Press HOME MENU (n). 4. Select [Movie] or [Music] using A/D, and press ENTER (b). 5. Select [Blu-ray Disc], [DVD], [VR] or [Audio] option using W/S, and press ENTER (b). Note y Playback functions described in this manual are not always available in every files and media. Some functions can be restricted depending on many factors. a [Movie] - Plays video contents. y Depending on the BD-ROM titles, a USB b [Music] - Plays audio contents. device connection may be needed for the proper playback.
  • Page 41: Playing Blu-Ray 3D Disc

    Operating Playing Blu-ray 3D disc Enjoying BD-Live™ This player can play the Blu-ray 3D discs which BD-ROM supporting BD-Live (BD-ROM version 2 contains separate views for the left and right eyes. Profile 2) that has a network extension function allows you to enjoy more functions such as downloading new movie trailers by connecting this Preparation unit to the internet. In order to playback Blu-ray 3D title in 1. Check the network connection and settings stereoscopic 3D mode, you need to: (pages 27-31). y y y C heck your TV is 3D capable and has HDMI 2. Insert a USB storage device to the USB port on (3D) input(s). the front panel. y Wear 3D glasses to enjoy the 3D experience A USB storage device is needed to download if it is necessary. bonus content. y Check whether the BD-ROM title is the Blu- 3. Press HOME MENU (n), and set the [BD-LIVE ray 3D disc or not. connection] option on the [Setup] menu (page y y y C onnect an HDMI cable (High Speed HDMI™...
  • Page 42: Playing A File On A Network Server

    Operating Playing a file on a network Entering a network user ID and the password server Depending on your PC’s environment, you may need to enter a network user ID and the password for accessing a shared folder. This player can play movie, music and photo files located in a PC or a DLNA server through your 1. The keyboard menu appears automatically if the home network. network user ID and the password are required. 1. Check the network connection and settings 2. Use W/S/A/D to select a character then (pages 27-31). press ENTER (b) to confirm your selection on the virtual keyboard. 2. Press HOME MENU (n). To enter a letter with an accent mark, press 3. Select [Movie], [Photo] or [Music] using A/D, DISPLAY (m) to display the extended character and press ENTER (b). set. 4. Select a DLNA media server or a share folder on your PC on the list using W/S, and press ENTER (b).
  • Page 43: Basic Operations For Video And Audio Content

    Operating Basic operations for video and Basic operations for photo audio content content To stop playback To play a slide show Press Z (STOP) while playback. Press d (PLAY) to start slide show. To pause playback To stop a slide show Press M (PAUSE/STEP) while playback. Press Z (STOP) while slide show. Press d (PLAY) to resume playback. To pause a slide show To play frame-by-frame (Video) Press M (PAUSE/STEP) while slide show.
  • Page 44: Resume Playback

    Operating Resume playback eroyt, The unit records the point where you pressed the Z (STOP) depending on the disc. If “MZ (Resume Stop)” appears on the screen briefly, press d (PLAY) to resume playback (from the scene point). If you press Z (STOP) twice or unload the disc, “Z(Complete Stop)” appears on the screen. The unit will clear the stopped point. Note y The resume point may be cleared when a button is pressed (for example; 1 (STANDBY/ON), B (OPEN/CLOSE), etc). y On BD-ROM discs with BD-J, the resume playback function does not work. y If you press Z (STOP) once during BD-ROM interactive title playback, the unit will be in Complete Stop mode .
  • Page 45: Advanced Playback

    Operating Advanced Playback Repeating a specific portion erot This player can repeat a portion you have selected. Repeat Playback 1. While playback, press REPEAT (h) to select erotu [A-] at the beginning of the portion you wish to repeat. During playback, press REPEAT (h) repeatedly to 2. Press ENTER (b) at the end of the portion. Your select a desired repeat mode. selected portion will be repeated continually. Blu-ray Disc/DVDs 3. To return to normal playback, press REPEAT jA- – Selected portion will be repeated continually. (h) repeatedly to select [Off ]. jChapter – The current chapter will be played Note back repeatedly. y You cannot select a portion less than 3 jTitle – The current title will be played back seconds. repeatedly. y This function may not work on some disc or title. To return to normal playback, press REPEAT (h) repeatedly to select [Off ].
  • Page 46: Marker Search

    Operating Marker Search Using the search menu eroy eroy You can start playback from up to nine memorized Using search menu, you can easily to find the point points. where you want to start playback. To enter a marker To search a point 1. While playback, press MARKER at the desired 1. During playback, press SEARCH to display the point. The Marker icon appears on the TV screen search menu. briefly. 2. Repeat step 1 to add up to nine markers. To recall a marked scene 2. Press A/D to skip the playback 15 seconds forward or backward. You can select a point that 1. Press SEARCH and the search menu appears on you want to skip by pressing and holding the screen.
  • Page 47: Selecting A Subtitle File

    Operating Selecting a subtitle file Last Scene Memory If the subtitle file name is different from the movie This unit memorizes the last scene from the last disc file name, you need to select the subtitle file on the that is viewed. The last scene remains in memory [Movie] menu before playing the movie. even if you remove the disc from the unit or switch off the unit. If you load a disc that has the scene 1. Use W/S/A/D to select the subtitle file you memorized, the scene is automatically recalled. wish to play in the [Movie] menu. Note 2. Press ENTER (b). y Last Scene Memory function for a previous disc is erased once a different disc is played. y This function may not work depending on the disc. y On BD-ROM discs with BD-J, the last scene memory function does not work. y This unit does not memorize settings of a disc if you switch off the unit before commencing to play it. Press ENTER (b) again to deselect the subtitle file. Selected subtitle file will be displayed when you play the movie file. Note y If you press Z (STOP) while playback, the subtitle selection is cancelled.
  • Page 48: Options While Viewing A Photo

    Operating Options while viewing a photo Listening to music while slide show You can use various options during viewing a photo in full screen. You can display photo files while listening to music 1. While viewing a photo in full screen, press files. DISPLAY (m) to display the option menu. 1. While viewing a photo in full screen, press 2. Select an option using W/S. DISPLAY (m) to display the option menu. 2. Use W/S to select [Music Select] option, and press ENTER (b) to display the [Music Select] menu. 3. Use W/S to select a device, and press ENTER (b). Device that you can select are differ depending on the location of the photo file you are displaying in full screen. Photo location Available Device Disc, USB Disc, USB a Current photo/Total number of photos Share Folder (PC) Share Folder (PC)
  • Page 49: On-Screen Display

    Operating On-Screen display 2. Select an option using W/S. 3. Use A/D to adjust the selected option value. 4. Press RETURN (x) to exit the On-Screen You can display and adjust various information and display. settings about the content. Note Displaying content information y If no button is pressed for a few seconds, the on-screen display disappears. on-screen y A title number cannot be selected on some eroy discs. y Available items may differ depending on 1. While playback, press DISPLAY (m) to show discs or titles. various playback information. y If an interactive Blu-ray Disc is playing back, some setting information is displayed on the screen but prohibited to be changed. a Title – current title number/total number of titles b Chapter – current chapter number/total number of chapters c Time – elapsed playing time/total playback time d Audio – selected audio language or channel...
  • Page 50: Playing From Selected Time

    Operating Playing from selected time Selecting a subtitle language eroy eroy 1. Press DISPLAY (m) during playback. The time 1. During playback, press DISPLAY (m) to display search box shows the elapsed playing time. the On-Screen display. 2. Select the [Time] option and then input the 2. Use W/S to select the [Subtitle] option. required start time in hours, minutes, and 3. Use A/D to select desired subtitle language. seconds from left to right. 4. Press RETURN (x) to exit the On-Screen For example, to find a scene at 2 hours, 10 display. minutes, and 20 seconds, enter “21020”. Note Press A/D to skip the playback 60 seconds Some discs allow you to change subtitle forward or backward. selections only via the disc menu. If this is the 3. Press ENTER (b) to start playback from selected case, press POPUP/TOP MENU or MENU button time. and choose the appropriate subtitle from the Note selections on the disc menu.
  • Page 51: Changing The Tv Aspect Ratio

    Operating Changing the TV Aspect Ratio Changing the Picture Mode eroy eroy You can change the TV aspect ratio setting while You can change the [Picture mode] option while playback. playback. 1. During playback, press DISPLAY (m) to display 1. During playback, press DISPLAY (m) to display the On-Screen display. the On-Screen display. 2. Use W/S to select the [TV Aspect Ratio] 2. Use W/S to select the [Picture Mode] option. option. 3. Use A/D to select desired option. 3. Use A/D to select desired option. 4. Press RETURN (x) to exit the On-Screen 4. Press RETURN (x) to exit the On-Screen display. display. Setting the [User] option Note 1. During playback, press DISPLAY (m) to display Even if you change the value of the [TV Aspect...
  • Page 52: Audio Cd Recording

    Operating Audio CD Recording press ENTER (b) while [OK] is selected. 8. Use W/S/A/D to select [OK], and press ENTER (b) to start Audio CD recording. You can record one desired track or all of the tracks If you want to stop in progressing Audio CD in Audio CD to a USB storage device. recording, press ENTER (b) while [Cancel] is 1. Insert a USB storage device to the USB port on highlighted. the front panel. 9. A message appears when Audio CD recording is 2. Press B (OPEN/CLOSE), and place an Audio CD completed. Press ENTER (b) to check the audio on the disc tray. file created in the destination folder. Press B (OPEN/CLOSE) to close the disc tray. Note The playback starts automatically. y The table below shows the average 3. Press DISPLAY (m) to display the option menu. recording time from an music track with 4 minutes of playback time to a audio file with Press X USB REC button on the remote control. 192 kbps as an example. You can record all musics in the audio CD. stop mode while playback 4. Use W/S to select [CD Recording] option, and 1.4 min. 2 min.
  • Page 53: Playing The Ipod

    Operating Playing the iPod 2. Select a file using W/S/A/D, and press ENTER (b) to play the file. You can enjoy the sound with your iPod. For details Enjoying iPod on the screen about iPod, refer to the iPod’s User Guide. 1. Connect the iPod firmly. Preparation 2. Press HOME MENU (n). y To view iPod’s Videos and Photos on the TV 3. Select [Music] or [Movie] using A/D, and press screen. ENTER (b). - Be sure to use the video connection through If you connected the other device the VIDEO OUT jack on the rear panel of this (CD or USB), select the iPod on the menu. unit. Select the appropriate video input mode 4. Select a content using W/S/A/D, and press on the TV. ENTER (b) to play. - Depending on the iPod, make sure that select Videos > Video settings, and then set TV Out to Ask or On from your iPod. For details about Video Settings, refer to the iPod User Guide.
  • Page 54: Enjoying The Ipod In Mode

    Compatibility with your iPod may vary Skip the playback forward or depending on the type of your iPod. backward . y iPod touch and iPhone have any difference To select a desired repeat in operation other than iPod. You may need REPEAT mode: Track (;), All (k), Off any additional control to use them with this (No display). unit. (e.g. “slide to unlock”) Note y If you use an application, make a call, or This system is compatible with the audio and send and receive SMS text message, etc. on video of the iPod (4th generation), iPod nano, iPod touch or iPhone, disconnect it from iPod classic, iPod mini, iPod touch and iPhone iPod dock of this unit and then use it. (iPod shuffle is not supported.). y This unit has been developed and tested for the software version of iPod/iPhone indicated on the website of Pioneer. y Installing software versions other than indicated on the website of Pioneer to your iPod/iPhone may result in incompatibility with this unit. y The video quality depends on the video sources on your iPod. y If you have a problem with your iPod, please visit www.apple.com/support/iPod.
  • Page 55: Radio Operations

    Operating Radio Operations Deleting a saved station 1. Press PRESET (W/S) to select a preset number you want to delete. Be sure that the antennas are connected. (Refer to the page 24) 2. Press CLEAR, the preset number will blink in the display window. Listening to the radio 3. Press CLEAR again, to delete the selected preset number. 1. Press INPUT/TUNER until TUNER (FM) appears in the display window. The last received station is tuned in. Deleting all the saved stations 2. Press and hold TUNE (-/+) for about two Press and hold CLEAR for two seconds. seconds until the frequency indication starts to “ERASE ALL” will flash up. Press CLEAR again. Then all change. Scanning stops when the unit tunes in the saved stations are deleted. a station. Or Press TUNE (-/+) repeatedly. 3. Adjust the volume by rotating VOLUME on Improving poor FM reception the front panel or by pressing VOL (+/-) on the remote control.
  • Page 56: Using The Online

    Using the Online You can use various content services via Internet with the Online feature. 1. Check the network connection and settings (pages 27-31). 2. Press HOME MENU (n). 3. Select the [Online] using A/D, and press ENTER (b). 4. Select an Online service using A/D, and press ENTER (b). Note y Detailed information of each service, contact to the content provider or visit support link of the service. y The content of Online services and service related information, including user interface, is subject to changes. Please refer to the web site of each service for most up-to-date information. y Using Online features with wireless network connection may result in improper streaming speed by interference from household devices that are using radio frequencies. y Please note that the related privacy policy will be applied to your privacy and legal rights of you when you provide the online services with user names, passwords, or other login information or personal information and when Pioneer stores them. Please refer to Pioneer Privacy Policy on the WEB site.
  • Page 57: Troubleshooting

    Troubleshooting Troubleshooting General Symptom Cause & Solution The Power does not turned on. y Plug the power cord into the wall outlet securely. The unit does not start y Insert a playable disc. (Check the disc type, colour system, and playback. regional code.) y Place the disc with the playback side down. y Place the disc on the disc tray correctly inside the guide. y Clean the disc. y Cancel the Rating function or change the rating level. The angle cannot be changed. y Multi-angles are not recorded on the DVD Video being played. Cannot play movie, photo or y The files are not recorded in a format that the unit can play. music files. y The unit does not support the codec of the movie file. The remote control does not y The remote control is not pointed at the remote sensor of the unit. work properly. y The remote control is too far from the unit. y There is an obstacle in the path of the remote control and the unit. y The batteries in the remote control are exhausted.
  • Page 58: Network

    Troubleshooting Network Symptom Cause & Solution BD-LIVE feature does not work. y The connected USB storage may not have enough space. Connect the USB storage with at least 1GB free space. y Ensure that the unit is correctly connected to the local area network and can access the internet (see page 27-31). y Your broadband speed may not fast enough to use the BD-LIVE features. Contact your Internet Service Provider (ISP) and increase the broadband speed is recommended. y The [BD-LIVE connection] option in the [Setup] menu is set to [Prohibited]. Set the option to [Permitted]. Streaming video services (such y Your broadband service speed may not be fast enough to stream as YouTube™, etc.) are often video services. Contact your Internet Service Provider (ISP) and stopped or “buffer” during increase the broadband speed is recommended. playback. Shared folder or files from your y The firewall or anti-virus software on your media server is running. PC or a media server are not Turn off the firewall or anti-virus software running on your PC or displayed on the device list. media server. y The player is not connected to the local area network that your PC or the media server are connected. Cannot connect the player to y The wireless communication may be interrupted from household the access point or wireless devices that are using radio frequencies. Move the player away from LAN router.
  • Page 59: Picture

    Your TV may not support the resolution you have set on the player. Change the resolution that your TV accepts. y The player’s HDMI OUT jack is connected to a DVI device that does not support copyright protection. Picture noise appears y You are playing a disc recorded in a colour system that is different from your TV. y Set the resolution which your TV accepts. Blu-ray 3D disc playback does y Connect the player to your TV with HDMI cable (Type A, High Speed not output 3D views. HDMI™ Cable with Ethernet). y Your TV may not support “HDMI 3D mandatory format”. y The [3D Mode] option in the [Setup] menu is set to [Off ]. Set the option to [On]. Sound Symptom Cause & Solution There is no sound or the sound y The unit is in scan, slow motion, or pause mode. is distorted. y The sound volume is low. y Check the speaker cable connection. (page 16) Updates Note that information on this product is available on the Pioneer website. Please check the website for information on updating or servicing this player.
  • Page 60: Appendix

    TV the Supplied Remote You can operate your TV with the supplied remote Control control. If your TV is listed in the table below, set the appropriate manufacturer code. You can control your TV using the buttons below. 1. While holding down 1 (TV POWER) button, and press the manufacturer code for your TV with the numerical buttons (see the table TV Control below). Buttons Manufacturer Code Number Pioneer 1 (Default) Sony 2, 3 By pressing You can Panasonic 4, 5 Turn the TV on or off. 1 (TV POWER) Samsung 6, 7 Switch the TV’s input source 8, 9 INPUT between the TV and other 2. Release the 1 (TV POWER) button to complete...
  • Page 61: Area Code List

    Appendix Area Code List Choose an area code from this list. Area Code Area Code Area Code Area Code Afghanistan Fiji Monaco Singapore Mongolia Slovak Republic Argentina Finland Slovenia Australia France Morocco Austria Germany Nepal South Africa Belgium Great Britain Netherlands South Korea Bhutan Greece Antilles Spain Bolivia Greenland New Zealand Sri Lanka Hong Kong Nigeria...
  • Page 62: Language Code List

    Appendix Language code List Use this list to input your desired language for the following initial settings: [Disc Audio], [Disc Subtitle] and [Disc Menu]. Language Code Language Code Language Code Language Code Afar 6565 French 7082 Lithuanian 7684 Sindhi 8368 Afrikaans 6570 Frisian 7089 Macedonian 7775 Singhalese 8373 Malagasy 7771 Slovak 8375 Albanian 8381 Galician 7176 Slovenian 8376 Ameharic 6577 Georgian...
  • Page 63: Trademarks And Licenses

    Appendix Trademarks and Licenses Manufactured under license under U.S. Patent #’s: 5,451,942; 5,956,674; 5,974,380; 5,978,762; 6,226,616; 6,487,535; 7,392,195; 7,272,567; 7,333,929; 7,212,872 & other U.S. and worldwide Blu-ray Disc™, Blu-ray™, Blu-ray 3D™, BD-Live™, patents issued & pending. DTS and the Symbol BONUSVIEW™ and the logos are trademarks of are registered trademarks,& DTS-HD, DTS-HD the Blu-ray Disc Association. Master Audio | Essential and the DTS logos are trademarks of DTS, Inc. Product includes software. © DTS, Inc. All Rights Reserved. is a trademark of DVD Format/Logo Licensing Corporation. DLNA™, the DLNA Logo and DLNA CERTIFIED™ are trademarks, service marks, or certification marks of the Digital Living Network Alliance. Oracle and Java are registered trademarks of Oracle and/or its affiliates. Other names may be The Wi-Fi CERTIFIED Logo is a certification mark trademarks of their respective owners. of the Wi-Fi Alliance. HDMI, the HDMI logo, and High-Definition The Wi-Fi Protected Setup Mark is a trademark of Multimedia Interface are trademarks or registered the Wi-Fi Alliance. trademarks of HDMI Licensing LLC in the United States and other countries. “x.v.Colour”, and are trademarks of Sony Corporation. Manufactured under license from Dolby Laboratories. Dolby and the double-D symbol are trademarks of Dolby Laboratories.
  • Page 64 Appendix “Made for iPod” and “Made for iPhone” mean that an electronic accessory has been designed to connect specifically to iPod, or iPhone, respectively, and has been certified by the developer to meet Apple performance standards. Apple is not responsible for the operation of this device or its compliance with safety and regulatory standards. Please note that the use of this accessory with iPod or iPhone may affect wireless performance. iPhone, iPod, iPod classic, iPod nano, and iPod touch are trademarks of Apple Inc., registered in the U.S. and other countries. YouTube™ is a trademark of Google Inc. Picasa™ Web Albums is a trademark of Google Inc. This product includes technology owned by Microsoft Corporation and cannot be used or distributed without a license from Microsoft Licensing, Inc.
  • Page 65: Video Output Resolution

    Appendix Video Output Resolution When the non-copy protected media is playing back Video Out COMPONENT VIDEO OUT HDMI OUT Resolution HDMI connected HDMI disconnected 576i 576p 576i 576p 576p 576p 720p 720p 720p 1080i 1080i 1080i 1080p/24 Hz 1080p / 24 Hz 576i 1080i 1080p / 50 Hz 1080p / 50 Hz 576i...
  • Page 66: Specifications

    Appendix Specifications General Power requirements AC 220-240 V, 50/60 Hz Power consumption 150 W (In Standby mode: Less than 0.3 W) Dimensions (W x H x D) Approx. 430 x 64 x 304 mm Net Weight (Approx.) 3.4 kg Operating temperature 5 °C to 35 °C Operating humidity 5 % to 85 % Inputs/Outputs VIDEO OUT 1.0 V (p-p), 75 Ω, sync negative, RCA jack x 1 (Y) 1.0 V (p-p), 75 Ω, sync negative, RCA jack x 1 COMPONENT VIDEO OUT (Pb)/(Pr) 0.7 V (p-p), 75 Ω, RCA jack x 2 HDMI IN/OUT (video/audio) 19 pin (Type A, HDMI™ Connector) ANALOG AUDIO IN 2.0 Vrms (1 kHz, 0 dB), 600 Ω, RCA jack (L, R) x 1 DIGITAL IN (OPTICAL) 3 V (p-p), Optical jack x 1 PORTABLE IN 0.5 Vrms (3.5 mm stereo jack) Tuner FM Tuning Range 87.5 to 108.0 MHz Amplifier Power output (RMS) Total 1100 W Front 180 W × 2 (1 kHz , 4 Ω, THD 10 %) Center 180 W (1 kHz , 4 Ω, THD 10%) Rear 180 W × 2 (1 kHz , 4 Ω, THD 10 %) Sub-Woofer...
  • Page 67 Semiconductor laser Wavelength 405 nm / 650 nm Signal system Standard PAL/NTSC colour TV system Frequency response 20 Hz to 18 kHz (48 kHz, 96 kHz, 192 kHz sampling) Harmonic distortion Less than 0.05 % Dynamic range More than 80 dB LAN port Ethernet jack x 1, 10BASE-T / 100BASE-TX Integrated IEEE 802.11n (5 GHz and 2.4 GHz bands) wireless Wireless LAN (internal antenna) networking access, compatible with 802.11a/b/g Wi-Fi networks. Bus Power Supply (USB) DC 5 V 0 500 mA Speakers for BCS-717 S-BD707T y Front/Surround speaker (Left/ Right) Net Dimensions Type 2 Way 260 x 1097 x 260 mm (W x H x D) Impedance Rated 4 Ω Net Weight 3.8 kg y Center speaker Net Dimensions Type 1 Way 300 x 87 x 65 mm (W x H x D) Impedance Rated 4 Ω...
  • Page 68 Appendix Speakers for BCS-313 S-BD303 y Front/Surround speaker (Left/ Right) Net Dimensions Type 1 Way 96 x 96 x 85 mm (W x H x D) Impedance Rated 4 Ω Net Weight 0.4 kg y Center speaker Net Dimensions Type 1 Way 300 x 87 x 65 mm (W x H x D) Impedance Rated 4 Ω Net Weight 0.6 kg y Subwoofer Net Dimensions Type 1 Way 130.5 x 420 x 375 mm (W x H x D) Impedance Rated 3 Ω Net Weight 4.4 kg y Design and specifications are subject to change without notice.
  • Page 69: Maintenance

    Appendix Maintenance Notes on Discs Handling Discs Handling the Unit Do not touch the playback side of the disc. Hold the disc by the edges so that fingerprints do not get on the surface. Never stick paper or tape on the When shipping the unit disc. Please save the original shipping carton and Storing Discs packing materials. If you need to ship the unit, for maximum protection, re-pack the unit as it was After playing, store the disc in its case. Do not originally packed at the factory. expose the disc to direct sunlight or sources of heat Keeping the exterior surfaces clean and never leave it in a parked car exposed to direct sunlight. y Do not use volatile liquids such as insecticide spray near the unit. Cleaning Discs y Wiping with strong pressure may damage the surface. Fingerprints and dust on the disc can cause poor picture quality and sound distortion. Before playing, y Do not leave rubber or plastic products in clean the disc with a clean cloth. Wipe the disc from contact with the unit for a long period of time.
  • Page 70: Software License Notice

    Software License Relating to Network Notice Services The licenses for the open source software used on this player can be found at the end of this All information, data, documents, communications, document. downloads, files, text, images, photographs, graphics, videos, webcasts, publications, tools, resources, software, code, programs, applets, widgets, applications, products and other content (“Content”) and all services and offerings (“Services”) provided or made available by or through any third party (each a “Service Provider”) is the sole responsibility of the Service Provider from whom it originated. The availability of and access to Content and Services furnished by the Service Provider through the PIONEER Device are subject to change at any time, without prior notice, including, but not limited to the suspension, removal or cessation of all or any part of the Content or Services. Should you have any inquiry or problem related to the Content or Services, you may refer to the Service Provider’s website for the most up-to-date information. PIONEER is neither responsible nor liable for customer service related to the Content and Services. Any question or request for service relating to the Content or Services should be made directly to the respective Content and Service Providers. Please note that PIONEER is not responsible for any Content or Services provided by the Service Provider or any changes to, removal of, or cessation of such Content or Services and does not warrant or guaranty the availability of or access to such Content or Services.
  • Page 72: Démarrage

    Démarrage Consignes de sécurité ATTENTION: Ce produit est catégorisé comme ATTENTION un produit laser de classe 1 selon le règlement IEC 60825-1:2007 sur la sécurité des produits laser. RISQUE D’ÉLECTROCUTION. NE Afin de garantir l’utilisation correcte de cet appareil, PAS OUVRIR. veuillez lire attentivement ce manuel d’utilisation ATTENTION : POUR EVITER UN RISQUE DE CHOC et conservez-le pour vous y référer ultérieurement. ÉLECTRIQUE, NE PAS RETIRER LE CACHE (NI Si l’appareil nécessite une intervention de L'ARRIÈRE). AUCUNE PIÈCE DE CET APPAREIL N’EST maintenance, contactez un point de service après- SUSCEPTIBLE D’ÊTRE RÉPARÉE PAR L’UTILISATEUR. vente agréé. CONFIEZ L’ENTRETIEN DE L’ A PPAREIL À DES L’utilisation de commandes, de réglages ou de PERSONNES QUALIFIÉES. procédures autres que ceux décrits dans ce document peut entraîner une exposition à des Le symbole représentant un éclair radiations dangereuses. (dans un triangle) sert à avertir Pour éviter l’exposition directe au faisceau laser, l’utilisateur de la présence d’une n’essayez pas d’ouvrir le boîtier. Le rayonnement tension dangereuse non isolée dans laser est visible lorsque l’appareil est ouvert. NE le corps de l’appareil, l'appareil. REGARDEZ PAS DIRECTEMENT LE FAISCEAU.
  • Page 73 Démarrage Informations destinées aux utilisateurs sur Cet appareil est équipé d’une batterie transportable ou de piles rechargeables. la collecte et la mise au rebut des anciens équipements et piles usagées Ôter sans danger la batterie ou les piles : pour retirer la batterie ou les piles usagées, procédez dans l’ordre inverse de leur insertion. Pour empêcher toute contamination de l’environnement et tout danger pour la santé des êtres humains et des animaux, la batterie ou les piles usagées Exemples de doivent être mises au rebut dans le conteneur Symbol examples symboles utilisés approprié à un point de collecte prévu pour leur for batteries...
  • Page 74 Démarrage Remarques sur les droits d’auteur Produit sans fil (avis de l'Union européenne) PIONEER déclare par la y De même que le système CSS (Content Scramble présente que ce ou ces System) protège le contenu des DVD, le système produits sont conformes aux AACS (Advanced Access Content System) exigences des directives 1999/5/CE, protège le contenu des disques 2004/108/CE, 2006/95/CE et 2009/125/CE. Blu-ray ; les contenus ainsi protégés sont donc Pour une utilisation en intérieur uniquement.
  • Page 75: Information Importante Concernant Votre Système De Télévision En Couleur

    Démarrage Information importante concernant votre système de télévision en couleur Le système de couleurs de ce lecteur diffère en fonction du disque en cours de lecture. Par exemple, lorsque le lecteur lit le disque enregistré sur un système de couleurs NTSC, l’image est restituée comme un signal NTSC. Seul un appareil avec un système multi peut recevoir tous les signaux de sortie du lecteur. y Si vous avez un téléviseur PAL et que vous utilisez des disques ou des contenus vidéo enregistrés en NTSC, vous verrez des images déformées. y Le téléviseur multisystème change le système couleurs automatiquement en fonction des signaux d’entrée. Si le système couleurs n’est pas modifié automatiquement, éteignez le téléviseur et rallumez-le pour voir des images normales à l’écran. y Même si les disques enregistrés dans le système couleurs NTSC s’affichent correctement sur votre téléviseur, il est possible qu'ils ne soient pas enregistrés correctement.
  • Page 76 39 Effets sonores Télécommande Panneau avant Utilisation Panneau arrière 40 Lecture générale 40 – Utilisation du Menu d’accueil Raccordements 40 – Lecture de disques Assemblage des enceintes 40 – Lecture d’un fichier sur un disque ou – Connexion au haut-parleur BCS-717 un périphérique USB – Connexion au haut-parleur BCS-313 – Lecture d'un disque 3D Blu-Ray Montage mural du haut-parleur central – Utilisation des fonctions BD-Live™ – Avant le montage 42 – Lecture d’un fichier sur un serveur Remarques supplémentaires sur la réseau disposition des haut-parleurs 43 – Opérations de base pour contenu 20 Disposition du système...
  • Page 77 Table des matières Annexe 46 – Utilisation du menu de recherche 47 – Sélection d’un fichier de sous-titres 60 Commande d’un téléviseur à l’aide de la 47 – Dernière scène en mémoire télécommande fournie 48 – Options disponibles pendant 60 – Réglage de la télécommande pour l’affichage d’une photo commander votre téléviseur 48 – Écoute de musique pendant un Liste des codes de région diaporama 62 Liste des codes de langue 49 Affichage à l’écran 63 Marques et licences 49 – Affichage à l’écran des informations 65 Résolution de la sortie vidéo sur le contenu 66 Caractéristiques 50 – Lecture à partir d'une durée définie...
  • Page 78: Démarrage

    Démarrage Introduction Disques lisibles et symboles utilisés dans ce manuel Support/ Logo Symbole Description terme y Disques tels que des films disponibles à l’achat ou à la location. y Disques “Blu-ray 3D” y BD-R/RE enregistrés au format BDAV. Blu-ray y Disques BD-R/RE contenant des fichiers vidéo, musicaux ou photo. y ISO 9660+JOLIET, UDF et UDF Bridge. y Disques tels des films à acheter ou à louer. y Mode Vidéo et finalisé uniquement DVD-ROM y Les disques double couche sont également pris DVD-R en charge. DVD-RW Format AVCHD finalisé DVD+R DVD+RW y Disques DVD±R/RW contenant des fichiers (8 cm, 12...
  • Page 79: À Propos Du Symbole "7

    Démarrage Remarque À propos du symbole “7” y Selon les caractéristiques des appareils Le symbole “7” peut apparaître sur votre écran de d'enregistrement ou des disques CD-R/RW téléviseur alors qu'il est en marche. Cela signifie (ou DVD±R/RW), certains disques CD-R/RW que la fonction décrite dans ce manuel n’est pas (ou DVD±R/RW) ne seront pas lus par cet disponible avec ce support spécifique. appareil. y Selon le logiciel d'enregistrement et de finalisation, certains disques (CD-R/RW, DVD±R/RW, BD-R/RE) ne seront pas lus par cet appareil. y Il est possible que les BD-R/RE, DVD±R/RW et CD-R/RW enregistrés à l’aide d’un ordinateur ou d’un enregistreur de CD/ DVD puissent ne pas être lus si le disque est endommagé ou sale, ou si la lentille du lecteur présente de la poussière ou de la condensation. y Si vous enregistrez un disque à l’aide d’un ordinateur, même s’il est enregistré dans un format compatible, il existe une possibilité qu’il ne puisse pas être lu à cause des paramètres du logiciel d’application utilisé pour créer le disque. (Adressez-vous à l’éditeur du logiciel pour des informations plus détaillées.) y Pour obtenir une qualité de lecture optimale, ce lecteur requiert que les disques et les enregistrements répondent à...
  • Page 80: Accessoires Fournis

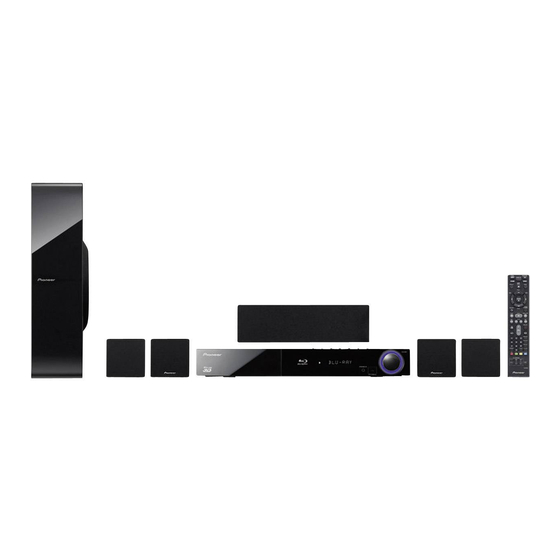
    Démarrage Accessoires fournis Accessoires du boîtier du haut-parleur (S-BD707SW) Câble vidéo (1) Télécommande (1) Câble de haut-parleur Tampons anti- dérapant - grands (1) Accessoires du boîtier du haut-parleur (S-BD303) Piles (1) Antenne FM (1) Sabot iPod (1) Tampons anti- Câbles d'enceinte avec dérapant – petits (1) code couleur (6) Accessoires du boîtier du haut-parleur (S-BD707T) Tampons anti-dérapant - grands (1) Vis (12) Câbles d'enceinte avec code couleur (5) Bases du socle Tampons anti- d’enceinte (4) dérapant – petits (1) Tampons anti-dérapant...
  • Page 81: Compatibilité Fichiers

    Démarrage Compatibilité fichiers Fichiers vidéo Emplacement Extension de Format de codec Format audio Sous-titre des fichiers fichier “.avi”, “.divx”, DIVX3.xx, DIVX4.xx, Dolby Digital, SubRip (.srt / .txt), SAMI (.smi), “.mpg”, “.mpeg”, DIVX5.xx, DIVX6.xx DTS, MP3, SubStation Alpha (.ssa/.txt), “.mkv”, “.mp4”, (lecture standard WMA, AAC, MicroDVD (.sub/.txt), VobSub Disque, “.asf”, “.wmv”, uniquement), XVID, (.sub), SubViewer 1.0 (.sub), “.m4v” (Sans MPEG1 SS, H.264/ SubViewer 2.0 (.sub/.txt), DRM) MPEG-4 AVC, MPEG2 TMPlayer (.txt), DVD Subtitle PS, MPEG2 TS, VC-1 System (.txt) SM (WMV3) “.avi”, “.divx”,...
  • Page 82: Avchd (Codec Vidéo Avancé En Haute Définition)

    Démarrage Remarque AVCHD (codec vidéo avancé y Le nom d'un fichier est limité à 180 en haute définition) caractères. y Nombre maximal de fichiers par dossier: 2 000 y Ce lecteur peut lire les disques au format AVCHD. (nombre total de fichiers et de dossiers) Ces disques sont normalement enregistrés et utilisés dans les caméscopes. y Suivant la taille et le nombre de fichiers, plusieurs minutes peuvent être nécessaires y Le format AVCHD est un format d’enregistrement pour lire les contenus du support. numérique de vidéo haute définition. y La compatibilité des fichiers peut différer y Le format MPEG-4 AVC/H.264 peut compresser selon le serveur. les images avec une plus grande efficacité que le y Les informations relatives à la compatibilité format de compression d’image conventionnel. listées page 11 sont sous réserve. Des y Ce lecteur peut lire les disques AVCHD au format restrictions sont à prendre en compte en “x.v.Colour”. fonction des caractéristiques du fichier et y Selon leurs conditions d’enregistrement, il est de la capacité du serveur multimédia.
  • Page 83: Configurations Système Spécifiques

    Démarrage Configurations système Remarques sur la spécifiques compatibilité Pour la lecture vidéo haute définition : y BD-ROM étant un nouveau format, certains problèmes avec les disques, la connexion y Téléviseur haute définition doté de prises numérique ou d’autres problèmes de d’entrée COMPONENT ou HDMI. compatibilité sont possibles. Si vous rencontrez y BD-ROM avec du contenu haute définition. des problèmes de compatibilité, contactez un y Une entrée HDMI ou DVI compatible HDCP est point de service après-vente agréé. nécessaire sur votre téléviseur pour certains y Cet appareil vous fait bénéficier de fonctions contenus (indiqués par les auteurs du disque). telles que l’incrustation d’image, de logiciels Pour lire les fichiers du dossier de partage via le audio et virtuels de tiers, etc. avec les BD-ROM réseau domestique, le PC nécessite la configuration compatibles BONUSVIEW (BD-ROM version 2 ci-dessous. profil 1 version 1.1/profil standard final). L’image et le programme audio secondaires peuvent y Windows® XP (Service Pack 2 ou supérieur), être lus à partir d’un disque compatible avec Windows Vista® (pas de Service Pack requis), la fonction d’incrustation PIP. Pour connaître Windows 7® (pas de Service Pack requis) la méthode de lecture, reportez-vous aux y Processeur Intel® Pentium® III à 1,2 GHz ou AMD...
  • Page 84: Télécommande

    Démarrage Télécommande SPK LEVEL: permet de régler • • • • • • • • • a • • • • • • • le volume sonore de l’enceinte INPUT/TUNER: permet de souhaitée. modifier la source d’entrée. X USB REC: permet d’enregistrer 1 (STANDBY/ON): permet un CD audio. d’allumer ou d’éteindre le lecteur. MUTE: permet de mettre B OPEN/CLOSE: permet l’appareil en sourdine. d’ouvrir ou de fermer le plateau SOUND: permet de sélectionner du disque. un mode d’effet sonore. HDMI IN: change directement le VOL +/- : permet de régler le mode d'entrée en HDMI IN. volume des enceintes. OPTICAL: permet de passer • • • • • • • • • c •...
  • Page 85: Panneau Avant

    Démarrage Panneau avant STANDBY/ON OPEN/CLOSE FUNCTION TUNE VOLUME PORTABLE IN 500 mA a Plateau de disque c Fenêtre d’affichage b Boutons d Capteur de la télécommande g h i j k 1 (STANDBY/ON) : e PORTABLE IN STANDBY/ON OPEN/CLOSE FUNCTION allumer ou éteindre le lecteur.
  • Page 86: Assemblage Des Enceintes

    Raccordements Assemblage des Pour le haut-parleur central : Utilisez l’adhésif fourni pour fixer quatre petits enceintes tampons à la base du haut-parleur central. Connexion au haut-parleur middle non-skid pads BCS-717 Tampons anti- small non-skid pads dérapant - petits Préparation des haut-parleurs 1. Fixez les tampons anti-dérapage à la base des socles de chaque haut-parleur, du caisson de basse et du haut-parleur central. middle non-skid pads Pour les haut-parleurs avant et enceintes small non-skid pads satellites : Utilisez l’adhésif fourni pour fixer les quatre...
  • Page 87 > Attention y Ne pas brancher les haut-parleurs fournis y Le taquet en plastique n’est pas une fixation sur un autre amplificateur que celui fourni de montage et le haut-parleur ne doit pas avec ce système. Tour branchement à un être directement accroché au mur avec ce autre amplificateur peut se traduire par un taquet. Utilisez toujours un cordon pour la dysfonctionnement ou un incendie. stabilisation du haut-parleur. y Brancher le câble de haut-parleur du caisson y Pioneer décline toute responsabilité en de basses (violet) sur le connecteur orange Mounting screw du lecteur. cas de perte ou de dommages dus à un 5 mm (not supplied) assemblage et une installation incorrecte, y Les bornes de haut-parleur sont chargées Mounting screw à l’utilisation de matériaux d’installation d'une tension DANGEREUSE. Pour 10 mm 5 mm (not supplied) insuffisamment robustes, à une mauvaise...
  • Page 88: Connexion Au Haut-Parleur Bcs

    Raccordements Connexion au haut-parleur Pour le haut-parleur central : Utilisez l’adhésif fourni pour fixer quatre petits BCS-313 tampons à la base du haut-parleur central. Préparation des haut-parleurs Tampons anti-dérapant 1. Fixez les tampons anti-dérapage à la base de small non-skid pads small non-skid pads – petits chaque haut-parleur. small non-skid pads small non-skid pads Pour les haut-parleurs: Utilisez le ruban adhésif fourni pour fixer les quatre petits tampons sur la base (en bas) de chaque haut-parleur. 2. Branchez les fils sur le lecteur. For subwoofer: Branchez le fil blanc avec la ligne grise sur le côté (+) et l’autre sur le côté (–). Pour raccorder...
  • Page 89: Montage Mural Du Haut-Parleur Central

    Les vis de montage ne sont pas fournies. Utilisez satellites fournis avec ce système sont blindés des vis appropriées au matériau du mur et capable magnétiquement. Toutefois, selon l’emplacement de supporter le poids des haut-parleurs. de l’installation, une distorsion des couleurs peut > Attention apparaître sur l’écran de votre téléviseur si vous avez installé le haut-parleur vraiment trop près de y Si vous n’êtes pas sûr de la qualité et de la celui-ci. Si c’est le cas, éteignez votre téléviseur, puis robustesse de la cloison, demandez conseil thick cord allumez-le à nouveau après avoir patienté entre 15 à un professionnel. et 30 minutes. Si le problème persiste, éloignez le y Pioneer ne peut pas être tenu pour système de haut-parleurs de votre téléviseur. Plastic catch responsable d’accidents ou de dommage Le caisson de basse n’est pas blindé dus à une installation incorrecte. magnétiquement et ne doit donc pas être placé à proximité d’un téléviseur ou d’un moniteur. Les supports de stockage magnétiques (comme des disquettes, les bandes et cassettes vidéo) ne doivent pas être rangés à proximité du caisson de basse. Ne fixez pas les haut-parleurs avant/enceintes satellites et le caisson de basse à un mur non droit ou au plafond. Ils peuvent tomber et blesser les Mounting screw personnes à proximité. Vis de montage...
  • Page 90: Disposition Du Système

    Raccordements > Attention Disposition du système y Veillez à ce que les enfants n'introduisent pas leurs mains ou d’autres objets dans le L’illustration suivante montre comment disposer le *évent du caisson de basse. système (exemple). Notez que les illustrations de *Évent du caisson de basse : orifice pour un ces instructions sont fournies à titre explicatif et son grave plein sur le coffret du caisson de peuvent parfois différer de votre Home Cinema. basse (enceinte). Pour optimiser au maximum le son surround, tous y Placez l’enceinte centrale hors de portée les haut-parleurs autres que le caisson de basse des enfants. doivent être placés à égale distance de la position L’enceinte risquerait de tomber et de d’écoute ( provoquer des blessures et/ou des dommages matériels. y Les hauts-parleurs contiennent des pièces magnétiques, ce qui peut dérégler la couleur de l'écran TV ou de l'ordinateur. Éloignez les haut-parleurs de votre écran de téléviseur ou de l’ordinateur. Enceinte avant gauche (L)/ Enceinte avant droite (R) : Placez les enceintes avant de chaque côté de l’écran ou du moniteur et si possible à la même hauteur.
  • Page 91: Raccordement À Votre Téléviseur

    Raccordements Raccordement à votre Connexion HDMI téléviseur Si vous possédez un moniteur ou un téléviseur HDMI, vous pouvez le raccorder à ce lecteur à l’aide d’un câble HDMI (Type A, Câble HDMI™ haute vitesse avec Ethernet). Raccordez la prise HDMI du Effectuez l’un des raccordements suivants, en lecteur à la prise HDMI d’un moniteur ou téléviseur fonction des caractéristiques disponibles sur votre compatible HDMI. appareil. y Connexion HDMI (page 21) y Connexion vidéo composantes (page 23) Arrière de l’appareil y Connexion vidéo (page 23) Remarque y Selon le modèle de téléviseur et les autres équipements que vous souhaitez brancher, vous pouvez raccorder le lecteur de différentes façons. Ne procédez qu’à un seul des raccordements décrits dans ce manuel. y Reportez-vous au manuel d’utilisation de votre téléviseur, de votre chaîne stéréo ou de vos autres appareils, pour choisir Câble le raccordement le plus adapté (le cas HDMI échéant). y Veillez à ce que le lecteur soit directement raccordé au téléviseur. Réglez le téléviseur sur le bon canal d’entrée vidéo.
  • Page 92: Fonction Arc (Audio Return Channel)

    Raccordements Remarque Fonction ARC (Audio Return y Si un périphérique HDMI raccordé n’accepte Channel) pas la sortie audio du lecteur, le son du périphérique HDMI peut être déformé ou La fonction ARC permet à un téléviseur compatible absent. HDMI d'envoyer le flux audio sur la sortie HDMI OUT de ce lecteur. y Lorsque vous utilisez la connexion HDMI, vous pouvez modifier la résolution pour Pour utiliser cette fonction : la sortie HDMI. (Reportez-vous à la section - Votre téléviseur doit prendre en charge “Réglage de la résolution”, page 24.) la fonction ARC et la fonction ARC de ce y Sélectionnez le type de sortie vidéo pour la lecteur doit être activée (initialement, elle est prise de sortie HDMI OUT à l’aide de l’option désactivée). [Rég. couleur HDMI] dans le menu [Config.] - La méthode de réglage de la fonction ARC peut (voir page 34). différer selon le téléviseur. Pour plus de détails y Une modification de la résolution alors que sur la fonction ARC, reportez-vous au manuel de la connexion est déjà établie peut entraîner votre téléviseur. des dysfonctionnements. Pour résoudre le - Vous devez utiliser le câble HDMI (type A, Câble problème, éteignez le lecteur puis rallumez- HDMI™ haute vitesse avec Ethernet).
  • Page 93: Connexion Composants Vidéo

    Raccordements Connexion composants vidéo Connexion vidéo Raccordez les prises de sortie vidéo en Raccordez la prise de sortie vidéo VIDEO OUT du composantes COMPONENT VIDEO OUT du lecteur lecteur à la prise d’entrée vidéo du téléviseur à aux prises d’entrée correspondantes de votre l’aide d’un câble vidéo. Vous pouvez entendre le téléviseur à l’aide d’un câble vidéo en composantes. son à la sortie des enceintes du système. Vous pouvez entendre le son à la sortie des enceintes du système. Arrière de l’appareil Arrière de l’appareil Câble vidéo Câble vidéo en composantes Remarque Lorsque vous utilisez la sortie vidéo composantes COMPONENT VIDEO OUT, vous pouvez modifier la résolution pour la sortie. (Reportez-vous à la section “Réglage de la résolution”, page 24.)
  • Page 94: Réglage De La Résolution

    Raccordements Raccordement de Réglage de la résolution l’antenne Le lecteur offre plusieurs résolutions de sortie pour les prises de sortie HDMI OUT et COMPONENT VIDEO OUT. Vous pouvez modifier la résolution à l’aide du menu [Config.]. Branchez l’antenne fournie pour écouter la radio. 1. Appuyez sur la touche HOME MENU (n). 2. Utilisez les touches A/D pour sélectionner [Config.], puis appuyez sur ENTER (b). Le menu [Config.] s'affiche. 3. Utilisez les touches W/S pour sélectionner l’option [AFFICHAGE], puis appuyez sur D pour accéder au deuxième niveau. 4. Utilisez les touches W/S pour sélectionner l’option [Résolution], puis appuyez sur ENTER (b) pour accéder au troisième niveau. Arrière de l’appareil Remarque 5. Utilisez les touches W/S pour sélectionner la Après avoir raccordé l’antenne filaire FM, faites résolution souhaitée, puis appuyez sur la touche lui adopter la position la plus horizontale ENTER (b) pour confirmer votre choix. possible. Veillez à déployer complètement Remarque l’antenne filaire FM. y Si votre téléviseur n’accepte pas la résolution que vous avez définie sur le lecteur, vous pouvez régler la résolution sur 576p comme suit.
  • Page 95: Connexions À Des Équipements Externes

    Raccordements Connexions à des Connexion PORTABLE IN équipements externes Vous pouvez écouter les fichiers son de votre baladeur sur les enceintes de ce système. Raccordez la prise casque (ou sortie de ligne) du baladeur à la prise PORTABLE IN de cet appareil. Connexion AUX Sélectionnez ensuite l’option [PORTABLE] en appuyant sur la touche INPUT/TUNER, puis sur Vous pouvez écouter les fichiers son d’un ENTER (b). équipement externe sur les enceintes de ce Vous pouvez également utiliser la touche système. FUNCTION sur le panneau avant pour sélectionner Raccordez le câble de sortie analogique audio de le mode d’entrée. votre équipement externe aux entrées G/D de cet appareil. Sélectionnez ensuite l’option [AUX] en appuyant sur la touche INPUT/TUNER, puis sur VOLUME ENTER (b). Vous pouvez également utiliser la touche PORTABLE IN FUNCTION sur le panneau avant pour sélectionner 500 mA le mode d’entrée. Arrière de l’appareil Lecteur MP3, etc. Blanc Rouge Vers les prises de sortie audio de votre équipement...
  • Page 96: Connexion Optical In

    Raccordements Connexion OPTICAL IN Connexion HDMI IN 1/2 Vous pouvez écouter sur les enceintes les fichiers Vous pouvez visionner les fichiers vidéo et écouter audio d'un équipement externe doté d'une prise les fichiers audio de votre équipement externe à optique numérique. l’aide de cette connexion. Raccordez la prise de sortie optique de votre Raccordez la prise de sortie HDMI OUT de votre équipement externe à la prise OPTICAL IN de appareil à la prise d’entrée HDMI IN 1 ou 2 de l’appareil. Sélectionnez ensuite l’option [OPTICAL] l’appareil. Sélectionnez ensuite l’option [HDMI IN en appuyant sur la touche INPUT/TUNER, puis sur 1/2] en appuyant sur la touche INPUT/TUNER, puis ENTER (b). Autrement, appuyez directement sur sur ENTER (b). OPTICAL. Vous pouvez également utiliser la touche Vous pouvez également utiliser la touche FUNCTION sur le panneau avant pour sélectionner FUNCTION sur le panneau avant pour sélectionner le mode d’entrée. le mode d’entrée. Arrière de l’appareil Arrière de l’appareil Vers la prise HDMI OUT de votre appareil (décodeur, Vers la prise de récepteur satellite sortie numérique numérique, console optique de votre de jeux vidéo, etc.) appareil...
  • Page 97: Raccordement À Votre Réseau Domestique

    Raccordements Raccordement à votre réseau domestique Service haut débit Ce lecteur peut être raccordé à un réseau local via le port LAN présent à l’arrière ou via le module interne sans fil. Si vous raccordez l’appareil à un réseau domestique haut débit, vous avez accès à des services tels que l’interactivité BD-Live et des services en ligne. Raccordement au réseau câblé Routeur L’utilisation d’un réseau câblé offre les meilleures performances car les périphériques raccordés se connectent directement au réseau et ne subissent pas d’interférences de radiofréquences. Reportez-vous à la documentation relative à votre périphérique réseau pour plus d’informations. Raccordez le port LAN du lecteur au port correspondant de votre modem ou routeur à PC et/ou serveur certifié DLNA l’aide d’un câble LAN ou Ethernet en vente dans le commerce. Remarque y Maintenez fermement la fiche lorsque vous branchez ou débranchez le câble LAN. Au moment de débrancher, ne tirez pas sur le câble LAN mais débranchez-le tout en appuyant sur la languette. y Ne raccordez pas un câble de téléphone Arrière de l’appareil modulaire au port LAN.
  • Page 98: Paramétrage De Réseau Câblé

    Raccordements Remarque Paramétrage de réseau câblé S’il n’existe pas de serveur DHCP sur le S’il existe un serveur DHCP sur le réseau local réseau et que vous voulez définir l’adresse IP via une connexion câblée, ce lecteur se verra manuellement, sélectionnez [Statique], puis attribuer automatiquement une adresse IP. Une réglez les options [Adresse IP], [Masque sous- fois le raccordement physique effectué, certains réseau], [Passerelle] et [Serveur DNS] à l’aide réseaux domestiques nécessitent un paramétrage des touches W/S/A/D et des touches du réseau du lecteur. Paramétrez l’option [RÉSEAU] numériques. Si vous vous trompez en saisissant comme suit. les chiffres, appuyez sur la touche CLEAR pour effacer la partie en surbrillance. Préparation Avant de paramétrer le réseau câblé, vous devez 4. Sélectionnez [OK] et appuyez sur ENTER (b) relier votre réseau domestique à une connexion pour appliquer les paramètres réseau. internet haut débit. 5. Le lecteur vous demandera de tester la 1. Sélectionnez l’option [Config. connexion] dans connexion réseau. Sélectionnez [OK] et appuyez le menu [Config.], puis appuyez sur la touche sur la touche ENTER (b) pour terminer la ENTER (b). connexion réseau. 6. Si vous sélectionnez [Test] et appuyez sur la touche ENTER (b) à l’étape 5 ci-dessus, le statut de la connexion réseau apparaît à l’écran.
  • Page 99: Raccordement Au Réseau Sans Fil

    Raccordements Remarque Raccordement au réseau sans La plage de fréquences et les canaux de la bande des 5 GHz sont indiqués ci-dessous. La connexion peut également être établie en Quelques différences et restrictions peuvent cependant s’appliquer dans certains pays. utilisant un point d’accès ou un routeur sans fil. La méthode de configuration et de connexion du Si vous rencontrez des difficultés avec votre réseau peut varier en fonction de l’équipement réseau sans fil, essayez de régler votre borne utilisé et de l’environnement du réseau. d’accès sur un autre canal. Ce lecteur est équipé d’un module sans fil Zone Plage de fréquences IEEE 802.11n (double bande, 5 GHz et 2,4 GHz) Amérique 5.15-5.25 GHz (ch. 36-48), compatible avec les normes 802.11a/b/g. Pour du Nord 5.725-5.825 GHz (ch. 149-161), obtenir les meilleures performances sans fil, nous 5.825-5.850 GHz (ch.165) recommandons d’utiliser un réseau Wi-Fi certifié Europe, EAU 5.15-5.25 GHz (ch. 36-48) IEEE 802.11n (point d’accès ou routeur sans fil). Autres 5.15-5.25 GHz (ch. 36-48), 5.725-5.825 GHz (ch. 149-161), VOLUME 5.825- 5.850 GHz (ch.165) PORTABLE IN 500 mA Paramétrage du réseau sans...
  • Page 100 Raccordements [Manuel] – Il se peut que votre point d’accès 2. Le menu [Config. connexion] apparaît à l’écran. Utilisez les touches W/S pour sélectionner ne diffuse pas son nom (SSID). Vérifiez les [Sans fil], puis appuyez sur ENTER (b). paramètres de votre routeur sur votre ordinateur et réglez votre routeur de sorte qu’il diffuse 3. Sélectionnez [Oui] et appuyez sur ENTER (b) son SSID ou saisissez manuellement le nom du pour continuer. Les paramètres du réseau sont point d’accès (SSID) dans l’option [Manuel]. alors réinitialisés. [App bouton] – Si votre point d’accès ou votre 4. Le lecteur recherche tous les points d’accès routeur sans fil prend en charge la méthode ou routeurs sans fil disponibles à portée et les de configuration par pression sur le bouton, affiche sous forme de liste. Utilisez les touches sélectionnez cette option et appuyez sur le W/S pour sélectionner un point d’accès ou bouton de votre point d’accès ou de votre un routeur sans fil dans la liste, puis appuyez sur routeur sans fil dans les 120 secondes. Vous ENTER (b). n’avez alors pas besoin de connaître le nom du point d’accès (SSID) ni le code de sécurité de votre point d’accès ou routeur sans fil. 5. Utilisez les touches W/S/A/D pour sélectionner le mode IP [Dynamique] ou [Statique]. Généralement, sélectionnez [Dynamique] pour attribuer automatiquement une adresse IP. Remarque Si votre point d’accès ou votre routeur sans fil est sécurisé, vérifiez que la clé WEP ou WPA...
  • Page 101: Remarques Sur La Connexion Réseau

    Raccordements Remarques sur la connexion réseau y Un port LAN 10 Base-T ou 100 Base-TX est nécessaire pour un raccordement câblé à ce y Bon nombre de problèmes de connexion lecteur. Si votre service internet ne permet réseau qui surviennent pendant la configuration pas un tel raccordement, vous ne pourrez pas peuvent souvent être résolus en réinitialisant brancher le lecteur. le routeur ou le modem. Pour ce faire, après y Vous devez vous servir d’un routeur pour pouvoir avoir raccordé le lecteur au réseau domestique, utiliser le service xDSL. éteignez et/ou débranchez rapidement le câble d’alimentation du routeur ou du y Un modem DSL est nécessaire pour utiliser modem câblé du réseau domestique. Ensuite, le service DSL et un modem par câble est rallumez l’appareil et/ou rebranchez le cordon nécessaire pour pouvoir utiliser le service de d’alimentation. modem par câble. Suivant la méthode d’accès de votre ISP et le contrat d’abonnement souscrit, y Selon le prestataire de services internet (ISP), le il est possible que vous ne puissiez pas utiliser nombre d’appareils pouvant recevoir le service la fonctionnalité de connexion à internet offerte internet peut être limité par les modalités par ce lecteur ou que vous soyez limité quant au de service applicables. Pour plus de détails, nombre d’appareils que vous pouvez raccorder contactez votre ISP.
  • Page 102: Raccordement D'un Périphérique Usb

    Raccordements Remarque Raccordement d’un y Ce lecteur reconnaît les lecteurs flash USB et périphérique USB les disques durs externes à formatage FAT16, FAT32 et NTFS pour l’accès aux fichiers (musique, photos, films). Toutefois, les Ce lecteur peut lire les fichiers vidéo, audio et photo fonctionnalités BD-Live et d’enregistrement contenus sur un périphérique USB. de CD audio ne prennent en charge que les formats FAT16 et FAT32. Pour les CD audio et les enregistrements BD-Live, vous pouvez Lecture du contenu d’un utiliser le lecteur USB ou le disque dur périphérique USB externe FAT16 ou FAT32. y Le périphérique USB peut être utilisé pour le 1. Insérez un périphérique USB dans le port USB stockage local afin de visionner des disques en veillant à ce qu'il soit bien branché. BD-Live avec internet. y Cet appareil reconnaît jusqu’à 8 partitions VOLUME sur le lecteur USB. y Ne retirez pas le périphérique USB pendant PORTABLE IN l’utilisation (lecture, etc.).
  • Page 103: Réglages

    Configuration du système Réglages Menu [AFFICHAGE] Format d’image Réglage des paramètres Pour sélectionner le format de l'image affichée en fonction du type de téléviseur. Vous pouvez modifier les réglages de votre lecteur dans le menu [Config.]. [4:3 Format respecté] 1. Appuyez sur la touche HOME MENU (n). Sélectionnez cette option lorsque l’appareil est connecté à un téléviseur 4:3 standard. Les images 16/9 s’affichent avec une bande noire en haut et en bas de l’écran. [4:3 Recadrage auto] Sélectionnez cette option lorsque l’appareil est connecté à un téléviseur 4:3 standard. Les images sont recadrées pour tenir dans votre 2. Utilisez les touches A/D pour sélectionner écran de téléviseur. L’image est réduite sur les [Config.], puis appuyez sur ENTER (b). côtés. Le menu [Config.] apparaît. [16:9 Original] Sélectionnez cette option lorsque l’appareil est connecté à un téléviseur 16:9. L’image de format 4:3 s’affiche avec son rapport largeur/ hauteur d’origine, avec des bandes noires sur...
  • Page 104: Réglage Couleur Hdmi

    Configuration du système Résolution Réglage couleur HDMI Cette option permet de définir la résolution de Sélection du type de sortie de la prise HDMI OUT. sortie du signal vidéo HDMI et en composantes. Pour ce réglage, reportez-vous au manuel de votre Reportez-vous aux pages 24 et 65 pour plus de téléviseur. détails sur le réglage de la résolution. [YCbCr] [Auto] Option à sélectionner lorsque vous raccordez Si la prise de sortie HDMI OUT est raccordée le lecteur à un téléviseur HDMI. à un téléviseur fournissant des informations [RGB] sur l’affichage (EDID), cette option sélectionne Option à sélectionner lorsque vous raccordez automatiquement la résolution la plus adaptée le lecteur à un téléviseur DVI. au téléviseur branché. [1080p] Mode 3D sortie vidéo progressive en 1080 lignes. Sélection du type du mode de sortie pour la lecture [1080i] de disques Blu-ray 3D. Sortie vidéo entrelacée en 1080 lignes. [Arrêt] [720p] La sortie de la lecture d’un disque Blu-ray 3D Sortie vidéo progressive en 720 lignes. s’effectue en mode 2D à l’instar de la lecture d’un disque BD-ROM classique. [576p] [Marche] Sortie vidéo progressive en 576 lignes.
  • Page 105: Menu [Langue]

    Configuration du système Menu [LANGUE] Menu [AUDIO] Affichage Menu Réglages enceintes Sélection d'une langue pour le menu de [Config.] Pour obtenir un son optimal, utilisez l’écran de et l’affichage à l’écran. réglage des enceintes pour définir le volume des enceintes que vous avez raccordées et leur distance Menu disque/Audio/Sous-titres par rapport à votre position d’écoute. Utilisez l’option Test pour régler le volume des enceintes au Sélectionnez la langue de votre choix pour la piste même niveau. audio, les sous-titres et le menu du disque. [Original] Langue d’origine dans laquelle le disque a été enregistré. [Autre] Appuyer sur ENTER (b) pour sélectionner une autre langue. Utilisez les touches numériques, puis appuyez sur ENTER (b) pour saisir le numéro à 4 chiffres correspondant indiqué [Enceintes] dans la liste des codes de langue, page 62. Sélection d'une enceinte à régler. [Arrêt] (Sous-titres du disque uniquement) [Volume] Les sous-titres ne sont plus affichés.
  • Page 106: Menu [Verrou]

    Configuration du système HD AV Sync Menu [VERROU] Avec la télévision numérique, il arrive qu’un Les réglages [VERROU] n’affectent que la lecture décalage s’installe entre l’image et le son. Si cela se des disques BD-ROM et DVD. produit vous pouvez régler le délai de l’arrivée du Pour pouvoir accéder aux réglages [VERROU], vous son pour qu’il «attende» l’arrivée de l’image : c’est devez saisir le code de sécurité à quatre chiffres que ce qu’on appelle la synchronisation HD AV. Utilisez vous avez créé. les touches W/S pour réduire ou augmenter ce Si vous n’avez pas encore saisi de mot de passe, délai, que vous pouvez paramétrer entre 0 et 300 vous serez invité à le faire. Saisissez deux fois un mot de passe à quatre chiffres, puis appuyez sur ENTER (b) pour valider le nouveau mot de passe. Mot de passe Vous pouvez créer ou modifier le mot de passe. [Sans] Saisissez deux fois un mot de passe à quatre chiffres, puis appuyez sur ENTER (b) pour valider le nouveau mot de passe. DRC (Contrôle de la gamme [Modifier] dynamique) Saisissez le mot de passe actuel et appuyez Cette fonction vous permet d’écouter la bande son sur la touche ENTER (b). Saisissez deux fois un d’un film à volume réduit sans perte de la clarté du...
  • Page 107: Indicatif Régional

    Configuration du système Contrôle parental DVD Menu [RÉSEAU] Blocage de la lecture de DVD associés à un certain Les paramètres [RÉSEAU] donnent accès aux niveau de contrôle en fonction de leur contenu. services de BD-Live et de contenu en ligne. (Tous les disques ne sont pas associés à un niveau de contrôle.) Config. connexion Même si votre environnement de réseau [Contrôle parental 1-8] domestique est prêt à être raccordé au lecteur, Le niveau 1 est le plus restrictif. Le niveau 8 est vous devez d’abord configurer ce dernier pour une le moins restrictif. connexion réseau câblé ou sans fil afin qu’il puisse communiquer avec le réseau. (Reportez-vous à la [Déverrouillage] section “Raccordement à votre réseau domestique”, Si vous sélectionnez cette option, le contrôle pages 27-31.) parental est désactivé et le disque peut être lu en entier. Statut connexion Si vous voulez connaître l’état du réseau sur le Contrôle parental Disque Blu-ray lecteur, sélectionnez l’option [Statut connexion] et Définissez une limite d’âge pour la lecture de BD- appuyez sur la touche ENTER (b) pour vérifier si ROM. Utilisez les touches numériques pour indiquer...
  • Page 108: Menu [Autres]

    Configuration du système Menu [AUTRES] Initialiser [Réglages d’usine] Fonction ARC (Audio Return Vous pouvez rétablir les réglages d’usine par Channel) défaut du lecteur. Vous pouvez définir la fonction ARC (Audio Return [Effacer stockage BD-LIVE] Channel) sur [Marche] ou [Arrêt]. La fonction ARC permet à un téléviseur compatible HDMI d'envoyer Initialise le contenu BD-Live à partir de la le flux audio sur la sortie HDMI OUT de ce lecteur. mémoire de stockage USB. Reportez-vous à la page 22 pour de plus amples Remarque informations sur cette fonction. Si vous restaurez la configuration usine du DivX® VOD lecteur au moyen de l’option [Réglages d’usine], vous devez également réactiver les À propos des vidéos DivX : DivX® est un format services en ligne et la configuration réseau. vidéo numérique créé par DivX, Inc. Cet appareil est officiellement certifié DivX et peut donc lire les vidéos DivX. Pour plus d’informations et pour Information logiciel obtenir des outils logiciels permettant de convertir Affiche la version actuelle du logiciel.
  • Page 109: Effets Sonores

    Configuration du système Effets sonores Vous pouvez choisir un effet sonore approprié. Appuyez sur SOUND jusqu’à ce que le mode souhaité apparaisse sur l’écran d’affichage du lecteur ou sur la TV. Les éléments affichés pour l’égaliseur peuvent être différents en fonction des sources sonores et des effets. [Mode 1]: permet d’obtenir un réglage du son adapté aux enceintes de petite taille (S-BD303). [Mode 2]: permet d’obtenir un réglage du son adapté aux enceintes de grande taille (S-BD707T). [Bypass]: les logiciels comportant des signaux audio surround multicanaux sont lus d'après la manière dont l'enregistrement a été effectué. [Graves max]: renforce l'effet de son de basse du haut-parleur avant gauche au haut-parleur avant droit et du subwoofer. [PL ll Film]: exécute le mode vidéo Pro Logic II qui décode le signal d’entrée et créé cinq canaux de sortie à toute la largeur de bande à partir de sources à 2 canaux. Ce réglage est idéal pour regarder des vidéos enregistrées en overdub (surimpression) ou des vieux films. Ce mode est uniquement disponible pour les sources à 2 canaux. [PL ll Musique]: exécute le mode musique Pro Logic II qui décode le signal d’entrée et créé cinq canaux de sortie à toute la largeur de bande à partir de sources à 2 canaux. Ce réglage est idéal pour les sources stéréo classiques telles que les CD. Ce mode est uniquement disponible pour les sources à 2 canaux.
  • Page 110: Lecture Générale

    Utilisation Remarque Lecture générale y Les fonctions de lecture décrites dans ce manuel ne sont pas toujours disponibles pour tous les fichiers et supports. Certaines Utilisation du Menu d’accueil fonctions peuvent être limitées pour différentes raisons. Le menu d’accueil apparaît lorsque vous appuyez y En fonction des titres du BD-ROM, une sur HOME MENU (n). Pour sélectionner une connexion à un périphérique USB peut être catégorie, utilisez les touches W/S/A/D puis nécessaire pour une lecture appropriée. appuyez sur ENTER (b). y Les disques au format DVD-VR non finalisés ne peuvent pas être lus par cet appareil. y Certains DVD-VR sont créés avec des données CPRM par un enregistreur de DVD. Cet appareil ne prend pas en charge ces types de disques. Lecture d’un fichier sur un disque ou un périphérique a [Film] - Lecture du contenu vidéo. b [Musique] - Lecture du contenu audio.
  • Page 111: Lecture D'un Disque 3D Blu-Ray

    Utilisation Lecture d'un disque 3D Blu-Ray Utilisation des fonctions BD-Live™ Ce lecteur peut lire les disques Blu-ray 3D contenant des vues séparées pour les yeux gauche et droit. BD-Video compatible BD-Live (BD-ROM version 2 profil 2). Son extension réseau permet, entre autres, Préparation de télécharger des bandes annonces en raccordant l’appareil à internet. Pour regarder un titre Blu-ray 3D en mode 3D stéréoscopique, vous devez : 1. Vérifier la connexion et les paramètres réseau (voir pages 27-31). y y y A ssurez-vous que votre téléviseur est compatible 3D et comporte une ou 2. Insérez un périphérique de stockage USB dans plusieurs entrées HDMI (3D). le port USB à l’avant du lecteur. y P ortez des lunettes 3D pour profiter de Un périphérique de stockage USB est nécessaire l’expérience 3D, si nécessaire. pour pouvoir télécharger les contenus en bonus. y y y Vérifiez si le titre BD-ROM est bien le disque Blu-ray 3D en question.
  • Page 112: Lecture D'un Fichier Sur Un Serveur Réseau

    Utilisation Lecture d’un fichier sur un Saisie de l’identifiant utilisateur réseau et du mot de passe serveur réseau En fonction de l'environnement système de votre ordinateur, il est possible que vous deviez saisir un identifiant utilisateur réseau et un mot de passe Ce lecteur peut lire des films, de la musique et des pour pouvoir accéder à un dossier partagé. fichiers photos enregistrés sur un PC ou un serveur DLNA via votre réseau domestique. 1. Le menu clavier apparaît automatiquement si l’identifiant et le mot de passe de l’utilisateur 1. Vérifiez la connexion et les paramètres réseau sont obligatoires. (voir pages 27-31). 2. Utilisez les touches W/S/A/D pour 2. Appuyez sur la touche HOME MENU (n). sélectionner un caractère, puis appuyez sur 3. Sélectionnez l’option [Film], [Photo] ou ENTER (b) pour confirmer votre choix sur le [Musique] à l’aide des touches A/D, puis clavier virtuel.
  • Page 113: Opérations De Base Pour Contenu Vidéo Et Audio

    Utilisation Opérations de base pour Opérations de base avec les contenu vidéo et audio photos Arrêt de la lecture Lecture d’un diaporama Appuyer sur Z (STOP) pour arrêter la lecture. Appuyez sur la touche d (PLAY) pour lancer le diaporama. Suspension de la lecture Arrêt d’un diaporama Appuyer sur M (PAUSE/STEP) pour mettre la lecture en pause. Appuyer sur Z (STOP) pour arrêter un diaporama. Appuyez sur d (PLAY) pour reprendre la lecture. Suspension d’un diaporama Lecture image par image (vidéo) Appuyer sur M (PAUSE/STEP) pour mettre le Appuyez sur la touche M (PAUSE/STEP) pendant la diaporama en pause.
  • Page 114: Reprise De La Lecture

    Utilisation Reprise de la lecture eroyt, Si le disque le permet, le lecteur garde en mémoire le moment où vous avez arrêté la lecture en appuyant sur Z (STOP). Si “MZ” (reprise de la lecture possible) s’affiche brièvement à l’écran, appuyez sur la touche d (PLAY) pour reprendre la lecture là où vous l’aviez interrompue. Si vous appuyez deux fois sur la touche Z (STOP) ou retirez le disque, “Z (arrêt complet de la lecture)” s’affiche à l’écran. Remarque y Le repère de reprise de la lecture peut être effacé si vous appuyez sur une touche (par exemple; 1 (STANDBY/ON), B (OPEN/ CLOSE), etc). y Sur les disques BD-ROM incluant la capacité BD-J, la fonction de reprise de la lecture n’est pas disponible. y Sur un titre interactif BD-ROM, l’appareil sera en mode arrêt complet si vous appuyez une fois sur la touche Z (STOP) pendant la lecture.
  • Page 115: Lecture Avancée

    Utilisation Lecture avancée Répétition d’une section spécifique erot Lecture répétée Ce lecteur peut répéter une section que vous avez erotu sélectionnée. 1. Pendant la lecture, vous pouvez appuyer sur Pendant la lecture, appuyez plusieurs fois sur la REPEAT (h) pour sélectionner [A-] au début touche REPEAT (h) pour sélectionner le mode de la partie que vous souhaitez relire. de répétition souhaité. 2. Appuyez sur la touche ENTER (b) à la fin de la Disque Blu-ray/DVD section. La section ainsi sélectionnée sera lue en jA- – La section sélectionnée sera lue en boucle. boucle. jChapitre – Le chapitre en cours sera lu en 3. Pour revenir à la lecture normale, appuyez boucle plusieurs fois sur la touche REPEAT (h) pour jTitre – Le titre en cours sera lu en boucle. sélectionner [Arrêt]. Remarque Pour revenir à la lecture normale, appuyez plusieurs y La section sélectionnée doit durer au moins fois sur la touche REPEAT (h) pour sélectionner [Arrêt].
  • Page 116: Recherche D'index

    Utilisation Recherche d’index Utilisation du menu de recherche eroy eroy Vous pouvez démarrer la lecture à partir de points mémorisés (neuf au maximum). À l’aide du menu de recherche, vous pouvez facilement trouver le point à partir duquel vous Saisie d’un index voulez démarrer la lecture. 1. Appuyez sur la touche MARKER à l’endroit Recherche d’un point souhaité pendant la lecture. L’icône de repère apparaît un court instant sur l’écran du 1. Pendant la lecture, appuyez sur la touche téléviseur. SEARCH pour afficher le menu de recherche. 2. Répétez l’étape 1 pour placer jusqu’à neuf repères. Lecture d’une scène indexée 2. Utilisez les touches A/D pour faire défiler la 1. Appuyez sur la touche SEARCH pour faire lecture de 15 secondes vers l’arrière ou vers apparaître le menu de recherche à l’écran.
  • Page 117: Sélection D'un Fichier De Sous-Titres

    Utilisation Sélection d’un fichier de sous- Dernière scène en mémoire titres Cet appareil mémorise la dernière scène du dernier disque qui a été visionné. La dernière scène reste Si le nom du fichier de sous-titres est différent de en mémoire même si vous sortez le disque du celui du fichier vidéo, vous devez sélectionner le lecteur ou éteignez l’appareil. Si vous insérez un fichier de sous-titres dans le menu [Film] avant de disque dont la scène est mémorisée, celle-ci est lancer la lecture du film. automatiquement lue. 1. Utilisez les touches W/S/A/D pour Remarque sélectionner le fichier de sous-titres que vous y La fonction Mémoire de la dernière scène voulez lire dans le menu [Film]. d’un disque précédent est effacée dès qu’un 2. Appuyez sur la touche ENTER (b). disque différent est lu. y Selon le disque, il se peut que cette fonction ne soit pas disponible. y Sur les disques BD-ROM de type BD-J, la fonction de mémorisation de la dernière scène ne sera pas disponible. y Cet appareil ne mémorise pas les paramètres d’un disque si vous l’éteignez avant de commencer à lire ce disque.
  • Page 118: Options Disponibles Pendant L'affichage D'une Photo

    Utilisation Options disponibles pendant Écoute de musique pendant l’affichage d’une photo un diaporama Vous pouvez utiliser différentes options pendant Vous pouvez afficher des fichiers photo pendant l’affichage d’une photo en plein écran. l’écoute de fichiers musicaux. 1. Lorsqu’une photo est affichée en plein écran, 1. Lorsqu’une photo est affichée en plein écran, appuyez sur la touche DISPLAY (m) pour appuyez sur la touche DISPLAY (m) pour afficher le menu des options. afficher le menu des options. 2. Sélectionnez une option à l’aide des touches 2. Utilisez les touches W/S pour sélectionner W/S. l’option [Sélect. musique], et appuyez sur ENTER (b) pour afficher le menu [Sélect. musique]. 3. Utilisez les touches W/S pour sélectionner un périphérique, puis appuyez sur ENTER (b). Les périphériques que vous pouvez sélectionner varient selon l’emplacement du fichier photo que vous affichez en plein écran. Emplacement des Périphériques photos disponibles...
  • Page 119: Affichage À L'écran

    Utilisation Affichage à l’écran 2. Sélectionnez une option à l’aide des touches W/S. 3. Utilisez les touches A/D pour régler la valeur Vous pouvez afficher et modifier différents réglages de l’option sélectionnée. et informations à propos du contenu. 4. Appuyez sur la touche RETURN (x) pour quitter l’affichage à l’écran. Affichage à l’écran des Remarque informations sur le contenu y Si aucune touche n’est actionnée pendant quelques secondes, l’affichage à l’écran eroy disparaît. 1. Pendant la lecture, appuyez sur DISPLAY (m) y Il est possible qu’un numéro de titre ne pour afficher diverses informations sur la lecture. puisse pas être sélectionné sur certains disques. y Les éléments disponibles peuvent varier suivant les disques ou les titres. y Si un disque Blu-ray interactif est en cours de lecture, certaines informations de réglage sont affichées à l’écran mais ne peuvent pas être modifiées.
  • Page 120: Lecture À Partir D'une Durée Définie

    Utilisation Lecture à partir d'une durée Sélection de la langue des définie sous-titres eroy eroy 1. Appuyez sur la touche DISPLAY (m) pendant la 1. Pendant la lecture, appuyez sur la touche lecture. La zone d’affichage du temps montre le DISPLAY (m) pour activer l’affichage à l’écran. temps de lecture écoulé. 2. Utilisez les touches W/S pour sélectionner 2. Sélectionnez l’option [Heure] et saisissez l’option [Sous-titrage]. l’heure de début requise au format heure, 3. Utilisez les touches A/D pour sélectionner la minutes et secondes, de gauche à droite. langue de votre choix pour les sous-titres. Par exemple, pour trouver une scène située à 4. Appuyez sur la touche RETURN (x) pour 2 heures, 10 minutes et 20 secondes du début, quitter l’affichage à l’écran. saisissez “21020”. Remarque Utilisez les touches A/D pour faire défiler la Certains disques ne vous permettent de lecture de 60 secondes avant ou encore après.
  • Page 121: Modification Du Format D'image

    Utilisation Modification du format Modification du mode d’image d’image eroy eroy Vous pouvez modifier l’option [Mode image] pendant la lecture. Vous pouvez modifier le réglage de format 1. Pendant la lecture, appuyez sur la touche d’image pendant la lecture. DISPLAY (m) pour activer l’affichage à l’écran. 1. Pendant la lecture, appuyez sur la touche 2. Utilisez les touches W/S pour sélectionner DISPLAY (m) pour activer l’affichage à l’écran. l’option [Mode image]. 2. Utilisez les touches W/S pour sélectionner 3. Utilisez les touches A/D pour sélectionner l’option [Format d’image]. l’option de votre choix. 3. Utilisez les touches A/D pour sélectionner 4. Appuyez sur la touche RETURN (x) pour l’option de votre choix. quitter l’affichage à l’écran. 4. Appuyez sur la touche RETURN (x) pour quitter l’affichage à l’écran. Réglage de l’option [Paramet. user] Remarque 1. Pendant la lecture, appuyez sur la touche Même si vous modifiez la valeur de l’option...
  • Page 122: Enregistrement D'un Cd Audio

    Utilisation Enregistrement d'un CD audio Vous pouvez enregistrer une piste en particulier ou toutes les pistes d’un CD audio vers un périphérique de stockage USB. 1. Insérez un périphérique de stockage USB dans le port USB à l’avant du lecteur. 2. Appuyez sur B (OPEN/CLOSE) et placez un CD Si vous voulez créer un nouveau dossier, utilisez audio sur le plateau. les touches W/S/A/D pour sélectionner [Nouveau dossier] et appuyez sur ENTER (b). Appuyez sur B (OPEN/CLOSE) pour fermer le plateau. La lecture démarre automatiquement. Saisissez un nom de dossier à l’aide du clavier virtuel, sélectionnez [OK] et appuyez sur la 3. Appuyez sur la touche DISPLAY (m) pour touche ENTER (b). afficher le menu des options. 8. Utilisez les touches W/S/A/D pour sélectionner [OK] et appuyez sur ENTER (b) Appuyez sur la touche X USB REC de la pour commencer l’enregistrement du CD audio. télécommande. Vous pouvez enregistrer tous les fichiers de Pour interrompre l’enregistrement du CD audio, musique sur le CD audio. sélectionnez [Annuler] et appuyez sur la touche ENTER (b). 4. Utilisez les touches W/S pour sélectionner [Enreg. CD] puis appuyez sur ENTER (b). 9. Un message apparaît lorsque l’enregistrement du CD audio est terminé. Appuyez sur ENTER 5. Utilisez les touches W/S pour sélectionner (b) pour vérifier le fichier audio créé dans le...
  • Page 123: Lecture De L'ipod

    Utilisation > Attention La réalisation de copies non autorisées d’un contenu protégé contre la copie, notamment un programme informatique, un fichier, une émission ou un enregistrement sonore, peut être une violation des droits d’auteur et constitue une infraction. Cet appareil ne doit pas être utilisé à de telles fins. Assumez vos responsabilités. Respectez les droits d’auteur. Lecture de l’iPod 2. Sélectionnez un fichier à l’aide des touches W/ Vous pouvez écouter la musique de votre iPod sur S/A/D puis appuyez sur ENTER (b) pour lire votre Home Cinema. Pour plus de détails sur l’iPod, le fichier. reportez-vous au manuel d’utilisation de l’iPod. Préparation Affichage de l’iPod à l’écran y Visionnage des vidéos et photos de votre iPod 1. Connectez l’iPod. sur l’écran de votre téléviseur. 2. Appuyez sur la touche HOME MENU (n). - Veillez à utiliser la connexion vidéo via la 3. Sélectionnez [Musique] ou [Film] à l’aide des prise VIDEO OUT sur le panneau arrière de...
  • Page 124: Le Mode Ipod In

    Si vous utilisez une application, passez un précédent. appel, ou envoyez ou recevez un SMS, etc. sur un iPod touch ou un iPhone, retirez-le permet de sélectionner le de la station d’accueil iPod du lecteur pour mode de répétition souhaité REPEAT l’utiliser. : Piste (;), Tout (k), Arrêt (pas d’affichage). y Cet appareil a été développé et testé pour la version d’iPod/iPhone présentée sur le site Remarque web de Pioneer. Ce système est compatible avec les y L’installation de versions de logiciel fonctionnalités audio et vidéo de l’iPod (4ème différentes que celles spécifiées sur le site génération), l’iPod nano, l’iPod classic, l’iPod web de Pioneer pour votre iPod/iPhone mini, l’iPod touch et l’iPhone (iPod shuffle n’est peut entraîner une incompatibilité avec cet pas pris en charge.). appareil. y La qualité vidéo dépend des sources vidéo utilisées sur votre iPod. y Si vous rencontrez un problème avec votre iPod, consultez le site www.apple.com/ support/iPod.
  • Page 125: Utilisation De La Radio

    Utilisation Utilisation de la radio Suppression de toutes les stations mémorisées Vérifiez que les antennes sont raccordées. Appuyez sur la touche CLEAR et maintenez-la (Voir page 24) enfoncée pendant deux secondes. L’indication «Effacer tout» s’affiche. Appuyez une nouvelle fois Écoute de radio sur CLEAR. Toutes les stations mémorisées sont définitivement supprimées. 1. Appuyez sur la touche INPUT/TUNER jusqu’à ce la fonction TUNER (FM) apparaisse sur l'écran. La Amélioration de la réception FM dernière station écoutée est celle que la radio émet par défaut. Appuyez sur la touche (D) (ST/MONO) bleue de la 2. Appuyez sur la touche TUNE (-/+) et maintenez-la télécommande. Le tuner passe du mode stéréo au enfoncée pendant environ deux secondes, jusqu’à mode mono (réception en général). ce que l’indication de fréquence commence à changer. La recherche de stations s’arrête lorsque Consulter les informations le tuner de l’appareil a détecté une station radio.
  • Page 126: Utilisation Du Web (En Ligne)

    1. Vérifier la connexion et les paramètres réseau (voir pages 27-31). 2. Appuyez sur la touche HOME MENU (n). 3. Sélectionnez [En ligne] au moyen des boutons A/D puis appuyez sur ENTER (b). 4. Sélectionnez un service en ligne au moyen des boutons A/D puis appuyez sur ENTER (b). Remarque y Pour en savoir plus sur chaque service, contactez le fournisseur ou cliquez sur le lien associé. y Le contenu des services en lignes et des informations liées aux services, y compris l'interface utilisateur, peuvent faire l'objet de modifications. Veuillez vous référer au site Web de chaque service pour des informations plus récentes. y L'utilisation des fonctionnalités en ligne avec une connexion sans fil peut entraîner une vitesse de flux inadaptée résultant d'interférences avec d'autres équipements qui utilisent des fréquences radioélectriques. y Veuillez prendre en compte que la politique de confidentialité liée s'applique au respect de votre vie privée et de vos droits lorsque vous fournissez aux services en ligne vos utilisateurs, mots de passe ou d'autres identifiants de connexion ou informations personnelles et que Pioneer les archive. Veuillez consulter la politique de confidentialité de Pioneer sur le site web.
  • Page 127: Dépannage

    Dépannage Dépannage Généralités Problème Cause et solution L’appareil ne s’allume pas. y Enfoncez correctement le cordon d’alimentation dans la prise murale. L’appareil ne démarre pas la y Insérez un disque lisible. (Vérifiez le type de disque, le système lecture. couleur et le code de région.) y Insérez le disque avec sa face de lecture vers le bas. y Positionnez le disque correctement sur le plateau. y Nettoyez le disque. y Annulez la fonction de contrôle parental ou modifiez le niveau de contrôle. L’angle de vue ne peut pas être y Le DVD en cours de lecture ne contient pas plusieurs angles de vue. modifié. Impossible de lire les fichiers y Les fichiers sont dans un format que l'appareil ne peut pas lire. audio, photo ou vidéo. y L’appareil ne prend pas en charge le codec des fichiers vidéo. La télécommande ne y La télécommande n’est pas dirigée vers le capteur de fonctionne pas correctement. l’appareil. y La télécommande est trop éloignée de l’appareil. y Un obstacle se trouve entre la télécommande et l’appareil.
  • Page 128: Réseau

    Dépannage Réseau Problème Cause et solution La fonctionnalité BD-Live ne y Le périphérique de stockage USB connecté ne contient pas fonctionne pas. suffisamment d’espace. Raccordez un périphérique USB ayant au moins 1 Go d’espace libre. y Veillez à ce que l’appareil soit correctement connecté au réseau local et puisse accéder à internet (voir page 27-31). y Votre débit n’est peut-être pas suffisamment élevé pour utiliser les fonctionnalités BD-Live. Contactez votre fournisseur d’accès à Internet pour augmenter votre débit. y L’option [Connexion BD-LIVE] du menu [Config.] est définie sur [Interdite]. Réglez cette option sur [Autorisée]. Les services de diffusion vidéo y Votre service haut débit n’est peut-être pas assez rapide pour diffuser (tels que YouTube™) s’arrêtent les services vidéo. Contactez votre fournisseur d’accès à Internet pour souvent ou subissent des mises augmenter votre débit. en mémoire tampon au cours de la lecture. Le dossier partagé ou les y Le pare-feu ou le logiciel antivirus de votre serveur multimédia est en fichiers de votre PC ou serveur cours d’exécution. Désactivez le pare-feu ou le logiciel antivirus qui multimédia n’apparaissent pas s’exécute sur votre ordinateur ou serveur multimédia. dans la liste des périphériques. y Le lecteur n’est pas connecté au réseau local auquel votre ordinateur ou le serveur multimédia est connecté.
  • Page 129: Image

    La prise de sortie HDMI OUT du lecteur est raccordée à un appareil DVI qui ne prend pas en charge la protection des droits d’auteur. Présence de bruits parasites sur y Vous essayez de lire un disque enregistré dans un système couleur l’image. différent de celui de votre téléviseur. y Sélectionnez une résolution acceptée par votre téléviseur. La sortie de la lecture du y Connectez le lecteur à votre téléviseur à l’aide d’un câble HDMI (Type disque Blu-ray 3D n’est pas en A, câble HDMI™ haut-débit avec Ethernet). mode 3D. y Votre téléviseur n’est peut-être pas compatible avec le “format obligatoire HDMI 3D”. y L’option [Mode 3D] du menu [Config.] est définie à [Arrêt]. Définissez cette option à [Marche]. Problème Cause et solution Il n’y a aucun son ou le son est y L’appareil est en mode de recherche, ralenti ou pause. déformé. y Le volume est bas. y Vérifiez le raccordement du câble d’enceinte. (page 16) Mises à jour Notez que des informations sur ce produit sont disponibles sur le site Web de Pioneer. Veuillez consulter ce site pour obtenir des informations sur la mise à jour ou la réparation de ce lecteur.
  • Page 130: Annexe

    Vous pouvez commander votre téléviseur à l’aide de la télécommande fournie. Si votre téléviseur est répertorié dans le tableau ci- Vous pouvez commander votre téléviseur à dessous, définissez le code fabricant approprié. l’aide des touches ci-dessous. 1. Tout en maintenant enfoncée la touche 1 (TV POWER), saisissez le code fabricant de votre téléviseur à l’aide des touches numériques Touches de (voir le tableau ci-dessous). commande du téléviseur Fabricant Numéro de code Pioneer 1 (valeur par défaut) Sony 2, 3 En appuyant sur Vous pouvez Panasonic 4, 5 Allumer ou éteindre le 1 (TV POWER) Samsung 6, 7 téléviseur. 8, 9 Choisir la source d’entrée INPUT entre le téléviseur et 2. Relâchez la touche 1 (TV POWER) pour...
  • Page 131: Liste Des Codes De Région

    Annexe Liste des codes de région Sélectionnez un code de région dans cette liste. Région Code Région Code Région Code Région Code Afghanistan Fidji Monaco Singapour Mongolie Slovaquie Argentine Finlande Slovénie Australie France Maroc Autriche Allemagne Népal Afrique du Sud Belgique Grande-Bretagne Pays-Bas Corée du Sud Bhoutan Grèce Antilles Espagne néerlandaises Bolivie Groenland Sri Lanka...
  • Page 132: Liste Des Codes De Langue

    Annexe Liste des codes de langue Cette liste vous permet de sélectionner la langue de votre choix pour les réglages initiaux suivants : [Audio], [Sous-titres] et [Menu disque]. Langue Code Langue Code Langue Code Langue Code Afar 6565 Français 7082 Lituanien 7684 Sindhi 8368 Afrikaans 6570 Frison 7089 Macédonien 7775 Singhalais 8373 Galicien 7176 Malgache 7771 Slovaque 8375 Albanais 8381 Malais 7783 Slovène...
  • Page 133: Marques Et Licences

    Annexe Marques et licences Fabriqué sous licence selon les brevets américains: 5,451,942; 5,956,674; 5,974,380; Blu-ray Disc™, Blu-ray™, Blu-ray 3D™, BD-Live™, 5,978,762; 6,226,616; 6,487,535; 7,392,195; BONUSVIEW™ et les logos sont des marques de 7,272,567; 7,333,929; 7,212,872 et d’autres commerce de la Blu-ray Disc Association. brevets américains et internationaux déposés et en attente. DTS est une marque déposée et les logos et le symbole DTS, ainsi que DTS-HD, DTS- HD Master Audio | Essential sont des marques de commerce de DTS, Inc. Logiciel fourni. © DTS, Inc. Tous droits réservés. est une marque de commerce de DVD Format/Logo Licensing Corporation. DLNA™, le logo DLNA et DLNA CERTIFIED™ sont des marques déposées, des marques de service ou des marques de certification de la Digital Living Network Alliance. Oracle et Java sont des marques déposées d'Oracle et / ou de ses sociétés. D'autres noms peuvent être des marques déposées de leur propriétaire respectif. Le logo Wi-Fi CERTIFIED est une marque de certification de la Wi-Fi Alliance. HDMI, le logo HDMI et High-Definition Multimedia Interface sont des marques La marque Wi-Fi Protected Setup est une marque commerciales ou déposées de HDMI Licensing commerciale de la Wi-Fi Alliance. LLC aux Etats-Unis et dans d'autres pays. Fabriqué sous licence de Dolby Laboratories. Dolby « x.v.Colour », et sont des et le symbole représentant un double D sont des marques de commerce de Sony Corporation.
  • Page 134 Annexe « Fabriqué pour iPod » et « Fabriqué pour iPhon » signifie qu’un accessoire a été conçu pour être connecté spécialement à respectivement un iPod ou un iPhone,et qu’il a été certifié par le développeur comme conforme aux normes de performance Apple. Apple n’est pas responsable pour le fonctionnement de cet appareil ou de sa compatibilité avec les normes d’application de la réglementation et de sécurité. Veuillez prendre en compte que l’utilisation de cet accessoire avec un iPod ou iPhone peut affecter la performance sans fil. iPhone, iPod, iPod classic, iPod nano, et iPod touch sont des marques d’Apple Inc., inscrit aux Etats-Unis et dans d’autres pays. YouTube™ est une marque de commerce de Google Inc. Picasa™ Web Albums est une marque de commerce de Google Inc. Ce produit inclut une technologie appartenant à Microsoft Corporation et ne peut pas être utilisé ni distribué sans licence de Microsoft Licensing, Inc.
  • Page 135: Résolution De La Sortie Vidéo

    Annexe Résolution de la sortie vidéo Lorsque le support lu n’est pas protégé contre la copie Sortie vidéo COMPONENT VIDEO OUT HDMI OUT Résolution HDMI connecté HDMI déconnecté 576i 576p 576i 576p 576p 576p 720p 720p 720p 1080i 1080i 1080i 1080p/24 Hz 1080p / 24 Hz 576i...
  • Page 136: Caractéristiques

    Annexe Caractéristiques Généralités Alimentation CA 220-240 V, 50/60 Hz Consommation électrique 150 W (en mode veille : moins de 0,3 W) Dimensions (L x H x P) Approximativement 430 x 64 x 304 mm Poids net (approx.) 3,4 kg Température de fonctionnement 5 °C à 35 °C Humidité de fonctionnement 5 % à 85 % Entrées/Sorties VIDEO OUT 1 V (crête à crête), 75 Ω, synchronisation négative, prise RCA x 1 (Y) 1 V (crête à crête), 75 Ω, synchronisation négative, prise RCA x 1 COMPONENT VIDEO OUT (Pb)/(Pr) 0,7 V (crête à crête), 75 Ω, prise RCA x 2 HDMI IN/OUT (video/audio) 19 broches (Type A, Connecteur HDMI™) ANALOG AUDIO IN 2 Vrms (1 kHz, 0 dB), 600 Ω, prise RCA (G, D) x 1 DIGITAL IN (OPTICAL) 3 V (crête à crête), prise optique x 1 PORTABLE IN 0,5 Vrms (prise stéréo 3,5 mm) Tuner Plage de réglage FM 87,5 à 108,0 MHz Amplificateur Puissance de sortie (RMS) Total 1100 W Avant 180 W × 2 (1 kHz , 4 Ω, THD 10 %) Centre 180 W (1 kHz , 4 Ω, THD 10%) Arrière 180 W × 2 (1 kHz , 4 Ω, THD 10 %) Subwoofer...
  • Page 137 Laser semi-conducteur Longueur d’onde 405 nm / 650 nm Système de signal Système de télévision couleur standard PAL/NTSC Réponse en fréquence 20 Hz à 18 kHz (échantillonnage de 48 kHz, 96 kHz et 192 kHz) Distorsion harmonique Inférieure à 0,05 % Classement Supérieure à 80 dB Port LAN Prise Ethernet x 1, 10BASE-T/100BASE-TX Réseau local sans fil (antenne Interface réseau sans fil intégrée IEEE 802.11n (bandes de 5 GHz et interne) 2,4 GHz), compatible avec les réseaux Wifi 802.11a/b/g. Alimentation bus (USB) DC 5 V 0 500 mA Enceintes BCS-717 S-BD707T y Haut-parleur avant/enceintes satellites (gauche/droite) Dimensions nettes Type 2 voie 260 x 1097 x 260 mm (L x H x P) Impédance nominale 4 Ω Poids net 3,8 kg y Enceinte centrale Dimensions nettes Type 1 voie 300 x 87 x 65 mm (L x H x P) Impédance nominale 4 Ω...
  • Page 138 Annexe Enceintes BCS-313 S-BD303 y Haut-parleur avant/enceintes satellites (gauche/droite) Dimensions nettes Type 1 voie 96 x 96 x 85 mm (L x H x P) Impédance nominale 4 Ω Poids net 0,4 kg y Enceinte centrale Dimensions nettes Type 1 voie 300 x 87 x 65 mm (L x H x P) Impédance nominale 4 Ω Poids net 0,6 kg y Caisson de graves Dimensions nettes Type 1 voie 130,5 x 420 x 375 mm (L x H x P) Impédance nominale 3 Ω Poids net 4,4 kg y La conception et les spécifications sont sujettes à modification sans préavis.
  • Page 139: Entretien

    Annexe Entretien Remarques sur les disques Manipulation des disques Manipulation de l’appareil Ne touchez pas la face de lecture des disques. Prenez le disque par les bords afin que vos empreintes de doigts ne marquent pas la surface. Lors du transport Ne collez jamais de papier ni de ruban adhésif sur Conservez le carton et les emballages d’origine. le disque. Si vous devez transporter l’appareil, pour une Rangement des disques protection maximale, emballez-le tel que vous l’avez reçu à sa sortie de l’usine. Après la lecture, rangez le disque dans son boîtier. Entretien des surfaces extérieures N’exposez pas le disque aux rayons directs du soleil ni à des sources de chaleur et ne le laissez jamais y N’utilisez pas de liquides volatiles tels qu’un dans une voiture garée en plein soleil. insecticide en aérosol à proximité de l’appareil. y Si vous frottez trop fort, vous risquez Nettoyage des disques d’endommager la surface.
  • Page 140: Informations Importantes Sur Les Services En Réseau

    Annexe Informations importantes sur les services en réseau L’intégralité des informations, données, documents, communications, téléchargements, fichiers, textes, images, photographiques, dessins, vidéos, diffusions web, publications, outils, ressources, logiciels, instructions, programmes, applets, widgets, applications, produits et autres formes de contenu (“contenu”), ainsi que tous les services et offres (“services”) fournis ou mis à disposition, directement ou indirectement, par des tiers (“prestataires”) relève exclusivement de la responsabilité du prestataire. La disponibilité et l’accès au contenu et aux services fournis par le prestataire au moyen de l’appareil PIONEER peuvent être modifiés à tout moment sans préavis. Cette disposition s’applique également, entre autres, à la suspension, à la suppression ou à la cessation de tout ou d'une partie du contenu ou des services. Pour toute question ou tout problème concernant le contenu ou les services, veuillez consulter le site web du prestataire pour obtenir les informations les plus récentes. PIONEER décline toute obligation de service après-vente pour le contenu et les services. Toute question ou demande de service après-vente liée au contenu ou aux services doit être adressée directement aux fournisseurs de contenu et aux prestataires concernés. Notez que PIONEER ne saurait être tenu pour responsable du contenu ou des services offerts par le prestataire ni pour l’éventuelle modification, suppression ou cessation desdits contenus et services. PIONEER décline également toute responsabilité ou accès à ces contenus ou services.
  • Page 141: Avis Concernant La Licence Du Logiciel

    - Copyright 2005 Lars Knoll & Zack DOMMAGE OU AUTRE RESPONSABILITÉ Une copie du code source correspondant Rusin, Trolltech DÉCOULANT D’UN CONTRAT, D’UN DÉLIT peut être obtenue moyennant le coût de - Copyright 2005 Trolltech AS OU AUTRE, EN RELATION AVEC LE LOGICIEL, distribution. Vous pouvez obtenir le code - Copyright 2007 Luca Barbato SON UTILISATION OU TOUTE AUTRE source libre sous l'URL suivante. - Copyright 2008 Aaron Plattner, MANIPULATION DE CE DERNIER. http://www.oss-pioneer.com/homeav/hts/ NVIDIA Corporation - Copyright 2008 Rodrigo Kumpera LICENCE PUBLIQUE Nous ne sommes pas en mesure de - Copyright 2008 André Tupinambá répondre aux questions relatives au code GÉNÉRALE GNU - Copyright 2008 Mozilla Corporation source pour des logiciels open source. - Copyright 2008 Frederic Plourde Ce produit inclut : Version 2, juin 1991 - Copyright 2009 Sun Microsystems, Inc.
  • Page 142 Annexe d’imposer des limitations qui interdisent à sont couvertes que si leur contenu constitue pas à ces éléments lorsque vous les quiconque de vous refuser ces droits ou de vous un ouvrage fondé sur le Programme distribuez en tant qu’ouvrages distincts. demander d’y renoncer. Certaines responsabilités (indépendamment du fait qu’il ait été réalisé Mais lorsque vous distribuez ces mêmes vous incombent en raison de ces limitations si par l’exécution du Programme). La validité éléments comme partie d’un tout, lequel constitue un ouvrage fondé sur le vous distribuez des copies de ces logiciels, ou si de ce qui précède dépend de ce que fait le vous les modifiez. Programme. Programme, la distribution de ce tout doit être soumise aux conditions de la présente Par exemple, si vous distribuez des copies Vous pouvez copier et distribuer des copies Licence, et les autorisations qu’elle octroie d’un tel programme, à titre gratuit ou contre à l’identique du code source du Programme aux autres concessionnaires s’étendent à une rémunération, vous devez accorder aux tel que vous l’avez reçu, sur n’importe quel l’ensemble de l’ouvrage et par conséquent destinataires tous les droits dont vous disposez. support, à condition que vous apposiez à chaque et toute partie indifférement de sur chaque copie, de manière ad hoc et Vous devez vous assurer qu’eux aussi reçoivent qui l’a écrite. Par conséquent, l’objet du parfaitement visible, l’avis de droit d’auteur ou puissent disposer du code source. Et vous présent article n’est pas de revendiquer adéquat et une exonération de garantie devez leur montrer les présentes conditions afin des droits ou de contester vos droits sur ; que vous gardiez intacts tous les avis qu’ils aient connaissance de leurs droits.
  • Page 143 Annexe composants principaux (compilateur, alors la seule façon pour vous de satisfaire à Notre décision sera guidée par le double noyau, et autre) du système d’exploitation la fois à la licence du brevet et à la présente objectif de préserver le statut libre de tous sur lequel l’exécutable tourne, à moins que Licence serait de vous abstenir totalement les dérivés de nos logiciels libres et de ce composant lui-même n’accompagne de toute distribution du Programme. promouvoir le partage et la réutilisation des Si une partie quelconque de cet article logiciels en général. l’exécutable. Si distribuer un exécutable ou un code est tenue pour nulle ou inopposable dans ABSENCE DE GARANTIE objet consiste à offrir un accès permettant une circonstance particulière quelconque, leur copie depuis un endroit particulier, l’intention est que le reste de l’article 11. COMME LA LICENCE DU PROGRAMME alors l’offre d’un accès équivalent pour s’applique. EST CONCÉDÉE À TITRE GRATUIT, AUCUNE copier le code source depuis le même La totalité de la section s’appliquera GARANTIE NE S’ A PPLIQUE AU PROGRAMME, endroit compte comme une distribution dans toutes les autres circonstances. Cet DANS LES LIMITES AUTORISÉES PAR LA LOI du code source, même si les tiers ne sont article n’a pas pour but de vous induire APPLICABLE. SAUF MENTION CONTRAIRE pas contraints de copier le code source en à transgresser un quelconque brevet...
  • Page 144: Licence Publique Générale Limitée Gnu

    Annexe Licence, ou (à votre discrétion) une version copies conformes de ce document de licence, utilisateurs d’un programme libre en obtenant ultérieure quelconque. mais toute modification en est proscrite. une licence restrictive d’un titulaire de brevet. Par conséquent, nous insistons pour que toute Ce programme est distribué dans l’espoir [Ceci est la première version publiée de la licence de brevet obtenue pour une version de la qu’il sera utile, mais SANS AUCUNE Licence Générale Publique Limitée (LGPL). Elle Bibliothèque soit cohérente avec sa pleine liberté GARANTIE ; sans même une garantie compte en tant que successeur de la Licence d’utilisation spécifiée dans la présente Licence. implicite de COMMERCIABILITÉ ou Générale Publique de Bibliothèque GNU, version La plupart des logiciels GNU, y compris certaines DE CONFORMITÉ À UNE UTILISATION 2, d’où le numéro de version 2.1] bibliothèques, sont couverts par la Licence PARTICULIÈRE. Voir la Licence Publique Préambule Générale Publique GNU. La présente licence Générale GNU pour plus de détails. Vous s’applique à certaines bibliothèques et est assez devriez avoir reçu un exemplaire de la Les licences de la plupart des logiciels sont différente de la Licence Générale Publique Licence Publique Générale GNU avec ce conçues pour vous enlever toute liberté de ordinaire. programme ; si ce n’est pas le cas, écrivez à les partager et de les modifier. À l’opposé, les Nous utilisons la présente licence pour certaines la Free Software Foundation Inc., 51 Franklin Licences Générales Publiques GNU ont pour bibliothèques afin de permettre de lier ces Street, Fifth Floor, Boston, MA 02110-1301, but de vous garantir votre liberté de partager bibliothèques, sous certaines conditions, à des...
  • Page 145 Annexe CONDITIONS DE COPIE, contre rémunération. partition d’un espace de stockage ou un support de distribution ne place pas cet DISTRIBUTION ET 2. Vous pouvez modifier votre copie ou des autre ouvrage dans le champ d’application copies de la Bibliothèque ou n’importe MODIFICATION DE LA LICENCE de la présente Licence. quelle partie de celui-ci, créant ainsi un PUBLIQUE GÉNÉRALE LIMITÉE ouvrage fondé sur la Bibliothèque, et copier Vous pouvez choisir d’appliquer les termes et distribuer de telles modifications ou de la Licence Générale Publique GNU ouvrage selon les termes de l’ A rticle 1 ci- ordinaire au lieu de ceux de cette Licence dessus, à condition de vous conformer à une copie donnée de cette Bibliothèque. Cet Accord de Licence s’applique à toute également à chacune des obligations Pour le faire, vous devez modifier les bibliothèque logicielle ou tout programme suivantes : notices qui se réfèrent à cette Licence, contenant une notice placée par le titulaire de sorte qu’elles se réfèrent plutôt à la de la réservation de droits (copyright) ou L’ouvrage modifié doit être lui-même Licence Générale Publique GNU version...
  • Page 146 Annexe l’ouvrage est luimême une bibliothèque. Les fonctionnera correctement avec une ou distribuer la Bibliothèque d’une autre délimitations de ce cas ne sont pas définies version modifiée de la Bibliothèque, manière est réputée non valable, et met de façon précise par la loi. si l’utilisateur en installe une, tant que immédiatement fin à vos droits au titre de Si un tel fichier objet utilise uniquement la version modifiée est compatible au la présente Licence. Toutefois, les tiers ayant reçu de vous des copies, ou des droits, au des paramètres numériques, des schémas niveau de l’interface avec la version et accesseurs de structures de données, avec laquelle l’ouvrage a été réalisé. titre de la présente Licence ne verront pas des petites macros et des petites fonctions Accompagner l’ouvrage d’une offre leurs autorisations résiliées aussi longtemps en ligne (dix lignes de source ou moins écrite, valide pour au moins trois que lesdits tiers se conforment pleinement en longueur), alors l’utilisation du fichier ans, de donner au même utilisateur à elle. objet est non restreinte, indépendamment les éléments spécifiés dans la Sous- Vous n’êtes pas obligé d’accepter la du fait que cela constitue légalement un section 6a, ci-dessus, contre un présente Licence étant donné que vous ne ouvrage dérivé. (Les règles de la Section paiement n’excédant pas le coût requis l’avez pas signée. Cependant, rien d’autre ne 6 s’appliqueront tout de même aux pour effectuer cette distribution. vous accorde l’autorisation de modifier ou exécutables contenant ce code objet plus d) Si la distribution de l’ouvrage est distribuer la Bibliothèque ou les ouvrages...
  • Page 147 Annexe des licences publiques. De nombreuses MAIS SANS Y ÊTRE LIMITÉ, LES GARANTIES de vous contacter par courrier électronique et personnes ont fait de généreuses IMPLICITES DE COMMERCIABILITÉ ET courrier postal. contributions au large spectre de logiciels DE CONFORMITÉ À UNE UTILISATION Vous devriez aussi obtenir de votre employeur distribués par ce système en se fiant à PARTICULIÈRE. VOUS ASSUMEZ LA TOTALITÉ (si vous travaillez en tant que développeur) ou de votre école, si c’est le cas, qu’il (ou elle) signe l’application cohérente de ce système ; DES RISQUES LIÉS À LA QUALITÉ ET AUX il appartient à chaque auteur/ donateur PERFORMANCES DE LA BIBLIOTHÈQUE. SI LA une “renonciation aux droits d’auteur”concernant de décider si il ou elle veut distribuer du BIBLIOTHÈQUE SE RÉVÉLAIT DÉFECTUEUSE, la bibliothèque, si nécessaire. Voici un exemple logiciel par l’intermédiaire d’un quelconque LE COÛT DE L’ENTRETIEN, DES RÉPARATIONS (changez les noms) : autre système, et un concessionnaire ne OU DES CORRECTIONS NÉCESSAIRES VOUS Yoyodyne, Inc., déclare par la présente peut imposer ce choix. INCOMBE INTÉGRALEMENT. renoncer à toute prétention sur les droits Cet article a pour but de rendre totalement 16. EN AUCUN CAS, SAUF LORSQUE LA LOI d’auteur de la bibliothèque ’Frob’(une limpide ce que l’on pense être une APPLICABLE OU UNE CONVENTION ÉCRITE bibliothèque destinée à déplier les coudes) conséquence du reste de la présente L’EXIGE, UN TITULAIRE DE DROIT D’ A UTEUR, écrit par James Random Hacker.
  • Page 148: Erste Schritte

    Erste Schritte Sicherheitshinweise Orten oder an Orten mit hoher Luftfeuchtigkeit oder direkter Sonneneinstrahlung (oder starker Beleuchtung) verwenden. ACHTUNG STROMSCHLAGGEFAHR NICHT ÖFFNEN VORSICHT: Dieses Produkt ist ein Laser-Produkt der ACHTUNG: UM DIE GEFAHR VON STROMSCHLÄGEN Klasse 1, das in der Sicherheits-Richtlinie für Laser- ZU VERMEIDEN, DAS GEHÄUSE (BZW. DIE Produkte, IEC 60825-1: 2007, klassifiziert ist. RÜCKSEITE) NICHT ABNEHMEN UND/ODER DAS Um das Gerät richtig zu verwenden, lesen Sie dieses GERÄT SELBST REPARIEREN. ES BEFINDEN SICH Benutzerhandbuch sorgfältig durch und bewahren KEINE BAUTEILE IM GERÄT, DIE VOM BENUTZER Sie es auf. Setzen Sie sich zur Wartung mit einem REPARIERT WERDEN KÖNNEN. REPARATUREN STETS qualifizierten Servicebetrieb in Verbindung. VOM FACHMANN AUSFÜHREN LASSEN. Durch Bedienungen, Einstellungen oder Verfahren, die in diesem Handbuch nicht erwähnt werden, Der Blitz mit der Pfeilspitze im können gefährliche Strahlungen verursacht werden. gleichseitigen Dreieck dient dazu, Um direkten Kontakt mit dem Laserstrahl zu den Benutzer vor unisolierten und vermeiden, darf das Gehäuse nicht geöffnet gefährlichen spannungsführenden werden. Ansonsten tritt sichtbare Laserstrahlung Stellen innerhalb des auf. NIEMALS DIREKT IN DEN LASERSTRAHL Gerätegehäuses zu warnen, an denen die BLICKEN. Spannung groß genug ist, um für den Menschen VORSICHTSHINWEISE zum Netzkabel die Gefahr eines Stromschlages zu bergen.
  • Page 149 Erste Schritte Hinweise zur Sammlung und Entsorgung von Dieses Gerät besitzt eine tragbare Batterie oder Akku-Batterie. Altgeräten und verbrauchten Batterien Sicherheitshinweise zum Herausnehmen der Batterie aus dem Gerät: Führen Sie zum Herausnehmen der alten Batterie bzw. des Batteriepakets die Einzelschritte zum Einlegen der Batterie in umgekehrter Reihenfolge durch. Um eine Gefährdung der Umwelt sowie mögliche Symbol examples Beispielsymbole Gesundheitsgefährdungen von Menschen und for batteries für Batterien Tieren zu vermeiden, sollten Altbatterien in einen geeigneten Behälter einer Sammelstelle Diese Symbole auf den Geräten, Verpackungen gegeben werden. Altbatterien niemals zusammen und/oder in der beigefügten Literatur weisen darauf mit dem Hausmüll entsorgen. Bitte geben Sie hin, dass diese elektrischen und elektronischen Altbatterien an einer kostenlosen Sammelstelle Geräte sowie Batterien nicht mit dem normalen...
  • Page 150 Erste Schritte Hinweise zum Copyright Hinweise der Europäischen Union zu schnurlosen Geräten y AACS (Advanced Access Content System) ist Hiermit erklärt PIONEER, ein gültiges System zum Schutz von Inhalten dass diese(s) Produkt(e) für das Blu-ray-Disc-Format, ähnlich CSS die grundlegenden (Content Scramble System) für das DVD- Anforderungen und die sonstigen Format. Für z. B. die Wiedergabe oder den Bestimmungen der Richtlinien 1999/5/EC, analogen Signalausgang bei AACS-geschützten 2004/108/EC, 2006/95/EC und 2009/125/EC Inhalten können bestimmte Einschränkungen erfüllt/erfüllen.
  • Page 151 Erste Schritte Wichtige Hinweise zur TV-Farbnorm Die Farbnorm dieses Players richtet sich nach der gerade wiedergegebenen Disc. Wird auf diesem Player z. B. eine in der NTSC- Farbnorm aufgenommene Disc wiedergegeben, wird das Bild als NTSC-Signal ausgegeben. Nur Multinorm-Farbfernseher können sämtliche Bildsignale dieses Players anzeigen. y Falls Sie einen Fernseher mit PAL-Farbnorm besitzen, wird das Bild bei der Wiedergabe von Discs oder Videofilmen im NTSC-Format verzerrt angezeigt. y Dieser Multinorm-Farbfernseher ändert die Farbnorm je nach Eingangssignal automatisch. Falls die Farbnorm nicht automatisch eingestellt wird, schalten Sie das Gerät aus und wieder ein, um das normale Fernsehbild anzuzeigen. y Auch wenn eine in der NTSC-Farbnorm aufgenommene Disc störungsfrei auf dem Fernsehgerät angezeigt wird, wird diese Disc möglicherweise nicht korrekt mit dem Rekorder beschrieben.
  • Page 152 38 – Das Menü [WEITERE] Fernbedienung 39 Klangeffekte Vorderes Bedienfeld Rückseite Bedienung 40 Normale Wiedergabe Anschlüsse 40 – Bedienungen im Menü [Hauptmenü] Montage der Lautsprecher 40 – Discs wiedergeben – Lautsprechereinstellungen BCS-717 40 – Wiedergabe einer Datei auf einer – Lautsprechereinstellungen BCS-313 Disc/einem USB-Gerät Wandmontage des Mittel-Lautsprechers – Wiedergabe von Blu-ray 3D-Discs – Vor der Montage – BD-Live™-Discs anschauen Zusätzliche Hinweise zum Standort der 42 – Wiedergabe einer Datei auf einem Lautsprecher Netzwerk-Server 20 Aufstellen des Systems 43 – Grundfunktionen für Video- und...
  • Page 153 Inhaltsverzeichnis Anhang 46 – Bedienungen im Suchmenü 47 – Auswahl der Untertiteldatei 60 Bedienung eines Fernsehgerätes über die 47 – Merken der letzten Szene mitgelieferte Fernbedienung 48 – Funktionen während der Fotoanzeige 60 – Fernbedienung zur Bedienung Ihres 48 – Während der Diashow Musik hören Fernsehgerätes einstellen 49 Bildschirmmenü Liste der Ländercodes 49 – Anzeige der Informationen zum Inhalt 62 Liste der Sprachcodes auf dem Bildschirm 63 Marken und Lizenzen 50 – Wiedergabe ab einer gewählten 65 Video-Ausgabeauflösung Zeitposition 66 Technische Daten 50 – Tonkanal wechseln...
  • Page 154: Erste Schritte

    Erste Schritte Einführung Spielbare Discs und in dieser Bedienungsanleitung verwendete Symbole Datenträger/ Logo Symbol Beschreibung Begriff y Gekaufte oder ausgeliehene Spielfilm-DVDs. y “Blu-ray 3D”-Discs y Im BDAV-Format beschriebene BD-R/RE-Discs. Blu-ray y BD-R/RE-Discs mit Film-, Musik- oder Fotodateien. y ISO 9660+JOLIET, UDF und UDF Bridge-Format. y Gekaufte oder ausgeliehene Spielfilm-DVDs. y Nur finalisierte Discs im Video-Modus. DVD-ROM y Unterstützt auch Dual-Layer-Discs DVD-R AVCHD-Format, finalisiert DVD-RW DVD+R y DVD±R/RW-Discs mit Film-, Musik- oder DVD+RW Fotodateien.
  • Page 155: Info Über Das Symbol "7" Auf Dem Bildschirm

    Erste Schritte Hinweis Info über das Symbol “7” auf y Einige CD-R-/RW- (bzw. DVD±R-/RW-) dem Bildschirm Discs können, abhängig vom verwendeten Aufnahmegerät oder der CD-R-/RW-Disc Während des Betriebs erscheint auf dem (bzw. DVD±R-/RW-Disc) selbst, mit diesem Fernsehbildschirm u. U. das Symbol “7” und zeigt Gerät u. U. nicht abgespielt werden. an, dass die im Benutzerhandbuch erläuterte y Abhängig von der Aufnahmesoftware Funktion für diese Disc nicht verfügbar ist. und der Finalisierung können einige beschriebene Discs (CD-R/RW, DVD±R/ RW oder BD-R/RE) nicht wiedergegeben werden. y Mit einem PC oder einem DVD- oder CD- Rekorder beschriebene BD-R/RE, DVD±R/ RW und CD-R/RW-Discs können u. U. nicht abgespielt werden, falls die Disc beschädigt oder verschmutzt ist oder die Linse des Players verschmutzt oder kondensiert ist. y Falls eine Disc mit einem PC beschrieben wird, auch in einem kompatiblen Aufnahmeformat, können einige Discs auf Grund der Einstellungen in der Brennsoftware nicht wiedergegeben werden. (Genauere Informationen hierzu erhalten Sie beim Hersteller der Brennsoftware.)
  • Page 156: Mitgeliefertes Zubehör

    Erste Schritte Mitgeliefertes Zubehör Lautsprecherzubehör (S-BD707SW) Videokabel (1) Fernbedienung (1) Lautsprecherkabel (1) große rutschfeste Unterlagen (1) Lautsprecherzubehör (S-BD303) Batterien (1) UKW-Antenne (1) iPod-Dock (1) Kleine rutschfeste Farbig markierte Unterlagen (1) Lautsprecherkabel (6) Lautsprecherzubehör (S-BD707T) Große rutschfeste Unterlagen (1) Schrauben (12) Farbig markierte Lautsprecherkabel (5) Lautsprecherständer- Kleine rutschfeste Basis (4) Unterlagen (1) Mittelgroße rutschfeste Unterlagen (1)
  • Page 157: Dateivoraussetzungen

    Erste Schritte Dateivoraussetzungen Filmdateien Datei- Datei- Codec-Format Audioformat Untertitel Speicherort erweiterung “.avi”, “.divx”, DIVX3.xx, DIVX4.xx, Dolby Digital, SubRip (.srt/.txt), SAMI (.smi), “.mpg”, “.mpeg”, DIVX5.xx, DIVX6.xx DTS, MP3, SubStation Alpha (.ssa/.txt), “.mkv”, “.mp4”, (nur normale WMA, AAC, MicroDVD (.sub/.txt), VobSub Disc, “.asf”, “.wmv”, Wiedergabe), XVID, (.sub), SubViewer 1.0 (.sub), “.m4v” (ohne MPEG1 SS, H.264/ SubViewer 2.0 (.sub/.txt), DRM) MPEG-4 AVC, MPEG2 TMPlayer (.txt), DVD Subtitle PS, MPEG2 TS, VC-1 System (.txt) SM (WMV3) “.avi”, “.divx”, DIVX3.xx, DIVX4.xx, Dolby Digital, SubRip (.srt/.txt), SAMI (.smi), “.mpg”, “.mpeg”, DIVX5.xx, DIVX6.xx DTS, MP3,...
  • Page 158: Avchd (Advanced Video Codec High Definition)

    Erste Schritte Hinweis AVCHD (Advanced Video y Der Dateiname darf maximal 180 Zeichen Codec High Definition) lang sein. y Maximale Anzahl Dateien/Ordner: 2000 y Mit diesem Player können Discs im AVCHD- (Gesamtanzahl der Dateien und Ordner) Format wiedergegeben werden. Diese Discs werden normalerweise zur Aufzeichnung mit y Je nach Größe und Anzahl der Dateien kann Camcordern eingesetzt. das Lesen der Disc einige Minuten dauern. y Beim AVCHD-Format handelt es sich um ein y Je nach Server gelten verschiedene Dateikompatibilitäten. hochauflösendes digitales Videokameraformat. y Die auf Seite 11 angegebenen y Das Format MPEG-4 AVC/H.264 ermöglicht Dateianforderungen sind u. U. nicht immer eine effizientere Komprimierung von Bildern kompatibel. Je nach den Dateimerkmalen als mit einem konventionellen Format zur und Fähigkeiten des Medien-Servers Bildkomprimierung. gelten möglicherweise verschiedene y Mit diesem Player können AVCHD-Discs im Einschränkungen.
  • Page 159: Besondere Systemanforderungen

    Erste Schritte Besondere Hinweise zur Kompatibilität Systemanforderungen y Da es sich bei BD-ROM-Discs um ein neues Format handelt, können Probleme mit Für hochauflösende Video-Wiedergabe: bestimmten Discs, digitalen Anschlüssen und y High Definition-Anzeigegerät mit COMPONENT- andere Kompatibilitätsprobleme auftreten. Bei oder HDMI-Eingangsbuchsen. Problemen mit der Kompatibilität wenden Sie sich bitte an ein zugelassenes Kundendienst- y BD-ROM-Disc mit hochauflösendem Inhalt. Center. y Für bestimmte Inhalte ist ein HDMI- oder y Mit diesem Gerät werden Funktionen wie Bild- HDCP-fähiger DVI-Eingang am Anzeigegerät im-Bild, zweiter Tonkanal oder virtuelle Pakete erforderlich (wie von den Disc-Autoren für BD-ROM-Inhalte ermöglicht, die BONUSVIEW festgelegt). (BD-ROM Version 2 Profil 1 Version 1.1/Final Zur Wiedergabe von Dateien in einem Standard Profile) unterstützen. Für Discs, die die freigegebenen Ordners eines PCs über das Bild-im-Bild-Funktion unterstützen, kann ein Heimnetzwerk sind folgende Voraussetzungen zweites Videobild angezeigt und eine zweite erforderlich. Tonspur wiedergegeben werden. Hinweise zu y Windows® XP (Service-Pack 2 oder höher), dieser Wiedergabeart finden Sie in der Anleitung Windows Vista® (kein Service-Pack erforderlich) zur jeweiligen Disc.
  • Page 160: Fernbedienung

    Erste Schritte Fernbedienung SPK LEVEL: Einstellung der • • • • • • • • • a • • • • • • • Lautstärke des gewünschten INPUT/TUNER: Ändern des Lautsprechers. Eingangsmodus. X USB REC: Aufnahme einer 1 (STANDBY/ON): Player ein- Audio-CD. und ausschalten. MUTE: Gerät stummschalten. B OPEN/CLOSE: Disc-Fach SOUND: Auswahl eines öffnen und schließen. Klangmodus. HDMI IN: Eingangsmodus auf VOL +/- : Einstellen der HDMI IN direkt einstellen. Lautstärke. OPTICAL: Eingangsmodus auf • • • • • • • • • c •...
  • Page 161: Vorderes Bedienfeld

    Erste Schritte Vorderes Bedienfeld STANDBY/ON OPEN/CLOSE FUNCTION TUNE VOLUME PORTABLE IN 500 mA a Disc-Fach c Anzeigefenster b Bedienungstasten d Fernbedienungs-Sensor g h i j k 1 (STANDBY/ON) Netzschalter e PORTABLE IN STANDBY/ON OPEN/CLOSE FUNCTION Player ein- und ausschalten. f USB-Anschluss TUNE B (OPEN/CLOSE) g Lautstärkeregelung FUNCTION VOLUME...
  • Page 162: Montage Der Lautsprecher

    Anschlüsse Montage der Für Mittel-Lautsprecher: Befestigen Sie mit den enthaltenen Klebestreifen Lautsprecher vier kleine Unterlagen am Standfuß des Mittel- Lautsprechers. Lautsprechereinstellungen BCS-717 middle non-skid pads kleine rutschfeste small non-skid pads Unterlagen Vorbereitung der Lautsprecher 1. Befestigen Sie die rutschfesten Unterlagen an den Standfüßen der Lautsprecher, des Subwoofers und des Mittel-Lautsprechers. Für Lautsprecherstandfüße: middle non-skid pads Befestigen Sie mit den enthaltenen Klebestreifen vier mittelgroße Unterlagen an small non-skid pads jedem Lautsprecherstandfuß (Unterseite). 2. Montieren Sie die Lautsprecherstandfüße mit middle non-skid pads den enthaltenen Schrauben an den Ständern.
  • Page 163 Plastic catch y Es sollten ausschließlich die im Lieferumfang y Bei der Kunststoffklemme handelt es sich dieses Systems enthaltenen Lautsprecher um kein Befestigungselement, d. h. der angeschlossen werden. Lautsprecher sollte nicht allein an der y Die enthaltenen Lautsprecher sollten Klemme befestigt von der Wand hängen. nur an den Verstärker dieses Systems Zur Stabilisierung des Lautsprechers muss angeschlossen werden. Beim Anschluss an ein Seil verwendet werden. einen anderen Verstärker besteht die Gefahr y Pioneer übernimmt keine Haftung von Fehlfunktionen oder Bränden. für Verluste oder Schäden jeglicher Mounting screw 5 mm Art, die auf einen unsachgemäßen y Bitte schließen Sie das Lautsprecherkabel (not supplied) Zusammenbau, eine unsachgemäße des Subwoofers (pink) an den 10 mm Montage, eine unzureichende Tragfähigkeit orangefarbenen Anschluss des Players an. Mounting screw der Montageorte, eine missbräuchliche y An diesen Lautsprecheranschlüssen kann...
  • Page 164: Lautsprechereinstellungen Bcs

    Anschlüsse Lautsprechereinstellungen Für Mittel-Lautsprecher: Befestigen Sie mit den enthaltenen Klebestreifen BCS-313 vier kleine Unterlagen am Standfuß des Mittel- Lautsprechers. Vorbereitung der Lautsprecher 1. Befestigen Sie die rutschfesten Unterlagen an kleine rutschfeste den Lautsprecherstandfüßen. small non-skid pads small non-skid pads Unterlagen Für Lautsprecher: Befestigen Sie mit den enthaltenen Klebestreifen vier kleinen Unterlagen an jedem small non-skid pads small non-skid pads Lautsprecher (Unterseite). For subwoofer: 2. Schließen Sie die Kabel am Player an. small non-skid pad small non-skid pads Schließen Sie den weißen Stecker des grauen kleine rutschfeste Unterlagen...
  • Page 165: Wandmontage Des Mittel-Lautsprechers

    Lautsprecher dieses Systems sind magnetisch enthalten. Verwenden Sie Schrauben, die für abgeschirmt. Falls die Lautsprecher sehr die Beschaffenheit und Tragfähigkeit der Wand nahe am Fernsehgerät aufgestellt werden, geeignet sind. können Farbverfälschungen jedoch nicht > Vorsicht ausgeschlossen werden. Schalten Sie in einem solchen Fall das Fernsehgerät aus und nach y Falls Sie die Beschaffenheit und Tragfähigkeit etwa 15 bis 30 Minuten wieder ein. Sollten die Ihrer Wand nicht einschätzen können, Farbverfälschungen weiterhin auftreten, stellen Sie thick cord ziehen Sie einen Fachmann zu Rate. das Lautsprechersystem in größerer Entfernung y Pioneer übernimmt keine Haftung zum Fernsehgerät auf. für Unfälle oder Schäden, die auf eine Plastic catch Der Subwoofer besitzt keine magnetische unsachgemäße Montage zurückzuführen Abschirmung und sollte daher nicht in der Nähe sind. eines Fernsehgerätes oder Monitors aufgestellt werden. Magnetische Datenträger (z. B. Disketten, Musik- oder Videokassetten) sollten ebenfalls nicht in der Nähe des Subwoofers aufbewahrt werden. Die vorderen, die Surround-Lautsprecher und der Subwoofer nicht an einer Wand oder Decke befestigen. Die Lautsprecher könnten herunterfallen und zu Verletzungen führen. Montageschrauben (nicht im...
  • Page 166: Aufstellen Des Systems

    Anschlüsse > Vorsicht Aufstellen des y Achten Sie darauf, dass Kinder nicht ihre Systems Hände oder andere Gegenstände in die *Subwooferöffnung einführen. *Subwooferöffnung: Eine Aushöhlung im Die folgende Abbildung zeigt die Aufstellung Gehäuse des Subwoofers zum Erzeugen des Systems am Beispiel. Die Abbildungen in satter Bässe. dieser Anleitung können vom tatsächlichen Gerät y Platzieren Sie den Mittel-Lautsprecher für abweichen und dienen lediglich zur Beschreibung. Kinder unzugänglich. Ein optimaler Surround-Sound wird erreicht, wenn Ansonsten könnte der Lautsprecher alle Lautsprecher mit Ausnahme des Subwoofers herunterfallen und Verletzungen und/oder im gleichen Abstand von der Zuhörerposition ( Sachschäden verursachen. aufgestellt werden. y Die Lautsprecher enthalten magnetische Bauteile. Aus diesem Grund können Farbverfälschungen auf dem Bildschirm oder PC-Monitor auftreten. Die Lautsprecher sollten daher in ausreichendem Abstand zum Fernseher oder PC-Monitor aufgestellt werden. Vorderer Lautsprecher links (L) Vorderer Lautsprecher rechts (R): Stellen Sie die vorderen Lautsprecher neben den Monitor oder Bildschirm und bündig mit der Bildschirmfläche auf.
  • Page 167: Anschluss An Einen Fernseher

    Anschlüsse Anschluss an einen HDMI-Anschluss Fernseher Ein HDMI-Fernseher oder Monitor kann über ein HDMI-Kabel an diesen Player angeschlossen werden (High-Speed HDMI™-Kabel mit Ethernet, Typ A). Verbinden Sie die HDMI-Buchse des Players Nehmen Sie, abhängig von den Möglichkeiten Ihrer mit der HDMI-Buchse eines HDMI-kompatiblen Geräte, einen der folgenden Anschlüsse vor. Fernsehers oder Monitors. y HDMI-Anschluss (Seite 21) y Component-Video-Anschluss (Seite 23) y Video-Anschluss (Links/Rechts) (Seite 23) Geräterückseite Hinweis y Abhängig vom Fernseher und anderen Geräten gibt es verschiedene Anschlussmöglichkeiten an den Player. Verwenden Sie nur einen der in dieser Anleitung angegebenen Anschlüsse. y Lesen Sie zum Anschluss die Bedienungsanlei-tung des Fernsehers, der Stereo-Anlage bzw. des jeweiligen Gerätes. HDMI y Der Player muss direkt am Fernseher Kabel angeschlossen werden. Stellen Sie den Fernseher auf den richtigen Videokanal ein. y Den Player nicht über einen Videorekorder anschließen. Das DVD-Bild könnte durch das Kopierschutzsystem verzerrt werden.
  • Page 168: Arc-Funktion (Audio Return Channel)

    Anschlüsse Hinweis ARC-Funktion (Audio Return y Falls ein angeschlossenes HDMI-Gerät den Channel) Audioausgang des Players nicht unterstützt, ist der Ton des HDMI-Gerätes u. U. nur Mithilfe der ARC-Funktion kann ein HDMI-fähiges verzerrt oder nicht zu hören. Fernsehgerät einen Audio-Stream an den HDMI OUT-Ausgang dieses Players senden. y Bei einem HDMI-Anschluss kann die Auflösung für den HDMI-Ausgang geändert Verwendung dieser Funktion: werden. (Siehe Kapitel “Einstellung der - Das Fernsehgerät muss die ARC-Funktion dieses Auflösung” auf Seite 24.) Players unterstützen, und die Option ARC muss y Legen Sie über die Option [HDMI-Farbeinst.] auf Ein eingestellt werden (Werkseinstellung: im Menü [Setup] die Art der Videoausgabe “Aus”). über die HDMI OUT-Buchse fest (siehe Seite - Die Aktivierung der Option ARC kann 34). je nach Fernsehgerät variieren. Weitere y Beim Ändern der Auflösung bei bereits Hinweise zur ARC-Funktion finden Sie in der angeschlossenem Gerät können Bedienungsanleitung Ihres Fernsehgerätes. Fehlfunktionen auftreten. Um diese Störung - Es kann ausschließlich das HDMI-Kabel zu beheben, schalten Sie den Player aus verwendet werden (High-Speed-HDMI™-Kabel und wieder ein.
  • Page 169: Component-Video-Anschluss

    Anschlüsse Component-Video-Anschluss Video-Anschluss Verbinden Sie die COMPONENT VIDEO OUT- Verbinden Sie die VIDEO OUT-Buchse des Buchsen des Players über ein Component- Players über das Videokabel mit der Video- Videokabel mit den entsprechenden Eingangsbuchse des Fernsehers. Der Ton wird über Eingangsbuchsen des Fernsehers. Der Ton wird die Systemlautsprecher ausgegeben. über die Systemlautsprecher ausgegeben. Geräterückseite Geräterückseite Videokabel Component- Videokabel Hinweis Bei einem COMPONENT VIDEO OUT-Anschluss kann die Auflösung für den Ausgang geändert werden. (Siehe Kapitel “Einstellung der Auflösung” auf Seite 24.)
  • Page 170: Einstellung Der Auflösung

    Anschlüsse Antennenanschluss Einstellung der Auflösung Der Player bietet verschiedene Ausgabeauflösungen für die HDMI OUT- und Schließen Sie zum Radioempfang die mitgelieferte COMPONENT VIDEO OUT-Buchsen. Die Auflösung Antenne an. wird im Menü [Setup] eingestellt. 1. Drücken Sie die Taste HOME MENU (n). 2. Wählen Sie mit den Tasten A/D den Eintrag [Setup] und drücken Sie ENTER (b). Daraufhin wird das Menü [Setup] aufgerufen. 3. Wählen Sie mit den Tasten W/S die Option [ANZEIGE] und drücken Sie die Taste D, um in das Unterverzeichnis zu gelangen. 4. Wählen Sie mit den Tasten W/S die Option [Auflösung] und drücken Sie die Taste ENTER (b), um in das nächste Unterverzeichnis zu gelangen. Geräterückseite Hinweis Die UKW-Drahtantenne sollte nach dem Anschluss so waagerecht wie möglich 5. Wählen Sie mit den Tasten W/S die ausgerichtet werden. Die UKW-Drahtantenne gewünschte Auflösung aus und drücken Sie zur muss vollständig entfaltet werden. Bestätigung der Auswahl auf ENTER (b). Hinweis y Falls Ihr Fernsehgerät die am Player eingestellte Auflösung nicht unterstützt, stellen Sie die Auflösung wie folgt auf 576p ein:...
  • Page 171: Anschluss Von Zusatzgeräten

    Anschlüsse Anschluss von PORTABLE IN-Anschluss Zusatzgeräten Sie haben die Möglichkeit, den Ton eines tragbaren Audio-Players über die Lautsprecher dieses Systems wiederzugeben. Verbinden Sie die Kopfhörerbuchse (oder Line AUX-Anschluss Out-Buchse) des tragbaren Audio-Players mit der PORTABLE IN-Buchse dieses Gerätes: Wählen Sie Sie haben die Möglichkeit, den Ton eines dann mit den Tasten INPUT/TUNER sowie ENTER Zusatzgerätes über die Lautsprecher dieses Systems (b) die Option [PORTABLE]. wiederzugeben. Der Eingangsmodus kann ebenfalls über die Taste Schließen Sie die analogen Audio- FUNCTION am Bedienungsfeld ausgewählt werden. Ausgangsbuchsen des Gerätes an den Anschluss AUX L/R (INPUT) dieses Gerätes an. Wählen Sie dann mit den Tasten INPUT/TUNER sowie ENTER VOLUME (b) die Option [AUX]. Der Eingangsmodus kann ebenfalls über die Taste PORTABLE IN FUNCTION am Bedienungsfeld ausgewählt werden. 500 mA Geräterückseite Z. B. MP3-Player. Weiß Zu den Audio- Ausgangsbuchsen des Zusatzgerätes (z. B. TV oder Videorekorder)
  • Page 172: Optical In-Anschluss

    Anschlüsse OPTICAL IN-Anschluss HDMI IN 1/2-Anschluss Der Ton eines Gerätes kann über einen optischen Sie haben die Möglichkeit, Bild und Ton eines Anschluss über die Lautsprecher dieses Systems Gerätes über diesen Anschluss wiederzugeben. ausgegeben werden. Verbinden Sie die HDMI OUT-Buchse des Gerätes Verbinden Sie die optische Ausgangsbuchse des mit der HDMI IN 1- oder 2 Buchse dieses Gerätes. Gerätes mit der OPTICAL IN-Buchse an diesem Wählen Sie dann mit den Tasten INPUT/TUNER Gerät. Wählen Sie dann mit den Tasten INPUT/ sowie ENTER (b) die Option [HDMI IN 1/2]. TUNER sowie ENTER (b) die Option [OPTICAL]. Der Eingangsmodus kann ebenfalls über die Taste Oder wählen Sie diese Funktion direkt über die FUNCTION am Bedienungsfeld ausgewählt werden. Taste OPTICAL aus. Der Eingangsmodus kann ebenfalls über die Taste FUNCTION am Bedienungsfeld ausgewählt werden. Geräterückseite Geräterückseite Zur HDMI OUT- Buchse des Gerätes (z. B. Digitalempfänger, digitaler Satelliten- Receiver oder Spielekonsole). Zur digitalen, optischen Ausgangsbuchse Hinweis des Gerätes y Die Video-Auflösung kann in der Betriebsart HDMI IN 1/2 nicht geändert werden.
  • Page 173: Verbindung Mit Dem Heimnetzwerk

    Anschlüsse Verbindung mit dem Heimnetzwerk Breitband- Dienst Dieser Player kann über den LAN-Anschluss auf der Rückseite oder das integrierte Wireless-Modul mit einem lokalen Netzwerk (LAN) verbunden werden. Über eine Verbindung des Gerätes mit einem Breitband-Heimnetzwerk können Sie interaktives BD-Live und Online-Dienste nutzen. Kabel-Netzwerkverbindung Router Ein Kabel-Netzwerk ermöglicht eine optimale Leistung, da die angeschlossenen Geräte direkt mit dem Netzwerk verbunden sind und keinerlei Störfrequenzen ausgesetzt sind. Weitere Hinweise finden Sie in der Bedienungsanleitung des Netzwerkgerätes. Verbinden Sie den LAN-Anschluss des Players über ein handelsübliches LAN- oder Ethernet-Kabel. PC und/oder DLNA-zertifizierter Server Hinweis y Halten Sie das LAN-Kabel beim Anschließen oder Abziehen immer am Stecker selbst fest. Ziehen Sie nicht am LAN-Kabel und halten Sie die Sperre am Stecker gedrückt. y Am LAN-Anschluss darf kein modulares Telefonkabel angeschlossen werden. y Halten Sie sich auf Grund der zahlreichen möglichen Anschlussarten an die Angaben Geräterückseite Ihres Telekommunikationsanbieters bzw. Internet-Anbieters. y Für den Zugriff auf Inhalte auf einem PC oder DLNA-Server muss dieser Player mit demselben lokalen Netzwerk wie der Router verbunden sein.
  • Page 174: Kabel-Netzwerkeinstellungen

    Anschlüsse Hinweis Kabel-Netzwerkeinstellungen Falls kein DHCP-Server im Netzwerk vorhanden Falls das kabelgebundene lokale Netzwerk (LAN) ist und die IP-Adresse manuell eingerichtet einen DHCP-Server besitzt, wird dem Player werden muss, wählen Sie die Option [Statisch] automatisch eine IP-Adresse zugewiesen. Für und nehmen Sie die Einstellungen für [IP- bestimmte Heimnetzwerke müssen nach dem Adresse], [Subnetzmaske], [Gateway] und Anschluss der Kabel die Netzwerkeinstellungen des [DNS-Server] mit den Tasten W/S/A/D Players vorgenommen werden. Nehmen Sie die sowie den Nummerntasten vor. Drücken Sie [NETZWERK]-Einstellungen wie folgt vor. bei falscher Eingabe einer Ziffer auf CLEAR, um den markierten Teil zu löschen. Vorbereitung Vor der Einrichtung des Kabel-Netzwerks muss eine 4. Markieren Sie die Option [OK] und drücken Sie Breitband-Internetverbindung zum Heimnetzwerk ENTER (b), um die Netzwerkeinstellungen zu hergestellt werden. übernehmen. 1. Wählen Sie im Menü [Setup] die Option 5. Der Player fordert Sie zur Prüfung der [Verbindungseinst.] und drücken Sie auf ENTER Netzwerkverbindung auf. Markieren Sie die (b). Option [OK] und drücken Sie ENTER (b), um die Netzwerkverbindung herzustellen. 6. Wählen Sie den Eintrag [Test] und drücken Sie bei Schritt 5 auf ENTER (b), um den Status der Netzwerkverbindung auf dem Bildschirm anzuzeigen.
  • Page 175: Wireless-Netzwerkverbindung

    Anschlüsse Hinweis Wireless-Netzwerkverbindung Der verfügbare Frequenzbereich und die Die Verbindung kann auch über einen Access- Kanäle des 5 GHz-Frequenzbandes werden Point oder Wireless-Router hergestellt werden. im Folgenden aufgeführt. Je nach Land sind Netzwerkkonfiguration und Verbindungsart Unterschiede oder Einschränkungen möglich. können je nach vorhandenen Geräten und Stellen Sie den Access-Point bei Problemen mit Netzwerkumgebung unterschiedlich sein. der Wireless-Netzwerkverbindung auf einen Dieser Player besitzt ein IEEE 802.11n Wireless- anderen Kanal ein. Modul (Dual-Band, 5 GHz und 2,4 GHz- Bereich Frequenzbereich Frequenzband), das ebenfalls die Standards 802.11a/b/g unterstützt. Die optimale Wireless- Nordamerika 5.15-5.25 GHz (ch. 36-48), Leistung wird über ein IEEE 802.11n-zertifiziertes 5.725-5.825 GHz (ch. 149-161), WiFi-Netzwerk erreicht (Access-Point oder Wireless- 5.825-5.850 GHz (ch.165) Router). Europa, VAE 5.15-5.25 GHz (ch. 36-48) Andere 5.15-5.25 GHz (ch. 36-48), VOLUME 5.725-5.825 GHz (ch. 149-161), PORTABLE IN 500 mA 5.825- 5.850 GHz (ch.165) Wireless- Wireless- Verbindung Netzwerkeinstellungen...
  • Page 176 Anschlüsse [Manuell] – Der Access-Point strahlt 2. Das Menü [Verbindungseinst.] wird eingeblendet. Wählen Sie mit den Tasten W/S den Eintrag möglicherweise nicht seinen Namen (SSID) aus. [Wireless] und drücken Sie ENTER (b). Überprüfen Sie die Router-Einstellungen mit Hilfe des Computers und stellen Sie den Router 3. Wählen Sie [Ja] und drücken Sie zum zum Senden der SSID ein, oder geben Sie den Fortfahren auf ENTER (b). Die derzeitigen Namen des Access-Points (SSID) unter [Manuell] Netzwerkeinstellungen werden durch die ein. neuen Verbindungseinstellungen ersetzt. [Push Button] – Falls der Access-Point oder 4. Der Player sucht daraufhin nach allen Wireless-Router die Push Button-Konfiguration verfügbaren Access-Points bzw. Wireless- unterstützt, wählen Sie diese Option und Routern in der Umgebung und zeigt diese in drücken Sie innerhalb von zwei Minuten auf einer Liste an. Markieren Sie mit den Tasten Push Button des Access-Points bzw. Wireless- W/S einen der Access-Points oder Wireless- Routers. Sie müssen den Namen des Access- Router in der Liste und drücken Sie auf Points (SSID) und das Sicherheitskennwort ENTER (b). des Access-Points bzw. Wireless-Routers nicht kennen. 5. Wählen Sie mit den Tasten W/S/A/D den IP-Modus [Dynamisch] oder [Statisch]. Wählen Sie die Option [Dynamisch], um die IP-Adresse automatisch zu beziehen.
  • Page 177 Anschlüsse Hinweise zur Netzwerkverbindung: erforderlich. Falls Ihr Internet-Anbieter einen solchen Anschluss nicht unterstützt, kann mit y Viele Probleme bei der Netzwerkverbindung dem Player keine Internetverbindung hergestellt während der Einrichtung können häufi g durch werden. ein Zurücksetzen des Routers bzw. Modems y Für den xDSL-Dienst ist ein Router erforderlich. behoben werden. Schalten Sie nach der Verbindung des Players mit dem Heimnetzwerk y Zur Nutzung des DSL-Dienstes ist ein DSL- den Router bzw. das Kabelmodem des Modem erforderlich. Für den Kabelmodem- Heimnetzwerks aus und/oder trennen Sie das Dienst ist in ein Kabelmodem erforderlich. Netzkabel. Schalten Sie das Gerät dann wieder Je nach Zugriffsart auf den und den ein und oder schließen Sie das Netzkabel wieder Vertragsbedingungen des ISP können Sie die Internetverbindungsfunktion dieses Players nicht nutzen oder die Anzahl der Geräte, die y Je nach Vertragsbedingungen Ihres Internet- gleichzeitig eine Internetverbindung herstellen Anbieters (ISP) kann die Anzahl der Geräte, für können, ist begrenzt. (Falls Ihr ISP nur die die eine Internet erbindung eingerichtet werden Verbindung von einem Gerät zulässt, kann mit kann, begrenzt sein. Hinweise erhalten Sie von diesem Player u. U. keine Verbindung hergestellt Ihrem Internet-Anbieter. werden, wenn bereits ein PC verbunden ist.) y Unser Unternehmen übernimmt keine y Der Einsatz eines “Routers” ist möglicherweise Haftung für Fehlfunktionen des Players und/ nicht oder nur eingeschränkt zulässig, abhängig...
  • Page 178: Anschluss Eines Usb-Gerätes

    Anschlüsse Hinweis Anschluss eines USB- y Dieser Player unterstützt USB-Flash- Gerätes Laufwerke/externe USB-Festplatten mit dem Dateiformat FAT16, FAT32 und NTFS (Musik, Foto und Video). Für BD-Live sowie Mit diesem Player können auf einem USB-Gerät zum Kopieren von Audio-CDs wird jedoch gespeicherte Film-, Musik- und Fotodateien ausschließlich das Dateiformat FAT16 oder FAT32 unterstützt. Bitte nutzen Sie für wiedergegeben werden. BD-Live und zum Kopieren von Audio- CDs das USB-Flash-Laufwerk/eine externe Inhalte auf dem USB-Gerät Festplatte mit dem Dateiformat FAT16 oder wiedergeben FAT32. y Das USB-Gerät kann als lokaler Speicher 1. Schließen Sie das USB-Gerät fest am USB- eingesetzt werden, um BD-Live-Discs über Anschluss an. das Internet wiederzugeben. y Dieses Gerät unterstützt bis zu acht VOLUME Partitionen auf einem USB-Gerät. y Ein USB-Gerät niemals während des Betriebs trennen (z. B. während der Wiedergabe oder PORTABLE IN eines Kopiervorgangs).
  • Page 179: Systemeinstellungen

    Systemeinstellungen Einstellungen Das Menü [ANZEIGE] Bildformat Setup-Einstellungen vornehmen Wählen Sie die für das Bildformat des Fernsehers die geeignete Einstellung. Im Menü [Setup] können die Einstellungen für den Player vorgenommen werden. [4:3 Letterbox] 1. Drücken Sie die Taste HOME MENU (n). Beim Anschluss an einen Standard 4:3-Fernseher. Zeigt Kinofilme mit schwarzen Balken oberhalb und unterhalb des Bildes. [4:3 Panscan] Beim Anschluss an einen Standard 4:3-Fernseher. Das Bild wird verkleinert, um den Bildschirm zu füllen. Beide Seiten des Bildes werden abgeschnitten. 2. Wählen Sie mit den Tasten A/D den Eintrag [Setup] und drücken Sie ENTER (b). [16:9 Original] Daraufhin wird das Menü [Setup] aufgerufen. Beim Anschluss an einen 16:9-Breitbildfernseher. Das 4:3-Bild wird im Original-Bildformat 4:3 mit schwarzen Streifen am linken und rechten Bildrand angezeigt. [16:9 Vollbild] Beim Anschluss an einen 16:9-Breitbildfernseher. Das 4:3-Bild wird horizontal gestreckt (bei gleichem 3. Wählen Sie mit den Tasten W/S den ersten Seitenverhältnis), um den gesamten Bildschirm...
  • Page 180 Systemeinstellungen Auflösung HDMI-Farbeinst. Einstellen der Ausgabeauflösung für das Auswahl der Ausgabeart über die HDMI OUT- Component- und HDMI-Videosignal. Einzelheiten Buchse. Hinweise zu dieser Einstellung finden Sie in zur Einstellung der Auflösung finden Sie auf den der Bedienungsanleitung des Anzeigegerätes. Seiten 24 und 65. [YCbCr] [Auto] Wählen Sie diese Einstellung beim Anschluss Falls an der HDMI OUT-Buchse ein Fernsehgerät an HDMI-Anzeigegerät. angeschlossen ist, das Anzeigeinformation [RGB] (EDID) bereitstellt, wird die Auflösung für den Wählen Sie diese Einstellung beim Anschluss angeschlossenen Fernseher automatisch an DVI-Anzeigegerät. optimal angepasst. [1080p] 3D-Modus Ausgabe von 1080 Zeilen Progressive-Video. Wählen Sie den Ausgabemodus zur Wiedergabe [1080i] von Blu-ray 3D-Discs. Ausgabe von 1080 Zeilen Interlaced-Video. [Aus] [720p] Blu-ray 3D-Discs werden im 2D-Modus wie Ausgabe von 720 Zeilen Progressive-Video. normale BD-ROM-Discs wiedergegeben. [576p] [Ein] Ausgabe von 576 Zeilen Progressive-Video. Blu-ray 3D-Discs werden im 3D-Modus wiedergegeben. [576i] Ausgabe von 576 Zeilen Interlaced-Video.
  • Page 181: Das Menü [Sprache]

    Systemeinstellungen Das Menü [SPRACHE] Das Menü [AUDIO] Anzeigemenü Lautsprecher-Setup Sprache für das [Setup]-Menü und für die Nutzen Sie für einen optimalen Ton die Bildschirmmenüs festlegen. Lautsprechereinstellungen, um die Lautstärke der angeschlossenen Lautsprecher sowie die Abstände Disc-Menü/Disc-Audio/ von der Zuhörerposition festzulegen. Führen Sie den Test durch, um die Lautstärke der Lautsprecher Disc-Untertitel auf den gleichen Wert einzustellen. Wählen Sie die gewünschte Sprache für Audiotracks (Disc-Audio), für Untertitel und für die Disc-Menüs aus. [Original] Die auf der Disc aufgezeichnete Originalsprache wird verwendet. [Andere] Drücken Sie zur Auswahl einer anderen Sprache auf ENTER (b). Geben Sie über die [Lautsprecher] Nummerntasten die entsprechende vierstellige Wählen Sie einen einzustellenden Lautsprecher Nummer ein, die Sie der Liste der Sprachcodes aus. entnehmen können (siehe Seite 62), und drücken Sie ENTER (b). [Lautstärke] Lautstärkepegel für jeden Lautsprecher [Aus] (Nur Disc-Untertitel) festlegen.
  • Page 182: Das Menü [Sperre]

    Systemeinstellungen HD AV Sync Das Menü [SPERRE] Beim Digitalfernsehen kann es zu Verzögerungen Die Einstellungen für die Option [SPERRE] betreffen zwischen Bild und Ton kommen. In diesem Fall nur die BD-ROM- und DVD-Wiedergabe. kann eine Verzögerung für den Ton festgelegt Um eine Funktion mit der Einstellung [SPERRE] werden, so dass der Ton auf das Bild ‘wartet’: Diese aufzurufen, müssen Sie den zuvor erstellten Funktion wird als HD AV Sync bezeichnet. Wählen vierstelligen Sicherheitscode eingeben. Sie mit den Tasten W/S einen Wert zwischen 0 Falls Sie noch kein Kennwort vergeben haben, und 300 mSek. für die Verzögerung aus. werden Sie nun dazu aufgefordert. Geben Sie zweimal ein vierstelliges Kennwort ein und drücken Sie ENTER (b), um das neue Kennwort zu erstellen. Kennwort Sie können ein Kennwort vergeben oder ändern. [Keine] Geben Sie zweimal ein vierstelliges Kennwort ein und drücken Sie ENTER (b), um das neue DRC (Steuerung des Kennwort zu erstellen. Dynamikbereichs) [Ändern] Mit Hilfe dieser Funktion können Sie z. B. einen Film Geben Sie das aktuelle Kennwort ein und bei geringer Lautstärke anschauen, ohne dass die drücken Sie ENTER (b). Geben Sie zweimal Klangqualität abnimmt. ein vierstelliges Kennwort ein und drücken Sie ENTER (b), um das neue Kennwort zu erstellen.
  • Page 183: Das Menü [Netzwerk]

    Systemeinstellungen DVD-Einstufung Das Menü [NETZWERK] Verhindert die Wiedergabe von nicht jugendfreien Für BD-Live und Online-Dienste müssen die DVDs. (Es sind jedoch nicht alle DVDs eingestuft.) [NETZWERK]-Einstellungen vorgenommen werden. [Einstufung 1-8] Verbindungseinst. Stufe 1 bedeutet niedrigste Wiedergabe- Nachdem Sie Ihr Heimnetzwerk zur Verbindung einschränkungen. Stufe 8 bedeutet höchste mit dem Player vorbereitet haben, muss der Player Wiedergabeeinschränkungen. für die Kabel- bzw. Wireless-Netzwerkverbindung [Aufheben] eingerichtet werden. (Siehe “Verbindung mit dem Heimnetzwerk” auf den Seiten 27-31.) Wenn Sie diese Option wählen, ist die Kindersicherung deaktiviert und die Disc wird Verbindungsstatus ohne Einschränkungen wiedergegeben. Um den Netzwerkstatus dieses Players zu überprüfen, wählen Sie die Option Blu-ray-Disc-Einstufung [Verbindungsstatus] und drücken Sie auf ENTER Festlegen einer Altersfreigabe für BD-ROM- (b), Daraufhin wird die Verbindung zum Netzwerk Discs. Geben Sie über die Nummerntasten eine und zum Internet getestet. Altersfreigabe zur Wiedergabe von BD-ROM-Discs ein. BD-LIVE-Verbindung [255] Der Internetzugriff für die BD-Live-Funktionen kann eingeschränkt werden. Alle BD-ROM-Discs wiedergeben. [Zulässig] [0-254] Der Internetzugriff wird für sämtliche BD-Live-...
  • Page 184: Das Menü [Weitere]

    Systemeinstellungen Das Menü [WEITERE] Initialisieren [Werkseinstellungen] ARC (Audio Return Channel) Der Player kann auf die ursprünglichen Die ARC-Funktion (Audio Return Channel) kann Werkseinstellungen zurückgesetzt werden. auf [Ein] oder [Aus] eingestellt werden. Mithilfe der ARC-Funktion kann ein HDMI-fähiges Fernsehgerät [BD-LIVE-Speicher löschen] einen Audio-Stream an den HDMI OUT-Ausgang BD-Live-Inhalte auf dem angeschlossenen USB- dieses Players senden. Hinweise zu dieser Funktion Gerät löschen. finden Sie auf Seite 22. Hinweis DivX® VOD Nach dem Zurücksetzen des Players auf die Werkseinstellungen über die Option ÜBER DIVX-VIDEO: DivX® ist ein von DivX, Inc. [Werkseinstellungen] müssen sämtliche entwickeltes digitales Videoformat. Dies ist ein Aktivierungen für Online-Dienste sowie die offizielles DivX Certified- oder DivX Ultra Certified- Netzwerkeinstellungen erneut vorgenommen Gerät zur Wiedergabe von DivX-Video. Weitere werden. Information und Software-Tools zur Konvertierung von Dateien in DivX-Videos finden Sie unter divx. com. Software-Information ÜBER DIVX VIDEO-ON-DEMAND: Dieses DivX Aktuelle Software-Version anzeigen.
  • Page 185: Klangeffekte

    Systemeinstellungen Klangeffekte Drücken Sie mehrmals die Taste SOUND am Gerät, bis die gewünschte Klangart in der Anzeige oder auf dem Fernsehbildschirm erscheint. Die angezeigten Einträge für den Equalizer können je nach Klangquellen und Effekten variieren. [Mode 1]: Für einen satten Klang durch den Anschluss kleiner Lautsprecher (S-BD303). [Mode 2]: Für einen satten Klang durch den Anschluss großer Lautsprecher (S-BD707T). [Bypass]: Softwaretitel mit Mehrkanal-Surround- Audiosignalen werden so wiedergegeben, wie sie aufgenommen wurden. [Bass-Blast]: Bässe der linken und rechten Lautsprecher und des Subwoofers verstärken. [PL ll Film]: Pro Logic ll Spielfi lm-Modus zur Dekodierung des Eingangssignals zur Ausgabe von fünf Ausgangskanälen voller Bandbreite über ein Zweikanal-System. Diese Einstellung eignet sich ideal zum Anschauen von synchronisierten Videos oder alten Spielfi lmen. Diese Funktion ist nur im 2-Kanal-Modus verfügbar. [PL ll Musik]: Pro Logic ll Musik-Modus zur Dekodierung des Eingangssignals zur Ausgabe von fünf Ausgangskanälen voller Bandbreite über ein Zweikanal-System. Diese Einstellung eignet sich ideal zum Anhören normaler Stereo-Quellen wie CDs. Diese Funktion ist nur im 2-Kanal-Modus verfügbar. [Sprache]: In diesem Modus wird Sprache klarer und mit verbesserter Qualität wiedergegeben. [Spiel]: Virtueller Klang für Videospiele. [Nacht]: Diese Funktion ist nützlich, um Spielfi lme bei Nacht mit geringer Lautstärke anzuschauen.
  • Page 186: Normale Wiedergabe

    Bedienung Hinweis Normale Wiedergabe y Die in dieser Anleitung beschriebenen Wiedergabefunktionen sind nicht für alle Dateien und Medien verfügbar. Bestimmte Bedienungen im Menü Funktionen sind aus verschiedenen Gründen nicht immer möglich. [Hauptmenü] y Abhängig von den Titeln auf einer BD-ROM Beim Drücken der Taste HOME MENU (n) wird Disc ist zur korrekten Wiedergabe u. U. ein das Hauptmenü eingeblendet. Wählen Sie mit USB-Anschluss erforderlich. den Tasten W/S/A/D einen Eintrag aus und y Nicht finalisierte DVD-VR-Discs werden auf drücken Sie ENTER (b). diesem Player u. U. nicht wiedergegeben. y Bestimmte DVD-VR-Discs enthalten CPRM- Daten des DVD RECORDER. Solche Discs können auf diesem Gerät nicht abgespielt werden. Wiedergabe einer Datei auf einer Disc/einem USB-Gerät a [Spielfilm] - Wiedergabe von Videos. Mit diesem Player können auf einer Disc oder einem USB-Gerät gespeicherte Film-, Musik- und b [Musik] - Wiedergabe von Musik.
  • Page 187: Wiedergabe Von Blu-Ray 3D-Discs

    Bedienung Wiedergabe von Blu-ray BD-Live™-Discs anschauen 3D-Discs BD-ROM-Inhalte unterstützen zudem BD-Live- Inhalte (BD-ROM Version 2 Profil 2), mit deren Mit diesem Player können Blu-ray 3D-Discs Hilfe über eine Netzwerkfunktion weitere wiedergegeben werden, auf denen ein separates Funktionen genutzt werden können, wie z. B. das Bild für jeweils das linke und das rechte Auge Herunterladen neuer Filmvorschauen, indem eine aufgenommen wurden. Internetverbindung hergestellt wird. 1. Überprüfen Sie die Netzwerkverbindung und Vorbereitung -einstellungen (Seiten 27-31). Zur Wiedergabe von Blu-ray 3D-Titeln im 2. Schließen Sie das USB-Speichergerät an den räumlichen 3D-Modus müssen folgende Voraussetzungen erfüllt werden: USB-Anschluss auf dem Bedienungsfeld an. y y y Ü berprüfen Sie, ob Ihr Fernsehgerät 3D-fähig Zum Herunterladen von Bonus-Material ist ein ist und einen HDMI (3D) Eingang besitzt. USB-Speichergerät erforderlich. y S etzen Sie zum Anschauen wirklichkeitsgetreuer 3. Drücken Sie die Taste HOME MENU (n) und 3D-Filme eine 3D-Brille auf.
  • Page 188: Wiedergabe Einer Datei Auf Einem Netzwerk-Server

    Bedienung Wiedergabe einer Datei auf Geben Sie die Benutzerkennung und das Kennwort für das Netzwerk ein. einem Netzwerk-Server Je nach Konfiguration des PCs müssen für den Zugriff auf einen freigegebenen Ordner u. U. die Benutzerkennung und das Kennwort für den Mit diesem Player können Film-, Musik- und Netzwerkzugriff angegeben werden. Fotodateien auf einem PC oder DLNA-Server über das Heimnetzwerk wiedergegeben werden. 1. Falls eine Benutzerkennung und das Kennwort für den Netzwerkzugriff eingegeben werden 1. Überprüfen Sie die Netzwerkverbindung und müssen, wird das Tastaturmenü automatisch -einstellungen (Seiten 27-31). eingeblendet. 2. Drücken Sie die Taste HOME MENU (n). 2. Wählen Sie mit den Tasten W/S/A/D das 3. Wählen Sie mit den Tasten A/D die Option erste Zeichen auf der Tastatur aus und drücken [Spielfilm], [Foto] oder [Musik] und drücken Sie Sie auf ENTER (b).
  • Page 189: Grundfunktionen Für Video- Und Audio-Inhalte

    Bedienung Grundfunktionen für Video- Grundfunktionen für Foto- und Audio-Inhalte Inhalte Wiedergabe anhalten Diashow anzeigen Drücken Sie während der Wiedergabe auf Z (STOP). Drücken Sie zum Starten der Diashow auf d (PLAY). Wiedergabe unterbrechen Diashow beenden Drücken Sie während der Wiedergabe auf M Drücken Sie während der Diashow auf Z (STOP). (PAUSE/STEP). Diashow unterbrechen Drücken Sie zum Fortsetzen der Wiedergabe auf d (PLAY). Drücken Sie während der Diashow auf M (PAUSE/ STEP). Einzelbildwiedergabe (Video) Drücken Sie zum Fortsetzen der Diashow auf Drücken Sie während der Wiedergabe auf d (PLAY). M (PAUSE/STEP). Zum vorherigen/nächsten Foto Drücken Sie zur Einzelbildwiedergabe mehrmals auf M (PAUSE/STEP). springen Drücken Sie während der Vollbildanzeige eines Suchlauf vor oder zurück...
  • Page 190: Wiedergabe Fortsetzen

    Bedienung Wiedergabe fortsetzen eroyt, Bei bestimmten Discs merkt sich das Gerät den Punkt, an dem die Taste Z (STOP) gedrückt wurde. Sobald das Symbol “MZ (Pause Stop)” kurz auf dem Bildschirm erscheint, drücken Sie auf d (PLAY), um die Wiedergabe (ab der aktuellen Szene) fortzusetzen. Bei zweimaligem Drücken auf Z (STOP) bzw. beim Auswerfen der Disc erscheint das Symbol “Z (Complete Stop)” auf dem Bildschirm. Das Gerät löscht daraufhin sämtliche Anhaltepunkte. Hinweis y Der Fortsetzungspunkt wird beim Betätigen einer Taste u. U. gelöscht (z. B. 1 (STANDBY/ ON) oder B (OPEN/CLOSE)). y Bei BD-Video-Discs einschließlich BD-J ist die Funktion Wiedergabe fortsetzen nicht möglich. y Beim Drücken auf Z (STOP) während der Wiedergabe eines interaktiven Titels einer BD-ROM wird die Wiedergabe angehalten.
  • Page 191: Erweiterte Wiedergabe

    Bedienung Erweiterte Wiedergabe Abschnittswiederholung erot Es ist möglich, einen markierten Abschnitt Wiederholte Wiedergabe wiederholt wiederzugeben. erotu 1. Drücken Sie während der Wiedergabe die Taste REPEAT (h), um den Startpunkt [A-] des zu Drücken Sie während der Wiedergabe mehrmals wiederholenden Abschnitts festzulegen. die Taste REPEAT (h), um den gewünschten 2. Drücken Sie am Ende des Abschnitts auf ENTER Wiederholungsmodus einzustellen. (b). Der gewählte Abschnitt wird daraufhin Blu-ray-Disc/DVD fortlaufend wiederholt. jA- – Den ausgewählten Abschnitt wiederholt 3. Drücken Sie zur normalen Wiedergabe wiedergeben. mehrmals die Taste REPEAT (h) und wählen jKapitel – Das aktuelle Kapitel mehrmals Sie die Option [Aus]. wiedergeben. Hinweis jTitel – Den aktuellen Titel mehrmals y Ein Abschnitt muss mindestens drei wiedergeben. Sekunden lang sein. y Diese Funktion ist bei einigen Discs oder Drücken Sie zur normalen Wiedergabe mehrmals Titeln nicht verfügbar.
  • Page 192: Markensuche

    Bedienung Markensuche Bedienungen im Suchmenü eroy eroy Die Wiedergabe kann von bis zu neun Über das Suchmenü kann eine gewünschte Stelle gespeicherten Punkten erfolgen. zum Beginn der Wiedergabe aufgerufen werden. Eine Marke hinzufügen Einen Wiedergabepunkt suchen 1. Drücken Sie während der Wiedergabe an 1. Drücken Sie während der Wiedergabe die Taste der gewünschten Stelle die Taste MARKER. SEARCH, um das Suchmenü aufzurufen. Daraufhin wird kurz das Markierungssymbol auf dem Bildschirm eingeblendet. 2. Wiederholen Sie Schritt 1, um bis zu neun Markierungen festzulegen. 2. Drücken Sie die Taste A/D, um die Wiedergabe 15 Sekunden vor oder zurück zu Aufrufen einer markierten Szene springen. Um eine bestimmte Stelle zu überspringen, 1. Drücken Sie die Taste SEARCH, um das halten Sie die Taste A/D gedrückt. Suchmenü auf dem Bildschirm aufzurufen.
  • Page 193: Auswahl Der Untertiteldatei

    Bedienung Auswahl der Untertiteldatei Merken der letzten Szene Falls Filmdatei und Untertiteldatei unterschiedliche Dieses Gerät merkt sich die zuletzt gespielte Szene Dateinamen besitzen, muss die Untertiteldatei der letzten Disc. Die letzte Szene wird im Speicher vor der Wiedergabe des Films im Menü [Spielfilm] aufbewahrt, auch wenn die Disc aus dem Player ausgewählt werden. herausgenommen oder das Gerät ausgeschaltet wird. Beim erneuten Einlegen dieser Disc wird die 1. Wechseln Sie mit den Tasten W/S/A/D im gespeicherte Szene automatisch wiedergegeben. Menü [Spielfilm] eine Untertiteldatei zur Anzeige. Hinweis 2. Drücken Sie auf ENTER (b). y Die Funktion Letzte Szene merken wird beim Einlegen einer neuen Disc zurückgesetzt. y Diese Funktion ist bei bestimmten Discs nicht möglich. y Die Funktion Letzte Szene merken ist bei BD-ROM mit BD-J nicht möglich. y Die Einstellungen einer Disc werden nicht gespeichert, wenn das Gerät vor der Wiedergabe der Disc ausgeschaltet wird. Drücken Sie zur Auswahl einer Untertiteldatei nochmals auf ENTER (b). Die gewählte Untertiteldatei wird während der Wiedergabe der Filmdatei angezeigt.
  • Page 194: Funktionen Während Der Fotoanzeige

    Bedienung Funktionen während der Während der Diashow Musik Fotoanzeige hören Während der Fotoanzeige im Vollbild stehen Ihnen Während der Fotoanzeige können Musiktitel verschiedene Funktionen zur Verfügung. wiedergegeben werden. 1. Drücken Sie während der Vollbildanzeige 1. Drücken Sie während der Vollbildanzeige eines Fotos auf DISPLAY (m), um das eines Fotos auf DISPLAY (m), um das Einstellungsmenü aufzurufen. Einstellungsmenü aufzurufen. 2. Wählen Sie mit den Tasten W/S eine 2. Wählen Sie mit den Tasten W/S den Eintrag Einstellung aus. [Musikauswahl] und drücken Sie ENTER (b), um das Menü [Musikauswahl] aufzurufen. 3. Wählen Sie mit den Tasten W/S ein Gerät aus und drücken Sie ENTER (b). Das auswählbare Gerät ist vom Speicherort der Fotodatei zur Vollbildanzeige abhängig. Speicherort des Verfügbares Gerät Fotos Disc, USB Disc, USB Freigegebener Ordner Freigegebener Ordner...
  • Page 195: Bildschirmmenü

    Bedienung Bildschirmmenü 2. Wählen Sie mit den Tasten W/S eine Einstellung aus. 3. Stellen Sie mit den Tasten A/D den Es können verschiedene Informationen und gewünschten Einstellungswert ein. Einstellungen zum Inhalt angezeigt und bearbeitet 4. Drücken Sie auf RETURN(x), um das werden. Bildschirmmenü zu verlassen. Hinweis Anzeige der Informationen y Wird einige Sekunden lang keine Taste zum Inhalt auf dem Bildschirm gedrückt, wird die Bildschirmanzeige ausgeblendet. eroy y Bei bestimmten Discs können Titelnummern 1. Drücken Sie während der Wiedergabe nicht ausgewählt werden. die Taste DISPLAY (m), um verschiedene y Die verfügbaren Einträge können je nach Wiedergabeinformationen anzuzeigen. Disc oder Titel variieren. y Während der Wiedergabe einer interaktiven Blu-ray-Disc werden auf dem Bildschirm möglicherweise verschiedene Einstellungen angezeigt, die jedoch nicht geändert...
  • Page 196: Wiedergabe Ab Einer Gewählten Zeitposition

    Bedienung Wiedergabe ab einer Auswahl der Untertitelsprache gewählten Zeitposition eroy eroy 1. Drücken Sie während der Wiedergabe die Taste DISPLAY (m), um das Bildschirmmenü 1. Drücken Sie während der Wiedergabe auf einzublenden. DISPLAY (m). Im Zeit-Suchlauf-Feld wird die 2. Wählen Sie mit den Tasten W/S die Option verstrichene Spielzeit angezeigt. [Untertitel]. 2. Wechseln Sie in das [Zeit]-Feld und geben Sie 3. Wählen Sie mit den Tasten A/D die die gewünschte Startzeit von links nach rechts gewünschte Untertitelsprache. in Stunden, Minuten und Sekunden ein. 4. Drücken Sie auf RETURN(x) um das Um beispielsweise eine Szene an der Wiedergabezeit Bildschirmmenü zu verlassen. 2 Stunden, 10 Minuten und 20 Sekunden zu suchen, geben Sie den Wert “21020” ein. Hinweis Drücken Sie die Taste A/D, um während der Bei bestimmten Discs können die Untertitel Wiedergabe 60 Sekunden vor oder zurück zu nur über das Disc-Menü eingestellt werden. springen.
  • Page 197: Ändern Des Tv-Bildformats

    Bedienung Ändern des TV-Bildformats Anzeigemodus einstellen eroy eroy Das TV-Bildformat kann während der Wiedergabe Der [Bildmodus] kann während der Wiedergabe geändert werden. geändert werden. 1. Drücken Sie während der Wiedergabe die 1. Drücken Sie während der Wiedergabe die Taste DISPLAY (m), um das Bildschirmmenü Taste DISPLAY (m), um das Bildschirmmenü einzublenden. einzublenden. 2. Wählen Sie mit den Tasten W/S die Option 2. Wählen Sie mit den Tasten W/S die Option [Bildformat]. [Bildmodus]. 3. Legen Sie mit den Tasten A/D das 3. Legen Sie mit den Tasten A/D das gewünschte Bildformat fest. gewünschte Bildformat fest. 4. Drücken Sie auf RETURN (x) um das 4. Drücken Sie auf RETURN (x) um das Bildschirmmenü zu verlassen. Bildschirmmenü zu verlassen. Hinweis Einstellen der Option Beim Ändern der Einstellung [Bildformat] [Benutzereinst.] im Bildschirmmenü wird die Einstellung...
  • Page 198: Audio-Cd Kopieren

    Bedienung Audio-CD kopieren Um einen neuen Ordner zu erstellen, wählen Sie mit den Tasten W/S/A/D den Eintrag [Neuer Ordner] und drücken Sie ENTER (b). Auf einem USB-Speichergerät können einer oder Geben Sie über die virtuelle Tastatur einen alle Titel einer Audio-CD aufgenommen werden. Ordnernamen ein, markieren Sie die Option 1. Schließen Sie das USB-Speichergerät an den [OK] und drücken Sie ENTER (b). USB-Anschluss auf dem Bedienungsfeld an. 8. Markieren Sie mit den Tasten W/S/A/D die 2. Drücken Sie die Taste B (OPEN/CLOSE) und Option [OK] und drücken Sie ENTER (b), um die legen Sie eine Audio-CD in das Disc-Fach. Audio-CD zu kopieren. Drücken Sie auf B (OPEN/CLOSE), um das Um den Kopiervorgang einer Audio-CD Disc-Fach zu schließen. Die Wiedergabe wird abzubrechen, markieren Sie die Option automatisch gestartet. [Abbrechen] und drücken Sie ENTER (b). 3. Drücken Sie die Taste DISPLAY (m), um das 9. Bei Abschluss des Kopiervorgangs der Audio-CD Einstellungsmenü aufzurufen. wird eine Mitteilung eingeblendet. Drücken Sie Oder auf ENTER (b), um die im Zielordner erstellte Drücken Sie die Taste X USB REC auf der Audiodatei anzuzeigen. Fernbedienung Hinweis Es können alle Musiktitel einer Audio-CD y In der folgenden Tabelle finden Sie die aufgenommen werden.
  • Page 199: Wiedergabe Von Einem Ipod

    Bedienung > Vorsicht Die unerlaubte Vervielfältigung kopiergeschützter Inhalte, einschließlich Computerprogramme, Dateien, Sendungen und Tonaufnahmen, stellt eine Verletzung des Urheberrechts dar und wird strafrechtlich verfolgt. Dieses Gerät sollte nicht für solche Zwecke eingesetzt werden. Zeigen Sie Verantwortung Beachten Sie das Urheberrecht Wiedergabe von einem iPod 2. Wählen Sie mit den Tasten W/S/A/D eine Datei aus und drücken Sie zur Wiedergabe auf Sie können die Musik auf Ihrem iPod ENTER (b). wiedergeben. Weitere Hinweise finden Sie in der Bedienungsanleitung des iPod. iPod-Inhalte auf dem Vorbereitung Bildschirm anzeigen y Videos und Fotos eines iPod auf dem Bildschirm 1. Schließen Sie den iPod fest an. anzeigen. 2. Drücken Sie die Taste HOME MENU (n). - Der Videoanschluss sollte über die VIDEO OUT-Buchse auf der Rückseite dieses 3. Wählen Sie mit den Tasten A/D die Option...
  • Page 200: Bedienung Des Ipod Im Ipod-Modus

    Titel vor oder zurück Gerät benötigen Sie u. U. eine zusätzliche überspringen. Steuerung. (z. B. “Slide to Unlock”) Auswahl eines gewünschten y Bei Verwendung eines Wiederholungsmodus: Titel Anwendungsprogramms, bei einem Anruf REPEAT (;), Alle (k), Aus (Keine oder beim Senden und Empfangen von Anzeige). SMS-Nachrichten usw. bei einem iPod touch oder iPhone, trennen Sie zuvor den iPod Hinweis vom iPod Dock dieses Gerätes. Dieses System ist mit dem Ton und dem y Dieses Gerät wurde für iPods/iPhones mit Bild eines iPod (4. Generation), iPod nano, der auf der Pioneer-Webseite angegebenen iPod classic, iPod mini, iPod touch und Software-Version entwickelt und getestet. iPhone kompatibel (iPod shuffle wird nicht unterstützt). y Die Installation einer anderen, auf der Pioneer-Webseite nicht angegebenen Software-Version für ein iPod/iPhone kann zu Inkompatibilitäten mit diesem Gerät führen. y Die Bildqualität ist abhängig von den Videoquellen des iPod. y Falls Sie ein Problem mit Ihrem iPod haben, besuchen Sie die Webseite www.apple. com/de/support/iPod.
  • Page 201: Radiobetrieb

    Bedienung Radiobetrieb Einen gespeicherten Sender löschen Die Antennen müssen angeschlossen sein. 1. Wählen Sie mit den Tasten PRESET (W/S) eine (Siehe Seite 24.) Speicherplatznummer zum Löschen aus. 2. Drücken Sie die Taste CLEAR, so dass die Radio hören Speicherplatznummer im Anzeigefenster blinkt. 1. Drücken Sie die Taste INPUT/TUNER, bis 3. Drücken Sie nochmals die Taste CLEAR, um den die Anzeige TUNER (FM) im Anzeigefenster gewählten Sender zu löschen. erscheint. Der zuletzt empfangene Sender wird eingestellt. Alle gespeicherten Sender 2. Halten Sie die Taste TUNE (-/+) ca. löschen zwei Sekunden lang gedrückt, bis die Frequenzanzeige beginnt zu laufen, und lassen Halten Sie die Taste CLEAR zwei Sekunden lang Sie die Taste dann los. Die Sendersuche stoppt, gedrückt. Daraufhin erscheint die Meldung “ALLES sobald ein Radiosender empfangen wird. Oder LÖSCHEN”. Drücken Sie nochmals auf CLEAR. drücken Sie mehrmals die Tasten TUNE (-/+). Daraufhin werden alle gespeicherten Sender 3. Stellen Sie über den Lautstärkeregler VOLUME auf gelöscht.
  • Page 202: Verwendung Der Online-Funktionen

    2. Drücken Sie die Taste HOME MENU (n). 3. Wählen Sie mit den Tasten A/D den Eintrag [Online] und drücken Sie ENTER (b). 4. Wählen Sie mit den Tasten A/D einen Online- Dienst aus und drücken Sie auf ENTER (b). Hinweis y Weitere Informationen zu den einzelnen Diensten erhalten Sie bei Ihrem Anbieter oder auf den Supportseiten der Dienste. y Änderungen an den Inhalten der Online- Dienste sowie an entsprechenden Informationen, einschließlich der Benutzeroberfläche, vorbehalten. Aktuelle Hinweise zu den einzelnen Diensten finden Sie auf der Website. y Durch elektromagnetische Störungen verschiedener Haushaltsgeräte kann es zu einer verminderten Übertragungsgeschwindigkeit während der Nutzung der Online-Funktionen über eine Wireless-Netzwerkverbindung kommen. y Bitte beachten Sie, dass bei Bereitstellung von Online-Diensten mit Ihrem Benutzernamen, Kennwort oder anderen Anmeldeinformationen oder persönlichen Informationen die allgemeinen datenschutzrechtlichen und rechtlichen Bestimmungen um die vorliegenden Datenschutzrichtlinien ergänzt werden, und die genannten Informationen von Pioneer gespeichert werden. Weitere Hinweise finden Sie in den Datenschutzrichtlinien von Pioneer auf der Website.
  • Page 203: Störungsbehebung

    Störungsbehebung Störungsbehebung Allgemein Störung Ursache & Lösung Das Gerät lässt sich nicht y Schließen Sie das Netzkabel an eine Steckdose an. einschalten. Das Gerät startet die y Eine spielbare Disc einlegen. (Disc-Typ, Farbnorm und Ländercode Wiedergabe nicht. überprüfen.) y Disc mit der Wiedergabeseite nach unten einlegen. y Disc richtig in die Mulde im Disc-Fach einlegen. y Die Disc reinigen. y Einstufung aufheben oder Freigabestufe ändern. Der Kamerawinkel kann nicht y Die wiedergegebene DVD Video-Disc enthält keine weiteren geändert werden. Kamerawinkel. Musik-/Foto-/Filmdateien y Die Dateien wurden in einem vom Gerät nicht unterstützten Format lassen sich nicht wiedergeben. erstellt. y Der Codec der Filmdatei wird nicht unterstützt. Die Fernbedienung y Die Fernbedienung ist nicht auf den Fernbedienungssensor des Gerätes gerichtet. y Die Fernbedienung ist zu weit vom Gerät entfernt.
  • Page 204: Netzwerk

    Störungsbehebung Netzwerk Störung Ursache & Lösung Die BD-Live-Funktion ist nicht y Auf dem angeschlossenen USB-Speichergerät ist nicht genügend möglich. Speicher verfügbar. Schließen Sie ein USB-Speichergerät mit mindestens 1 GB freiem Speicher an. y Stellen Sie sicher, dass das Gerät richtig mit dem lokalen Netzwerk verbunden und auf das Internet zugreifen kann (siehe Seiten 27-31). y Die Breitbandgeschwindigkeit ist zur Nutzung von BD-Live- Funktionen nicht schnell genug. Wenden Sie sich an Ihren Internet- Dienstanbieter (ISP) und lassen Sie die Breitbandgeschwindigkeit erhöhen. y Die Option [BD-LIVE-Verbindung] wurde im [Setup]-Menü auf [Nicht zulässig] eingestellt. Stellen Sie die Option auf [Zulässig] ein. Die Wiedergabe von y Die Breitbandgeschwindigkeit ist zur Anzeige von Stream-Videos Streaming-Videodiensten (wie nicht schnell genug. Wenden Sie sich an Ihren Internet-Dienstanbieter z. B. YouTube™) wird häufig (ISP) und lassen Sie die Breitbandgeschwindigkeit erhöhen. unterbrochen oder “gepuffert”. Freigegebene Ordner oder y Auf dem Medien-Server wird eine Firewall oder Antiviren-Software Dateien auf dem PC oder ausgeführt. Deaktivieren Sie die Firewall oder Antiviren-Software auf Medien-Server werden in der dem PC bzw. Medien-Server. Geräteliste nicht angezeigt. y Der Player ist nicht mit dem lokalen Netzwerk des PCs bzw. Medien- Servers verbunden.
  • Page 205: Bild

    Falls Ihr Fernsehgerät die am Player eingestellte Auflösung nicht unterstützt, wählen Sie eine vom Fernsehgerät unterstützte Auflösung. y An der HDMI OUT-Buchse des Players ist ein DVI-Gerät angeschlossen, dass den Kopierschutz nicht unterstützt. Verzerrtes Bild. y Die wiedergegebene Disc wurde in einer Farbnorm aufgenommen, die das Fernsehgerät nicht unterstützt. y Wählen Sie eine vom Fernseher unterstützte Auflösung. Die Wiedergabe von y Schließen Sie den Player über ein HDMI-Kabel (High Speed HDMI™- 3D-Ansichten ist bei Blu-ray Kabel mit Ethernet, Typ A) am Fernsehgerät an. 3D-Discs nicht möglich. y Ihr Fernsehgerät unterstützt möglicherweise nicht das “HDMI 3D Mandatory Format”. y Die Option [3D-Modus] im Menü [Setup] ist auf [Aus] eingestellt. Stellen Sie diese Option auf [Ein]. Störung Ursache & Lösung Kein oder verzerrter Ton. y Das Gerät führt gerade einen Suchlauf oder eine Wiedergabe in Zeitlupe durch oder befindet sich im Pause-Modus. y Die Lautstärke ist zu gering. y Überprüfen Sie die Lautsprecheranschlüsse. (Seite 16) Updates Informationen zu diesem Produkt erhalten Sie auf der Webseite von Pioneer. Auf dieser Webseite finden Sie Hinweise zur Aktualisierung und Wartung dieses Players.
  • Page 206: Anhang

    Ihres Fernsehgerätes Fernsehgerätes über einstellen die mitgelieferte Sie können Ihren vorhandenen Fernseher über die Fernbedienung mitgelieferte Fernbedienung bedienen. Falls Ihr Fernseher in der folgenden Tabelle aufgeführt wird, stellen Sie die jeweilige Der Fernseher wird mit folgenden Tasten bedient. Herstellerkennung ein. 1. Halten Sie die 1 (TV POWER) gedrückt und geben Sie den Herstellercode Ihres Fernsehers über die Nummerntasten ein (siehe folgende Tabelle). TV-Bedienungstasten Hersteller Codenummer Pioneer 1 (Voreinstellung) Sony 2, 3 Tastendruck Funktion Panasonic 4, 5 Fernseher ein-/ausschalten. 1 (TV POWER) Samsung 6, 7 Eingangsquelle des 8, 9 Fernsehers zwischen TV INPUT und anderen Quellen 2. Lassen Sie die Taste 1 (TV POWER) wieder los, umschalten.
  • Page 207: Liste Der Ländercodes

    Anhang Liste der Ländercodes Wählen Sie einen Ländercode aus der Liste. Land Code Land Code Land Code Land Code Afghanistan Fiji Monaco Singapur Mongolei Slowakische Argentinien Finnland Republik Australien Frankreich Marokko Slowenien Österreich Deutschland Nepal Südafrika Belgien Großbritannien Niederlande Südkorea Bhutan Griechenland Niederländische Antillen Spanien Bolivien Grönland Neu Seeland Sri Lanka...
  • Page 208: Liste Der Sprachcodes

    Anhang Liste der Sprachcodes Verwenden Sie diese Liste zur Einstellung der gewünschten Sprache für die folgenden Voreinstellungen: [Disc-Audio], [Disc-Untertitel] und [Disc-Menü]. Sprache Code Sprache Code Sprache Code Sprache Code Afar 6565 Französisch 7082 Litauisch 7684 Sindhi 8368 Afrikaans 6570 Friesisch 7089 Mazedonisch 7775 Singalesisch 8373 Galizisch 7176 Madagassisch 7771 Slowakisch 8375 Albanisch 8381 Malaiisch 7783 Slowenisch 8376 Amharisch...
  • Page 209: Marken Und Lizenzen

    Anhang Marken und Lizenzen Hergestellt unter folgenden U.S.-Patenten: 5,451,942; 5,956,674; 5,974,380; 5,978,762; Blu-ray-Disc™, Blu-ray™, Blu-ray 3D™, BD-Live™, 6,226,616; 6,487,535; 7,392,195; 7,272,567; BONUSVIEW™ sowie und die Logos und Marken 7,333,929; 7,212,872 und weitere U.S.- und sind Markenzeichen der Blu-ray Disc Association weltweite Patente ausgestellt und angemeldet. DTS und das Symbol sind eingetragene Markenzeichen, DTS-HD, DTS-HD Master Audio l Essential und die DTS-Logos sind Markenzeichen von DTS, Inc. Dieses Produkt beinhaltet Software. ist ein Markenzeichen von DVD Format/ © DTS, Inc. Alle Rechte vorbehalten. Logo Licensing Corporation. DLNA™, das DLNA Logo und DLNA CERTIFIED™ sind Markenzeichen, Dienstleistungszeichen oder Gütezeichen von Digital Living Network Alliance. Oracle und Java sind eingetragene Markenzeichen von Oracle und/oder Tochtergesellschaften. Andere Markennamen sind möglicherweise Markenzeichen der jeweiligen Eigentümer. Das Logo Wi-Fi CERTIFIED ist ein Gütezeichen der Wi-Fi Alliance. HDMI, das HDMI-Logo und High-Definition Multimedia Interface sind Markenzeichen Die Wi-Fi Protected Setup Mark ist ein oder eingetragene Markenzeichen von HDMI Markenzeichen der Wi-Fi Alliance. Licensing, LLC in den Vereinigten Staaten und anderen Ländern. “x.v.Colour”, und sind Markenzeichen von Sony Corporation.
  • Page 210 Anhang Die Hinweise “Made for iPod” und “Made for iPhone” weisen darauf hin, dass ein elektronisches Gerät für den Anschluss eines iPod bzw. eines iPhone entwickelt wurde und von Hersteller als ein Gerät zertifiziert wurde, das den Apple- Leistungsstandards entspricht. Apple übernimmt keine Haftung für den Betrieb dieses Gerät oder dessen Kompatibilität mit Sicherheitsstandards und Richtlinien. Bitte beachten Sie, dass die Wireless-Übertragung bei Verwendung eines iPod oder iPhone beeinträchtigt werden kann. iPhone, iPod, iPod classic, iPod nano und iPod touch sind Markenzeichen von Apple Inc., eingetragen in den Vereinigten Staaten und anderen Ländern. YouTube™ ist ein Markenzeichen von Google Inc. Picasa™-Webalbum ist eine Marke von Google Inc. Dieses Produkt verfügt über eine Technologie der Microsoft Corporation und darf nicht ohne Genehmigung von Microsoft Licensing, Inc. genutzt oder vertrieben werden.
  • Page 211: Video-Ausgabeauflösung

    Anhang Video-Ausgabeauflösung Bei der Wiedergabe von Datenträgern ohne Kopierschutz Videoausgang COMPONENT VIDEO OUT HDMI OUT Auflösung mit HDMI Anschluss ohne HDMI Anschluss 576i 576p 576i 576p 576p 576p 720p 720p 720p 1080i 1080i 1080i 1080p/24 Hz 1080p / 24 Hz 576i 1080i 1080p / 50 Hz 1080p / 50 Hz 576i 1080i Bei der Wiedergabe kopiergeschützter Datenträger...
  • Page 212: Technische Daten

    Anhang Technische Daten Allgemein Stromversorgung AC 220-240 V, 50/60 Hz Leistungsaufnahme 150 W (Im Bereitschaftsbetrieb: unter 0,3 W) Abmessungen (B x H x T) Ca. 430 x 64 x 304 mm Gesamtgewicht (ca.) 3,4 kg Betriebstemperatur 5°C bis 35°C Luftfeuchtigkeit bei Betrieb 5% bis 85% Eingänge/Ausgänge VIDEO OUT 1,0 V (p-p), 75 Ω, negative Sync., Cinch-Buchse x 1 (Y) 1,0 V (p-p), 75 Ω, negative Sync., Cinch-Buchse x 1 COMPONENT VIDEO OUT (Pb)/(Pr) 0,7 V (p-p), 75 Ω, Cinch-Buchse x 2 HDMI IN/OUT (video/audio) 19-polig (Typ A, HDMI™-Stecker) ANALOG AUDIO IN 2,0 Vrms (1 kHz, 0 dB), 600 Ω, Cinch-Buchse (L, R) x 1 DIGITAL IN (OPTICAL) 3 V (p-p), Optische Buchse x 1 PORTABLE IN 0,5 Vrms (3,5 mm Stereo-Buchse) Tuner UKW-Empfangsbereich 87,5 - 108,0 MHz Verstärker Ausgangsleistung (RMS) Gesamt 1100 W Vorn 180 W × 2 (1 kHz , 4 Ω, THD 10 %) Mitte 180 W (1 kHz , 4 Ω, THD 10%) Hinten 180 W × 2 (1 kHz , 4 Ω, THD 10 %)
  • Page 213 Halbleiterlaser Wellenlänge 405 nm / 650 nm Fernsehnorm Standard PAL/NTSC Farb-Fernsehnorm Frequenzbereich 20 Hz bis 18 kHz (48 kHz-, 96 kHz-, 192 kHz-Sampling) Klirrfaktor Weniger als 0,05 % Dynamikbereich Über 80 dB LAN-Anschluss Ethernet-Buchse x 1, 10BASE-T/100BASE-TX Integrierter IEEE 802.11n (5 GHz- und 2,4 GHz-Frequenzband) Wireless LAN (interne Antenne) Wireless-Netzwerkzugriff, kompatibel mit 802.11a/b/g Wi-Fi- Netzwerken. Stromversorgung über Bus (USB) DC 5 V 0 500 mA Lautsprecher BCS-717 S-BD707T y Vordere/Surround-Lautsprecher (Links/Rechts) Gesamtabmessungen 2 Weg 260 x 1097 x 260 mm (B x H x T) Nennimpedanz 4 Ω Gesamtgewicht 3,8 kg y Mittel-Lautsprecher Gesamtabmessungen 1 Weg 300 x 87 x 65 mm (B x H x T) Nennimpedanz 4 Ω Gesamtgewicht...
  • Page 214 Anhang Lautsprecher BCS-313 S-BD303 y Vordere/Surround-Lautsprecher (Links/Rechts) Gesamtabmessungen 1 Weg 96 x 96 x 85 mm (B x H x T) Nennimpedanz 4 Ω Gesamtgewicht 0,4 kg y Mittel-Lautsprecher Gesamtabmessungen 1 Weg 300 x 87 x 65 mm (B x H x T) Nennimpedanz 4 Ω Gesamtgewicht 0,6 kg y Subwoofer Gesamtabmessungen 1 Weg 130,5 x 420 x 375 mm (B x H x T) Nennimpedanz 3 Ω Gesamtgewicht 4,4 kg y Änderungen der Ausführung und der technischen Daten ohne vorherige Ankündigung vorbehalten.
  • Page 215: Wartung

    Anhang Wartung Hinweise zu Discs Handhabung von Discs Handhabung des Gerätes Berühren Sie die bespielte Seite der Disc nicht. Fassen Sie die Disc an den Rändern an, um nicht die Oberfläche mit den Fingern zu berühren. Bringen Transport und Versand des Gerätes Sie auf keiner der beiden Seiten der Disc Papier Bewahren Sie den Original-Versandkarton und oder Aufkleber an. das Verpackungsmaterial auf. Wenn Sie das Gerät Aufbewahrung von Discs einsenden müssen, verpacken Sie es wieder so, wie es ab Werk geliefert wurde, um es optimal zu Legen Sie die Disc nach der Wiedergabe wieder schützen. in die zugehörige Hülle. Setzen Sie die Disc keiner Außenseiten sauber halten direkten Sonneneinstrahlung oder Wärmequellen aus und lassen Sie sie nie in einem Auto liegen, das y Verwenden Sie keine flüchtigen Flüssigkeiten direkt in der Sonne geparkt wird. wie Insektensprays in der Nähe des Gerätes. y Durch zu starken Druck beim Abwischen können Reinigung von Discs die Oberflächen beschädigt werden.
  • Page 216: Wichtige Informationen Zu Netzwerkdiensten

    Informationen zu Lizenz Netzwerkdiensten Die Lizenzen für die Open Source Software, die in diesem Player verwendet wird, sind am Ende dieses Die Bereitstellung oder Zurverfügungstellung Dokuments aufgeführt. sämtlicher Informationen, Daten, Dokumente, Kommunikation, Downloads, Dateien, Texte, Bilder, Fotos, Grafiken, Videos, Webcasts, Veröffentlichungen, Tools, Ressourcen, Software, Code, Programme, Applets, Widgets, Anwendungen, Produkte und andere Inhalte (“Inhalte”) sowie sämtlicher Dienste und Angebote (“Dienste”) durch Sie oder Dritte (jeweils “Dienstanbieter”) liegt in der alleinigen Verantwortung des Dienstanbieters, der diese bereitstellt. Die Verfügbarkeit dieser sowie der Zugriff auf diese Inhalte und Dienste des Dienstanbieters über ein PIONEER Gerät sind ohne Vorankündigung vorbehalten, einschließlich, aber nicht ausschließlich, Aufhebung, Löschung oder Beendigung aller oder von Teilen der Inhalte oder Dienste. Für aktuelle Informationen sowie bei Anfragen oder Fragen zu den Inhalten oder Diensten wenden Sie sich bitte an die Webseite des Dienstanbieters. PIONEER übernimmt keinerlei Verpflichtung oder Haftung für Kundendienstleistungen bezüglich der Inhalte und Dienste. Fragen oder Anfragen zu solchen Diensten bezüglich dieser Inhalte oder Dienste müssen direkt an den jeweiligen Anbieter der Inhalte oder Dienste gerichtet werden. Bitte beachten Sie, dass PIONEER keine Haftung für Inhalte oder Dienste des Dienstanbieters oder Änderungen, Löschung oder Beendigung solcher Inhalte oder Dienste und keine Garantie oder Haftung für die Verfügbarkeit oder den Zugang zu solchen Inhalten oder Diensten übernimmt.
  • Page 218: Informazioni Sulla Sicurezza

    Come iniziare Informazioni sulla elevata umidità o alla luce del sole diretta (o alla luce artificiale forte). sicurezza AVVERTENZA: Questo è un prodotto laser di classe AVVERTENZA 1 in base alla classificazione Sicurezza dei prodotti RISCHIO DI SCOSSE laser IEC 60825-1:2007. ELETTRICHE NON APRIRE Per essere sicuri di utilizzare il prodotto in modo AVVERTENZA: PER RIDURRE IL RISCHIO DI SCOSSE appropriato, leggere con particolare attenzione ELETTRICHE, NON RIMUOVERE IL COPERCHIO (O questo manuale d’uso e conservarlo come LA PARTE POSTERIORE). L’UNITÀ NON CONTIENE riferimento per ogni eventuale futuro intervento PARTI RIPARABILI DALL’UTENTE. SE OCCORRE UN di manutenzione; per questi interventi, rivolgersi a INTERVENTO IN ASSISTENZA, RIVOLGERSI A UN centri di assistenza autorizzati. TECNICO QUALIFICATO. L’utilizzo di controlli, regolazioni o procedure diverse da quelle specificate di seguito può dare Questo simbolo di un fulmine luogo a una pericolosa esposizione a radiazioni. all’interno di un triangolo avverte Per evitare l’esposizione diretta al fascio laser, non l’utente della presenza di tensione aprire il contenitore. Quando il contenitore è aperto, pericolosa non isolata all’interno la radiazione laser è visibile. NON FISSARE CON LO dell’unità che può provocare scosse SGUARDO IL FASCIO LASER.
  • Page 219: Come Iniziare

    Come iniziare Informazioni per gli utilizzatori finali sulla Questo dispositivo è dotato di batteria portatile o accumulatore. raccolta e lo smaltimento di vecchi dispositivi e batterie esauste Modo sicuro per rimuovere la batteria o la batteria dall’apparecchiatura: Rimuovere la batteria vecchia o accumulatore seguendo i passi inversi a quelli seguiti per l’assemblaggio. Per impedire la contaminazione dell’ambiente e creare possibili pericoli alla salute dell’uomo o animali, la Esempio di vecchia batteria deve essere smaltita inserendola Symbol examples simboli per le nel contenitore adeguato nei punti di raccolta for batteries batterie...
  • Page 220 Come iniziare Nota sul Copyright Avviso per prodotto wireless Unione Europea PIONEER dichiara che questo/ y A causa del fatto che l’ A ACS (sistema con i prodotti è/sono in accordo contenuto di accesso avanzato) è approvato con i requisiti essenziali e come sistema di protezione del contenuto altre norme importanti delle Direttive 1999/5/ per il formato disco Blu-ray, similare all’uso del EC, 2004/108/EC, 2006/95/EC e 2009/125/EC.
  • Page 221 Come iniziare Avviso importante per il sistema della TV a colori Il sistema colore di questo lettore cambia sulla base del sistema del disco correntemente in riproduzione. Per esempio, quando il lettore riproduce un disco registrato con il sistema colore NTSC, l’uscita dell’immagine sarà con segnale NTSC. Solo un apparecchio TV multi sistema colore è in grado di ricevere tutti i segnali in uscita dal lettore. y Se si dispone di una TV con sistema colore PAL, quando si usano dischi registrati in NTSC si vedranno solo delle immagini distorte . y Un apparecchio TV a sistema multiplo colore cambia automaticamente il sistema colore sulla base dei segnali in ingresso. Nel caso in cui il sistema colore non venga cambiato automaticamente, spegnere l’apparecchio e riaccendere per vedere le immagini normalmente sullo schermo. y Anche se i dischi vengono visualizzati correttamente sull’apparecchio TV, è possibile che non vengano registrati correttamente sul registratore.
  • Page 222 37 – Menu [RETE] Telecomando 38 – Menu [ALTRO] Pannello frontale 39 Effetto audio Pannello posteriore Utilizzo Collegamento 40 Riproduzione generale Assemblare gli altoparlanti 40 – Uso del menu [HOME] – Montaggio degli altoparlanti BCS-717 40 – Riproduzione dei dischi – Montaggio degli altoparlanti BCS-313 40 – Riprodurre un file su disco/dispositivo Installazione a parete dell’altoparlante USB centrale – Riproduzione di dischi Blu-ray 3D – Prima dell’installazione – Gustare BD-Live™ Note aggiuntive sugli altoparlanti 42 – Leggere un file su un server della rete 20 Posizionamento del sistema 43 – Operazioni principali del contenuto...
  • Page 223 Sommario Appendice 45 – Ingrandire l’immagine riprodotta 46 – Ricerca di segnalibri 60 Controllo del televisore mediante il 46 – Uso del menu di ricerca telecomando 47 – Selezione del file dei sottotitoli 60 – Impostare il telecomando per 47 – Memorizzazione dell’ultima scena controllare il proprio apparecchio TV 48 – Opzioni durante la visualizzazione di Indicativo località una foto 62 Elenco codici lingua 48 – Ascolto della musica durante la 63 Marchi commerciali e licenze presentazione diapositive 65 Risoluzione uscita video 49 Visualizzazione su schermo 66 Specifiche tecniche 49 – Visualizzazione di contenuto sullo 69 Manutenzione...
  • Page 224: Come Iniziare

    Come iniziare Introduzione Dischi riproducibili e simboli usati in questo manuale Media/ Logo Simbolo Descrizione Termini y Dischi come quelli dei film che possono essere acquistati o affittati. y Dischi "Blu-ray 3D” y Dischi BD-R/RE che sono registrati nel formato BDAV. Blu-ray y Dischi BD-R/RE che contengono file di film, musica o foto. y ISO 9660+JOLIET, UDF e formato UDF Bridge y Dischi come quelli dei film che possono essere acquistati o affittati. y Solo modo di video e finalizzato DVD-ROM y Supporta anche il disco a doppia faccia di DVD-R registrazione DVD-RW Formato AVCHD definito DVD+R...
  • Page 225: Informazioni Sul Simbolo "7

    Come iniziare Nota Informazioni sul simbolo “7” y In base alle condizioni dell’apparecchiatura Durante la riproduzione, sullo schermo della vostra di registrazione o dello stesso disco CD-R/ televisione può apparire “7”, questo segno indica RW (o DVD±R/RW), non è possibile che la funzione descritta nel manuale dell’utente riprodurre nell’unità alcuni dischi CD-R/RW non è disponibile su quel supporto specifico. (o DVD±R/RW). y In base al software di registrazione e finalizzazione, potrebbe non essere possibile riprodurre alcuni dischi registrati (CD-R/RW, DVD±R/RW o BD-R/RE). y I dischi BD-R/RE, DVD±R/RW e CD-R/RW registrati mediante PC o masterizzatore DVD o CD potrebbero non venire riprodotti se il disco è danneggiato o sporco, oppure se è presente sporcizia o condensa sulla lente del lettore. y Se il disco è stato registrato tramite PC, anche mediante un formato compatibile, in alcuni casi la riproduzione potrebbe risultare impossibile a causa delle impostazioni del software utilizzato per creare il disco. Per maggiori informazioni, consultare il produttore del software. y Per garantire un’ottima qualità della riproduzione, questo lettore richiede la conformità di dischi e registrazioni con determinati standard tecnici.
  • Page 226: Accessori Forniti

    Come iniziare Accessori forniti Accessori della cassa dell’altoparlante (S-BD707SW) Cavo video (1) Telecomando (1) Cavi altoparlante (1) Attenuatori antislittamento grandi Batterie (1) Antenna FM (1) Accessori della cassa dell’altoparlante (S-BD303) Supporto per iPod (1) Attenuatori Cavi per altoparlanti Accessori della cassa antislittamento codificati in base al generali (1) dell’altoparlante (S-BD707T) colore (6) Attenuatori Viti (12) Cavi per altoparlanti antislittamento grandi codificati in base al colore (5) Basi per sostegno Attenuatori altoparlante (4) antislittamento generali (1)
  • Page 227: Requisiti Dei File

    Come iniziare Requisiti dei file File di film File File Formato Formato codificato Suttotitolo Posizione Estensione Audio “.avi”, “.divx”, DIVX3.xx, DIVX4.xx, Dolby Digital, SubRip (.srt / .txt), SAMI (.smi), “.mpg”, “.mpeg”, DIVX5.xx, DIVX6.xx DTS, MP3, SubStation Alpha (.ssa/.txt), “.mkv”, “.mp4”, (solo riproduzione WMA, AAC, MicroDVD (.sub/.txt), VobSub Disco, “.asf”, “.wmv”, standard), XVID, (.sub), SubViewer 1.0 (.sub), “.m4v” (DRM MPEG1 SS, H.264/ SubViewer 2.0 (.sub/.txt), TMPlayer free) MPEG-4 AVC, MPEG2 (.txt), DVD Subtitle System (.txt) PS, MPEG2 TS, VC-1 SM (WMV3) “.avi”, “.divx”, DIVX3.xx, DIVX4.xx,...
  • Page 228: Avchd (Advanced Video Codec High Definition)

    Come iniziare Nota AVCHD (Advanced Video y Il nome del file è limitato a 180 caratteri. Codec High Definition) y Numero massimo di file/cartelle: Inferiore a y Questo lettore può riprodurre dischi in formato 2.000 (numero totale di file e cartelle) AVCHD. Tali dischi vengono normalmente y Dipendendo dalle dimensioni e numero di registrati e utilizzati nelle videocamere. file, possono essere necessari diversi minuti y Il formato AVCHD è un formato digitale ad alta per la lettura del contenuto dei supporti. definizione per videocamere. y La compatibilità dei file può essere y Il formato MPEG-4 AVC/H.264 è in grado differente in relazione al server. di comprimere le immagini con efficienza y I requisiti dei file a pagina 11 non sono maggiore rispetto al formato convenzionale di sempre compatibili. Vi possono essere delle compressione immagini. limitazioni delle funzioni dei file e della y Questo lettore è in grado di riprodurre dischi capacità del server dei media. AVCHD tramite il formato “x.v.Colour”.
  • Page 229: Requisiti Del Sistema

    Come iniziare Requisiti del sistema Note di compatibilità Per la riproduzione video ad alta definizione: y Poiché BD-ROM è un nuovo formato, sono possibili alcuni problemi ai dischi, di connessione y Un display ad alta definizione dotato di jack di digitale e di compatibilità. Se si rilevano problemi ingresso COMPONENT o HDMI. di compatibilità, rivolgersi a un centro assistenza y Disco BD-ROM con contenuto ad alta definizione. autorizzato. y Per alcuni contenuti (come definito dagli autori) y Questa unità vi permette di utilizzare le è richiesto un ingresso DVI compatibile HDMI o funzioni come immagine-entro-immagine, HDCP sulla propria periferica di visualizzazione. pacchetti audio secondari e pacchetti virtuali, Per riprodurre file sulla cartella condivisa del PC ecc., con BD-ROM che supporti il BONUSVIEW tramite la rete domestica, il PC richiede quanto di (BD-ROM versione 2, profilo 1, versione seguito indicato. 1.1/ profilo Standard finale). Audio e video secondari possono essere riprodotti da un y Windows® XP (Service Pack 2 o superiore), disco compatibile con la funzione immagine Windows Vista® (nessun Service Pack richiesto) nell’immagine. Per il metodo di riproduzione Windows 7® (nessun Service Pack richiesto) vedere le istruzioni fornite con il disco.
  • Page 230: Telecomando

    Come iniziare Telecomando c/v SCAN: Ricerca avanti • • • • • • • • • a • • • • • • • o indietro. INPUT/TUNER: Cambia SPK LEVEL: Imposta il livello modo ingresso. audio dell’altoparlante 1 (STANDBY/ON): Accende e desiderato. spegne il lettore. X USB REC: Registra un segnale B OPEN/CLOSE: Apre/chiude il audio CD. vassoio del disco. MUTE: Silenzia l’unità. HDMI IN: Cambia il modo di SOUND: Seleziona una modalità immissione in HDMI IN in modo di effetto audio. immediato. VOL +/- : Regola il volume OPTICAL: Cambia modo dell’altoparlante.
  • Page 231: Pannello Frontale

    Come iniziare Pannello frontale STANDBY/ON OPEN/CLOSE FUNCTION TUNE VOLUME PORTABLE IN 500 mA a Vassoio del disco c Finestra Display b Pulsanti di funzionamento d Sensore del telecomando g h i j k Pulsante 1 (STANDBY/ON) e PORTABLE IN STANDBY/ON OPEN/CLOSE FUNCTION Accende e spegne il lettore.
  • Page 232: Assemblare Gli Altoparlanti

    Collegamento Assemblare gli Per l’altoparlante centrale: Utilizzare l’adesivo in dotazione per applicare i altoparlanti quattro piedini piccoli alla base dell’altoparlante centrale. Montaggio degli altoparlanti BCS-717 middle non-skid pads piedini antiscivolo small non-skid pads piccoli Preparazione degli altoparlanti 1. Applicare i piedini antiscivolo alla base di ciascun altoparlante, del subwoofer e dell’altoparlante centrale. middle non-skid pads Per basi dell’altoparlante: small non-skid pads Utilizzare l’adesivo in dotazione per applicare i quattro piedini medi alla base (parte inferiore) di ciascuna base dell’altoparlante.
  • Page 233 Attenzione y Non collegare gli altoparlanti in dotazione ad amplificatori diversi da quelli forniti con y Il morsetto in plastica non è un accessorio il sistema. Il collegamento ad amplificatori d’installazione e non si deve appendere di altro tipo può provocare un problema di l’altoparlante alla parete utilizzando funzionamento o un incendio. esclusivamente il morsetto. Per stabilizzare gli altoparlanti utilizzare sempre un cavo. y Si prega di collegare il cavo dell’altoparlante del subwoofer (di colore porpora) al filo y Pioneer non è responsabile di danni arancione del lettore. o perdite provocate dal montaggio, Mounting screw dall’installazione inadeguata, dalla forza 5 mm y Questi terminali di altoparlante hanno (not supplied) Mounting screw insufficiente dei materiali d’installazione, una TENSIONE DI ALIMENTAZIONE 5 mm (not supplied) 10 mm dall’uso improprio o dai disastri naturali.
  • Page 234 Collegamento Montaggio degli altoparlanti Per l’altoparlante centrale: Utilizzare l’adesivo in dotazione per applicare i BCS-313 quattro piedini piccoli alla base dell’altoparlante centrale. Preparazione degli altoparlanti 1. Applicare i piedini antiscivolo alla base di ogni piedini antiscivolo altoparlante. small non-skid pads small non-skid pads piccoli Per gli altoparlanti: small non-skid pads small non-skid pads Usare l’adesivo fornito per collegare quattro piccoli tamponi alla base (fondo) di ciascun altoparlante. For subwoofer: 2. Collegare i cavi al lettore. small non-skid pad small non-skid pads piedini antiscivolo piccoli...
  • Page 235: Installazione A Parete Dell'altoparlante Centrale

    (ON) dopo 15 - 30 min. Se il problema persiste il perso dell’altoparlante. posizionare il sistema di altoparlanti lontano dal > Attenzione televisore. y Se non si è sicuri della qualità e della forza thick cord Il subwoofer non è schermato magneticamente e della parte, consultare un tecnico per non dovrebbe essere posto vicino a un TV o a un eventuali consigli. monitor. I supporti di memorizzazione magnetica Plastic catch y Pioneer non è responsabile di incidenti o (fl oppy-disk, nastri o videocassette) devono essere danni dovuti all’installazione impropria. conservati lontani dal subwoofer. Non installare l’altoparlante anteriore/surround e il subwoofer alla parete o al soffitto. Potrebbero cadere provocando ferimenti. Vite per Mounting screw l’installazione 5 mm (not supplied) (non in dotazione) 10 mm da 5 mm a 7 mm 5 mm to 7 mm...
  • Page 236: Posizionamento Del Sistema

    Collegamento > Attenzione Posizionamento del y Fare attenzione che i bambini non mettano sistema le mani o altri oggetti del *condotto del subwoofer. *condotto del subwoofer: Un foro per L’illustrazione seguente mostra un esempio un suono basso pieno nell'armadio del di posizionamento del sistema. Notare che le subwoofer (cassa). illustrazioni in queste istruzioni possono essere y Disporre l’altoparlante centrale ad una diverse dall’unità effettiva per scopo esplicativo. distanza sicura per evitare che sia toccato Per ottenere il miglior audio surround possibile, da bambini. tutti gli altoparlanti diversi dal subwoofer devono Altrimenti si può produrre la caduta essere posizionati alla stessa distanza dal punto di dell’altoparlante e si possono produrre ascolto ( danni alle persone e/o danni alla proprietà. y L'altoparlante contiene parti magnetiche , pertanto si può verificare una irregolarità dello schermo della TV o di quello del PC. Usare gli altoparlanti lontani dallo schermo TV o da quello del PC. Altoparlante anteriore sinistro (S) Altoparlante anteriore destro (D): Posizionare gli altoparlanti anteriori sui lati del monitor o schermo e il più possibile a livello con la superficie dello schermo.
  • Page 237: Connessioni Alla Tv

    Collegamento Connessioni alla TV Connessione HDMI Se si possiede un televisore o un monitor HDMI è possibile collegarli a questo lettore mediante cavo Effettuare uno dei collegamenti che seguono HDMI (Tipo A, Cavo HDMI™ ad alta velocità con a seconda delle capacità delle apparecchiature Ethernet). Connettere il jack HDMI sull’unità al jack esistenti. HDMI di un TV o monitor compatibili HDMI. y Connessione HDMI (pagina 21) y Connessione Component Video (pagina 23) y Connessione video (pagina 23) Lato posteriore dell’unità Nota y In base alle apparecchiature che si desidera connettere, esistono varie modalità di connessione del lettore. Usare solo una delle connessioni descritte in questo manuale. y Consultare i manuali della propria TV, videoregistratore, impianto stereo o altre apparecchiature al fine di effettuare il miglior collegamento. Cavo y Assicurarsi che il lettore sia collegato HDMI direttamente alla TV. Sintonizzare la TV sul canale di ingresso video corretto. y Non connettere il lettore passando dal VCR. L’immagine DVD potrebbe venire distorta dal sistema di protezione della copia.
  • Page 238: Funzione Arc (Canale Di Ritorno Audio)

    Collegamento Nota Funzione ARC (canale di y Se un dispositivo HDMI connesso non ritorno audio) accetta un’uscita audio del lettore, l’audio del dispositivo HDMI può essere distorto o La funzione ARC permette che una TV adatta per può non uscire. HDMI invii il flusso audio alla presa HDMI OUT di questo lettore. y Quando si usa la connessione HDMI, è possibile modificare la risoluzione dell’uscita Per usare questa funzione: HDMI. (Vedere “Impostazione della - La TV deve supportare la funzione ARC e l'ARC risoluzione” a pagina 24) di questo lettore deve essere impostato su On y Selezionare il tipo di uscita video dal jack (impostazione iniziale è "Off"). HDMI OUT usando l’opzione [Imp. colore - Il metodo di impostazione dell’ A RC può essere HDMI] sul menu [Impostaz.] (vedere pagina diverso in relazione alla TV. Per i dettagli della 34). funzione ARC, vedere il manuale della TV. y La modifica della risoluzione quando la - Si deve usare il cavo HDMI (tipo A, Cavo HDMI™ connessione è già stata stabilita può avere ad alta velocità con Ethernet).
  • Page 239: Connessione Component Video

    Collegamento Connessione Component Connessione video Video Collegare il connettore VIDEO OUT del lettore al connettore video sul TV tramite il cavo video. Potete Connettere i jack COMPONENT VIDEO OUT del ascoltare l’audio sull’altoparlante del sistema. lettore ai jack di ingresso corrispondenti della TV usando cavi video. Potete ascoltare l’audio sull’altoparlante del sistema. Lato posteriore dell’unità Lato posteriore dell’unità Cavo video Cavo video Component Nota Quando si usa la connessione COMPONENT VIDEO OUT, è possibile modificare la risoluzione dell’uscita VIDEO. (Vedere “Impostazione della risoluzione” a pagina 24.)
  • Page 240: Impostazione Della Risoluzione

    Collegamento Connessione Impostazione della risoluzione dell’antenna Il lettore consente di impostare diverse risoluzioni dell’uscita per i jack HDMI OUT e COMPONENT VIDEO OUT. Si può modificare la risoluzione usando il menu di configurazione [Impostaz.]. Per ascoltare la radio connettere l’antenna fornita in dotazione. 1. Premere HOME MENU (n). 2. Usare A/D per selezionare [Impostaz.] e premere ENTER (b). Appare il menu di configurazione [Impostaz.]. 3. Utilizzare W/S per selezionare l’opzione [DISPLAY], quindi premere D per passare al secondo livello. 4. Utilizzare W/S per selezionare l’opzione [Risoluzione], quindi premere ENTER (b) per passare al terzo livello. Lato posteriore dell’unità 5. Utilizzare W/S per selezionare la risoluzione Nota desiderata, quindi premere ENTER (b) per Una volta connessa l’antenna a filo FM confermare la selezione. tenerla nella posizione più orizzontale Nota possibile. Verificare che l’antenna a filo FM sia completamente distesa. y Se la TV non accetta la risoluzione impostata sul lettore è possibile impostare la risoluzione su 576p come segue: 1. Premere B per aprire il vassoio del disco.
  • Page 241: Connessione Con Il Dispositivo Esterno

    Collegamento Connessione con il Collegamento d'ingresso (PORTABLE IN) dispositivo esterno Potete godere del suono del lettore audio portatile tramite gli altoparlanti di questo sistema. Collegare il jack della cuffia (o allinearlo) del lettore Connessione AUX audio portatile nella presa PORTABLE IN di questa unità. E quindi selezionare l’opzione [PORTABLE] Potete godere del suono prodotto da un premendo tasti INPUT/TUNER e ENTER (b). componente esterno tramite gli altoparlanti di questo sistema. Potete anche usare il pulsante FUNCTION sul Connettere i jack di uscita audio analogici del pannello anteriore per selezionare il modo di componente alla porta AUX S/D (INPUT) di ingresso. questa unità. E quindi selezionare l’opzione [AUX] premendo INPUT/TUNER e ENTER (b). VOLUME Potete anche usare il pulsante FUNCTION sul pannello anteriore per selezionare il modo di ingresso. PORTABLE IN 500 mA Lato posteriore dell’unità Lettore MP3, ecc... Bianco rosso Ai jack di uscita audio del componente (TV, VCR, ecc.)
  • Page 242: Collegamento Ingresso Optical In

    Collegamento Collegamento ingresso Connessione INGRESSO HDMI OPTICAL IN Potete godere del suono del componente con un Potete godere delle immagini e suono del collegamento ottico digitale tramite gli altoparlanti componente tramite questo collegamento. di questo sistema. Connettere il jack HDMI OUT del componente ai Collegare il jack di uscita ottica del componente jack HDMI IN 1 o 2 dell’unità. E quindi selezionare nel jack OPTICAL IN dell’unità. E quindi selezionare l’opzione [HDMI IN 1/2] premendo INPUT/TUNER e l’opzione [OPTICAL] premendo INPUT/TUNER ENTER (b). e ENTER (b). Oppure premere OPTICAL per la Potete anche usare il pulsante FUNCTION sul selezione diretta. pannello anteriore per selezionare il modo di Potete anche usare il pulsante FUNCTION sul ingresso. pannello anteriore per selezionare il modo di ingresso. Lato posteriore dell’unità Lato posteriore dell’unità Verso il jack HDMI OUT del proprio componente (decoder, ricevitore satellitare digitale, consolle video Verso l’uscita jack game ecc.) ottico digitale del componente Nota y Potete modificare la risoluzione video nel...
  • Page 243: Connessione Alla Rete Domestica

    Collegamento Connessione alla rete domestica Servizio a banda larga Questo lettore può essere connesso ad una rete locale (LAN) tramite la porta LAN sul pannello posteriore oppure tramite il modulo wireless interno. Connettendo l’unità alla rete a banda larga domestica, avete accesso a servizi quali interattività BD Live e servizi online. Router Connessione alla rete cablata L’uso di una rete cablata garantisce le prestazioni migliori, poiché le periferiche si connettono direttamente alla rete e non sono soggette a interferenze delle frequenze radio. Per ulteriori informazioni consultare la documentazione relativa alla propria periferica di rete. Server certificato per PC e/o DLNA Connettere la porta LAN alla porta corrispondente del proprio modem o router usando un cavo LAN o Ethernet disponibile commercialmente. Nota y Quando si collega o scollega il cavo LAN, afferrare la spina e non il cavo. Quando si scollega il cavo LAN, non tirarlo ma estrarlo dalla presa premendo in basso la linguetta. y Non collegare un cavo telefonico modulare Lato posteriore dell’unità alla porta LAN. y Poiché esistono diverse configurazioni della connessione, seguire le specifiche della società telefonica o del fornitore di accesso.
  • Page 244: Impostazione Della Rete Cablata

    Collegamento Nota Impostazione della rete Se sulla rete non ci sono server DHCP cablata e si desidera impostare il numero di IP Se sulla rete locale (LAN) è presente un server manualmente, selezionare [Statico] quindi DHCP tramite connessione cablata, questo lettore impostare [Indirizzo IP], [Subnet Mask], verrà allocato automaticamente un indirizzo IP. [Ingresso] e [Server DNS] tramite i tasti Dopo avere eseguito la connessione fisica, un certo numerici W/S/A/D. Se commettete un numero di reti locali può richiedere una regolazione errore inserendo il numero, premere CLEAR delle impostazioni di rete del lettore. Regolare le per cancellare la sezione evidenziata. impostazioni di rete [RETE] come segue. 4. Selezionare [OK] e premere ENTER (b) per Preparazione applicare le impostazioni di rete. Prima di impostare la rete cablata è necessario 5. Il lettore chiederà di verificare la connessione di collegare la rete a banda larga alla rete domestica. rete. Selezionare [OK] e premere ENTER (b) per 1. Selezionare l’opzione [Impost. connessione] nel completare la connessione di rete. menu di [Impostaz.] quindi premere ENTER (b). 6. Se si seleziona [Test] e preme ENTER (b) al punto 5 di cui sopra, lo stato della connessione di rete viene visualizzato sullo schermo. La connessione di rete può anche essere testata su [Stato connessione] nel menu di [Impostaz.].
  • Page 245: Connessione Di Rete Wireless

    Collegamento Nota Connessione di rete Wireless Campo di frequenze disponibili e canali per Un’altra opzione di connessione è quella di banda di 5 GHz sono indicati di seguito. Ma utilizzare un punto di accesso o router wireless. La possono esistere differenze e limitazioni configurazione di rete e il metodo di connessione in relazione al paese di utilizzo. Tentare di possono variare a seconda delle apparecchiature impostare il punto di accesso con altro canale usate e dell’ambiente di rete. se si hanno difficoltà nel collegamento di rete Questo lettore è equipaggiato con modulo wireless wireless. IEEE 802,11n (Dual-band, 5 GHz e banda 2,4 GHz), Area Campo di frequenze che supporta anche gli standard 802,11a/b/g. Per ottenere la migliore prestazione wireless possibile si Nord 5.15-5.25 GHz (ch. 36-48), raccomanda di usare una rete Wi-Fi certificata IEEE America 5.725-5.825 GHz (ch. 149-161), 802.11n (punto di accesso o router wireless). 5.825-5.850 GHz (ch.165) Europa, EAU 5.15-5.25 GHz (ch. 36-48) VOLUME Altri paesi 5.15-5.25 GHz (ch. 36-48), PORTABLE IN 500 mA 5.725-5.825 GHz (ch. 149-161), 5.825- 5.850 GHz (ch.165)
  • Page 246 Collegamento [Manuale] – È possibile che l’access point 2. Il menù di [Impost. connessione] appare sullo schermo. Usare W/S per selezionare [Wireless] non trasmetta il nome dell’access point (SSID). e premere ENTER (b). Controllare le impostazioni del router tramite il computer e impostare in modo che il codice 3. Selezionare [Sì], e poi premere ENTER (b) SSID venga trasmesso, oppure manualmente per continuare. Le nuove impostazioni di inserire il nome dell’access point (SSID) in connessione ripristinano le impostazioni di rete [Manuale]. correnti. [Pulsante] – Se il punto di accesso o router 4. Il lettore esegue una scansione di tutti i punti di wireless è un dispositivo che supporta il metodo accesso o router wireless nel campo di azione e di configurazione con pulsante, selezionare li visualizza come elenco. questa opzione e premere il pulsante del punto Usare W/S per selezionare un punto di di accesso o router wireless entro 120 conteggi. accesso o router wireless dall’elenco e quindi Non è necessario conoscere il nome dell’access premere ENTER (b). point (SSID) e codice di sicurezza del punto di accesso o router wireless. 5. Usare i tasti W/S/A/D per selezionare la modalità IP scegliendo tra [Dinamico] e [Statico]. Solitamente selezionare [Dinamico] per allocare un indirizzo IP automaticamente.
  • Page 247 Collegamento Note relative alla connessione di y Per la connessione cablata di questo lettore è necessaria una porta A 10 Base-T o 100 Base-TX rete: LAN. Se il vostro servizio Internet non permette y Molti problemi di connessione di rete durate la questo tipo di connessione, non sarà possibile configurazione possono essere risolti eseguendo collegare il lettore. un reset del router o modem. Dopo avere y Per usare un servizio xDSL è necessario utilizzare connesso il lettore alla rete domestica, accendere un router. e spegnere il cavo di alimentazione del router y Per usare un servizio DSL è necessario un modem delle rete domestica oppure al modem via cavo. DSL e per usare il servizio di modem cablato Quindi accendere e/o riconnettere il cavo di è necessario un modem cablato. Dipendendo alimentazione. dal metodo di accesso dell’accordo di licenza y Dipendendo dal fornitore di servizi Internet (ISP) con il vostro ISP, è possibile che la funzione il numero di dispositivi che possono ricevere il di connessione Internet del vostro lettore o è servizio Internet può essere limitato dai termini possibile che abbiate un limite ai dispositivi che di servizio applicabili. Per maggiori dettagli possono essere collegati contemporaneamente. rivolgersi al proprio gestore del servizio. (Se il vostro ISP limita l’abbonamento ad un y La nostra azienda non è responsabile per dispositivo, è possibile che a questo questo...
  • Page 248: Connessione Dispositivo Usb

    Collegamento Nota Connessione y Questo lettore supporta memorie Flash/ dispositivo USB Disco rigido esterno formattati FAT16, FAT32 e NTFS quando accede a file (musica, foto, video). Tuttavia, per la registrazione BD- Questo lettore è in grado di riprodurre file video, Live e Audio CD, sono supportati solo i musicali e di foto presenti di un dispositivo USB. formati FAT16 e FAT32. Usare una memoria USB flash/disco fisso esterno formattati con Riproduzione di contenuto FAT16 o FAT32 quando si usa BD-Live e la registrazione Audio CD. presente sul dispositivo USB y Il dispositivo USB può essere utilizzato per 1. Inserire un dispositivo USB nella porta USB fino la memorizzazione locale per poter vedere a quando non è ben inserito. dischi BD-Live tramite internet. y Questa unità può supportare fino a 8 VOLUME partizioni del dispositivo USB. y Non estrarre il dispositivo USB durante il funzionamento (riproduzione, ecc.) PORTABLE IN 500 mA y Un dispositivo USB che richiede l’installazione aggiuntiva di un programma...
  • Page 249: Configurazione Del Sistema

    Configurazione del sistema Settaggi Menu [DISPLAY] Aspetto TV Regolare le impostazioni di Selezionare un rapporto d’aspetto TV in base al tipo della propria TV. configurazione [4:3 LetterBox] Potete cambiare le impostazioni del lettore sul Selezionare se è collegato un televisore menu [Impostaz.]. standard 4:3. Visualizza le immagini con barre 1. Premere HOME MENU (n). nere sopra e sotto. [4:3 Panscan] Selezionare se è collegato un televisore standard 4:3. Visualizza immagini tagliate per riempire lo schermo. Entrambi i lati dell’immagine sono tagliati. [16:9 Originale] 2. Usare A/D per selezionare [Impostaz.] e premere ENTER (b). Appare il menu di Selezionare se è collegato un televisore 16:9. configurazione [Impostaz.]. L’immagine a 4:3 è visualizzata con un rapporto di aspetto 4:3 originale, con barre nere sul lato destro e sinistro. [16:9 Full] Selezionare se è collegato un televisore 16:9.
  • Page 250 Configurazione del sistema Risoluzione Imp. colore HDMI Imposta la risoluzione di uscita del segnale video Selezionare il tipo di uscita dal jack HDMI OUT. Per Component e HDMI. Vedere la pagina 24 e 65 per questa impostazione, fare riferimento ai manuali maggiori dettagli relativi all’impostazione della dello schermo. risoluzione. [YCbCr] [Auto] Selezionare quando si collega a uno schermo Se è collegato il jack HDMI OUT per fornire HDMI. i dati di identificazione dello schermo TV [RGB] (EDID), viene selezionata automaticamente la Selezionare quando si collega a uno schermo risoluzione più adatta al televisore collegato. DVI. [1080p] produce 1080 linee di video progressivo. Modalità 3D [1080i] Selezionare il tipo di modalità di uscita per la riproduzione di disco Blu-ray 3D. produce 1080 linee di video interlacciato. [720p] [Off] produce 720 linee di video progressivo. La riproduzione dei dischi Blu-ray 3D avviene in modalità 2D come una riproduzione normale [576p] di dischi BD-ROM. produce 576 linee di video progressivo.
  • Page 251: Menu [Lingua]

    Configurazione del sistema Menu [LINGUA] Menu [AUDIO] Menu display Settaggio Diffusori Selezionare una lingua per il menu [Impostaz.] e Per ottenere il miglior audio possibile, usare per le visualizzazioni a schermo. il display di configurazione altoparlanti per specificare il volume degli altoparlanti connessi e la Menu Disco/Audio Disco/Sottotitolo loro distanza dal punto di ascolto. Usare questo test per regolare il volume degli altoparlanti allo stesso Disco livello. Selezionare la lingua preferita per la traccia audio (disc audio), sottotitoli e menu disco. [Originale] Indica la lingua originale in cui è stato registrato il disco. [Altro] Premere ENTER (b) per selezionare un’altra lingua. Usare i pulsanti numerici quindi ENTER (b) per immettere il numero corrispondente a [Diffusore] 4 cifre in base all’elenco codici lingua a pagina Selezionare l’altoparlante che si desidera regolare. [Off] (Solo sottotitoli disco) [Volume] Disattiva i sottotitoli.
  • Page 252: Menu [Bloccato]

    Configurazione del sistema HD AV Sync Menu [BLOCCATO] A volte con la TV digitale ci sono ritardi tra Le impostazioni [BLOCCATO] influisce solo sulla immagine e audio. Quando si verifica questa riproduzione BD-ROM e DVD. eventualità potete compensare impostando un Per accedere alle funzioni di [BLOCCATO], occorre ritardo sull’audio in modo che questo ‘attenda’ immettere il codice di sicurezza a 4 cifre creato. l’arrivo dell’immagine: questo viene denominato HD Se non è ancora stata inserita una password, verrà AV Sync. Usare W/S per fare scorrere in aumento chiesto di farlo. Inserire due volte una password a 4 o in riduzione il valore di ritardo che impostate in cifre e premere ENTER (b) per creare una password un campo fra 0 e 300 ms. nuova. Password Potete creare o modificare la password. [Nessuno] Inserire due volte una password a 4 cifre e premere ENTER (b) per creare una password nuova. DRC (Controllo dinamico della [Modifica] gamma) Inserire la password attuale e premere ENTER (b). Inserire due volte una password a 4 cifre e Questa funzione consente di seguire un film a premere ENTER (b) per creare una password basso volume senza perdere la chiarezza del suono.
  • Page 253: Menu [Rete]

    Configurazione del sistema Classificazione DVD Menu [RETE] Blocca la riproduzione di DVD classificati sulla Le impostazioni [RETE] sono necessarie per BD-Live base dei loro contenuti. (Non tutti i dischi sono e altre funzioni online. classificati.) Impost. connessione [Restrizione 1-8] Se l’ambiente di rete domestico è pronto per la Il valore 1 presenta le maggiori restrizioni, connessione del lettore, il lettore deve essere mentre il valore 8 presenta restrizioni minime. cablato oppure connesso alla rete con connessione [Sblocca] wireless per la comunicazione di rete. (Vedere “Connessione della rete domestica” alle pagine 27- Selezionando l’impostazione [Sblocca], il filtro 31.) dei contenuti viene disattivato e il disco viene riprodotto interamente. Stato connessione Se si desidera controllare lo stato della connessione Classificazione Disco Blu-ray di rete su questo lettore, selezionare le opzioni Impostare in limite di età di lettura dei BD-ROM. [Stato connessione] e premere ENTER (b) per Usare i tasti numerici per immettere un limite di età verificare se sono state stabilite connessioni alla per la visione dei BD-ROM. rete e a Internet.
  • Page 254: Menu [Altro]

    Configurazione del sistema Menu [ALTRO] Inizializza [Imp.fabbrica] ARC (canale di ritorno audio) L’unità può essere resettata alle impostazioni Potete impostare la funzione ARC (canale di ritorno originali di fabbrica. audio) su [On] o [Off ]. La funzione ARC consente che una TV con connessione HDMI invii il flusso di [Canc. mem. BD-LIVE] segnali audio all'uscita HDMI OUT di questo lettore. Inzializza i contenuti di BD-Live dalla memoria Vedere a pag. 22 per il dettagli di questa funzione. USB collegata. Nota DivX® VOD Se si ripristina il lettore alle impostazioni INFORMAZIONI SU DIVX VIDEO: DivX® è un predefinite utilizzando l’opzione [Imp.fabbrica], formato digitale video creato da DivX, Inc. Questo bisognerà impostare di nuovo l’attivazione a dispositivo è un dispositivo originale certificato tutti i servizi on-line e di rete. DivX Certified® che riproduce DivX video. Visitate divx.com per ulteriori informazioni e strumenti software per convertire i vostri file in DivX video. Info software CARATTERISTICHE DEL DIVX VIDEO-ON-DEMAND: Visualizza la versione di software corrente.
  • Page 255: Effetto Audio

    Configurazione del sistema Effetto audio Potete selezionare una modalità audio adatta. Premere SOUND ripetutamente fino a quando non appare la modalità desiderata sul pannello anteriore o schermo. Gli elementi visualizzati per l’equalizzatore possono essere diversi dipendendo dalle fonti audio ed effetti. [Mode 1]: Fornisce una regolazione del suono adatta con il tipo di collegamento piccolo degli altoparlanti (S-BD303). [Mode 2]: Fornisce una regolazione del suono adatta con il tipo di collegamento grande degli altoparlanti (S-BD707T). [Bypass]: Software con segnale audio surround multicanale viene riprodotto in base al modo con cui è stato registrato. [Bass Blast]: Rinforza l’effetto audio basso dagli altoparlanti anteriore destro e sinistro e subwoofer. [PL ll Film]: Esegue la decodifica modalità film Pro Logic ll del segnale di ingresso e produce cinque canali di uscita a banda completa da 2 sorgenti canale. Questa impostazione è ideale per la visione di video di vecchi film o film doppiati. Questa modalità è disponibile solo per 2 sorgenti canale. [PL ll Musica]: Esegue la decodifica modalità musica Pro Logic ll del segnale di ingresso e produce cinque canali di uscita a banda completa da 2 sorgenti canale. Questa impostazione è l’ideale sia per gli stereo normali che per i CD. Questa modalità è disponibile solo per 2 sorgenti canale.
  • Page 256: Riproduzione Generale

    Utilizzo Nota Riproduzione generale y Le funzioni di riproduzione descritte in questo manuale non sono sempre disponibili con ogni file e supporto. Uso del menu [HOME] Alcune funzioni possono essere limitate dipendendo da molti fattori. Il menu home appare quando si preme y Dipendendo dai titoli BD-ROM, per la HOME MENU (n). Usare l’opzione W/S/A/ riproduzione corretta è possibile che sia D per selezionare una categoria e premere ENTER necessaria una connessione con dispositivo (b). USB. y I dischi di formato DVD VR non definito non possono essere riprodotti in questo lettore. y Alcuni dischi DVD-VR sono realizzati con dati CPRM con DVD RECORDER. Questa unità non può supportare questi tipi di dischi. Riprodurre un file su disco/ dispositivo USB a [Video] - Visualizza i contenuti di video. b [Musica] - Visualizza i contenuti di audio.
  • Page 257: Riproduzione Di Dischi Blu-Ray 3D

    Utilizzo Riproduzione di dischi Blu-ray Gustare BD-Live™ Il BD-ROM con supporto BD-Live (BD-ROM versione 2 Profilo 2) con funzione di estensione di rete Il lettore è in grado di riprodurre dischi Blu-ray permette di usare più funzioni quali scaricare i 3D che contengono visualizzazioni separate per trailer dei nuovi film in uscita tramite la connessione l’occhio sinistro e il destro. di questa unità a Internet. 1. Controllare la connessione di rete e le Preparazione impostazioni (Pagine 27-31). Per riprodurre titoli Blu-ray 3D in modalità 3D 2. Inserire un dispositivo di memorizzazione nella stereoscopica, è necessario: porta USB sul pannello anteriore. y y y V erificare che il TV supporti il 3D e abbia gli Per scaricare i contenuti bonus è necessario ingressi HDMI (3D). disporre di un dispositivo di memorizzazione y I ndossare occhiali 3D per godere USB. dell’esperienza 3D. 3. Premere HOME MENU (n), e impostare y y y V erificare che il titolo BD-ROM sia un disco l’opzione [Collegamento BD-LIVE] nel menu di Blu-ray 3D.
  • Page 258: Leggere Un File Su Un Server Della Rete

    Utilizzo Leggere un file su un server Inserimento di un ID utente di rete e password della rete Dipendendo dall’ambiente del PC è possibile che sia necessario inserire un ID utente e password per accedere alla cartella condivisa. Questo lettore può riprodurre film, musica e foto poste in un PC o un server DLNA tramite la rete 1. Il menu della tastiera viene visualizzato domestica. automaticamente se è richiesto l’inserimento dell’ID utente e della password di rete. 1. Controllare la connessione di rete e le impostazioni (Pagine 27-31). 2. Usare W/S/A/D per selezionare un carattere quindi premere ENTER (b) per 2. Premere HOME MENU (n). confermare la selezione sulla tastiera virtuale. 3. Selezionare [Video], [Foto] o [Musica] tramite Per immettere una lettera con un simbolo di A/D, e premendo ENTER (b).
  • Page 259: Operazioni Principali Del Contenuto Video E Audio

    Utilizzo Operazioni principali del Operzioni principali per il contenuto video e audio contenuto delle foto Per interrompere l Esecuzione della presentazione Premere Z (STOP) durante la riproduzione Premere d (PLAY) per avviare la presentazione. Per sospendere la riproduzione Fermare una presentazione. Premere M (PAUSE/STEP) durante la riproduzione Premere Z (STOP) durante la presentazione. Premere d (PLAY) per riprendere la riproduzione. Fermare temporaneamente una Riproduzione fotogramma per presentazione. fotogramma (video) Premere M (PAUSE/STEP) durante la presentazione.
  • Page 260: Riprendere La Riproduzione

    Utilizzo Riprendere la riproduzione eroyt, L’unità registra il punto in cui avete premuto il Z (STOP) dipendendo dal disco. Se “MZ (Resume Stop)” (Riprendi Stop) appare sullo schermo brevemente, premere d (PLAY) riprendere la riproduzione (dal punto scena). Se si preme Z (STOP) due volte o si scarica il disco, “Z (Complete Stop)” appare sullo schermo. L’unità annulla il punto di arresto. Nota • Il punto di ripresa può essere cancellato quando si preme un pulsante (ad esempio; 1 (STANDBY/ON), B (OPEN/CLOSE), ecc). • Sui dischi BD-ROM con BD-J, la funzione di ripresa riproduzione non funziona. • Se si preme Z (STOP) una volta durante la riproduzione di un titolo BD-ROM interattivo, l’unità si troverà nella modalità di arresto completo.
  • Page 261: Riproduzione Avanzata

    Utilizzo Riproduzione avanzata Ripetizione di una sezione specifica erot Ripetere la riproduzione Questo lettore può ripetere una porzione che avete erotu selezionato. 1. Durante la riproduzione premere REPEAT (h) Durante la riproduzione, premere più volte REPEAT (h) (Ripeti) per selezionare [A-] all’inizio della (h) per selezionare la modalità di ripetizione sezione che desiderate ripetere. richiesta. 2. Premere ENTER (b) al termine della sezione. Disco Blu-ray / DVD La sezione selezionata verrà ripetuta jA- – La sezione selezionata verrà ripetuta continuamente. continuamente. 3. Per tornare alla riproduzione normale, premere jCapitolo – Il capitolo corrente viene riprodotto ripetutamente REPEAT (h) fino a selezionare ripetutamente. [Off ]. jTitolo – Il titolo corrente viene riprodotto Nota ripetutamente.
  • Page 262: Ricerca Di Segnalibri

    Utilizzo Ricerca di segnalibri Uso del menu di ricerca eroy eroy Potete avviare la riproduzione da/fino a nove punti Usando il menu di ricerca si può trovare memorizzati. agevolmente il punto dal quale si desidera avviare la riproduzione. Per immettere un segnalibri Cercare un punto 1. Durante la riproduzione, premere MARKER nel punto desiderato. L’icona Marker appare 1. Durante la riproduzione, premere SEARCH per brevemente sullo schermo. visualizzare il menu di ricerca. 2. Ripetere il punto 1 per aggiungere fino a nove segnalibri. Per richiamare una scena 2. Premere A/D per saltare alla riproduzione contrassegnata con 15 secondi in avanti o all’indietro. Potete selezionare un punto che volete saltare 1. Premere SEARCH e il menu di ricerca appare...
  • Page 263: Selezione Del File Dei Sottotitoli

    Utilizzo Selezione del file dei sottotitoli Memorizzazione dell’ultima scena Se il nome del file di sottotitoli è diverso da quello del file video, è necessario selezionare il nome del file Questa unità è in grado di memorizzare l’ultima sottotitoli nel menu [Video] prima di riprodurre il file. scena dell’ultimo disco visualizzato. L’ultima scena 1. Usare W/S/A/D per selezionare il file di rimane in memoria anche se si rimuove il disco o sottotitoli che si desidera riprodurre nel menu si spegne l’unità. Se si carica un disco la cui ultima [Video]. scena è stata memorizzata, quest’ultima viene richiamata automaticamente. 2. Premere ENTER (b). Nota y L’ultima scena memorizzata di un disco precedente viene cancellata non appena viene riprodotto un altro disco. y Sui dischi BD-ROM con BD-J la funzione di memoria ultima scena non funziona. y Con alcuni dischi, questa funzione potrebbe non funzionare. y Questo lettore non memorizza le Premere ENTER (b) nuovamente per impostazioni di un disco se l’unità viene deselezionare il file di sottotitoli. Il file di spenta prima di iniziare la riproduzione.
  • Page 264: Opzioni Durante La Visualizzazione Di Una Foto

    Utilizzo Opzioni durante la Ascolto della musica durante visualizzazione di una foto la presentazione diapositive Potete usare varie funzioni durante la visione di una Potete visualizzare i file di foto durante l’ascolto dei foto a tutto schermo. file musicali. 1. Durante la visione di una foto a tutto schermo, 1. Durante la visione di una foto a tutto schermo, premere DISPLAY (m) per visualizzare il menu premere DISPLAY (m) per visualizzare il menu delle opzioni. delle opzioni. 2. Selezionare un’opzione usando W/S. 2. Usare W/S per selezionare l’opzione [Sel. musica] e premere ENTER (b) per visualizzare il menu [Sel. musica]. 3. Usare W/S per selezionare un dispositivo, e premere ENTER (b). I dispositivi che potete selezionare possono essere diversi dipendendo dalla posizione dei file di foto che si stanno visualizzando a tutto schermo. Dispositivo Posizione foto disponibile...
  • Page 265: Visualizzazione Su Schermo

    Utilizzo Visualizzazione su 2. Selezionare un’opzione usando W/S. 3. Usare A/D per selezionare il parametro schermo desiderato per l’opzione. 4. Premere RETURN (x) per uscire dal menu su schermo. Si possono visualizzare e regolare varie informazioni Nota e impostazioni del contenuto. y Se non vengono premuti pulsanti per Visualizzazione di contenuto un paio di secondi, il display su schermo scompare. sullo schermo y Un numero di titolo non può essere eroy selezionato su alcuni dischi. y Le voci disponibili possono essere diversi 1. Durante la riproduzione premere DISPLAY dipendendo dai dischi e dai titoli. (m) per visualizzare le varie informazioni di riproduzione. y Se un disco Blu-ray interattivo è in fase di riproduzione, alcune informazioni di impostazione sono visualizzate sullo schermo ma non possono essere modificate.
  • Page 266: Riproduzione A Partire Da Un Punto Desiderato

    Utilizzo Riproduzione a partire da un Scelta della lingua dei punto desiderato sottotitoli eroy eroy 1. Premere DISPLAY (m) durante la riproduzione. 1. Durante la riproduzione, premere La casella di ricerca tempo visualizza il tempo DISPLAY (m) per visualizzare il menu su trascorso. schermo. 2. Selezionare l’opzione [Tempo] quindi inserire 2. Usare W/S per selezionare l’opzione il tempo di inizio desiderato indicando le ore, i [Sottotitolo]. minuti e i secondi da sinistra a destra. 3. Usare A/D per selezionare la lingua desiderata Per esempio, per trovare una scena a 2 ore, 10 per i sottotitoli. minuti e 20 secondi, inserire “21020”. 4. Premere RETURN (x) per uscire dal menu su Premere A/D per andare avanti o indietro di schermo. 60 secondi. Nota 3. Premere ENTER (b) per avviare la riproduzione Alcuni dischi consentono di cambiare le...
  • Page 267: Modifica Del Rapporto Di Aspetto Della Tv

    Utilizzo Modifica del rapporto di Modifica della modalità aspetto della TV immagine eroy eroy Si può modificare il rapporto di aspetto della TV Si può modificare la [Mod. immagine] durante la durante la riproduzione. riproduzione. 1. Durante la riproduzione, premere 1. Durante la riproduzione, premere DISPLAY (m) per visualizzare il menu su DISPLAY (m) per visualizzare il menu su schermo. schermo. 2. Usare W/S per selezionare l’opzione [Aspetto 2. Usare W/S per selezionare l’opzione [Mod. TV]. immagine]. 3. Usare A/D per selezionare l’opzione 3. Usare A/D per selezionare l’opzione desiderata. desiderata. 4. Premere RETURN (x) per uscire dal menu su 4. Premere RETURN (x) per uscire dal menu su schermo.
  • Page 268: Registrazione Audio Cd

    Utilizzo Registrazione Audio Se si desidera creare una cartella nuova usare W/S/A/D per selezionare [Nuova cartella] e premere ENTER (b). Inserire un nome di cartella tramite la tastiera virtuale e premere ENTER (b) con [OK] è Si può registrare una traccia o tutte le tracce selezionato. desiderate da un CD audio su un dispositivo di 8. Usare W/S/A/D per selezionare [OK] e memorizzazione. premere ENTER (b) per avviare la registrazione 1. Inserire un dispositivo di memorizzazione nella CD audio. porta USB sul pannello anteriore. Se si desidera interrompere la registrazione 2. Premere B (OPEN/CLOSE) e posizionare un CD audio CD in corso, premere ENTER (b) con audio sul vassoio portadisco. [Annulla] evidenziato. Premere B (OPEN/CLOSE) per chiudere il 9. Un messaggio appare quando la registrazione vassoio portadischi. La riproduzione inizia Audio CD è completata. Premere ENTER (b) per automaticamente. verificare il file musicale creato nella cartella di 3. Premere DISPLAY (m) per visualizzare il menu destinazione. delle opzioni. Nota Oppure y La tabella sotto mostra il tempo medio di Premere tasto X USB REC sul telecomando.
  • Page 269: Riproduzione Del Ipod

    Utilizzo > Attenzione La copia non autorizzata di materiale protetto, compresi programmi per computer, file, trasmissioni e registrazioni audio, potrebbe infrangere i diritti d’autore e costituire reato. Questo apparecchio non dovrebbe essere usato per tali propositi. Siate responsabili Rispettate i diritti d’autore Riproduzione del iPod Potete godere dell’audio del vostro iPod. Per i 2. Selezionare un file usando W/S/A/D, e dettagli sul iPod, vedere guida utente dell’iPod. premere ENTER (b) per riprodurre il file. Preparazione Godersi l’iPod sullo schermo y Per visualizzare i video e le foto iPod sullo schermo TV. 1. Connettere saldamente l’unità iPod. - Accertarsi di utilizzare la connessione video 2. Premere HOME MENU (n). tramite il jack VIDEO OUT sul pannello 3. Selezionare [Musica] o [Video] tramite A/D, e posteriore di questa unità. Selezionare la premendo ENTER (b).
  • Page 270: Usare Il Modo Di Ipod In

    Fare avanzare la riproduzione che sia necessario un controllo aggiuntivo in avanti o all’indietro. per utilizzarli su questa unità (es. “scorrere per sbloccare”). Per selezionare un modo di y Se si usa un’applicazione, si effettua una ripetizione desiderato: Traccia REPEAT telefonata, o si invia e riceve un messaggio (;), All (k), Off (nessuna di testo SMS, ecc. su iPod touch o iPhone, schermata). staccarlo dal supporto dell’iPod di questa Nota unità e quindi usarlo. Questo sistema è compatibile con le funzioni y Questa unità è stata sviluppata e testata audio e video di iPod (4^ generazione), iPod per la versione di software di iPod/iPhone nano, iPod classico, iPod mini, iPod touch e indicata sul sito web della Pioneer. iPhone (iPod shuffle non è supportato.). y Installando le versioni di software diverse da quelle indicate sul sito web della Pioneer nel vostro iPod/iPhone si può provocare una incompatibilità con questa unità. y La qualità video dipende dalle sorgenti video del vostro iPod. y Se si hanno problemi con il proprio iPod, visitare www.apple.com/support/iPod.
  • Page 271: Utilizzi Della Radio

    Utilizzo Utilizzi della radio Cancellazione di una stazione salvata Accertare che le antenne siano collegate. 1. Premere PRESET (W/S) per selezionare un (Vedere a pagina 24.) numero impostato che si desidera cancellare. 2. Premere CLEAR, il numero impostato Ascolto della radio lampeggerà nella finestra del display. 1. Premere INPUT/TUNER fino a quando TUNER 3. Premere ancora CLEAR, per calcellare il numero (FM) appare sul display. Viene sintonizzata impostato selezionato. l’ultima stazione radio ricevuta. 2. Premere e mantenere TUNE (-/+) per circa Cancellazione di tutte le due secondi fino a quando l’indicazione della stazioni salvate frequenza si modifica. La scansione si arresta quando l’unità è sintonizzata su una stazione. Premere e mantenere premuto CLEAR per due O premere TUNE (-/+) più volte. secondi. La scritta “CANCELLA TUTTO” lampeggia 3. Regolare il volume girando VOLUME sul sul display. Premere nuovamente CLEAR. Ora tutte...
  • Page 272: Uso Della Funzione Online

    Online Potete usare vari servizi di contenuti tramite Internet con la caratteristica Online. 1. Controllare la connessione di rete e le impostazioni (pagine 27-31). 2. Premere HOME MENU (n). 3. Selezionare opzione [Online] ucando A/D, e premere ENTER (b). 4. Selezionare un servizio in linea usando A/D, e premere ENTER (b). Nota y Per le informazioni dettagliate per ciascun servizio, contattare il provider dei contenuti o visitare il link di supporto del servizio. y Il contenuto dei servizi Online e delle informazioni di servizio correlate, compresa l’interfaccia utente, è soggetta a modifiche. Vedere il sito web di ciascun servizio per le informazione più aggiornate. y Usando le caratteristiche Online del collegamento di rete wireless si può produrre una velocità di scaricamento incorretta per interferenza con i dispositivi domestici che utilizzano le radiofrequenze. y Notare che la politica della privacy correlata verrà applicata ai vostri diritti di privacy e legali quando fornite nei servizi in linea i nomi, password e altre informazioni di accesso o informazioni personali e quando la Soc. Pioneer li mette nella sua banca dati. Vedere la politica di privacy della Pioneer sul suo sito WEB.
  • Page 273: Risoluzione Dei Problemi

    Risoluzione dei problemi Risoluzione dei problemi Generale Sintomo Causa/Soluzione L’alimentazione non è inserita. y Inserire il cavo di alimentazione saldamente nella presa a muro. L’unità non avvia la y Inserire un disco riproducibile (Controllare il tipo di disco, sistema riproduzione. colore e codice regionale) y Disporre il disco con il lato riproduzione volto verso il basso. y Collocare in modo corretto nella guida il disco nel vassoio portadisco y Pulire il disco. y Eliminare la funzione di classificazione o modificare il livello di classificazione. Non è possibile cambiare y Le angolazioni multiple non vengono registrate sul DVD Video in l'angolo di visione. riproduzione. Impossibile riprodurre file y I file non sono stati registrati con un formato compatibile con l’unità. musicali/foto/video. y L’unità non supporta il codec del file video. Il telecomando non funziona y Il telecomando non è puntato al sensore dell’unità. correttamente.
  • Page 274: Rete

    Risoluzione dei problemi Rete Sintomo Causa/Soluzione La funzionalità BD-Live non y L’unità di archiviazione USB connessa può non avere spazio funziona. sufficiente. Connettere un’unità di memorizzazione USB con almeno 1GB di spazio libero. y Verificare che l’unità sia collegata correttamente alla rete LAN e che sia possibile accedere a Internet (vedere a pag. 27-31). y La velocità della connessione a banda larga non è sufficiente per l’uso delle funzioni BD-Live. Rivolgersi al proprio provider di servizi internet (ISP) e si consiglia aumentare la velocità della banda larga. y L’opzione [Collegamento BD-Live] nel menu di configurazione [Impostaz.] è impostata [Proibito]. Impostare l’opzione su [Consentito]. Servizi di video streaming y Il vostro servizio di banda larga può non essere sufficientemente (quali YouTube™, ecc.) spesso veloce per la riproduzioni di servizi in video streaming. Rivolgersi al si fermano per memorizzare proprio provider di servizi internet (ISP) e si consiglia aumentare la durante la riproduzione. velocità della banda larga. La cartella condivisa o i file del y Il Firewall o software anti virus del server multimediale è in PC o server multimediale non esecuzione. Disattivare il Firewall o software anti virus in esecuzione sono visualizzati nel menu del sul PC o server multimediale. dispositivo. y Il lettore non è connesso alla rete locale alla quale sono connessi il PC o server multimediale.
  • Page 275: Immagine

    È possibile che la vostra TV non supporti la risoluzione di impostazione del lettore. Modificare la risoluzione su una una TV supportata. y Il jack di uscita HDMI OUT è connesso ad un dispositivo DVI che non supporta la funzione di protezione del copyright. L’immagine è molto disturbata y Si sta riproducendo un disco registrato con un sistema colore diverso da quello della TV. y Impostare su una risoluzione supportata dalla propria TV. La riproduzione dei dischi y Collegare il lettore alla TV con il cavo HDMI (Tipo A, Cavo HDMI™ ad Blu-ray 3D non genera alta velocità con Ethernet). visualizzazioni 3D. y La TV non è compatibile con il formato obbligatorio “HDMI 3D”. y L’opzione [Modalità 3D] nel menu [Impostaz.] è impostata su [Off ]. Impostare l’opzione su [On]. Suono Sintomo Causa/Soluzione L’audio è assente o l’audio è y L’unità si trova nella modalità di scansione, rallentatore o pausa. distorto y Il volume audio è basso. y Controllare la connessione dei cavi dell’altoparlante. (pagina 16) Aggiornamenti Si noti che le informazioni di questo prodotto sono disponibili nel sito web della Pioneer. Controllare il sito web per le informazioni su aggiornamento e servizio tecnico di questo lettore.
  • Page 276: Controllo Del Televisore Mediante Il Telecomando

    TV telecomando È possibile controllare il proprio apparecchio TV con il telecomando incluso. Se il televisore è tra quelli elencati di seguito, Potete controllare la TV tramite i pulsanti sotto. impostare il relativo codice di fabbrica. 1. Tenendo premuto il tasto 1 (TV POWER), digitare il codice di fabbrica del proprio Pulsanti di televisore usando i tasti numerici (consultare la controllo TV tabella in basso). Produttore Numero di codice Pioneer 1 (Predefinito) Premendo Potete Sony 2, 3 Spegne/accende la TV 1 (TV POWER) Panasonic 4, 5 Alterna la sorgente di Samsung 6, 7 INPUT ingresso TV tra la TV e altre 8, 9 sorgenti di ingresso.
  • Page 277: Indicativo Località

    Appendice Indicativo località Selezionare un codice area dall’elenco. Area Codice Area Codice Area Codice Area Codice Afghanistan Fiji Monaco Singapore Mongolia Repubblica Argentina Finlandia Slovacca Australia Francia Morocco Slovenia Austria Germania Nepal Sud Africa Belgio Gran Bretagna Paesi Bassi Corea del Sud Bhutan Grecia Antille Olandesi Spagna Bolivia Groenlandia Nuova Zelanda Sri Lanka Hong Kong Nigeria...
  • Page 278: Elenco Codici Lingua

    Appendice Elenco codici lingua Usare questo elenco per inserire la lingua desiderata per le seguenti impostazioni iniziali: [Audio Disco], [Sottotitolo Disco], e [Menu Disco]. Lingua Codice Lingua Codice Lingua Codice Lingua Codice Afar 6565 Francese 7082 Lituano 7684 Sindhi 8368 Afrikaans 6570 Frisone 7089 Macedone 7775 Cingalese 8373 Galiziano 7176 Malgascio 7771 Slovacco 8375 Albanese 8381 Malese 7783 Sloveno 8376 Ameharic...
  • Page 279: Marchi Commerciali E Licenze

    Appendice Marchi commerciali e licenze Prodotto sotto la licenza di brevetti USA numeri: 5,451,942; 5,956,674; 5,974,380; 5,978,762; 6,226,616; 6,487,535; 7,392,195; 7,272,567; 7,333,929; 7,212,872 & e altri brevetti U.S.A. e Blu-ray Disc™, Blu-ray™, Blu-ray 3D™, BD-Live™, mondiali rilasciati e in via di registrazione. DTS e BONUSVIEW™ e i loghi sono marchi depositati il simbolo sono marchi registrati, & i loghi DTS- dalla Blu-ray Disc Association. HD, DTS-HD Master Audio | Essential DTS sono marcvhi registrati della DTS, Inc. Il prodotto include il software. © DTS, Inc. , tutti i dritti riservati. è un marchio di DVD Format/Logo Licensing Corporation. DLNA™, e il logo DLNA e DLNA CERTIFIED™ sono marchi commerciali, marchi di servizio o di certificazione della Digital Living Network Alliance. Oracle e Java sono marchi commerciali registrati della Oracle e/o sue affiliate. Altri nomi possono essere marchi commerciali dei rispettivi proprietari. Il logotipo WI-FI CERTIFIED è un marchio di certificazione di proprietà della Wi-Fi Alliance. HDMI, il logo HDMI, e High-Definition Multimedia Interface sono marchi depositati o registrati della HDMI Licensing LLC negli Stati Uniti e in altri Il marchio di impostazione Wi-Fi protetto è un paesi. marchio della Wi-Fi Alliance. Prodotto con concessione di licenza da parte “x.v.Colour”, sono di Dolby Laboratories. “Dolby”, e il simbolo marchi commerciali della Sony Corporation.
  • Page 280 Appendice “Made for iPod” e “Made for iPhone” indicano che l’accessorio elettronico è stato progettato per collegarlo specificamente a iPod, o rispettivamente a iPhone, e è stato certificato dallo sviluppatore per soddisfare gli standard di prestazione della Apple. Apple non è responsabile per il funzionamento di questo dispositivo o per la sua conformità agli standard normativi e regolamentari di sicurezza. Si noti che l’uso di questo accessorio con iPod o iPhone può influenzare la prestazione wireless. iPhone, iPod, iPod classic, iPod nano, e iPod touch sono marchi commerciali della Apple Inc., registrati negli USA e in altri paesi. YouTube™ è un marchio di Google Inc. Picasa™ Web Albums è un marchio commerciale di Google Inc. Il prodotto include sistemi di proprietà di Microsoft Corporation e non può essere utilizzato o distribuito senza una licenza di Microsoft Licensing, Inc.
  • Page 281: Risoluzione Uscita Video

    Appendice Risoluzione uscita video Quando si riproducono supporti non protetti da copia Video Out COMPONENT VIDEO OUT HDMI OUT Risoluzione HDMI connesso HDMI disconnesso 576i 576p 576i 576p 576p 576p 720p 720p 720p 1080i 1080i 1080i 1080p/24 Hz 1080p / 24 Hz 576i 1080i 1080p / 50 Hz 1080p / 50 Hz 576i...
  • Page 282: Specifiche Tecniche

    Appendice Specifiche tecniche Generale Requisiti di alimentazione CA 220-240 V, 50/60 Hz Assorbimento energetico 150 W (In modo Standby: meno di 0,3 W) DIMENSIONI (L x A x P) Approx. 430 x 64 x 304 mm Peso netto (approssimativo) 3,4 kg Temperatura di funzionamento 5 °C a 35 °C Umidità di funzionamento 5 % a 85 % Ingressi/Uscite VIDEO OUT 1,0 V(p-p), 75 Ω, sinc negativa, jack RCA x 1 (Y) 1,0 V (p-p), 75 Ω, sinc negativa, jack RCA x 1 COMPONENT VIDEO OUT (Pb)/(Pr) 0,7 V (p-p), 75 Ω, jack RCA x 2 HDMI IN/OUT (video/audio) 19 pin (Tipo A, Connettore HDMI™) ANALOG AUDIO IN 2, 0 Vrms (1 kHz, 0 dB), 600 Ω, jack RCA (L, R) x 1 DIGITAL IN (OPTICAL) 3 V (p-p), jack ottico x 1 PORTABLE IN 0,5 Vrms (3,5 mm stereo jack) Sintonizzatore Campo sintonia FM 87,5 - 108,0 MHz Amplificatore Uscita di potenza (RMS) Totale 1100 W Anteriore 180 W × 2 (1 kHz , 4 Ω, THD 10 %) Centro 180 W (1 kHz , 4 Ω, THD 10%) Vista posteriore 180 W × 2 (1 kHz , 4 Ω, THD 10 %)
  • Page 283 Laser Laser a semiconduttore lunghezze d’onda 405 nm / 650 nm Sistema segnali Sistema colore TV PAL/NTSC standard Risposta in frequenza Da 20 Hz a 18 kHz (campionamento 48 kHz, 96 kHz, 192 kHz) Distorsione armonica Meno di 0,05% Gamma dinamica Più di 80 dB Porta LAN jack Ethernet x 1, 10BASE-T/100BASE-TX Accesso di rete wireless IEEE 802.11n integrata, (bande 5 GHz e Wireless LAN (antenna interna) 2,4 GHz), compatibile con reti 802,11a/b/g Wi-Fi. Alimentazione tensione bus (USB) DC 5 V 0 500 mA Altoparlanti BCS-717 S-BD707T y Cassa anteriore/surround (sinistra/destra) Dimensioni nette Tipo 2 vie 260 x 1097 x 260 mm (L x H x P) Impedenza nominale 4 Ω Peso netto 3,8 kg y Diffusore centrale Dimensioni nette Tipo 1 vie 300 x 87 x 65 mm (L x H x P) Impedenza nominale 4 Ω...
  • Page 284 Appendice Altoparlanti BCS-313 S-BD303 y Altoparlante anteriore/surround (sinistra/destra) Dimensioni nette Tipo 1 vie 96 x 96 x 85 mm (L x H x P) Impedenza nominale 4 Ω Peso netto 0,4 kg y Diffusore centrale Dimensioni nette Tipo 1 vie 300 x 87 x 65 mm (L x H x P) Impedenza nominale 4 Ω Peso netto 0,6 kg y Subwoofer Dimensioni nette Tipo 1 vie 130,5 x 420 x 375 mm (L x H x P) Impedenza nominale 3 Ω Peso netto 4,4 kg y Il design e le specifiche tecniche sono soggette a cambiamento senza preavviso.
  • Page 285: Manutenzione

    Appendice Manutenzione Note sui Dischi Manipolazione dei Dischi Maneggiare l’unità Non toccare la faccia di lettura dei dischi. Tenere i dischi dai bordi in modo da non lasciare impronte sulla superficie. Non incollare in alcun caso carta o Maneggiare l’unità nastro adesivo sul disco. Conservare la confezione di trasporto originale e il Conservazione dei Dischi materiale dell’imballo. Se occorre trasportare l’unità, per ottenere la massima protezione è possibile Dopo la riproduzione, conservare i dischi nella loro reimballare il prodotto nell’imballo originale fornito custodia. Non esporre il disco alla luce solare diretta dalla fabbrica. o a sorgenti di calore e non lasciarlo mai in un’auto Tenere pulite le superfici esterne parcheggiata alla luce solare diretta. y Non utilizzare liquidi volatili in prossimità Pulizia dei Dischi dell’unità, come ad esempio spray insetticida. y Strofinare con forza può danneggiare la Impronte digitali e polvere sul disco possono superficie. causare una qualità scadente dell’immagine e dell’audio. Prima di riprodurre un disco, pulirlo con y Non lasciare prodotti in gomma o plastica a un panno pulito. Strofinare il disco partendo dal...
  • Page 286: Informazione Importante Riguardo I Servizi In Rete

    Le licenze del software open source usato in questo lettore si trovano alla fine di questo documento. Tutte le informazioni, dati, documenti, comunicazioni, scaricamenti di file, file, testo, immagini, fotografie, grafici, video, abbozzi di web, pubblicazioni, utilità, risorse, software, codici, programmi, programmi applet, oggetti, applicazioni, prodotti e altro contenuto (“contenuto”) e tutti i servizi e le offerte (“servizi”) forniti o resi disponibili da o tramite una qualsiasi terza parte (ciascuno con un “provider di servizi”) sono di sola responsabilità del provider di servizi da cui sono generati. Le disponibilità del e l’accesso al contenuto e ai servizi forniti dal provider di servizi tramite la Soc. PIONEER Device sono soggetti a variazione in un qualsiasi momento, senza avviso preventivo, comprendenti, ma non limitati alla sospensione, rimozione o cessazione di tutti o di qualsiasi parte del contenuto o dei servizi. Se avete qualche richiesta o problema correlato al contenuto o ai servizi, potete fare riferimento al sito web del fornitore di servizi per le informazioni più aggiornate. La PIONEER non è responsabile né perseguibile per il servizio clienti correlato al contenuto e ai servizi. Una qualsiasi domanda o richiesta di servizio che si riferisca al contenuto o ai servizi dovrebbe essere inviata direttamente ai rispettivi fornitori di contenuto e di servizi. La PIONEER non è responsabile di alcun contenuto o servizi fornito dal provider di servizi o di una qualsiasi variazione di, rimozione da, o cessazione di tale contenuto o servizi e non garantisce nè...
  • Page 288: Información De Seguridad

    Guía de inicio Información de a niveles altos de humedad o la luz solar directa (o luz artificial potente) seguridad PRECAUCIÓN: Éste es un producto láser clase I, ADVERTENCIA clasificado conforme a la norma CEI 60825-1:2007 RIESGO DE DESCARGA sobre seguridad de los productos láser. ELÉCTRICA NO ABRIR Para asegurar un uso apropiado de este producto, ADVERTENCIA: PARA REDUCIR EL RIESGO DE lea cuidadosamente este manual del propietario DESCARGA ELÉCTRICA NO EXTRAIGA LA CUBIERTA y consérvelo para futuras consultas. Si la unidad (O PARTE POSTERIOR). NO HAY EN EL INTERIOR necesitara de mantenimiento, póngase en contacto NINGUNA PARTE QUE PUEDA REEMPLAZAR con un centro de servicio autorizado. EL USUARIO. PARA CUALQUIER REPARACIÓN El uso de controles, ajustes o procedimientos CONTACTE CON PERSONAL DE MANTENIMIENTO diferentes a los especificados aquí puede provocar CUALIFICADO. una exposición peligrosa a la radiación. Para prevenir la exposición directa al rayo láser, no Este símbolo de un relámpago intente abrir el cerramiento. Radiación visible del con cabeza de flecha dentro láser al abrirlo. NO FIJE LA VISTA EN EL LÁSER O HAZ de un triángulo equilátero está DE LUZ.
  • Page 289 Guía de inicio Información para los usuarios sobre la recogida Este dispositivo está provisto de una pila o acumulador portátil. y eliminación de equipos usados y pilas agotadas. Forma segura de las pilas o el acumulador del equipo: Retire la pila o juego de pilas antiguo y siga los pasos en orden inverso a su colocación. Para impedir la contaminación del medioambiente o los posibles efectos adversos en la salud de humanos y animales, coloque la pila usada o el acumulador en el contenedor apropiado de los puntos de recogida Symbol examples Símbolo para designados para tal fin. No elimine las pilas o el for batteries pilas y baterías acumulador junto con la basura doméstica. Se...
  • Page 290 Guía de inicio Notas sobre el copyright Aviso de la Unión Europea para productos inalámbricos y Debido a que AACS (Sistema de Contenido de PIONEER Electronics Acceso Avanzado) está aprobado como sistema declara que este producto de protección de contenidos para el formato o productos cumplen con de discos Blu-ray, similar al uso del sistema de los requisitos esenciales y otras disposiciones protección anticopia CSS (Content Scramble relevantes de la Directiva 1999/5/EC, 2004/108/ System) para el formato DVD, se imponen ciertas EC, 2006/95/EC y 2009/125/EC.
  • Page 291 Guía de inicio Aviso importante para los sistemas de color de su televisor El sistema de color de este reproductor varía en función de los discos que se están reproduciendo en ese momento. Por ejemplo, cuando la unidad reproduce un disco grabado en el sistema de color NTSC, la imagen se emite como una señal NTSC. El sistema multicolor del televisor es el único que puede recibir todas las señales emitidas por el reproductor. y Si tiene un televisor con un sistema de color PAL, sólo se mostrarán imágenes distorsionadas cuando utilice discos o contenidos de vídeo grabado en NTSC. y Los televisores con sistema multicolor cambian el sistema de color de forma automática según las señales de entrada. En caso de que el sistema de color no se cambie automáticamente, desactívelo y actívelo de nuevo para ver imágenes normales en pantalla. y Incluso si los discos grabados en el sistema de color NTSC se visualizan correctamente en su televisor, quizás no se graben correctamente en su grabadora.
  • Page 292 Mando a distancia 39 Efectos de sonido Panel delantero Parte posterior Funcionamiento 40 Reproducción general Conexión 40 – Uso del menú [HOME] Montaje los altavoces 40 – Reproducción general – Configuración de los altavoces 40 – Reproducir un archivo en el disco/ BCS-717 dispositivo USB – Configuración de los altavoces – Reproducción de discos BCS-313 Blu-ray 3D Montaje mural del altavoz central – Disfrutar del BD-Live™ – Antes del montaje 42 – Reproducir un archivo desde un Notas adicionales sobre la colocación servidor de red 20 Colocación del sistema 43 – Operaciones básicas para los...
  • Page 293 Índice Solución de problemas 45 – Repetición de una parte específica 45 – Ampliar la imagen de reproducción 57 Solución de problemas 46 – Búsqueda por marcador 57 – General 46 – Utilizar el menú búsqueda 58 – Red 47 – Seleccionar un archivo de subtítulos 59 – Imagen 47 – Memoria de la última escena 59 – Sonido 48 – Opciones durante la visualización de 59 – Actualizaciones una foto 48 – Escuchar música mientras se muestran diapositivas...
  • Page 294: Discos Reproducibles Y Símbolos Utilizados En Este Manual

    Guía de inicio Introducción Discos reproducibles y símbolos utilizados en este manual Medio/Plazo Logo Símbolo Descripción y Discos de películas que puedan comprarse o alquilarse. y Discos “Blu-ray 3D” y Discos BD-R/RE grabados en formato BDAV. Blu-ray y Discos BD-R/RE que contienen archivos con películas, música o fotografías. y Formato ISO 9660+JOLIET, UDF y UDF Bridge y Discos de películas que puedan comprarse o alquilarse. y Sólo modo de vídeo y finalizado DVD-ROM y También admite discos de doble capa DVD-R Formato AVCHD finalizado DVD-RW DVD+R DVD+RW y Discos DVD±R/RW que contienen archivos con...
  • Page 295: Guía De Inicio

    Guía de inicio Nota El símbolo “7” en pantalla y Algunos discos CD-R/RW (o DVD±R/RW) no El símbolo “7” puede aparecer en la pantalla de su podrán reproducirse en la unidad debido a televisor durante su manejo e indica que la función las condiciones del equipo de grabación o a explicada en este manual del usuario no está los propios discos CD-R/RW (o DVD±R/RW). disponible en ese el aparato. y Dependiendo de la finalización y del software de grabación, algunos discos grabados (CD-R/RW, DVD±R/RW o BD-R/RE) podrían no reproducirse. y Puede que no se reproduzcan los discos CD-R/RW y BD-R/RE, DVD±R/RW grabados con un ordenador personal o una grabadora de DVD o CD si el disco está dañado o sucio, o si hay suciedad o restos de condensación en la lente de la unidad. y Si graba un disco con un ordenador, incluso si lo hace en un formato compatible, hay casos en los que no se puede reproducir debido a los ajustes del programa usado para crear el disco. (Consulte al editor del programa para más información). y La unidad requiere discos y grabaciones que cumplan ciertas normas técnicas para obtener una calidad de reproducción óptima.
  • Page 296: Accesorios Suministrados

    Guía de inicio Accesorios suministrados Accesorios y cajas de altavoces (S-BD707SW) Cable de vídeo (1) Mando a distancia (1) Cables para los Apoyos grandes altavoces (1) antideslizantes (1) Accesorios y cajas de altavoces (S-BD303) Pilas (1) Antena FM (1) Cradle para iPod (1) Apoyos pequeños Cables codificados antideslizantes (1) por colores para los altavoces (6) Accesorios y cajas de altavoces (S-BD707T) Apoyos grandes antideslizantes (1) Tornillos (12) Cables codificados por colores para los altavoces (5)
  • Page 297: Compatibilidad De Archivos

    Guía de inicio Compatibilidad de archivos Archivos de vídeo Fuente Extensión del Formato de Formato de códec Subtítulo archivo audio archivo “.avi”, “.divx”, DIVX3.xx, DIVX4.xx, Dolby Digital, SubRip (.srt / .txt), SAMI (.smi), “.mpg”, “.mpeg”, DIVX5.xx, DIVX6.xx DTS, MP3, SubStation Alpha (.ssa/.txt), “.mkv”, “.mp4”, (sólo para WMA, AAC, MicroDVD (.sub/.txt), VobSub “.asf”, “.wmv”, reproducción (.sub), SubViewer 1.0 (.sub), Disco, “.m4v” (DRM estándar), XVID, SubViewer 2.0 (.sub/.txt), TMPlayer free) MPEG1 SS, H.264/ (.txt), DVD Subtitle System (.txt)
  • Page 298: Avchd (Códec De Video Avanzado De Alta Definición)

    Guía de inicio Nota AVCHD (Códec de video y El número máximo de caracteres para el avanzado de alta definición) nombre de archivo es 180. y Este reproductor puede reproducir discos en y Número máximo de archivos/carpetas: Menos de 2 000 (número total de archivos y formato AVCHD. Estos discos se graban y usan carpetas) normalmente en videocámaras. y Puede que tarde varios minutos en leer el y El formato AVCHD es un formato de cámara de contenido del soporte dependiendo del vídeo digital de alta definición. tamaño y el número de archivos. y El formato MPEG-4 AVC/H.264 es capaz de y La compatibilidad de archivos puede variar comprimir imágenes con una eficacia mayor según el servidor. que el formato de compresión de imagen convencional. y Los requisitos de archivo de la página 11 no siempre son compatibles. Puede que haya y Este reproductor puede reproducir discos algunas restricciones por las características...
  • Page 299: Algunos Requisitos Del Sistema

    Guía de inicio Algunos requisitos del sistema Notas sobre la compatibilidad Para reproducción de vídeo de alta definición: y Dado que BD-ROM es un nuevo formato, pueden aparecer algunos problemas de discos, conexión y Visualización de alta definición con tomas de digital y otros problemas de compatibilidad. Si entrada COMPONENT o HDMI. tiene problemas de compatibilidad, póngase y Disco BD-ROM con contenido en alta definición. en contacto con un Centro de servicio técnico y Es necesario que el dispositivo de pantalla autorizado. disponga de una entrada DVI apta para HDMI o y Esta unidad le permite disfrutar de funciones HDCP para mostrar algunos contenidos (según tales como imagen secundaria (PIP), audio indiquen los autores del disco). secundario y paquetes virtuales, etc… con Para reproducir archivos de la carpeta compartida BD-Video que admite BONUSVIEW (BD-ROM de tu PC a través de la red doméstica, el PC requiere versión 2 Perfil 1 versión 1.1/ Perfil de estándar lo siguiente: final). Es posible reproducir audio y vídeo y Windows® XP (Service Pack 2 o superior), secundario desde un disco compatible con la Windows Vista® (no se requiere Service Pack), función Picture-in-Picture. Para más información...
  • Page 300: Mando A Distancia

    Guía de inicio Mando a distancia c/v SCAN: Busca hacia • • • • • • • • • a • • • • • • • atrás o delante. P INPUT/TUNER: Cambia el SPK LEVEL: Ajusta el nivel de modo de entrada. sonido del altavoz deseado. 1 (STANDBY/ON): Apaga y X USB REC: Graba un CD de enciende el reproductor. audio. B OPEN/CLOSE: Abre o cierra la MUTE: Silencia el aparato. bandeja del disco. SOUND: Selecciona un modo de HDMI IN: Cambia el modo de efecto de sonido. entrada a HDMI IN directamente. VOL +/- : Ajusta el volumen de OPTICAL: Cambia directamente los altavoces.
  • Page 301: Panel Delantero

    Guía de inicio Panel delantero STANDBY/ON OPEN/CLOSE FUNCTION TUNE VOLUME PORTABLE IN 500 mA a Bandeja del disco c Ventana de visualización b Botones de funcionamiento d Sensor remoto g h i j k Botón 1 (STANDBY/ON) e PORTABLE IN STANDBY/ON OPEN/CLOSE FUNCTION Apaga y enciende el reproductor.
  • Page 302: Montaje Los Altavoces

    Conexión Montaje los altavoces Para altavoz central: Utilice el adhesivo incluido para colocar los cuatro apoyos pequeños en la base del altavoz central. Configuración de los altavoces BCS-717 middle non-skid pads Preparación de los altavoces apoyos pequeños small non-skid pads antideslizantes 1. Coloque los apoyos antideslizantes en la base de cada pie de altavoz, el subwoofer y el altavoz central. Para las bases de altavoz: Utilice el adhesivo incluido para colocar los middle non-skid pads cuatro apoyos centrales en la base (inferior) de cada pie de altavoz.
  • Page 303 > Precaución y No conecte los altavoces suministrados y El pasador plástico no es un componente a ningún amplificador diferente al que se de montaje, y el altavoz no debe colgar incluye con este sistema. La conexión a otro directamente de la pared con este pasador. amplificador puede dar lugar a fallos de Utilice siempre un cordón para estabilizar el funcionamiento o un incendio. altavoz. y Conecte el cable de altavoz de subwoofer y Pioneer no acepta ninguna responsabilidad (púrpura) al naranja de reproductor. Mounting screw por posibles pérdidas o daños resultantes y Estos terminales de altavoz tienen voltaje 5 mm (not supplied) de un montaje o instalación incorrectos, PELIGROSO. Para evitar el riesgo de Mounting screw una resistencia insuficiente de los materiales descargas eléctricas durante la conexión o 5 mm 10 mm (not supplied) de instalación, uso incorrecto o desastres...
  • Page 304 Conexión Configuración de los altavoces Para altavoz central: Utilice el adhesivo incluido para colocar los BCS-313 cuatro apoyos pequeños en la base del altavoz central. Preparación de los altavoces 1. Coloque los apoyos antideslizantes en la base de cada altavoz. apoyos antideslizantes small non-skid pads small non-skid pads pequeños Para los altavoces: Utilice el adhesivo incluido para colocar los small non-skid pads small non-skid pads cuatro apoyos centrales pequeños en la base (inferior) de cada altavoz. For subwoofer: apoyos antideslizantes small non-skid pad small non-skid pads...
  • Page 305: Montaje Mural Del Altavoz Central

    > Precaución – 30 minutos. Si el problema continúa, separe el sistema de altavoces del televisor. y Si no está seguro de la calidad y la resistencia de una pared, consulte a un thick cord El subwoofer no está protegido magnéticamente profesional. y, por esta razón, no puede colocarse cerca de un televisor o monitor. No coloque medios de y Pioneer no se hace responsable de ningún Plastic catch almacenaje magnéticos (como discos flexibles y accidente o daños resultantes de una cintas o cassettes de vídeo) cerca del subwoofer. instalación inadecuada. No fije los altavoces delanteros/surround y el subwoofer a una pared o techo. Podrían caerse o causar lesiones. Mounting screw Tornillo de montaje 5 mm (not supplied) (No incluido) 10 mm De 5 mm a 7 mm...
  • Page 306: Colocación Del Sistema

    Conexión > Precaución Colocación del sistema y Tenga cuidado de que los niños no coloquen las manos o cualquier objeto en La ilustración siguiente muestra un ejemplo de el conducto del subwoofer* colocación del sistema. Tenga en cuenta que, para *conducto de subwoofer: Un orificio para una mejor explicación, estas ilustraciones pueden los sonidos graves en la caja del subwoofer. no coincidir con el producto real. y Coloque el altavoz central a una distancia Para lograr el mejor efecto de sonido surround, los segura, fuera del alcance de los niños. altavoces que no sean subwoofer se colocarán en De lo contrario, podría caer el altavoz y la misma dirección desde la posición de escucha causar lesiones y/o daños materiales. y Los altavoces contienen piezas magnéticas, por lo que pueden producirse irregularidades en la pantalla del televisor o monitor del PC. Coloque los altavoces alejados del televisor o el monitor del ordenador. Altavoz delantero izquierdo (L)/ Altavoz delantero derecho (R): Coloque los altavoces delanteros a los lados del monitor y nivelados con la superficie la pantalla, cuanto sea posible.
  • Page 307: Conexiones Al Televisor

    Conexión Conexiones al televisor Conexión HDMI Si dispone de un televisor o monitor HDMI, puede conectarlo a este “reproductor usando un cable Realice una de las siguientes conexiones, HDMI (cable HDMI™ de alta velocidad con Ethernet, dependiendo de la capacidad del equipo en tipo A). Conecte la toma HDMI del reproductor a la cuestión. toma HDMI de un televisor o monitor compatible y Conexión HDMI (página 21) con HDMI. y Conexión de vídeo componente (página 23) y Conexión del vídeo (página 23) Nota Parte trasera de la unidad y Según del televisor y del otro equipo que desee conectar, existen varias formas de conectar la unidad. Utilice sólo una de las conexiones descritas en este manual. y Consulte el manual del televisor, del sistema estéreo o de otros dispositivos, según considere necesario, para realizar las conexiones más adecuadas. y Asegúrese de que el reproductor está Cable conectado directamente al TV. Sintonice el HDMI Televisor TV al canal de entrada de vídeo correcto. y No conecte el reproductor a través del vídeo. La imagen del DVD podría aparecer distorsionada por el sistema de protección...
  • Page 308: Función Arc (Canal De Retorno De Audio)

    Conexión Nota Función ARC (Canal de retorno y Si un dispositivo HDMI conectado no acepta de audio) la salida de audio del reproductor, el audio del dispositivo HDMI podrá distorsionarse o La función ARC permite a un televisor con no emitirse. capacidad HDMI enviar audio a la salida HDMI OUT de este reproductor. y Si utiliza una conexión HDMI, es posible cambiar la resolución para la salida HDMI. Para utilizar esta función: (Consulte “Configuración de resolución” en - El televisor debe ser compatible con la función la página 24). ARC y el ARC de este reproductor debe estar en y Seleccione el tipo de salida de vídeo de On (Activo) (El ajuste inicial es “Off” (Apagado)). la toma HDMI OUT mediante la opción - El método de ajuste de ARC puede variar [Conf. color HDMI] en el menú [Config.] (ver dependiendo del televisor. Para más información página 34). acerca de la función ARC. consulte el manual del y No modifique la resolución si la conexión ya televisor. se ha establecido, podrían producirse fallos - Debe utilizar el cable HDMI (Cable HDMI™ de alta en el funcionamiento. Para resolver este velocidad con Ethernet, tipo A).
  • Page 309: Conexión De Vídeo Componente

    Conexión Conexión de vídeo Conexión del vídeo componente Conecte la toma VIDEO OUT del reproductor a la toma de entrada de vídeo situada en el televisor Conecte las tomas COMPONENT VIDEO OUT del mediante un cable de vídeo. Puede oír el sonido a reproductor a las correspondientes tomas de través del altavoz del sistema. entrada del televisor mediante un cable de vídeo de componente. Puede oír el sonido a través del altavoz del sistema. Parte trasera de la unidad Parte trasera de la unidad Cable de vídeo Televisor Cable de vídeo de componente Televisor Nota Si utiliza la conexión COMPONENT VIDEO OUT, puede modificar la resolución de salida (consulte el apartado “Configuración de resolución” en la página 24.)
  • Page 310: Configuración De Resolución

    Conexión Conexión de la antena Configuración de resolución El reproductor proporciona varias resoluciones de salida para las conexiones HDMI OUT y Conecte la antena suministrada para escuchar la COMPONENT VIDEO OUT. Es posible cambiar la radio. resolución mediante el menú [Config.]. 1. Pulse HOME MENU (n). 2. Utilice A/D para seleccionar el menú [Config.] y pulse ENTER (b). Aparecerá el menú [Config.]. 3. Utilice W/S para seleccionar la opción [PANTALLA] y, a continuación, pulse D para pasar al segundo nivel. 4. Utilice W/S para seleccionar la opción [Resolución] y, a continuación, pulse ENTER (b) para pasar al tercer nivel. Parte trasera de la unidad Nota 5. Use W/S para seleccionar una opción y, a Tras conectar la antena por cable de FM, continuación, pulse ENTER (b) para confirmar manténgala tan horizontal como sea posible. su selección. Asegúrese de sacar la antena por cable FM Nota completamente. y Si su televisor no acepta la resolución que ha configurado en el reproductor, es posible ajustar la resolución a 576p de la siguiente manera:...
  • Page 311: Conexiones Con Un Dispositivo Externo

    Conexión Conexiones con un Conexión PORTABLE IN dispositivo externo Puede disfrutar del sonido de su reproductor de audio portátil a través de los altavoces de este sistema. Conecte la clavija de los auriculares (o salida de Conexión AUX línea) del reproductor d audio portátil en la toma PORTABLE IN de esta unidad. Y seleccione la opción Puede disfrutar del sonido de un componente [PORTABLE] pulsando INPUT/TUNER y ENTER (b). externo a través de los altavoces de este sistema. También puede pulsar el botón FUNCTION del Conecte las tomas de salida de audio analógica al panel frontal para seleccionar el modo de entrada. componente en AUX L/R (INPUT) de esta unidad. Y seleccione la opción [AUX] pulsando INPUT/TUNER y ENTER (b). VOLUME También puede pulsar el botón FUNCTION del panel frontal para seleccionar el modo de entrada. PORTABLE IN 500 mA Parte trasera de la unidad Blanco Reproductor de MP3, etc. Rojo A las tomas de salida de audio de su componente (TV, VCR, etc.)
  • Page 312: Conexión Optical In

    Conexión Conexión OPTICAL IN Conexión HDMI IN 1/2 Puede disfrutar del sonido de su componente con Puede disfrutar de la imagen y sonido de su una conexión óptica digital a través de los altavoces componente a través de esta conexión. de este sistema. Conecte la clavija HDMI OUT de su componente Conecte la clavija de salida óptica de su en la toma HDMI IN 1 o 2 de esta unidad. Y, a componente en la toma OPTICAL IN de la unidad. continuación, seleccione la opción [HDMI IN 1/2] Y seleccione la opción [OPTICAL] pulsando INPUT/ pulsando INPUT/TUNER y ENTER (b). TUNER y ENTER (b). O pulse OPTICAL para También puede pulsar el botón FUNCTION del seleccionarlo directamente. panel frontal para seleccionar el modo de entrada. También puede pulsar el botón FUNCTION del panel frontal para seleccionar el modo de entrada. Parte trasera de la unidad Parte trasera de la unidad A la clavija HDMI OUT de su componente (caja de conexión, receptor satélite digital, consola de A la clavija de salida videojuegos, etc.) óptica digital de su componente Nota y No se puede cambiar la resolución de vídeo en el modo HDMI IN 1/2. Cambie la resolución de vídeo del componente...
  • Page 313: Conexión A La Red Doméstica

    Conexión Conexión a la red doméstica Servicio de banda ancha Este reproductor puede conectarse a una red de área local (LAN) a través del puerto LAN del panel trasero o el módulo inalámbrico interno. Al conectar la unidad a una red particular de banda ancha, tiene acceso a servicios como interactividad BD-Live y servicios en línea. Conexión a red por cable Router Las redes por cable proporcionan el mejor rendimiento, ya que los dispositivos están conectados directamente a la red y no están sometidos a la interferencia de radiofrecuencias. Para más información consulte la documentación del dispositivo de red. Conecte el puerto LAN del reproductor al correspondiente puerto del módem o router a PC y/o servidor certificado DLNA través de un cable de red LAN o cable Ethernet. Nota y Cuando enchufe o desenchufe el cable LAN, hágalo sujetando el cable por el enchufe. Al desenchufarlo, no estire del cable LAN, desenchúfelo presionando hacia abajo el enchufe. y No conecte un cable de teléfono modular al puerto LAN. Parte trasera de la unidad y Existen varias configuraciones para la conexión, siga las especificaciones de su...
  • Page 314: Configuración De La Red Por Cable

    Conexión Nota Configuración de la red por Si no hay disponible un servidor DHCP en cable la red y desea configurar manualmente Si hay un servidor DHCP en la red de área local la dirección IP, seleccione [Estática] y, a (LAN) a través de una conexión por cable, a este continuación, [dirección IP], [máscara de reproductor se le asignará automáticamente red], [gateway] y [servidor DNS] mediante una dirección IP. Después de realizar la conexión los botones W/S/A/D y los botones física, es posible que se tenga que ajustar la numéricos. Si se equivoca mientras introduce configuración de red del reproductor en algunas un número, pulse CLEAR para borrar la parte redes domésticas. Ajuste la configuración de [RED] resaltada. de la siguiente manera. 4. Seleccione [OK] y pulse ENTER (b) para aplicar Preparación los ajustes de red. Antes de ajustar la red por cable, es necesario 5. El reproductor le pedirá que compruebe la conectar Internet de banda ancha a su red conexión de red. Seleccione [OK] y pulse ENTER doméstica. (b) para completar la conexión de red. 1. Seleccione la opción [Config de conexión] en el 6. Si selecciona [Test] y pulsa ENTER (b) en el menú [Config.] y, a continuación, pulse ENTER paso 5 anterior, el estado de conexión de la red (b).
  • Page 315: Conexión A Red Inalámbrica

    Conexión Nota Conexión a red inalámbrica El rango de frecuencia disponible y los Otra conexión opcional es la utilización de un canales para bandas de 5 GHz se indican en el punto de acceso o un router inalámbrico. La siguiente cuadro. Pero podría haber diferencias configuración de red y el método de conexión y restricciones dependiendo del país. Intente pueden variar en función de los equipos utilizados configurar su punto de acceso con otro canal y el entorno de red. si tiene dificultades con la conexión de red Este reproductor está equipado con un modulo inalámbrica. inalámbrico IEEE 802,11n (banda dual, 5 GHz Área Rango de frecuencia y 2,4 GHz) que también es compatible con los estándares 802,11 a/b/g. Para conseguir el mejor Norteamérica 5.15-5.25 GHz (ch. 36-48), rendimiento inalámbrico, se recomienda utilizar 5.725-5.825 GHz (ch. 149-161), una red Wi-Fi certificada IEEE 802.11n (punto de 5.825-5.850 GHz (ch.165) acceso o router inalámbrico). Europa, EAU 5.15-5.25 GHz (ch. 36-48) Otros 5.15-5.25 GHz (ch. 36-48), VOLUME 5.725-5.825 GHz (ch. 149-161), PORTABLE IN 500 mA 5.825- 5.850 GHz (ch.165) Configuración de una red...
  • Page 316 Conexión [Manual] – Es posible que el punto de acceso 2. El menú [Config de conexión] aparecerá en la pantalla. Utilice W/S para seleccionar no emita el nombre del punto de acceso (SSID). [Inalámb.] y pulse ENTER (b). Compruebe la configuración del router a través de su ordenador y ajuste el router para emitir un 3. Seleccione [Sí] y pulse ENTER (b) para SSID, o introduzca manualmente el nombre del continuar. Los ajustes de la nueva conexión punto de acceso (SSID) en [Manual]. resetean la configuración de la red actual. [Pulsador] – Si su punto de acceso o router 4. El reproductor escanea todos los puntos de inalámbrico admite el método de configuración acceso o routers inalámbricos disponibles Pulsador, seleccione esta opción y presione dentro del rango y los visualiza en una lista. el pulsador en el punto de acceso o router Utilice W/S para seleccionar un punto de inalámbrico antes de que transcurran un par de acceso o router inalámbrico de la lista y, a minutos. No es necesario saber el nombre del continuación, pulse ENTER (b). punto de acceso (SSID) y código de seguridad de su punto de acceso o router inalámbrico. 5. Utilice W/S/A/D para seleccionar el modo IP entre [Dinámico] y [Estático]. Normalmente, seleccione [Dinámico] para asignar de forma automática una dirección IP. Nota Si no hay disponible un servidor DHCP en Si tiene seguridad en su punto de acceso o la red y desea configurar manualmente router inalámbrico, compruebe que la clave la dirección IP, seleccione [Estático] y, a...
  • Page 317 Conexión Notas sobre la conexión de red: y Se necesita un puerto 10 LAN Base-T o 100 Base- TX para la conexión por cable a este reproductor. y Muchos de los problemas de conexión a la Si su servicio de Internet no permite ese tipo de red que se producen durante la configuración conexiones no podrá conectar el reproductor. pueden resolverse a menudo reiniciando el y Para utilizar el servicio xDSL necesitará un router. router o cable módem. Después de conectar el reproductor a la red doméstica, apague y Es necesario un módem DSL para utilizar el inmediatamente y/o desconecte el cable de servicio DSL y un cable módem para usar el alimentación del router o cable módem de la red servicio de cable módem. Dependiendo del doméstica. Después, encienda y/o conecte de método de acceso y el acuerdo de suscripción nuevo el cable de alimentación. que tenga con su ISP, puede que no pueda utilizar la función de conexión a Internet de este y El número de dispositivos que pueden recibir reproductor, o puede que se limite al número el servicio de Internet quedará limitado por las de dispositivos que se pueden conectar a la vez. condiciones de servicio aplicables dependiendo (Si su ISP limita la suscripción a un dispositivo, del proveedor de servicios de Internet (ISP). Para puede que este reproductor no pueda obtener más información, póngase en contacto conectarse si ya hay conectado un ordenador).
  • Page 318: Conexión De Dispositivos Usb

    Conexión Nota Conexión de y Este reproductor es compatible con dispositivos USB memoria flash USB/HDD externo formateado en FAT16, FAT32 y NTFS cuando se accede a archivos (música, fotos, vídeos). Este reproductor puede reproducir archivos de Sin embargo, para la grabación de CD de vídeo, música y fotos guardados en el dispositivo audio y BD-Live sólo son compatibles los USB. formatos FAT16 y FAT32. Utilice la memoria flash USB/HDD externo formateado en Reproducción de contenido en FAT16 o FAT32 cuando use la grabación de CD de audio y BD-Live. dispositivos USB y El dispositivo USB puede utilizarse para 1. Inserte un dispositivo USB en el puerto USB el almacenamiento local y así disfrutar de hasta que encaje perfectamente. discos BD-Live con Internet. y Esta unidad admite hasta 8 particiones del VOLUME dispositivo USB. y No extraiga el dispositivo USB mientras esté en funcionamiento (reproducción, etc.). PORTABLE IN y No es compatible con un dispositivo USB 500 mA...
  • Page 319: Configuración Del Sistema

    Configuración del sistema Ajustes Menú [PANTALLA] Aspecto TV Ajuste de los valores de Seleccione una relación de aspecto del TV según el tipo de televisor. configuración [Formato Carta 4:3] Es posible modificar los ajustes del reproductor en Selecciónelo cuando haya un televisor el menú [Config.]. tradicional (4:3) conectada. Muestra la imagen 1. Pulse HOME MENU (n). con barras que la ocultan por la parte superior e inferior. [Form. panorám. 4:3] Selecciónelo cuando haya un televisor tradicional (4:3) conectada. Muestra la imagen recortada para ajustarse a la pantalla de su televisor. Ambos lados de la imagen están 2. Utilice A/D para seleccionar el menú [Config.] recortados. y pulse ENTER (b). Aparecerá el menú [Config.]. [16:9 Original] Seleccione esta opción cuando se haya conectado a un televisor panorámico 16:9. La imagen de formato 4:3 se mostrará con una...
  • Page 320 Configuración del sistema Resolución Conf. color HDMI Ajusta la resolución de salida de la señal de vídeo Seleccione el tipo de salida de la conexión HDMI HDMI y de componente. Refiérase a la página 24 y OUT. Para esta configuración, consulte los manuales 65 para obtener detalles sobre la configuración de del dispositivo de pantalla. la resolución. [YCbCr] [Auto] Seleccione esta opción al conectar a un Si la conexión [HDMI OUT] se conecta a una dispositivo de pantalla HDMI. TV que proporcione información de pantalla [RGB] (EDID), se seleccionará automáticamente Seleccione esta opción al conectar a un la resolución que mejor se adapte a la TV dispositivo de pantalla DVI. conectada. [1080p] Modo 3D Representa 1080 líneas de vídeo progresivo. Seleccione el tipo de modo de salida para la [1080i] reproducción de discos Blu-ray 3D. Representa 1080 líneas de vídeo entrelazado. [Apagado] [720p] La reproducción de discos Blu-ray 3D se hará Representa 720 líneas de vídeo progresivo. en modo 2D, como un disco BD-ROM normal. [576p] [Activo] Representa 576 líneas de vídeo progresivo.
  • Page 321: Menú [Idioma]

    Configuración del sistema Menú [IDIOMA] Menú [AUDIO] Menú de visualización Ajuste Altavoces Seleccione un idioma para el menú [Config.] y para Para obtener el mejor sonido posible, utilice la información en pantalla. la pantalla de configuración de altavoces para especificar el volumen de los altavoces conectados Menú del disco/Audio del disco/ y la distancia desde su posición de escucha. Utilice la prueba para ajustar el volumen de los altavoces Subtítulo del disco al mismo nivel. Seleccione el idioma que prefiera para la pista de audio (audio del disco), los subtítulos, y el menú del disco. [Original] Hace referencia al idioma original en que se grabó el disco. [Otros] Pulse ENTER (b) para seleccionar otro idioma. Use los botones numéricos y a continuación [Altavoces] ENTER (b) para introducir el número de 4 Selecciona un altavoz que quiera ajustar. dígitos según la lista de códigos de idioma de la página 62.
  • Page 322: Menú [Bloqueo]

    Configuración del sistema Sincronismo HD AV Menú [BLOQUEO] En ocasiones, en la televisión digital puede Los ajustes de [BLOQUEO] sólo afectan a la producirse un retardo entre la imagen y el sonido. reproducción de BD-ROM y DVD. Si esto ocurre, se puede compensar ajustando un Para acceder a las distintas funciones de [BLOQUEO] retardo en el sonido, es decir, hacer que ‘espere’ a es preciso introducir el código de seguridad de 4 la llegada de la imagen: se denomina HD AV Sync. dígitos establecido anteriormente. Utilice W/S para desplazarse arriba y abajo a Si todavía no ha introducido una contraseña, se través de la cantidad de retardo, que se puede le pedirá que lo haga. Introduzca dos veces una ajustar entre 0 y 300 ms. contraseña de 4 dígitos y pulse ENTER (b) para crear una nueva contraseña. Contraseña Puede crear o cambiar la contraseña. [Ninguno] Introduzca dos veces una contraseña de 4 dígitos y pulse ENTER (b) para crear una nueva contraseña. DRC (Control de rango dinámico) [Cambiar] Esta función le permite escuchar una película Introduzca la contraseña actual y pulse ENTER con un nivel más bajo sin pérdida de claridad del (b). Introduzca dos veces una contraseña de 4...
  • Page 323: Menú [Red]

    System Setting Índice DVD Menú [RED] Bloquea la reproducción de un DVD clasificado La configuración [RED] es necesaria para utilizar BD- según su contenido. (No todos los discos están Live y los servicios en línea. clasificados). Configuración de conexión [Indice 1-8] Si su entorno de red doméstica está preparado para La clasificación uno (1) es la que tiene más la conexión del reproductor, se deberá configurar restricciones y la ocho (8) la que menos. la conexión de red por cable o inalámbrica del [Desbloqueo] reproductor para una comunicación por red. (Consulte la “Conexión a la red doméstica” en las Si selecciona la opción de [Desbloqueo], el páginas 27-31.) control paterno no estará activado y el disco se reproducirá en su totalidad. Estado de conexión Si desea comprobar el estado de red en este Índice Disco Blu-ray reproductor, seleccione las opciones [Estado Establece un límite de edad para la reproducción conexión] y pulse ENTER (b) para comprobar si se de BD-ROM. Utilice los botones numéricos para ha establecido una conexión a la red e Internet. introducir un límite de edad para la visualización de BD-ROM.
  • Page 324: Menú [Otros]

    Configuración del sistema Menú [OTROS] Inicializar [Ajuste de fábrica] ARC (Canal de retorno de audio) Se pueden restablecer la configuración del Puede activar [Activo] o desactivar [Apagado] la reproductor a los ajustes predeterminados de función ARC. La función ARC permite a un televisor fábrica. con capacidad HDMI enviar audio a la salida HDMI OUT de este reproductor. Para más información [Espac. libre en BD-LIVE] acerca de esta función, consulte la página 22. Inicializa los contenidos de BD-Live desde la unidad de almacenaje conectada a través de DivX® VOD USB. ACERCA DE DIVX VIDEO: DivX ® es un formato Nota de vídeo digital creado por DivX, Inc. Se trata de Si restablece la configuración de fábrica del un dispositivo oficial con certificación DivX que reproductor utilizando la opción [Ajuste de reproduce vídeo DivX. Visite divx.com y podrá fábrica] deberá activar de nuevo los servicios obtener más información y herramientas de en línea y la configuración de red.
  • Page 325: Efectos De Sonido

    Configuración del sistema Efectos de sonido Puede seleccionar un modo de sonido adecuado. Pulse SOUND varias veces hasta que aparezca el modo deseado en la pantalla del panel frontal o en la pantalla del TV. Los elementos mostrados en el ecualizador pueden variar según las fuentes de sonido y los efectos. [Mode 1]: Le proporciona el ajuste de sonido adecuado cuando se conectan altavoces de tipo pequeño (S-BD303). [Mode 2]: Le proporciona el ajuste de sonido adecuado cuando se conectan altavoces de tipo alto (S-BD707T). [Bypass]: Las señales de audio envolvente y de múltiples canales se reproducen según la manera en la que se grabaron. [Bajos]: Refuerza el efecto del sonido grave desde el altavoz frontal izquierdo y derecho y el subwoofer. [PL ll Cine]: Realiza la decodificación del modo de película Pro Logic II en la señal de entrada y produce cinco canales de salida de banda ancha desde las fuentes de 2 canales. Este ajuste es ideal para ver vídeos de películas ya grabadas o antiguas. Este modo está disponible sólo en las fuentes de 2 canales. [PL ll Música]: Realiza la decodificación del modo de música Pro Logic II en la señal de entrada y produce cinco canales de salida de banda ancha desde las fuentes de 2 canales. Este ajuste es ideal para las fuentes de estéreo normal como un CD.
  • Page 326: Reproducción General

    Funcionamiento Nota Reproducción general y Las funciones de reproducción descritas en este manual no siempre están disponibles en todos los archivos y dispositivos. Algunas Uso del menú [HOME] funciones pueden estar restringidas por muchos factores. El menu HOME aparece al pulsar el botón HOME y Dependiendo de los títulos de BD-ROM, MENU (n). Utilice W/S/A/D para seleccionar es posible que sea necesaria una conexión una categoría y pulse ENTER (b). de dispositivo USB para una correcta reproducción. y Los discos de formato DVD VR sin finalizar no podrán reproducirse en esta unidad. y Algunos discos DVD-VR se hacen con datos CPRM mediante una DVD RECORDER. Esta unidad no admite estos tipos de disco. Reproducir un archivo en el disco/dispositivo USB a [Película] - Reproduce contenidos de vídeo. b [Música] - Reproduce contenidos de audio.
  • Page 327: Reproducción De Discos Blu-Ray 3D

    Funcionamiento Reproducción de discos Disfrutar del BD-Live™ Blu-ray 3D Además de la función BONUSVIEW, el BD-ROM, con compatibilidad con BD-Live (BD-ROM versión 2 Este reproductor puede reproducir discos Blu-ray perfil 2) y función de ampliación de red, le permite 3D que contienen visión separada para los ojos disfrutar de más funciones como la descarga de izquierdo y derecho. trailers de películas nuevas mediante la conexión de esta unidad a Internet. Preparación 1. Revisar la conexión de red y los ajustes (páginas Para reproducir un título Blu-ray 3D en modo 27-31). 3D estereoscópico, se necesita: 2. Inserte en el panel frontal un dispositivo de y y y C ompruebe si su TV tiene capacidad 3D y almacenamiento USB en el puerto USB. entrada(s) HDMI (3D). Para descargar contenido extra se necesita un y S i es necesario, utilice gafas 3D para disfrutar dispositivo de almacenamiento USB. de la experiencia 3D. 3. Pulse HOME MENU (n), y ajuste la opción y y y C omprobar si el título BD-ROM es un disco [Conexión BD-LIVE] en el menú [Config.] (página...
  • Page 328: Reproducir Un Archivo Desde Un Servidor De Red

    Funcionamiento Reproducir un archivo desde Introducción de una ID usuario y contraseña de red un servidor de red Dependiendo del entorno de su PC, puede que tenga que introducir una ID de usuario y contraseña de red para poder acceder a una Este dispositivo puede reproducir películas, música carpeta compartida. e imágenes contenidas en un PC o un servidor DLNA a través de su red doméstica. 1. El menú de teclado aparece automáticamente si se solicitan la ID de usuario de red y la 1. Revisar la conexión de red y los ajustes (páginas contraseña. 27-31). 2. Utilice W/S/A/D para seleccionar un 2. Pulse HOME MENU (n). carácter y, a continuación, pulse ENTER (b) para 3. Seleccione [Película], [Foto] o [Música] con los confirmar su selección en el teclado virtual. botones A/D, y pulse ENTER (b).
  • Page 329: Operaciones Básicas Para Los Contenidos De Vídeo Y Audio

    Funcionamiento Operaciones básicas para los Operaciones básicas para los contenidos de vídeo y audio contenidos de imágenes Para detener la reproducción Para reproducir una presentación de diapositivas Pulse Z (STOP) durante la reproducción. Pulse d (PLAY) para iniciar la presentación de Para hacer una pausa diapositivas. Pulse M (PAUSE/STEP) durante la reproducción. Para detener una presentación de Pulse d (PLAY) para reanudar la reproducción.
  • Page 330: Reanudar La Reproducción

    Funcionamiento Reanudar la reproducción eroyt, La unidad graba a partir del punto en el que pulsó Z (STOP) dependiendo del disco. Si aparece en la pantalla durante unos instantes “MZ (Resume Stop)”, pulse d (PLAY) para reanudar la reproducción (desde el punto de la escena). Si pulsa dos veces Z (STOP) o extrae el disco, aparece en pantalla “Z(parada completa)”. La unidad eliminará el punto donde se detuvo. Nota y El punto de reanudación podría eliminarse si se pulsa un botón (por ejemplo; 1 (STANDBY/ON), B (OPEN/CLOSE), etc). y La función de reanudación no está operativa para discos BD-ROM con BD-J. y Si pulsa una vez Z (STOP) durante la reproducción de títulos interactivos de BD-ROM, la unidad entrará en el modo de parada completa.
  • Page 331: Reproducción Avanzada

    Funcionamiento Reproducción Repetición de una parte específica avanzada erot Este reproductor puede repetir una parte que haya Reproducción repetida seleccionado. 1. Durante la reproducción pulse REPEAT (h) erotu para seleccionar [A-] al comienzo de la parte que desea repetir. Durante la reproducción, pulse REPEAT (h) repetidamente para seleccionar un modo de 2. Pulse ENTER (b) al final de la parte. La secuencia repetición deseado. seleccionada se repetirá continuamente. Disco Blu-ray / DVD 3. Para volver a la reproducción normal, pulse REPEAT (h) varias veces para seleccionar jA- – La parte seleccionada se repetirá de forma continua. [Apagado]. Nota jCapítulo – El capítulo actual se reproducirá de forma repetida. y No es posible seleccionar inferiores a 3 jTítulo –...
  • Page 332: Búsqueda Por Marcador

    Operating Búsqueda por marcador Utilizar el menú búsqueda eroy eroy Puede comenzar la reproducción desde un máximo Con el menú de búsqueda, es posible encontrar de nueve puntos memorizados. fácilmente el punto a partir del cual se desea iniciar la reproducción. Para introducir un marcador Para buscar un punto 1. Durante la reproducción, pulse MARKER en el punto que desee. El icono Marker aparece 1. Durante la reproducción, pulse SEARCH para brevemente en la pantalla del televisor. mostrar el menú de búsqueda. 2. Repita el paso 1 para agregar hasta nueve marcadores. Para recuperar una escena marcada 2. Pulse A/D para saltar la reproducción 15 segundos hacia delante o hacia atrás.
  • Page 333: Seleccionar Un Archivo De Subtítulos

    Funcionamiento Seleccionar un archivo de Memoria de la última escena subtítulos Esta unidad memoriza la última escena del último disco que se haya visionado. La última escena Si el nombre del archivo de subtítulos es diferente visualizada permanece en memoria incluso si retira del nombre del archivo de película, tendrá que el disco de la unidad o apaga la unidad. Si carga un seleccionar el archivo de subtítulos en el menú disco con la escena memorizada, ésta se recuperará [Película] antes de reproducir la película. automáticamente. 1. Utilice W/S/A/D para seleccionar el archivo Nota de subtítulos que desea reproducir en el menú [Película]. y La función de memoria de un disco anterior se borrará al reproducir un disco diferente. 2. Pulse ENTER (b). y Esta función puede no funcionar dependiendo del disco. y En discos BD-ROM con BD-J la función de memoria de la última escena no funciona. y Esta unidad no memoriza los ajustes de un disco si apaga la unidad antes de comenzar la reproducción.
  • Page 334: Opciones Durante La Visualización De Una Foto

    Funcionamiento Opciones durante la Escuchar música mientras se visualización de una foto muestran diapositivas Puede utilizar varias opciones mientras visualiza Puede mostrar archivos de fotografías mientras una foto en pantalla completa. escucha archivos de música. 1. Mientras ve una foto en pantalla completa, 1. Mientras ve una foto en pantalla completa, pulse DISPLAY (m) para mostrar el menú de pulse DISPLAY (m) para mostrar el menú de opciones. opciones. 2. Seleccione una opción con W/S. 2. Utilice W/S para seleccionar la opción [Selec música] y pulse ENTER (b) para mostrar el menú [Selec música]. 3. Utilice W/S para seleccionar un dispositivo, and pulse ENTER (b). Los dispositivos que pueden seleccionarse difieren dependiendo de la ubicación del archivo de fotografías que se muestra en pantalla completa. Ubicación de la Dispositivo fotografía disponible...
  • Page 335: Visualización En Pantalla

    Funcionamiento Visualización en 2. Seleccione una opción con W/S. 3. Utilice A/D para ajustar el valor de la opción pantalla seleccionada. 4. Pulse RETURN (x) para salir de la visualización en pantalla. Es posible visualizar y ajustar diversa información y Nota ajustes sobre el contenido. y Si durante unos segundos no pulsa ningún Visualización en pantalla de la botón, la visualización de la pantalla desaparecerá. información del contenido y En algunos discos no puede seleccionarse eroy un número de título. y Las opciones disponibles podrán variar en 1. Durante la reproducción pulse DISPLAY (m) función del disco o título. para mostrar diversa información sobre la reproducción. y Si se está reproduciendo un disco Blu- ray interactivo, se muestran algunas informaciones de ajuste en la pantalla, pero no pueden cambiarse.
  • Page 336: Reproducir A Partir Del Tiempo Seleccionado

    Funcionamiento Reproducir a partir del tiempo Seleccionar el idioma de los seleccionado subtítulos eroy eroy 1. Presione DISPLAY (m) durante la reproducción. 1. Durante la reproducción, pulse El cuadro de búsqueda de tiempo muestra el DISPLAY (m) para mostrar la visualización en tiempo de reproducción transcurrido. pantalla. 2. Seleccione la opción [Tiempo] e introduzca el 2. Utilice W/S para seleccionar la opción tiempo de inicio deseado en horas, minutos y [Subtítulo]. segundos, de izquierda a derecha. 3. Utilice A/D para seleccionar el idioma de Por ejemplo, para buscar una escena a las 2 subtítulos deseado. horas, 10 minutos y 20 segundos, introduzca 4. Pulse RETURN (x) para salir de la visualización “21020”. en pantalla. Pulse A/D para avanzar o retroceder la Nota reproducción 60 segundos.
  • Page 337: Para Cambiar La Relación De Aspecto De Tv

    Funcionamiento Para cambiar la relación de Para cambiar el modo de aspecto de TV imagen eroy eroy Es posible cambiar el ajuste de la relación de Es posible cambiar la opción [Modo de imagen] aspecto de TV durante la reproducción. durante la reproducción. 1. Durante la reproducción, pulse 1. Durante la reproducción, pulse DISPLAY (m) para mostrar la visualización en DISPLAY (m) para mostrar la visualización en pantalla. pantalla. 2. Utilice W/S para seleccionar la opción 2. Utilice W/S para seleccionar la opción [Modo [Aspecto TV]. de imagen]. 3. Utilice A/D para seleccionar la opción 3. Utilice A/D para seleccionar la opción deseada. deseada.
  • Page 338: Grabación De Cd De Audio

    Funcionamiento Grabación de CD de Si desea crear una carpeta nueva, utilice W/S/A/D para seleccionar [Nueva carpeta] audio y pulse ENTER (b). Introduzca un nombre de carpeta con el teclado virtual, y pulse ENTER (b) mientras [OK] Es posible grabar una pista o todas las pistas que está seleccionado. desee de un CD de audio hasta un dispositivo de 8. Utilice W/S/A/D para seleccionar [OK] y almacenamiento USB. pulse ENTER (b) para iniciar la grabación del 1. Inserte en el panel frontal un dispositivo de CD de audio. almacenamiento USB en el puerto USB. Si desea detener la grabación de un CD de 2. Pulse B (OPEN/CLOSE), y coloque un CD de audio, pulse ENTER (b) mientras [Cancelar] se audio en la bandeja de discos. ilumina. Pulse B (OPEN/CLOSE) para cerrar la bandeja 9. Aparecerá un mensaje cuando se haya de discos. completado la grabación del CD de audio. La reproducción se inicia automáticamente. Pulse ENTER (b) para comprobar el archivo de 3. Pulse DISPLAY (m) para visualizar el menú de música creado en la carpeta de destino. opciones. Nota y La siguiente tabla muestra el promedio de Pulse el botón X USB REC del mando a distancia.
  • Page 339: Reproducir Música Desde El Ipod

    Funcionamiento > Precaución La realización de copias no autorizadas de material protegido contra copias, incluidos programas informáticos, archivos, emisiones o grabaciones de audio, puede infringir los derechos de autor y como tal constituir un delito. Este equipo no deberá utilizarse para dichos fines. Sea responsable Respete los derechos de autor Reproducir música desde el iPod 2. Seleccione un archivo con W/S/A/D, y Puede disfrutar del sonido de su iPod. Para más pulse ENTER (b) para reproducir el archivo. información acerca del iPod, consulte la guía de usuario del iPod. Disfrutar del iPod en la pantalla Preparación y Para ver vídeos y fotos del iPod en la pantalla del 1. Conecte el iPod con fuerza. televisor. 2. Pulse HOME MENU (n). - Asegúrese de utilizar la conexión de vídeo 3. Seleccione [Música] o [Película] con A/D, y a través de la toma VIDEO OUT del panel...
  • Page 340: Disfrutar Del Modo Ipod In

    La compatibilidad con su iPod puede variar adelante o atrás. en función del tipo de dispositivo. Para seleccionar un modo de y iPod touch y iPhone pueden tener un repetición deseado: Pista (;), funcionamiento diferente del iPod. Puede REPEAT Todos (k), Desactivado (Sin ser necesario algún control adicional para pantalla). su utilización con esta unidad. (por ejemplo, “deslizar para desbloquear”) Nota y Si utiliza una aplicación, hace una llamada, o Este sistema es compatible con el audio y el envía y recibe mensajes de texto SMS, etc., vídeo de un iPod (4ª generación), iPod nano, en el iPod touch o iPhone, desconéctelo del iPod classic, iPod mini, iPod touch y iPhone dock del iPod de esta unidad y utilícelo. (iPod shuffle no es compatible.). y Esta unidad se ha desarrollado y probado para la versión de software de iPod/iPhone indicada en la página web de Pioneer. y La instalación de otras versiones de software no indicados en el sitio web de Pioneer para su iPod/iPhone puede dar lugar a problemas de incompatibilidad. y La calidad del vídeo depende de las fuentes de vídeo del iPod. y Si tiene algún problema con su iPod, visite www.apple.com/support/iPod.
  • Page 341: Operaciones De La Radio

    Funcionamiento Operaciones de la radio Borrar todas las emisoras memorizadas Asegúrese de que estén conectadas las antenas. Mantenga pulsado CLEAR durante dos segundos. (Consulte la página 24) Parpadeará “ERASE ALL” (Borrar todo). Pulse CLEAR de nuevo. Se borran todas las emisoras guardadas. Escuchar la radio Cómo mejorar una recepción 1. Pulse INPUT/TUNER hasta que aparezca TUNER (sintonizador) (FM) en la ventana del visor. Se de FM de baja calidad sintonizará la última emisora recibida. Pulse el botón de color azul (D) (MONO/STEREO) 2. Mantenga pulsado TUNE (-/+) del mando a distancia. Cambiará el sintonizador aproximadamente dos segundos hasta que de estéreo a mono y, generalmente, mejorará la comience a cambiar la indicación de frecuencia recepción La búsqueda se detendrá cuando la grabadora sintonice un canal. O pulse TUNE (-/+) repetidamente.
  • Page 342: Uso De La Función Online

    1. Revisar la conexión de red y los ajustes (páginas 27-31). 2. Pulse HOME MENU (n). 3. Seleccione [Online] con A/D, y pulse ENTER (b). 4. Seleccione un servicio en línea con A/D, y pulse ENTER (b). Nota y Para recibir información detallada de cada servicio, póngase en contacto con el proveedor de contenidos o visite en enlace de asistencia del servicio. y Los contenidos de los servicios online y la información relacionada de servicios, incluida la interfaz de usuario, están sujetos a cambios. Consulte la dirección web de cada servicio para obtener la información más actualizada. y La utilización de las funciones online con una conexión de red inalámbrica puede causar una velocidad de streaming incorrecta por las interferencias con aparatos doméstico que utilizan radio frecuencias. y Se aplicará la política de privacidad relacionada a sus derechos de privacidad y legales cuando facilite a los servicios online sus nombres de usuario, contraseñas y otras informaciones de conexión o personales y cuando Pioneer las guarde. Consulte la política de privacidad de Pioneer en la página web.
  • Page 343: Solución De Problemas

    Solución de problemas Solución de problemas General Síntoma Causa y solución El aparato no se enciende. y Enchufe correctamente el cable de alimentación a la salida de la pared. La unidad no inicia la y Introduzca un disco reproducible. (Compruebe el tipo de disco, reproducción. sistema del color y código de región.) y Cargue el disco con la cara de reproducción hacia abajo. y Coloque el disco en la bandeja de discos correctamente dentro de las guías. y Limpie el disco. y Cancele la función de clasificación o cambie el nivel de clasificación. No es posible cambiar el y Los ángulos múltiples no se graban en el Vídeo DVD que se está ángulo. reproduciendo. No se puede reproducir y Los archivos no están grabados en un formato que pueda reproducir archivos de música/foto/vídeo. la unidad. y La unidad no admite el códec del archivo de vídeo. El mando a distancia no y El mando a distancia no está apuntando al sensor remoto de la funciona correctamente.
  • Page 344: Red

    Solución de problemas Síntoma Causa y solución La función BD-Live no y Es posible que el almacenamiento USB que hay conectado no tenga espacio suficiente. Conecte el almacenamiento USB con al menos 1 funciona. GB de espacio libre. y Asegúrese de que la unidad está correctamente conectada a la red de área local y pueda acceder a Internet (véase la página 27-31). y Su velocidad de banda ancha puede que no sea lo suficientemente rápida para usar las funciones BD-Live. Le recomendamos que se ponga en contacto con su proveedor de servicios Internet (ISP) y aumente la velocidad de banda ancha. y La opción [Conexión BD-LIVE] del menú [Config.] está ajustada en [Prohibido]. Ajuste la opción en [Permitido]. Servicios de vídeo streaming y Puede que la velocidad de su servicio de banda ancha no sea lo (como YouTube™, etc) suelen suficientemente rápida para transmitir los servicios de vídeo. Le detenerse o almacenar recomendamos que se ponga en contacto con su proveedor de temporalmente durante la servicios Internet (ISP) y aumente la velocidad de banda ancha. reproducción. La carpeta o archivos y Se está ejecutando el software antivirus o cortafuegos de su servidor compartidos de su ordenador de medios. Desactive el software antivirus o cortafuegos que se está o servidor de medios no ejecutando en el ordenador o servidor de medios.
  • Page 345: Imagen

    El televisor no es compatible con la resolución que ha configurado en el reproductor. Cambie la resolución a una compatible con el televisor. y La toma HDMI OUT del reproductor está conectada a un dispositivo DVI que no es compatible con la protección de los derechos de autor. Aparece ruido en la imagen. y Está reproduciendo un disco grabado en un sistema de color diferente al del televisor. y Ajuste la resolución que su televisor admita. La reproducción de discos Blu- y Conecte el reproductor a su televisor mediante un cable HDMI (Cable ray 3D se se hace en modo 3D. HDMI™ de alta velocidad con Ethernet, tipo A). y Quizás su televisor no sea compatible con el “formato HDMI 3D obligatorio”. y La opción [Modo 3D] de menu [Config.] se pone en [Apagado]. Cambie la opción a [Activo]. Sonido Síntoma Causa y solución No hay sonido o el sonido se y La unidad está en modo pausa, cámara lenta o escaneo. emite distorsionado. y El volumen del sonido es bajo. y Conecte la conexión de los cables de los altavoces. (página 16) Actualizaciones La información de este producto está disponible en el sitio web de Pioneer. Consulte en el citado sitio web la información relacionada con la actualización o el soporte para este reproductor.
  • Page 346: Control De Un Televisor Con El Mando A Distancia Suministrado

    Puede manejar su televisor con el mando a distancia suministrado. Si su televisor aparece en la tabla siguiente, Puede controlar su televisor utilizando los introduzca el código de fabricante adecuado. siguientes botones. 1. Mientras mantiene pulsado el botón 1 (TV POWER), pulse los botones numéricos para introducir el código de fabricante de su TV Botones de (véase la tabla a continuación). control del televisor Fabricante Número de código Pioneer 1 (por defecto) Sony 2, 3 Pulsando Puede Panasonic 4, 5 Encender y apagar el 1 (TV POWER) Samsung 6, 7 televisor. 8, 9 Cambiar la fuente de entrada del televisor entre 2. Suelte el botón 1 (TV POWER) para completar INPUT éste y otras fuentes de...
  • Page 347: Lista De Códigos De Países

    Apéndice Lista de códigos de países Seleccione un código de área de esta lista. País Código País Código País Código País Código Afganistán Fidji Mónaco Singapur Mongolia República de Argentina Finlandia Eslovaquia Australia Francia Marruecos Eslovenia Austria Alemania Nepal Sudáfrica Bélgica Gran Bretaña Holanda Corea del Sur Bután Grecia Antillas Holandesas AN España Bolivia Groenlandia...
  • Page 348: Lista De Códigos De Idiomas

    Apéndice Lista de códigos de idiomas Utilice esta lista para introducir el idioma deseado para los siguientes ajustes iniciales: [Audio del disco], [Subtítulo del disco] y [Menú del disco]. Idioma Código Idioma Código Idioma Código Idioma Código Afar 6565 Francés 7082 Lituano 7684 Sindhi 8368 Afrikaans 6570 Frisón 7089 Macedonio 7775 Cingalés 8373 Gallego 7176 Malgache 7771 Eslovaco 8375 Albanés 8381 Malayo 7783 Esloveno...
  • Page 349: Marcas Comerciales Y Licencias

    Apéndice Marcas comerciales y licencias Fabricado bajo licencia de las patentes de EE.UU. nº: 5,451,942; 5,956,674; 5,974,380; 5,978,762; 6,226,616; 6,487,535; 7,392,195; 7,272,567; 7,333,929; 7,212,872 y otras patentes de EE.UU e Blu-ray Disc™, Blu-ray™, Blu-ray 3D™, BD-Live™, internacionales, registradas o solicitadas. DTS y el BONUSVIEW™ y sus logotipos son marcas símbolo son marcas registradas y DTS-HD, DTS- comerciales de Blu-ray Disc Association. HD Master Audio l Essential and los logotipos DTS son marcas comerciales de DTS, Inc. El producto incluye software. © DTS, Inc. Todos los derechos reservados. es una marca registrada de DVD Format/ Logo Licensing Corporation. DLNA™, el logo de DLNA y DLNA CERTIFIED™ son marcas comerciales, marcas de servicios o marcas de certificación de Digital Living Network Alliance. Oracle y Java son marcas registradas Oracle y/ o sus fliales. Todas las marcas comerciales son propiedad de sus respectivos propietarios. El logotipo Wi-Fi CERTIFIED es una marca de certificación de Wi-Fi Alliance. HDMI, el logotipo HDMI y High-Definition Multimedia Interface son marcas registradas de La marca Wi-Fi Protected Setup es una marca de HDMI Licensing LLC en Estados Unidos y otros Wi-Fi Alliance. países. “x.v.Colour”, son marcas Fabricado bajo autorización de Dolby comerciales de Sony Corporation.
  • Page 350 Apéndice "Made for iPod" (fabricado para iPod) y "Made for iPhone" (fabricado para iPhone) significa que un accesorio electrónico ha sido diseñado para su conexión específica a un iPod, o iPhone respectivamente, y ha sido certificado por el desarrollador para cumplir con las normas de funcionamiento estándar de Apple. Apple no es responsable del funcionamiento de este aparato o de su cumplimiento con normas de seguridad y reglamentaciones. El uso de este accesorio con un iPod o iPhone puede afectar a su rendimiento inalámbrico. iPhone, iPod, iPod classic, iPod nano, y iPod son marcas comerciales de Apple Inc., registradas en EE.UU. y otros países YouTube™ es una marca registrada de Google Inc. Picasa™ Web Albums es una marca comercial de Google Inc. Este producto incluye tecnología propiedad de Microsoft Corporation y no puede ser utilizado o distribuido sin una licencia de Microsoft Licensing, Inc.
  • Page 351: Resolución De La Salida De Vídeo

    Apéndice Resolución de la salida de vídeo Cuando se reproducen medios sin protección anticopia Salida de vídeo COMPONENT VIDEO OUT HDMI OUT Resolución HDMI conectado HDMI desconectado 576i 576p 576i 576p 576p 576p 720p 720p 720p 1080i 1080i 1080i 1080p/24 Hz 1080p / 24 Hz 576i 1080i...
  • Page 352: Especificaciones

    Apéndice Especificaciones General Requisitos de alimentación AC 220-240 V, 50/60 Hz Consumo de energía 150 W (En modo de reposo: menos de 0,3 W) Dimensiones (A x Alt x F) Aprox. 430 x 64 x 304 mm Peso neto (aprox.) 3,4 kg Temperatura de funcionamiento 5 °C a 35 °C Humedad de funcionamiento 5 % a 85 % Entradas/Salidas VIDEO OUT 1,0 V (p-p), 75 Ω, sinc. negativa, toma RCA x 1 (Y) 1,0 V (p-p), 75 Ω, sinc. negativa, toma RCA x 1 COMPONENT VIDEO OUT (Pb)/(Pr) 0,7 V (p-p), 75 Ω, toma RCA x 2 HDMI IN/OUT (vídeo/audio) 19 clavijas (tipo A, Conector HDMI™) ANALOG AUDIO IN 2,0 Vrms (1 kHz, 0 dB), 600 Ω, toma RCA (L, R) x 1 DIGITAL IN (OPTICAL) 3 V (p-p), Toma óptica x 1 PORTABLE IN 0,5 Vrms (toma estéreo 3,5 mm) Sintonizador Rango de sintonización de FM 87,5 a 108,0 MHz Amplificador Salida de potencia (RMS) Total 1100 W Parte anterior 180 W × 2 (1 kHz , 4 Ω, THD 10 %) Centro 180 W (1 kHz , 4 Ω, THD 10%) Parte trasera 180 W × 2 (1 kHz , 4 Ω, THD 10 %) Subwoofer...
  • Page 353 Láser Láser semiconductor longitud de onda de 405 nm / 650 nm Sistema de señal Sistema de televisor a color PAL/NTSC estándar Respuesta de frecuencia 20 Hz a 18 kHz (muestreo a 48 kHz, 96 kHz, 192 kHz) Distorsión harmónica Menos de 0,05 % Rango dinámico Más de 80 dB Puerto LAN Toma Ethernet x 1, 10BASE-T/100BASE-TX Acceso a redes inalámbricas IEEE 802,11n (bandas de 5 GHz y LAN inalámbrica (antena interna) 2,4 GHz) integradas, compatible con redes Wi-Fi 802,11a/b/g. Alimentación bus (USB) DC 5 V 0 500 mA Altavoces BCS-717 S-BD707T y Altavoz delantero/Surround (Izquierdo/Delantero) Dimensiones netas Tipo 2 vías 260 x 1097 x 260 mm (An. x Al. x Prof.) Relación de impedancia 4 Ω Peso neto 3,8 kg y Altavoz central Dimensiones netas Tipo 1 vía 300 x 87 x 65 mm (An. x Al. x Prof.) Relación de impedancia 4 Ω...
  • Page 354 Apéndice Altavoces BCS-313 S-BD303 y Altavoz delantero/Surround (Izquierdo/Delantero) Dimensiones netas Tipo 1 vía 96 x 96 x 85 mm (An. x Al. x Prof.) Relación de impedancia 4 Ω Peso neto 0,4 kg y Altavoz central Dimensiones netas Tipo 1 vía 300 x 87 x 65 mm (An. x Al. x Prof.) Relación de impedancia 4 Ω Peso neto 0,6 kg y Subwoofer Dimensiones netas Tipo 1 vía 130,5 x 420 x 375 mm (An. x Al. x Prof.) Relación de impedancia 3 Ω Peso neto 4,4 kg y El diseño y las especificaciones están sujetas a cambio sin previo aviso.
  • Page 355: Mantenimiento

    Apéndice Mantenimiento Notas sobre los discos Manejo de los discos Manejo de la unidad No toque la cara grabada del disco. Sostenga el disco por los extremos para no dejar huellas en la superficie. Nunca pegue papel o cinta adhesiva en Durante el transporte de la unidad el disco. Conserve la caja y los materiales de embalaje Almacenamiento de los discos originales. Si necesita enviar de nuevo la unidad, para una máxima protección de la misma, Tras la reproducción, guarde el disco en su caja. No empaquétela como venía de fábrica. exponga el disco a la luz solar directa o a fuentes Conservación de las superficies externas limpias de calor, ni lo deje dentro de un coche aparcado y expuesto a la luz solar directa. y No utilice líquidos volátiles, como insecticidas, cerca de la unidad. Limpieza de los discos y No frote el paño demasiado fuerte para no dañar la superficie.
  • Page 356: Información Importante Relacionada Con Los Servicios De Red

    Las licencias para el software de fuente abierta usado en este producto se pueden encontrar al final de este documento. Toda la información, datos, documentos, comunicaciones, descargas, archivos, texto, imágenes, fotografías, gráficos, videos, webcasts, publicaciones, herramientas, recursos, software, código, programas, applets, widgets, aplicaciones, productos y demás contenido (“el Contenido”) y todos los servicios y ofertas (“los Servicios”) proporcionados por o a través de una tercera parte (consideradas cada una un “proveedor de servicios” serán únicamente responsabilidad del Proveedor de servicios del que originaron. La disponibilidad y el acceso al contenido y a los servicios proporcionados por el proveedor de servcios a través del dispositivo PIONEER están sujetas a cambio en cualquier momento sin previo aviso, incluida, pero no limitada a la suspensión, retiro o cese de cualquier parte del contenido o de los servicios. Si tiene alguna queja o problema relacionada con el contenido o los servicios, deberá acudir al sitio Web del proveedor de servicios para recibir la información más actualizada. PIONEER no se hace responsable del servicio al cliente relacionado con los contenidos y servicios. Cualquier pregunta o solicitud relacionada con el contenido o los servicios debería formularse directamente a los respectivos proveedores del contenido y los servicios. Por favor, tenga en cuenta que PIONEER no se hace responsable de ninguno de los contenidos o servicios proporcionados por el proveedor de servicios ni de ningún cambio, retiro o cese de tal contenido o servicio y no garantiza la disponibilidad o el acceso a tal contenido o servicio.
  • Page 358: Veiligheidsinformatie

    Aan de slag Veiligheidsinformatie (koelopeningen niet geblokkeerd). Installeer dit apparaat niet in een slecht geventileerde of erg vochtige ruimte of in de volle zon (of onder fel kunstlicht). VOORZICHTIG Schokgevaar! NIET OPENEN LET OP: OM HET RISICO VAN EEN ELEKTRISCHE WAARSCHUWING: Dit is een klasse 1 laserproduct SCHOKTE BEPERKEN, DIENT U DE BEHUIZING dat onder de norm Veiligheid van laserproducten, (OF DE ACHTERZIJDE) NIET TE VERWIJDEREN. DIT IEC 60825-1.2007 valt. APPARAAT BEVAT GEEN ONDERDELEN DIE DOOR DE Lees deze handleiding zorgvuldig door voordat u GEBRUIKER KUNNEN WORDEN ONDERHOUDEN OF het product gebruikt en bewaar de handleiding GEREPAREERD. LAAT ONDERHOUD EN REPARATIES om, indien nodig, later te kunnen raadplegen. OVER AAN EEN GEKWALIFICEERDE ELEKTRICIEN. Neem contact op met een erkend servicecentrum indien het apparaat onderhoud nodig heeft. Het symbool dat bestaat uit een Het gebruik van regelaars, instellingen of het doen bliksemschicht met pijlpunt in van uitvoeringen anders dan hier beschreven, kan een gelijkzijdige driehoek, is leiden tot blootstelling aan gevaarlijke straling. bedoeld als waarschuwing voor de Ter voorkoming van rechtstreekse blootstelling aanwezigheid van niet-geïsoleerde aan de laserstraal mag de behuizing niet worden ‘gevaarlijke stroomspanning’ in de behuizing van geopend. De laserstraal is zichtbaar wanneer de het product. Deze spanning is dusdanig hoog dat behuizing wordt geopend. KIJK NIET IN DE STRAAL.
  • Page 359 Aan de slag Informatie voor gebruikers betreffende het Dit apparaat is voorzien van een draagbare batterij of accu. verzamelen en wegdoen van oude apparaten en gebruikte batterijen Veilige manier om de batterij of accu uit de apparatuur te verwijderen: verwijder de oude batterij, volg de stappen in omgekeerde volgorde om de batterij te plaatsen. Om milieuvervuiling en een mogelijk gevaar voor de gezondheid van mens en dier te voorkomen, dient de batterij of batterijset in een geschikte container op de Voorbeelden van Symbol examples symbolen voor daarvoor aangewezen gratis inzamelpunten te for batteries...
  • Page 360 Aan de slag Opmerkingen over de auteursrechten Informatie over draadloze producten in de Europese Unie y Er zijn bepaalde beperkingen voor het afspelen, Hierbij verklaart PIONEER dat de analoge signaaluitvoer e.d. van door AACS dit/deze product(en) voldoen (Advanced Access Content System) beschermde aan de belangrijkste eisen inhoud omdat AACS goedgekeurd is als en andere relevante voorzieningen van de EG inhoudbeschermingsysteem voor het Blu-ray richtlijnen 1999/5/EC, 2004/108/EC, 2006/95/EC diskformaat, vergelijkbaar met het gebruik van en 2009/125/EC.
  • Page 361 Aan de slag Belangrijke informatie over het tv- kleurensysteem Het door deze speler gebruikte tv-kleurensysteem richt zich naar de afgespeelde schijven. Wanneer de speler bijvoorbeeld een volgens het NTSC-kleurensysteem opgenomen schijf afspeelt, wordt het beeld als NTSC-signaal uitgevoerd. Alleen kleurentelevisies die voor meerdere kleurensystemen geschikt zijn, kunnen alle door de speler uitgevoerde signalen verwerken. y Als uw tv uitsluitend geschikt is voor het PAL- kleurensysteem, worden er vervormde beelden weergegeven wanneer u schijven of video- inhoud gebruikt die in NTSC zijn opgenomen. y Een kleuren-tv die voor meerdere systemen geschikt is, past het kleurensysteem automatisch aan bij het ingevoerde signaal. Wanneer het kleurensysteem niet automatisch wordt gewijzigd, schakelt u de tv uit en weer aan waardoor een normaal beeld op het beeldscherm verschijnt. y Ook wanneer volgens het NTSC-kleurensysteem opgenomen schijven door uw tv correct worden weergegeven, is het mogelijk dat dit signaaltype niet correct door uw recorder wordt opgenomen.
  • Page 362 – Opmerkingen over de compatibiliteit 39 Geluidseffecten Afstandsbediening Frontpaneel Bediening Achterpaneel 40 Afspelen in het algemeen 40 – Het menu [HOME] gebruiken Aansluiten 40 – Een schijf afspelen Luidsprekers monteren 40 – Een bestand op een schijf/USB- – Luidsprekers installeren BCS-717 apparaat afspelen – Luidsprekers installeren BCS-313 – Blu-ray 3D-schijven afspelen De middenluidspreker aan de wand – De ongekende mogelijkheden van bevestigen BD-LIVE – Vóór de montage 42 – Een bestand op een netwerkserver Extra informatie over het ophangen van afspelen luidsprekers 43 – Basisfuncties voor video- en audio-...
  • Page 363 Inhoudsopgave Bijlage 45 – De afspeelweergave vergroten 46 – Markering Zoeken 60 Uw tv bedienen met de bijgeleverde 46 – Het zoekmenu gebruiken afstandsbediening 47 – Een bestand met ondertitels 60 – De afstandsbediening instellen voor selecteren de bediening van uw tv 47 – Laatste scène onthouden Regiocodelijst 48 – Opties tijdens het weergeven van 62 Taalcodelijst foto’s 63 Handelsmerken en licenties 48 – Muziek en foto’s tegelijk weergeven 65 Resolutie video-uitvoer 49 Beeldscherminformatie (OSD) 66 Specificaties 49 – Inhoudsinformatie op het 69 Onderhoud...
  • Page 364: Afspeelbare Schijven En Symbolen Die In Deze Handleiding Worden Gebruikt

    Aan de slag Inleiding Afspeelbare schijven en symbolen die in deze handleiding worden gebruikt Media/term Logo Symbool Beschrijving y Schijven zoals films die u kunt kopen of huren. y 'Blu-ray 3D'-schijven y BD-R/RE-schijven die worden opgenomen in een BDAV-indeling. Blu-ray y BD-R/RE-schijven die film-, muziek- of fotobestanden bevatten. y ISO 9660+JOLIET-, UDF- en UDF Bridge-indeling y Schijven zoals films die u kunt kopen of huren. y Videomodus en alleen gefinaliseerd. DVD-ROM y Ondersteunt ook tweelaags schijven DVD-R Gefinaliseerde AVCHD-indeling DVD-RW DVD+R DVD+RW...
  • Page 365: Aan De Slag

    Aan de slag Opmerking Over de weergave van het y Naargelang de toestand van de symbool '7' opnameapparatuur of van de CD-R/RW (of van een DVD±R/RW), kunnen sommige '7' kan eventueel op uw tv-scherm verschijnen CD-R/RW-schijven (of DVD±R/RW-schijven) tijdens de bediening en geeft aan dat de functie niet op het toestel worden afgespeeld. die uitgelegd wordt in deze gebruikershandleiding, y Afhankelijk van de opnamesoftware en de niet beschikbaar is op dat specifieke medium. voltooiing worden sommige opgenomen schijven (CD-R/RW, DVD±R/RW, BD-R/RE) niet afgespeeld. y BD-R/RE, DVD±R/RW en CD-R/RW-schijven die zijn opgenomen met een computer of een dvd- of cd-recorder worden mogelijk niet afgespeeld als de schijf is beschadigd of vuil is, of als er vuil of condens op de lens van de speler zit. y Indien u een schijf opneemt met een computer, zelfs bij een compatibele indeling, kan het gebeuren dat de schijf niet wordt afgespeeld, vanwege de instellingen van de software waarmee de schijf is gemaakt. (Neem contact met de uitgever van de software op voor meer informatie.) y Deze recorder vereist schijven en opnames die voldoen aan bepaalde technologische...
  • Page 366: Meegeleverde Toebehoren

    Aan de slag Meegeleverde toebehoren Toebehoren voor luidsprekerboxen (S-BD707SW) Videokabel (1) Afstandsbediening (1) Luidsprekerkabel Grote (1) antislipkussentjes (1) Toebehoren voor Batterijen (1) Fm-antenne (1) luidsprekerboxen (S-BD303) iPod houder (1) Kleine Luidsprekerkabels met Toebehoren voor antislipkussentjes (1) kleurcodering (5) luidsprekerboxen (S-BD707T) Grote antislipkussentjes Schroeven (12) Luidsprekerkabels met kleurcodering (5) Luidsprekervoet- Kleine stukken (4) antislipkussentjes (1) Middelgrote antislipkussentjes (1)
  • Page 367: Bestandsvereisten

    Aan de slag Bestandsvereisten Filmbestanden Audio- Bestandsvereisten Bestandsvereisten Codecindeling ONDERTITEL Fotolocatie Extension indeling “.avi”, “.divx”, DIVX3.xx, DIVX4.xx, Dolby Digital, SubRip (.srt / .txt), SAMI (.smi), “.mpg”, “.mpeg”, DIVX5.xx, DIVX6.xx DTS, MP3, SubStation Alpha (.ssa/.txt), “.mkv”, “.mp4”, (alleen standaard WMA, AAC, MicroDVD (.sub/.txt), VobSub Schijf, “.asf”, “.wmv”, afspelen), XVID, (.sub), SubViewer 1.0 (.sub), USB: “.m4v” (DRM MPEG1 SS, H.264/ SubViewer 2.0 (.sub/.txt), free) MPEG-4 AVC, MPEG2 TMPlayer (.txt), DVD Subtitle PS, MPEG2 TS, VC-1 System (.txt) SM (WMV3) “.avi”, “.divx”, DIVX3.xx, DIVX4.xx, Dolby Digital, SubRip (.srt / .txt), SAMI...
  • Page 368: Avchd (Advanced Video Codec High Definition)

    Aan de slag Opmerking AVCHD (Advanced Video y De bestandsnaam kan maximaal 180 tekens Codec High Definition) bevatten. y Deze speler kan AVCHD-schijven afspelen. Deze y Maximum aantal bestanden/mappen: schijven worden normaliter opgenomen en Minder dan 2000 (totaal aantal bestanden gebruikt in camcorders. en mappen) y De AVCHD-indeling is een indeling voor y Afhankelijk van de grootte en het aantal videogegevens met een hoge definitie. bestanden kan het enige minuten duren om de inhoud op het medium in te lezen. y Met de indeling MPEG-4 AVC/H.264 y De bestandscompatibiliteit kan verschillen, kunnen afbeeldingen nog verder worden afhankelijk van de server. gecomprimeerd dan met een conventionele gecomprimeerde indeling voor afbeeldingen. y De bestandsvereisten op pagina 11 zijn niet altijd compatibel. Er kunnen y Deze speler kan schijven met een AVCHD- bepaalde beperkingen gelden voor schijven met een 'x.v.Colour'-indeling afspelen.
  • Page 369: Systeemvereisten

    Aan de slag Systeemvereisten Opmerkingen over de compatibiliteit Voor het afspelen van HD-video: y HD-beeldscherm met COMPONENT of HDMI- y Omdat BD-ROM een nieuw formaat is, kunnen ingangen. onder andere bij bepaalde schijven en digitale aansluitingen compatibiliteitsproblemen y BD-ROM schijf met HD-inhoud. ontstaan. Neem contact op met het y Voor bepaalde inhoud moet het apparaat over LG Klantenservicecentrum indien u een DVI-ingang met ondersteuning voor HDMI compatibiliteitsproblemen ondervindt. of HDCP beschikken (zoals opgegeven door de y Met dit apparaat beschikt u over functies als auteurs van de schijf ). beeld-in-beeld, secundaire audio en virtuele Als u via het thuisnetwerk bestanden uit de pakketten, etc. met BD-ROM met BONUSVIEW gedeelde map op uw computer wilt afspelen, (BD-ROM versie 2 Profiel 1 versie 1.1 / Definitieve moet de computer voldoen aan de onderstaande standaard profiel). U kunt secundaire video en vereisten. audio afspelen van schijven die geschikt zijn y Windows® XP (Service Pack 2 of hoger), voor de beeld-in-beeld functie. Zie voor de Windows Vista® (geen Service Pack vereist) afspeelmethode de aanwijzingen op de schijf.
  • Page 370: Afstandsbediening

    Aan de slag Afstandsbediening SPK LEVEL: hiermee stelt u het • • • • • • • • • a • • • • • • • geluidsniveau van de gewenste INPUT/TUNER: hiermee luidspreker in. wijzigt u de invoermodus. X USB REC: hiermee kunt u een 1 (STANDBY/ON): in- en audio-cd opnemen. uitschakelen van de speler. MUTE: hiermee kunt u het B OPEN/CLOSE: de schijflade systeem dempen. openen en sluiten. SOUND: hiermee selecteert u de HDMI IN: Verandert de modus voor geluidseffecten. invoermodus rechtstreeks in VOL +/- : hiermee past u het HDMI-IN.
  • Page 371: Frontpaneel

    Aan de slag Frontpaneel STANDBY/ON OPEN/CLOSE FUNCTION TUNE VOLUME PORTABLE IN 500 mA a Disklade c Informatievenster b Bedieningsknoppen d Sensor van de afstandsbediening g h i j k 1 (STANDBY/ON) Knop voor e PORTABLE IN STANDBY/ON OPEN/CLOSE FUNCTION in- en uitschakelen van de speler f USB-poort TUNE B (OPEN/CLOSE)
  • Page 372: Luidsprekers Monteren

    Aansluiten Luidsprekers monteren Voor de middenluidspreker: Zet vier kleine antislipkussentjes op de onderkant van de middenluidspreker vast. Luidsprekers installeren BCS-717 middle non-skid pads Kleine De luidsprekers voorbereiden small non-skid pads antislipkussentjes 1. Bevestig antislipkussentjes op de onderkant van de luidsprekerconsoles, de subwoofer en de middenluidspreker. Voor luidsprekerconsoles: Zet vier middelgrote antislipkussentjes met het middle non-skid pads meegeleverde hechtmiddel op de onderkant (de bodem) van de luidsprekerconsoles vast. small non-skid pads middle non-skid pads 2. Bevestig de luidsprekerconsoles met de...
  • Page 373 > Let op! zijn geleverd. y De kunststof houder is geen montagefitting y Sluit de meegeleverde luidsprekers niet op en de luidsprekers mogen niet met deze een andere versterker aan dan de versterker houder rechtstreeks aan de wand worden die bij dit systeem is meegeleverd. Wanneer opgehangen. Gebruik bij het stabiliseren u de luidsprekers op een andere versterker van de luidsprekers altijd een koord. aansluit riskeert u beschadiging van de luidsprekers en de versterker evenals brand. y Pioneer is niet aansprakelijk voor verliezen Mounting screw y Sluit de luidsprekerkabel van de subwoofer of schade als gevolg van onvakkundige 5 mm (not supplied) montage, installatie, onvoldoende sterkte (paars) aan op de oranje ingang van de Mounting screw van het montagemateriaal, verkeerd speler. 5 mm 10 mm (not supplied)
  • Page 374: Luidsprekers Installeren Bcs

    Aansluiten Luidsprekers installeren Voor de middenluidspreker: Zet vier kleine antislipkussentjes op de BCS-313 onderkant van de middenluidspreker vast. De luidsprekers voorbereiden 1. Bevestig antislipkussentjes op de onderkant van kleine small non-skid pads small non-skid pads antislipkussentjes elke luidspreker. Voor luidsprekers: small non-skid pads small non-skid pads Bevestig de vier antislipkussentjes met het meegeleverde hechtmiddel op de onderkant (de bodem) van de luidsprekerconsoles. For subwoofer: 2. Sluit de luidsprekerkabels op de speler aan. Sluit de witte kabel met de grijze lijn op de (+) small non-skid pad small non-skid pads kleine antislipkussentjes zijde aan en de andere kabel op de (-) zijde.
  • Page 375: Vóór De Montage

    > Let op! de u de luidsprekers op grotere afstand van de y Als u niet zeker weet met welk televisie hangen. wandmateriaal u te maken hebt en of dit De subwoofer is niet magnetisch afgeschermd sterk genoeg is, neem dan contact op met thick cord en mag dus niet dicht bij een televisie of monitor een vakman voor advies. worden geplaatst. Media die voor magnetisme y Pioneer is niet aansprakelijk voor ongevallen gevoelig zijn (zoals floppy disks en band- of Plastic catch of schade als gevolg van een verkeerde videocassettes) mogen niet in de buurt van een installatie. subwoofer worden bewaard. Bevestig de front/surround-luidsprekers en de subwoofer niet aan de wand of het plafond. Door hun gewicht kunnen ze vallen en verwondingen veroorzaken. Mounting screw Montageschroef 5 mm (not supplied) (niet meegeleverd)
  • Page 376: Het Systeem Positioneren

    Aansluiten > Let op! Het systeem y Probeer te voorkomen dat kinderen positioneren hun handen of voorwerpen in het *subwooferkanaal steken. *Subwooferkanaal: Een opening in De volgende afbeelding toont een voorbeeld de subwoofer voor een rijk basgeluid van de opstelling van het systeem. U moet er (luidsprekerbox). rekening mee houden dat de afbeeldingen in deze y Plaats de middenluidspreker op veilige handleiding omwille van de duidelijkheid kunnen afstand buiten het bereik van kinderen. afwijken van de werkelijke uitvoering van de Anders kan de luidspreker vallen en letsel apparaten. en/of schade veroorzaken. U bereikt het best mogelijke surroundgeluid y De luidsprekers bevatten krachtige door alle luidsprekers, met uitzondering van magnetische onderdelen. Deze kunnen de subwoofer, op dezelfde afstand van uw de weergave van het beeld van een tv luisterpositie ( ) te plaatsen. of pc-monitor storen. Plaats in dat geval de tv of de pc-monitor verder van de luidsprekerboxen vandaan. Frontluidspreker links (L) Frontluidspreker rechts (R): Plaats de frontluidsprekers links en rechts van de tv of de monitor en op dezelfde lijn als het...
  • Page 377: Aansluiten Op Uw Tv

    Aansluiten Aansluiten op uw tv HDMI-aansluiting Als u een tv of monitor met een HDMI-aansluiting hebt, kunt u een HDMI-kabel (Type A, High Speed Maak een van de volgende aansluitingen, HDMI™-kabel met ethernet) gebruiken om de tv afhankelijk van de mogelijkheden van uw tv. of monitor aan te sluiten op de speler. Sluit het y HDMI-aansluiting (pagina 21) HDMI-aansluitpunt van de speler aan op het HDMI- y Component Video-aansluiting (pagina 23) aansluitpunt van een tv of monitor, geschikt voor HDMI. y Video-aansluiting (pagina 23) Opmerking y U kunt de speler op verschillende manieren Achterkant van het aansluiten, afhankelijk van de tv en andere apparaat apparatuur die u wilt aansluiten. Kies één van de aansluitmogelijkheden die in deze handleiding beschreven zijn. y Kijk in de handleiding van uw tv of de andere aangesloten apparaten om de beste verbinding te maken. y Zorg ervoor dat de speler rechtstreeks is aangesloten op de tv. Stem de tv af op het juiste video-ingangskanaal. HDMI- y Sluit de speler niet aan via uw videorecorder. kabel Het dvd-videobeeld kan door het veiligheidssysteem vervormd zijn.
  • Page 378: Arc (Audio Return Channel)-Functie

    Aansluiten Opmerking ARC (Audio Return Channel)- y Als een aangesloten HDMI-apparaat het functie audio-uitgangssignaal van de speler niet accepteert, is het mogelijk dat het geluid Met behulp van de ARC-functie kan een tv met van het HDMI-apparaat vervormd of niet HDMI het audiosignaal van de tv naar de HDMI- uitgevoerd wordt . uitgang van deze speler sturen. y Als u een HDMI-verbinding gebruikt, kunt u U gebruikt deze functie als volgt: de resolutie van het HDMI-uitgangssignaal - Uw tv moet de ARC-functie ondersteunen en aanpassen. (Zie 'Resolutie instellen' op u moet de ARC-functie van deze speler op pagina 24.) “On (aan)” (Ingeschakeld) instellen (ARC staat y Selecteer het type video uitvoer van het aanvankelijk op “Off” (uit)). HDMI OUT-contactpunt met behulp van de optie [HDMI Kleurinstelling] in het - De instelmethode van ARC is afhankelijk van instellingenmenu (zie pagina 34). de tv. Zie de handleiding van uw tv voor meer informatie over de ARC-functie. y Wanneer u de resolutie wijzigt terwijl er al een verbinding tot stand is gebracht, - U moet een HDMI-kabel gebruiken (Type A, High kunnen er storingen optreden. U kunt dit Speed HDMI™-kabel met ethernet).
  • Page 379: Component Video-Aansluiting

    Aansluiten Component Video-aansluiting Video-aansluiting Sluit de COMPONENT VIDEO-uitgangen van de Gebruik een videokabel om de uitgang VIDEO OUT speler met een component videokabel aan op op de speler aan te sluiten op de video-ingang op gelijksoortige ingangsbussen van de tv. U kunt de tv. U kunt het geluid via de luidsprekers van het het geluid via de luidsprekers van het systeem systeem weergeven. weergeven. Achterkant van het apparaat Achterkant van het apparaat Video-kabel Component Videokabel Opmerking Als u een COMPONENT VIDEO OUT- verbinding gebruikt, kunt u de resolutie van het uitgangssignaal aanpassen. (Zie 'Resolutie instellen' op pagina 24.)
  • Page 380: De Resolutie Instellen

    Aansluiten De antenne aansluiten De resolutie instellen De speler voorziet in verschillende uitgangresoluties voor HDMI OUT- en COMPONENT VIDEO-uitgangen. Sluit voor de ontvangst van radio-uitzendingen de U kunt de resolutie veranderen via het menu meegeleverde antenne aan. [Instellen]. 1. Druk op HOME MENU (n). 2. Gebruik A/D om [Instellen] te selecteren en druk vervolgens op ENTER (b). Het installatiemenu verschijnt. 3. Gebruik W/S om de optie [SCHERM] te selecteren en druk vervolgens op D om naar het tweede niveau te gaan. 4. Gebruik de toetsen W/S om de optie [Resolutie] te selecteren en druk vervolgens op ENTER (b) om naar het derde niveau te gaan. Achterkant van het apparaat Opmerking Nadat u de FM-draadantenne hebt 5. Gebruik W/S om de gewenste resolutie te aangesloten, kunt u deze het best zoveel selecteren en druk vervolgens op ENTER (b) mogelijk horizontaal bevestigen. Trek de FM- om uw selectie te bevestigen. antenne over de volle lengte uit. Opmerking y Als de tv de door u op de speler ingestelde resolutie niet accepteert, kunt u de resolutie als volgt op 576p instellen: 1. Druk op B om de schijflade te openen.
  • Page 381: Op Een Extern Apparaat Aansluiten

    Aansluiten Op een extern PORTABLE IN-aansluiting apparaat aansluiten U kunt het geluid van uw draagbare audiospeler via de luidsprekers van dit systeem weergeven. Sluit de hoofdtelefoonaansluiting (of de uitgang line out ) van de draagbare audiospeler aan op de AUX-aansluiting PORTABLE IN-aansluiting van dit apparaat. Selecteer vervolgens de optie [PORTABLE] door op INPUT/ U kunt het geluid van een externe component via TUNER en ENTER (b) te drukken. de luidsprekers van dit systeem weergeven. U kunt ook de FUNCTION-toets op het voorpaneel Sluit de analoge audio-uitgangen van de gebruiken om de invoermodus te selecteren. component aan op de AUX L/R-ingangen van het hoofdapparaat. Selecteer vervolgens de optie [AUX] door achtereenvolgens op INPUT/TUNER en ENTER VOLUME (b) te drukken. U kunt ook de FUNCTION-toets op het voorpaneel PORTABLE IN gebruiken om de invoermodus te selecteren. 500 mA Achterkant van het apparaat MP3-speler enzovoort... Rood Naar de audio-uitgangen op uw component (tv, videorecorder enzovoort)
  • Page 382: Optical In-Aansluiting

    Aansluiten OPTICAL IN-aansluiting HDMI IN 1/2-aansluiting U kunt het geluid van een component met een U kunt het beeld en het geluid van uw component digitale optische verbinding via de luidsprekers van via deze aansluiting weergeven. dit systeem weergeven. Sluit de HDMI OUT-uitgang van uw component Sluit de optische uitgang van uw component aan op de HDMI IN 1- of 2-ingang op dit apparaat. aan op de ingang OPTICAL IN op het apparaat. Selecteer vervolgens de optie [HDMI IN 1/2] door Selecteer vervolgens de optie [OPTICAL] door op achtereenvolgens op INPUT/TUNER en ENTER (b) INPUT/TUNER en ENTER (b) te drukken. Of druk te drukken. op de toets OPTICAL om deze optie rechtstreeks te U kunt ook de FUNCTION-toets op het voorpaneel selecteren. gebruiken om de invoermodus te selecteren. U kunt ook de FUNCTION-toets op het voorpaneel gebruiken om de invoermodus te selecteren. Achterkant van het apparaat Achterkant van het apparaat Naar de HDMI- Uitgang van de component (set- top box, digitale satellietontvanger, videogameapparaat Naar de digitale e.d.). optische uitgang van de component Opmerking y U kunt de videoresolutie niet wijzigen in de modus HDMI IN 1/2. Wijzig de videoresolutie van de aangesloten component.
  • Page 383: Aansluiten Op Uw Thuisnetwerk

    Aansluiten Aansluiten op uw thuisnetwerk Breedbanddienst Via de LAN-poort op de achterzijde van de speler of de ingebouwde draadloze module kunt u deze speler op een LAN (Local Area Network) aansluiten. Door het apparaat op een breedband thuisnetwerk aan te sluiten, hebt u toegang tot diensten als BD- Live interactiviteit en online diensten. Aansluiting voor bekabeld Router netwerk Door gebruik te maken van een bekabeld netwerk bereikt u de beste prestaties, omdat de aangesloten apparaten rechtstreeks met het netwerk in verbinding staan en niet vatbaar zijn voor radiofrequente storing. Zie voor nadere instructies de documentatie van Computer en/of DLNA-gecertificeerde uw netwerkapparaat. server Gebruik een in de handel verkrijgbare LAN- of Ethernet-kabel om de LAN-poort van de speler aan te sluiten op de bijbehorende poort op uw modem of router. Opmerking y Wanneer u de LAN-kabel aansluit of loskoppelt, houdt u de kabelstekker vast. Wanneer u de LAN-kabel loskoppelt, trek dan niet aan de kabel. Houdt de stekker Achterkant van het apparaat vast en druk tegelijkertijd de vergrendeling omlaag. y Sluit geen modulaire telefoonkabel op de LAN-poort aan.
  • Page 384: Een Bekabeld Netwerk Installeren

    Aansluiten Opmerking Een bekabeld netwerk Als er een DHCP-server in het netwerk installeren aanwezig is en u wilt het IP-adres met de Als er een DHCP-server via een kabelverbinding hand instellen, selecteer dan [Statisch] en stel op het LAN-netwerk is aangesloten, krijgt deze vervolgens de opties [IP Adres], [Subnet Mask], speler automatisch een IP-adres toegewezen. [Gateway] en [DNS Server] met behulp van Bij sommige thuisnetwerken is het nodig de W/S/A/D en de cijfertoetsen in. Als u bij netwerkinstelling van de speler aan te passen nadat het invoeren van een getal een fout maakt, de fysieke verbinding tot stand is gebracht. Pas de druk dan op CLEAR om het gemarkeerde [NETWERK]-instelling als volgt aan. gedeelte te wissen. Voorbereiding 4. Selecteer [OK] en druk op ENTER (b) om de netwerkinstellingen toe te passen. Voordat u het bedrade netwerk installeert, 5. Vervolgens vraagt de speler u de moet u uw thuisnetwerk op een breedband- internetverbinding aansluiten. netwerkverbinding te testen. Selecteer [OK] en druk op ENTER (b) om de netwerkverbinding 1. Selecteer de optie [Verbindingsinstelling] in het te voltooien. menu [Instellen] en druk vervolgens op ENTER (b). 6. Als u bij stap 5 de optie [Test] selecteert en op ENTER (b) drukt, wordt de verbindingsstatus van het netwerk op het scherm weergegeven.
  • Page 385: Draadloze Netwerkverbinding

    Aansluiten Opmerking Draadloze netwerkverbinding Onderstaand vindt u het beschikbare Deze verbindingsmogelijkheid maakt gebruik frequentiebereik en de beschikbare kanalen van een toegangspunt of een draadloze router. voor een 5 GHz band. Het is echter mogelijk De netwerkconfiguratie en de aansluitmethode dat afhankelijk van het land de gegevens kunnen verschillen, afhankelijk van de gebruikte enigszins afwijken of dat er beperkingen apparatuur en de netwerkomgeving. gelden. Probeer uw toegangspunt in te Deze speler is voorzien van een draadloze IEEE stellen op een ander kanaal wanneer u 802.11n-module (Dual-band, 5 GHz en 2,4 GHz problemen ondervindt met de draadloze band) die ook de 802.11a/b/g-standaarden netwerkverbinding. ondersteunt. Voor de beste draadloze prestaties Regio Frequentiebereik adviseren wij een gecertificeerd IEEE 802.11n Wi-Fi- netwerk te gebruiken (toegangspunt of draadloze Noord- 5,15-5,25 GHz (kanaal 36-48), router). Amerika 5,725-5,825 GHz (kanaal 149-161), 5,825-5,850 GHz (kanaal 165) Europa, UAE 5,15-5,25 GHz (kanaal 36-48) VOLUME PORTABLE IN 500 mA Overige 5,15-5,25 GHz (kanaal 36-48), 5,725-5,825 GHz (kanaal 149-161), 5,825- 5,850 GHz (kanaal 165)
  • Page 386 Aansluiten [Manueel] – Het is mogelijk dat uw 2. Het menu [VERBINDINGSINSTELLING] verschijnt op het scherm. Gebruik W/S om [Draadloos] toegangspunt geen netwerknaam (SSID) te selecteren en druk op ENTER (b). uitzendt. Controleer de instellingen van uw router met behulp van uw computer en stel uw 3. Selecteer [Ja] en druk op ENTER (b) om door router in voor het uitzenden van de SSID of geef te gaan. De bestaande netwerkinstellingen handmatig de naam van het toegangspunt worden door de nieuwe instellingen vervangen. (SSID) in het veld [Manueel] op. 4. De speler scant alle beschikbare [drukknop] – Als uw toegangspunt of toegangspunten of draadloze routers die draadloze router de drukknopconfiguratiemethode binnen bereik zijn en toont ze in een lijst. ondersteunt, selecteert u deze optie en Gebruik W/S om een toegangspunt of drukt u binnen 120 tellen op de knop op uw draadloze router in deze lijst te selecteren en toegangspunt of draadloze router. In dit geval druk vervolgens op ENTER (b). hoeft u de naam van het toegangspunt (SSID) en de beveiligingscode van het toegangspunt of de draadloze router niet te kennen. 5. Gebruik W/S/A/D om de IP Mode-opties [Dynamisch] of [Statisch] te selecteren. Meestal kunt u het best [Dynamisch] selecteren om automatisch een IP-adres toe te wijzen. Opmerking Als uw toegangspunt of draadloze router van Als er een DHCP-server in het netwerk een beveiliging zijn voorzien, controleert u aanwezig is en u wilt het IP-adres met de...
  • Page 387 Uw internetleverancier (ISP) kan contractueel internetverbindingsfunctie van deze speler niet bepalen hoeveel voor internet geschikte kunt gebruiken of dat uw internetleverancier apparaten u op één internetaansluiting mag beperkingen heeft gesteld aan het aantal aansluiten. Neem voor meer informatie contact apparaten dat u gelijktijdig kunt aansluiten. op met uw internetleverancier. (Als uw serviceprovider het abonnement heeft y Pioneer is niet verantwoordelijk voor storingen beperkt tot één apparaat, is het mogelijk dat u in de speler en/of de internetverbinding met deze speler geen verbinding met internet ten gevolge van communicatiefouten/ kunt maken als u al een computer op internet storingen die verband houden met uw hebt aangesloten.) breedbandinternetaansluiting of andere y Mogelijk is het gebruik van een router niet aangesloten apparatuur. of slechts onder beperkende voorwaarden y De functies van BD-ROM schijven die via een toegestaan, afhankelijk van het beleid van internetverbinding beschikbaar zijn, worden niet uw internetleverancier en de door deze door ons ontwikkeld of geleverd en wij zijn dan bedongen beperkingen. Neem voor meer...
  • Page 388: Een Usb-Apparaat Aansluiten

    Aansluiten Opmerking Een USB-apparaat y Voor het openen van bestanden (film, foto aansluiten en muziek) ondersteunt deze speler USB- flashgeheugens en volgens FAT 16, FAT 32 en NTFS geformatteerde harde schijven De speler kan in een USB-apparaat opgeslagen (HDD). Voor het opnemen van BD-Live en films, muziek en fotobestanden afspelen. audio-cd’s worden alleen volgens FAT 16 en FAT 32 geformatteerde media ondersteund. Inhoud van een USB-apparaat Gebruik het USB-flashgeheugen of een afspelen externe HDD die volgens FAT16 of FAT32 zijn geformatteerd wanneer u BD-Live of audio- 1. Plaats een USB-apparaat in de USB-poort zodat cd’s wilt opnemen. het goed vast zit. y U kunt een USB-apparaat gebruiken voor plaatselijke opslag van BD-Live schijven via VOLUME internet. y Dit apparaat ondersteunt tot 8 partities van PORTABLE IN een USB-apparaat. 500 mA y Koppel een USB-apparaat nooit los wanneer de speler is ingeschakeld (afspelen, kopiëren enz.).
  • Page 389: Instellingen

    Instellen van systeem Instellingen Menu [SCHERM] Beeldverhouding De Setup-instellingen Selecteer de hoogte-breedteverhouding (aspect ratio) die met uw tv overeenstemt. aanpassen [4:3 Letterbox] U kunt de instellingen van de speler in het menu Kies dit als u een standaard 4:3 monitor hebt. [Instellen] wijzigen. Toont films met balken boven en onder het 1. Druk op HOME MENU (n). beeld. [4:3 Pan Scan] Kies dit als u een standaard 4:3 monitor hebt. De beelden worden bijgesneden om uw tv- scherm te vullen. Beide kanten van het beeld wordt afgesneden. [16:9 Origineel] 2. Gebruik A/D om [Instellen] te selecteren en druk vervolgens op ENTER (b). Selecteren indien een 16:9 breedbeeld-tv is Het [Instellen] menu verschijnt. aangesloten. Het beeld met de verhouding 4:3 wordt weergegeven met de oorspronkelijke hoogte-breedteverhouding van 4:3. Links en rechts van het beeld worden zwarte randen weergegeven. [16:9 Volledig] Selecteren indien een 16:9 breedbeeld-tv is aangesloten. Het beeld met de verhouding...
  • Page 390 Instellen van systeem Resolutie HDMI Kleur instelling. Hiermee stelt u de uitgangsresolutie van het HDMI- Selecteer het type uitvoer van de HDMI UIT-stekker. en Component-Video-signaal in. Zie pagina 24 en Raadpleeg voor deze instelling de handleidingen 65 voor meer informatie over de instelling van de van uw weergavetoestel. resolutie. [YCbCr] [Auto] Selecteer deze optie wanneer u een HDMI- Als uw HDMI OUT-uitgang is aangesloten op de weergaveapparaat aansluit. tv voor het verstrekken van scherminformatie [RGB ] (EDID), wordt automatisch de meest geschikte Selecteer deze optie wanneer u een DVI- resolutie voor de tv geselecteerd. weergaveapparaat aansluit. [1080p] Voert 1080 beeldlijnen progressieve video uit. 3D-modus [1080i] Selecteer het type uitvoermodus voor het afspelen van Blu-ray 3D-schijven. Voert 1080 beeldlijnen interlaced video uit. [720p] [uit] Voert 720 beeldlijnen progressieve video uit. Een Blu-ray 3D-schijf wordt net als bij het afspelen van normale BD-ROM's uitgevoerd in 576p de 2D-modus. Voert 576 beeldlijnen progressieve video uit.
  • Page 391: Menu [Taal]

    Instellen van systeem Menu [TAAL] Menu [AUDIO] Schermmenu Luidspreker Set-up Kies een taal voor het [Instellen] menu en onscreen Voor een zo goed mogelijke geluidsweergave kunt scherm. u het scherm Speaker Setup gebruiken om het volume van de aangesloten luidsprekers en de Disk Menu/Audio disk/ afstand van de luidsprekers tot de luisterpositie in te stellen. Gebruik de test om het volume van de Disk ondertiteling luidsprekers op een gelijk niveau af te stellen. Selecteer tijdens het afspelen van een dvd de gewenste taal voor de audiotrack (schijf audio), ondertitels en het schijfmenu. [Origineel] Verwijst naar de oorspronkelijke taal waarin de schijf is opgenomen. [Anders] Druk op ENTER (b) om een andere taal te selecteren. Gebruik de nummertoetsen en [Luidspreker] vervolgens ENTER (b) om de overeenkomende Selecteer de luidspreker die u wilt aanpassen. 4-cijferige code in te voeren volgens de taalcodelijst op pagina 62. [Volume] Hiermee kunt u het volume voor de [uit] (alleen ondertiteling schijf) afzonderlijke luidsprekers aanpassen.
  • Page 392: Menu [Slot]

    Instellen van systeem HD AV Sync Menu [SLOT] Soms treedt er bij digitale tv een vertraging De instellingen voor [SLOT] zijn alleen van invloed tussen het beeld en het geluid op. In dat geval op het afspelen van BD-ROM's en DVD's. kunt u de vertraging compenseren door een Als u functies wilt gebruiken wanneer [SLOT] is vertraging voor het geluid in te stellen, zodat het ingesteld, moet u de beveiligingscode van vier geluid daadwerkelijk ‘wacht’ op het bijbehorende cijfers opgeven. beeld. Dit wordt HD AV-synchronisatie genoemd. Als u nog geen wachtwoord hebt opgegeven, Gebruik W/S om door de vertragingswaarden te wordt u gevraagd dit te doen. Voer een bladeren. U kunt een waarde opgeven tussen de 0 wachtwoord van vier cijfers tweemaal in en druk en 300 ms. up ENTER (b) om een nieuw wachtwoord aan te maken. Wachtwoord U kunt een wachtwoord aanmaken of een bestaand wachtwoord wijzigen. [Geen] Voer een wachtwoord van vier cijfers tweemaal in en druk up ENTER (b) om een nieuw Post DRC (Dynamisch Bereik wachtwoord aan te maken. Controle) [Wijzig] Hierdoor kunt u bijvoorbeeld het geluid van een...
  • Page 393: Menu [Netwerk]

    Instellen van systeem DVD Beoordeling Menu [NETWERK] Blokkeert het afspelen van geclassificeerde dvd’s De [NETWERK]-instellingen zijn noodzakelijk voor op grond van hun inhoud. (Niet alle schijven zijn het gebruik van BD-Live en online functies. geclassificeerd.) Verbindingsinstelling [Waardering 1-8] Als uw thuisnetwerkomgeving klaar is voor het Classificatie (1) bevat de meeste beperkingen aansluiten van de speler, moet u de speler met het en niveau (8) de minste. oog op de netwerkcommunicatie instellen op een [Ontgrendelen] draadloze of bekabelde verbinding. (Zie 'Aansluiten op uw thuisnetwerk' op pagina 27-31.) Als u dit selecteert, is het ouderlijk toezicht ('parental control') niet actief en wordt de schijf Verbindingsstatus volledig afgespeeld. Als u op deze speler de netwerkstatus wilt controleren, selecteert u de optie Blu-ray disk Beoordeling [Verbindingsstatus] en drukt u op ENTER (b) om te Geef een leeftijdslimiet voor het afspelen van controleren of een verbinding met het netwerk en de Bd-rom op. Voer met de cijfertoetsen een internet tot stand is gebracht. leeftijdslimiet in voor het weergeven van de BD-ROM. BD-LIVE aansluiting [255] U kunt de internettoegang beperken indien de BD- Live functies gebruikt worden.
  • Page 394: Menu [Anders]

    Instellen van systeem Menu [ANDERS] Initialiseren [Fabrieksinstelling] ARC (Audio Return Channel)-functie Hierdoor wordt de speler naar zijn U kunt de ARC-functie [aan] en [uit] zetten. Met oorspronkelijke fabrieksinstellingen teruggezet. behulp van de ARC-functie kan een tv met HDMI de audiostream naar de HDMI-uitgang van deze [BD-LIVE opslag wissen] speler sturen. Zie pagina 22 voor meer informatie Initialiseert de inhoud van BD-Live vanaf de over deze functie. aangesloten usb-memorystick. Opmerking DivX® VOD Als u de optie [Fabrieksinstelling] wilt OVER DIVX VIDEO: DivX® is een digitaal gebruiken om de oorspronkelijke videoformaat dat door DivX, Inc. is gecreëerd. Dit fabrieksinstellingen te herstellen, moet u is een officieel DivX Certified® apparaat dat DivX- de activering van alle online diensten en de video kan afspelen. Ga naar de website divx.com netwerkinstellingen opnieuw instellen. voor meer informatie en software-hulpmiddelen om uw bestanden in DivX-video’s om te zetten. OVER DIVX VIDEO-ON-DEMAND: dit DivX Certified®- Software informatie apparaat moet worden geregistreerd om Toont de huidige softwareversie.
  • Page 395: Geluidseffecten

    Instellen van systeem Geluidseffecten [Mus. ReTouch]: Stand waarmee u de kwaliteit van het geluid kunt verbeteren bij het luisteren naar mp3-muziekbestanden en ander gecomprimeerd U kunt naar wens een bepaalde geluidsmodus geluid. Deze modus is alleen geschikt voor het instellen. Druk een paar keer op SOUND tot de afspelen van tweekanaals bronmateriaal. gewenste geluidsmodus op het display aan de [Loudness]: Hierdoor kunt u de weergave van de voorkant van het apparaat of op het tv-scherm hoge en lage tonen verbeteren. zichtbaar is. De weergegeven onderwerpen voor de equalizer kunnen verschillen, afhankelijk van de gekozen geluidsbronnen en effecten. [Mode 1]: De beste geluidsinstelling wanneer u kleine luidsprekers aansluit (S-BD303). [Mode 2]: De beste geluidsinstelling wanneer u hoge luidsprekers aansluit (S-BD707T). [Bypass]: Software met meerkanaals surround- sound wordt volgens de oorspronkelijke opname weergegeven. [Bass Blast]: In deze stand worden de lage tonen van de linker en rechter frontluidsprekers en van de subwoofer extra versterkt. [PL ll Film]: Geluidskleur die speciaal is afgestemd op decodering van het signaal van de Pro Logic III filmmodus. Deze maakt het mogelijk vijf uitvoerkanalen met een volledige bandbreedte te creëren met gebruikmaking van slechts twee kanaalbronnen. Deze stand is ideaal voor het bekijken van video’s van overgedubde of oudere films. Deze stand is alleen geschikt voor het afspelen van tweekanaals bronmateriaal.
  • Page 396: Afspelen In Het Algemeen

    Bedienen Opmerking Afspelen in het y De in deze handleiding beschreven algemeen afspeelfuncties zijn niet voor alle bestanden en media beschikbaar. Afhankelijk van allerlei factoren kunnen bepaalde functies beperkt beschikbaar zijn. Het menu [HOME] gebruiken y Afhankelijk van de BD-ROM titels is het mogelijk dat u een USB-aansluiting nodig Het menu Home verschijnt wanneer u op HOME hebt om het bestand af te kunnen spelen. MENU (n) drukt. Gebruik de toetsen W/S/A/ D om de categorie te selecteren en druk op ENTER y Een DVD-schijf die is opgenomen in de (b). DVD-VR modus, wordt niet afgespeeld, indien de opname niet gefinaliseerd is. y Sommige DVD-schijven zijn opgenomen met CPRM (Copy Protection for Recordable Media) kopieerbeveiliging. Dit toestel ondersteunt dit soort schijven niet. Een bestand op een schijf/ USB-apparaat afspelen a [Film] - Video-inhoud afspelen.
  • Page 397: Blu-Ray 3D-Schijven Afspelen

    Bedienen Blu-ray 3D-schijven afspelen De ongekende mogelijkheden van BD-LIVE Deze speler kan Blu-ray 3D-schijven afspelen die afzonderlijke weergaven bevatten voor het linker- BD-ROM dat BD-Live (BD-ROM versie 2 Profiel 2) en rechteroog. ondersteunt heeft een netwerkuitbreidingsfunctie waarmee u, door dit apparaat aan te sluiten op Voorbereiding internet, gebruik kunt maken van meer functies, zoals het downloaden van nieuwe filmtrailers. Om Blu-ray 3D-schijftitels in 3D-modus stereoscopisch af te spelen moet u het 1. Controleer de netwerkverbinding en volgende doen: netwerkinstellingen (pagina 27-31). y y y C ontroleer of uw tv voor 3D geschikt is en 2. Bevestig een USB-opslagapparaat in de USB- een of meer HDMI (3D) ingangen heeft. poort op het frontpaneel. y O m 3D te ervaren moet u waarschijnlijk een Een USB-geheugen is nodig voor het 3D-bril gebruiken. downloaden van extra bonuscontent. y y y C ontroleer of de BD-ROM titel die u wilt 3. Druk op HOME MENU (n) en stel de optie afspelen wel of geen Blu-ray 3D-schijf is.
  • Page 398: Een Bestand Op Een Netwerkserver Afspelen

    Bedienen Een bestand op een Uw netwerkgebruikersnaam en wachtwoord invoeren netwerkserver afspelen Afhankelijk van uw pc-omgeving kan het nodig zijn dat u de naam van de netwerkgebruiker en een wachtwoord moet invoeren om een gedeelde map Deze speler kan via uw thuisnetwerk film-, muziek- te openen. en fotobestanden afspelen die zich op een computer of een DLNA-server bevinden. 1. Het toetsenbordmenu verschijnt automatisch als een netwerkgebruikersnaam en een 1. Controleer de netwerkverbinding en wachtwoord vereist zijn. netwerkinstellingen (pagina 27-31). 2. Gebruik de toetsen W/S/A/D om een 2. Druk op HOME MENU (n). teken te selecteren en druk vervolgens op 3. Gebruik de toetsen A/D om [Film], [Foto] of ENTER (b) om uw selectie op het virtuele [Muziek] te selecteren en druk vervolgens op toetsenbord te bevestigen. ENTER (b). Als u een letter met een accentteken wilt 4. Selecteer een DLNA-mediaserver of een opgeven, drukt u op DISPLAY (m) om de gedeelde map op uw computer met de toetsen speciale tekenset weer te geven.
  • Page 399: Basisfuncties Voor Video- En Audio-Inhoud

    Bedienen Basisfuncties voor video- en Basisfuncties voor foto-inhoud audio-inhoud Een diavoorstelling (slideshow) afspelen Afspelen stoppen Druk op d (PLAY) om de diapresentatie te starten. Druk tijdens het afspelen op Z (STOP). Een diapresentatie stoppen Afspelen pauzeren Druk op Z (STOP) terwijl de diapresentatie loopt. Druk tijdens het afspelen op M (PAUSE/STEP). Druk op d (PLAY) om het afspelen te hervatten. Een diapresentatie pauzeren Beeld-voor-beeld afspelen Druk op M (PAUSE/STEP) terwijl de diapresentatie loopt. Druk tijdens het afspelen van een film op M (PAUSE/ Druk op d (PLAY) om de diapresentatie opnieuw te STEP). starten. Druk herhaaldelijk op M (PAUSE/STEP) om de beelden frame voor frame weer te geven. Naar de vorige of volgende foto Vooruit of achteruit scannen overspringen Druk op c of v om tijdens het afspelen over...
  • Page 400: Afspelen Hervatten

    Bedienen Afspelen hervatten eroyt, Afhankelijk van de schijf slaat het apparaat het punt op waar u op Z (STOP) hebt gedrukt. Als 'MZ (Hervatten/stoppen)' kort op het scherm wordt weergegeven, drukt u op d (PLAY) om het afspelen (vanaf het opgeslagen punt) te hervatten. Als u tweemaal op Z (STOP) drukt of de schijf uit de schijflade verwijdert, verschijnt 'Z (Volledige stop)' op het scherm. Hierbij wordt het opgeslagen stoppunt door het apparaat gewist. Opmerking y Het punt waarop het afspelen wordt hervat is mogelijk gewist, toen er op een toets is gedrukt (bijvoorbeeld; 1 (STANDBY/ON), B (OPEN/CLOSE), etc). y De functie voor afspelen hervatten werkt niet bij BD-ROM-schijven met BD-J. y Als u tijdens het afspelen van een interactieve BD-ROM titel één keer op Z (STOP) drukt, wordt het apparaat volledig uitgeschakeld (Volledige stop).
  • Page 401: Geavanceerd Afspelen

    Bedienen Geavanceerd afspelen Een bepaald gedeelte herhalen erot Deze speler kan een door u geselecteerd gedeelte Afspelen herhalen van een bestand herhalen. erotu 1. Druk tijdens het afspelen op REPEAT (h) om [A-] te selecteren aan het begin van het Druk tijdens het afspelen herhaaldelijk op gedeelte dat u wilt herhalen. REPEAT (h) om een gewenste herhaalmodus te 2. Druk aan het einde van het gedeelte op ENTER selecteren. (b). Het geselecteerde gedeelte wordt continu Blu-rayschijf/DVD herhaald. jA- – Het geselecteerde gedeelte wordt continu 3. Druk een paar keer op REPEAT (h) om [Uit] herhaald. te selecteren en naar normaal afspelen terug te jHoofdstuk – Het momenteel geselecteerde gaan. hoofdstuk wordt continu herhaald. Opmerking jTitel – De momenteel geselecteerde titel wordt y U kunt geen deelpunt korter dan 3 continu herhaald. seconden selecteren. y Bij bepaalde schijven en titels werkt deze Druk een paar keer op REPEAT (h) om [uit] te functie niet.
  • Page 402: Markering Zoeken

    Bedienen Markering Zoeken Het zoekmenu gebruiken eroy eroy U kunt beginnen met afspelen vanaf een totaal Met behulp van het zoekmenu kunt u het punt van negen punten die in het geheugen worden waar u het afspelen wilt starten gemakkelijk opgeslagen. terugvinden. Een markering invoeren Een punt opzoeken 1. Druk tijdens het afspelen op het gewenste punt 1. Druk tijdens het afspelen op SEARCH om het op MARKER. Het markeerpictogram verschijnt zoekmenu weer te geven. even op het tv-scherm. 2. Door stap 1 te herhalen kunt u totaal negen markeringen toevoegen. 2. Druk op A/D om tijdens het afspelen 15 Gemarkeerde scènes terugzoeken seconden vooruit of achteruit te gaan. U kunt een punt dat u wilt overslaan selecteren door 1. Druk op SEARCH zodat het zoekmenu op het de toets A/D ingedrukt te houden. scherm wordt weergegeven.
  • Page 403: Een Bestand Met Ondertitels Selecteren

    Bedienen Een bestand met ondertitels Laatste scène onthouden selecteren Dit apparaat onthoudt de laatste scène van de laatste schijf die is afgespeeld. De laatste scène Als de naam van het ondertitelbestand niet blijft in het geheugen staan, zelfs als u de schijf uit gelijk is aan die van het filmbestand, moet u het het apparaat verwijdert of het apparaat uitschakelt. ondertitelbestand voordat u de film afspeelt selecteren in het menu [Film]. Wanneer u een schijf laadt met daarop een scène die is opgeslagen in het geheugen, wordt de scène 1. Selecteer met W/S/A/D in het menu [Film] automatisch herinnerd. het ondertitelbestand dat u wilt afspelen. Opmerking 2. Druk op ENTER (b). y De functie Laatste Scène Geheugen voor een vorige schijf wordt gewist zodra er een andere schijf afgespeeld wordt. y Deze functie werkt, afhankelijk van de schijf, misschien niet. y De geheugenfunctie voor de laatste scène werkt niet bij BD-ROM-schijven met BD-J. y De speler onthoudt geen instellingen van een schijf als u de speler uitschakelt voordat Druk nogmaals op ENTER (b) om de selectie het afspelen van de schijf is gestart.
  • Page 404: Opties Tijdens Het Weergeven Van Foto's

    Bedienen Opties tijdens het weergeven Muziek en foto’s tegelijk van foto’s weergeven Tijdens het schermvullend weergeven van foto’s Tijdens het luisteren naar uw muziekbestanden hebt u verschillende keuzemogelijkheden. kunt u ook fotobestanden weergeven. 1. Druk tijdens het schermvullend weergeven van 1. Druk tijdens het schermvullend weergeven van foto’s op DISPLAY (m) om het optiemenu op te foto’s op DISPLAY (m) om het optiemenu op te roepen. roepen. 2. Gebruik de toetsen W/S om een optie te 2. Selecteer met W/S de optie [Kies Muziek] en selecteren. druk op ENTER (b) om het menu [Kies Muziek]. 3. Gebruik de toetsen W/S om een apparaat te selecteren en druk vervolgens op ENTER (b). De apparaten die u kunt selecteren zijn verschillend afhankelijk van de locatie van het fotobestand dat u beeldschermvullend weergeeft. Beschikbaar Fotolocatie apparaat Schijf, USB Schijf, USB Gedeelde map...
  • Page 405: Beeldscherminformatie (Osd)

    Bedienen Beeldscherminformatie 2. Gebruik de toetsen W/S om een optie te selecteren. (OSD) 3. Gebruik A/D om de geselecteerde optiewaarde aan te passen. 4. Druk op RETURN (x) om het schermmenu te U kunt verschillende soorten informatie óver sluiten. en instellingen van de inhoud weergeven en Opmerking aanpassen. y Als er een paar seconden niet op een toets Inhoudsinformatie op het wordt gedrukt, verdwijnt het schermmenu. beeldscherm weergeven y Op bepaalde schijven kan er geen titelnummer worden geselecteerd. eroy y Afhankelijk van de schijven en de titels kunnen de beschikbare onderwerpen 1. Druk tijdens het afspelen op DISPLAY (m) variëren. om verschillende soorten informatie over het afspelen weer te geven. y Tijdens het afspelen van een interactieve Blu-ray disk kan informatie over de instelling worden weergegeven maar deze kan niet worden gewijzigd.
  • Page 406: Afspelen Vanaf De Geselecteerde Tijd

    Bedienen Afspelen vanaf de Een taal voor de ondertiteling geselecteerde tijd selecteren eroy eroy 1. Druk tijdens het afspelen op DISPLAY (m). De 1. Druk tijdens het afspelen op DISPLAY (m) om tijd zoekenbox toont de verstreken afspeeltijd. het schermmenu weer te geven. 2. Selecteer de optie [Tijd] en geef vervolgens 2. Gebruik de toetsen W/S om een optie van links naar rechts de gewenste starttijd op in [Ondertiteling] te selecteren. uren, minuten, en seconden. 3. Gebruik de toetsen A/D om de gewenste taal Om bijvoorbeeld een scène op 2 uur, 10 voor de ondertiteling te selecteren. minuten en 20 seconden te vinden, voert u 4. Druk op RETURN (x) om het schermmenu te '21020' in. sluiten. Druk op A/D om tijdens het afspelen 60 Opmerking seconden vooruit of achteruit te gaan. Sommige schijven stellen u in staat om 3. Druk op ENTER (b) om het afspelen vanaf het ondertiteling selecties alleen via het geselecteerde tijdstip te starten.
  • Page 407: De Hoogte-Breedteverhouding Van Het Tv-Beeld Aanpassen

    Bedienen De hoogte-breedteverhouding Beeldmodus wijzigen van het tv-beeld aanpassen eroy eroy Tijdens het afspelen kunt u de optie [Beeldmodus] wijzigen. Tijdens het afspelen kunt u de ingestelde hoogte- 1. Druk tijdens het afspelen op DISPLAY (m) om breedteverhouding van het tv-beeld aanpassen. het schermmenu weer te geven. 1. Druk tijdens het afspelen op DISPLAY (m) om 2. Selecteer met W/S de optie [Beeldmodus]. het schermmenu weer te geven. 3. Gebruik de toetsen A/D om de gewenste 2. Selecteer met W/S de optie optie te selecteren. [Beeldverhouding]. 4. Druk op RETURN (x) om het schermmenu te 3. Gebruik de toetsen A/D om de gewenste sluiten. optie te selecteren. 4. Druk op RETURN (x) om het schermmenu te De optie [Gebr. Inst.] instellen sluiten.
  • Page 408: Audio-Cd's Opnemen

    Bedienen Audio-cd’s opnemen Voer met het virtuele toetsenbord een mapnaam in en druk op ENTER terwijl [OK] is geselecteerd. U kunt een bepaald nummer of alle nummers 8. Gebruik de toetsen W/S/A/D om [OK] van een audio-cd naar een USB-opslagapparaat te selecteren en druk op ENTER (b) om de overzetten. opname van een audio-cd te starten. 1. Bevestig een USB-opslagapparaat in de USB- Als u tijdens het opnemen van een audio-cd poort op het frontpaneel. wilt stoppen, drukt u op ENTER (b) terwijl [Sluit] gemarkeerd is. 2. Druk op B (OPEN/CLOSE) en plaats een audio- cd in de schijflade. 9. Er verschijnt een bericht wanneer het opnemen van de audio-cd is voltooid. Druk op ENTER (b) Druk op B (OPEN/CLOSE) om de schijflade te om het muziekbestand te controleren dat u in sluiten. Het afspelen start automatisch. de bestemmingsmap hebt aangemaakt. 3. Druk op DISPLAY (m) om het optiemenu weer Opmerking te geven. y De onderstaande tabel bevat een overzicht van de gemiddelde opnametijden met Druk op de toets X USB REC op de bijvoorbeeld een snelheid van 192 Kbps afstandsbediening U kunt alle muziek op de audio-cd opnemen. vanaf een nummer met een afspeeltijd van 4 minuten naar een muziekbestand.
  • Page 409: Ipod Afspelen

    Bedienen iPod afspelen 2. Selecteer een bestand via W/S/A/D en druk op ENTER (b) om het bestand af te spelen. U kunt een iPod op dit systeem afspelen. Raadpleeg De iPod weergeven op het de gebruikershandleiding bij de iPod voor meer scherm informatie. 1. Sluit de iPod stevig aan. Voorbereiding 2. Druk op HOME MENU (n). y Als u video’s en foto’s op de iPod wilt weergeven 3. Selecteer [Muziek] of [Film] met de toetsen op uw tv: A/D,en druk op ENTER (b). - Gebruik een video-aansluiting via het VIDEO Zodra u het andere apparaat hebt aangesloten UIT-aansluitpunt aan de achterzijde van (cd of USB), selecteert in het menu de iPod. dit apparaat. Selecteer de geschikte video- 4. Gebruik de toetsen W/S/A/D om een ingangsmodus op de tv. bestand te selecteren en druk op ENTER (b) - Afhankelijk van uw iPod, dient u ervoor te om het bestand af te spelen. zorgen dat u Videos > Video instellingen selecteert en op uw iPod voor TV Uit de optie Ask of Aan instelt. Raadpleeg de gebruikershandleiding bij uw iPod voor meer...
  • Page 410: De Modus Ipod In

    De bediening van de iPod Touch en iPhone verschilt van uw iPod. Het is mogelijk dat u De gewenste herhaalmodus een aanvullende bedieningsmogelijkheid REPEAT selecteren: Track (;), All nodig hebt om ze met dit apparaat te (k), Uit (geen weergave). gebruiken. (bijv. ‘slide to unlock’ ofwel Opmerking ‘openschuiven om te ontgrendelen’) Dit systeem is compatibel met audio en video y Als u bijvoorbeeld een toepassing op de van de iPod (4e generatie), iPod nano, iPod iPod Touch of iPhone wilt gebruiken, wilt bellen of een sms-bericht wilt verzenden, classic, iPod mini, iPod touch en iPhone (iPod moet u de iPod Touch of iPhone eerst uit shuffle wordt niet ondersteund). het iPod-dock van dit apparaat verwijderen. y Dit apparaat is ontwikkeld en getest voor de softwareversie van iPod/iPhone, zoals vermeld op de website van Pioneer. y Het installeren van andere software op uw iPod/iPhone dan die welke op de website van Pioneer is vermeld, kan incompatibiliteit met dit apparaat veroorzaken. y De videokwaliteit is afhankelijk van het videobronmateriaal op uw iPod y In het geval van problemen met uw iPod, gaat u naar www.apple.com/support/iPod.
  • Page 411: Radiofuncties

    Bedienen Radiofuncties Alle opgeslagen stations verwijderen Zorg ervoor dat de antennes zijn aangesloten. Houd CLEAR twee seconden in gedrukt. (Zie pagina 24.) ‘Verwijder alles’ wordt weergegeven. Druk nogmaals op CLEAR. Alle opgeslagen stations Naar de radio luisteren worden verwijderd. 1. Druk op INPUT/TUNER totdat RADIO (FM) in Een slecht FM-signaal het display verschijnt. De radiotuner stemt nu af op het radiostation waarop u het laatst hebt verbeteren afgestemd. Druk op de blauwe (D) (ST/MONO) knop op de 2. Houd TUNE (-/+) ongeveer twee seconden afstandsbediening. Hiermee schakelt u van een ingedrukt totdat de frequentie-indicatie wordt stereo naar een mono weergave en is de ontvangst gewijzigd. Het zoeken stopt zodra een zender doorgaans beter. wordt ontvangen. Of druk herhaaldelijk op TUNE (-/+). Informatie over een 3. Pas het volume aan met de draaiknop VOLUME op het voorpaneel of met de toetsen VOL (-/+) radiostation weergeven...
  • Page 412: De Online-Functie Gebruiken

    1. Controleer de netwerkverbinding en netwerkinstellingen (pagina 27-31). 2. Druk op HOME MENU (n). 3. Gebruik de toetsen A/D om de optie [Online] te selecteren en druk vervolgens op ENTER (b). 4. Gebruik de toetsen A/D om een online dienst te selecteren en druk op ENTER (b). Opmerking y Voor meer informatie over elke dienst kunt u contact opnemen met de inhoudprovider of de ondersteuningslink voor de dienst bezoeken. y De inhoud van Online-diensten en aan deze diensten gerelateerde informatie, inclusief gebruikersinterfaces, kan worden gewijzigd. Ga voor de meest actuele informatie naar de website van elke service. y Het gebruik van online-functies via een draadloze netwerkverbinding kan een verkeerde streaming-snelheid veroorzaken door storing van huishoudelijke apparaten die identieke radiofrequenties gebruiken. y Pioneer respecteert het privacybeleid dat hierop betrekking heeft en past dit ook op uw privacy en uw wettelijke rechten toe wanneer u onlinediensten van gebruikersnamen, wachtwoorden en andere inloginformatie voorziet en wanneer deze door Pioneer worden opgeslagen. Zie voor meer informatie over dit onderwerp het privacybeleid van Pioneer ("Pioneer Privacy Policy") op de website van Pioneer.
  • Page 413: Problemen Oplossen

    Problemen oplossen Problemen oplossen Algemeen Symptoom Oorzaak en oplossing De stroom wordt niet y Bevestig de netkabel goed in het stopcontact. ingeschakeld. Het apparaat start niet met y Plaats een afspeelbare schijf. (Controleer het type schijf, kleursysteem afspelen. en de regio-code.) y Leg de schijf met de afspeelkant naar beneden. y Plaats de schijf correct in de cd-lade. y Maak de schijf schoon. y Annuleer de Classificatiefunctie of verander het Classificatieniveau. De hoek kan niet worden y Op de dvd-video die u afspeelt zijn geen verschillende veranderd. camerastandpunten (multi-angles) opgenomen. Ik kan geen film-, foto- of y De bestanden zijn niet opgenomen in een formaat dat de speler kan muziekbestanden afspelen. afspelen. y De speler ondersteunt de codec van het filmbestand niet. De afstandsbediening y De afstandsbediening is niet op de afstandssensor van het apparaat functioneert niet goed.
  • Page 414: Netwerk

    Problemen oplossen Netwerk Symptoom Oorzaak en oplossing BD-Live functie werkt niet. y De aangesloten USB-geheugenstick heeft niet genoeg opslagruimte . Sluit een USB-geheugenstick aan met minstens 1 GB vrij beschikbare geheugenruimte. y Zorg dat het apparaat goed is aangesloten op het LAN-netwerk en toegang heeft tot internet (zie pagina 27-31). y Uw breedbandsnelheid is te traag voor het gebruik van BD- Live functies. Wij adviseren u contact op te nemen met uw internetprovider en deze om een hogere breedbandsnelheid te vragen. y De optie [BD-LIVE aansluiting] in het menu [Instellen] is ingesteld op [Verboden].Stel de optie in op [Toegestaan]. Streaming-video-diensten y De snelheid van uw breedband-internetverbinding is waarschijnlijk (zoals YouTube enz.) kunnen niet hoog genoeg voor streaming-video-diensten. Wij adviseren tijdens het afspelen vaak u contact op te nemen met uw internetprovider en deze om een stoppen of 'bufferen' . hogere breedbandsnelheid te vragen. Gedeelde mappen of y Er is een firewall of antivirusprogramma op uw mediaserver bestanden van uw computer actief. Schakel de firewall of het antivirusprogramma op uw pc of of een mediaserver worden mediaserver uit. niet weergegeven in de y De speler heeft geen verbinding met het LAN (Local Area Network) apparaatlijst.
  • Page 415: Beeld

    Mogelijk ondersteunt uw tv de resolutie die u voor de speler hebt ingesteld, niet. Stel een resolutie in die door uw tv wordt geaccepteerd. y De HDMI-uitgang van de speler is aangesloten op een dvi-apparaat dat de kopieerbeveiligingsfunctie niet ondersteunt. Er verschijnt beeldruis y U speelt een disc af die opgenomen is met een kleurensysteem dat niet bij uw tv past. y Stel een resolutie in die uw tv accepteert. Bij het afspelen van een y Gebruik een HDMI-kabel (Type A, High Speed HDMI™-kabel met 3D-schijf worden geen ethernet) om de speler op uw tv aan te sluiten. 3D-beelden weergegeven. y Het is mogelijk dat uw televisie het 'HDMI 3D mandatory format' niet ondersteunt. y De optie [3D Modus] in het menu [Instellen] is uitgeschakeld ([Uit]). Schakel de optie in ([Aan]). Geluid Symptoom Oorzaak en oplossing Er is geen geluid of het geluid y Het apparaat is op scannen, slow motion of pauzeren ingesteld. is vervormd. y Het volume is te laag. y Controleer of de luidsprekerkabel goed is aangesloten (pagin 16). Updates Informatie over dit product is beschikbaar op de website van Pioneer. Op deze website vindt u informatie over het bijwerken (updaten) en het onderhoud/repareren van deze speler.
  • Page 416: Uw Tv Bedienen Met De Bijgeleverde Afstandsbediening

    U kunt uw tv bedienen met de bijgeleverde afstandsbediening afstandsbediening. Als uw tv op de hieronder getoonde lijst staat, kunt u de code van de bijbehorende fabrikant ingeven. Met de onderstaande toetsen kunt u de tv functies 1. Houd de toets 1 (TV POWER) ingedrukt en bedienen gebruik de cijfertoetsen om de code van de fabrikant van uw tv op te geven (zie de onderstaande tabel) Bedieningstoetsen Merk Codenummer voor de tv Pioneer 1 (Standaard) Sony 2, 3 Panasonic 4, 5 Druk op Kunt u Samsung 6, 7 De tv in en uitschakelen. 1 (TV POWER) 8, 9 De ontvanger van de tv 2. Laat de toets 1 (TV POWER) los om de tussen de tv en andere INPUT signaalontvangers instelling te voltooien.
  • Page 417: Regiocodelijst

    Bijlage Regiocodelijst Kies een regiocode uit deze lijst. Regio Code Regio Code Regio Code Regio Code Afghanistan Fiji Eilanden Monaco Singapore Mongolië Slowakije Argentinië Finland Slovenië Australië Frankrijk Marokko Oostenrijk Duitsland Nepal Zuid-Afrika België Groot-Brittannië Nederland Zuid-Korea Bhoetan Griekenland Nederlandse Spanje Antillen Bolivia Groenland Sri Lanka Nieuw-Zeeland Hong Kong Zweden Brazilië...
  • Page 418: Taalcodelijst

    Bijlage Taalcodelijst Aan de hand van deze lijst kunt u de gewenste taal voor de volgende startinstellingen invoeren: [Audio disk], [Disk ondertiteling] en [Disk Menu]. Taal Code Taal Code Taal Code Taal Code Afaars 6565 Frans 7082 Litouws 7684 Sindhi 8368 Afrikaans 6570 Fries 7089 Macedonisch 7775 Singalees 8373 Keltisch 7176 Malagazisch 7771 Slowaaks 8375 Albanees 8381 Maleis 7783 Sloveens 8376 Amhaars 6577 Georgisch...
  • Page 419: Handelsmerken En Licenties

    Bijlage Handelsmerken en licenties Gefabriceerd onder licentie van de volgende Amerikaanse patenten: 5,451,942; 5,956,674; 5,974,380; 5,978,762; 6,226,616; 6,487,535; 7,392,195; 7,272,567; 7,333,929; 7,212,872 en Blu-ray Disc™, Blu-ray™, Blu-ray 3D™, BD-Live™, andere verleende en aangevraagde Amerikaanse BONUSVIEW™ en de logo’s zijn handelsmerken en wereldwijde patenten. DTS en het DTS- van de Blu-ray Disc Association. symbool zijn gedeponeerde handelsmerken en DTS-HD, DTS-HD Master Audio | Essential en de DTS-logo’s zijn handelsmerken van DTS, Inc. Het product bevat software. © DTS, Inc. Alle rechten voorbehouden. is een handelsmerk van de Blu-Ray organisatie. DLNA™, het DLNA-logo en DLNA CERTIFIED™ zijn handelsmerken, servicemerken of certificeringsmerken van de Digital Living Network Alliance. Oracle en Java zijn gedeponeerde handelsmnerken van Oracle en/of aan Oracle gelieerde ondernemingen. Andere namen zijn handelsmerken van hun respectieve eigenaren. Het Wi-Fi CERTIFIED-logo is een certificeringsmerk van de Wi-Fi Alliance. HDMI, het HDMI Logo en High-Definition Multimedia Interface zijn handelsmerken of gedeponeerde handelsmerken van HDMI Licensing LLC in de De Wi-Fi Protected Setup Mark is een Verenigde Staten en in andere landen. handelsmerk van de Wi-Fi Alliance. Geproduceerd onder licentie van Dolby “x.v.Colour”, en zijn Laboratories. Dolby en het dubbele D-symbool handelsmerken van Sony Corporation.
  • Page 420 Bijlage “Made for iPod” en “Made for iPhone” betekent dat een elektronisch accessoire speciaal voor aansluiting op een iPod of iPhone is ontwikkeld en door de ontwerper volgens de kwaliteitsnormen van Apple is goedgekeurd. Apple is niet verantwoordelijk voor de werking van dit apparaat of het voldoen ervan aan de veiligheidsnormen en de wettelijke normen. Houd rekening met de mogelijkheid dat het gebruik van dit accessoire bij een iPod of iPhone de draadloze prestaties ervan kan beïnvloeden. iPhone, iPod, iPod classic, iPod nano en iPod touch zijn handelsmerken van Apple Inc. die in de Verenigde Staten en andere landen wettig zijn gedeponeerd. YouTube™ is een handelsmerk van Google Inc. Picasa™ Web Albums is een handelsmerk van Google Inc. Dit product bevat technologie die eigendom is van Microsoft Corporation en deze kan niet worden gebruikt of gedistribueerd zonder een...
  • Page 421: Resolutie Video-Uitvoer

    Bijlage Resolutie video-uitvoer Bij afspelen van beveiligde media Video-uitgang COMPONENT VIDEO OUT HDMI OUT Resolutie HDMI aangesloten HDMI ontkoppeld 576i 576p 576i 576p 576p 576p 720p 720p 720p 1080i 1080i 1080i 1080p/24 Hz 1080p / 24 Hz 576i 1080i 1080p/50 Hz 1080p/50 Hz 576i 1080i Bij afspelen van beveiligde media Video-uitgang HDMI OUT COMPONENT VIDEO OUT...
  • Page 422: Specificaties

    Bijlage Specificaties Algemeen Stroomvereisten AC 220-240 V, 50/60 Hz Opgenomen vermogen 150 W (in standby-modus: minder dan 0,3 W) Afmetingen (B x H x D) Circa 430 x 64 x 304 mm Netto gewicht (circa) 3,4 kg Gebruikstemperatuur 5 °C tot 35 °C Relatieve vochtigheid 5 % tot 85 % Ingangen/uitgangen VIDEO OUT 1,0 V (p-p), 75 ohm, sync negatief, RCA-aansluiting x 1 1,0 V (p-p), 75 ohm, sync negatief, RCA-aansluiting x 1 COMPONENT VIDEO OUT (Pb)/(Pr) 0,7 V (p-p), 75 ohm, RCA-aansluiting x 2 HDMI IN/OUT (video/audio) 19 pins (type A, HDMI™-connector) ANALOG AUDIO IN 2,0 Vrms (1 kHz, 0 dB), 600 ohm, RCA-aansluiting (L, R) x 1 DIGITAL IN (OPTICAL) 3 V (p-p), optische aansluiting x 1 PORTABLE IN 0,5 Vrms (3,5 mm stereoaansluiting) Radio Bereik FM-radio 87,5 tot 108,0 MHz Versterker Uitgangsvermogen (RMS) Totaal 1100 W Voorzijde 180 W × 2 (1 kHz , 4 ohm, THD 10 %) Centre 180 W (1 kHz , 4 ohm, THD 10%) Achter 180 W × 2 (1 kHz , 4 ohm, THD 10 %) Sub-Woofer...
  • Page 423 405 nm / 650 nm Signaalsysteem Standaard PAL/NTSC-kleuren-tv Frequentierespons 20 Hz tot 18 kHz (48 kHz, 96 kHz, 192 kHz bemonstering) Harmonische storing Minder dan 0,05% Dynamisch bereik Beter dan 80 dB LAN-poort Ethernet-aansluiting x 1, 10BASE-T/100BASE-TX Geïntegreerde IEEE 802.11n (5 GHz en 2,4 GHz band) voor draadloze Draadloos LAN (ingebouwde toegang tot het netwerk, compatibel met 802.11a/b/g Wi-Fi- antenne): netwerken. USB-busvoeding DC 5 V 0 500 mA Luidsprekers BCS-717 S-BD707T y Front/surround-luidsprekerbox (links/rechts) Afmetingen Type tweeweg 260 x 1097 x 260 mm (b x h x d) Gewogen impedantie 4 ohm Netto gewicht 3,8 kg y Middenluidspreker Afmetingen Type eenweg 300 x 87 x 65 mm (b x h x d) Gewogen impedantie...
  • Page 424 Bijlage Luidsprekers BCS-313 S-BD303 y Front/surround-luidsprekerbox (links/rechts) Afmetingen Type eenweg 96 x 96 x 85 mm (b x h x d) Gewogen impedantie 4 ohm Netto gewicht 0,4 kg y Middenluidspreker Afmetingen Type eenweg 300 x 87 x 65 mm (b x h x d) Gewogen impedantie 4 ohm Netto gewicht 0,6 kg y Subwoofer Afmetingen Type eenweg 130,5 x 420 x 375 mm (b x h x d) Gewogen impedantie 3 ohm Netto gewicht 4,4 kg y Ontwerp en specificaties kunnen zonder voorafgaande kennisgeving worden gewijzigd.
  • Page 425: Onderhoud

    Bijlage Onderhoud Opmerkingen over schijven Omgaan met schijven Omgaan met het apparaat Raak de afspeelzijde van de schijf niet aan. Houd de schijf aan de randen vast zodat u geen vingerafdrukken op het oppervlak maakt. Plak nooit Het apparaat verzenden papier of plakband op de schijf. Bewaar de originele verzenddoos en Schijven opbergen verpakkingsmaterialen. Als u het apparaat moet verzenden, kunt u het apparaat voor een Berg de schijf na het spelen op in het bijbehorende maximale bescherming weer inpakken zoals het doosje. Stel de schijf niet bloot aan direct zonlicht, oorspronkelijk in de fabriek is gedaan. of hittebronnen en laat de schijf nooit liggen in een Houd het oppervlak van de behuizing schoon in de zon geparkeerde auto. y Gebruik geen vluchtige stoffen, zoals Schijven reinigen insecticiden, in de buurt van het apparaat. y Als u druk uitoefent wanneer u het apparaat Vingerafdrukken en stof op de schijf kunnen zorgen afneemt, kan het oppervlak beschadigd raken. voor een slechte beeldkwaliteit en geluidsstoringen.
  • Page 426: Belangrijke Informatie Met Betrekking Tot De Netwerkservices

    De licenties voor de open source software die gebruikt wordt in deze speler kunt u vinden aan Voor alle informatie, gegevens, documenten, het eind van dit document. communicaties, downloads, bestanden, teksten, afbeeldingen, foto's, grafische voorstellingen, video's, webcasts, publicaties, hulpprogramma's, bronnen, software, code, programma's, applets, widgets, toepassingen, producten en andere inhoud ('Inhoud') en alle services en aanbiedingen ('Services') die via een derde partij (elk een 'Serviceprovider') wordt geleverd of beschikbaar wordt gesteld, geldt dat de Serviceprovider hier volledig verantwoordelijk voor is. De beschikbaarheid van en toegang tot de Inhoud en Services die via het PIONEER-apparaat door de Serviceprovider worden verschaft kunnen op elk gewenst moment zonder voorafgaande kennisgeving worden gewijzigd, inclusief, maar niet beperkt tot opschorting, verwijdering, beëindiging van alle of een deel van de Inhoud of Services. Als u vragen of problemen hebt met betrekking tot de Inhoud of Diensten, raadpleegt u de website van de Serviceprovider voor de meest actuele informatie. PIONEER is niet verantwoordelijk of aansprakelijk voor de klantenservice met betrekking tot de Inhoud en Diensten. Alle vragen of serviceverzoeken met betrekking tot de Inhoud of Diensten moeten rechtstreeks worden gericht aan de desbetreffende Inhoud en Dienstenproviders. PIONEER is niet verantwoordelijk voor de Inhoud of Diensten die door de Serviceprovider wordt verstrekt of voor de wijzigingen, verwijdering of beëindiging van dergelijke Inhoud of Diensten...
  • Page 427: Gnu General Public License

    - Copyright 1999, 2004, 2008 Keith merge, publish, distribute, sublicense, Packard gSOAP Public License 1.3 LIBRARY: and/or sell copies of the Software, and to - Copyright 2000 SuSE, Inc. gsoap permit persons to whom the Software is - Copyright 2000 Keith Packard, You can get corresponding open source furnished to do so, subject to the following member of The XFree86 Project, Inc. code from the following URL. conditions: - Copyright 2004, 2005, 2007, 2008 http://www.oss-pioneer.com/homeav/hts/ Red Hat, Inc. THE SOFTWARE IS PROVIDED "AS IS", - Copyright 2004 Nicholas Miell WITHOUT WARRANTY OF ANY KIND, We are unable to answer any question - Copyright 2005 Lars Knoll & Zack EXPRESS OR IMPLIED, INCLUDING BUT about the source code for the open source Rusin, Trolltech NOT LIMITED TO THE WARRANTIES software. - Copyright 2005 Trolltech AS OF MERCHANTABILITY, FITNESS This product includes...
  • Page 428 Bijlage your freedom to share and change free the Program or any derivative work does not normally print such an software--to make sure the software is free under copyright law: that is to say, announcement, your work based for all its users. This General Public License a work containing the Program or on the Program is not required to applies to most of the Free Software a portion of it, either verbatim or print an announcement.) Foundation's software and to any other with modifications and/or translated These requirements apply to program whose authors commit to using into another language. (Hereinafter, the modified work as a whole. If it. (Some other Free Software Foundation translation is included without identifiable sections of that work software is covered by the GNU Lesser limitation in the term "modification".) are not derived from the Program, General Public License instead.) You can Each licensee is addressed as "you". and can be reasonably considered apply it to your programs, too. Activities other than copying, independent and separate works in When we speak of free software, we are distribution and modification are themselves, then this License, and its referring to freedom, not price. Our General not covered by this License; they are terms, do not apply to those sections Public Licenses are designed to make sure outside its scope. The act of running when you distribute them as separate that you have the freedom to distribute the Program is not restricted, and the works. But when you distribute the...
  • Page 429 Bijlage (whether by court order, agreement either of that version or of any later The source code for a work means the preferred form of the work for making or otherwise) that contradict the version published by the Free Software modifications to it. For an executable conditions of this License, they do not Foundation. If the Program does work, complete source code means excuse you from the conditions of not specify a version number of this all the source code for all modules it this License. If you cannot distribute License, you may choose any version contains, plus any associated interface so as to satisfy simultaneously your ever published by the Free Software definition files, plus the scripts used to obligations under this License and Foundation. control compilation and installation any other pertinent obligations, 10. If you wish to incorporate parts of of the executable. However, as a then as a consequence you may the Program into other free programs special exception, the source code not distribute the Program at all. For whose distribution conditions are distributed need not include anything example, if a patent license would not different, write to the author to ask that is normally distributed (in either permit royalty-free redistribution of for permission. For software which source or binary form) with the major the Program by all those who receive is copyrighted by the Free Software components (compiler, kernel, and copies directly or indirectly through...
  • Page 430: Gnu Lesser General Public License

    Bijlage the public, the best way to achieve this is to a subroutine library, you may consider it show them these terms so they know their make it free software which everyone can more useful to permit linking proprietary rights. redistribute and change under these terms. applications with the library. If this is what We protect your rights with a two-step To do so, attach the following notices to the you want to do, use the GNU Lesser General method: (1) we copyright the library, and program. It is safest to attach them to the Public License instead of this License. (2) we offer you this license, which gives start of each source file to most effectively you legal permission to copy, distribute convey the exclusion of warranty; and each and/or modify the library. GNU LESSER file should have at least the "copyright" line To protect each distributor, we want to GENERAL PUBLIC and a pointer to where the full notice is make it very clear that there is no warranty found. for the free library. Also, if the library is LICENSE modified by someone else and passed <one line to give the program's name on, the recipients should know that what and an idea of what it does.> Version 2.1, February 1999 they have is not the original version, so Copyright © <year> <name of author> Copyright © 1991, 1999 Free Software that the original author's reputation will Foundation, Inc.
  • Page 431 Bijlage permission to use the GNU C Library in is true depends on what the Library the distribution of the whole must be non-free programs enables many more does and what the program that uses on the terms of this License, whose people to use the whole GNU operating the Library does. permissions for other licensees extend system, as well as its variant, the GNU/Linux to the entire whole, and thus to each 1. You may copy and distribute verbatim operating system. and every part regardless of who copies of the Library's complete source Although the Lesser General Public License wrote it. code as you receive it, in any medium, is Less protective of the users' freedom, it provided that you conspicuously and Thus, it is not the intent of this section does ensure that the user of a program that appropriately publish on each copy to claim rights or contest your rights is linked with the Library has the freedom an appropriate copyright notice and to work written entirely by you; rather, and the wherewithal to run that program disclaimer of warranty; keep intact all the intent is to exercise the right to using a modified version of the Library. the notices that refer to this License control the distribution of derivative or The precise terms and conditions for and to the absence of any warranty; collective works based on the Library. copying, distribution and modification and distribute a copy of this License In addition, mere aggregation of follow. Pay close attention to the difference along with the Library.
  • Page 432 Bijlage derivative work of the Library, and linked with the Library, with the by this License, and distribute such therefore falls outside the scope of this complete machine-readable a combined library, provided that License. "work that uses the Library", as the separate distribution of the work However, linking a "work that uses the object code and/or source code, based on the Library and of the other Library" with the Library creates an so that the user can modify library facilities is otherwise permitted, executable that is a derivative of the the Library and then relink to and provided that you do these two Library (because it contains portions produce a modified executable things: of the Library), rather than a "work containing the modified Library. a) Accompany the combined library that uses the library". The executable (It is understood that the user with a copy of the same work is therefore covered by this License. who changes the contents of based on the Library, uncombined Section 6 states terms for distribution definitions files in the Library with any other library facilities. of such executables. will not necessarily be able to This must be distributed under When a "work that uses the Library" recompile the application to use the terms of the Sections above.
  • Page 433 Bijlage obligations under this License and any 14. If you wish to incorporate parts of them to the start of each source file to other pertinent obligations, then as a the Library into other free programs most effectively convey the exclusion of consequence you may not distribute whose distribution conditions are warranty; and each file should have at least the Library at all. For example, if a incompatible with these, write to the "copyright" line and a pointer to where patent license would not permit the author to ask for permission. For the full notice is found. royalty-free redistribution of the software which is copyrighted by <one line to give the library's name Library by all those who receive copies the Free Software Foundation, write and an idea of what it does.> directly or indirectly through you, to the Free Software Foundation; we Copyright © <year> <name of then the only way you could satisfy sometimes make exceptions for this. author> both it and this License would be to Our decision will be guided by the two refrain entirely from distribution of the goals of preserving the free status of This library is free software; you can Library. all derivatives of our free software and redistribute it and/or modify it under If any portion of this section is held of promoting the sharing and reuse of the terms of the GNU Lesser General invalid or unenforceable under any software generally.
  • Page 434 Declaration of Conformity with regard to the R&TTE Directive 1999/5/EC Manufacturer: EU Representative’s: Pioneer Corporation Pioneer Europe NV Haven 1087, Keetberglaan 1, 1-1, SHIN-OGURA, SAIWAI-KU, 9120 Melsele, Belgium KAWASAKI-SHI, http://www.pioneer.eu KANAGAWA-KEN 212-0031, JAPAN English: Dansk: Hereby, Pioneer, declares that this BCS-717 Undertegnede Pioneer erklærer herved, (BCS-313) is in compliance with the essential at følgende udstyr BCS-717 (BCS-313) requirements and other relevant provisions overholder de væsentlige krav og øvrige of Directive 1999/5/EC. relevante krav i direktiv 1999/5/EF. Suomi: Deutsch: Pioneer vakuuttaa täten että BCS-717 (BCS- Hiermit erklärt Pioneer, dass sich dieses BCS- 313) tyyppinen laite on direktiivin 1999/5/ 717 (BCS-313) in Übereinstimmung mit EY oleellisten vaatimusten ja sitä koskevien den grundlegenden Anforderungen und direktiivin muiden ehtojen mukainen.
  • Page 435: Lietuvių Kalba

    Português: Slovenčina: Pioneer declara que este BCS-717 (BCS-313) Pioneer týmto vyhlasuje, že BCS-717 (BCS- está conforme com os requisitos essenciais 313) spĺňa základné požiadavky a všetky e outras disposições da Directiva 1999/5/CE. príslušné ustanovenia Smernice 1999/5/ES. Čeština: Slovenščina: Pioneer tímto prohlašuje, že tento BCS- Pioneer izjavlja, da je ta BCS-717 (BCS-313) v 717 (BCS-313) je ve shodě se základními skladu z bistvenimi zahtevami in ostalimi požadavky a dalšími příslušnými relevantnimi določili direktive 1999/5/ES. ustanoveními směrnice 1999/5/ES. Română: Eesti: Prin prezenta, Pioneer declara ca acest Käesolevaga kinnitab Pioneer seadme BCS- BCS-717 (BCS-313) este in conformitate 717 (BCS-313) vastavust direktiivi 1999/5/ cu cerintele esentiale si alte prevederi ale EÜ põhinõuetele ja nimetatud direktiivist Directivei 1999/5/EU. tulenevatele teistele asjakohastele sätetele. български: Magyar: С настоящето, Pioneer декларира, че Alulírott, Pioneer nyilatkozom, hogy a този BCS-717 (BCS-313) отговаря на BCS-717 (BCS-313) megfelel a vonatkozó основните изисквания и други съответни alapvetõ követelményeknek és az 1999/5/EC постановления на Директива 1999/5/EC. irányelv egyéb elõírásainak. Polski: Latviešu valoda: Niniejszym Pioneer oświadcza, że BCS-...
  • Page 436 PIONEER CORPORATION 1-1, Shin-ogura, Saiwai-ku, Kawasaki-shi, Kanagawa 212-0031, Japan PIONEER ELECTRONICS (USA) INC. P.O. BOX 1540, Long Beach, California 90801-1540, U.S.A. TEL: (800) 421-1404 PIONEER ELECTRONICS OF CANADA, INC. 340 Ferrier Street, Unit 2, Markham, Ontario L3R 2Z5, Canada TEL: 1-877-283-5901, 905-479-4411 PIONEER EUROPE NV Haven 1087, Keetberglaan 1, B-9120 Melsele, Belgium TEL: 03/570.05.11 PIONEER ELECTRONICS ASIACENTRE PTE. LTD. 253 Alexandra Road, #04-01, Singapore 159936 TEL: 65-6472-7555 PIONEER ELECTRONICS AUSTRALIA PTY. LTD. 5 Arco Lane, Heatherton, Victoria, 3202, Australia, TEL: (03) 9586-6300 PIONEER ELECTRONICS DE MEXICO S.A. DE C.V. Blvd.Manuel Avila Camacho 138 10 piso Col.Lomas de Chapultepec, Mexico, D.F. 11000 TEL: 55-9178- 4270 Printed in Indonesia / Imprimé en Indonesia...

Ce manuel est également adapté pour:

Xv-bd717wS-bd707tS-bd707swBcs-313S-bd303

Table des Matières