Publicité

Les langues disponibles
  • FR

Les langues disponibles

  • FRANÇAIS, page 23

Liens rapides

Quick Installation Guide
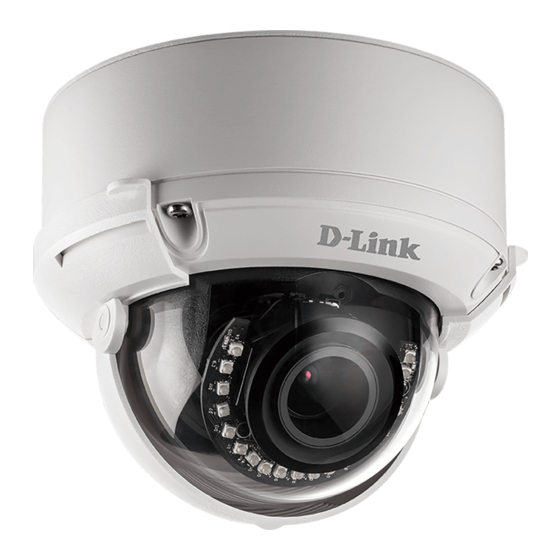
5 Megapixel H.265 Outdoor Dome Network Camera
This document will guide you through the
basic installation process for your new
D-Link Network Camera.
DCS-6517
Quick Installation Guide
Installationsanleitung
Guide d'installation
Guía de instalación
Guida di Installazione
Краткое руководство по установке
Guia de Instalação Rápida
快速安裝指南
Petunjuk Pemasangan Cepat
Documentation also available on
CD and via the D-Link Website

Publicité

Table des Matières
loading

Sommaire des Matières pour D-Link DCS-6517

  • Page 1 D-Link Network Camera. DCS-6517 Quick Installation Guide Installationsanleitung Guide d’installation Guía de instalación Guida di Installazione Краткое руководство по установке Guia de Instalação Rápida 快速安裝指南 Petunjuk Pemasangan Cepat Documentation also available on CD and via the D-Link Website...
  • Page 3: Package Contents

    This installation guide provides basic instructions for installing the DCS-6517. For additional information about how to use the camera, please see the User Manual which is available on the CD included in this package or from the D-Link support website.
  • Page 4: Hardware Overview

    Connects to the optional cable harness (not included). 1. 12V IN 6. 12V OUT 2. GND 7. GND Cable Harness Port 3. AUD IN 8. RESET 4. AUD GND 9. DI 5. AUD OUT 10. DO D-Link DCS-6517 Quick Installation Guide...
  • Page 5 Optional Cable Harness (not included) Connects to the DCS-6517. For more details on connecting the Cable Harness A/V cable, refer to the User Manual. Connector I/O connectors for external devices. DI/DO (12 V DC output not supported for the DCS-6517)
  • Page 6 For bottom cable exit: Attach the protective side cover via the provided screws. Connect the camera connector to the camera. Reattach the camera cover using the security wrench to tighten the 3 screws, and reattach the sun shield. D-Link DCS-6517 Quick Installation Guide...
  • Page 7: Microsd Card Installation

    Adjusting the Camera's Lens Adjust the Camera’s Lens gimbal; Turn the lens module left and right, up and down and the orientation until the desired position is achieved. Tighten the pan, tile and the adjustment screw once completed. D-Link DCS-6517 Quick Installation Guide...
  • Page 8 Insert the screw into the base of the pendant bracket at the top of the bracket cap to secure the bracket cap into place. D-Link DCS-6517 Quick Installation Guide...
  • Page 9 (+2 / -0 mm) hole to be cut. Use the included template to mark and cut the mounting holes. Drill four 6 mm holes corresponding to the holes in the mounting template and insert the plastic anchors into these holes. D-Link DCS-6517 Quick Installation Guide...
  • Page 10: Connecting The Camera

    General Connection Using 12 V DC Power Adapter (not included) ƒ Connect the Ethernet cable to your network. ƒ Connect your power adapter to the camera's power connector, then plug in the power adapter. D-Link DCS-6517 Quick Installation Guide...
  • Page 11: Configuring The Camera

    Configuring the Camera Insert the DCS-6517 CD into your computer's CD-ROM drive to begin the installation. If the Autorun function on your computer is disabled, or if the D-Link Launcher fails to start automatically, run D:\autorun.exe, where D: represents the drive letter of your CD-ROM drive.
  • Page 12: Additional Information

    Viewing Your Camera via a Web Browser Click on the D-Link Setup Wizard SE icon that was created in your Windows Start menu (Start > D-Link > Setup Wizard SE). Select the camera and click Link to access the web configuration.
  • Page 13 Installationsanleitung Diese Installationsanleitung bietet Ihnen grundlegende Anleitungen zur Installation der DCS-6517 in Ihrem Netzwerk. Zusätzliche Informationen zur Verwendung der Kamera finden Sie im Benutzerhandbuch, das Ihnen auf der CD, die diesem Paket beiliegt, oder über die D-Link Support-Website zur Verfügung steht.
  • Page 14 Wird mit dem optionalen Kabelbaum (nicht enthalten) verbunden. 1. 12V IN 6. 12V OUT 2. GND (Masse) 7. GND (Masse) Kabelbaumanschluss 3. AUD IN 8. RESET 4. AUD GND (RÜCKSETZEN) 5. AUD OUT 9. DI 10. DO D-Link DCS-6517 Quick Installation Guide...
  • Page 15 Informationen zum Anschluss des A/V-Kabels finden Sie Kabelbaumanschluss im Benutzerhandbuch. Steckverbinder für E/A-Anschlüsse für externe Geräte. digitalen Ein- und (12 V DC-Ausgang nicht unterstützt für die DCS-6517) Ausgang Drücken und halten Sie den Knopf 10 Sekunden lang, Rücksetztaste um die Kameraeinstellungen auf die werkseitigen Standardeinstellungen zurückzusetzen.
  • Page 16 Bringen Sie die Seitenabdeckung mit den vorgesehenen Schrauben an. Schließen Sie den Kamerastecker an der Kamera an. Bringen Sie die Kameraabdeckung mit dem Sicherheitsschraubendreher wieder an, ziehen Sie die 3 Schrauben fest und setzen Sie den Sonnenschutz wieder auf. D-Link DCS-6517 Quick Installation Guide...
  • Page 17: Installation Der Microsd-Karte

    Objektivmodul nach links und rechts, nach oben und unten und führen Sie die Ausrichtung durch, bis die gewünschte Position erreicht ist. Ziehen Sie danach die Schraube zum Schwenken, Neigen und Einstellen fest. Schwenken 375° Neigen 90° Drehen 90° D-Link DCS-6517 Quick Installation Guide...
  • Page 18 Bringen Sie die Bügelkappe unten am Hängebügel an, indem Sie die Kappe gegen den Uhrzeigersinn festdrehen. Setzen Sie die Schraube in die Basis der Hängemontagehalterung oben an der Bügelkappe ein, um die Bügelkappe zu sichern. D-Link DCS-6517 Quick Installation Guide...
  • Page 19 Bohrung von 34 mm (+2 / -0 mm) möglich ist. Verwenden Sie die enthalten Schablone, um die Bohrungen zu markieren und vorzunehmen. Bohren Sie vier 6 mm-Löcher anhand den Öffnungen in der Befestigungsschablone und setzen Sie die Kunststoffdübel in diese Löcher ein. D-Link DCS-6517 Quick Installation Guide...
  • Page 20: Anschluss Der Kamera

    Sie die folgende Anschlussmethode verwenden: Allgemeiner Anschluss mit 12 V DC-Netzteil (nicht im Lieferumfang) ƒ Verbinden Sie das Ethernet-Kabel mit Ihrem Netzwerk. ƒ Verbinden Sie Ihr Netzteil mit dem Stromanschluss der Kamera, dann stecken Sie das Netzteil ein. D-Link DCS-6517 Quick Installation Guide...
  • Page 21: Konfiguration Der Kamera

    Konfiguration der Kamera Legen Sie die DCS-6517 CD in das CD-ROM-Laufwerk Ihres Computers, um die Installation zu beginnen. Sollte die CD auf Ihrem Computer nicht automatisch ausgeführt werden oder der D-Link Launcher nicht automatisch starten, führen Sie D:\autorun.exe aus, wobei D: für den Buchstaben Ihres CD-ROM-Laufwerks steht.
  • Page 22: Weitere Informationen

    Anzeige Ihrer Kamera über einen Webbrowser Klicken Sie auf das Symbol für den D-Link Setup- Assistenten SE, der in Ihrem Windows-Startmenü (Start > D-Link > Setup Wizard SE) erstellt wurde. Wählen Sie die Kamera aus und klicken Sie auf Link, um auf die Web-Konfiguration zuzugreifen.
  • Page 23: Contenu De La Boîte

    Guide d'installation rapide Ce guide d'installation rapide fournit des instructions de base pour l'installation du DCS-6517. Pour obtenir des informations complémentaires sur l'utilisation de la caméra, consultez le Manuel d'utilisation, disponible sur le CD joint à ce coffret, ou sur le site Web d'assistance D-Link.
  • Page 24: Description Du Matériel

    Permet de connecter le faisceau de câbles optionnel (non inclus) 1. 12V IN 6. 12V OUT Port de faisceau de 2. GND 7. GND câbles 3. AUD IN 8. astre tête RESET 4. AUD GND 9. DI 5. AUD OUT 10. DO D-Link DCS-6517 Quick Installation Guide...
  • Page 25: Faisceau De Câbles Optionnel (Non Fourni)

    Faisceau de câbles optionnel (non fourni) Se connecte au DCS-6517. Pour plus de détails sur le Connecteur raccordement du câble A/V, reportez-vous au manuel de pour faisceau de l'utilisateur. câbles Connecteurs E/S pour périphériques externes Connecteur DI/ (Sortie12 V cc non prise en charge pour le DCS-6517) Appuyez dessus et maintenez-le enfoncé...
  • Page 26: Raccordement Au Faisceau De Câbles Optionnel

    Raccordez le connecteur de la caméra sur celle-ci. Remonter le capot de la caméra à l'aide de la clé de sécurité pour serrer les 3 vis et monter à nouveau l'écran de protection solaire. D-Link DCS-6517 Quick Installation Guide...
  • Page 27: Installation De La Carte Microsd

    Une fois terminé, serrez la vis de réglage du panoramique et de l'inclinaison. Panoramique de 375° Inclinaison de 90° Ratation de 90° D-Link DCS-6517 Quick Installation Guide...
  • Page 28: Installation De La Monture À Suspension (Optionnelle)

    Insérez la vis dans la base du support à suspension en haut du capuchon du support pour mettre fermement en place le capuchon du support. D-Link DCS-6517 Quick Installation Guide...
  • Page 29: Installation De La Monture À Angle Droit (Optionnelle)

    34 mm (+2 / -0 mm). Utilisez le patron fourni pour marquer et découper les orifices de montage. Percez des orifices de 6 mm correspondant aux orifices du patron de montage et insérez les encres en plastique dans ces orifices. D-Link DCS-6517 Quick Installation Guide...
  • Page 30: Connexion De La Caméra

    électrique 12 V cc (non fourni) ƒ Connectez le câble Ethernet à votre réseau. ƒ Connectez une extrémité de l'adaptateur secteur sur le connecteur d'alimentation situé sur votre caméra et l'autre sur une prise murale. D-Link DCS-6517 Quick Installation Guide...
  • Page 31: Configuration De La Caméra

    Configuration de la caméra Insérez le CD de la DCS-6517 dans le lecteur de CD-ROM de l'ordinateur pour lancer l'installation. Si la fonction d'exécution automatique de votre ordinateur est désactivée ou si le dispositif de lancement D-Link ne parvient pas à démarrer automatiquement, exécutez D:\autorun.exe (où...
  • Page 32: Affichage De Votre Caméra Via Un Navigateur Web

    Affichage de votre caméra via un navigateur Web Cliquez sur l'icône D-Link Setup Wizard SE (Assistant de configuration D-Link SE) dans le menu Démarrer de Windows (Start > D-Link > Setup Wizard SE) (Démarrer > D-Link > Assistant de configuration SE).
  • Page 33: Contenido De La Caja

    Manual del usuario disponible en el CD incluido en el paquete o en el sitio web de asistencia de D-Link. Contenido de la caja ƒ DCS-6517 Cámara de red domo para exteriores de 5 megapíxeles H.265 ƒ Cable Ethernet ƒ Adaptador de extensión ƒ...
  • Page 34 Se conecta al arnés para el cable óptico (no incluido). 1. ENTRADA 12V 6. SALIDA 12V Puerto del arnés para 2. Toma de tierra 7. Toma de tierra cables 3. ENTRADA AUD 8. REINICIO 4. TIERRA AUD 9. DI 5. SALIDA AUD 10. DO D-Link DCS-6517 Quick Installation Guide...
  • Page 35 Conectores de E/S para dispositivos externos. Conector de (salida de CC de 12 V no admitida para el DCS-6517) DI/DO Pulse y mantenga pulsado el botón durante 10 segundos para Botón de reiniciar la cámara en los parámetros predeterminados de reinicio fábrica...
  • Page 36 Acople la cubierta lateral protectora con los tornillos suministrados. Conecte el conector de la cámara a la cámara. Vuelva a conectar la cubierta de la cámara con la llave de seguridad para apretar los 3 tornillos; vuelva a colocar el parasol. D-Link DCS-6517 Quick Installation Guide...
  • Page 37: Instalación De La Tarjeta Microsd

    Ajuste el cardán de la lente de la cámara; gire el módulo de la lente a izquierda y derecha, arriba y abajo hasta conseguir la posición que desee. Apriete la panorámica e inclinación y el tornillo de ajuste cuando finalice. Panorámica 375° Inclinación 90° Giro de 90° D-Link DCS-6517 Quick Installation Guide...
  • Page 38 Inserte el tapón en la base del soporte suspendido en la parte superior del tapón del soporte para asegurarlo en su sitio. D-Link DCS-6517 Quick Installation Guide...
  • Page 39 34 mm (+2 / -0 mm). Use la plantilla incluida para marcar y cortar los orificios de montaje. Practique cuatro orificios de 6 mm correspondientes a los de la plantilla de montaje e inserte los tacos de plástico en dichos orificios. D-Link DCS-6517 Quick Installation Guide...
  • Page 40: Conexión De La Cámara

    CC de 12 V (no incluido) ƒ Conecte el cable Ethernet a la red. ƒ Conecte el adaptador de alimentación al conector de alimentación de la cámara y enchufe el adaptador de alimentación. D-Link DCS-6517 Quick Installation Guide...
  • Page 41: Configuración De La Cámara

    Configuración de la cámara Inserte el CD de la DCS-6517 en la unidad de CD-ROM del ordenador para comenzar la instalación. Si la función de ejecución automática del ordenador está desactivada o si el iniciador de D-Link no se inicia automáticamente, ejecute D:\ autorun.exe (donde D: representa la letra de unidad de la unidad de CD-ROM.
  • Page 42: Información Adicional

    Haga clic en el icono Asistente de configuración SE D-Link que se creó en el menú Inicio de Windows (Inicio > D-Link > Asistente de configuración SE). Seleccione la cámara y haga clic en Vincular para acceder a la configuración web.
  • Page 43: Guida Di Installazione Rapida

    CD incluso nella confezione o scaricabile dal sito Web di supporto di D-Link. Contenuto della confezione ƒ DCS-6517 Videocamera di rete a cupola da esterni H.265 da 5 Megapixel ƒ Cavo Ethernet ƒ Adattatore prolunga ƒ Piastra di montaggio e viti ƒ...
  • Page 44 Canali dei cavi Si collega all'harness cavo opzionale (non incluso). 1. IN 12V 6. USC 12V 2. GND 7. GND Porta cablaggio 3. IN AUD 8. REIMPOSTA 4. GND AUD 9. DI 5. USC AUD 10. DO D-Link DCS-6517 Quick Installation Guide...
  • Page 45 A/V, consultare il Manuale utente. cablaggio Connettori I/O per dispositivi esterni. Connettore DI/ (uscita CC 12 V non supportata per DCS-6517) Tenerlo premuto il pulsante per 10 secondi per ripristinare le Pulsante di reset impostazioni predefinite della telecamera Connettore di Non supportato per DCS-6517.
  • Page 46 Per l'uscita cavo inferiore: Agganciare il coperchio laterale protettivo tramite le viti fornite. Collegare il connettore alla videocamera. Riagganciare il coperchio della videocamera utilizzando la chiave di sicurezza per fissare le 3 viti; quindi riagganciare il parasole. D-Link DCS-6517 Quick Installation Guide...
  • Page 47: Installazione Della Scheda Microsd

    Regolare il bilanciere dell'obiettivo della camera. Ruotare il modulo dell'obiettivo a sinistra e a destra, su e giù e l'orientamento fino a raggiungere la posizione desiderata. Al termine, fissare la panoramica, l'inclinazione e la vite di regolazione. Panoramica 375° Inclinazione 90° Rotazione 90° D-Link DCS-6517 Quick Installation Guide...
  • Page 48 Fissare il tappo della staffa alla base del supporto di montaggio facendo ruotare il tappo in senso antiorario per fissarlo in posizione. Inserire la vite nella base del supporto sospeso, sopra il tappo della staffa, per fissare il tappo in posizione. D-Link DCS-6517 Quick Installation Guide...
  • Page 49 34 mm (+2 / -0 mm). Usare lo schema incluso per segnare ed effettuare i fori di montaggi. Praticare quattro fori da 6mm in corrispondenza dei fori nello schema di montaggio e inserire al loro interno i tasselli in plastica. D-Link DCS-6517 Quick Installation Guide...
  • Page 50: Collegamento Della Videocamera

    Collegamento generico con adattatore di alimentazione a 12 V CC (non incluso) ƒ Collegamento del cavo Ethernet alla rete. ƒ Collegare l'adattatore di rete al connettore di alimentazione della videocamera, quindi inserire l'adattatore di alimentazione. D-Link DCS-6517 Quick Installation Guide...
  • Page 51 Configurazione della videocamera Inserire il CD del dispositivo DCS-6517 nell'unità CD-ROM per avviare l'installazione. Se la funzione di Autorun sul computer è disabilitata, o se il D-Link Launcher non si avvia automaticamente, eseguire D:\autorun.exe (dove D: rappresenta la lettera dell'unità CD-ROM), quindi premere Invio.
  • Page 52: Ulteriori Informazioni

    Visualizzazione della videocamera tramite il browser Web Fare clic sull'icona D-Link Setup Wizard SE creata nel menu Start di Windows (Start > D-Link > Setup Wizard SE). Selezionare la videocamera e fare clic su Link (Collegamento) per accedere alla configurazione Web.
  • Page 53: Комплект Поставки

    Краткое руководство по установке Данное руководство содержит основные инструкции по установке камеры DCS-6517 в сети. Для получения дополнительной информации по настройке всех функций камеры обратитесь к руководству пользователя на входящем в комплект поставки компакт-диске или доступному на Web-сайте D-Link. Комплект поставки...
  • Page 54 Подключение дополнительного жгута проводов (не входит в комплект поставки). 1. 12V IN 6. 12V OUT Разъем для жгута 2. GND 7. GND проводов 3. AUD IN 8. RESET 4. AUD GND 9. DI 5. AUD OUT 10. DO D-Link DCS-6517 Quick Installation Guide...
  • Page 55 Дополнительный жгут проводов (не входит в комплект поставки) Используется для подключения к DCS-6517. Для получения Коннектор для дополнительной информации о подключении кабеля A/V подключения к обратитесь к руководству пользователя. камере Разъемы для подключения внешних устройств. (Выход 12 В Разъемы DI/DO постоянного...
  • Page 56 Расположите защитную панель поверх каналов для кабелей и прикрепите ее с помощью входящих в комплект поставки винтов. Подключите соответствующий разъем жгута проводов к камере. Прикрепите купол камеры, затянув ключом 4 винта, и установите солнцезащитный козырек. D-Link DCS-6517 Quick Installation Guide...
  • Page 57 прикрутите винтами камеру к этой панели. Регулировка объектива камеры Отрегулируйте положение объектива камеры по трем осям. Поворачивайте объектив влево и вправо, вверх и вниз, чтобы установить его в требуемом положении. Закрепите винты соответствующих модулей. Вращение 375° Наклон 90° Поворот 90° D-Link DCS-6517 Quick Installation Guide...
  • Page 58 Прикрепите подвесной кронштейн к потолку с помощью входящих в комплект поставки винтов. Прикрепите крышку снизу подвесного кронштейна, поворачивая ее против часовой стрелки до полной фиксации. Вставьте винт в основание подвесного кронштейна сверху крышки, чтобы зафиксировать ее. D-Link DCS-6517 Quick Installation Guide...
  • Page 59 (+2 / -0 мм). Используйте входящий в комплект поставки шаблон, чтобы разметить и вырезать Настенный монтажные отверстия. кронштейн Просверлите четыре отверстия диаметром 6 мм, соответствующие отверстиям на шаблоне, и вставьте в них пластмассовые анкеры. Крышка кронштейна D-Link DCS-6517 Quick Installation Guide...
  • Page 60: Подключение Камеры

    постоянного тока 12 В (не входит в комплект поставки) ƒ Подключите камеру к коммутатору или маршрутизатору с помощью Ethernet- кабеля. ƒ Подключите кабель питания от камеры к адаптеру. Затем подключите адаптер питания к электрической розетке. D-Link DCS-6517 Quick Installation Guide...
  • Page 61 Настройка камеры Вставьте компакт-диск для DCS-6517 в привод CD-ROM, чтобы начать установку. Если функция автозапуска на компьютере выключена, или D-Link Launcher не запускается автоматически, нажмите Пуск > Выполнить. Введите D:\autorun.exe, где D: - имя привода CD-ROM, и нажмите Enter. Нажмите Setup Wizard (Мастер установки).
  • Page 62 Просмотр изображения камеры через Web-браузер Нажмите на значок D-Link Setup Wizard SE в стартовом меню Windows (Пуск > D-Link > Setup Wizard SE). Выберите камеру и нажмите Link (Подключение) для доступа к сетевым настройкам. Мастер установки автоматически откроет Web-браузер по IP-адресу камеры.
  • Page 63: Технические Характеристики

    • DDNS-клиент (D-Link) • Bonjour • SMTP-клиент • 802.1x • FTP-клиент • SNMP • HTTP/HTTPS • Соответствие ONVIF Безопасность • Защита учетной записи администратора и • Аутентификация HTTP и RTSP группы пользователей • Аутентификация по паролю D-Link DCS-6517 Quick Installation Guide...
  • Page 64 • Хранения: от -20 до 70 °С Влажность • При эксплуатации: от 20% до 80% (без конденсата) • При хранении: от 5% до 95% (без конденсата) Прочее Сертификаты • CE • FCC • CE LVD • C-Tick D-Link DCS-6517 Quick Installation Guide...
  • Page 65 G - 2016, H - 2017. Месяц: 1 - январь, 2 - февраль, ..., 9 - сентябрь, A - октябрь, B - ноябрь, С - декабрь. * Комплект поставки может отличаться в зависимости от региона. D-Link DCS-6517 Quick Installation Guide...
  • Page 66 Обновления программного обеспечения и документация доступны на Интернет-сайте D-Link. D-Link предоставляет бесплатную поддержку для клиентов в течение гарантийного срока. Клиенты могут обратиться в группу технической поддержки D-Link по телефону или через Интернет. Техническая поддержка компании D-Link работает в круглосуточном режиме ежедневно, кроме...
  • Page 67: Conteúdos Do Pacote

    Manual do Usuário que está disponível no CD incluso neste pacote ou no site de suporte da D-Link. Conteúdos do pacote ƒ DCS-6517 Câmera de Segurança Dome IP 5 Megapixel H.265 Externa ƒ Cabo Ethernet ƒ Adaptador de Extensão ƒ...
  • Page 68 Conecta em um conector do chicote opcional (não incluído) 1. 12V IN 6. 12V OUT 2. GND 7. GND Porta multi cabos 3. AUD IN 8. RESET 4. AUD GND 9. DI 5. AUD OUT 10. DO D-Link DCS-6517 Quick Installation Guide...
  • Page 69 Cabo de conexões opcional (não incluso) Plugue o DCS-6517. Para obter mais detalhes sobre a Conector multi conexão do cabo A / V, consulte o Manual do Usuário. Cabos Conectores de E / S para dispositivos externos. DI/DO Conector (A saída de 12V DC não suporta o DCS-6517) Pressione e segure o botão por 10 segundos para redefinir a...
  • Page 70 Para saída do cabo inferior: Fixe a tampa lateral de proteção através dos parafusos fornecidos. Ligue o conector da câmera. Recoloque a tampa usando a chave de segurança para apertar os 3 parafusos e reconecte o protetor contra aquecimento. D-Link DCS-6517 Quick Installation Guide...
  • Page 71: Montagem Da Câmera No Teto

    Ajuste foco da lente manualmente; Gire o módulo para a esquerda e para a direita, para cima e para baixo, até que a posição desejada seja alcançada. Aperte a tampa o parafuso de ajuste e estará concluído. Pan 375° Tilt 90° Rotação 90° D-Link DCS-6517 Quick Installation Guide...
  • Page 72 Fixe a tampa do suporte à parte inferior pendente, girando a tampa no sentido anti-horário para apertá-la no lugar. Insira o parafuso na base do suporte e na parte superior da tampa para fixa-la. D-Link DCS-6517 Quick Installation Guide...
  • Page 73 34 mm (+2 / -0 mm) a ser cortado. Use o modelo incluído para marcar e cortar os furos de montagem. Perfure quatro furos de 6 mm correspondentes aos furos no gabarito de montagem e insira as âncoras de plástico nesses furos. D-Link DCS-6517 Quick Installation Guide...
  • Page 74 Conexão Geral utilizando um Adaptador de Alimentação de 12 V CC (não incluído) ƒ Conecte o cabo Ethernet à rede. ƒ Conecte o adaptador ao conector da câmera. Em seguida, conecte o adaptador de alimentação. D-Link DCS-6517 Quick Installation Guide...
  • Page 75 Configurando a Câmera Insira o DCS-6517 na unidade de CD-ROM do computador para iniciar a instalação. Se a função Autorun no computador estiver desativada ou se o Disparador D-Link não iniciar automaticamente, execute D: \ autorun.exe, onde D: representa a letra da unidade de CD-ROM.
  • Page 76: Informações De Garantia

    Como visualizar sua câmera por meio de um navegador da Web lique no ícone D-Link Setup Wizard SE que foi criado no menu Iniciar do Windows (Start > D-Link > Setup Wizard SE). Selecione a câmera e clique em Link para acessar a configuração da web.
  • Page 77 下載產品使用手冊。 包裝內容 ƒ ƒ DCS-6517ƒ5百萬H.265ƒ戶外半球型網路攝影機 ƒ ƒ 乙太網路線 ƒ ƒ RJ45母對母轉接頭 ƒ ƒ 壁掛支架與螺絲 ƒ ƒ 遮陽罩 ƒ ƒ 側蓋 ƒ ƒ 校準貼紙 ƒ ƒ 光碟內含操作手冊與軟體 ƒ ƒ 快速安裝手冊ƒ 若包裝內缺少以上任何項目,請聯絡您的經銷商。 安全須知: 此產品應該由具備相關證照的技術人員安裝,以符合當地的法規及避免產品的 中 保固失效。 文 D-Link DCS-6517 Quick Installation Guide...
  • Page 78 記憶卡插槽 可插入microSD記憶卡用於儲存螢幕快照或是紀錄影像。 可連接RJ-45乙太網路線提供攝影機網路,或是透過PoE方式 乙太網路線接頭 供電至攝影機。 配線孔道 允許配線從攝影機底部或側面穿出。 連接至額外配線(標準包裝內不包含)。 1. 12V IN 6. 12V OUT 2. GND 7. GND 配線連接埠 3. AUD IN 8. RESET 4. AUD GND 9. DI 5. AUD OUT 10. DO D-Link DCS-6517 Quick Installation Guide...
  • Page 79 選購配線(請另行購買) 連接至ƒDCS-6517。請參閱使用手冊,以取得更多關於A/V纜線 配線連接埠 中 的連接方式。 DI/DO連接埠 DI/DO埠以連接外接設備。(DCS-6517不支援12ƒVƒDCƒ電源輸出) 文 Reset按鈕 按壓約10秒不放,將攝影機回復至出廠預設值。 24 V電源連接埠 DCS-6517不適用。 電源連接埠 連接12ƒVƒDC電源供應器(請另行購買)。 喇叭埠 (綠) 連接至喇叭。 麥克風埠 (紅) 連接至麥克風。 BNC連接埠 DCS-6517不適用。 D-Link DCS-6517 Quick Installation Guide...
  • Page 80 連接至選購配線 將遮陽罩從攝影機取下,使用隨附板手卸下攝影機 頂部的四顆螺絲後,將攝影機外殼取下。 依據配線需求,將攝影機側邊的防水墊片取下。 將攝影機連接埠及配線穿過配線孔後,將防水墊片 裝回。 為確保攝影機是完全密封的,請務必確認防水墊片 有正確的裝回。 側面配線孔道: 使用隨附螺絲將側蓋鎖上。 中 文 將側蓋滑入配線孔。 底部配線孔道: 使用隨附螺絲將防護側蓋鎖上。 將攝影機連接埠連接至攝影機。 將攝影機外殼裝回並用螺絲固定,最後再將遮陽罩 裝回。 D-Link DCS-6517 Quick Installation Guide...
  • Page 81 安裝microSD記憶卡 將遮陽罩從攝影機取下,使用隨附板手卸下攝影機 頂部的四顆螺絲後,將攝影機外殼取下。 插入microSD記憶卡(金屬觸點請朝向相機外部)。 *欲取出記憶卡時,請將microSD記憶卡往插槽內部 按壓後,即可取出記憶卡。 將攝影機外殼裝回並用螺絲固定,最後再將遮陽罩 裝回。 壁掛攝影機 Drill hole 在天花板或牆面上找到能夠支撐攝影機重量的地 方,將校準貼紙貼在天花板或牆壁上。 Wire hole Drill hole Drill hole 天花板 中 將壁掛支架對齊貼紙上的孔洞位置,在牆面上鑽孔 後用螺絲固定。 文 將攝影機固定至壁掛支架上。 調整攝影機鏡頭 左右、上下、旋轉鏡頭模組至您所期望的位置後,將固定螺絲栓緊。 左右 375° 上下 90° 旋轉 90° D-Link DCS-6517 Quick Installation Guide...
  • Page 82 懸臂壁掛攝影機(選配) 使用隨附螺絲將壁掛背板固定至懸臂蓋上。 橡膠墊片 在天花板上找到一個適合的位置「34ƒ mmƒ (+2ƒ /ƒ -0ƒ mm)」。使用隨附的模板標記並切割壁掛孔。 懸臂支架 在天花板上找到一個適合的位置「34ƒ mmƒ (+2ƒ /ƒ -0ƒ 懸臂蓋 mm)」。使用隨附的模板標記並切割接線孔。 依照牆面的材質以適當的工具,用6mm的鑽頭在描 出的孔位鑽出孔洞後,放入壁虎以支撐螺絲。 中 文 使用橡膠墊片密封懸臂支架與天花板之縫隙,以確 保天花板與支架間的防水無疑。 使用隨附螺絲將懸臂支架固定至天花板。 將懸臂蓋逆時針旋轉固定至懸臂支架上。 使用隨附螺絲將懸臂支架固定。 D-Link DCS-6517 Quick Installation Guide...
  • Page 83 將乙太網路線及電源線穿過懸臂支架。 將攝影機機身使用隨附螺絲(長的)固定至支架蓋 上。 中 水平壁掛安裝攝影機(選配) 文 使用隨附螺絲將壁掛背版固定至懸臂蓋上。 懸臂蓋 在天花板上找到一個適合的位置「34ƒ mmƒ (+2ƒ /ƒ -0ƒ mm)」。使用隨附的模板標記並切割壁掛孔。 壁掛背板 依照牆面的材質以適當的工具,用6mm的鑽頭在描 出的孔位鑽出孔洞後,放入壁虎以支撐螺絲。 水平支架 懸臂蓋 D-Link DCS-6517 Quick Installation Guide...
  • Page 84 使用橡膠墊片密封水平支架與天花板之縫隙,以確 保天花板與支架間的防水無疑。 使用隨附螺絲將水平支架固定至天花板。 水平支架 將支架蓋逆時針旋轉固定至水平支架上。 使用隨附螺絲將水平支架固定。 攝影機 將乙太網路線及電源線穿過懸臂支架。 將攝影機機身使用隨附螺絲(長的)固定至支架蓋 上。 中 連接攝影機 文 透過PoE交換器連接 •ƒ 連 接乙太網路線至您的PoE交換器或網路電源供應 器,乙太網路線將可同時提供電源及網路連線。 若您已連接至選購配線,請依下方指示連線: 透過12 V DC 電源供應器供電(請另行購買) •連接乙太網路線至您的網路埠。 •ƒ 連 接電源供應器至攝影機的電源連接埠後接上電 源。 D-Link DCS-6517 Quick Installation Guide...
  • Page 85 攝影機設定 請將包裝內附的光碟放入您電腦的光碟機並開始執行安裝。若您電腦的自動執行 功能已被停用,或D-Linkƒ Launcher無法自動執行時,請點選開始>執行後輸入「D:\ autorun.exe」(D代表您光碟機的代號)。 點選「SetupƒWizard」開始安裝。 點選SetupƒWizard後,下方頁面將會被開啟。 點選「Next」繼續下一步。 中 文 點選「Yes」同意協議。 點選「Next」開始進行安裝。 注意:安裝過程將會花費數分鐘。 點選「Finish」完成安裝。 D-Link DCS-6517 Quick Installation Guide...
  • Page 86 透過網頁瀏覽器檢視您的攝影機 點選Windows開始選單中的D-LinkƒSetupƒWizardƒ SE圖示。(開始>ƒD-Linkƒ>ƒSetupƒWizardƒSE)。 請選擇攝影機並點選「Link」的按鈕來存取網 頁設定介面。 設定精靈將會自動以攝影機的IP位址來開啟設 定網頁。 首次登入攝影機時,您會被要求設這管理者帳 號,在輸入密碼後,點選「Save」。 中 畫面將顯示您攝影機的即時影像,您可以開始 文 控制及設定攝影機。若要取得更多關於設定網 頁的資訊,請參考包裝內附的光碟或D-Link網 站上的使用手冊。 其他資訊 請造訪官方網站http://www.dlink.com取得更多產品的相關資訊與協助。 保固資訊 請造訪官方網站http://warranty.dlink.com/查看您所在地區的保固資訊。 D-Link DCS-6517 Quick Installation Guide...
  • Page 87 Panduan Pengguna yang tersedia di CD yang disertakan dalam paket ini atau dari akses ke situs web dukungan D-Link. Isi Dalam Kemasan ƒ Kamera DCS-6517 5 megapixel H.265 Outdoor Dome Network Camera ƒ Kabel Ethernet ƒ Ekstensi Adapter ƒ Piringan pemasangan dan skrup ƒ...
  • Page 88 Penghubung ke kabel harness (tidak termasuk). 1. 12V IN 6. 12V OUT Port Kabel 2. GND 7. GND Harnes 3. AUD IN 8. RESET 4. AUD GND 9. DI 5. AUD OUT 10. DO D-Link DCS-6517 Quick Installation Guide...
  • Page 89 Optional Cable Harness (not included) Hubungkan ke DCS-6517. Untuk rincian lebih lanjut tentang Konektor Kabel menghubungkan Kabel A/V silahkan liat pada buku manual Harness Konektor I/O untuk perangkat eksternal. (Keluaran 12V DC Konektor DI/ tidak di dukung oleh kamera DCS-6517)
  • Page 90 Geser penutup atas port Kabel. Untuk sisi bawah kabel keluar: Pasang penutup sisi pelindung melalui sekrup yang disediakan. Hubungkan konektor kamera ke kamera. Pasang kembali penutup kamera menggunakan kunci keamanan dengan mengencangkan 3 sekrup, dan pasang kembali perisai matahari. D-Link DCS-6517 Quick Installation Guide...
  • Page 91 Kamera gimbal Lens; Mengubah modul lensa kiri dan kanan, atas dan bawah dan orientasi hingga posisi yang diinginkan tercapai. Kencangkan skrup pada putaran dan kemiringan setelah mendapatkan posisi lensa yang diinginkan. Perputaran 375° Kemiringan 90° Rotasi 90° D-Link DCS-6517 Quick Installation Guide...
  • Page 92 Pasang braket gantung ke langit-langit plafon menggunakan sekrup yang disediakan. Pasang tutup braket ke bagian bawah braket gantung dengan memutar tutup berlawanan untuk mengencangkan Masukkan sekrup ke dasar braket gantung di bagian atas, untuk mengamankan tutup braket ke tempatnya. D-Link DCS-6517 Quick Installation Guide...
  • Page 93 34 mm (2 / -0 mm) lubang yang akan di bor. Gunakan contoh yang disertakan untuk menandai dan memboor lubang penempatan. Mengebor empat lubang 6 mm sesuai dengan lubang di contoh pemasangan dan masukkan jangkar plastik ke lubang tersebut. D-Link DCS-6517 Quick Installation Guide...
  • Page 94 Jika Anda memiliki opsional kabel harness, Anda juga dapat menggunakan metode koneksi berikut: Konesikan dengan Power Adaptor 12V DC (Terpisah dalam kemasan) ƒ Hubungkan kabel ethernet ke jaringan anda. ƒ Hubungkan adaptor daya ke konektor daya kamera, kemudian pasang di adaptor listrik. D-Link DCS-6517 Quick Installation Guide...
  • Page 95 Konfigurasi Kamera Masukkan CD DCS-6517 ke dalam CD-ROM komputer Anda untuk memulai instalasi. Jika fungsi Autorun di komputer Anda dinonaktifkan, atau jika D-Link Launcher gagal untuk memulai secara otomatis, jalankan D: \ autorun.exe, di mana D: mewakili huruf drive dari drive CD-ROM Anda.
  • Page 96 Melihat Kamera Melalui Browser Klik pada D-Link Setup Wizard SE ikon yang tersedia pada menu Start Windows Anda (Start> D-Link> Setup Wizard SE). Pilih kamera dan klik Link untuk mengakses konfigurasi web. Setup Wizard secara otomatis akan membuka browser web Anda ke alamat IP kamera.
  • Page 97 Cet appareil numérique de la classe A est conforme à la norme NMB-003 du Canada. 警告使用者: 此為甲類的資訊技術設備,在居住環境中使用時,可能會造成射頻擾動,在這種情況下, 使用者會被要求採取某些適當的對策。 CE EMI Class A Warning This equipment is compliant with Class A of CISPR 32. In a residential environment this equipment may cause radio interference. D-Link DCS-6517 Quick Installation Guide...
  • Page 98 Innovation, Science and Economic Development Canada (ISED) Statement: This Class B digital apparatus complies with Canadian ICES-003. Cet appareil numérique de la classe B est conforme à la norme NMB-003 du Canada. D-Link DCS-6517 Quick Installation Guide...
  • Page 99: Safety Instructions

    été spécifiquement conçu pour une application extérieure. • Éloignez le produit des radiateurs et autres sources de chaleur. • Débranchez toujours le produit de l’alimentation avant de le nettoyer et utilisez uniquement un chiffon sec non pelucheux. D-Link DCS-6517 Quick Installation Guide...
  • Page 100: Instrucciones De Seguridad

    • Houd het product uit de buurt van radiators en andere warmtebronnen. • U dient het product steeds los te koppelen van de stroom voordat u het reinigt en gebruik uitsluitend een droge pluisvrije doek D-Link DCS-6517 Quick Installation Guide...
  • Page 101 D-Link recommends that you always switch off or unplug your D-Link products when they are not in use. By doing so you will help to save energy and reduce CO2 emissions.
  • Page 102 D-Link cerca da sempre di ridurre l'impatto ambientale dei propri stabilimenti e dei propri prodotti. Allo scopo di ridurre al minimo tale impatto, D-Link progetta e realizza i propri prodotti in modo che rispettino il più possibile l'ambiente, utilizzando materiali riciclabili a basso tasso di tossicità...
  • Page 103 D-Link a životní prostředí Ve společnosti D-Link jsme si vědomi vlivu našich provozů a výrobků na životní prostředí a snažíme se o minimalizaci těchto vlivů. Proto své výrobky navrhujeme a vyrábíme tak, aby byly co nejekologičtější, a ve výrobcích i obalech používáme recyklovatelné a nízkotoxické materiály.
  • Page 104 å verne miljøet og beskytte folks helse. D-Link og miljøet Hos D-Link forstår vi oss på og er forpliktet til å minske innvirkningen som vår drift og våre produkter kan ha på miljøet. For å minimalisere denne innvirkningen designer og lager D-Link produkter som er så...
  • Page 105 D-Link och miljön På D-Link förstår vi och är fast beslutna att minska den påverkan våra verksamheter och produkter kan ha på miljön. För att minska denna påverkan utformar och bygger D-Link sina produkter för att de ska vara så miljövänliga som möjligt, genom att använda återvinningsbara material med låg gifthalt i både produkter och förpackningar.
  • Page 106 WRITTEN OFFER FOR GPL AND LGPL SOURCE CODE Where such specific license terms entitle you to the source code of such software, D-Link will provide upon written request via email and/or traditional paper mail the applicable GPL and LGPL source code files via CD-ROM for a nominal cost to cover shipping and media charges as allowed under the GPL and LGPL.
  • Page 107 License. (Exception: if the Program itself is interactive but does not normally print such an announcement, your work based on the Program is not required to print an announcement.) D-Link DCS-6517 Quick Installation Guide...
  • Page 108 Our decision will be guided by the two goals of preserving the free status of all derivatives of our free software and of promoting the sharing and reuse of software generally. D-Link DCS-6517 Quick Installation Guide...
  • Page 109 If this is what you want to do, use the GNU Library General Public License instead of this License. D-Link DCS-6517 Quick Installation Guide...
  • Page 110 Notes D-Link DCS-6517 Quick Installation Guide...
  • Page 111 Notes D-Link DCS-6517 Quick Installation Guide...
  • Page 112 Notes D-Link DCS-6517 Quick Installation Guide...
  • Page 113 Notes D-Link DCS-6517 Quick Installation Guide...
  • Page 114 Notes D-Link DCS-6517 Quick Installation Guide...
  • Page 116 Ver. 2.00(WW)_130x183 2017/06/28 0420123-DL...

Table des Matières