Sharp MD-MT90C Mode D'emploi

Manuels Connexes pour Sharp MD-MT90C


Sommaire des Matières pour Sharp MD-MT90C
- Page 46 FRANÇAIS Introduction Nous vous remercions d'avoir porté votre choix sur ce produit SHARP. Avant l'utilisation, veuillez lire ce mode d'em- ploi très attentivement. Table des matières „ Instructions importantes „ Fonctions avancées Remarques spéciales ......2 Modification des réglages par défaut .
-
Page 47: Remarques Spéciales
Le fonctionnement et Dolby Laboratories. les caractéristiques ne varient pas selon la couleur du modèle. z L'adaptateur CA livré avec le MD-MT90C ne devra pas être z Le matériel audio-visuel peut comporter des oeuvres utilisé avec un autre appareil. -
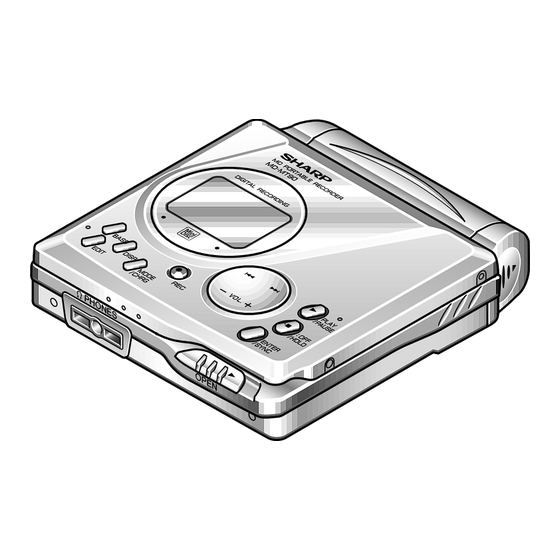
Page 48: Commandes Et Voyants
Commandes et voyants „ Appareil principal 1. Jack d'entrée 5V CC (7) 2. Jack d'entrée de ligne/optique (7, 8) 3. Jack d'entrée de microphone (20) 4. Touches des graves/annulation (12, 30) 5. Touche de montage/numérotage automatique/ marque de temps (18, 22, 29) 6. -
Page 49: Afficheur
„ Afficheur 1. Compteur de niveau (9) 2. Voyant d'enregistrement (9) 3. Voyant de temps d'enregistrement restant (23) 4. Voyant de mode de longue durée monaurale (16) 5. Voyant de répétition (14) 6. Voyant TOC (10) 7. Voyant d'enregistrement synchronisé (15) 8. -
Page 50: Précautions
écartera l'appareil. rer. Il est déconseillé de mettre le MD dans une poche- SHARP n'est pas responsable des dommages causés revolver. On le brisera en s'asseyant. par une mauvaise utilisation. Pour toute réparation, confier l'appareil au centre de service autorisé par SHARP . -
Page 51: Mise En Place D'un Md
Mise en place d'un MD Agir sur le levier OPEN pour déverrouiller le compartiment. Ouvrir le compartiment. Mettre un MD en place (voir illustration). Refermer le compartiment. Notes: z Ne pas placer le minidisc sous le support. z Ne pas forcer pour introduire un minidisc dans l'enre- gistreur. -
Page 52: Raccordement
Raccordement On peut enregistrer des CD ou cassettes favoris sur un MD. FRANÇAIS... - Page 53 FRANÇAIS...
-
Page 54: Enregistrement
Enregistrement Appuyer sur la touche pour régler le ni- veau d'enregistrement. Enregistrement analogique Le niveau sonore maximal devra alors être situé entre - - - 4 dB et 0 dB. Enregistrement numérique On peut ajuster le niveau par paliers de 1 dB dans une plage comprise entre +12 - -- - 12 dB. - Page 55 Du TOC Appuyer sur la touche PLAY/PAUSE pour déclen- Après l'enregistrement ou le montage, l'appareil affiche cher l'enregistrement. "TOC". Pour terminer l'opération, appuyer sur la touche /:OFF. L'appareil fait clignoter alors "TOC" et affiche "TOC EDIT!". Pendant l'enregistrement ou le montage, le Déclencher la lecture sur la chaîne hi-fi.
-
Page 56: Lecture
Lecture F-11 FRANÇAIS... -
Page 57: Commande De Volume
„ Commande de volume Brancher le casque sur la télécommande. Appuyer sur la touche VOL+ pour augmenter le niveau sonore et sur la touche VOL--- pour le baisser. Brancher la télécommande sur le jack REMOTE de l'appareil principal. „ Commande de graves Mettre un minidisc en place (page 6). -
Page 58: Lecture Avancée
Lecture avancée „ Pour localiser un morceau Pour passer au morceau suivant: Appuyer, en cours de lecture, sur la touche Pour repasser le morceau en cours: Appuyer, en cours de lecture, sur la touche Pour localiser un morceau suivant: Appuyer, en cours d'arrêt, sur la touche „... -
Page 59: Pour Reproduire À Double Vitesse
„ Lecture au hasard et répétition Pendant la lecture, appuyer à plusieurs reprises sur la touche MODE/CHRG pour sélectionner le mode de lec- ture. RANDOM Lecture au hasard RANDOM Répétition de morceau dans un ordre aléatoire Répétition de tous les morceaux Répétition d'un seul morceau Lecture ordi- Lecture normale... -
Page 60: Enregistrement Avancé
Enregistrement avancé „ Enregistrement déclenché par le son repro- Appuyer sur la touche pour régler le duit niveau d'enregistrement. (Voir page 9.) L'enregistrement se déclenche dès la détection de signaux sonores en provenance d'une chaîne hi-fi (enre- Appuyer sur la touche PAUSE sur la chaîne hi-fi gistrement synchronisé). -
Page 61: Enregistrement De Longue Durée
„ Enregistrement de longue durée Appuyer sur la touche MODE/CHRG en cours de Lorsqu'il s'agit de l'enregistrement en mono (longue lec- pause d'enregistrement. ture), le temps disponible est doublé. L'enregistrement peut être alors reproduit à une double vitesse (voir page 14). -
Page 62: Enregistrement Avancé (Suite)
Enregistrement avancé (suite) „ Pour déclencher l'enregistrement à partir En cours de lecture, appuyer sur la touche du milieu d'un morceau PLAY/PAUSE lorsqu'on atteindra un point par On peut effectuer un nouvel enregistrement sur un mor- lequel on commencera l'enregistrement. ceau en effaçant ce dernier. -
Page 63: Pour Numéroter Comme On Le Souhaitera
„ Pour numéroter comme on le souhaitera „ Pour protéger les MD contre un effacement On peut numéroter des points de son choix. accidentel Déplacer le cavalier de protection, situé sur le côté, dans Pendant l'enregistrement, appuyer sur la touche REC le sens indiqué... -
Page 64: Numéros De Morceaux
Enregistrement avancé (suite) „ Numéros de morceaux z Les numéros des morceaux sur MD peuvent ne pas correspondre à ceux de la source si on a effectué la 1. Les morceaux sont numérotés automatiquement en lecture en programmant des morceaux sur la source cours d'enregistrement (raccordement analogique) ou en en programmant à... -
Page 65: Enregistrement À Partir D'un Microphone
Enregistrement à partir d'un microphone „ Pour enregistrer par un microphone Appuyer sur la touche pour régler le niveau d'enregistrement. Le niveau sonore maximal devra alors être situé en- 4 dB et 0 dB. - - - Appuyer sur la touche PLAY/PAUSE. L'enregistrement reprend. -
Page 66: Enregistrement À Partir D'un Microphone (Suite)
Enregistrement à partir d'un microphone (suite) „ Enregistrement synchronisé de son (enre- Fonction de pause L'appareil se met en pause si un silence dure 3 secondes gistrement synchronisé avec micro) ou plus. (La fonction de pause ne marche pas dans les 10 secondes qui suivent le départ de l'enregistrement.) Appuyer sur la touche REC. -
Page 67: Intervalles Entre Morceaux
„ Intervalles entre morceaux Exemple: numérotage à "5 minutes" Pendant l'enregistrement par microphone, les morceaux Pendant l'enregistrement manuel par micro sont numérotés automatiquement à un intervalle régulier Le numérotage s'effectue à un intervalle de 5 minutes. (réglage par défaut: toutes les 5 minutes environ). Pen- dant l'enregistrement synchronisé... -
Page 68: Vérification De L'affichage
Vérification de l'affichage „ Pour vérifier le temps écoulé et le temps „ Pour vérifier le temps d'enregistrement res- restant sur le morceau tant et le temps de lecture total Pendant la lecture, appuyer sur la touche DISP. En mode d'arrêt, appuyer sur la touche DISP. Chaque fois que la touche est pressée, l'affichage se Chaque fois que la touche est pressée, l'affichage se modifie comme suit. -
Page 69: Pour Vérifier L'état D'usure De La Batterie
„ Pour afficher le temps de lecture sur le mor- „ Pour vérifier l'état d'usure de la batterie ceau L'état d'usure de la batterie est indiqué par le voyant de pile ( En mode d'arrêt, appuyer sur la touche pour afficher le numéro et le titre du mor- ceau. -
Page 70: Fonctionnement Sur Les Piles
Fonctionnement sur les piles „ Mise en place de la batterie rechargeable Recharger complètement la batterie lors de la première utilisation et après une longue période de non-emploi. Introduire la batterie rechargeable. Il n'est pas possible de recharger une autre batterie que celle livrée avec l'appareil ou une batterie en option (AD-N70BT). -
Page 71: Temps De Charge
„ Temps de charge „ Avec la batterie rechargeable ou une pile Environ 3,5 heures après, " " s'éteint. La alcaline recharge de la batterie est alors réalisée à 90 %. Pour recharger la batterie complètement, poursuivre Débrancher l'adaptateur CA. encore 2 heures. -
Page 72: Fonction De Maintien
Fonction de maintien L'enregistreur MD gardera son fonctionnement en cours même si une touche est pressée accidentelle- ment (dans un train bondé par exemple). Si on a mis une pile en place ou si l'adaptateur CA est Pour annuler le mode de maintien raccordé, on peut activer cette fonction que l'appareil soit Déplacer le commutateur HOLD vers l'autre côté... -
Page 73: Modification Des Réglages Par Défaut
Modification des réglages par défaut „ Bips En mode d'arrêt ... On peut supprimer le bip de confirmation qui est émis à la pression d'une touche. Mettre un MD en place et appuyer plus de 2 secon- „ Lecture automatique des sur la touche MODE/CHRG. -
Page 74: Titrage D'un Minidisc
Titrage d'un minidisc „ Titrage de disques et de morceaux Sélectionner un type de caractère en agissant Mettre un MD à titrer. Le montage n'est pas possible sur la touche DISP. avec un MD non-enregistrable ou protégé contre l'enre- gistrement. <Titre de disque>... -
Page 75: Pour Effacer Un Caractère
„ Pour effacer un caractère Pour saisir d'autres caractères, renouveler les Appuyer sur la touche VOL+ ou VOL pour déplacer le - - - étapes 3 - 5. curseur sur un caractère à effacer, et puis appuyer sur la touche BASS. La saisie de caractères terminée, on pressera „... -
Page 76: Titrage D'un Minidisc (Suite)
Titrage d'un minidisc (suite) „ Pour ajouter des caractères „ Copie de titres Mettre l'appareil en mode d'entrée de caractère. Avant la copie de titres Il est possible de copier des informations en caractères (Suivre les étapes 1 et 2 à la page 29.) (titres de disque et de morceaux) si des mêmes mor- ceaux sont enregistrés sur les deux MD de source et de Appuyer sur la touche VOL+ ou VOL--- pour dé-... - Page 77 Opération pour côté source Opération pour côté cible Mettre un MD de source en place. Mettre un MD de cible en place. Ne pas le confondre avec celui de source. En mode d'arrêt, appuyer sur la touche EDIT pour sélectionner "NAME STAMP". Appuyer sur la touche ENTER/SYNC.
-
Page 78: Montage D'un Minidisc Enregistré
Montage d'un minidisc enregistré „ Pour effacer des morceaux à la fois „ Pour effacer tous les morceaux à la fois Reproduire le morceau à effacer et appuyer sur En mode d'arrêt, agir à plusieurs reprises sur la la touche PLAY/PAUSE. touche EDIT pour sélectionner "ALL ERASE". -
Page 79: Pour Diviser Un Morceau
„ Pour diviser un morceau „ Pour fusionner des morceaux Reproduire le morceau à diviser en deux. Ap- Reproduire le deuxième des deux morceaux à puyer sur la touche PLAY/PAUSE lorsque l'on fusionner et appuyer sur la touche PLAY/PAU- atteindra un point par lequel on divise le mor- ceau. -
Page 80: Montage D'un Minidisc Enregistré (Suite)
Montage d'un minidisc enregistré (suite) „ Pour déplacer un morceau Titre du morceau divisé: Les deux morceaux portent un même titre. Toutefois, le deuxième ne portera pas de titre si le TOC FULL est Reproduire le morceau à déplacer et appuyer plein. -
Page 81: Écoute À Travers Un Autre Système
Écoute à travers un autre système „ Avec une chaîne audio „ Avec un autoradio Notes: Notes: z Il est conseillé de porter le niveau sonore du MD au z Régler le volume sur l'enregistreur MD et un autora- maximum pour l'écouter au moyen d'une chaîne hi-fi. dio. -
Page 82: Autres Fonctions Et Précautions
Autres fonctions et précautions „ Reprise de la lecture automatique „ Batterie rechargeable z La seule batterie au nickel-métal-hydride est utilisable. Lorsque l'on arrête et recommence la lecture sans Il faut recharger la batterie rechargeable tous les trois retirer le MD, elle part à partir d'un point où on a mois même en période de non-utilisation prolongée interrompu. -
Page 83: Limites Du Minidisc
Limites du minidisc L'appareil peut se comporter comme suit pendant l'enregistrement ou le montage. Il ne s'agit pas d'une panne. PROBLÈME DESCRIPTION L'appareil peut afficher "DISC FULL" ou Il est impossible d'enregistrer plus de 255 morceaux (maxi), quel "TOC FULL" même si le temps d'enre- que soit la durée d'enregistrement. -
Page 84: Messages Affichés
Messages affichés MESSAGES SIGNIFICATION SOLUTION D'ERREUR BATT EMPTY z La pile est epuisée. z Recharger la batterie rechargeable ou remplacer la pile al- caline (ou bien, utiliser l'adaptateur CA). z Rien n'a été enregistré. z Remplacer le disque. BLANK MD z Il s'agit d'un MD protégé... - Page 85 NO SIGNAL z Mauvais raccordement du câble numérique. z Bien raccorder le câble numérique. z Aucun signal en provenance d'un élément rac- z S'il s'agit d'un lecteur CD doté d'une fonction anti-choc, cordé. il faut la désactiver. z La fréquence d'échantillonnage des signaux z Effectuer la lecture sur l'élément raccordé.
-
Page 86: Dépannage
Dépannage L'utilisateur peut résoudre pas mal de problèmes sans faire appel à un dépanneur. Si le cas se présente, vérifier les points ci-dessous avant de prendre contact avec un revendeur ou un centre de réparation agréés par SHARP. PROBLÈME CAUSE z L'adaptateur CA reste-t-il branché... -
Page 87: Entretien
Entretien „ En cas de dérangement „ Nettoyage Si l'appareil a subi une force extérieure (chocs, électricité Si l'appareil est encrassé statique, surtension due à un foudre, etc.) ou une mau- Essuyer l'appareil avec un chiffon sec. Si la saleté résis- vaise manipulation, il peut mal fonctionner. -
Page 88: Fiche Technique
Fiche technique SHARP se réserve le droit d'apporter des modifications à la présentation et aux caractéristiques des appareils à fin d'amélioration. Les valeurs indiquées dans ce document sont les valeurs nominales des appareils de série mais de légères différences peuvent être constatées d'un appareil à l'autre. - Page 89 „ Enregistreur MD Sensibilité d'entrée: Niveau d'en- Niveau d'entrée Impédance d'en- Type: Lecteur-enregistreur minidisc portable registrement de référence trée Procédé de Sans contact, lecture optique (par la- MIC H 0,25 mV 10 kilohms lecture: ser à semi-conducteur à 3 faisceaux) MIC L 2,5 mV 10 kilohms...
- Page 90 This warranty constitutes the entire express warranty granted by Sharp and no other dealer, service centre or their agent or employee is authorized to extend, enlarge or transfer this warranty on behalf of Sharp. To the extent the law permits, Sharp disclaims any and all liability for direct or indirect damages or losses or for any incidental, special or consequential damages or loss of profits resulting from a defect in material or workmanship relating to the product, including damages for the loss of time or use of this Sharp product or the loss of information.
- Page 91 (i) Aux coûts d’installation, configuration et/ou programmation. Si un défaut de fabrication est décelé dans ce produit Sharp au cours de la période de la garantie. La réparation sous garantie est offerte à la condition que le produit Sharp soit livré accompagné de la preuve d’achat et une copie de cette GARANTIE LIMITÉE à un centre agréé de service Sharp ou à un Détaillant autorisé au service Sharp.
- Page 92 SHARP ELECTRONICS OF CANADA LTD. 335 Britannia Road East, Mississauga,Ontario L4Z 1W9 SHARP CORPORATION 9906 PRINTED IN MALAYSIA IMPRIMÉ EN MALAISIE TINSK0116AWZZ A0102.TO...