Philips HP6391 Mode D'emploi
Masquer les pouces Voir aussi pour HP6391:

Publicité

Les langues disponibles
  • FR

Les langues disponibles

  • FRANÇAIS, page 20

Liens rapides

Always here to help you
Register your product and get support at
www.philips.com/welcome
HP6391
User manual

Publicité

Table des Matières
loading

Sommaire des Matières pour Philips HP6391

  • Page 1 Always here to help you Register your product and get support at www.philips.com/welcome HP6391 User manual...
  • Page 3: Table Des Matières

    Table of contents EnglisH 4 EsPañol 12 Français 20 indonEsia 28 한국어 36 BaHasa MElayu 44 Português 52 ภาษาไทย 60 Tiếng ViệT 67 繁體中文 74 简体中文 81...
  • Page 4: English

    EnglisH introduction Congratulations on your purchase and welcome to Philips! To fully benefit from the support that Philips offers, register your product at www.philips.com/welcome. general description (Fig. 1) Precision trimming head On/off switch Battery compartment cap Protection cap Trimming comb (2mm and 4mm)
  • Page 5: Compliance With Standards

    Do not use the appliance in the bath or in the shower. Do not rinse the appliance with water. Compliance with standards This Philips appliance complies with all standards regarding electromagnetic fields (EMF). Preparing for use Note: Make sure your hands and the appliance are dry when you insert the battery.
  • Page 6 EnglisH using the precision trimmer general When you use the precision trimmer for the first time, try it out on a small, easily accessible area first. Always trim against the direction of hair growth. Make sure that the precision trimmer is switched off when you remove or place the adjustable length trimming comb or the precision trimming attachment.
  • Page 7 EnglisH Push the on/off slide upwards to switch on the precision trimmer. Place the precision trimming head gently on the skin and move it slowly over the skin against the direction of hair growth. Stretch the skin with one hand to make the hairs stand upright. Use the appliance with your other hand.
  • Page 8 EnglisH Place the precision trimming head gently on the skin and move it slowly over the skin against the direction of hair growth. Note: Make sure that precision trimming attachment is always completely in contact with the area you want to trim. trimming with comb The trimming comb has two different sides to trim eyebrow hairs to two different lengths (2mm and 4mm).
  • Page 9: Cleaning And Maintenance

    EnglisH using the tweezers Use an eyebrow pencil to mark the desired shape of your eyebrows. Remove any hairs outside the marked shape. Always pull out the hairs one by one in the direction of hair growth. Cleaning and maintenance Do not rinse the appliance with water.
  • Page 10: Ordering Accessories

    To purchase accessories for this appliance, please visit our website www.shop.philips.com/service. If you have any difficulties obtaining accessories for your appliance or if there is no online shop in your country, please contact the Philips Consumer Care Centre in your country or visit www.philips.com/support. Environment...
  • Page 11: Guarantee And Support

    EnglisH guarantee and support If you need information or support, please visit the Philips website at www.philips.com/support or contact the Philips Consumer Care Centre in your country. You find its phone number in the worldwide guarantee leaflet. If there is no Consumer Care Centre in your country, go...
  • Page 12: Español

    EsPañol introducción Enhorabuena por la compra de este producto y bienvenido a Philips. Para sacar el mayor partido de la asistencia que Philips le ofrece, registre su producto en www.philips.com/welcome. Descripción general (fig. 1) Cabezal de corte de precisión Interruptor de encendido/apagado...
  • Page 13: Cumplimiento De Normas

    No utilice el aparato en la bañera o en la ducha. No enjuague el aparato con agua. Cumplimiento de normas Este aparato Philips cumple todos los estándares sobre campos electromagnéticos (CEM). Preparación para su uso Nota: Asegúrese de que sus manos y el aparato estén secos cuando ponga la pila.
  • Page 14 EsPañol uso del recortador de precisión general Cuando utilice el recortador de precisión por primera vez, pruébelo primero en una zona pequeña y fácilmente accesible. Recorte siempre en dirección contraria a la del crecimiento del vello. Asegúrese de que el recortador de precisión esté apagado cuando quite o coloque el peine-guía de longitud ajustable o el accesorio de corte de precisión.
  • Page 15: Corte De Precisión

    EsPañol Pulse el botón de encendido/apagado hacia arriba para encender el recortador de precisión. Coloque suavemente el cabezal de corte de precisión sobre la piel y muévalo lentamente en dirección contraria a la de crecimiento del vello. Estire la piel con una mano para hacer que el vello se levante. Utilice el aparato con la otra mano.
  • Page 16 EsPañol Coloque suavemente el cabezal de corte de precisión sobre la piel y muévalo lentamente en dirección contraria a la de crecimiento del vello. Nota: Asegúrese de que el accesorio de corte de precisión esté siempre en contacto total con la zona que desea recortar. Cómo recortar con el peine-guía El peine-guía tiene dos lados diferentes para recortar los pelos de las cejas con dos longitudes distintas (2 mm y 4 mm).
  • Page 17: Limpieza Y Mantenimiento

    EsPañol uso de las pinzas Utilice un lápiz de cejas para marcar la forma deseada de las cejas. Utilice un lápiz de ojos para marcar la forma deseada de las cejas. Elimine el vello siempre uno a uno en la dirección de su crecimiento. limpieza y mantenimiento No enjuague el aparato con agua.
  • Page 18: Solicitud De Accesorios

    Si tiene cualquier dificultad para obtener accesorios para su aparato o no dispone de tienda online en su país, póngase en contacto con el Servicio de Atención al Cliente de Philips en su país o visite www.philips.com/support. Medio ambiente Al final de su vida útil, no tire el aparato junto con la basura normal del...
  • Page 19: Garantía Y Asistencia

    Atención al Cliente de Philips de su país. Hallará el número de teléfono en el folleto de la garantía mundial. Si no hay Servicio de Atención al Cliente en su país, diríjase a su distribuidor local de Philips o a un centro de servicio autorizado por Philips.
  • Page 20: Français

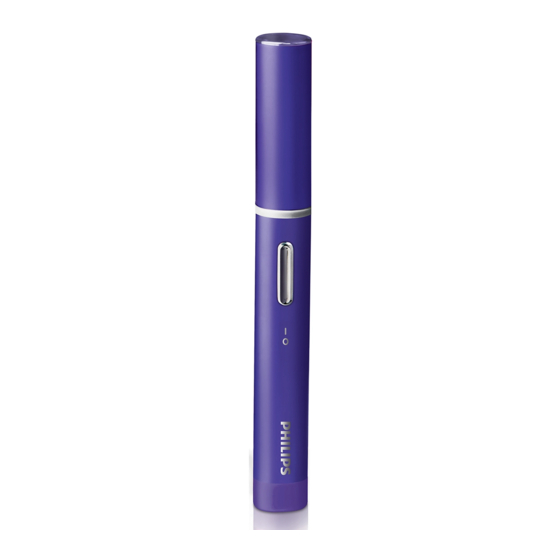
    Français introduction Félicitations pour votre achat et bienvenue dans l’univers Philips ! Pour profiter pleinement de l’assistance Philips, enregistrez votre produit sur le site à l’adresse suivante : www.philips.com/welcome. Description générale (fig. 1) Tête de tonte de précision Bouton marche/arrêt Capuchon du compartiment à...
  • Page 21: Avant Utilisation

    N’utilisez jamais l’appareil dans le bain ni sous la douche. Ne rincez pas l’appareil à l’eau. Conforme aux normes Cet appareil Philips est conforme à toutes les normes relatives aux champs électromagnétiques (CEM). avant utilisation Remarque : Veillez à avoir les mains sèches et à bien sécher l’appareil avant d’insérer la pile.
  • Page 22 Français utilisation de la tondeuse de précision général Lors de la première utilisation, essayez la tondeuse de précision sur une petite zone facile d’accès. Déplacez toujours la tondeuse dans le sens inverse de la pousse. Assurez-vous que la tondeuse de précision est éteinte lorsque vous enlevez ou installez le sabot réglable ou l’accessoire de coupe de précision.
  • Page 23 Français Faites glisser le bouton marche/arrêt vers l’avant pour mettre la tondeuse de précision en marche. Posez délicatement la tête de tonte de précision sur la peau et déplacez-la lentement sur la peau dans le sens inverse de la pousse des poils.
  • Page 24 Français Posez délicatement la tête de tonte de précision sur la peau et déplacez-la lentement sur la peau dans le sens inverse de la pousse des poils. Remarque : Assurez-vous que l’accessoire de coupe de précision est toujours en contact avec la zone que vous souhaitez tondre. tonte avec le sabot Le sabot a deux côtés différents pour tondre les poils des sourcils à...
  • Page 25: Utilisation De La Pince

    Français utilisation de la pince Dessinez la forme que vous souhaitez donner à vos sourcils à l’aide d’un crayon. Éliminez tous les poils en dehors du trait. Éliminez toujours les poils un à un, dans leur sens de pousse. nettoyage et entretien Ne rincez pas l’appareil à...
  • Page 26 Web www.shop.philips.com/service. Si vous rencontrez des problèmes pour vous procurer des accessoires pour votre appareil ou si aucune boutique en ligne n’est disponible dans votre pays, contactez le Service Consommateurs Philips de votre pays ou visitez le site Web www.philips.com/support.
  • Page 27: Environnement

    Web de Philips à l’adresse www.philips.com/support ou contactez le Service Consommateurs Philips de votre pays. Vous trouverez le numéro de téléphone correspondant sur le dépliant de garantie internationale. S’il n’existe pas de Service Consommateurs Philips dans votre pays, renseignez-vous auprès de votre revendeur Philips local ou d’un...
  • Page 28: Indonesia

    Pendahuluan Selamat atas pembelian Anda dan selamat datang di Philips! Untuk memanfaatkan sepenuhnya dukungan yang ditawarkan Philips, daftarkan produk Anda di www.philips.com/welcome. gambaran umum (gbr. 1) Kepala pemangkas akurat Sakelar on/off Tutup wadah baterai Tutup pelindung Sisir pemangkas (2mm dan 4mm)
  • Page 29 indonEsia Jangan menggunakan alat di saat mandi atau di bawah pancuran. Jangan membilas alat dengan air. Memenuhi standar Alat Phillips ini mematuhi semua standar yang terkait dengan medan elektromagnet (EMF). Persiapan penggunaan Catatan: Pastikan tangan Anda dan alat dalam keadaan kering sewaktu Anda memasukkan baterai.
  • Page 30 indonEsia Menggunakan pemangkas akurat umum Saat menggunakan pemangkas akurat untuk pertama kali, cobalah dahulu pada area yang kecil, dan mudah dijangkau. Selalu arahkan pemangkasan berlawanan dengan arah tumbuhnya rambut. Pastikan pemangkas akurat mati saat Anda melepas atau memasang sisir pemangkas dengan panjang yang bisa disesuaikan atau perlengkapan pemangkas akurat.
  • Page 31 indonEsia Tekan geseran on/off ke atas untuk menghidupkan pemangkas akurat. Letakkan kepala pemangkas akurat perlahan pada kulit dan gerakkan perlahan pada kulit berlawanan dengan arah pertumbuhan rambut. Rentangkan kulit dengan salah satu tangan untuk membuat rambut berdiri. Gunakan alat dengan tangan lainnya. Catatan: Pastikan kepala pemangkas akurat selalu tepat bersentuhan dengan kulit.
  • Page 32 indonEsia Letakkan kepala pemangkas akurat perlahan pada kulit dan gerakkan perlahan pada kulit berlawanan dengan arah pertumbuhan rambut. Catatan: Pastikan perlengkapan pemangkas akurat selalu tepat bersentuhan dengan area yang ingin Anda pangkas. Pemangkas dengan sisir Sisir pemangkas memiliki dua sisi berbeda untuk memangkas rambut alis dengan dua panjang berbeda (2mm dan 4mm).
  • Page 33 indonEsia Menggunakan penjepit Gunakan pensil alis untuk menandai bentuk alis yang Anda inginkan. Bersihkan rambut-rambut yang berada di luar tanda bentuk. Cabut rambut satu-persatu sesuai arah pertumbuhan rambut. Membersihkan dan pemeliharaan Jangan bilas alat dengan air. Hanya bagian-bagian yang bisa dilepas saja yang bisa dibersihkan dengan air.
  • Page 34 Untuk membeli aksesori alat ini, silakan kunjungi situs web kami di www.shop.philips.com/service. Jika Anda kesulitan mendapatkan aksesori untuk alat Anda atau jika tidak ada toko online di negara Anda, silakan hubungi Pusat Layanan Konsumen Philips di negara Anda atau kunjungi www.philips.com/support. lingkungan...
  • Page 35 Jika Anda membutuhkan informasi atau bantuan, silakan mengunjungi situs web Philips di www.philips.com/support atau hubungi Pusat Layanan Konsumen Philips di negara Anda. Anda dapat menemukan nomor teleponnya dalam brosur garansi internasional. Jika tidak ada Pusat Layanan Konsumen di negara Anda, kunjungi dealer Philips setempat atau pusat...
  • Page 36: 한국어

    한국어 소개 필립스 제품을 구입해 주셔서 감사합니다! 필립스가 드리는 지원 혜택을 받으실 수 있도록 www.philips.com/welcome에서 제품을 등록하십시오. 각 부의 명칭 (그림 1) 1 정밀 트리머 헤드 2 전원 스위치 3 배터리함 뚜껑 4 보호 뚜껑 5 트리밍 빗(2mm 및 4mm) 6 정밀...
  • Page 37 한국어 본 제품을 목욕이나 샤워 중에 사용하지 마십시오. 트리머를 물로 헹구지 마십시오. 기준 준수 필립스 제품은 EMF(전자기장)와 관련된 모든 기준을 준수합니다. 사용 준비 참고: 배터리를 끼울 때에는 반드시 제품과 손이 마른 상태인지 확 인하십시오. 배터리함 뚜껑을 반시계 방향으로 돌려 제품에서 당겨 빼내십 시오.
  • Page 38 한국어 프리시젼 트리머 사용 일반 프리시젼 트리머를 처음 사용하는 경우에는 쉽게 접근할 수 있 는 좁은 부위부터 사용해 보십시오. 항상 체모가 자라는 반대 방향으로 다듬으십시오. 길이 조절이 가능한 트리밍 빗 또는 프리시젼 트리머 액세서리 를 장착하거나 분리할 때는 프리시젼 트리머의 전원을 끄십시 오.
  • Page 39 한국어 프리시젼 트리머의 전원을 켜려면 전원 스위치를 위로 미십시 오. 프리시젼 트리머 헤드를 피부에 가볍게 대고 체모가 자라는 반 대 방향으로 천천히 움직이십시오. 한 손으로 피부를 팽팽하게 당겨서 체모가 위를 향하도록 만듭 니다. 다른 손으로 제품을 사용합니다. 참고: 프리시젼 트리머 헤드가 항상 피부와 완전히 밀착되어 있는 지...
  • Page 40 한국어 프리시젼 트리머 헤드를 피부에 가볍게 대고 체모가 자라는 반 대 방향으로 천천히 움직이십시오. 참고: 프리시젼 트리머 액세서리가 트리밍할 부위에 완전히 밀착 되어 있는지 항상 확인하십시오. 빗으로 트리밍 트리밍 빗은 눈썹을 2가지 다른 길이로 자를 수 있도록 양면 (2mm와 4mm)으로 구성되어 있습니다. 프리시젼...
  • Page 41 한국어 족집게 사용 아이펜슬로 원하는 눈썹 모양을 표시하십시오. 표시한 선 밖에 있는 눈썹을 제거하십시오. 항상 털이 난 방향 으로 하나씩 눈썹을 당기십시오. 청소 및 유지관리 제품을 물로 헹구지 마십시오. 분리 가능한 부품만 물로 세척할 수 있습니다. 부식성 세제, 수세미나 헝겊, 휘발유, 아세톤 등으로 제품을 닦지 마십시오.
  • Page 42 분리형 트리머 헤드의 날 부분에 1년에 2번 재봉틀용 기름을 한 방울 정도 발라 주십시오. 액세서리 주문 본 제품의 액세서리를 구입하려면, 필립스 웹 사이트(www.philips. co.kr)를 방문하십시오. 해당 제품의 액세서리를 구하기 어렵거나 온라인 상점에 없는 경우에는 필립스 고객 상담실로 문의하거나 www.philips.com/support를 방문하셔도 됩니다.
  • Page 43 한국어 보증 및 지원 보다 자세한 정보나 지원이 필요한 경우에는, 필립스전자 홈페이지 (www.philips.com/support)를 방문하시거나 필립스 고객 상담실로 문의하십시오. 전국 서비스센터 안내는 제품 보증서를 참조하십시오. *(주)필립스전자: (02)709-1200 *고객 상담실: (080)600-6600(수신자부담)
  • Page 44: Bahasa Melayu

    BaHasa MElayu Pengenalan Tahniah atas pembelian anda, dan selamat datang ke Philips! Untuk mendapat manfaat sepenuhnya daripada sokongan yang ditawarkan oleh Philips, daftarkan produk anda di www.philips.com/welcome. Perihalan umum (gamb. 1) Kepala perapian tepat Suis hidup/mati Tukup petak bateri Tukup pelindung...
  • Page 45 Jangan gunakan pencukur di dalam tab mandi atau di bawah pancuran. Jangan bilas perkakas dengan air. Pematuhan standard Perkakas Philips ini mematuhi semua piawai yang berkaitan dengan medan elektromagnet (EMF). Bersedia untuk menggunakan Nota: Pastikan tangan anda dan perkakas kering apabila anda memasukkan bateri.
  • Page 46 BaHasa MElayu Menggunakan perapi tepat Apabila anda menggunakan perapi tepat pada kali pertama, cuba gunakannya pada bahagian yang kecil dan mudah dicapai dahulu. Sentiasa merapi melawan arah pertumbuhan rambut. Pastikan perapian tepat dimatikan apabila anda mengeluarkan atau menempatkan sikat perapi kepanjangan boleh laras atau alat tambahan perapian tepat.
  • Page 47 BaHasa MElayu Tolak gelangsar buka/tutup ke atas untuk menghidupkan perapi tepat. Letakkan kepala perapi tepat secara perlahan pada kulit dan gerakkannya perlahan-lahan pada kulit melawan arah pertumbuhan rambut. Regangkan kulit dengan satu tangan untuk membuatkan rambut menegak. Gunakan perkakas dengan tangan yang lain. Nota: Pastikan kepala perapian tepat sentiasa bersentuhan sepenuhnya dengan kulit.
  • Page 48 BaHasa MElayu Letakkan kepala perapi tepat secara perlahan pada kulit dan gerakkannya perlahan-lahan pada kulit melawan arah pertumbuhan rambut. Nota: Pastikan alat tambahan perapian tepat sentiasa bersentuhan sepenuhnya dengan kawasan yang anda ingin rapikan. Merapi dengan sikat Sikat perapi mempunyai dua bahagian yang berlainan untuk merapikan bulu kening kepada dua kepanjangan yang berbeza (2mm dan 4mm).
  • Page 49: Pembersihan Dan Penyelenggaraan

    BaHasa MElayu Menggunakan penyepit Gunakan pensel kening untuk menandakan bentuk kening yang anda kehendaki. Keluarkan sebarang bulu kening di luar bentuk yang tertanda. Sentiasa cabut bulu satu persatu dalam arah pertumbuhan rambut. Pembersihan dan penyelenggaraan Jangan bilas perkakas dengan air. Hanya bahagian boleh tanggal boleh dibersihkan dengan air.
  • Page 50 Untuk membeli aksesori perkakas ini, sila lawati laman web kami di www.shop.philips.com/service. Jika anda mempunyai kesukaran mendapatkan aksesori untuk perkakas anda atau jika tiada kedai dalam talian di negara anda, sila hubungi Pusat Layanan Pengguna Philips di negara anda atau lawati www.philips.com/support.
  • Page 51 Philips di www.philips.com/support atau hubungi Pusat Layanan Pelanggan Philips di negara anda. Anda boleh mendapatkan nombor telefonnya dalam risalah jaminan sedunia. Jika Pusat Layanan Pelanggan tidak terdapat di negara anda, pergi ke wakil penjual Philips tempatan anda atau pusat servis Philips yang disahkan.
  • Page 52: Português

    Português introdução Parabéns pela sua compra e bem-vindo à Philips! Para tirar todo o partido da assistência fornecida pela Philips, registe o seu produto em www.philips.com/welcome. Descrição geral (fig. 1) Cabeça aparadora de precisão Botão ligar/desligar Tampa do compartimento das pilhas Tampa de protecção...
  • Page 53: Conformidade Com As Normas

    Não utilize o aparelho no banho ou no duche. Não enxagúe o aparelho com água. Conformidade com as normas Este aparelho Philips respeita todas as normas relacionadas com campos electromagnéticos (CEM). Preparar para a utilização Nota:   Certifique-se de que as suas mãos e o aparelho estão secos quando ...
  • Page 54 Português utilizar o aparador de precisão geral Quando utilizar o aparador de precisão pela primeira vez, experimente-o primeiro numa área pequena e fácil de alcançar. Apare sempre na direcção oposta ao crescimento do pêlo. Assegure-se de que o aparador de precisão está desligado quando retirar ou colocar o pente aparador de comprimento ajustável ou o acessório aparador de precisão.
  • Page 55 Português Desloque o botão ligar/desligar para cima para ligar o aparador de precisão. Coloque a cabeça aparadora de precisão suavemente sobre a pele e movimente-a lentamente sobre a pele, no sentido oposto ao crescimento dos pêlos. Estique a pele com uma mão para levantar os pêlos. Utilize o aparelho com a outra mão.
  • Page 56 Português Coloque a cabeça aparadora de precisão suavemente sobre a pele e movimente-a lentamente sobre a pele, no sentido oposto ao crescimento dos pêlos. Nota:   Assegure-se de que acessório aparador de precisão está sempre  completamente em contacto com a área que pretende aparar. aparar com pente O pente aparador tem dois lados diferentes para aparar pêlos das sobrancelhas a dois comprimentos diferentes (2 mm e 4 mm).
  • Page 57: Limpeza E Manutenção

    Português utilização da pinça Utilize um lápis para sobrancelhas para marcar o formato desejado das suas sobrancelhas. Retire os pêlos que se encontram fora do formato marcado. Retire sempre os pêlos um a um, na direcção de crescimento do pêlo. limpeza e manutenção Não enxagúe o aparelho com água.
  • Page 58: Encomendar Acessórios

    Para comprar acessórios para este aparelho, visite o nosso Web site em www.shop.philips.com/service. Se tem dificuldades em obter acessórios para o seu aparelho ou se não houver nenhuma loja online no seu país, contacte o Centro de Apoio ao Cliente da Philips no seu país ou visite www.philips.com/support.
  • Page 59: Meio Ambiente

    Se precisar de informações ou assistência, visite o Web site da Philips em www.philips.com/support ou contacte o Centro de Apoio ao Cliente da Philips no seu país. Poderá encontrar o número de telefone no folheto de garantia mundial.
  • Page 60: ภาษาไทย

    ห า มจ  ม เครื ่ อ งกั น ขนลงในน  ความสอดคล อ งกั บ มาตรฐาน เครื ่ อ งของ Philips ร  น นี ้ ส อดคล อ งตามมาตรฐานด า นคลื ่ น แม เ หล็ ก ไฟฟ า (EMF)
  • Page 61 ภาษาไทย การเตรี ย มตั ว ก อ นใช ง าน หมายเหตุ : ควรเช็ ด มื อ และตั ว เครื ่ อ งให แ ห ง ก อ นใส แ บตเตอรี ่ ล งไป หมุ น ฝาป ด ช อ งใส แ บตเตอรี ่ ใ นทิ ศ ทางทวนเข็ ม นาฬิ ก าเพื ่ อ ปลดล็ อ คและดึ ง ออกจากเครื ่ อ ง ใส...
  • Page 62 ภาษาไทย การกั น จอน ใช ห ั ว โกนเฉพาะจุ ด เพื ่ อ ถอนหรื อ กั น ขนในบริ เ วณที ่ เ ข า ถึ ง ได ง  า ยซึ ่ ง ไม ต  อ งการความแม น ยำ า มากนั ก เช น บนหน...
  • Page 63 ภาษาไทย ตรึ ง ผิ ว หนั ง ด ว ยมื อ ข า งหนึ ่ ง เพื ่ อ ให เ ส น ขนชี ้ ข ึ ้ น ในขณะที ่ ใ ช เ ครื ่ อ งด ว ยมื อ อี ก ข า งหนึ ่ ง หมายเหตุ...
  • Page 64 ภาษาไทย การเล็ ม โดยใช ห วี หวี ก ั น ขนมี ป ลายสองด า นซึ ่ ง แตกต า งกั น เพื ่ อ ใช ก ั น ขนคิ ้ ว ที ่ ม ี ค วามยาวต า งกั น สองระดั บ (2 มม. และ 4 มม.) วางหวี...
  • Page 65 ภาษาไทย ดั น ตั ว เลื ่ อ นปลดล็ อ ค และถอดหั ว เล็ ม แบบถอดได อ อกจากเครื ่ อ ง ใช แ ปรงที ่ จ ั ด มาให ป ด ทำ า ความสะอาดฝุ ่ น และเศษขน ล า งหั ว เล็ ม แบบถอดได , หวี ก ั น ขน, อุ ป กรณ เ สริ ม เพิ ่ ม ความแม น ยำ า ยิ ่ ง ขึ ้ น และแหนบ ด ว ยน  หลั ง การใช ง านทุ กครั...
  • Page 66 ศู น ย บ ริ ก ารดู แ ลลู ก ค า ของบริ ษ ั ท Philips ในประเทศของคุ ณ หมายเลขโทรศั พ ท ข องศู น ย บ ริ ก ารลู ก ค า อย  ใ นเอกสารแผ น พั บ...
  • Page 67: Tiếng Việt

    Chúc mừng bạn đã mua được sản phẩm Philips mới và chào mừng bạn đến với Philips! Để có được lợi ích đầy đủ từ sự hỗ trợ do Philips cung cấp, hãy đăng ký sản phẩm tại www.philips.com/welcome.
  • Page 68 Không sử dụng máy trong bồn tắm hoặc dưới vòi tắm. Không rửa thiết bị dưới vòi nước. Tuân thủ các tiêu chuẩn Thiết bị Philips này tuân thủ tất cả các tiêu chuẩn liên quan đến điện từ trường (EMF). Chuẩn bị sử dụng máy Lưu ý: Đảm bảo tay và...
  • Page 69 Tiếng ViệT Sử dụng tông đơ chính xác Tổng quát Khi sử dụng tông đơ chính xác lần đầu tiên, hãy thử sử dụng thiết bị trên một vùng nhỏ, dễ tiếp cận trước. Luôn cắt tỉa ngược với hướng mọc của lông. Đảm bảo rằng tông đơ...
  • Page 70 Tiếng ViệT Đặt đầu cắt tỉa chính xác nhẹ nhàng lên da và di chuyển thiết bị từ từ trên da theo hướng ngược với hướng mọc của râu. 3 Dùng một tay kéo căng da để cho râu dựng đứng lên. Dùng tay kia để sử dụng thiết bị. Lưu ý: Đảm bảo rằng đầu cắt tỉa chính xác luôn tiếp xúc hoàn toàn với da. Cắt tỉa chính xác Phụ kiện cắt tỉa chính xác cho phép bạn cắt lông trên những vùng dễ nhận thấy hay những vùng khó...
  • Page 71 Tiếng ViệT Cắt tỉa bằng lược Lược tỉa có hai cạnh khác nhau để cắt tỉa lông mày theo hai độ dài khác nhau (2mm và 4mm). Đặt lược tỉa lên đầu cắt tỉa chính xác. Đảm bảo rằng cạnh bạn muốn trỏ theo hướng của bộ phận cắt. Đẩy nút trượt tắt/mở (on/off) lên trên để bật tông đơ chính xác. 3 Đặt lược tỉa lên cạnh ngoài của lông mày và di chuyển thiết bị từ từ trên lông mày theo hướng mọc của lông. Lưu ý: Đảm bảo rằng lược tỉa luôn tiếp xúc hoàn toàn với khu vực bạn muốn cắt tỉa.
  • Page 72 Tiếng ViệT Vệ sinh và bảo dưỡng máy Không rửa thiết bị bằng nước. Chỉ có thể làm sạch những bộ phận có thể tháo rời bằng nước. Không sử dụng bất cứ loại xà phòng nào gây ăn mòn, các miếng tẩy rửa hoặc vải, xăng, axêtôn v.v... để lau chùi thiết bị. Lau chùi sạch thiết bị sau mỗi lần sử dụng. Đẩy thanh trượt tháo bộ phận xuống và lấy đầu cắt tỉa có thể tháo rời ra khỏi thiết bị. Sử dụng bàn chải làm sạch đi kèm để chải sạch mọi lông hoặc bụi. 3 Để có độ vệ sinh tuyệt đối, rửa đầu cắt tỉa có thể tháo rời, lược tỉa, phụ kiện cắt tỉa chính xác và nhíp nhổ dưới vòi nước sau mỗi lần sử dụng. Đặt đầu cắt tỉa có thể tháo rời vào thiết bị và đẩy thanh trượt tháo bộ phận lên để khóa đầu cắt tỉa có thể tháo rời vào thiết bị.
  • Page 73 Philips tại quốc gia bạn. Bạn có thể tìm thấy số điện thoại trong tờ bảo hành toàn cầu. Nếu không có Trung tâm Chăm sóc Khách hàng tại quốc gia bạn, hãy liên hệ với đại lý Philips ở địa phương bạn hoặc trung tâm dịch vụ do Philips ủy quyền.
  • Page 74: 繁體中文

    繁體中文 簡介 恭喜您購買本產品並歡迎加入飛利浦!請於 www.philips.com/ welcome 註冊您的產品,以善用飛利浦提供的支援。 一般說明 (圖 1) 1 精準修整刀頭 2 電源開關 3 電池盒蓋 4 保護蓋 5 修剪梳 (2 公釐與 4 公釐) 6 精準修整配件組 7 清潔刷 8 LED 鑷子 重要事項 使用本產品前,請先仔細閱讀使用手冊並參考圖示,並保留此使用 手冊以供日後參考。 警示 在有人從旁監督或適當指示如何安全使用本產品,以及瞭解潛在 危險的狀況下,本產品可供 8 歲以上兒童、身體官能或心智能 力退化者,或是經驗與使用知識缺乏者使用。 不得讓 8 歲以下兒童於無人在旁監督時,清潔與維護產品。...
  • Page 75 繁體中文 使用前準備 注意: 安裝電池時,請確定您的雙手及本產品都處於乾燥狀態。 將電池盒蓋以逆時鐘方向旋轉,解除鎖定後再將之從本產品中拉 出。 將電池放入電池盒蓋中 (型號 LR03 AAA)。 請確定電池的正 (+) 負 (-) 極放置無誤。 將電池盒蓋放回精準修整刀底部,並依順時鐘方向旋轉以將其鎖 住。 注意: 如果將有一個月以上的時間不使用修整刀,請將電池取出。 使用精準修整刀 一般 當您第一次使用精準修整刀時,請先用於小範圍、容易使用的 區域。 請務必逆著毛髮的生長方向進行修整。 當您取下或安裝可調整長度的梳具或精準修整配件組時,請確實 關閉精準修整刀的電源。 當您使用梳具時,請確定梳具總是平放在皮膚上。 為達最佳效果,請一手將皮膚繃緊,一手使用精準修整刀。 修剪  在容易觸及、無需極精密技術的部位,請使用精準修整刀頭來除毛 或修整毛髮,例如:...
  • Page 76 繁體中文 額頭 鬢角範圍 上唇 將 On/Off 開關往上推,即可開啟精準修整刀電源。 將精準修整刀頭輕輕置於皮膚上,並逆著毛髮生長的方向緩緩移 動。...
  • Page 77 繁體中文 用一隻手繃緊皮膚使毛髮豎直,再用另一隻手使用本產品。 注意: 請保持精準修整刀頭與皮膚完全接觸。 精準修整 精準修整配件組可讓您從顯而易見的地方或是難以處理的部位清除 單撮毛髮,例如眉毛周圍。 將精準修整配件組滑入精準修整刀頭。 注意: 您可以調整精準修整配件組的三種不同設定,確保更輕鬆地 深入難以處理的部位。 將 On/Off 開關往上推,即可開啟精準修整刀電源。 將精準修整刀頭輕輕置於皮膚上,並逆著毛髮生長的方向緩緩移 動。 注意: 請保持精準修整配件組與您欲修剪的區域完全接觸。...
  • Page 78 繁體中文 使用梳具修剪  修剪梳共有兩面,可將眉毛修整成不同長度 (2 公釐及 4 公釐)。 將修剪梳置於精準修整刀頭上。請確定您想要的那一面朝向修剪 組件的方向。 將 On/Off 開關往上推,即可開啟精準修整刀電源。 將修剪梳置於眉毛的外緣,並順著毛髮生長方向在眉毛上緩緩移 動。 注意: 請保持修剪梳與您欲修剪的區域完全接觸。 使用鑷子 使用眉筆畫出您想要的眉型。 去除所畫眉型範圍外的多餘毛髮。務必朝著毛髮生長的方向一 根一根拔除。...
  • Page 79 繁體中文 清潔與維護 請勿用水清洗本產品。僅有可拆式零件可以用水清洗。 不可使用任何具腐蝕性的清潔劑、鋼絲絨/布、汽油、丙酮等清潔本 產品。 每次使用後均需清潔本產品。 將釋放滑鈕往下壓,並將可拆式修整刀頭從產品上取下。 使用隨附的清潔刷去除任何毛髮或灰塵。 為保持乾淨衛生,每次使用後請以水清洗可拆式修整刀頭 、修剪梳、精準修整配件組和鑷子。 將可拆式修整刀頭裝上本產品,並將釋放滑鈕往上推, 即可將可拆式修整刀頭卡入本產品。...
  • Page 80 繁體中文 每年兩次,用一滴縫紉機油來潤滑可拆式修整刀頭的鋸齒部位。 訂購配件 如需購買本產品的配件,請造訪本公司網站: www.shop.philips.com/service。如果無法取得您產品的配件,或是 您所在國家/地區沒有線上商店,請聯絡您所在國家/地區的飛利浦客 戶服務中心,或者您也可以造訪:www.philips.com/support。 環境保護 電器壽命結束時請勿與一般家庭廢棄物一併丟棄。請將該產品放 置於政府指定的回收站,此舉能為環保盡一份心力。 電池內含可能會污染環境的物質,請勿將電力耗盡的電池與一 般家庭廢棄物一併丟棄,應送至政府指定的電池回收點進行回 收。若要丟棄本產品,也請將電池取出,再將產品送至政府指定 的回收點。 保固與支援 若您需要相關資訊或支援,請瀏覽飛利浦網站:www.philips.com/ support,或聯絡當地的飛利浦客戶服務中心,您可以在全球保證書 上找到聯絡電話。若您當地沒有客戶服務中心,請洽詢當地的飛利 浦經銷商或飛利浦授權之服務中心。...
  • Page 81: 简体中文

    简体中文 简介 感谢您的惠顾,欢迎光临飞利浦!为了您能充分享受飞利浦提供的 支持,请在 www.philips.com/welcome 上注册您的产品。 基本说明 (图 1) 1 精细修剪刀头 2 开/关按钮 3 电池盒盖 4 保护盖 5 修剪梳(2 毫米和 4 毫米) 6 精细美颜修剪附件 7 清洁刷 8 夹轮 注意事项 使用产品之前,请仔细阅读本用户手册和查看图解。妥善保管用户 手册以供日后参考。 警告 本产品适合由 8 岁或以上年龄的儿童以及肢体不健全、感觉或 精神上有障碍或缺乏相关经验和知识的人士使用,但前提是有人 对他们使用本产品进行监督或指导,以确保他们安全使用,并且 让他们明白相关的危害。 不要让儿童进行清洁和保养,除非儿童已年满 8 周岁且在有人 监督的情况下。...
  • Page 82 简体中文 使用准备 注意: 装入电池时,确保双手和产品均保持干燥。 逆时针旋转电池盒盖将其解锁,然后再将其从产品中拉出。 将电池放入电池盒中(LR03 AAA 型)。 确保电池的 + 和 - 极方向正确。 将电池盒盖装回精确修剪器的底部,然后顺时针旋转将其锁定。 注意: 如果超过一个月不使用修剪器,请取出电池。 使用精确修剪器 概述 首次使用本产品时,可先在易于触及的小范围部位尝试使用。 始终逆着毛发生长的方向进行修剪。 卸下或安装可调节长度的修剪梳或精确修剪附件时,要确保精细 修剪器已关闭。 在使用修剪梳齿时,需确保梳齿始终平放在皮肤上。 为获得最佳效果,可用一只手紧压皮肤,另一只手使用精细修 剪器。 修发  使用精细修剪刀头在易于触及但不要求超精细修剪的部位剃除或修 剪毛发,如:...
  • Page 83 简体中文 前额 鬓角区 嘴唇上方 向上推动开/关滑钮可打开精细修剪器。 将精细修剪刀头轻轻放在皮肤上,逆着毛发生长的方向缓慢移动 产品。...
  • Page 84 简体中文 用一只手紧压皮肤,使毛发向上直立。用另一只手使用产品。 注意: 确保精细修剪刀头始终完全贴合皮肤。 精细修剪 精细修剪附件可让您去除可见或死角部位(如眉毛轮廓)的单根毛 发。 将精细修剪附件滑至精细修剪刀头上。 注意: 您可以将精细修剪附件调节至三种不同档位,确保更好的修 剪难以触及的部位。 向上推动开/关滑钮可打开精细修剪器。 将精细修剪刀头轻轻放在皮肤上,逆着毛发生长的方向缓慢移动 产品。 注意: 确保精细修剪附件始终完全贴合要修剪的部位。...
  • Page 85 简体中文 修剪(有修剪梳)  修剪梳的两侧不同,可将眉毛修剪成两种不同的长度(2 毫米和4 毫米)。 将修剪梳装到精细修剪刀头上。确保您想要的一面朝向修剪部件 的方向。 向上推动开/关滑钮可打开精细修剪器。 将修剪梳置于眉毛外缘,在眉毛上顺着毛发生长的方向缓慢移动 产品。 注意: 确保修剪梳附件始终完全贴合要修剪的部位。 使用夹轮 使用眉笔画出想要的眉形。 去除所画眉形之外的眉毛。始终顺着毛发生长的方向去除眉毛。...
  • Page 86 简体中文 清洁和保养 切勿用水冲洗产品。只有可拆卸的部件才能用水清洗。 不要使用腐蚀性的洗涤液、钢丝绒或抹布、汽油、 丙酮等来清洁产品。 每次使用后都应立即清洁产品。 向下推动释放滑块,然后从产品中取出可分离式修剪刀头。 使用随附的清洁刷擦除毛发或灰尘。 为了保证卫生,每次使用后要用水冲洗可分离式修剪刀头、 修剪梳、精细修剪附件和夹轮。 将可分离式修剪刀头装到产品上,向上推动释放滑块, 将可分离式修剪刀头锁定到产品上。...
  • Page 87 简体中文 用一滴缝纫机油润滑分离式修剪刀头的齿(一年两次)。 订购附件 要购买本产品的附件,请访问我们的网站   www.shop.philips.com/service。如果您购买产品的附件有困难, 或您所在国家/地区没有网上商店,请联系您所在国家/地区的飞利浦 客户服务中心或访问 www.philips.com/support。 环保 弃置产品时,请不要将其与一般生活垃圾堆放在一起;应将其交 给官方指定的回收中心。这样做有利于环保。 电池包含可能污染环境的物质。不要将废电池和普通生活垃圾一 同丢弃,而应交给正式的电池收集点处理。丢弃产品时,一 定要将电池取出,并将产品送到官方指定的回收站。 保修和支持 如需信息或支持,请访问飞利浦网站 www.philips.com/support, 也可以联系您所在国家/地区的飞利浦客户服务中心(可在全球保修 卡中找到其电话号码)。如果您所在的国家/地区没有飞利浦客户服 务中心,请与当地的飞利浦经销商或授权的飞利浦服务中心联系。...
  • Page 88 8222.002.0039.1...

Table des Matières