
Manuels Connexes pour Daewoo International DCR-300


Sommaire des Matières pour Daewoo International DCR-300
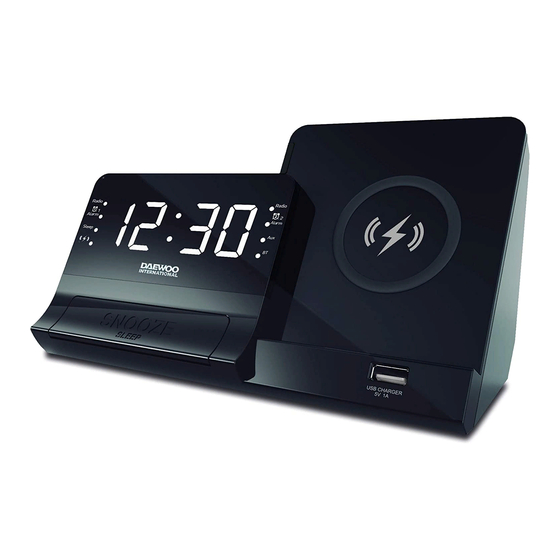
- Page 1 DCR-300 RADIO RELOJ CLOCK RADIO RADIO!RÉVEIL RÁDIO DESPERTADOR Manual de instrucciones · User manual Manuel d’instructions · Manual de instruções...
- Page 2 LEA LA TOTALIDAD DE ESTE MANUAL DEL USUARIO ANTES DE UTILIZAR ESTA UNIDAD Y CONSÉRVELO PARA FUTURAS CONSULTAS ADVERTENCIAS SOBRE LA INSTALACIÓN • No utilice la unidad en lugares extremadamente cálidos, fríos, polvorientos o húmedos. • Coloque la unidad sobre una super cie plana y nivelada. •...
-
Page 3: Localización De Los Controles
Para todas las demás baterías, consulte la sección sobre cómo extraer la batería del producto de un modo seguro. Lleve la batería al punto de recogida correspondiente para su reciclaje. La validez del marcado CE se limita a aquellos países donde es obligatoria por ley, principalmente en los países del Espacio Económico Europeo (EEE). -
Page 4: Conexión Eléctrica
19. INDICADOR BATERÍA BAJA FUENTE DE ALIMENTACIÓN (SOLO ADAPTADOR DE CA) El DCR-300 funciona con un adaptador externo de CA-CC con una salida de CC 5V1A La unidad también incluye un sistema de batería de reserva para el reloj que funciona con dos baterías tipo AAA (no incluidas). -
Page 5: Ajuste De La Hora Del Reloj
2. Pulse el botón CLOCK/MEM/PRESET (#3) para con rmar la hora. FUNCIONAMIENTO DE LA ALARMA El DCR-300 incluye un reloj despertador doble. Para ajustar las alarmas: 1. En modo de reposo, pulse y mantenga pulsado el botón AL1/VOL-(#9) para acceder al modo de ajuste de la hora de la alarma 1. -
Page 6: Funcionamiento De La Radio
3. Pulse repetidas veces los botones HOUR/TUNER- (#4) y MIN/TUNER+ (#5) hasta que se muestre la hora correcta de la alarma. 4. Pulse el botón AL1/VOL- (#9) para con rmar. 5. El procedimiento de ajuste de la alarma 2 es el mismo que el de la alarma 1. AJUSTE DE LA ALARMA O LA RADIO COMO DESPERTADOR, o APAGADO 1. -
Page 7: Funcionamiento Del Bluetooth
para buscar la siguiente/anterior emisora disponible. 3. Si la recepción es de ciente, intente sintonizar manualmente la emisora. Pulse brevemente el botón HOUR/TUNER- (#4) o bien MIN/TUNER+ (#5) para sintonizar manualmente la banda de frecuencia. 4. Ajuste los botones HOUR/TUNER-(#4) y MIN/TUNER+(#5) para obtener el nivel de volumen deseado. - Page 8 Notas: • Si conecta el DCR-300 al conector de salida de su dispositivo externo, tan solo deberá ajustar el volumen de su DCR-300. Si lo conecta al conector para auriculares de su dispositivo externo, deberá...
-
Page 9: Carga Inalámbrica
3. Desconecte el cable cuando el dispositivo esté completamente cargado. ADVERTENCIA! • El puerto USB situado en la parte posterior del DCR-300 solo puede utilizarse para cargar la batería de smartphones o dispositivos portátiles, y no soporta transferencias de datos ni conexiones a ordenadores. -
Page 10: Cuidado Y Mantenimiento
CUIDADO Y MANTENIMIENTO • Limpie la radio con un paño suave húmedo y deje que se seque bien tras la limpieza. • No utilice detergentes agresivos, cepillos con cerdas de nailon, utensilios de limpieza a lados o metálicos, cuchillos, rascadores duros u otros objetos similares. Podrían dañar las super cies de la radio. - Page 11 Declaramos bajo nuestras exclusiva responsabilidad la conformidad del producto: PRODUCTO Nombre: Radioreloj con carga Marca: Daewoo Modelo: DCR-300 • EN301 489-1 V2.1.1 :2017-02 • EN301 489-3 V2.1.1 :2017-03 • EN301 489-17 V.3.1.1 :2017-02 • EN 55032: 2015 • EN 55035: 2017 • EN 61000-3-2 :2014 •...
-
Page 12: Servicio Técnico
A. Todos los productos en los que se detecten fallos de funcionamiento antes de transcurridos 15 DÍAS desde la fecha de venta al cliente nal SERÁN CAMBIADOS POR OTRO, cuando: 1. El producto haya sido utilizado solo en el uso normal para el que estaba previsto. 2. - Page 13 PLEASE READ THIS USER MANUAL COMPLETELY BEFORE OPERATING THIS UNIT AND RETAIN THIS BOOKLET FOR FUTURE REFERENCE WARNING ON PLACEMENT • Do not use the unit in places which are extremely hot, cold, dusty or humid. • Place the unit on a at and even surface. •...
-
Page 14: Location Of Controls
For all other batteries, please view the section on how to remove the battery from the product safely. Hand the battery over to the applicable collection point for the recycling of waste batteries. For The validity of the CE marking is restricted to only those countries where it is legally enforced, mainly in the countries EEA (European Economic Area). -
Page 15: Power Connection
2 x AAA batteries (Not included). POWER CONNECTION 1. Connect the cord of the power adaptor to the DC IN JACK (#7) of the DCR-300. 2. Connect the plug of the power adaptor to a wall socket. The DCR-300 is powered and in standby mode when you see the display is switched Battery Back-up system •... -
Page 16: Setting The Clock Time
2. Press the CLOCK / MEM / PRESET BUTTON (#3) to con rm the time. ALARM OPERATION The DCR-300 features a dual alarm clock. To set the alarms: 1. In standby mode, press and hold the AL1 / VOL- BUTTON (#9) to enter the alarm 1 time setting mode. -
Page 17: Snooze Function
SETTING WAKE TO ALARM, RADIO or OFF 1. In standby mode, tap the AL1 / VOL- BUTTON (#9) repeatedly to set alarm 1. a. Wake to Alarm, Alarm 1 INDICATOR (wake to alarm) (#14) will light up. b. Wake to Radio, Alarm 1 INDICATOR (wake to radio) (#13) will light up. c. -
Page 18: Bluetooth Operation
4. Activate your Bluetooth device and select the search mode. 5. “DCR-300” will appear on your Bluetooth device list. 6. Select “DCR-300” and enter “0000” for the password if necessary. 7. To disconnect the Bluetooth function, press the MODE button to switch to another... -
Page 19: Aux In Operation
Notes: • If you connect the DCR-300 to the Line-Out Jack of your external device, you only need to adjust the volume control of your DCR-300. If you connect to the Headphone Jack of your external device, you may need to adjust both the volume controls of your external device and the DCR-300 to obtain the desirable listening level. -
Page 20: Wireless Charging
(DC 5V ==== 1.0A) 1. Plug the standard end of the USB cable (not included) into the USB CHARGE PORT (#19) located on the back of the DCR-300. Plug the other end of the cable into the device you wish to charge. -
Page 21: Troubleshooting Guide
• Unplug the power adaptor and clean the radio before storage. • Always store the radio in a dry and clean place. SPECIFICATIONS Power: AC /DC Adaptor: Input AC 100-240V ~ Output: DC 5V === 2.4A Frequency band: 2.400GHz - 2.480GHz Compatible Bluetooth Pro le: A2DP (Advanced Audio Distribution Pro le), AVRCP (Audio/... -
Page 22: Product Disposal
PRODUCT DISPOSAL Electrical products should not be disposed of with household waste. Thank you to recycle collection points provided for this purpose. Consult with your local authorities or dealer for advice on recycling. GUARANTEE This product is guaranteed against all manufacturing defects for 2 years from the date of purchase. -
Page 23: Avertissements
AVANT D’UTILISER CETTE UNITÉ, LISEZ LA TOTALITÉ DE CE MANUEL DE L’UTILISATEUR ET CONSERVEZ POUR DE FUTURES CONSULTATIONS AVERTISSEMENTS SUR L’INSTALLATION • Ne pas utiliser l’unité dans des endroits extrêmement chauds, froids, poussiéreux ou humides. • Placez l’unité sur une super cie plane et nivelée. •... -
Page 24: Localisation De O Contrôles
La validité de la marque CE se limite aux pays où elle est obligatoire selon la loi, principalement aux pays de l’Espace Economique Européen (EEE). Les essais réalisés avec ce type d’appareil manifestent son adéquation aux limites stipulés sur la Directive CEM lorsque le câble de connexion à moins de 3 mètres. -
Page 25: Connexion Eléctrique
18. TOUCHE REPET. / REPOS 25. INDICATEUR BLUETOOTH SOURCE D’ALIMENTACIÓN Le DCR-300 fonctionne avec un adaptateur externe de CA-CC avec un sortie de CC 5V1A L’unité inclut aussi un système de batterie de réserve pour l’horloge qui fonctionne avec deux batteries type AAA (non incluses). -
Page 26: Précautions
1. Appuyez plusieurs fois sur les touches HOUR/TUNER- (#4) et MIN/TUNER+ (#5) jusqu’à ce que l’heure correcte s’a che. 2. Appuyez sur la touche CLOCK/MEM/PRESET (#3 )pour con rmer l’heure. FONCTIONNEMENT DE L’ALARME Le DCR-300 inclut une horloge réveil double. Pour ajuster les alarmes:... -
Page 27: Réglage De L'alarme Ou La Radio Commeréveil, Ou Eteint
1. En mode repos, appuyez et maintenez appuyée la touche AL1/VOL-(#9) pour accéder au mode de réglage de l’heure de l’alarme1. 2. L’heure de l’alarme clignotera sur l’écran. 3. Appuyez plusieurs fois sur les touches HOUR/TUNER- (#4) et MIN/TUNER+ (#5) jusqu’à... -
Page 28: Fonctionnement De La Radio
FONCTIONNEMENT DE LA RADIO Écouter la radio 1. Appuyez sur la touche MODE (#2) plusieurs fois pour allumer l’unité et sélectionner le mode FM, la fréquence s’a chera sur l’écran LED. 2. Appuyez et maintenez appuyée la touche HOUR/TUNER- #4) ou bien MIN/ TUNER+(#5) pour chercher la suivante/antérieure émission disponible. -
Page 29: Fonctionnement Du Bluetooth
4. Allumez et commencez à reproduire avec le dispositif externe que vous avez connecté au connecteur AUX IN (#8). 5. Ajustez lentement les contrôles du volume de votre DCR-300 et du dispositif externe usqu’à obtenir un niveau de son adéquat. -
Page 30: Fonctionnement Du Mode Repos
Smartphones ou dispositifs portables, et ne supporte pas les transferts de données ni les connexions aux ordinateurs. • Ne pas connecter le port USB du DCR-300 à un autre chargeur USB. Il pourrait endommager les deux unités et invalider la garantie. -
Page 31: Précaution
Cette unité permet de charger les téléphones sans ls à l’aide du standard. Placez le dispositif avec la partie postérieure vers le bas sur la base de charge sans ls (#20) sur le DCR-300. L’indicateur de charge s’illuminera (#16). PRÉCAUTION: Retirez la carcasse métallique de protection du téléphone avant de le charge. -
Page 32: Guide De Localisation De Pannes
GUIDE DE LOCALISATION DE PANNES SYMPTÔME POSSIBLE CAUSE POSSIBLE SOLUTION Pas de courant Connexion instable de Connecter à nouveau l’adaptateur de courant. l’adaptateur. Contrôle du volume au Augmenter le volume. Pas de son minimum L’unité n’est pas au mode Activer le mode BT de Le Bluetooth ne BT. - Page 33 POR FAVOR, LEIA ESTE MANUAL DE UTILIZADOR COM ATENÇÃO ANTES DE UTILIZAR ESTE APARELHO E GUARDE-O PARA CONSULTAS FUTURAS AVISO COLOCAÇÃO • Não use a unidade em locais extremamente quentes, frios, empoeirados ou húmidos. • Coloque a unidade numa superfície plana. •...
-
Page 34: Localização Dos Controlos
A validade da marcação CE é restrita a os países onde é legalmente aplicada, principalmente nos países EEE (Espaço Económico Europeu). Este equipamento foi testado e está em conformidade com a Diretriz EMC com cabo de ligação inferior a 3 metros. LOCALIZAÇÃO DOS CONTROLOS 12 11 10 BOTÃO DE LIGAÇÃO... - Page 35 1. Ligue o cabo de alimentação à entrada DC (#7) DCR-300. 2. Ligue o cabo à tomada da rede elétrica. O visor acendido indica que o DCR-300 está ligado e em modo de espera (standby). Sistema de reserva de bateria •...
- Page 36 2. Prima o botão AJUST. RELÓG. / MEM. / CONF.(#3) para con rmar. ALARME O DCR-300 disponibiliza um alarme duplo. Con gurar alarmes: 1. Em modo de espera (standby), mantenha premido o BOTÃOAL1 / VOL-(#9)para entrar no modo de con guração do Alarme 1.
-
Page 37: Funcionamento Do Rádio
CONFIGURAR DESPERTADOR PARA ALARME, RÁDIO OU DESLIGAR 1. Em modo de espera (standby), prima o botão AL1 / VOL- (#9) repetidamente para con gurar o alarme 1. a. Acordar com alarme; o INDICADOR Alarme 1 (acordar com alarme) (#14) irá acender. -
Page 38: Função Bluetooth
“BT” irá piscar no visor LED( #25). 4. Ative o seu dispositivo Bluetooth e ative o modo de pesquisa. 5. Irá aparecer a indicação “DCR-300” na lista de dispositivos Bluetooth. 6. Selecione “DCR-300” e introduza a palavra-passe “0000”, se necessário. -
Page 39: Temporizador (Sleep)
Notas: • Se ligar o DCR-300 ao conector de saída de linha do seu dispositivo externo, só precisará ajustar o controle de volume do DCR-300. Se ligar ao conector paraauriculares do seu dispositivo externo, pode ser necessário ajustar os controles de volume do dispositivo e do DCR-300 para obter o nível de audição desejável. -
Page 40: Cuidados E Manutenção
• Não conecte a porta USB do DCR-300 a outro carregador USB. Pode dani car ambas as unidades e anular a garantia. -
Page 41: Especificações
superfícies do rádio. • Não submerja o rádio na água e não deixe entrar água no compartimento do rádio. • Desligue o adaptador de alimentação e limpe o rádio antes do armazenamento. • Guarde sempre o rádio num local seco e limpo. ESPECIFICAÇÕES Alimentação: Adaptador AC/DC:... -
Page 42: Eliminação Do Produto
LIMINAÇÃO DO PRODUTO Os aparelhos elétricos não devem ser eliminados juntamente com o lixo doméstico. Dirija-se a um centro de reciclagem para os eliminar. Consulte as autoridades locais ou o seu revendedor para informações sobre reciclagem. GARANTIA Este equipamento tem uma garantia de 2 anos a partir da data de compra contra quaisquer defeitos de fabrico.