Axis D2110-VE Guide D'installation

Masquer les pouces Voir aussi pour D2110-VE:
Table des Matières

Publicité

Les langues disponibles
  • FR

Les langues disponibles

  • FRANÇAIS, page 31

Liens rapides

AXIS D2110-VE Security Radar
Installation Guide

Publicité

Table des Matières
loading

Sommaire des Matières pour Axis D2110-VE

  • Page 1 AXIS D2110-VE Security Radar Installation Guide...
  • Page 3 English France: Français Deutschland: Deutsch Italia: Italiano España: Español 日本: 日本語 中文: 简体中文...
  • Page 4 communications.
  • Page 5 Directive Japan 2014/53/EC. この装置は、クラスA機器です。この装置を 住宅環境で使⽤すると電波妨害を引き起こす ことがあります。この場合には使⽤者が適切 Par la présente Axis Communications AB déclare que な対策を講ずるよう要求されることがありま l’appareil ce produit est conforme aux exigences す。 VCCI ‒ A essentielles et aux autres dispositions pertinentes de 本製品は、シールドネットワークケーブル...
  • Page 6: Warranty Information

    Power Sourcing Equipment (PSE) shall comply with Limited Power Source (LPS) according to clause 2.5 of IEC/EN/UL 60950-1 or annex Q of IEC/EN/UL 62368-1. We recommend the use of Axis High PoE midspans or Axis High PoE switches. Disposal and recycling...
  • Page 7: Package Contents

    AXIS D2110-VE Security Radar Package contents • AXIS D2110-VE Security Radar • Mount bracket • Pipe adapter (2x) • Screw T30 (4x) for use with pole mount. • Torx screwdriver TR20 • Mounting tool for RJ45 • Cable shoe •...
  • Page 8: Product Overview

    AXIS D2110-VE Security Radar Product overview Control button Network LED Status LED Power LED PoE out LED microSD card slot Power connector (DC) I/O connector Relay connector 10 Grounding screw 11 Network connector (PoE in) 12 Network connector (PoE out) 13 Intrusion alarm sensor For technical specifications, see Specifications on page 23.
  • Page 9: Detection Range

    Avoid aiming the radar towards another radar. If more than three radars are mounted close together they may interfere with each other. To avoid interference from other AXIS D2110-VE Security Radars, see Install multiple radars on page 10. Detection range For optimal performance, install the radar 3.5 m (11 ft) above ground.
  • Page 10 AXIS D2110-VE Security Radar 4.5 m 4.0–60 m Not recommended Not recommended (15 ft) (13–197 ft) 5.5 m 7.5–60 m Not recommended Not recommended (18 ft) (25–197 ft) 6.5 m 7.5–60 m 5.5–60 m Not recommended (21 ft) (25–197 ft) (18–197 ft)
  • Page 11: Installation Examples

    AXIS D2110-VE Security Radar 1. To avoid interference when more than three radars of are mounted close together, go to Settings > Radar > General and select Number of neighboring radars under Coexistence. If the radar has more than two neighboring radars within its coexistence area the performance decreases.
  • Page 12 AXIS D2110-VE Security Radar Cover an area To cover a large open area, use two pole mounts to place two radars back to back. Note When two radars are mounted this close together, they are in the same coexistence zone.
  • Page 13: How To Install The Product

    AXIS D2110-VE Security Radar How to install the product 1. Use the drill template and drill holes in the wall. 2. Fasten the mounting bracket to the wall. 3. Route the network cable through the mounting bracket. Leave approximately 30 cm (12 in) of cable for connecting the radar.
  • Page 14 AXIS D2110-VE Security Radar Cover Strut Screw (2x) 9. To use a microSD card for local storage, insert the card into the radar’s microSD card slot. 10. Remove the left cable gasket and pull the tab to open a hole for the network cable.
  • Page 15 AXIS D2110-VE Security Radar 12. Pull the network cable back slightly so that the cable gasket adjusts itself on the cable. CAUTION Risk of water leaks. If the cable gasket is not correctly adjusted on the cable water can seep in and damage the product.
  • Page 16 AXIS D2110-VE Security Radar • Use a cable with a diameter of 5–6 mm (0.2–0.24 in). Gasket Body Seal Plug (discard) 16. Ground the radar: WARNING • Use a grounding cable with 1.5–4 mm cross section (AWG 16–11). • The strain relief is designed for cables with a diameter of 8.5–9.5 mm (0.33–0.37 in).
  • Page 17 22. Tighten the four screws with 1 N m (0.7 lb ft) torque. Find the device on the network To find Axis devices on the network and assign them IP addresses in Windows®, use AXIS IP Utility or AXIS Device Manager. Both applications are free and can be downloaded from axis.com/support.
  • Page 18 You can use the device with the following browsers: ® ® ® Chrome Firefox Edge Safari ® Windows recommended ® macOS recommended Other operating systems To find out more about how to use the device, see the User Manual available at axis.com.
  • Page 19 For more information about calibration, see the User Manual at axis.com To make it easier to see where objects are moving, you can upload a reference map, for example a ground plan or an aerial photo, that shows the area covered by the radar.
  • Page 20 AXIS D2110-VE Security Radar • Pins (easy): This calibration is performed in the web interface by clicking in the reference map. This is the easiest way to calibrate the reference map, and you can use it if you do not have physical access to the site.
  • Page 21: Reset To Factory Default Settings

    AXIS D2110-VE Security Radar Reset to factory default settings Important Reset to factory default should be used with caution. A reset to factory default resets all settings, including the IP address, to the factory default values. To reset the product to the factory default settings: 1.
  • Page 22: Further Information

    For the latest version of this document, see axis.com • The user manual is available at axis.com • To check if there is updated firmware available for your device, see axis.com/support • For useful online trainings and webinars, see axis.com/academy Optional accessories For a complete list of available accessories for this product, go to the product’s page on...
  • Page 23: Led Indicators

    AXIS D2110-VE Security Radar Specifications To find the latest version of the product’s datasheet, go to the product page at axis.com and locate Support & Documentation. LED indicators Status LED Indication Green Steady green for normal operation. Network LED Indication Green Steady for connection to a 1 Gbit/s network.
  • Page 24 AXIS D2110-VE Security Radar Connectors Network connector RJ45 Ethernet connector with Power over Ethernet Plus (PoE+). CAUTION Risk of damage to the device. Do not power the device with both PoE and DC. Network connector (PoE out) Power over Ethernet IEEE 802.3at type 2, max 30W Use this connector to supply power to another PoE device, for example a camera, a horn speaker, or a second security radar.
  • Page 25: Power Connector

    AXIS D2110-VE Security Radar Function Notes Specifications DC ground 0 V DC DC output Can be used to power auxiliary equipment. 12 V DC Note: This pin can only be used as power out. Max load = 50 mA 3–...
  • Page 26 24 V DC/5 A Isolation from other circuitry 2.5 kV Intrusion alarm switch Use the intrusion alarm switch to get a notification when someone opens the device’s housing. To set up an action rule, see the User Manual available at axis.com.
  • Page 27: Safety Information

    AXIS D2110-VE Security Radar Safety information Hazard levels DANGER Indicates a hazardous situation which, if not avoided, will result in death or serious injury. WARNING Indicates a hazardous situation which, if not avoided, could result in death or serious injury.
  • Page 28: Safety Instructions

    • Use only spare parts provided by or recommended by Axis. • Do not attempt to repair the product yourself. Contact Axis support or your Axis reseller for service matters. • Use a yellow/green colored grounding cable of at least 1.5 mm or 15 AWG.
  • Page 29 CAUTION Do not replace the battery yourself. Contact Axis support if the log message requests a battery change. Lithium coin cell 3.0 V batteries contain 1,2-dimethoxyethane; ethylene glycol dimethyl ether...
  • Page 31: Contenu De L'emballage

    AXIS D2110-VE Security Radar Contenu de l’emballage • AXIS D2110-VE Security Radar • Support mural • Adaptateur de tube (x 2) • Vis T30 (x 4) pour utilisation avec la fixation sur poteau. • Tournevis Torx TR20 • Outil de montage pour RJ45 •...
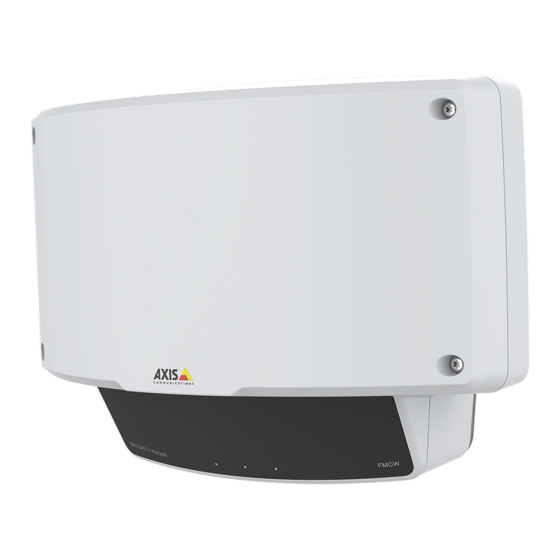
  • Page 32: Vue D'ensemble Du Produit

    AXIS D2110-VE Security Radar Vue d'ensemble du produit Bouton de commande LED réseau LED de statut LED d’alimentation LED sortie PoE Emplacement de carte microSD Connecteur d’alimentation (CC) Connecteur d'E/S Connecteur relais 10 Vis de mise à la terre 11 Connecteur réseau (entrée PoE) 12 Connecteur réseau (sortie PoE)
  • Page 33: Où Installer Le Produit

    Évitez d'orienter le radar vers un autre radar. Si plus de trois radars sont montés l'un à côté de l'autre, ils risquent d'interférer l'un avec l'autre. Pour éviter les interférences provenant des autres radars AXIS D2110-VE Security Radars, consultez Installer plusieurs radars page 34.
  • Page 34: Installer Plusieurs Radars

    AXIS D2110-VE Security Radar 4,5 m 4,0 - 60 m Non recommandé Non recommandé (15 pi) (13 - 197 pi) 5,5 m 7,5 - 60 m Non recommandé Non recommandé (18 pi) (25 - 197 pi) 6,5 m 7,5 - 60 m 5,5 - 60 m Non recommandé...
  • Page 35: Exemples D'installation

    AXIS D2110-VE Security Radar 1. Pour éviter les interférences lorsque plus de trois radars sont montés à proximité l'un de l'autre, accédez à Settings > Radar > General (Paramètres > Radar > Général) et sélectionnez Number of neighboring radars (Nombre de radars voisins) sous Coexistence.
  • Page 36 AXIS D2110-VE Security Radar Couvrir une zone Pour couvrir une grande zone ouverte, utilisez deux fixations sur mât afin de placer deux radars dos à dos. Note Lorsque deux radars sont montés ainsi l'un à côté de l'autre, ils sont dans la même zone de coexistence.
  • Page 37: Comment Installer Le Produit

    AXIS D2110-VE Security Radar Comment installer le produit 1. Utilisez le gabarit de perçage et percez les trous dans le mur. 2. Fixez le support de montage au mur. 3. Acheminez le câble réseau à travers le support de montage. Laissez environ 30 cm (12 po) de câble pour la connexion du radar.
  • Page 38 AXIS D2110-VE Security Radar Couvercle Entretoise Vis (x2) 9. Pour utiliser une carte microSD comme espace de stockage local, insérez la carte dans le logement de carte microSD du radar. 10. Retirez le joint de câble gauche et tirez sur la patte pour ouvrir un trou au niveau du câble réseau.
  • Page 39 AXIS D2110-VE Security Radar 12. Tirez légèrement sur le câble réseau pour que le joint s’ajuste dessus. ATTENTION Risque de fuites d'eau. Si le joint de câble n'est pas correctement ajusté sur le câble, de l'eau peut s'infiltrer et endommager le produit.
  • Page 40 AXIS D2110-VE Security Radar • Utilisez un câble d'un diamètre compris entre 5 et 6 mm (0,2 et 0,24 po). Écrou Joint Boîtier Joint Capuchon Bouchon (rebut) 16. Raccordez le radar à la terre : AVERTISSEMENT • Utilisez un câble de mise à la terre avec une section transversale de 1,5 à...
  • Page 41 AXIS D2110-VE Security Radar 16.6 Pour contrôler un équipement électrique externe depuis le radar, raccordez les câbles au relais du radar. 16.7 Fixez le câble avec le réducteur de tension. 16.8 Fixez le couvercle avec la vis. Couvercle Réducteur de tension Connecteur relais Vis de mise à...
  • Page 42: Trouver Le Périphérique Sur Le Réseau

    AXIS D2110-VE Security Radar Trouver le périphérique sur le réseau Pour trouver les périphériques Axis présents sur le réseau et leur attribuer des adresses IP sous Windows®, utilisez AXIS IP Utility ou AXIS Device Manager. Ces applications sont gratuites et peuvent être téléchargées via axis.com/support.
  • Page 43: Calibrer Le Radar

    Si le radar est monté à une hauteur différente, vous devez calibrer le radar pour compenser la hauteur de montage. Pour plus d’informations sur le calibrage, reportez-vous au manuel de l’utilisateur sur axis.com Pour voir plus facilement où se trouvent les objets en mouvement, vous pouvez télécharger une carte de référence, par exemple un plan de base ou une photo aérienne, qui indique la zone...
  • Page 44: Comment Calibrer Le Radar

    AXIS D2110-VE Security Radar Il existe deux méthodes de calibrage de la carte de référence : • Pins (easy) (Repères (facile)) : Ce calibrage est effectué dans l'interface web en cliquant dans la carte de référence. Il s'agit du moyen le plus simple pour calibrer la carte de référence.
  • Page 45: Réinitialiser Les Paramètres Par Défaut

    AXIS D2110-VE Security Radar Réinitialiser les paramètres par défaut Important La réinitialisation aux paramètres par défaut doit être utilisée avec prudence. Cette opération restaure tous les paramètres par défaut, y compris l'adresse IP. Pour réinitialiser l’appareil aux paramètres d’usine par défaut : 1.
  • Page 46: Informations Complémentaires

    • Le manuel d'utilisateur est disponible sur le site axis.com • Pour vérifier s'il existe un firmware mis à jour pour votre appareil, voir axis.com/support • Pour accéder à des formations et webinaires en ligne utiles, voir axis.com/academy Accessoires en option Pour une liste complète des accessoires disponibles pour ce produit, accédez à...
  • Page 47: Caractéristiques

    AXIS D2110-VE Security Radar Caractéristiques Pour obtenir la dernière version de la fiche technique du produit, rendez-vous sur la page du produit sur le site axis.com et trouvez l'option Support & Documentation (Assistance et documentation). Voyants DEL Indication Voyant d’état Vert Vert et fixe en cas de fonctionnement normal.
  • Page 48: Connecteurs

    AXIS D2110-VE Security Radar • Réinitialisation du produit aux paramètres d’usine par défaut. Cf. page 45. Connecteurs Connecteur réseau Connecteur Ethernet RJ45 avec l'alimentation par Ethernet Plus (PoE+). ATTENTION Risque de dommages au périphérique. Ne mettez pas le périphérique sous tension avec PoE et CC.
  • Page 49 AXIS D2110-VE Security Radar Fonction Remarques Caractéristiques Masse du CC 0 V CC Sortie CC Peut servir à alimenter le matériel auxiliaire. 12 V CC Remarque : cette broche ne peut être utilisée que Charge max. = comme sortie d’alimentation.
  • Page 50: Connecteur D'alimentation

    AXIS D2110-VE Security Radar E/S configurable E/S configurable Connecteur d’alimentation Bloc terminal à 2 broches pour l'entrée d'alimentation CC. Utilisez une source d'alimentation limitée (LPS) conforme aux exigences de Très basse tension de sécurité (TBTS) de 8 à 28 V CC avec une puissance de sortie nominale limitée à...
  • Page 51: Interrupteur D'alarme D'intrusion

    AXIS D2110-VE Security Radar Interrupteur d’alarme d’intrusion Utilisez le commutateur d'alarme d'intrusion pour obtenir une notification lorsqu'une personne ouvre le boîtier du périphérique. Pour configurer une règle d'action, consultez le manuel de l'utilisateur disponible sur axis.com.
  • Page 53: Informations Sur La Sécurité

    AXIS D2110-VE Security Radar Informations sur la sécurité Niveaux de risques DANGER Indique une situation dangereuse qui, si elle n'est pas évitée, entraînera le décès ou des blessures graves. AVERTISSEMENT Indique une situation dangereuse qui, si elle n'est pas évitée, pourrait entraîner le décès ou des blessures graves.
  • Page 54: Consignes De Sécurité

    Risque de choc électrique. Tous les câbles doivent être mis hors tension avant l'installation ou une intervention de maintenance sur le produit. AVERTISSEMENT Le produit Axis doit être installé par un professionnel qualifié et conformément aux lois et règlementations locales en vigueur. ATTENTION Faire attention aux bords métalliques coupants.
  • Page 55: Transport

    AXIS D2110-VE Security Radar Transport A A A VIS • Lors du transport du produit Axis, utilisez l'emballage d'origine ou un équivalent pour éviter d'endommager le produit. Batterie Si la batterie est faible, le fonctionnement de l'horloge en temps réel peut être affecté et entraîner sa réinitialisation à...
  • Page 57: Lieferumfang

    AXIS D2110-VE Security Radar Lieferumfang • AXIS D2110-VE Sicherheitsradar • Montagehalterung • Rohradapter (2 St.) • Schraube T30 (4 St.) für Masthalterung • Schraubendreher Torx® TR20 • Montagewerkzeug für RJ-45 • Kabelschuh • Sicherungsscheibe • Kabeldichtung, grau (2 St.) •...
  • Page 58: Produktübersicht

    AXIS D2110-VE Security Radar Produktübersicht Steuertaste Netzwerk LED Status LED Netz-LED PoE-Ausgang-LED Einschub für microSD-Karte Netzanschluss (Gleichstrom) E/A-Anschluss Relaisanschluss 10 Erdungsschraube 11 Netzwerk-Anschluss (PoE in) 12 Netzwerk-Anschluss (PoE out) 13 Einbruchalarmsensor Für die technischen Daten siehe Technische Daten auf Seite 73.
  • Page 59 Das Radar sollte nicht auf ein anderes Radar gerichtet sein. Wenn mehr als drei Radargeräte nahe beieinander montiert sind, können sie sich gegenseitig stören. Um Störungen von anderen AXIS D2110-VE-Sicherheitsradars zu vermeiden, lesen Sie Mehrere Radargeräte installieren auf Seite 60.
  • Page 60 AXIS D2110-VE Security Radar 3,5 m 3,0–60 m Nicht empfohlen Nicht empfohlen 4,5 m 4,0–60 m Nicht empfohlen Nicht empfohlen 5,5 m 7,5–60 m Nicht empfohlen Nicht empfohlen 6,5 m 7,5–60 m 5,5–60 m Nicht empfohlen 9–60 m 7,5–30 m...
  • Page 61 AXIS D2110-VE Security Radar Erfassungsbereich Koexistenzbereich 1. Um Interferenzen zu vermeiden, wenn mehr als drei Radargeräte nahe beieinander montiert sind, gehen Sie zu Settings > Radar > General (Einstellungen > Radar > Allgemein) und wählen Sie unter Coexistence (Koexistenz) die Option Number of neighboring radars (Anzahl benachbarter Radargeräte).
  • Page 62 AXIS D2110-VE Security Radar Einen Bereich abdecken Verwenden Sie zur Abdeckung eines großen offenen Bereichs zwei Masthalterungen, um zwei Radargeräte rückseitig zu platzieren. Beachten Wenn zwei Radargeräte so nah beieinander installiert werden, befinden sie sich im selben Koexistenzbereich. Sie können den PoE-Ausgang eines Radars für die Stromversorgung des zweiten Radars verwenden.
  • Page 63: Installieren Des Produkts

    AXIS D2110-VE Security Radar Installieren des Produkts 1. Mithilfe der Bohrschablone Löcher in die Wand bohren. 2. Die Montagehalterung an der Wand anbringen. 3. Das Netzwerk-Kabel durch die Wandhalterung führen. Für den Radaranschluss ca. 30 cm Kabel zugeben. VORSICHT Risiko, dass Wasser eindringt.
  • Page 64 AXIS D2110-VE Security Radar Abdeckung Strebe Schraube (2 St.) 9. Wenn eine microSD-Karte als lokaler Speicher verwendet wird, die Karte in den microSD-Karteneinschub des Radars einsetzen. 10. Die linke Kabeldichtung entfernen und die Lasche ziehen, um eine Öffnung für das Netzwerk-Kabel zu schaffen.
  • Page 65 AXIS D2110-VE Security Radar 12. Ziehen Sie das Netzwerk-Kabel ein wenig zurück, bis die Kabeldichtung bündig um das Kabel sitzt. VORSICHT Risiko, dass Wasser eindringt. Wenn die Kabeldichtung nicht ordnungsgemäß am Kabel angebracht wird, kann Wasser eindringen und das Produkt beschädigen.
  • Page 66 AXIS D2110-VE Security Radar • Nur ein Kabel durch die Kabelverschraubung ziehen. • Verwenden Sie ein Kabel mit einem Durchmesser von 5 bis 6 mm. Mutter Dichtung Gehäuse Dichtung Kappe Stopfen (entsorgen) 16. Erdung des Radars: WARNUNG • Verwenden Sie ein Erdungskabel mit 1,5 bis 4 mm Durchmesser (AWG 16–11).
  • Page 67 AXIS D2110-VE Security Radar 16.6 Die Kabel am Radarrelais anschließen, um externe elektrische Geräte vom Radar zu steuern. 16.7 Das Kabel mit der Zugentlastung befestigen. 16.8 Die Abdeckung mit der Schraube befestigen. Schraube Abdeckung Schraube Zugentlastung Relaisanschluss Erdungsschraube Kabelschuh Unterlegscheibe 17.
  • Page 68 AXIS D2110-VE Security Radar Das Gerät im Netzwerk ermitteln Mit AXIS IP Utility und AXIS Device Manager die Axis Geräte im Netzwerk ermitteln und ihnen unter Windows® IP-Adressen zuweisen. Beide Anwendungen sind kostenlos und können von axis.com/support heruntergeladen werden. Weitere Informationen zum Zuweisen von IP-Adressen bietet das Dokument Zuweisen von IP-Adressen und Zugreifen auf das Gerät auf der jeweiligen Geräteseite auf axis.com.
  • Page 69 Radar auf einer anderen Höhe montiert ist, müssen Sie das Radar kalibrieren, um die Montagehöhe zu kompensieren. Weitere Informationen zur Kalibrierung finden Sie im Benutzerhandbuch auf axis.com Um die Bewegungsrichtung der Objekte leichter einordnen zu können, kann eine Referenzkarte hochgeladen werden. Dies kann zum Beispiel eine Planzeichnung oder ein Luftbild sein, das die vom Radar abgedeckte Fläche darstellt.
  • Page 70 AXIS D2110-VE Security Radar Die Referenzkarte kann mittels zwei Methoden kalibriert werden: • Pins (easy) (Pins (einfach)): Diese Kalibrierung erfolgt über die Weboberfläche durch Klicken auf die Referenzkarte. Das ist die einfachste Methode, um die Referenzkarte zu kalibrieren. Sie kann verwendet werden, wenn kein physischer Zugriff auf den Standort möglich ist.
  • Page 71: Zurücksetzen Auf Die Werkseinstellungen

    AXIS D2110-VE Security Radar Zurücksetzen auf die Werkseinstellungen Wichtig Das Zurücksetzen auf die Werkseinstellungen sollte mit Vorsicht erfolgen. Beim Zurücksetzen auf die Werkseinstellungen werden alle Einstellungen einschließlich der IP-Adresse zurückgesetzt. So wird das Produkt auf die werksseitigen Standardeinstellungen zurückgesetzt: 1. Trennen Sie das Produkt von der Stromversorgung.
  • Page 72: Weitere Informationen

    Unter axis.com/support finden Sie die aktuellen Firmwareversionen für Ihr Gerät. • Nützliches Onlinetraining und Webinare finden Sie unter axis.com/academy. Optionales Zubehör Eine vollständige Liste lieferbaren Zubehörs für dieses Produkt finden Sie auf axis.com unter Produkt, Software und Zubehör. • AXIS T91R61 Wall Mount •...
  • Page 73: Technische Daten

    AXIS D2110-VE Security Radar Technische Daten Die aktuelle Version des technischen Datenblatts für das Produkt finden Sie auf axis.com unter Support und Dokumentation. LED-Anzeigen Status-LED Anzeige Grün Leuchtet bei Normalbetrieb grün. Netzwerk LED Anzeige Grün Leuchtet bei Verbindung mit einem 1 GBit/s-Netzwerk. Blinkt bei Netzwerkaktivität.
  • Page 74 AXIS D2110-VE Security Radar Anschlüsse Netzwerkanschluss RJ45-Ethernetanschluss mit Power over Ethernet Plus (PoE+). VORSICHT Risiko, dass das Gerät beschädigt wird. Versorgen Sie das Gerät nicht sowohl mit PoE als auch mit Gleichstrom. Netzwerk-Anschluss (PoE out) Power over Ethernet IEEE 802.3at Typ 2, max. 30 W Mit diesem Anschluss können Sie ein anderes PoE-Gerät mit Strom versorgen, z.
  • Page 75 AXIS D2110-VE Security Radar Funktion Hinweise Technische Angaben Erdung 0 V Gleichstrom Gleichstrom Gleichstro- Darf für die Stromversorgung von Zusatzgeräten 12 V DC mausgang verwendet werden. Max. Stromstärke = Hinweis: Dieser Kontakt darf nur für den 50 mA Stromausgang verwendet werden.
  • Page 76 AXIS D2110-VE Security Radar E/A als Ausgang konfiguriert Konfigurierbarer E/A Konfigurierbarer E/A Stromanschluss 2-poliger Anschlussblock für die Gleichstromversorgung. Verwenden Sie eine mit den Anforderungen für Schutzkleinspannung (SELV) kompatible Stromquelle mit begrenzter Leistung (LPS) mit 8 bis 28 V Gleichstrom und einem dauerhaft auf ≤100 W begrenzten Nennausgangsstrom.
  • Page 77 AXIS D2110-VE Security Radar Einbruchsalarmschalter Verwenden Sie den Einbruchsalarmschalter, um eine Benachrichtigung zu erhalten, wenn das Gehäuse des Geräts geöffnet wird. Weitere Informationen zum Einrichten einer Aktionsregel finden Sie im Benutzerhandbuch auf axis.com.
  • Page 79: Sicherheitsinformationen

    AXIS D2110-VE Security Radar Sicherheitsinformationen Gefährdungsstufen GEFAHR Weist auf eine gefährliche Situation hin, welche, falls nicht verhindert, zu Tod oder schweren Verletzungen führen kann. WARNUNG Weist auf eine gefährliche Situation hin, welche, falls nicht verhindert, zu Tod oder schweren Verletzungen führen kann.
  • Page 80 • Verwenden Sie zum Reinigen ein sauberes, mit destilliertem Wasser angefeuchtetes Tuch. • Verwenden Sie nur Zubehör, das den technischen Vorgaben Ihres Produkts entspricht. Dieses ist von Axis oder Drittanbietern erhältlich. Axis empfiehlt die mit Ihrem Produkt kompatible Stromversorgung von Axis.
  • Page 81 Systemstart zurückgesetzt wird. Sie erhalten eine Protokollnachricht im Server-Bericht des Produkts, wenn die Batteriespannung niedrig ist. VORSICHT Tauschen Sie die Batterie nicht selbst aus. Wenden Sie sich an den Axis Support, wenn die Protokollnachricht einen Batterietausch anfordert. Lithium-Knopfzellen (3,0 V) enthalten 1,2-Dimethoxyethan; Ethylenglycoldimethylether (EGDME),...
  • Page 83: Contenuto Della Confezione

    AXIS D2110-VE Security Radar Contenuto della confezione • AXIS D2110-VE Security Radar • Staffa di montaggio • Adattatore per tubi (2x) • Vite T30 (4x) per l'uso con il montaggio su palo. • Cacciavite Torx TR20 • Strumento di montaggio per RJ45 •...
  • Page 84: Panoramica Del Dispositivo

    AXIS D2110-VE Security Radar Panoramica del dispositivo Pulsante di comando LED di rete LED di stato Power LED LED uscita PoE Slot per scheda microSD Connettore di alimentazione (CC) Connettore I/O Connettore relè 10 Vite di messa a terra 11 Connettore di rete (PoE in)
  • Page 85 Evitare di puntare il radar verso un altro radar. Se più di tre radar sono montati gli uni vicini agli altri, potrebbero creare interferenze tra di loro. Per evitare interferenze da altri AXIS D2110-VE Security Radar, vedere Installazione di più radar alla pagina 86.
  • Page 86 AXIS D2110-VE Security Radar 4,5 m 4–60 m Non consigliate Non consigliate 5,5 m 7,5–60 m Non consigliate Non consigliate 6,5 m 7,5–60 m 5,5–60 m Non consigliate 9–60 m 7,5–30 m Non consigliate 10 m 15–60 m 9–35 m...
  • Page 87: Esempi Di Installazione

    AXIS D2110-VE Security Radar 1. Per evitare interferenze quando più di tre radar sono montati gli uni vicini agli altri, andare a Settings > Radar > General (Impostazioni > Radar > Generale) e selezionare Number of neighboring radars (Numero di radar vicini) in Coexistence (Coesistenza).
  • Page 88 AXIS D2110-VE Security Radar Coprire un'area Per coprire un'ampia area aperta, utilizzare due supporti per il montaggio su palo per posizionare due radar in modo che siano rivolti in direzioni opposte. Nota Quando due radar sono montati così vicini, si trovano nella stessa zona di coesistenza.
  • Page 89: Come Installare Il Dispositivo

    AXIS D2110-VE Security Radar Come installare il dispositivo 1. Usare la maschera di foratura e praticare fori nella parete. 2. Fissare la staffa di montaggio alla parete. 3. Far passare il cavo di rete attraverso la staffa di montaggio. Lasciare circa 30 cm di cavo per il collegamento al radar.
  • Page 90 AXIS D2110-VE Security Radar Coperchio Puntello Vite (2x) 9. Per utilizzare una scheda microSD per l'archiviazione locale, inserirla nell'apposito slot del radar. 10. Rimuovere il cavo sinistro e tirare la linguetta per aprire il foro per il cavo di rete.
  • Page 91 AXIS D2110-VE Security Radar 12. Tirare delicatamente il cavo di rete in modo da sistemare la guarnizione sul cavo. ATTENZIONE Rischio di perdite d'acqua. Se la guarnizione del cavo non è sistemata correttamente sul cavo, l'acqua può penetrare e danneggiare il dispositivo.
  • Page 92 AXIS D2110-VE Security Radar • Utilizzare un cavo di 5–6 mm di diametro. Dado Guarnizione Corpo Tenuta Cappuccio Tassello (da scartare) 16. Messa a terra del radar: AVVERTENZA • Utilizzare un cavo di messa a terra con sezione trasversale da 1,5–4 mm (AWG 16–11).
  • Page 93 22. Serrare le quattro viti con coppia di serraggio 1 Nm. Individuazione del dispositivo sulla rete Per trovare i dispositivi Axis sulla rete e assegnare loro un indirizzo IP in Windows®, utilizzare AXIS IP Utility o AXIS Device Manager. Queste applicazioni sono entrambe gratuite e possono...
  • Page 94 AXIS D2110-VE Security Radar Per maggiori informazioni su come trovare e assegnare indirizzi IP, vedere il documento che illustra come assegnare un indirizzo IP e accedere al dispositivo dalla pagina del dispositivo all'indirizzo axis.com. Supporto browser Il dispositivo può essere utilizzato con i seguenti browser: ®...
  • Page 95 è necessario calibrare il radar in modo da compensare l'altezza di montaggio. Per ulteriori informazioni sulla calibrazione, consultare il manuale per l'utente a axis.com Per semplificare la visione degli oggetti in movimento, è possibile caricare una mappa di riferimento, ad esempio una pianta o una foto aerea, che mostra l'area coperta dal radar.
  • Page 96 AXIS D2110-VE Security Radar • Pins (easy) (Pin (facili)): Questa calibrazione viene eseguita nell'interfaccia web facendo clic nella mappa di riferimento. Questo è il modo più semplice per calibrare la mappa di riferimento ed è possibile servirsene se non si ha accesso fisico al sito.
  • Page 97: Ripristino Delle Impostazioni Predefinite Di Fabbrica

    IP, impostare la password e accedere al flusso video. Gli strumenti per l'installazione e la gestione del software sono disponibili nelle pagine dedicate all'assistenza sul sito Web axis.com/support. È anche possibile reimpostare i valori predefiniti di fabbrica dei parametri mediante l'interfaccia Web.
  • Page 98: Ulteriori Informazioni

    AXIS D2110-VE Security Radar Ulteriori Informazioni • Per la versione più recente di questo documento, visitare il sito all'indirizzo axis.com • Il manuale per l'utente è disponibile all'indirizzo axis.com • Per verificare se sono stati pubblicati aggiornamenti del firmware per il proprio dispositivo, vedere axis.com/support...
  • Page 99: Indicatori Led

    AXIS D2110-VE Security Radar Specifiche Per la versione più aggiornata della scheda tecnica del dispositivo, visitare il sito Web axis.com e trovare la sezione Support & Documentation (Supporto e documentazione). Indicatori LED LED di stato Indicazione Verde Luce verde fissa: condizioni di normale utilizzo.
  • Page 100 AXIS D2110-VE Security Radar Connettori Connettore di rete Connettore Ethernet RJ45 con Power over Ethernet Plus (PoE+). ATTENZIONE Rischio di danni al dispositivo. Non alimentare il dispositivo sia con PoE che con CC. Connettore di rete (PoE out) Power over Ethernet IEEE 802.3at tipo 2, max 30 W Utilizzare questo connettore per alimentare un altro dispositivo PoE, ad esempio una telecamera, un altoparlante a tromba o un secondo radar di sicurezza.
  • Page 101 AXIS D2110-VE Security Radar Funzione Note Specifiche Terra CC 0 V CC Può essere utilizzato per alimentare una periferica Uscita CC 12 V CC ausiliaria. Carico massimo = Nota: questo pin può essere usato solo come 50 mA uscita alimentazione.
  • Page 102 AXIS D2110-VE Security Radar Connettore di alimentazione Morsettiera a 2 pin per ingresso alimentazione CC. Utilizzare una sorgente di alimentazione limitata (LPS) da 8–28 V CC conforme a SELV (bassissima tensione di sicurezza) con una potenza di uscita nominale limitata a ≤100 W.
  • Page 103: Informazioni Di Sicurezza

    AXIS D2110-VE Security Radar Informazioni di sicurezza Livelli di pericolo PERICOLO Indica una situazione pericolosa che, se non evitata, provoca morte o lesioni gravi. AVVERTENZA Indica una situazione pericolosa che, se non evitata, potrebbe provocare la morte o lesioni gravi.
  • Page 104 VVISO VVISO • Il dispositivo Axis deve essere utilizzato in conformità alle leggi e alle normative locali. • Axis consiglia l'uso di un cavo di rete schermato (STP). • Axis consiglia di utilizzare un cavo di rete di categoria CAT6 o versione successiva.
  • Page 105 ATTENZIONE Non sostituire la batteria da soli. Contattare l'assistenza di Axis se il messaggio di registro richiede una sostituzione della batteria. Le batterie a bottone al litio da 3 V contengono 1,2-dimetossietano; etere dimetilico di glicole...
  • Page 107: Contenido Del Paquete

    AXIS D2110-VE Security Radar Contenido del paquete • AXIS D2110-VE Security Radar • Soporte de montaje • Adaptador para tubo (2) • Tornillo T30 (4) para su uso en soportes de montaje en poste. • Destornillador Torx TR20 • Herramienta de montaje para RJ45 •...
  • Page 108: Información General Del Producto

    AXIS D2110-VE Security Radar Información general del producto Botón de control LED de red LED de estado LED de alimentación Salida PoE LED Ranura para tarjeta microSD Conector de alimentación (CC) Conector de E/S Conector de relé 10 Tornillo de toma de tierra...
  • Page 109: Rango De Detección

    Evite orientar el radar hacia otro radar. Si se montan más de tres radares juntos, pueden interferir entre sí. Para evitar interferencias de otros radares AXIS D2110-VE Security Radar, consulte Instalar varios radares en la página 110. Rango de detección Para lograr un rendimiento óptimo, instale el radar a 3,5 m del suelo.
  • Page 110 AXIS D2110-VE Security Radar 4,5 m De 4 a 60 m No recomendado No recomendado 5,5 m De 7,5 a 60 m No recomendado No recomendado 6,5 m De 7,5 a 60 m De 5,5 a 60 m No recomendado...
  • Page 111: Ejemplos De Instalación

    AXIS D2110-VE Security Radar 1. Para evitar interferencias cuando hay más de tres radares montados juntos, vaya a Settings > Radar > General (Ajustes > Radar > General) y seleccione Number of neighboring radars (Número de radares cercanos) en Coexistence (Coexistencia).
  • Page 112 AXIS D2110-VE Security Radar Cubrir un área Para cubrir un área abierta grande, use dos montajes en poste para colocar dos radares de forma consecutiva. Nota Cuando se montan dos radares tan juntos, se encuentran en la misma zona de coexistencia.
  • Page 113: Cómo Instalar El Producto

    AXIS D2110-VE Security Radar Cómo instalar el producto 1. Utilice la plantilla de perforado y taladre orificios en la pared. 2. Fije el soporte de montaje a la pared. 3. Guíe el cable de red a través del soporte de montaje. Deje aproximadamente unos 30 cm de cable para conectarlo al radar.
  • Page 114 AXIS D2110-VE Security Radar Cubierta Puntal Tornillo (2) 9. Para utilizar una tarjeta microSD como unidad de almacenamiento local, inserte la tarjeta en la ranura para tarjetas microSD del radar. 10. Retire la junta del cable de la parte izquierda y tire de la lengüeta para abrir un orificio para el cable de red.
  • Page 115 AXIS D2110-VE Security Radar 12. Tire del cable de red hacia atrás suavemente de manera que la junta del cable se ajuste en el cable. ATENCIÓN Riesgo de fugas de agua. Si la junta del cable no está correctamente ajustada, el agua del cable puede filtrarse y dañar el producto.
  • Page 116 AXIS D2110-VE Security Radar • Extraiga solo un cable a través del prensaestopas. • Utilice un cable con un diámetro de entre 5 y 6 mm. Tuerca Junta Cuerpo Junta Tapa Tapón (desechable) 16. Conecte a tierra el radar: ADVERTENCIA •...
  • Page 117 AXIS D2110-VE Security Radar 16.6 Para controlar el equipo eléctrico externo desde el radar, conecte los cables al relé del radar. 16.7 Fije el cable con la descarga de tracción. 16.8 Fije la cubierta con el tornillo. Tornillo Cubierta Tornillo Descarga de tracción...
  • Page 118 AXIS D2110-VE Security Radar Localice el dispositivo en la red Para localizar dispositivos Axis en la red y asignarles direcciones IP en Windows®, utilice AXIS IP Utility o AXIS Device Manager. Ambas aplicaciones son gratuitas y pueden descargarse desde axis.com/support.
  • Page 119 Para obtener más información sobre la calibración, consulte el manual del usuario en axis.com Para que resulte más fácil ver dónde se mueven los objetos, puede cargar un mapa de referencia, como un plano de planta o una foto aérea, que muestre el área cubierta por el radar.
  • Page 120 AXIS D2110-VE Security Radar • Pins (easy) (Pines [fácil]): Esta calibración se realiza en la interfaz web haciendo clic en el mapa de referencia. Esta es la forma más sencilla de calibrar el mapa de referencia y puede utilizarla si no dispone de acceso físico a la instalación.
  • Page 121: Restablecimiento A La Configuración Predeterminada De Fábrica

    AXIS D2110-VE Security Radar Restablecimiento a la configuración predeterminada de fábrica Importante Es preciso tener cuidado si se va a restablecer la configuración predeterminada de fábrica. Todos los valores, incluida la dirección IP, se restablecerán a la configuración predeterminada de fábrica.
  • Page 122: Más Información

    AXIS D2110-VE Security Radar Más información • Para consultar la versión más reciente de este documento, vaya a axis.com. • El manual de usuario se encuentra disponible en axis.com. • Para comprobar si existe un firmware actualizado disponible para su dispositivo, vaya a axis.com/support.
  • Page 123: Indicadores Led

    AXIS D2110-VE Security Radar Especificaciones Para acceder a la versión más reciente de la hoja de datos del producto, visite la página del producto en axis.com y localice Support & Documentation (Soporte técnico y documentación). Indicadores LED LED de Estado Indicación...
  • Page 124 AXIS D2110-VE Security Radar • Restablecer el producto a la configuración predeterminada de fábrica. Consulte página 121. Conectores Conector de red Conector Ethernet RJ45 con alimentación a través de Ethernet Plus (PoE+). ATENCIÓN Riesgo de daños en el dispositivo. No alimente el dispositivo con PoE y CC.
  • Page 125 AXIS D2110-VE Security Radar Notas Especificaciones Función Tierra CC 0 V CC Salida de CC Se puede utilizar para conectar el equipo auxiliar. 12 V CC Nota: Este pin solo se puede utilizar como salida Carga máx. = 50 mA de alimentación.
  • Page 126: Conector De Relé

    AXIS D2110-VE Security Radar Conector de alimentación Bloque de terminales de 2 pines para la entrada de alimentación de CC. Use una fuente de alimentación limitada (LPS) compatible con una tensión muy baja de seguridad (SELV) de entre 8 y 28 V CC con una potencia nominal de salida limitada a ≤100 W.
  • Page 127: Información De Seguridad

    AXIS D2110-VE Security Radar Información de seguridad Niveles de peligro PELIGRO Indica una situación peligrosa que, si no se evita, provocará lesiones graves o la muerte. ADVERTENCIA Indica una situación peligrosa que, si no se evita, puede provocar lesiones graves o la muerte.
  • Page 128: Instrucciones De Seguridad

    VISO VISO • Este producto de Axis debe utilizarse de acuerdo con las leyes y normativas locales. • Axis recomienda utilizar un cable de red blindado (STP). • Axis recomienda utilizar un cable de red de categoría CAT6 o superior.
  • Page 129 No sustituya la batería usted mismo. Póngase en contacto con el servicio de asistencia técnica de Axis si el mensaje de registro solicita un cambio de batería. Las pilas de botón de litio de 3,0 V contienen 1,2-dimetoxietano; éter dimetílico de etilenglicol...
  • Page 131 AXIS D2110-VE Security Radar パ パ パ ッ ッ ッ ケ ケ ケ ー ー ー ジ ジ ジ の の の 内 内 内 容 容 容 AXIS D2110-VE Security Radar • 取り付けブラケット • パイプアダプター (×2) • ポール取付⾦具⽤ネジT30 (×4)。...
  • Page 132 AXIS D2110-VE Security Radar 製 製 製 品 品 品 の の の 概 概 概 要 要 要 コントロールボタン ネットワークLED ステータスLED 電源LED PoE出⼒ LED microSDカードスロット 電源コネクタ (DC) I/Oコネクタ 接点コネクタ 10 アース端⼦ネジ 11 ネットワークコネクタ (PoE⼊⼒) 12 ネットワークコネクタ (PoE出⼒) 13 侵⼊アラームセンサー...
  • Page 133 レーダーはポールに取り付けるか、壁⾯上で隣に他の物体や設置された装置がな い場所に取り付けます。 レーダーに近い電波を反射する物体は、パフォーマン スに影響を与えます。 検知範囲内の動きを正しく特定するために、本レーダーは安定した場所に取り付け る必要があります。 本レーダーを揺れ動くポールには取り付けないでください。 視野内の⾦属の物体は、パフォーマンスに影響を与える反射を引き起こします。 他のレーダーに向かってレーダーを向けないでください。 4つ以上のレーダーが互いに近距離に取り付けられている場合、相互に⼲渉し合う 134ペー ことがあります。 他のAXIS D2110-VE Security Radarの⼲渉を避けるには、 ジの、複数のレーダーを設置 を参照してください。 検 検 検 知 知 知 範 範 範 囲 囲 囲 最適なパフォーマンスを得るには、レーダーを地上から3.5 mの位置に取り付けます。 注意 • レーダーを別の⾼さに設置する場合は、レーダーのキャリブレーションを⾏ う時に製品のWebページに実際の取り付け位置の⾼さを⼊⼒します。 • 検知範囲はシーンの影響を受けます。 • 検知範囲は近隣のレーダーによって影響されます。...
  • Page 134 AXIS D2110-VE Security Radar 3.5 m 3.0〜60 m ⾮推奨 ⾮推奨 4.5 m 4.0〜60 m ⾮推奨 ⾮推奨 5.5 m 7.5〜60 m ⾮推奨 ⾮推奨 6.5 m 7.5〜60 m 5.5〜60 m ⾮推奨 9〜60 m 7.5〜30 m ⾮推奨 10 m 15〜60 m 9〜35 m ⾮推奨...
  • Page 135 AXIS D2110-VE Security Radar レーダー 検知領域 共存領域 1. 4台以上のレーダーが互いに近距離に設置されている場合に⼲渉を避 けるには、[Settings Settings Settings > > > Radar Radar Radar > > > General General General ( ( ( 設 設 設 定 定 定 > > > レ レ レ ー ー ー ダ ダ ダ ー ー ー > > > ⼀ ⼀ ⼀ 般 般 般 ) ) ) ] から...
  • Page 136 AXIS D2110-VE Security Radar 建 建 建 物 物 物 の の の 周 周 周 囲 囲 囲 の の の 現 現 現 場 場 場 を を を カ カ カ バ バ バ ー ー ー す す す る る る...
  • Page 137 AXIS D2110-VE Security Radar 1つのレーダーからのPoE出⼒を使⽤して2番⽬のレーダーに電⼒を供給することがで きますが、この⽅法で3番⽬のレーダーを接続することはできません。 注意 レーダーが60 Wミッドスパンから給電されている場合、レーダーのPoE出⼒ が有効になります。...
  • Page 138 AXIS D2110-VE Security Radar 製 製 製 品 品 品 の の の 取 取 取 り り り 付 付 付 け け け ⽅ ⽅ ⽅ 法 法 法 1. ドリルテンプレートを使⽤して、壁に2つ⽳を開けます。 2. 取り付けブラケットを壁に固定します。 3. ネットワークケーブルを取り付けブラケットに通します。 レーダーとの接 続⽤に30 cmほどケーブルを残します。...
  • Page 139 AXIS D2110-VE Security Radar カバー ストラット ネジ×2 9. microSDカードをローカルストレージとして使⽤する場合は、レーダーの microSDカードスロットにカードを挿⼊します。 10. 左側のケーブルガスケットを取り除き、タブを引いてネットワークケーブ ル⽤の⽳を開けます。 注意 ⽔漏れのリスクがあります。 • 使⽤するケーブルガスケットの⽳のみを開けます。 • ケーブルガスケットが破れている場合は、新しいケーブルガスケットに交 換します。 11. ネットワークケーブルをケーブルガスケットに通します。...
  • Page 140 AXIS D2110-VE Security Radar 12. ネットワークケーブルを少し⼿前に引き、ケーブルガスケットをケーブル にぴったりと合わせます。 注意 ⽔漏れのリスクがあります。 ケーブルガスケットがケーブル上で正しく調整 されていないと、⽔が浸透して製品を損傷する可能性があります。 13. ケーブルガスケットを戻します。 14. I/Oなどの補助デバイスを接続する場合、それぞれのデバイスについて同じ ⼿順を繰り返します。 複数のケーブルを使⽤する場合、各ケーブルをそれ ぞれ別のケーブルガスケットに通す必要があります。 ネットワーク ネットワークデバイスへのPoE出⼒ 電源 アース/接点 15. ストレインリリーフ付きケーブルグランドを使⽤する場合、以下のように 組み⽴てます。 ナットとキャップを⼿でしっかりと締めます。 注意 ⽔漏れのリスクがあります。...
  • Page 141 AXIS D2110-VE Security Radar • ケーブルグランドを通してケーブルを1本だけ引き出します。 • 直径5〜 6 mmのケーブルを使⽤します。 ナット ガスケット 本体 シール キャップ プラグ (破棄) 16. レーダーを接地します: 警告 • 断⾯1.5〜4 mm のアースケーブルを使⽤してください (AWG 16〜 11)。 • ストレインリリーフは、直径8.5〜9.5 mmのケーブル⽤に設計されて います。 ⼩さいケーブル直径でのストレインリリーフを使⽤するに は、付属のケーブルグランドとストレインリリーフを使⽤します。 16.1 ネジとカバーを外します。 16.2 外部装置を接点コネクタに接続します。 16.3 アース端⼦ネジを外します。 16.4 ケーブルシュープライヤーを使⽤して、アース線をケーブルシュー...
  • Page 142 AXIS D2110-VE Security Radar 16.6 レーダーから外部電気機器を制御するには、ケーブルをレーダー の接点に接続します。 16.7 ストレインリリーフでケーブルを固定します。 16.8 ネジを使⽤してカバーを固定します。 ネジ カバー ネジ ストレインリリーフ 接点コネクタ アース端⼦ネジ ケーブルシュー ワッシャー 17. レーダーに外部デバイスを接続します。 18. ネットワークケーブルを接続します。 19. PoEを使⽤していない場合は、DC電源を接続します。 注意 デバイスの損傷の危険があります。 PoEとDCの両⽅を使⽤してデバイスの電 源を⼊れないでください。 148ページの、LEDイン 20. LEDが正しい状態を⽰しているかを確認します。 ジケーター を参照してください。 21. ストラットを引いてカバーを閉じます。 22. 1 N mのトルクで4つのネジを締めます。...
  • Page 143 ネ ネ ネ ッ ッ ッ ト ト ト ワ ワ ワ ー ー ー ク ク ク 上 上 上 の の の デ デ デ バ バ バ イ イ イ ス ス ス を を を 検 検 検 索 索 索 す す す る る る Windows®でAxisデバイスを探してIPアドレスの割り当てを⾏う⽅法については、 AXIS IP UtilityまたはAXIS Device Managerを使⽤してください。 いずれのアプリケー axis.com/support ションも無料で、...
  • Page 144 AXIS D2110-VE Security Radar レ レ レ ー ー ー ダ ダ ダ ー ー ー キ キ キ ャ ャ ャ リ リ リ ブ ブ ブ レ レ レ ー ー ー シ シ シ ョ ョ ョ ン ン ン を を を ⾏ ⾏ ⾏ う う う...
  • Page 145 AXIS D2110-VE Security Radar Pins Pins (easy) Pins (easy) (easy) ( ( ( ピ ピ ピ ン ン ン ( ( ( 簡 簡 簡 易 易 易 )) )) )) : Webインターフェースで、参照マップ内をクリッ • クして、このキャリブレーションを⾏います。 この⽅法は、参照マップの キャリブレーションを⾏う最も簡単な⽅法であり、サイトに物理的にアク セスできない場合に使⽤することができます。 T T T racks...
  • Page 146 AXIS D2110-VE Security Radar ⼯ ⼯ ⼯ 場 場 場 出 出 出 荷 荷 荷 時 時 時 の の の 設 設 設 定 定 定 に に に リ リ リ セ セ セ ッ ッ ッ ト ト ト す す す る る る...
  • Page 147 AXIS D2110-VE Security Radar 関 関 関 連 連 連 情 情 情 報 報 報 axis.com 本書の最新バージョンについては、 にアクセスしてください。 • axis.com ユーザーズマニュアルは、 で⼊⼿できます。 • ご使⽤のデバイスの新しいファームウェアがリリースされていないかを確 • axis.com/support 認するには、 にアクセスしてください。 役に⽴つオンライントレーニングおよびWebセミナーをご⽤意しておりま • axis.com/academy す。 をご覧ください。 オ オ オ プ プ プ シ シ シ ョ ョ ョ ン ン ン ア ア ア ク ク ク セ セ セ サ サ サ リ リ リ ー ー ー...
  • Page 148 AXIS D2110-VE Security Radar 仕 仕 仕 様 様 様 axis.com 最新バージョンの製品のデータシートについては、 で本製品のページを開い て「Support Support & & & Documentation Support Documentation Documentation ( ( ( サ サ サ ポ ポ ポ ー ー ー ト ト ト と と と ド ド ド キ キ キ ュ ュ ュ メ メ メ ン ン ン ト ト ト ) ) ) 」へお進みください。...
  • Page 149 AXIS D2110-VE Security Radar ボ ボ ボ タ タ タ ン ン ン コ コ コ ン ン ン ト ト ト ロ ロ ロ ー ー ー ル ル ル ボ ボ ボ タ タ タ ン ン ン...
  • Page 150 AXIS D2110-VE Security Radar デ デ デ ジ ジ ジ タ タ タ ル ル ル ⼊ ⼊ ⼊ ⼒ ⼒ ⼒ - - - 開回路と閉回路の切り替えが可能なデバイス (PIRセンサー、ドア/窓 の接触、ガラス破損検知器など) を接続するための⼊⼒です。 デ デ デ ジ ジ ジ タ タ タ ル ル ル 出 出 出 ⼒ ⼒ ⼒ - - - リレーやLEDなどの外部デバイスを接続します。 接続されたデバ...
  • Page 151 AXIS D2110-VE Security Radar DCグランド DC出⼒ 12 V、最⼤50 mA I/O (⼊⼒として設定) I/O (出⼒として設定) 設定可能I/O 設定可能I/O 電 電 電 源 源 源 コ コ コ ネ ネ ネ ク ク ク タ タ タ DC電源⼊⼒⽤2ピンターミナルブロック。 100 W以下に制限された定格出⼒電⼒で、 安全超低電圧 (SELV) 準拠の制限電源 (LPS) 8‒28 V DCを使⽤してください。...
  • Page 152 AXIS D2110-VE Security Radar 接 接 接 点 点 点 コ コ コ ネ ネ ネ ク ク ク タ タ タ 注意 接点コネクタには単⼼線を使⽤してください。 機 機 機 能 能 能 仕 仕 仕 様 様 様 タイプ NO (ノーマルオープン) 24 V DC/5 A 定格...
  • Page 153 AXIS D2110-VE Security Radar 安 安 安 全 全 全 情 情 情 報 報 報 危 危 危 険 険 険 レ レ レ ベ ベ ベ ル ル ル 危険 回避しない場合、死亡または重傷につながる危険な状態を⽰します。 警告 回避しない場合、死亡または重傷につながるおそれのある危険な状態を ⽰します。 注意 回避しない場合、軽傷または中程度の怪我につながるおそれのある危険 な状態を⽰します。 注記...
  • Page 154 AXIS D2110-VE Security Radar 安 安 安 全 全 全 ⼿ ⼿ ⼿ 順 順 順 危険 感電の危険があります。 製品の設置やメンテナンスを⾏う前にすべての ケーブルの通電を切ってください。 警告 本製品の設置は、お使いになる地域の法律や規制に準拠して、訓練を受け た専⾨技術者が⾏ってください。 注意 鋭利な⾦属エッジに注意してください。 取り付け時は耐切創⼿袋を使⽤ してください。 注記 • 本アクシス製品は、お使いになる地域の法律や規制に準拠して使⽤して ください。 • Axisは、シールドネットワークケーブル (STP) の使⽤を推奨します。 • Axisは、カテゴリーCAT6以上のネットワークケーブルの使⽤を推奨します。 • 本製品は乾燥した換気のよい環境に保管してください。 • 本製品に衝撃または強い圧⼒を加えないでください。...
  • Page 155 AXIS D2110-VE Security Radar 輸 輸 輸 送 送 送 注記 • 本製品を運搬する際は、製品が損傷しないよう、元の梱包か同等の梱包を 使⽤してください。 バ バ バ ッ ッ ッ テ テ テ リ リ リ ー ー ー バッテリーが低電⼒状態になると、RTCの動作に影響し、電源を⼊れるたびにRTC がリセットされます。 バッテリーの電圧が低下すると、製品のサーバーレポー トにログメッセージが表⽰されます。 注意 ⾃分でバッテリーを交換しないでください。 ログメッセージがバッテリーの 交換を要求している場合は、アクシスサポートに連絡してください。 リチウムコイン型3.0 V電池は、1,2-ジメトキシエタン (エチレングリコールジメチル...
  • Page 157 AXIS D2110-VE Security Radar 包 包 包 装 装 装 内 内 内 容 容 容 AXIS D2110-VE Security Radar • 安装支架 • 管接头(2 个) • 用于立杆托架的螺丝 T30(4 个)。 • Torx TR20 螺丝刀 • RJ45 安装工具 • 电缆终端套管 • 锁紧垫圈...
  • Page 158: Led 状态指示灯

    AXIS D2110-VE Security Radar 产 产 产 品 品 品 概 概 概 述 述 述 控制按钮 网络指示灯 LED 状态指示灯 电源灯 PoE 输出 LED microSD 卡槽 电源连接器 (DC) I/O 连接器 中继连接器 10 接地螺丝 11 网络连接器(PoE 输入) 12 网络连接器(PoE 输出) 13 入侵报警传感器...
  • Page 159 AXIS D2110-VE Security Radar 产 产 产 品 品 品 安 安 安 装 装 装 位 位 位 置 置 置 雷达用于监视开阔区域。 覆盖区域内的大多数实体物体(如墙体、围栏、树木或大灌 木丛)背后会形成盲点(雷达阴影)。 将雷达安装在旁边没有其他物体或装置的立杆或墙面的一个点上。 靠近雷达的反射 无线电波的物体会影响性能。 为了能够正确识别覆盖区域内的移动情况,需要将该雷达安装在一个稳固支架上。 请勿将雷达安装在一根摇晃的立杆上。 视野中的金属物体会产生影响性能的反射。 应避免雷达与雷达之间面对面。 如果三个以上的雷达安装距离过近,则可能会互相干扰。 要避免干扰其他 AXIS 安装多个雷达 在第160页 D2110-VE Security Radars,请参见...
  • Page 160 AXIS D2110-VE Security Radar 4.5 米 4.0–60 米 不推荐 不推荐 (15 英尺) (13–197 英尺) 5.5 米 7.5–60 米 不推荐 不推荐 (18 英尺) (25–197 英尺) 6.5 米 7.5–60 米 5.5–60 米 不推荐 (21 英尺) (25–197 英尺) (18–197 英尺) 8 米 不推荐...
  • Page 161 AXIS D2110-VE Security Radar 共存区域 1. 为避免三个以上雷达安装位置较近时发生干扰的情况,请前往设 设 设 置 置 置 > > > 雷 雷 雷 达 达 达 > > > 常 常 常 规 规 规 ,然后在共 共 共 存 存 存 下选择邻 邻 邻 近 近 近 雷 雷 雷 达 达 达 的 的 的 数 数 数 量 量 量 。...
  • Page 162 AXIS D2110-VE Security Radar 覆 覆 覆 盖 盖 盖 区 区 区 域 域 域 要覆盖一个较大的开放区域,请使用两个立杆托架将两个雷达背靠背放置。 备注 当两个雷达像这样近距离安装在一起时,它们处于同一个共存区域。 您可以使用一个雷达的 PoE 输出来为第二个雷达供电,但无法以这种方式连接第三 个雷达。 备注 当雷达由 60 W 中跨供电时,雷达上的 PoE 输出将启用。...
  • Page 163 AXIS D2110-VE Security Radar 如 如 如 何 何 何 安 安 安 装 装 装 产 产 产 品 品 品 1. 使用钻孔模板在墙上钻孔。 2. 将安装支架紧固至墙壁。 3. 将网络电缆穿过安装支架。 留出大约 30 厘米(12 英寸)的电缆来连接雷达。 小心 漏水风险。 • 请勿使用具有带帽网络连接器的网络电缆,因为它们可能导致线缆垫圈破损。 • 请使用直径为 5–9.5 毫米(0.2–0.4 英寸)的电缆。...
  • Page 164 AXIS D2110-VE Security Radar 外壳 撑杆 螺丝(2 个) 9. 要使用用于本地存储的 microSD 卡,请将卡插入雷达的 microSD 卡槽中。 10. 取下左线缆垫圈,并拉动耳片以打开网络电缆孔。 小心 漏水风险。 • 请仅打开所使用的线缆垫圈上的孔。 • 如果线缆垫圈破损,请更换新线缆垫圈。 11. 推动网络电缆,使其穿过线缆垫圈。...
  • Page 165 AXIS D2110-VE Security Radar 12. 轻轻回拉网络电缆,以便调整线缆垫圈在电缆上的位置。 小心 漏水风险。 如果线缆垫圈未在电缆上正确调节,水有可能渗入,造成产品损坏。 13. 将线缆垫圈放回原位。 14. 如果要连接一个辅助装置(例如,输入/输出),则重复以上适用于特殊装置 的步骤。 如果使用不止一根电缆,则必须将每根电缆都穿过各自的线缆垫圈。 网络 PoE 输出到网络设备 电源 输入/输出 接地/继电器 15. 若要使用一个带应变消除件的电缆套管,则将其按如下所示进行装配。 手动 牢固拧紧螺母和盖帽。 小心 漏水风险。 • 从线缆密封套内只拉出一根电缆。 • 请使用直径为 5–6 毫米(0.2–0.24 英寸)的电缆。...
  • Page 166 AXIS D2110-VE Security Radar 螺母 垫圈 主体 密封 盖帽 塞子(丢弃) 16. 将雷达接地: 警告 • 请使用横截面为 1.5–4 平方毫米的接地电缆 (AWG 16–11)。 • 应力消除器专门用于直径为 8.5–9.5 毫米(0.33–0.37 英寸)的电缆。 要在更小的电缆直径上使用应力消除器,请使用提供的带应力消除 器的线缆密封套 。 16.1 卸下螺丝和外壳。 16.2 将外部设备连接到中继连接器。 16.3 卸下接地螺丝。 16.4 使用电缆套管钳将接地电缆连接到电缆终端套管。 16.5 用螺丝紧固垫圈和电缆终端套管。 16.6 要从雷达控制外部电气设备,请将电缆连接到雷达的继电器。 16.7 使用应力消除器紧固电缆。...
  • Page 167 22. 拧紧扭矩为 1 Nm (0.7 lb ft) 的四颗螺丝。 在 在 在 网 网 网 络 络 络 上 上 上 查 查 查 找 找 找 设 设 设 备 备 备 若要在网络中查找安讯士设备并为它们分配 Windows® 中的 IP 地址,请使 用 AXIS IP Utility 或 AXIS 设备管理器。 这两种应用程序都是免费的,可以从 axis.com/support 上下载。...
  • Page 168 AXIS D2110-VE Security Radar 浏 浏 浏 览 览 览 器 器 器 支 支 支 持 持 持 您可以在以下浏览器中使用该设备: Firefox Edge Chrome Safari ® ® ® Windows ® 推荐 macOS ® 推荐 其他操作系统 axis.com 要查找更多有关设备使用方法的信息,请参见 上提供的用户手册。...
  • Page 169 AXIS D2110-VE Security Radar 校 校 校 准 准 准 雷 雷 雷 达 达 达 一旦安装完毕,雷达即可使用。 默认实时视图将显示雷达覆盖范围和侦测到的移 动,您可以立即添加侦测区域和规则。 如果雷达安装在地面以上 3.5 米(11 英尺)处,则无需再执行其他操作。 如果安装 在其他高度,您需要校准雷达来达到安装高度要求。 axis.com 有关如何校准的更多信息,请参见 上的用户手册 为了能够更加轻松地查看物体移动位置,您可以上载一份显示雷达覆盖区域的参考 图(例如,一份平面图或航拍照片)。 图像要求: 支持的文件格式为 jpeg 和 png。 • 图像可在雷达中裁剪。 • 图像可在雷达中旋转 ±35°。...
  • Page 170 AXIS D2110-VE Security Radar 路 路 路 径 径 径 ( ( ( 准 准 准 确 确 确 ) ) ) : 此校准方法需要一个人在雷达前方移动。 这是很准确的参考图 • 校准方法,但如果场景中存在很多其他移动,则不能使用。 您可以在访问移动设备的网页接口时自己移动,或让其他人按照您的指示移 动。 按照不同步伐四处移动时,请移动到在参考图中容易找到的位置。 如 如 如 何 何 何 校 校 校 准 准 准 雷 雷 雷 达 达 达...
  • Page 171 AXIS D2110-VE Security Radar 重 重 重 置 置 置 为 为 为 出 出 出 厂 厂 厂 默 默 默 认 认 认 设 设 设 置 置 置 重要 重置为出厂默认设置时应谨慎。 重置为出厂默认设置会将全部设置(包括 IP 地址)重置为出厂默认值。 将产品重置为出厂默认设置: 1. 断开产品电源。 产品概述 在第158页...
  • Page 172 AXIS D2110-VE Security Radar 更 更 更 多 多 多 信 信 信 息 息 息 axis.com 若要获取本文档的新版本,请参见 • axis.com 用户手册可从 获取 • axis.com/support 要检查是否有设备的可用更新固件,请参见 • axis.com/academy 如需有用的在线培训和在线研讨会,请参见 • 可 可 可 选 选 选 附 附 附 件 件 件...
  • Page 173 AXIS D2110-VE Security Radar 规 规 规 格 格 格 axis.com 上的产品页并查找支 支 支 持 持 持 和 和 和 文 文 文 档 档 档 。 要查找最新版本的产品数据表,请转到 LED 指 指 指 示 示 示 灯 灯 灯 LED 状 状 状 态 态 态 指 指 指 示 示 示 灯 灯 灯...
  • Page 174 AXIS D2110-VE Security Radar 接 接 接 口 口 口 网 网 网 络 络 络 连 连 连 接 接 接 器 器 器 采用以太网供电 增强版 (PoE+) 的 RJ45 以太网连接器。 小心 设备损坏风险。 请勿使用 PoE 和 DC 为设备供电。 网 网 网 络 络 络 连 连 连 接 接 接 器 器 器 ( ( ( PoE PoE 输...
  • Page 175 AXIS D2110-VE Security Radar 功 功 功 能 能 能 针 针 针 注 注 注 意 意 意 事 事 事 项 项 项 规 规 规 格 格 格 脚 脚 脚 0 V DC DC 接地 12 V DC DC 输出...
  • Page 176 AXIS D2110-VE Security Radar 小心 设备损坏风险。 请勿使用 PoE 和 DC 为设备供电。 中 中 中 继 继 继 连 连 连 接 接 接 器 器 器 小心 使用用于中继连接器的单芯电线。 功 功 功 能 能 能 规 规 规 格 格 格...
  • Page 177 AXIS D2110-VE Security Radar 安 安 安 全 全 全 信 信 信 息 息 息 危 危 危 险 险 险 等 等 等 级 级 级 危险 表示如果不避免则会导致死亡或严重伤害的危险情况。 警告 表示如果不避免则可能导致死亡或严重伤害的危险情况。 小心 表示如果不避免则可能导致轻微或中度伤害的危险情况。 注意 表示如果不避免则可能导致财产损失的情况。 其 其 其 他 他 他 消 消 消 息 息 息 等 等 等 级 级 级...
  • Page 178 AXIS D2110-VE Security Radar 安 安 安 全 全 全 说 说 说 明 明 明 危险 电击风险。 在安装或执行产品维护之前,电缆应断电。 警告 安讯士产品应由受过培训的专业人员进行安装,并遵守当地法律和法规。 小心 请小心锋利的金属边缘。 请在安装期间使用防割手套。 注意 • 使用 Axis 产品时应遵守当地法律和法规。 • 安讯士推荐使用屏蔽网络电缆 (STP)。 • 安讯士建议使用类别 CAT6 或更高级别的网线。 • 在干燥通风的环境中存放安讯士产品。 • 避免将安讯士产品暴露在冲击或高压环境下。...
  • Page 179 AXIS D2110-VE Security Radar 小心 请勿自行更换电池。 如果日志消息要求更换电池,请联系安讯士支持部门。 3.0 V 纽扣锂电池内含 1,2-二甲氧基乙烷;乙二醇二甲醚 (EGDME),CAS 编号为 110-71-4。...
  • Page 180 Installation Guide Ver. M3.2 AXIS D2110-VE Security Radar Date: February 2021 © 2021 Axis Communications AB Part No. 2298522...

Table des Matières