Table des Matières
Publicité
Les langues disponibles
Les langues disponibles
Liens rapides
Publicité
Chapitres
Table des Matières

Manuels Connexes pour Telefunken TECHCLIM9

Sommaire des Matières pour Telefunken TECHCLIM9
- Page 1 CLIMATISEUR 9000Btu TECHCLIM9...
-
Page 2: Consignes De Sécurité
FRANÇAIS CONSIGNES DE SÉCURITÉ • LIRE IMPÉRATIVEMENT CE MODE D’EMPLOI ET LE CONSERVER AFIN DE POUVOIR LE CONSULTER ULTÉRIEUREMENT. DANS LE CAS OÙ VOUS CÉDEZ CET APPAREIL Á UN TIERS, N’OUBLIEZ PAS DE FOURNIR CETTE NOTICE AVEC L’APPAREIL. • AVERTISSEMENT : AVANT LA MISE EN SERVICE DE VOTRE CLIMATISEUR, CELUI-CI DOIT AVOIR ÉTÉ... - Page 3 FRANÇAIS ENCOURUS ONT ÉTÉ APPRÉHENDÉS. LES ENFANTS NE DOIVENT PAS JOUER AVEC L’APPAREIL. LE NETTOYAGE ET L’ENTRETIEN PAR L’USAGER NE DOIVENT PAS ÊTRE RÉALISÉS PAR DES ENFANTS SANS SURVEILLANCE. • TENEZ L’APPAREIL ET SON CORDON HORS DE PORTÉE DES ENFANTS DE MOINS DE 8 ANS. •...
-
Page 4: Est Donc Demandé D'attendre Au Minimum 5 Minutes
FONCTION DES MODELES COMMERCIALISES. MARQUE MODELE TYPE DE POIDS TEQ CO2 UNITAIRE UNITAIRE Telefunken TECHCLIM9 R290 200 gr 0.00066 Telefunken TECHCLIM12 R290 210 gr 0.00063 • LE GAZ RÉFRIGÉRANT R290 EST CONFORME AUX DIRECTIVES EUROPÉENNES SUR L’ENVIRONNEMENT. NE JAMAIS PERCER AUCUNE PARTIE DU CIRCUIT RÉFRIGÉRANT DE L’APPAREIL. -
Page 5: La Réparation Et La Manipulation Du Circuit
FRANÇAIS • NE PAS PERCER OU BRÛLER L’APPAREIL. • CET APPAREIL DOIT ÊTRE INSTALLÉ, UTILISÉ ET STOCKÉ DANS UN LOCAL VENTILÉ DONT LA SURFACE AU PLANCHER EST SUPÉRIEURE A 12M2. • CET APPAREIL DOIT ÊTRE RANGÉ DANS UN LOCAL NE CONTENANT PAS DE FEUX NUS FONCTIONNANT EN PERMANENCE (PAR EXEMPLE, FEUX NUS, UN APPAREIL Á... - Page 6 FRANÇAIS • MISE EN GARDE : NE PAS ENDOMMAGER LE CIRCUIT DE RÉFRIGÉRATION. • SIGNIFICATION DES SYMBOLES UTILISÉS DANS LA NOTICE ET APPOSÉS SUR LE PRODUIT : DANGER : RISQUE D’INCENDIE, MATIÈRES INFLAMMABLES. LE GAZ RÉFRIGÉRANT CONTENU DANS LE CIRCUIT DE CET APPAREIL EST DU PROPANE R290.
- Page 7 FRANÇAIS • MISE EN GARDE : POUR ÉVITER UNE SURCHAUFFE, NE PAS COUVRIR L'APPAREIL OU ENTRAVER LA LIBRE CIRCULATION DE L’AIR AUTOUR DE L’APPAREIL. • NE PAS OBSTRUER LES ENTREES ET SORTIES D’AIR DE L’APPAREIL. • L'APPAREIL DOIT ETRE STOCKE DE MANIERE A EMPECHER LES DOMMAGES MECANIQUES.
-
Page 8: Après Avoir Deballé Votre Appareil, Assurez-Vous
FRANÇAIS • APRÈS AVOIR DEBALLÉ VOTRE APPAREIL, ASSUREZ-VOUS D’ABORD QU’IL N’A PAS ÉTÉ ABIMÉ. SI VOUS AVEZ UN DOUTE, N’UTILISEZ PAS VOTRE APPAREIL, ET CONSULTEZ UN TECHNICIEN QUALIFIÉ. • N’UTILISEZ JAMAIS D’ACCESSOIRES OU DE PIÈCES D’UN AUTRE FABRICANT. L’UTILISATION DE CE TYPE D’ACCESSOIRES OU DE PIÈCES ENTRAÎNE L’ANNULATION DE LA GARANTIE. -
Page 9: N'insérez Jamais Vos Doigts, Des Crayons Ou Tout
FRANÇAIS • ASSUREZ-VOUS QUE L’INSTALLATION ÉLECTRIQUE EST SUFFISANTE POUR ALIMENTER UN APPAREIL DE CETTE PUISSANCE (DISJONCTEUR DIFFÉRENTIEL ET PROTÉGÉE PAR UN FUSIBLE DE 16 A). • VÉRIFIEZ QUE LE VOLTAGE MARQUÉ SUR LA PLAQUE SIGNALÉTIQUE CORRESPOND BIEN Á CELUI DE VOTRE INSTALLATION. -
Page 10: Normes De Sécurité
FRANÇAIS • N’UTILISEZ PAS CET APPAREIL Á PROXIMITÉ D’UNE BAIGNOIRE, D’UNE DOUCHE OU D’UNE PISCINE. ÉVITEZ TOUTE PROJECTION D’EAU SUR L’APPAREIL. • DÉBRANCHEZ TOUJOURS L’APPAREIL EN TIRANT AU NIVEAU DE LA FICHE ; AVANT DE LE DÉPLACER ET EN CAS DE LONGUE DURÉE D’INUTILISATION. -
Page 11: Table Des Matières
FRANÇAIS SOMMAIRE DESCRIPTION ................1 MISE EN SERVICE ET UTILISATION ..........2 Installation ................2 Utiliser votre appareil ............... 5 NETTOYAGE ET ENTRETIEN ............10 ANOMALIES DE FONCTIONNEMENT ......... 12 INFORMATION TECHNIQUE ............13 INSTRUCTIONS DE REPARATION ..........14... -
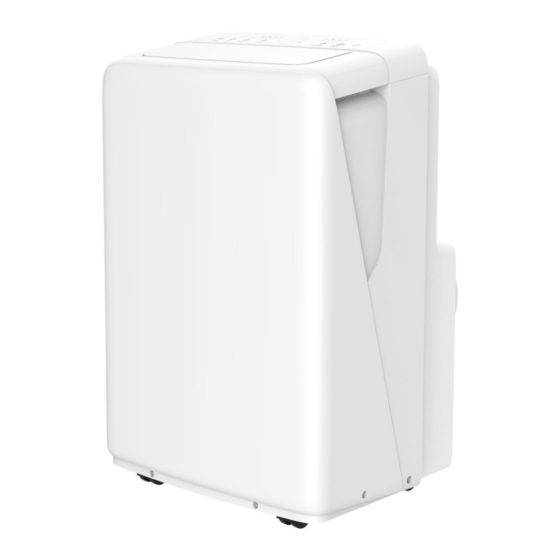
Page 12: Description
FRANÇAIS DESCRIPTION 1. Volets de sortie d’air froid 2. Panneau de commande électronique 3. Poignée de transport 4. Connecteur pour l’adaptateur 19c 5. Corps de l’appareil 6. Sortie de vidange du déshumidificateur 7. Sortie d’évacuation de l’air 8. Fixation pour la fiche d’alimentation 9. -
Page 13: Mise En Service Et Utilisation
FRANÇAIS MISE EN SERVICE ET UTILISATION Installation Retirez les films de protection et tous les éléments de calage qui se trouvent dans le carton d’emballage. Sortez les différents éléments de l’appareil. ATTENTION : Pour l’installation ou l’entretien, l’appareil doit être débranché de la prise de courant. - Page 14 FRANÇAIS Choisissez un lieu d’installation approprié, proche d’une prise électrique. Toujours installer le climatiseur à une distance minimum de 50cm des murs ou tous autres objets. Fixez le manchon de raccordement de la gaine sur l’orifice de l’adaptateur fenêtre.
- Page 15 FRANÇAIS Installation sans usage du kit fenêtre Pour une installation murale de votre appareil, veuillez suivre le schéma d’installation ci-dessous. Attention, l’installation murale nécessite un connecteur spécifique non fourni. Veuillez contacter le fabricant ou son service après-vente pour acheter ce connecteur. Mauvaise versus bonne mise en place de la gaine d’évacuation de l’air :...
-
Page 16: Utiliser Votre Appareil
FRANÇAIS Utiliser votre appareil ▪ Placez votre appareil sur une surface plane, sèche et stable, et à une distance de 50 cm des murs et de tout objet. ▪ Branchez votre appareil à une prise murale. 1. Panneau de commande électronique et télécommande Note : le panneau de commande et la télécommande partagent des touches communes, et ont donc les mêmes numéros de description. - Page 17 FRANÇAIS Panneau Télécommande Description Appuyez une fois sur le bouton Marche / Arrêt pour mettre en marche l’appareil. Après 250h d’utilisation, le voyant lumineux de cette fonction s’illumine pour indiquer que les filtres doivent être nettoyés. Appuyez une fois sur ce bouton après nettoyage des filtres pour réinitialiser le cycle de 250h.
- Page 18 FRANÇAIS Mode nuit : programme automatique permettant d’économiser la consommation énergétique avec une ventilation de l’air basse en mode climatisation. Il fonctionnera pendant 8h puis l’appareil revient au réglage initial. Il peut être annulé à tout moment en réappuyant sur le bouton. Note : ce mode ne peut être mis en route pour la fonction ventilation ou déshumidification.
- Page 19 FRANÇAIS Lorsque l’appareil est en marche, appuyez sur ce bouton pour activer la fonction « Health », qui relâchera les ions négatifs. Réappuyez pour sortir de cette fonction. Lorsque l’appareil est en arrêt, appuyez sur ce bouton pour activer la fonction «...
- Page 20 FRANÇAIS ▪ Pour arrêter l’appareil : appuyez sur le bouton marche / arrêt. ▪ Débranchez votre appareil. ▪ En cas de longue période d’inutilisation, pensez à vidanger l’appareil. L’appareil dispose d’un dispositif de protection du compresseur. Si l’appareil se déconnecte tout seul et que vous ne parvenez pas à...
-
Page 21: Nettoyage Et Entretien
FRANÇAIS NETTOYAGE ET ENTRETIEN ▪ L’appareil a besoin d’un nettoyage régulier pour éviter les mauvaises odeurs, nous vous recommandons d’effectuer cette opération tous les 15 jours lors d’une utilisation quotidienne. ▪ Débranchez l’appareil de sa prise. ▪ Ne passez jamais l’appareil sous l’eau du robinet. ▪... - Page 22 FRANÇAIS Nettoyage des filtres de l’appareil : Pour éviter l’encrassement des éléments internes de l’appareil, il est recommandé de nettoyer toute les 2 semaines les filtres à air se situant à l’arrière de l’appareil. Cet appareil dispose de 2 filtres, A et B ✓...
-
Page 23: Anomalies De Fonctionnement
FRANÇAIS ANOMALIES DE FONCTIONNEMENT Problèmes Causes Solutions 1 : Prise débranchée 1 : Branchez l’appareil 2 : Absence de courant 2 : Vérifiez le disjoncteur 3 : Temporisation de 3 min. en cours 3 : Attendre 3 min. L’appareil ne fonctionne 4 : Température sélectionnée proche 4 : Programmez une température de la température ambiante... -
Page 24: Information Technique
FRANÇAIS INFORMATION TECHNIQUE Modèle : TECHCLIM9 Alimentation 220-240V ~ 50Hz Classe de protection Classe I électrique Classe climatique Puissance frigorifique 2.6kW nominale (P rated Puissance frigorifique 0.87kW absorbée nominale (P Courant d'entrée maximum 4.6A Puissance absorbée max. 0.97kW Coefficient d'efficacité... -
Page 25: Instructions De Reparation
FRANÇAIS INSTRUCTIONS DE REPARATION Veuillez suivre les consignes de sécurité lors de la manipulation et réparation de l’appareil contenant du fluide frigorigène inflammable R290. Vérifications de la zone Avant de commencer les travaux sur les systèmes contenant des fluides frigorigènes inflammables, des vérifications de sécurité... - Page 26 FRANÇAIS – si un circuit frigorifique indirect est utilisé, le circuit secondaire doit être vérifié quant à la présence de fluide frigorigène; – le marquage de l'équipement continue à être visible et lisible. Les marques et les symboles qui sont illisibles doivent être corrigés;...
- Page 27 FRANÇAIS Des sources potentielles d'inflammation ne doivent en aucune circonstance être utilisées pour la recherche ou la détection de fuites de fluide frigorigène. Une lampe haloïde (ou tout autre détecteur utilisant une flamme nue) ne doit pas être utilisée. Retrait et évacuation Lors d'une intervention sur le circuit de fluide frigorigène pour faire des réparations –...
- Page 28 FRANÇAIS h) Ne pas laisser déborder les bouteilles. (Pas plus de 80 % de charge de liquide en volume). i) Ne pas dépasser la pression de service maximale de la bouteille, même temporairement. j) Lorsque les bouteilles ont été remplies correctement et que le processus est terminé, s'assurer que les bouteilles et l'équipement sont retirés rapidement du site et que toutes les vannes d'isolation de l'équipement sont fermées.
- Page 29 FRANÇAIS Vestel France, 17 rue de la Couture – 94563 Rungis CEDEX Cette notice est aussi disponible sur le site suivant: http://pieces-detachees.sogedis.fr/...
- Page 30 AIR CON 9000Btu TECHCLIM9 SAFETY WARNINGS...
- Page 31 ENGLISH • READ CAREFULLY THE INSTRUCTIONS BEFORE INSTALLING AND USING THIS APPLIANCE. IN THE CASE YOU RESELL THIS APPLIANCE, PLEASE MAKE SURE TO PROVIDE THIS INSTRUCTION MANUAL TO YOUR BUYER. • WARNING: BEFORE USING YOUR APPLIANCE, THE UNIT HAS TO BE POSITIONED UPRIGHT FOR AT LEAST 2 HOURS TO STABILIZE THE REFRIGERANT GAS.
- Page 32 ENGLISH AND MAINTENANCE SHALL NOT BE MADE BY CHILDREN WITHOUT SUPERVISION. • KEEP AWAY THIS APPLIANCE AND ITS ELECTRIC PLUG FROM CHILDREN UNDER 8 YEARS OLD. • THE APPLIANCE MUST NOT BE USED IF IT HAS BEEN DROPPED, IF IT HAS ANY VISIBLE DAMAGE, IF IT LEAKS OR IF IT FUNCTIONS ABNORMALLY IN ANY WAY.
- Page 33 WARMING POTENTIAL OF THOSE GASES FOR EACH OF OUR AIR CONDITIONNER. BRAND MODEL UNIT TYPE CO2 BY WEIGHT UNIT Telefunken TECHCLIM9 R290 200 gr 0.00066 Telefunken TECHCLIM12 R290 210 gr 0.00063 • R290 REFRIGERANT GAS COMPLIES WITH EUROPEAN ENVIRONMENTAL DIRECTIVES. NEVER PERFORATE ANY PART OF THE REFRIGERANT CIRCUIT ON THE APPLIANCE.
- Page 34 ENGLISH THEIR COMPETENCE TO HANDLE REFRIGERANTS SAFETY IN ACCORDANCE WITH AN INDUSTRY RECOGNIZED ASSESSMENT SPECIFICATIONS. • SERVICING SHALL ONLY BE PERFORMED AS RECOMMENDED BY THE EQUIPMENT MANUFACTURER. MAINTENANCE AND REPAIR REQUIRING THE ASSITANCE OF OTHER SKILLED PERSONNEL SHALL BE CARRIED OUT UNDER THE SUPERVISION OF THE PERSON COMPETENT IN THE USE OF FLAMMABLE REFRIGERANTS.
- Page 35 ENGLISH PLEASE READ OPERATING INSTRUCTIONS CAREFULLY! VEUILLEZ LIRE ATTENTIVEMENT DONNÉES TECHNIQUES, D’INSTALLATION ET DE RÉPARATION DE L’APPAREIL ! PLEASE READ TECHNICAL MANUAL, INSTALLATION AND SERVICING CAREFULLY! • WARNING: TO AVOID OVERHEATING, DO NOT COVER THE APPLIANCE. • DO NOT OBSTRUCT ANY VENTILATION OPENINGS. KEEP ALL THE VENTILATION CLEAR OF OBSTRUCTION.
- Page 36 ENGLISH BANDS IN EASY REACH OF CHILDREN AS THEY MAY CAUSE SERIOUS INJURIES. • AFTER UNPACKING YOUR APPLIANCE, MAKE SURE YOU HAVE PUT IT ON A FLAT, STABLE AND HEAT-RESISTANT SURFACE. CHECK YOU HAD LEAVE ENOUGH SPACE BETWEEN YOUR APPLIANCE AND SURROUNDING WALL TO LET THE AIR CIRCULATE AROUND THE UNIT.
- Page 37 ENGLISH • CHILDREN SHALL NOT PLAY WITH THE APPLIANCE AND CLIMB ON THE APPLIANCE. • WHEN THE UNIT IS FUNCTIONING, KEEP AN EYE ON CHILDREN AND PETS. • DO NOT EXPOSE DOMESTIC ANIMALS OR PLANTS TO PROLONGED DIRECT AIR FLOW. •...
- Page 38 ENGLISH TABLE OF CONTENTS DESCRIPTION ................1 SET-UP AND USE ................. 2 Installation ................2 Using your appliance ..............5 CLEANING AND MAINTENANCE ..........9 TROUBLESHOOTING ..............12 TECHNICAL INFORMATION ............13 SERVICING AND REPAIRING INSTRUCTION ....... 14...
-
Page 39: Description
ENGLISH DESCRIPTION 1. Room air outlet 2. LCD display 3. Handle 4. Connector for 19C 5. Body 6. Dehumidifying drain outlet 7. Exhaust air outlet 8. Plug fixing 9. Pump drain outlet 10. Bottom tank drain outlet 11. Air filter (behind the grid) 12. -
Page 40: Set-Up And Use
ENGLISH SET-UP AND USE Installation Ensure to take out all the packaging inside the box. Take out all the elements of the appliance. Place your appliance on a flat and stable surface. WARNING: Always turn off the and unplug the appliance when installing and cleaning it. - Page 41 ENGLISH Choose an appropriate location for your appliance and keep at least 50cm from any walls and objects. Fix the hose adaptor to the air outlet of the window kit.
- Page 42 ENGLISH Installing without the window kit. For wall mounting installation, follow below figure: Attention, wall installation requires a specific connector not supplied. Please contact the manufacturer or the after sales services to purchase this connector. Bad versus good setting of the exhaust pipe:...
-
Page 43: Using Your Appliance
ENGLISH Using your appliance ▪ Place your appliance on a flat, dry and stable surface with a 50 cm away from any walls and objects. ▪ Plug your unit to a socket. 1. Electronic control panel and remote control Note: The control panel and remote control share common keys, and therefore have the same description numbers. - Page 44 ENGLISH Panneau Télécommande Description Press one time on this ON/OFF button to switch on the appliance. After 250 hours of use, this light function will illuminate to indicate that the filters need to be cleaned. Press this button once after cleaning the filters to reset the 250h cycle. Note: The light stays on until you press it again.
- Page 45 ENGLISH Fan speed button. Select different speed each time you press on it, the corresponding light indicator will turn on : Slow speed Medium speed High speed HIGH Auto speed. Only for the cooling mode. Louvers auto swcing mode: * on the control panel, press the button to allow the louvers to switch automatically.
- Page 46 ENGLISH Timer setting: You can set the delay stop time and delay start time when the unit is turned on or off. When the unit is turned on, press the timer button. The indicator light switches on and flashes. Press one UP or DOWN button to set the timer time between 30 minutes and 24 hours.
-
Page 47: Cleaning And Maintenance
ENGLISH 3. Dehumidifier mode and draining In dehumidification mode, it is necessary to drain the condensate water from the unit. Remove the cap from the dehumidifier drain outlet (1), and then screw the hose to the fitting hole (3) as shown in the drawing. The drain hose can then drain the water to a drain point. - Page 48 ENGLISH Water draining operation: Your appliance is equipped with the Auto Evaporative System, it will automatically evaporates the condensation through the air outlet hose. There is no need to empty the bottom drainage tank except for the 3 below conditions: •...
- Page 49 ENGLISH Filter cleaning: To prevent clogging of the internal components of the appliance, it is recommended to clean every 2 weeks the air filter located at the back of the device. This appliance has 2 kind of filters, A and B. ✓...
-
Page 50: Troubleshooting
ENGLISH TROUBLESHOOTING Issues Possible causes Solutions 1: the unit is unplugged 1: Plug the unit 2: No electricity 2: Check for power 3: 3 min. timing in progress 3: Wait for 3 min. 4: The selected temperature is closed The unit is not working 4: Select a bigger temperature to the room temperature 5: The room temperature is below... -
Page 51: Technical Information
ENGLISH TECHNICAL INFORMATION Model TECHCLIM9 Power supply 220-240V ~ 50Hz Electric shock prevention Classe I Climates type Cooling capacity (P 2.6kW rated Power input (P 0.87kW MAX. input current 4.6A MAX. input power 0.97kW Rated energy efficiency ratio (EERrated) Power consumption in 0.378 W... -
Page 52: Servicing And Repairing Instruction
ENGLISH SERVICING AND REPAIRING INSTRUCTION Please follow the safety instructions when handling and repairing the device containing R290 flammable refrigerant. Checks to the area Prior to beginning work on systems containing flammable refrigerants, safety checks are necessary to ensure that the risk of ignition is minimised. - Page 53 ENGLISH Checks to electrical devices Repair and maintenance to electrical components shall include initial safety checks and component inspection procedures. If a fault exists that could compromise safety, then no electrical supply shall be connected to the circuit until it is satisfactorily dealt with. If the fault cannot be corrected immediately but it is necessary to continue operation, an adequate temporary solution shall be used.
- Page 54 ENGLISH system. When the final oxygen-free nitrogen charge is used, the system shall be vented down to atmospheric pressure to enable work to take place. This operation is absolutely vital if brazing operations on the pipe-work are to take place. Ensure that the outlet for the vacuum pump is not close to any potential ignition sources and that ventilation is available.
- Page 55 ENGLISH it is in satisfactory working order, has been properly maintained and that any associated electrical components are sealed to prevent ignition in the event of a refrigerant release. Consult manufacturer if in doubt. The recovered refrigerant shall be returned to the refrigerant supplier in the correct recovery cylinder, and the relevant waste transfer note arranged.