Frico WattsTemp 860 Guide D'utilisation
Table des Matières
Les langues disponibles
Les langues disponibles
Chapitres
Table des Matières

Manuels Connexes pour Frico WattsTemp 860


Sommaire des Matières pour Frico WattsTemp 860
- Page 27 Manuel d‟installation et d„utilisation IMPORTANT ! Avant l’installation, le monteur doit lire, comprendre et observer les présentes instructions de montage et de service. La responsabilité du fabricant conformément aux dispositions légales s'applique uniquement dans le cas du respect des conditions précitées. - Veuillez observer l'ensemble des instructions de montage et de service lors de l'utilisation du programmateur de zones.
- Page 28 Sommaire Description ............29 Écran..............30 Clavier ............... 31 Première mise en Service ........ 32 Alimentation ............32 Réglage de la date et de l‟heure ...... 32 Mise en marche ..........33 Mode de fonctionnement ........34 Mode manuel – Confort : ......... 34 Mode manuel –...
-
Page 29: Description
Description Thermostat électronique programmable spécialement conçu pour la régulation des Planchers Rayonnants Electriques (PRE) et Plafonds Rayonnants (PRP et PRM). - Grand écran retro-éclairé - Installation simplifiée - Création de programme maitrisée grâce à ses icônes d‟aide à la création. - Programme hebdomadaire par pas de 30min. -
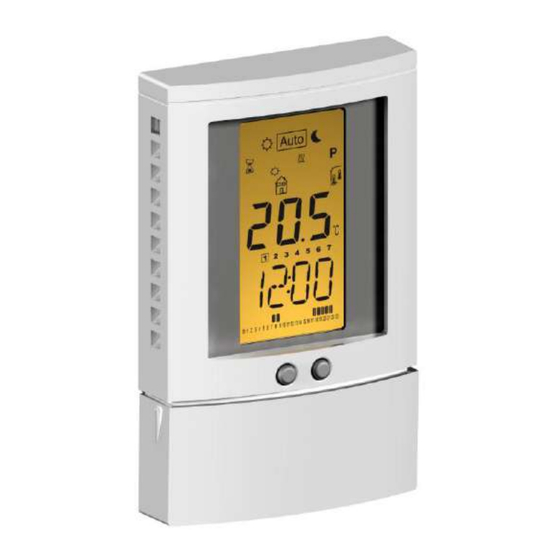
Page 30: Écran
Écran Mode de fonctionnement (le mode actif est encadré). Indicateur de limitation de la dalle (Sol) Indicateur de chauffe Type de sonde utilisée pour la régulation et indicateur de la température affichée Régulation => Sonde interne ou ambiance déportée externe. Régulation =>... -
Page 31: Clavier
Clavier ON/OFF Chauffage /Edit Touche Moins (-) Touche Plus (+) Touche Retour ( Touche de navigation gauche (►) Touche de Validation (OK) Touche de navigation droite (►) Touche de sélection ( ) /Edit... -
Page 32: Première Mise En Service
Première mise en Service Alimentation À la première mise sous tension de votre thermostat, vous serez invitez à faire quelque réglages comme, (Heures…) Votre thermostat devrait maintenant vous proposer les ajustements suivants. Réglage de la date et de l‟heure Ouvrez la trappe afin d‟accéder au clavier. A chaque fois qu‟une valeur clignote à... -
Page 33: Mise En Marche
Mise en marche Votre thermostat est maintenant prêt à fonctionner. Le mode de fonctionnement par défaut est le mode avec le programme usine “P1”, voir le Automatique détail du programme “P1” ci-dessous. De Lundi à Vendredi 20°C 18°C 07:00 09:00 17:00 23:00 Samedi &... -
Page 34: Mode De Fonctionnement
Mode de fonctionnement Comment changer le mode de fonctionnement de votre thermostat? Ouvrir le capot de protection pour accéder aux touches de navigation (◄) ou (►). - Vous pouvez maintenant appuyer sur une des touches afin de faire apparaître la barre de menu des modes de fonctionnement. -
Page 35: Mode Manuel - Eco
Mode manuel – Eco : Le mode manuel ECO vous permet de la même façon que le mode Confort de régler un point de consigne qui sera suivi tout au long de la journée. Ce deuxième mode Manuel vous permet de basculer très rapidement d‟une température de confort à... -
Page 36: Mode Programme
Pour stopper une dérogation avant le prochain palier il vous suffit d‟appuyer sur la touche ( Le pictogramme dérogation clignotant vous signalera la mise en route de la fonction “ITCS”. (Voir menu paramètre pour plus d‟information sur la fonction ITCS) Mode programme : Lorsque vous entrez dans le mode programme, la première opération à... - Page 37 7H – 19H (Bureau) 8H – 19H & Samedi (Magasin) Weekend (Maison secondaire) Changer le jour du programme par les touches de navigation (◄) ou (►). Valider le choix en appuyant sur la touche (OK) et retourner à l‟écran principal (dans le régime AUTO) (Reportez vous à...
- Page 38 Description des pictogrammes utilisés pour la personnalisation d‟un programme: Première étape de la journée, l‟heure de réveil devra être ajustée. (Température de confort Etape de journée, l‟heure de départ devra être ajustée. (Température ECO Etape de journée, l‟heure de retour devra être ajustée. (Température de confort Dernière étape de la journée, l‟heure du coucher devra être ajustée.
- Page 39 Régler l‟heure du premier palier du programme avec les touches (-) ou (+), puis valider en appuyant sur (OK) et passer au palier suivant. Exemple : L‟heure de votre réveil est „6:00” heures.
- Page 40 Vous devez maintenant choisir le type du prochain palier. Changer le symbole de programmation, deux choix vous seront proposés : choix, symbole de fin de journée, l‟heure du coucher. ème choix, symbole de départ, un palier sera ajouté dans la journée. Régler l‟heure du palier avec les touches (-) ou (+).
- Page 41 Vous serez de nouveau invité à choisir le type du prochain palier, vous aurez de la même manière deux choix possibles : choix, symbole de fin de journée. ème choix, symbole de départ, un autre palier sera rajouté dans la journée. Valider le choix par la touche (OK), et réglez l‟heure de ce palier avec les touches (-) ou (+) Régler l‟heure du palier suivant avec les touches (-) ou (+).
- Page 42 Valider le choix par la touche (OK) pour terminer les modifications dans le premier jour. Maintenant vous pouvez copier le programme que vous venez de créer, dans les jours suivants. Passer de “Yes” (Oui) à “no” (non) à l‟aide des touches (-) ou (+) et valider votre choix (OK).
-
Page 43: Mode Vacances
Appuyez sur (OK) pour sauvegarder votre programme et revenir au menu principal mode AUTO. Appuyez plusieurs fois sur la touche échappe ( ) pour stopper la programmation en cours et revenir au menu principal. Mode Vacances : Le mode vacances vous permettra de mettre votre installation de chauffage en mode Hors Gel pendant le nombre de jours que vous souhaitez. -
Page 44: Mode Timer
la durée sur la valeur “no” à l‟aide de la touche (-). Vous pourrez alors revenir à un mode de fonctionnement standard à l‟aide des touches de navigation (◄) ou (►). Mode Timer : Le mode Timer vous permettra de régler une température pour une durée souhaitée. -
Page 45: Fonction Visualisation
Fonction Visualisation: A l‟aide de cette fonction vous pourrez visualiser très rapidement la consigne courante ainsi que les températures des différentes sondes connectées sur votre thermostat. Pour ce, depuis l‟écran principal, appuyez plusieurs fois sur la touche ( Vous visualiserez dans l‟ordre à chaque appui: 1/ La consigne courante suivie par le thermostat. -
Page 46: Menu Paramètres D"Installation
Menu paramètres d‟installation Votre thermostat a un menu de paramètres. Pour entrer dans ce menu, maintenez la touche édition ( ) enfoncée pendant 5 secondes. Le premier écran du menu s‟affiche - Vous pouvez maintenant sélectionner un paramètre à ajuster à l‟aide des touches (◄) ou (►). Une fois sur le paramètre, appuyez sur (OK) pour accéder au réglage (valeur clignotante), modifiez la valeur à... - Page 47 __:__ Choix des heures 24H (24:00) 12H (12:00 AM (matin) /PM (après-midi) dst: Changement d‟heure EtéHiver automatique YES L‟heure changera automatiquement. L‟heure devra être changée manuellement. * Pensez à régler la date correctement. Airc: Calibrage de la sonde interne L‟étalonnage doit être fait après 1 journée de fonctionnement à...
- Page 48 Utilisez les touches (-) ou (+) pour changer la valeur et validez votre réglage avec (Ok). ITCS: Système intelligent de commande de la température met votre appareil en marche d„avance (max. 2 heures) pour garantir la température demandée à l‟heure qui est programmée selon votre programme hebdomadaire.
-
Page 49: Caractéristiques Techniques
Caractéristiques techniques Précision de mesure 0,1°C Précision de l‟horloge (dérive) Moins de 15 minutes /an Environnent. (Températures) Fonctionnement: 0°C - 40°C Transport et stockage : de -10°C à +50°C Plage de réglage consignes Confort, Eco, de 5°C à 37°C par pas de 0,5°C Timer de 5°C à... -
Page 50: Problèmes & Solutions
Problèmes & Solutions Mon WattsTemp ne s‟allume pas - Vérifier l‟interrupteur On/OFF Alimentation - Vérifier l‟alimentation L‟afficheur de mon WattsTemp afiiche le text suivant „Err” clignote à l„écran et le message „Err” Le symbole clignotent. Errur sur la sonde interne. - Contactez votre installateur ou revendeur. -
Page 51: Divers
Mon WattsTemp semble fonctionner correctement, mais la sortie ne s‟active pas même si la température dans le local est inférieure à la consigne. Les symboles & clignotent. La fonction de surveillance de dalle c‟est Symbole du activée. La température de dalle a dépassée capteur la limite supérieure. - Page 52 Annexes 0 1 2 3 4 5 6 7 8 9 10 111213141516 17 1819 20212223 0 1 2 3 4 5 6 7 8 9 10 111213141516 17 1819 20212223 0 1 2 3 4 5 6 7 8 9 10 111213141516 17 1819 20212223 0 1 2 3 4 5 6 7 8 9 10 111213141516 17 1819 20212223 0 1 2 3 4 5 6 7 8 9 10 111213141516 17 1819 20212223 0 1 2 3 4 5 6 7 8 9 10 111213141516 17 1819 20212223...
- Page 53 0 1 2 3 4 5 6 7 8 9 10 111213141516 17 1819 20212223 0 1 2 3 4 5 6 7 8 9 10 111213141516 17 1819 20212223 0 1 2 3 4 5 6 7 8 9 10 111213141516 17 1819 20212223 0 1 2 3 4 5 6 7 8 9 10 111213141516 17 1819 20212223 0 1 2 3 4 5 6 7 8 9 10 111213141516 17 1819 20212223 0 1 2 3 4 5 6 7 8 9 10 111213141516 17 1819 20212223...
- Page 54 0 1 2 3 4 5 6 7 8 9 10 111213141516 17 1819 20212223 0 1 2 3 4 5 6 7 8 9 10 111213141516 17 1819 20212223 0 1 2 3 4 5 6 7 8 9 10 111213141516 17 1819 20212223 0 1 2 3 4 5 6 7 8 9 10 111213141516 17 1819 20212223 0 1 2 3 4 5 6 7 8 9 10 111213141516 17 1819 20212223 0 1 2 3 4 5 6 7 8 9 10 111213141516 17 1819 20212223...
- Page 55 0 1 2 3 4 5 6 7 8 9 10 111213141516 17 1819 20212223 0 1 2 3 4 5 6 7 8 9 10 111213141516 17 1819 20212223 0 1 2 3 4 5 6 7 8 9 10 111213141516 17 1819 20212223 0 1 2 3 4 5 6 7 8 9 10 111213141516 17 1819 20212223 0 1 2 3 4 5 6 7 8 9 10 111213141516 17 1819 20212223 0 1 2 3 4 5 6 7 8 9 10 111213141516 17 1819 20212223...
- Page 56 0 1 2 3 4 5 6 7 8 9 10 111213141516 17 1819 20212223 0 1 2 3 4 5 6 7 8 9 10 111213141516 17 1819 20212223 0 1 2 3 4 5 6 7 8 9 10 111213141516 17 1819 20212223 0 1 2 3 4 5 6 7 8 9 10 111213141516 17 1819 20212223 0 1 2 3 4 5 6 7 8 9 10 111213141516 17 1819 20212223 0 1 2 3 4 5 6 7 8 9 10 111213141516 17 1819 20212223...
- Page 58 PPLIMP09551Ab rev: 23/12/2011...