Table des Matières
Publicité
Les langues disponibles
Les langues disponibles
Liens rapides
ambiente sano
KAYAMI RM 2000-D
•
Español ...............................................
•
English ................................................
•
Français ..............................................
•
Portuguese ..........................................
•
Italiano. ...............................................
•
Nerderlands ..................................
3
13
23
33
43
53
Publicité
Table des Matières

Manuels Connexes pour kayami RM 2000-D

Sommaire des Matières pour kayami RM 2000-D
- Page 1 KAYAMI RM 2000-D • Español ..........• English ..........• Français ..........• Portuguese .......... • Italiano..........• Nerderlands …………………………….
-
Page 3: Antes Del Primer Uso
RADIADOR MICA REF: KAYAMI RM 2000-D MANUAL DE INSTRUCCIONES Gracias por haber elegido un Aparato Eléctrico Portátil Kayami. Lea aten- tamente las siguientes instrucciones antes de poner en funcionamiento el aparato y guárdelas para futuras consultas. ANTES DEL PRIMER USO •... -
Page 4: Informacion De Seguridad Importante
INFORMACION DE SEGURIDAD IMPORTANTE Cuando utilice cualquier aparato eléctrico debe seguir siempre estas pre- cauciones básicas de seguridad. ADVERTENCIA : NO CUBRA el aparato para evitar el sobrecalentamiento. Para reducir el riesgo de incendio, cortocircuito o lesiones personales o materiales: •... - Page 5 • Use este aparato sólo como se describe en este manual. • Cualquier otro uso no recomendado por el fabricante puede causar un incendio, descarga eléctrica o lesiones. Especificaciones del radiador de Mica Modelo RM 2000-D Consumo: 1200W / 2000W Voltaje: 220-240V ~, 50Hz...
- Page 6 INSTRUCCIONES DE MONTAJE Este radiador se suministra con soportes de instalación fija para su montaje en pared y con soportes y ruedas para la portabilidad. Montaje portátil 1. Sitúe con cuidado el radiador boca abajo y coloque los soportes sobre el orificio del tornillo en la base de cada extremo del calentador.
-
Page 7: Distancias Mínimas
La distancia entre dos tornillos es de 500 mm Colocación del radiador Portátil: El aparato debe ser colocado a una distancia mínima de 1 metro de cual- quier pared u otro objeto. Coloque el aparato de forma que optimice el flujo de aire de la habitación. - Page 8 INSTRUCCIONES DE FUNCIONAMIENTO NOTA: Cuando se enciende por primera vez el radiador puede emitir un ligero olor durante unos minutos. Esto es inofensivo y ocurre con la mayoría de los electrodo- mésticos, ya que los ligeros residuos de polvo o lubricantes pueden haberse acu- mulado durante la fabricación.
-
Page 9: Función Del Temporizador
• Para seleccionar la opción de Alta Potencia pulse el botón de Ajuste Subir (+). Ambas luces azules se iluminarán para indicar "Alta potencia". • La Baja Potencia es 1200W y la Alta Potencia 2000W. Función del termostato • Pulse el botón de selección de temperatura ( El ajuste actual del termostato parpadeará... -
Page 10: Características De Seguridad
CARACTERÍSTICAS DE SEGURIDAD Protección contra sobrecalentamiento • Este radiador está protegido con un dispositivo de protección contra sobrecalen- tamiento que lo desconecta automáticamente si se sobrecalienta. • El sobrecalentamiento puede ser causado por la obstrucción de las entradas de aire en la parte posterior del radiador o en la parrilla de la parte delantera. •... -
Page 11: Condiciones De Garantía
GARANTÍA PARA APARATOS ELÉCTRICOS PORTÁTILES NOTA MUY IMPORTANTE PARA LA VALIDEZ DE ESTA GARANTÍA: EN EL MOMENTO DE LA INTERVENCIÓN TÉCNICA ES ABSOLUTAMENTE IMPRES- CINDIBLE PRESENTAR AL PERSONAL AUTORIZADO LA FACTURA O TI- CKET DE COMPRA DEL APARATO, ASÍ COMO ESTA HOJA CON LOS DATOS QUE FIGURAN EN LA PARTE INFERIOR DEBIDAMENTE CUMPLIMENTADOS. - Page 12 SUGERENCIAS MUY IMPORTANTES − Antes de poner el aparato en marcha, léase atentamente las instrucciones de uso. Utilice el aparato únicamente para el uso indicado y en espacios adecuados. RELLENAR OBLIGATORIAMENTE PARA DISFRUTAR DE LAS CONDICIONES DE GARANTÍA Tipo de Aparato Modelo Nº...
-
Page 13: Before First Use
MICA PANEL HEATER Model No. KAYAMI RM 2000-D INSTRUCTION MANUAL Congratulations on your purchase of a Mica panel heater. Please read the following instructions carefully before use and retain for future reference . BEFORE FIRST USE • Read and follow all the instructions below even if you feel you are familiar with the appliance. - Page 14 WARNING: DO NOT COVER in order to avoid overheating. To reduce the risk of fire, electrical shock or injury to persons or property: • To avoid overheating, keep airflow grilles clear of dust and hair build up - espe- cially if you have indoor pets. •...
- Page 15 • This appliance is not intended for outdoor use. • Always operate upright, on a flat surface only. • CAUTION: This product is NOT suitable to be used on long pile carpets or rugs. • Unroll the cord before operating. Operating with a coiled cord may cause over- heating and fire risk.
- Page 16 ASSEMBLY INSTRUCTIONS This heater is supplied with both wall mounting brackets for fixed installation and castors for portability. Portable Assembly 1. Position the heater carefully upside down and position the base supports over the screw hole in the base of each end of the heater. 2.
-
Page 17: Minimum Clearances
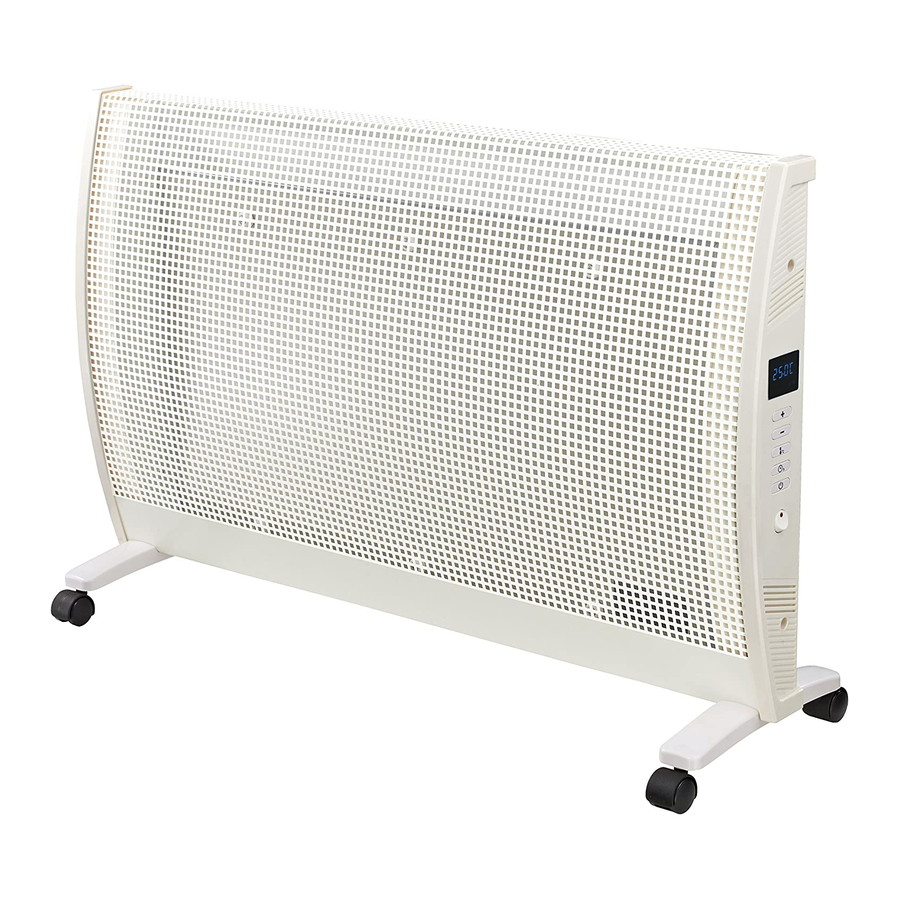
he distance between two screws is 500mm Positioning of the Heater Portable: The appliance should only be operated at a minimum distance of 1 me- tre from any wall or other object. Position the heater in order to optimise the air flow of the room. Wall-mounted: Refer to the drawing below for minimum clearances. - Page 18 OPERATING INSTRUCTIONS NOTE: When switched on for the first time a slight odor may be for a few minutes. This is and occurs with most appliances as slight traces of dust or may have collected during manufacture Power Light Low Power High Power Setting Adjustment (up) Setting Adjustment (down)
-
Page 19: Thermostat Function
• T o select the HIGH power option press the setting button Both blue lights will light up to indicate ‘high power’. • LOW power is 1200W and HIGH power is 2000W. Thermostat Function • Press the select button ( ), the current setting will flash then it will return to display the current room temperature. -
Page 20: Heat Protection
SAFETY FEATURES Over: Heat Protection • This heater is protected with an protection facility that switches it if it over-heats. • can be caused by to the air intakes on the back of the or the grill on the front. •... -
Page 21: Conditions Of Warranty
Acts of nature (atmospheric phenomena, ecological phenomena, etc) • The cost of sending the device and spare parts. Type of device Model Serial number Mica Panel Heater RM 2000-D Stamp of the establishment Date of purchase Linea Plus Essege, s.l.u. www.lineaplus.eu... -
Page 23: Avant La Premiere Utilisation
RADIATEUR MICA Modèle No. KAYAMI RM 2000-D MODE D’emploi Nous vous remercions de la confiance que vous avez bien voulu témoigner à notre marque. Vous venez d’acquérir un produit de qualité, qui vous don- nera entière satisfaction durant de très nombreuses années. A condition, bien sûr, de respecter les consignes d’utilisation. -
Page 24: Informations De Securite Importantes
INFORMATIONS DE SECURITE IMPORTANTES Lorsque vous utilisez tout appareil électrique, les précautions de base suivantes doivent toujours être respectées. ATTENTION: NE JAMAIS COUVRIR afin d’éviter une surchauffe. Pour réduire le risque d’incendie, choque électrique ou préjudice à des personnes ou des biens: •... -
Page 25: Spécifications
• Cet appareil n’est pas recommandé pour une utilisation extérieure. • Placez l’appareil sur une surface plane et à même le sol ou sur chariot disponible chez votre revendeur. • Déroulez le cordon d’alimentation avant l’utilisation. • Il n’est pas recommandé d’utilisé une allonge pour ce type d’appareil. •... -
Page 26: Assemblage
ASSEMBLAGE Cet appareil de chauffage est fourni avec des accessoires pour une installation fixe ou mobile avec des roulettes. Avec roulettes 1. Placer l'appareil de chauffage soigneusement à l'envers et placer les supports de base sur le trou de vis dans la base de chaque extrémité de l'appareil de chauf- fage. -
Page 27: Emplacement De L'appareil
La distance entre les 2 vis est de 500mm Emplacement de l’appareil Mobile: L'appareil ne doit être utilisé qu'à une distance minimale de 1 mètre de n'importe quel mur ou autre objet. Placez le radiateur afin d'optimiser le flux d'air de la pièce. Fixe: reportez-vous au dessin ci-dessous pour les distances de sécurité. -
Page 28: Sélection De La Puissance
INSTRUCTIONS D’UTILISATION NOTE: Lors de la première utilisation, une légère odeur peut être émise pendant quelques minutes. Ceci est normal. Cela arrive avec la plupart des appareils lors du dégagement de la poussière ou lubrifiants collectées lors de la fabrication. Témoin d’allumage Témoin basse puissance Témoin haute puissance... -
Page 29: Fonction Thermostat
• Pour sélectionner la puissance maximum, appuyez sur le bouton de réglage de température ( + ). Les deux témoins lumineux bleus s’allumeront pour indiquer la pleine puissance. • La puissance basse est de 1200W e t l a h a u t e e s t d e 2000W. -
Page 30: Carateristiques De Securite
CARATERISTIQUES DE SECURITE: Protection contre la chaleur Cet appareil s’éteint automatiquement en cas de surchauffe. • • S’il y a une coupure automatique de surchauffe, veuillez débrancher votre ap- pareil de la prise de courant et permettez lui de se refroidir pendant 30 mi- nutes. -
Page 31: Conditions De Garantie
GARANTIE NOTE TRES IMPORTANTE POUR LA VALIDITE DE CETTE GARANTIE: POUR TOUT INTERVENTION TECHNIQUE IL EST ABSOLUMENT NECESSAIRE DE PRESENTER SA FACTURE OU SON TICKET DE CAISSE AU TECHNICIEN AINSI QUE CETTE PAGE DU- MENT COMPLETEE AVEC LES DONNEES CI-DESSOUS. Cet appareil est garanti 24 mois à... -
Page 33: Antes Do Primeiro Uso
MANUAL DE INSTRUÇÕES KAYAMI RM 2000-D Obrigado por ter escolhido um aparelho portátil KAYAMI. Por favor, leia as seguintes instruções antes de colocar o aparelho em funcionamento e guarde-as para referência futura. ANTES DO PRIMEIRO USO • Leia e siga todas as instruções de funcionamento, mesmo se sentir que já está... - Page 34 ATENÇÃO: Não cubra o aparelho para evitar o sobreaquecimento. Para reduzir o risco de incêndio, choque eléctrico ou danos pessoais ou materiais: • Para evitar o sobreaquecimento, mantenha as grelhas de ventilação livres de poeira e acúmulo de cabelo, especialmente se tem animais de estimação. •...
- Page 35 • Utilize este aparelho apenas como descrito neste manual. • Qualquer outro uso não recomendado pelo fabricante pode causar incêndio, choque eléctrico ou lesão Especificações do radiador de Mica Modelo RM 2000-D Consumo: 1200W / 2000W Tensão: 220-240V ~, 50Hz...
-
Page 36: Instruções De Montagem
INSTRUÇÕES DE MONTAGEM Este radiador é fornecido com suportes de INSTALAÇÃO para a montagem na parede (fixa) e suportes e rodas para portabilidade. Montagem portátil Coloque o aparelho cuidadosamente de cabeça para baixo e coloque os suportes sobre o orifício do parafuso na base de cada uma das extremidades do aparelho. -
Page 37: Distâncias Mínimas
A distância entre dois parafusos é de 500 mm Colocação do radiador Portátil: O aparelho deve ser colocado a uma distância de 1 metro a partir de qualquer parede ou outro objecto. Colocar o dispositivo de modo a optimizar o fluxo de ar na divisão. -
Page 38: Instruções De Funcionamento
INSTRUÇÕES DE FUNCIONAMENTO NOTA: Quando se liga o aquecedor pela primeira vez, ele pode emitir um ligeiro odor durante alguns minutos. É inofensivo e ocorre na maioria dos aparelhos, uma vez que os resíduos de pó ou lubrificantes podem ter-se acumulado durante a fabricação. -
Page 39: Função De Memória
• Para seleccionar a opção Alta Potência, pressione o botão de ajuste “Alta Potência” (+).Ambas as luzes azuis acendem para indicar “Alta Potência”. • A baixa potência é 1200W e a alta potência é de 2000W. Função termóstato • Pressione o botão de selecção da temperatura ( A definição actual do termostato pisca e depois volta para mostrar a temperatura ambiente actual. -
Page 40: Características De Segurança
CARACTERÍSTICAS DE SEGURANÇA Protecção contra sobreaquecimento • Este radiador é protegido com um dispositivo de protecção de sobreaquecimento que o desliga automaticamente em caso de sobreaquecimento. • O sobreaquecimento pode ser causado por obstrução das saídas de ar na parte de trás da grade do radiador ou na frente. -
Page 41: Condições De Garantia
GARANTIA para aparelhos elétricos portáteis NOTA MUITO IMPORTANTE PARA A VALIDADE DESTA GARANTIA: Na altura da intervenção técnica é imprescindível apresentar a Factura ao pessoal autorizado, bem como esta folha com os dados que estão na parte inferior, devidamente preenchidos. Line Plus Essege, S.L.U. - Page 42 DEVE SER PREENCHIDO COMPLETAMENTE PARA ACESSO À GARANTIA Tipo de Aparelho Modelo Nº Serie Carimbo do estabelecimento Data de compra Linea Plus Essege, s.l.u. www.lineaplus.eu Tfno: 902320111 Esta marca indica que este produto não deve ser colocado no lixo doméstico comum, em toda a UE.
-
Page 43: Al Primo Utilizzo
Pannello riscaldante in MICA Modello No. KAYAMI RM 2000-D MANUALE DI ISTRUZIONI Congratulazioni per aver scelto un apparecchio portatile kent. Leggere at- tentamente prima dell’ uso le seguenti istruzioni e conservarle per future consultazioni AL PRIMO UTILIZZO • Leggere le seguenti istruzioni per un utilizzo sicuro dell’ apparecchio •... - Page 44 ATTENZIONE: non coprire l’ apparecchio per evitare il surriscaldamento Per evitare il rischio di incendio, scossa elettrica o danni a persone e proprietà: • Per evitare il surriscaldamento, tenere le griglie uscita aria libere e pulite Usare solo su prese elettriche dello specifico voltaggio •...
-
Page 45: Specifiche Tecniche
• Usare l’ apparecchio come da spiegazioni sul manuale • Ogni altro uso improprio non è raccomandato dal costruttore e può causare in- cendio o danni alle persone SPECIFICHE TECNICHE Modello No.: KAYAMI RM 200-D Heat Settings: 1200W / 2000W Rating: 220-240V~, 50Hz... - Page 46 ISTRUZIONI ASSEMBLAGGIO Questo apparecchio è fornito con staffe da montaggio muri se ancorato o staffe con ruote se portatile Assemblaggio apparecchio portatile 1. Posizionare l’ apparecchio attentamente in posizione verticale e collocare alla base tramite le viti I supporti ai lati estremi dell’ apparecchio 2.
- Page 47 la distanza tra le viti è 500mm Posizione della stufa Utilizzo Portatile: l’ apparecchio dovrebbe essere utilizzato alla distanza minima di sicurezza di 1 metro. Posizionare la stufa per otimizzare la resa di calore nella stanza Montaggio a muro: controllare le quote delle distanze minime di sicurezza poste da disegno Distanza minima 100 mm...
- Page 48 OPERATING INSTRUCTIONS NOTA: quando per la prima volta si accende l’ apparecchio potrebbe emanare un leggero odore, dovuto al fa o che l’ apparecchio risulta essere nuovo. Spia di alimentazione Bassa potenza Alta potenza Impostazioni (su) Impostazioni (giu) Impostazioni temperatura Impostazioni timer Standby On / offPower...
-
Page 49: Funzione Termostato
• Per selezionare Potenza massima premere il tasto impostazioni (+), entrambi le luci blu si accenderanno per indicare la massima potenza • Potenza bassa è 1200w e alta Potenza è 2000 w Funzione termostato • Premere il tasto di selezione temperature ( ), si illuminerà... -
Page 50: Cura E Pulizia
SICUREZZA: Protezione da surriscaldamento • Questa stufa è provvista di una protezione da surriscaldamento. La stufa si spegnerà automaticamente se questo problema dovesse insorgere • Il surriscaldamento può essere causato se I fori griglia vengono occlusi • In questo caso disconnettere la stufa dalla presa elettrica e attendere 30 minuti che si raffreddi. -
Page 51: Condizioni Di Garanzia
GARANZIA NOTA MOLTO IMPORTANTE PER LA VALIDITA DELLA GARANZIA: AL MOMENTO DELL'INTERVENTO TECNICO E ESSENZIALE PRESENTARE LA RICEVUTA FISCALE O LA FATTURA DI ACQUISTO DELL’ APPAREC- CHIO, CON L’ INFORMAZIONE RICHIESTA NELLA PARTE INFERIORE DI QUESTO FOGLIO COMPILATO CORRETTAMENTE. Il apparecchi i cui dati di identificazione siano contenuti nel presente documento, per un periodo di 24 mesi contro i difetti di materiale, e 6 mesi contro i difetti di fabbricazione e dei componenti utilizzati nel processo (materiali e manodopera), che saranno riparati o sostituiti gratuitamente in qualsiasi servizio tecnico. -
Page 53: Voor Het Eerste Gebruik
MICA VERWARMING-RADIATOR Model No. OWNERS INSTRUCTION VOOR HET EERSTE GEBRUIK • Lees en volg onderstaande handleiding, zelfs indien u vertrouwd bent met dit soort toestellen. • Verwijder de verpakking en check of het toestel intact is. Indien u twijfelt, gebruik het toestel niet en contacteer uw verkooppunt. •... - Page 54 WAARSCHUWING: BEDEK HET TOESTEL NIET om oververhitting tegen te gaan. Om het risico op brand, elektrische schokken, blessures of beschadigingen te ver- minderen: • Om oververhitting te vermijden, hou de luchtrooster vrij van stof en haarophopin- gen, zeker indien u huisdieren hebt die in huis rondlopen. •...
- Page 55 • Dit toestel is niet geschikt voor buitengebruik. • Gebruik het toestel enkel als het rechtop staat en op een vlakke ondergrond. • WAARSCHUWING: dit product is niet geschikt voor te gebruiken op tapijten. • Rol het stroomsnoer volledig af alvorens het toestel te gebruiken. Het toestel gebruiken met een opgerolde stroomkabel, kan brand of oververhitting veroorza- ken.
-
Page 56: Montage-Instructies
MONTAGEINSTRUCTIES Deze chauffage wordt geleverd met zowel onderdelen om het toestel aan de muur te hangen, als om het op het wieltjes te plaatsen. Montage op wieltjes 1. Plaats het toestel voorzicht onderste boven en plaats de basissteunen op de daarvoor voorziene gaten aan de onder kant van het toestel. - Page 57 Afstand tussen de vijzen : 500mm Positie van de verwarming Mobiel (wieltjes):Het toestel dient enkel te gebruikt te worden indien het op zijn minst 1 meter van alle muren of objecten is verwijderd. Plaats het toestel op een plaat waar de luchtstroom in de kamer wordt geoptimaliseerd Aan de muur: zie tekening onder MINIMUM AFSTAND...
- Page 58 GEBRUIKSAANWIJZING NOTITIE: Als het toestel voor de eerte keer gebruikt wordt, is het mogelijk dat er een lichte geur merkbaar is de eerste minuten. Deze is compleet onschadelijk en komt bij de meeste toestellen voor doordat zeer beperkte restanten van als stof en smeermiddelen $jdens produc$e zich licht ophopen.
-
Page 59: Timerfunctie
• Om het Hoog vermogen in te stellen, druk op de aanpassingsknop boven (+). Beide blauwe lichtjes zullen oplichten om HIGH power aan te geven. • LOW power/vermogen is 1200W en HIGH power is 2000W. Thermostaatfuncties • Druk op de ‘temperatuurselectieknop’ ( ) , zodat de huidige thermostaatfunc- tie zal oplichten nadien zal het terugkeren naar het weergeven van de kamer- temperatuur. - Page 60 VEILIGHEIDSKENMERKEN : Oververhitting bescherming • Dit toestel is beveiligd met een oververhittingssensor die het toestel automatisch zal uitschakelen bij oververhitting. • Oververhitting kan veroorzaakt worden door het blokkeren van de luchtinlaat aan de achterkant of van de rooster aan de voorzijde. •...
- Page 61 GARANTIERICHTLIJNEN BELANGRIJK VOOR DE GELDIGHEID VAN DEZE GARANTIE IN GEVAL VAN EEN IN- TERVENTIE DOOR ONZE DIENST NA VERKOOP OF EEN TECHNICUS: EEN FACTUUR OF AANKOOPBEWIJS SAMEN MET DEZE CORRECT EN VOLLEDIG INGEVULDE BLAD- ZIJDE ZIJN NOODZAKELIJK. Dit toestel geniet een waarborg van 24 maanden vanaf de datum van aankoop (aankoopbewijs of factuur).
- Page 62 ambiente sano Head Office: ESSEGE SA-NV Chaussée de Waterloo 1589D 1180 UCCLE - BELGIUM www.essege.com France: Ligne Plus SA Synergie Park 15 rue Pierre et Marie Curie 59260 Lezennes (France) www.ligne-plus.com España: LINEA PLUS :: Clima y confort Arkotz Kalea, 1 (Polígono Lanbarren) 20180 Oyarzun (Guipúzcoa) Teléfono: +34 943 493 555 www.lineaplus.eu...