Publicité

Les langues disponibles
  • FR

Les langues disponibles

Liens rapides

English
Contents
Connecting Up . . . . . . . . . . . . . . .4
Block Diagram . . . . . . . . . . . . . . .5
Introduction . . . . . . . . . . . . . . . .6
and Switches . . . . . . . . . . . . . . . . .6
Facilities and Controls . . . . . . . . . .7
Stereo Expander . . . . . . . . . . . .7
Stereo Equaliser . . . . . . . . . . . .8
Output . . . . . . . . . . . . . . . . . .9
Main Bargraph Meter . . . . . . . .9
Direct Input . . . . . . . . . . . . . . .9
Digital Output . . . . . . . . . . . .10
Applications . . . . . . . . . . . . . .10
Specifications . . . . . . . . . . . . . . .14
Distributor List . . . . . . . . . . . . . .47
Deutsch
Inhaltsverzeichnis
Wichtige Sicherheitshinweise . . . . .2
Signalanschlüsse . . . . . . . . . . . . . .4
Block Diagram . . . . . . . . . . . . . . .5
Einleitung . . . . . . . . . . . . . . . . .15
Rückseite . . . . . . . . . . . . . . . . . .15
Bedienelemente . . . . . . . . . . . . .16
Stereo-Expander . . . . . . . . . . .16
Stereo-Equaliser . . . . . . . . . . .17
Output . . . . . . . . . . . . . . . . . .18
Haupt-Pegelanzeige . . . . . . . .18
Direkteingang . . . . . . . . . . . . .18
Der digitale Ausgang . . . . . . . .19
/Anwendungsbeispiele . . . . . .19
Technische Daten . . . . . . . . . . . .21
Distributoren . . . . . . . . . . . . . . .47
Français

Table des matières

Consignes de sécurité . . . . . . . . . .3
Connexions . . . . . . . . . . . . . . . . .4
Block Diagram . . . . . . . . . . . . . . .5
. . . . . . . . . . . . . . .22
arriére . . . . . . . . . . . . . . . . . . . . .22
Fonctions et commandes . . . . . . .23
Expanseur stéréo . . . . . . . . . . .23
Correcteur stéréo . . . . . . . . . .24
Sortie . . . . . . . . . . . . . . . . . . .25
Afficheurs de niveaux . . . . . . .25
Entree directe . . . . . . . . . . . . .25
Sortie numérique . . . . . . . . . .26
Applications . . . . . . . . . . . . . .26
Mastering . . . . . . . . . . . . . . . .28
Caractéristiques . . . . . . . . . . . . . .30
Distributeurs . . . . . . . . . . . . . . . .47
Italiano
Indice
Importanti Istruzioni per
la Sicurezza . . . . . . . . . . . . . . . . . .3
Connessioni . . . . . . . . . . . . . . . . .4
Schema a Blocchi . . . . . . . . . . . . .5
Introduzione . . . . . . . . . . . . . . . .31
Pannello Posteriore . . . . . . . . . . .31
Funzioni e Controlli . . . . . . . . . .32
Stereo Expander . . . . . . . . . . .32
Stereo Equaliser . . . . . . . . . . .33
Output . . . . . . . . . . . . . . . . . .34
Sezione Strumenti . . . . . . . . . .34
Direct Input . . . . . . . . . . . . . .34
Digital Output . . . . . . . . . . . .35
Applicazioni . . . . . . . . . . . . . .35
Specifiche Tecniche . . . . . . . .37
Elenco dei Distributori . . . . . . . .47
E
N
G
E
Español
L
N
I
G
S
L
H
I
S
Contenido
H
D
Instrucciones Importantes de
Seguridad . . . . . . . . . . . . . . . . . . .3
E
D
U
E
Puesta en Marcha . . . . . . . . . . . . .4
T
U
Diagrama de Bloques . . . . . . . . . . .5
S
T
C
S
Introducción . . . . . . . . . . . . . . .38
H
C
H
del Panel Trasero . . . . . . . . . . . . .38
F
F
Prestaciones y Controles . . . . . . .39
R
R
A
A
Stereo Expander . . . . . . . . . . .39
N
N
Ç
Ç
A
A
Stereo Equaliser . . . . . . . . . . .40
I
I
S
Output . . . . . . . . . . . . . . . . . .41
S
I
Medidores . . . . . . . . . . . . . . .41
I
T
Direct Input . . . . . . . . . . . . . .41
T
A
L
A
Digital Output . . . . . . . . . . . .42
I
L
A
Aplicaciones . . . . . . . . . . . . . .42
I
N
A
O
N
O
Especificaciones . . . . . . . . . . . . . .46
E
Lista de Distribuidores . . . . . . . . .47
S
P
E
A
S
Ñ
P
O
A
L
Ñ
O
1
L

Publicité

Table des Matières
loading

Sommaire des Matières pour Focusrite MixMaster

  • Page 1: Table Des Matières

    English Deutsch Français Italiano Español Contents Inhaltsverzeichnis Table des matières Indice Contenido Important Safety Instructions ..2 Wichtige Sicherheitshinweise ..2 Consignes de sécurité ..3 Importanti Istruzioni per Instrucciones Importantes de la Sicurezza .
  • Page 2: Important Safety Instructions

    The internal power supply unit contains no user serviceable parts. Refer all servicing to a Das Netzteil des Gerätes enthält keine vom Anwender zu wartenden Teile. Bitte überlassen Sie alle qualified service engineer, through the appropriate Focusrite dealer. Wartungsarbeiten einem von Ihrem Focusrite-Händler beauftragten, qualifizierten Servicetechniker.
  • Page 3: Consignes De Sécurité

    Aucun élément de l’alimentation interne n’est réparable par in caso di guasto, contattare il centro di assistenza attraverso un l’utilisateur. Pour toute réparation, adressez-vous à un technicien preferible que se dirijan a su distribuidor Focusrite o a un servicio rivenditore Focusrite. qualifié.
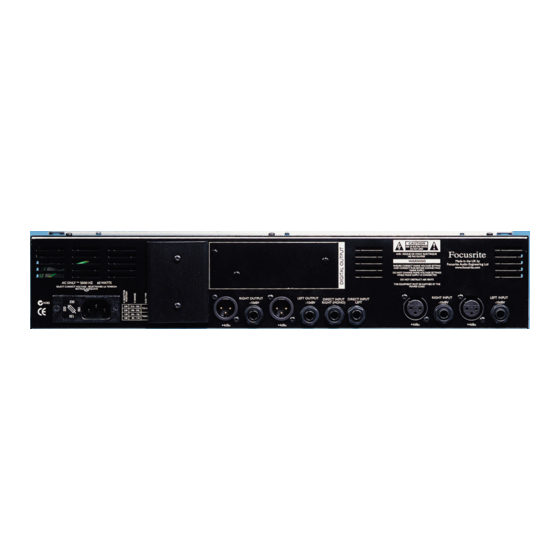
  • Page 4: Connecting Up

    C o n n e c t i n g U p...
  • Page 5 B l o c k D i a g r a m o f t h e M i x M a s t e r INPUT +4dBu STEREO SPECTRAL COMPRESSOR INPUT STEREO EXPANDER INPUT threshold release threshold LF trim lock HF trim ratio...
  • Page 6: Introduction

    REAR PANEL CONNECTIONS AND SWITCHES Introduction The MixMaster is provided with line level inputs on both XLR and 3 pole 1/4” jack The MixMaster is an analogue stereo audio processor, connectors: inserting a jack cord plug into the jack will override the corresponding XLR. The with an optional 24/96 high quality digital output.
  • Page 7: Facilities And Controls

    - switches the Expander in and out of the signal path to allow easy A/B comparison of the processed and unprocessed signals. The switch illuminates when pressed to show that the The following pages describe the facilities on the MixMaster. Each section of the unit may be Expander is active.
  • Page 8: Stereo Equaliser

    U s i n g t h e M i x M a s t e r - meters display the amount of gain reduction due to compression - determines how quickly compression dies away once the level of the source GAIN REDUCTION RELEASE in each of the three bands.
  • Page 9: Output

    IMAGE IN switch is pressed. Signals may be isolated from this section by being routed into the MixMaster after the width control circuit, using the Direct Input - see “Direct Input” section - The Q control defines the width of the band of frequencies to be cut or boosted. Q is below.
  • Page 10: Digital Output

    - if an external wordclock source is fed to EXT WCLK (WORDCLOCK) INPUT returns the BNC connector, the MixMaster will attempt to synchronise to it. When the unit is correctly locked to the external clock source the LOCK LED will light to indicate correct sends operation.
  • Page 11 U s i n g t h e M i x M a s t e r APPLICATIONS (cont) digital HD Mastering Direct I/P Using MixMaster to add analogue warmth to a PRO TOOLS mix This example makes use of the limiter and A/D converter without passing through the preceding processing sections.
  • Page 12: Tips On Home Mastering

    T i p s o n H o m e M a s t e r i n g Tips on Home Mastering Once you have decided on a running order for the tracks on the album, you’ll need to get the levels to match. This doesn’t simply mean making everything the same level though as this will make any ballads seem very loud compared to more meaty songs.
  • Page 13 T i p s o n H o m e M a s t e r i n g Have a CD player and some reference material on hand to use as a comparison for When transferring digital material into a computer, ensure that the computer your work.
  • Page 14: Specifications

    T i p s o n H o m e M a s t e r i n g / S p e c i f i c a t i o n s When deciding on the space between tracks on an album, listen to how the first Specifications track ends and how the second one starts.
  • Page 15: Einleitung

    Anschlüsse und Schalter auf der Rückseite Einleitung Der MixMaster bietet XLR- sowie dreipolige 6,3 mm-Klinkenbuchsen, die für Signale mit Linepegel Der MixMaster ist ein analoger Stereo-Signalprozessor mit ausgelegt sind. Durch Einstecken eines Klinkensteckers in eine der 6,3 mm-Buchsen wird der entsprechende XLR-Eingang abgeschaltet.
  • Page 16: Bedienelemente

    Bereichen stattfindet, wird vermieden, dass zum Beispiel eine sehr laute Bassdrum das gesamte POWER – zum Anschalten des Geräten. Wir empfehlen Ihnen, zuerst den MixMaster und erst dann Signal »herunterzieht«. Beim MixMaster löst eine Bassdrum nur eine Kompression im Bassbereich aus, die die an seine Ausgänge angeschlossenen Geräte einzuschalten.
  • Page 17: Stereo-Equaliser

    LED des Schalters. Stereo-Equaliser Der parametrische 3 Band-Stereo-EQ des MixMaster hat je einen abgestuften Regelbereich mit Shelving- Charakteristik für Tiefen und Höhen sowie einen parametrischen Mittenbereich. Der gesamte EQ- Schaltkreis wurde für eine möglichst »schonende«, musikalische Bearbeitung in der Endphase einer Mischung entwickelt.
  • Page 18: Output

    Regler ist nur aktiv, wenn der IMAGE IN-Schalter gedrückt ist. I/P-Schalter – wenn dieser Schalter gedrückt ist, zeigen die Pegelanzeigen das Signal am Eingang des MixMaster. Wenn der Schalter nicht gedrückt ist, zeigen sie das Ausgangssignal nach dem Limiter, aber vor dem als Option erhältlichen Digitalausgang. PHASE - Anzeige –...
  • Page 19: Der Digitale Ausgang

    Synchronisation – Wenn an die mit EXT WCLK INPUT bezeichnete BNC-Buchse eine returns externe Wordclock-Quelle angeschlossen ist, versucht der MixMaster, sich zu dieser zu synchronisieren. Bei erfolgreicher Synchronisation leuchtet die LOCK-LED kontinuierlich. Wenn diese LED flackert, sends weist dies auf Synchronisationsfehler (Jitter) hin. In diesem Fall sollten Sie den verwendeten Wordclock- Generator überprüfen.
  • Page 20 E i n s a t z b e r e i c h e / A n w e n d u n g s b e i s p i e l e Anwendungen (Forts.) digital HD Mastering Hier wird der MixMaster verwendet, um einer PRO TOOLS-Mischung etwas analoge Wärme zu verleihen. Direkteingang In diesem Beispiel werden Limiter und...
  • Page 21: Technische Daten

    T e c h n i s c h e D a t e n Technische Daten Eingänge: elektronisch symmetriert, Impedanz 20 KΩ, Nennpegel +4 dBu/-10 dBV. Ausgänge: elektronisch symmetriert, Impedanz 50 Ω, Nennpegel +4 dBu. unsymmetrisch, ground compensated, Impedanz 75 Ω, Nennpegel -10 dBV. Headroom: 22 dB Gesamtklirrfaktor...
  • Page 22: Introduction

    CONNEXIONS ET RÉGLAGES EN FACE ARRIéRE Introduction Le MixMaster est équipé d’entrées à niveau ligne sur connecteurs XLR et Jacks stéréo 6,35 mm : Le MixMaster est un processeur stéréo analogique avec l’insertion d’un jack désactive automatiquement le connecteur XLR correspondant. La sensibilité...
  • Page 23: Fonctions Et Commandes

    (voir schéma). Ce système offre un son plus naturel qu’avec un Noise Gate, en particulier pour des sons non percussifs. L’expanseur du MixMaster peut être réglé sur un seuil particulièrement bas lui permettant de descendre jusqu’au niveau du bruit de fond.
  • Page 24: Correcteur Stéréo

    F o n c t i o n s e t c o m m a n d e s – Couple les seuils des trois bandes de fréquences et entraîne – Détermine la vitesse à laquelle la compression LOCK (VERROUILLAGE) RELEASE (RÉTABLISSEMENT) une compression égale sur toute la plage des fréquences.
  • Page 25: Sortie

    – Sélection de la plage de fréquence la plus haute (10 fois les valeurs indiquées en façade). différence. Les signaux entrant dans le MixMaster par l’entrée directe évitent cette section en (voir la Lorsque la touche X10 est enfoncée, la fréquence du filtre paramétrique varie entre 1 kHz et section “Entrée directe”...
  • Page 26: Sortie Numérique

    – Si une horloge externe returns est reliée au connecteur BNC, le MixMaster se synchronise sur celle-ci. Lorsque l’appareil est correctement synchronisé sur l’horloge externe, la led LOCK s’allume. Si la led clignote, cela indique que le signal de synchronisation a un problème de Jitter. Il convient alors de rechercher sends l’origine du problème.
  • Page 27 U s i n g t h e M i x M a s t e r APPLICATIONS digital D-t-D Utilisation du MixMaster pour ajouter la chaleur de l’analogique à un mixage réalisé en numérique Utilisation directe sans traitement Cet exemple utilise un limiteur et un convertisseur A/N sans que le signal ne passe par les sections de traitement.
  • Page 28: Quelques Conseils Pour Le Home Mastering

    Q u e l q u e s c o n s e i l s p o u r l e H o m e M a s t e r i n g Quelques conseils pour le Home Mastering se fait à...
  • Page 29 Q u e l q u e s c o n s e i l s p o u r l e H o m e M a s t e r i n g Ayez toujours à portée un lecteur de CD et quelques morceaux de référence pour les comparer à Lors du transfert des données numériques depuis/vers votre ordinateur : Assurez-vous que ce votre travail.
  • Page 30: Caractéristiques

    Q u e l q u e s c o n s e i l s p o u r l e H o m e M a s t e r i n g / C a r a c t é r i s t i q u e s que cette dernière n’est pas vierge.
  • Page 31: Introduzione

    Pannello Posteriore Introduzione Mixmaster è provvisto di ingressi a livello linea con connessioni XLR e Jack ?” stereo, Mixmaster è un processore audio analogico stereo con inserendo un jack si escluderà il relativo XLR. La sensibilità nominale dell’ingresso XLR è...
  • Page 32: Funzioni E Controlli

    è possibile evitare gli spiacevoli effetti, ad esempio, di una cassa troppo presente, che alimentare apparecchi connessi all’uscita. controlla la compressione su tutto il resto del segnale. Con MixMaster la cassa ed il basso Stereo Expander influenzeranno solo la banda delle basse la voce solo la banda delle medie ed il charleston solo quella delle alte.
  • Page 33: Stereo Equaliser

    F u n z i o n i e C o n t r o l l i – Gli strumenti mostrano l’ammontare della riduzione del livello - Questo controllo (Rilascio) determina quanto velocemente venga rimossa la GAIN REDUCTION RELEASE dovuta alla compressione, su ciascuna delle tre bande.
  • Page 34: Output

    Due connettori Jack sul pannello posteriore permettono di miscelare un segnale esterno al flusso del MixMaster in un punto prima del Limiter, ma dopo la sezione Image Control, per aggiungere, ad esempio, una voce o una cassa, al centro, con un trattamento diverso, è possibile...
  • Page 35: Digital Output

    - Se una sorgente di wordClock pre or post master fader EXTERNAL WCLK (WORDCLOCK) INPUT viene collegata all’ingresso BNC, Mixmaster tenterà di sincronizzarsi a questa. A returns sincronizzazione avvenuta si accenderà, per conferma il LED Lock. sends stereo bus...
  • Page 36 A p p l i c a z i o n i HD Mastering digital Utilizzo del MixMaster per restituire “calore” ai sistemi digitali su hard disk Direct Input Questo esempio mostra l’utilizzo del convertitore D/A opzionale senza passare attraverso la sezione di processo L &...
  • Page 37: Specifiche Tecniche

    S p e c i f i c h e T e c n i c h e Specifiche Tecniche Inputs: Electronically balanced, impedance 20KΩ, nominal level +4dBu/-10dBV. Outputs: Electronically balanced, impedance 50Ω, nominal level +4dBu. Unbalanced, ground compensated, impedance 75Ω, nominal level -10dBV. Headroom: 22dB @ 0dBr, all sections in, no gain reduction:...
  • Page 38: Introducción

    CONEXIONES Y CONMUTADORES DEL PANEL TRASERO Introducción: El MixMaster está provisto de entradas de nivel línea con conectores formato XLR y jack ?”: al introducir un latiguillo jack en el conector jack se desactivará la entrada XLR correspondiente. El MixMaster es un procesador stereo de audio analógico, con salida digital de alta calidad 24/96 opcional.
  • Page 39: Prestaciones Y Controles

    – activa la unidad. Recomendamos que la unidad esté activada antes de activar POWER toda la señal stereo. El compresor del MixMaster permite que el bombo solo afecte a la banda otras unidades a las que se esté entregando de bajas frecuencias, la voz a las frecuencias medias y el chaston a las frecuencias altas.
  • Page 40: Stereo Equaliser

    P r e s t a c i o n e s y C o n t r o l e s – los medidores muestran la ganancia de reducción aplicada debido – determina lo rápido que dejará de actuar el compresor una vez el nivel de la señal GAIN REDUCTION RELEASE a la compresión en cada una de las tres bandas.
  • Page 41: Output

    IMAGE IN esté pulsado. Las señales se pueden aislar desde esta sección al ser enviadas al MixMaster después del circuito del control Width, utilizando la – el control Q determina la amplitud de la banda de frecuencias en la que se ganará o Direct Input –...
  • Page 42: Digital Output

    – cuando un wordclock externo se conecta EXT WCLK (WORDCLOCK) INPUT returns al BNC, el MixMaster intentará sincronizarse con él. Cuando la unidad esté correctamente vinculada al reloj externo el LOCK LED indicará la operativa correcta. En este caso el LOCK sends LED lucirá...
  • Page 43 A p l i c a c i o n e s APLICACIONES (cont) digital Masterización en HD Entrada Directa Este ejemplo muestra el uso del Limitador y del convertidor A/D sin pasar por las secciones precedentes de proceso. L & R L &...
  • Page 44: Consejos En Masterización

    C o n s e j o s e n M a s t e r i z a c i ó n Consejos en Masterización Una vez se ha decidido el orden de las pistas en el álbum, necesitará conocer los niveles para igualarlos.
  • Page 45 C o n s e j o s e n M a s t e r i z a c i ó n Si una mezcla suena muy media o un poco vacía de definición. Le sugiero utilizar un Intentar trabajar con una cinta master a 44.1kHz si el producto final será un CD master. Si enhancer, pero mucho cuidado de no pasarse, ya que la mezcla podría sonar muy áspera.
  • Page 46: Especificaciones

    C o n s e j o s e n M a s t e r i z a c i ó n / E s p e c i f i c a c i o n e s Siempre es una buena idea no grabar nada durante el primer minuto de cinta para evitar los Especificaciones drops de las cintas de DAT nuevas por causas mecánicas.
  • Page 47 France DM2J Audio Solution Fax: 00 31 20 4476464 Phone: 00 33 1 48 63 04 43 United Kingdom Focusrite Audio Engineering Ltd New Zealand Protel Fax: 00 33 1 48 63 02 01 Phone: +44 (0) 1494 462246 Phone:...

Table des Matières