Publicité
Liens rapides
Publicité

Manuels Connexes pour HEIDENHAIN AK ERA 4-70 Série


Sommaire des Matières pour HEIDENHAIN AK ERA 4-70 Série
- Page 1 Mounting Instructions Istruzioni di montaggio AK ERA 4x70 AK ERA 4x80 10/2006...
- Page 2 Inhalt . Contents . Sommaire . Indice . Indice 4, 6 5, 7 Avvertenze generali Dimensions of ERA 4xx0 scanning head with ERA 4x00/4202 scale drum Dimensioni AK ERA 4xx0 con tamburo ERA 4x00/4202 Dimensions of ERA 4xx0 scanning head with ERA 4x01 scale drum Dimensioni AK ERA 4xx0 con tamburo ERA 4x01 Dimensions for possible fine adjustment of the ERA 4270/4280 scanning head Dimensioni per possibilità...
- Page 3 Mounting the scale drum Montaggio del tamburo Mounting the scanning head Montaggio della testina di scansione 19, 21 18, 20 Checking the output signals Verifica dei segnali in uscita 22, 24 23, 25 Fine adjustment of the scanning head with 20-µm grating period Taratura di precisione della testina di scansione con passo di divisione di 20 µm 26, 28, 30, 32 27, 29, 31, 33...
- Page 4 Maße in mm Dimensions in mm Cotes en mm Dimensioni in mm Dimensiones en mm DIN EN 100 015 – 1 CECC 00015 – 1...
- Page 5 Avoid direct contact of fluids with the encoder and connector! Evitare che il sistema di misura e il connettore vengano a contatto con liquidi. If necessary, provide appropriate protection to the unit. See the cleaning instructions on page 21. Se necessario, prevedere un dispositivo di protezione. Istruzioni per la pulizia a pagina 21.
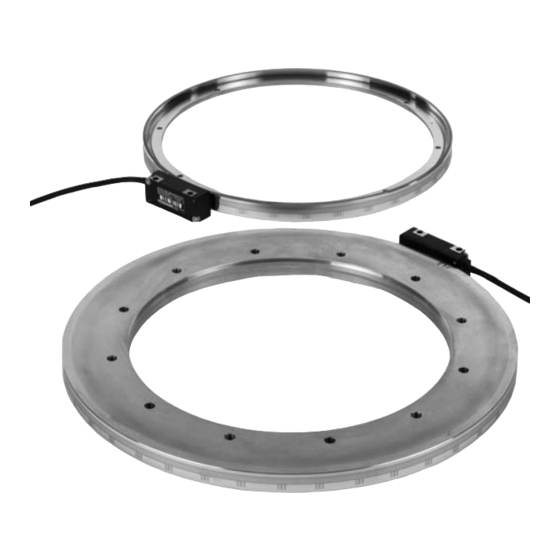
- Page 6 When mounting the scanning head and the scale drum, please refer to the dimensions and notes in the Mounting Instructions for the respective ERA 4x0x Scale Drum. All mounting surfaces must be clean and free of burrs. The specified shaft tolerances must be complied with. The scale drum is to be fastened with all provided screws and washers.
- Page 7 Per il montaggio della testina e del tamburo, attenersi anche alle dimensioni e alle indicazioni riportate sulle istruzioni di montaggio del corrispondente tamburo ERA 4x0x. Le superifici di montaggio devono essere prive di graffi e pulite. Devono essere rispettate le tolleranze dell'albero indicate. Il tamburo deve essere fissato con tutte le viti e le rondelle previste.
- Page 8 AK ERA 4xx0 mit Teilungstrommel ERA 4x00/4202 ERA 4xx0 scanning head with ERA 4x00/4202 scale drum Tête captrice ERA 4xx0 avec tambour gradué ERA 4x00/4202 AK ERA 4xx0 con tamburo ERA 4x00/4202 Cabezal captador AK ERA 4xx0 con tambor graduado ERA 4x00/4202 ¬...
- Page 9 Alternative Anbaumöglichkeit Á Alternative mounting option Ensure adjustability of mounting surface for scanning head Alternative de possibilité de montage Definire la superficie di montaggio della testina di scansione con possibilità di taratura Possibilità di montaggio alternativa Posible montaje alternativo ‰ ¬...
- Page 10 AK ERA 4xx0 mit Teilungstrommel ERA 4x01 ERA 4xx0 scanning head with ERA 4x01 scale drum Tête captrice ERA 4xx0 avec tambour gradué ERA 4x01 AK ERA 4xx0 con tamburo ERA 4x01 Cabezal captador AK ERA 4xx0 con tambor graduado ERA 4x01 ¬...
- Page 11 Á Alternative Anbaumöglichkeit Alternative mounting option Ensure adjustability of mounting surface for scanning head Alternative de possibilité de montage Definire la superficie di montaggio della testina di scansione con possibilità di taratura Possibilità di montaggio alternativa Posible montaje alternativo ‰ ¬...
- Page 12 Abmessungen für Feinjustagemöglichkeit des AK ERA 4270/4280 (20 µm Teilungsperiode) Dimensions for possible fine adjustment of the ERA 4270/4280 scanning head (20-µm grating period) Cotes pour possibilité de réglage fin de la tête ERA 4270/4280 (période de division 20 µm) Dimensioni per possibilità...
- Page 13 À Eccentric nut (diameter of adjustment holes 1.3 mm) Boccola eccentrica (diametro dei fori di taratura di 1.3 mm) Á Holes required for fine adjustment Fori necessari per la taratura di precisione...
- Page 14 siehe Montageanleitung für die entsprechende Teilungstrommel ERA 4x00/ERA 4x01/ERA 4202. See the Mounting Instructions for the respective ERA 4x00/ERA 4x01/ERA 4202 scale drum. cf. également Instructions de montage des tambours gradués concernés ERA 4x00/ERA 4x01/ERA 4202. vedi Istruzioni di montaggio del corrispondente tamburo ERA 4x00/ERA 4x01/ERA 4202. ver las Instrucciones de Montaje para el correspondiente tambor graduado ERA 4x00/ERA 4x01/ERA 4202.
- Page 15 ERA 4201/ERA 4401 scale drum. Tamburo ERA 4201/ERA 4401. ERA 4202 scale drum. Tamburo ERA 4202...
- Page 16 Ensure correct position of reference mark track! Attenzione alla posizione della traccia degli indici di riferimento! Gently press the scanning head against the spacer foil and the mounting surface and secure it with the screws provided. Premere la testina di scansione esercitando una leggera pressione sulla pellicola di montaggio e sulla superficie di avvitamento e fissare.
- Page 17 Other mounting option: altra possibilità di montaggio:...
- Page 18 Prüfung der Ausgangssignale see Operating Instructions for PWT 1x, ID 319 502-9x Checking the output signals Contrôle des signaux de sortie Verifica dei segnali in uscita vedi Manuale di intruzioni del PWT 1x, ID 319 502-9x Comprobación de las señales de salida AK ERA 4x70 PWT 17 Included in the items supplied with the PWT 18...
- Page 19 The PWT shows the signal amplitude, signal quality, position and width of the reference mark in a display window. Il PWT consente di visualizzare ampiezza del segnale, qualità del segnale, posizione e larghezza dell'indice di riferimento. Signal quality Signal amplitude Qualità...
- Page 20 If the given adjustment values cannot be achieved, check the mounting tolerances and refer to the cleaning instructions-or make a fine adjustment of scanning heads with 20-µm grating period. Nel caso non possano essere ottenuti i valori di taratura indicati, controllare le tolleranze di montaggio e attenersi alle istruzioni per la pulizia o, per testina di scansione con passo di divisione di 20 µm, eseguire una taratura di precisione.
- Page 21 Reinigungshinweise Cleaning Instructions Instructions de nettoyage Istruzioni per la pulizia Instrucciones de limpieza If the scanning head or scale drum is contaminated, carefully clean the encoder with a clean, lint-free cloth and distilled spirit or isopropyl alcohol. Remove solid particles with a jet of compressed air first. Con testina di scansione o tamburo contaminato pulire con cura il sistema di misura utilizzando un panno pulito che non lascia pelucchi e alcool denaturato o isopropilico.
- Page 22 Feinjustage des AK mit 20 µm Teilungsperiode Fine adjustment of the scanning head with 20-µm grating period Réglage fin de la tête captrice avec période de division de 20 µm Taratura di precisione della testina di scansione con passo di divisione di 20 µm Ajuste de precisión del cabezal con 20 µm de periodo de división Loosen the screws one eighth of a turn (45°) to one sixth of a turn (60°) Adjustable at a torque of 0.1 Nm.
- Page 23 The incremental signals and the reference-mark signals can be optimized by turning the eccentric nut. (Fine adjustment of the scanning field). Ruotando la boccola eccentrica è possibile ottimizzare i segnali incrementali e di riferimento (taratura di precisione del settore di scansione). 0.5 .
- Page 24 Achtung: To adjust the position of the reference mark, turn the scanning head slightly. The peak of the reference mark signal should be in line with the peak of the composite signal. Caution: Pay attention to the amplitude of the incremental signals and the position of the reference-mark signals. Attention: Ruotare leggermente la testina per tarare la posizione dell’indice di riferimento.
- Page 25 R (I A + B 0.5 ..1 ..1.5...
- Page 26 ERA 4x70 = 5 V Fault see, vedi, Guasto £ ‡...
- Page 27 a [µs] without Fault detection signal senza Segnale di guasto = High: with U aS = Low:...
- Page 28 ERA 4x70 AK ER A 4x70 HEIDENHAIN In normal operation, connect with the 0 V line of the subsequent electronics. Shield on housing Apply 5 V and switch to TTL/11 µA Schermo sulla carcassa In funzionamento normale collegare a 0 V dell'elettronica successiva.
- Page 29 ERA 4x80 = 5 V see, vedi, A, B, R 0.2 V † R † 0.85 V ( 0.5 V)
- Page 30 ERA 4x80 AK ER A 4x80 HEIDENHAIN A– B– R– BN/GN A– B– R– BN/GN...
- Page 31 Shield on housing Schermo sulla carcassa The sensor line is connected internally with the power supply. La linea del sensore è collegata internamente con la linea di alimentazione. † 150 m...
- Page 32 (°C Ø (°F) ³ ³ ³ ³ ³ Ø 3.7 mm ³ ³ ³ Ø 8 mm Noise sources Sorgenti di disturbo...
- Page 33 Sollwert: < 1 W max. Check the resistance between the connector housing and the machine. Desired value: < 1 W max. Valeur nominale: < 1 W max. Controllare la resistenza elettrica tra l’alloggiamento del connettore e la macchina. Valore nominale: < 1 W max. Valor nominal: <...
- Page 34 DR. JOHANNES HEIDENHAIN GmbH 83301 Traunreut, Germany Technical support Measuring systems { TNC support NC programming PLC programming { Lathe controls www.heidenhain.de Subject to change without notice Con riserva di modifiche...