Table des Matières

Publicité

Les langues disponibles

Les langues disponibles

Liens rapides

Thule Coaster
Instructions
A
51100985

Publicité

Table des Matières
loading

Sommaire des Matières pour Thule Coaster

  • Page 1 Thule Coaster Instructions 51100985...
  • Page 2: Table Des Matières

    CONTENTS IntroductIon use & features Manual Intended Use 5.1 Setting the Parking Brake Carrier Intended Use 5.2 Adjusting the Padded Shoulder Harness 1.3 Specifications 5.3 Using the Two-in One Cover 5.4 Using the Sunscreen Parts descrIPtIon 5.5 Storage Included addItIonal InformatIon safety 6.1 Accessories 3.1 Symbols and Instructions 6.2 Service and Care 3.2 General Safety Instructions 6.3 Storage 6.4 Wear and Tear GettInG started 4.1 Included Components 4.2 Unfolding the Carrier...
  • Page 3: Introduction

    INTRODUCTION Thank you for choosing a Thule Coaster. Your new carrier offers quality, safety features and comfort. PLEASE NOTE: Thule Child Transport Systems Ltd. retains all rights to this Owner’s Manual. No text, details, or illustrations from this manual may be reproduced, distributed, or become the subject of unauthorized use for commercial purposes, nor may they be made available to others. The manual for using this carrier may be downloaded from www.thule.com. Great care has been taken in assembling this manual. Nevertheless, should you discover any errors, we would be grateful if you could bring them to our attention. Thule Child Transport Systems Ltd. info@thule.com www.thule.com 105 - 5760 9th Street SE Calgary, AB T2H 1Z9 Canada 51100985 - A...
  • Page 4: Manual Intended Use

    Use as intended Any use that goes beyond the above is not The carrier is intended for use within the recommended. performance ranges specified for the carrying of children in daylight hours, on sidewalks, light traffic Use not recommended is primarily the conveying of public roads, and smooth paths. people together with animals, use of this carrier on rough off-road terrain, use for commercial purposes, Luggage may also be carried in the storage areas overloading, excessive speed and improper repair intended for that purpose, provided the children in of defects or modifications. the carrier are not put at risk. The manufacturer is not liable for damages arising from use that is not recommended – this is at the risk of the user. 1.3 sPecIfIcatIons Coaster Maximum Passenger Weight 22kg / 49lb Maximum Load Carrying Capacity Including Passenger(s) 45kg / 100lb and Cargo Combined Number of child(ren) 1 or 2 ........................................Dimensions without handlebars (Length x Width x Height) 91x 77 x 67cm 35 x 30 x 26in ........................................Dimensions folded (Length x Width x Height) 94 x 77 x 28cm 37 x 30 x 11in ........................................Weight of Thule child carrier without conversion kits 11kg / 24lb ........................................
  • Page 5: Parts Description

    PARTS DESCRIPTION Included Thule Coaster chassis Bicycle trailer kit Strolling kit Handlebar Two 20 inch wheels 51100985 - A...
  • Page 6: Safety

    SAFETY The safe use of this Thule child carrier is vital to the enjoyment of it. For that reason it is extremely important that you familiarize yourself with the safety instructions in this manual and follow them whenever you use this Thule child carrier.
  • Page 7 • Passengers must always use seat belts and harness WARNING and wear an approved helmet. • Follow the instructions that came with your Thule child Do not let your child play with this product. carrier for proper child placement. • Child must be old enough to wear a helmet and to sit upright unattended when trailering. Consult a pediatrician if child is less than one year old. • Child's head, including helmet, must not project above the upper frame. • Always consult your bicycle owner's manual and/or specialist retailer to find out the limitations or conditions when towing a Thule child carrier with your bicycle. • Never leave your child unattended in the Thule child carrier. • Only park the Thule child carrier on flat surfaces and secure it with the parking brake. • Have your bicycle checked by a qualified bicycle mechanic before attaching it to this trailer kit. • M aximum capacity for this Thule child carrier is 45Kg/100lb including children and cargo. • Cyclist must be an experienced, strong rider. • Never ride a bicycle at night without adequate lighting. Obey all local legal requirements for lighting. 51100985 - A...
  • Page 8: Getting Started

    GETTING STARTED 4.1 Included comPonents Verify that your carrier was packaged with the following items: • Thule Coaster chassis • Bicycle trailer kit • Strolling kit • Handlebar • Two 20 inch wheels • Owner's manual NOTICE Store your carrier and its components in a safe dry place so that when they are needed, they are in the best possible condition.
  • Page 9: Unfolding The Carrier

    4.2 unfoldInG the carrIer 4.3 foldInG the carrIer With two hands, pull or release the auto-lock discs on both sides of the back frame. With the locks released, give the back frame a sharp push down and inwards. (See image 3) With one hand on the upper frame and the other hand on the carrier axle, push the two halves together. WARNING Care must be taken when folding and unfolding this Thule child carrier to prevent finger entrapment. To avoid injury ensure that your child is kept away when unfolding and folding this product. With one hand on the upper frame and the other hand on the lower frame, pull the two halves apart. (See image 1) With one hand on the upper frame and the other hand on the back frame, pull the back frame rearward until the auto-lock discs engage (See image 2) Verify that the carrier's frame is locked by giving the back frame a push inwards. WARNING Ensure that all the locking devices are engaged before use. 51100985 - A...
  • Page 10: Installing The Wheels

    4.4 InstallInG the Wheels Disengage the parking brake. Press and hold the wheel release button on a wheel. 4.6 InstallInG the Wheel deflectors Insert the wheel axle into an axle socket. (See image 1) Release the wheel release button. Press the wheel fully into the axle socket. Verify that the wheel is securely attached to the carrier by giving it a sharp pull. Repeat for the other wheel. Using a tire pressure gauge check the air pressure in each tire. The minimum recommended tire pressure is 30 psi (2.1 bar) and the maximum is 35 psi (2.5 bar). If air pressure is too low in either one of the tires fill them up using a bicycle tire pump. WARNING Before each journey make sure that both of the wheels are securely locked in the carrier axle. 4.5 removInG the Wheels Disengage the parking brake. Press and hold the wheel release button on a wheel. (See image 2) Pull the wheel out of the carrier axle. Install wheel deflector on the lower frame in front of Repeat for the other wheel. the wheels where there is hole in the fabric (See image 3) Align the hole on the wheel deflector to hole on the frame.
  • Page 11: Installing The Handlebar

    4.8 cyclInG 4.8.1 InstallIng the safety flag NOTICE The HeightRight™ adjustable handlebar has two positions; high and low. Remove the handlebar and turn it over to change between these two positions. WARNING Insert the flagpole into the metal or plastic collar on the safety flag. Any load attached to the handle affects the stability of the Thule child carrier. Insert the flagpole through the sleeve on the left hand side of the body. (See image 3) 51100985 - A...
  • Page 12: Installing The Ezhitch Tm With A Quick-Release

    4.8.2 InstallIng the ezhItch wIth a QuIck-Release Verify that the quick release skewer is compatible with your bicycle. Completely unscrew and remove the quick-release knob from the quick release skewer. Remove one of the springs from the quick-release skewer. Insert the quick-release skewer through the ezHitch™. (See image 1) Insert the quick-release skewer into the bicycle axle from the left side pointing right. Replace the spring back onto the quick-release skewer, narrow end pointing inwards, towards the bicycle. Close the quick-release lever. Replace and tighten the quick release knob until thumb tight. Open the quick-release lever. (See image 2) Tighten the quick-release knob another full turn. Close the quick-release lever. (See image 3) Verify that the bicycle wheel is securely attached to the bicycle by giving it a sharp pull. WARNING The quick-release knob must be tightened on the quick-release skewer completely with at least two screw threads showing past the end of the quick-release knob to ensure the rear wheel of the bicycle does not loosen off.
  • Page 13: Installing The Ezhitch Tm On A Solid Axle

    Make sure that the hitch arm is correctly attached and secured to the Thule child carrier. Any kind of incorrect assembly may lead to the Thule child carrier becoming separated from the bicycle.
  • Page 14: Attaching The Carrier To Your Bicycle

    Pull the rubber tab down over the protruding end of the reason. Failure to install the hitch’s back up security pin to secure it on the ezHitch™. (See image 3) safety strap may lead to the Thule child carrier becoming separated from the bicycle. Loop the back-up safety strap around the bicycle frame and hook the clip onto the D-ring. (See image 4) WARNING The hitch arm load shall be no less than 0.1kg/0.22lb and no greater than 8kg/17.6lb.
  • Page 15: Removing The Carrier From Your Bicycle

    4.9 strollInG 4.8.6 ReMovIng the caRRIeR fRoM youR BIcycle 4.9.1 adjustIng the hItch aRM foR stRollIng Unlatch the back-up safety strap from the bicycle frame. (See image 1) Pull the rubber tab off of the end of the security pin. Pull the security pin up out of the ezHitch™. Pull the hitch ball forward out of the ezHitch™. Slide the hitch arm inwards until the front hole on the hitch arm aligns with the hole in the wing. (See image 2) Insert the safety pin through the back of the wing and through the hitch arm and close the D-clip. (See image 3) Verify that the hitch arm is securely attached to the Thule child carrier by giving it a sharp pull away from the Thule child carrier. 51100985 - A...
  • Page 16: Inserting The Stroller Wheel

    4.9.2 InseRtIng the stRolleR wheel 4.9.3 stoRIng the stRolleR wheel whIle cyclIng Insert the stroller wheel to the hitch arm from the bottom. (See image1) Remove the stroller wheel by unclipping the D-clip, Insert the pin through stroller wheel attachment and pulling out the pin and removing the wheel. close the D-clip. (See image 2) Insert the stroller wheel to the hitch arm from the top. (See image3) Insert the pin through stroller wheel attachment and close the D-clip. (See image 4) WARNING Always make sure that the stroller wheel is properly and fully engaged and locked. To check this move the stroller wheel up and down in a vertical direction.
  • Page 17: Use & Features

    USE & FEATURES settInG the ParkInG Brake Grasp the red handle on the brake lever and pull it WARNING downwards (See image 1) After engaging the brake always verify that the parking Never leave your child unattended in brake is working - the carrier should not roll forwards or this Thule child carrier. backwards. The parking brake should always Grasp the red handle on the brake lever and push it be engaged during the loading and upwards to release the parking brake. (See image 2) unloading of children. 51100985 - A...
  • Page 18: Adjusting The Padded Shoulder Harness

    (See image 1) Lift up the crotch strap and connect the two shoulder strap buckles together and then insert them together into the crotch buckle. (See image 2) Adjust the harness system using the shoulder length adjustments until the crotch strap buckle is positioned above their lower chest. (See image 3) Snugly tighten the two shoulder straps by pulling downward on the shoulder strap loose ends. Ensure that there is no looseness in the harness system at the child's waist and shoulders. Ensure the shoulder pads are positioned on top of the child`s shoulders and next to their neck. WARNING This seat unit is not suitable for children under 6 months. For children under 6 months an approved Thule baby accessory must be used. NOTICE When seating a single child in the carrier always seat the child on the right side. 51100985 - A...
  • Page 19: Using The Two-In One Cover

    5.3 usInG the tWo-In one cover To improve the air flow inside the carrier; roll up the plastic window. Use the elastic rings at the top of the cover to keep the window up. (See image 1) To keep the elements out of the carrier; unroll the plastic window. Use the velcro at the bottom of the cover to keep the window closed. To open the cover; undo the velcro on the front corner of each carrier's cover. To close the cover; pull down the front of the cover and attach each corner using the velcro. (See image 2) WARNING The user of this Thule child carrier must be aware of exposure hazards such as wind chill and heat exhaustion, either by prolonged exposure in colder temperatures, or by extended periods in warmer temperatures without adequate ventilation or hydration. WARNING When this Thule child carrier is used as a cycle trailer, the weather cover should be closed to prevent debris from entering the carrier. 51100985 - A...
  • Page 20: Using The Sunscreen

    5.4 usInG the sunscreen 5.5 storaGe To enclose the back of Thule child carrier, roll the back flap down the back of the carrier. Use the velcro at the bottom of the back flap to keep it closed. To shade inside the child compartment; roll the back flap down the front of the carrier. Use the velcro at the bottom of the sunscreen to keep it closed. (See image 1) To completely open up the front and back of the Thule child carrier, roll the back flap up. Use the elastic rings at the top of the back flap to keep it up. Your carrier is equipped with the following storage compartments: One large cavity in the back. (See image 2) One small mesh pocket inside the carrier at the front. (See image 3) WARNING Do not carry extra children or bags on this Thule child carrier. 51100985 - A...
  • Page 21: Additional Information

    ADDITIONAL INFORMATION 6.1 accessorIes 6.2 servIce and care There are numerous accessories that are compatible with Regularly inspect your Thule child carrier and accessories your Thule child carrier. for damage and signs of wear. Metal Components • Thule Infant Sling • Thule Baby Supporter Check for any dents or cracks. Do not use the Thule child • Thule Bunting Bag carrier if any metal components are cracked or damaged. • Thule Axle Mount ezHitch Fasteners • Thule Internal Hub Hitch Adapter Regularly examine the Thule child carrier to see if any of • Thule 12mm Axle Adapter the fasteners are bent, broken, missing or loose. Tighten • Thule Hydration Cage any loose fasteners and replace any damaged or missing • Thule Cup Holder fasteners. • Thule Storage Cover Fabric •...
  • Page 22: Storage

    Storage Storing this Thule child carrier properly will reduce the amount of wear, especially to the fabric. Type of Use Hard cornering, fast acceleration and braking all contribute to premature wear of various components especially brakes and tires. Weather Various weather conditions affect individual components differently. Direct sunlight prematurely wears the fabric, windows and rubber wheels. Salt in the air or on the road affects the wheel rims and fabric floor. Dirt and mud can get into moving parts and contribute to wear as well. Extreme use of this carrier can lead to premature wear. The way this Thule child carrier is used and cared for will greatly affect how quickly it wears. Thule Child Transport Systems Ltd. info@thule.com www.thule.com 105 - 5760 9th Street SE Calgary, AB T2H 1Z9 Canada 51100985 - A...
  • Page 23 Thule Coaster Instructions 51100985...
  • Page 24 CONTENU IntroductIon utIlIsatIon et caractérIstIques Utilisation prévue du guide Régler le frein de stationnement Utilisation prévue du transporteur 5.2 Régler le harnais rembourré 1.3 Spécifications 5.3 Utiliser la protection deux-en-une 5.4 Utiliser le pare-soleil descrIptIon des pIèces Rangement Inclus InformatIons supplémentaIres sécurIté Accessoires Symboles et instructions Service et entretien Instructions de sécurité...
  • Page 25: Introduction

    INTRODUCTION Nous vous remercions d’avoir choisi la remorque Thule Coaster. Votre nouveau transporteur allie qualité, sécurité et confort. REMARQUE : Thule Child Transport Systems Ltd. conserve tous les droits de ce guide de l’utilisateur. Aucun texte, détail ni aucune illustration du présent guide ne peut être reproduit, distribué ni faire l’objet d’un emploi non autorisé à des fins commerciales, ni être mis à la disposition d’autrui. Il est possible de télécharger le guide d’utilisation de ce transporteur à www.thule.com. Nous avons procédé avec soin à l’élaboration de ce guide. Toutefois, si vous y découvrez des erreurs, nous vous serions reconnaissants de bien vouloir nous en faire part. Thule Child Transport Systems Ltd. info@thule.com www.thule.com 105 - 5760 9th Street SE Calgary (Alberta), T2H 1Z9 Canada 51100985 - A...
  • Page 26: Utilisation Prévue Du Guide

    Le fabricant n’est pas responsable en cas de aucun risque pour les enfants dans le transporteur. dommages découlant de toute utilisation non recommandée; cela étant aux risques de l’utilisateur. Si le transporteur pour enfants Thule est utilisé 1.3 spécIfIcatIons Coaster Poids maximal des passagers 22 kg/49 lb Capacité...
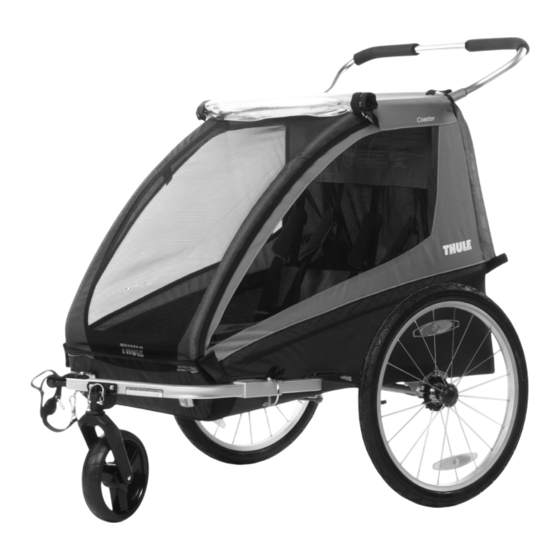
  • Page 27: Description Des Pièces

    DESCRIPTION DES PIÈCES Inclus Cadre du Thule Coaster Trousse de remorque pour vélo Trousse de marche Guidon Deux roues de 50,8 cm (20 po) 51100985 - A...
  • Page 28: Sécurité

    • Si vous transportez un seul enfant dans ce transporteur supplémentaires facilitant l’utilisation du produit. pour enfants Thule, celui-ci doit être assis du côté droit. • L’utilisateur de ce transporteur pour enfants Thule doit connaître les dangers liés à l’exposition aux éléments...
  • Page 29 Empêchez toute partie du corps de l’enfant, tout • La capacité maximale de ce transporteur pour enfants Thule est de 45 kg (100 lb), y compris les vêtement, lacet ou jouet d’entrer en contact avec des pièces mobiles. enfants et les bagages.
  • Page 30: Démarrage

    DÉMARRAGE 4.1 pIèces comprIses Assurez-vous que l’emballage du transporteur contient ce qui suit : • Cadre du Thule Coaster • Trousse de remorque pour vélo • Trousse de marche • Guidon • Deux roues de 50,8 cm (20 po) • Guide de l’utilisateur AVIS Rangez votre transporteur et ses pièces dans un endroit sec et sécuritaire, afin qu’ils soient dans le meilleur état possible lorsque vous en aurez besoin.
  • Page 31: Déplier Le Transporteur

    à verrouillage automatique des deux côtés du cadre arrière et relâchez-les. Une fois les verrous dégagés, poussez le cadre arrière d’un coup sec vers le bas et l’intérieur. (Consultez l’image 3.) Placez une main sur le cadre supérieur et l’autre main sur l’essieu du transporteur, puis ramenez les deux sections ensemble. AVERTISSEMENT Prenez toutes les mesures nécessaires pour éviter tout coincement de doigt au moment de plier et déplier ce transporteur pour enfants Thule. Pour éviter toute blessure, tenez votre enfant à l’écart au moment de plier ou déplier ce produit. Placez une main sur le cadre supérieur et l’autre main sur le cadre inférieur, puis tirez en éloignant les deux sections. (Consultez l’image 1.) Placez une main sur le cadre supérieur et l’autre main sur le cadre arrière, puis tirez ce dernier vers l’arrière jusqu’à ce que les disques à verrouillage automatique s’enclenchent. (Consultez l’image 2.) Assurez-vous que le cadre du transporteur est verrouillé...
  • Page 32: Installer Les Roues

    4.4 Installer les roues Desserrez le frein de stationnement. 4.6 Installer les déflecteurs de roue Maintenez enfoncé le bouton de dégagement sur la roue. Insérez l’essieu de roue dans l’emboîtement de l’essieu. (Consultez l’image 1.) Relâchez le bouton de dégagement de la roue. Poussez entièrement la roue dans l’emboîtement de l’essieu. Assurez-vous que la roue est bien fixée au transporteur en tirant d’un coup sec. Répétez le processus pour l’autre roue. À l’aide d’un manomètre, vérifier la pression d’air de chaque pneu. La pression recommandée minimale pour chaque pneu est de 2,1 bars (30 psi), sans dépasser 2,5 bars (35 psi). Si la pression est insuffisante dans un pneu, gonflez-le à l’aide d’une pompe à vélo. AVERTISSEMENT Avant chaque promenade, assurez- vous que les deux roues sont bien fixées dans l’essieu du transporteur. 4.5 retIrer les roues Desserrez le frein de stationnement. Maintenez enfoncé le bouton de dégagement sur la roue. (Consultez l’image 2.) Sortez la roue de l’essieu du transporteur.
  • Page 33: Installer Le Guidon

    4.81 Installer le drapeau de sécurIté AVIS Le guidon réglable HeightRight™ a deux positions : haute et basse. Retirez le guidon et retournez-le pour passer d’une position à l’autre. AVERTISSEMENT Insérez le mât dans la collerette en métal ou en plastique du drapeau. Toute charge fixée à la poignée a une incidence sur la stabilité du transporteur Insérez le mât dans la pochette située du côté pour enfants Thule. gauche. (Consultez l’image 3.) 51100985 - A...
  • Page 34: Installer Le Dispositif Ezhitch

    4.8.2 Installer le dIsposItIf ezHItcH à dégageMent rapIde Assurez-vous que la tige à dégagement rapide est compatible avec votre vélo. Dévissez complètement le bouton à dégagement rapide et retirez-le de la tige à dégagement rapide. Retirez l’un des ressorts de la tige à dégagement rapide. Insérez la tige à dégagement rapide dans le dispositif ezHitch™. (Consultez l’image 1.) Insérez la tige à dégagement rapide dans l’essieu du vélo, à partir du côté gauche vers la droite. Replacez le ressort dans la tige à dégagement rapide, l’extrémité étroite pointant vers l’intérieur, vers le vélo. Fermez le levier à dégagement rapide. Replacez et serrez le bouton à dégagement rapide avec les doigts. Ouvrez le levier à dégagement rapide. (Consultez l’image 2.) Serrez le bouton à dégagement rapide en lui faisant faire un tour de plus. Fermez le levier à dégagement rapide. (Consultez l’image 3.) Assurez-vous que la roue du vélo est bien fixée au vélo en tirant d’un coup sec.
  • Page 35: Installer Le Dispositif Ezhitch

    En ce qui a trait aux moyeux intégrés, référez- Assurez-vous que le bras de serrage n’est pas vous aux guides d’instruction fournis avec la trousse d’adaptateur de fixation pour moyeu endommagé ni usé, car cela pourrait compromettre intégré Thule pour avoir des précisions au l’utilisation sécuritaire du bras d’attelage. sujet de l’installation. Positionnez le bras d’attelage à l’avant du transporteur pour enfants Thule, la boule d’attache pointant vers l’avant et la droite.
  • Page 36: Fixer Le Transporteur À Votre Vélo

    Tirez la languette de caoutchouc vers le bas, autour du cadre du vélo ou pour toute autre raison. Si la sangle de sécurité de secours au-dessus de l’extrémité saillante de la goupille n’est pas installée, le transporteur pour de sécurité afin de la fixer au dispositif ezHitch™. enfants Thule pourrait se détacher du vélo. (Consultez l’image 3.) Formez une boucle à l’aide de la sangle de sécurité de secours autour du cadre du vélo et accrochez AVERTISSEMENT l’attache à l’anneau en D. (Consultez l’image 4.) La charge du bras d’attelage ne doit pas être inférieure à...
  • Page 37: Retirer Le Transporteur De Votre Vélo

    4.9.1 régler le bras d’attelage pour le Mode MarcHe Décrochez la sangle de sécurité de secours du cadre du vélo. (Consultez l’image 1.) Retirez la languette de caoutchouc de l’extrémité de la goupille de sécurité. Retirez la goupille de sécurité du dispositif ezHitch™. Retirez la boule d’attache du dispositif ezHitch™ en tirant vers l’avant. Glissez le bras d’attelage vers l’intérieur, jusqu’à ce que le trou avant du bras s’aligne avec le trou de l’aile. (Consultez l’image 2.) Insérez la goupille de sécurité à l’arrière de l’aile, dans le bras d’attelage, puis fermez l’attache en D. (Consultez l’image 3.) Assurez-vous que le bras d’attelage est bien fixé au transporteur pour enfants Thule en tirant dessus d’un coup sec. 51100985 - A...
  • Page 38: Insérer La Roue Pour Le Mode Marche

    4.9.2 Insérer la roue pour le Mode 4.9.3 ranger la roue de poussette en MarcHe Mode vélo Insérez la roue de poussette dans le bras Pour retirer la roue de poussette, détachez l’attache d’attelage, à partir du bas. (Consultez l’image 1.) en D, puis tirez sur la goupille et retirez la roue. Insérez la goupille dans la fixation de la roue de Insérez la roue de poussette dans le bras poussette et fermez l’attache en D. (Consultez d’attelage, à partir du haut. (Consultez l’image 3.) l’image 2.) Insérez la goupille dans la fixation de la roue de poussette et fermez l’attache en D. (Consultez l’image 4.) AVERTISSEMENT Assurez-vous toujours que la roue de poussette est complètement et adéquatement enclenchée et verrouillée.
  • Page 39: Utilisation Et Caractéristiques

    Empoignez la poignée rouge sur le levier de frein et AVERTISSEMENT tirez-la vers le bas. (Consultez l’image 1.) Après avoir enclenché le frein, vérifiez toujours si le Ne laissez jamais votre enfant sans frein de stationnement fonctionne; le transporteur ne surveillance dans ce transporteur pour devrait pas rouler vers l’avant ni vers l’arrière. enfants Thule. Empoignez la poignée rouge sur le levier de frein et Le frein de stationnement doit toujours poussez-la vers le haut afin de relâcher le frein de être actionné lorsque vous installez et stationnement. (Consultez l’image 2.) sortez les enfants du transporteur. 51100985 - A...
  • Page 40: Régler Le Harnais Rembourré

    (Consultez l’image 3.) Serrez bien les deux sangles d’épaule en tirant les extrémités libres vers le bas. Assurez-vous qu’il n’y a aucun relâchement dans le système de harnais, vis-à-vis de la taille et des épaules de l’enfant. Assurez-vous que le rembourrage des sangles d’épaule est situé sur le dessus des épaules, près du cou de l’enfant. AVERTISSEMENT Ce siège ne convient pas aux enfants de moins de six mois. Pour tout enfant de moins de six mois, vous devez utiliser un accessoire pour bébé Thule approuvé. AVIS Si vous asseyez un seul enfant dans le transporteur, celui-ci doit toujours être assis du côté droit. 51100985 - A...
  • Page 41: Utiliser La Protection Deux-En-Une

    (Consultez l’image 1.) Pour protéger l’intérieur du transporteur des intempéries, déroulez la fenêtre de plastique vers le bas. Utilisez le velcro au bas de la protection pour maintenir la fenêtre fermée. Pour ouvrir la protection, détachez le velcro situé sur le coin avant de chaque protection du transporteur. Pour fermer la protection, tirez l’avant de la protection vers le bas et fixez chaque coin à l’aide du velcro. (Consultez l’image 2.) AVERTISSEMENT L’utilisateur de ce transporteur pour enfants Thule doit connaître les dangers liés à l’exposition aux éléments météorologiques, comme le refroidissement causé par le facteur éolien et l’épuisement par la chaleur pouvant survenir si l’on est exposé de façon prolongée à des températures froides ou chaudes, sans une ventilation ou une hydratation adéquate. AVERTISSEMENT Lorsque ce transporteur pour enfants Thule est utilisé en mode remorque, la toile de protection doit être fermée afin d’éviter que tout débris n’y entre.
  • Page 42: Utiliser Le Pare-Soleil

    Pour protéger l’intérieur du compartiment pour enfant, déroulez le rabat arrière vers l’avant du transporteur. Utilisez le velcro au bas du pare-soleil pour le maintenir fermé. (Consultez l’image 1.) Pour ouvrir complètement l’avant et l’arrière du transporteur, roulez le rabat arrière vers le haut. Utilisez les anneaux élastiques au haut du rabat arrière pour le maintenir ouvert. Votre transporteur est doté des compartiments de rangement suivants : Une grande cavité à l’arrière. (Consultez l’image 2.) Une pochette en filet à l’intérieur, à l’avant du transporteur. (Consultez l’image 3.) AVERTISSEMENT Ne transportez pas d’enfants ni de bagages supplémentaires dans ce transporteur pour enfants Thule. 51100985 - A...
  • Page 43: Informations Supplémentaires

    INFORMATIONS SUPPLÉMENTAIRES 6.1 accessoIres 6.2 servIce et entretIen Plusieurs accessoires sont compatibles avec votre Vérifiez régulièrement votre transporteur pour transporteur pour enfants Thule. enfants Thule et ses accessoires connexes afin de vous assurer qu’ils ne sont pas endommagés ni usés. • Hamac pour nouveau-né Thule Pièces métalliques • Siège de maintien pour bébé Thule • Nid d’ange Thule Vérifiez s’il y a présence de fissures ou de bosselures. • Dispositif ezHitch Thule N’utilisez pas le transporteur pour enfants Thule si une • Adaptateur de fixation pour moyeu intégré Thule pièce métallique est fissurée ou endommagée. • Adaptateur pour essieu Thule de 12 mm Attaches • Porte-bouteille Thule Examinez régulièrement le transporteur pour •...
  • Page 44: Rangement

    La terre et la boue peuvent entrer dans les pièces mobiles et contribuer à leur usure. Des conditions d’utilisation extrêmes peuvent contribuer à une usure prématurée du transporteur. La façon avec laquelle ce transporteur pour enfants Thule est utilisé et entretenu a une grande incidence sur la rapidité de son usure. Thule Child Transport Systems Ltd. info@thule.com www.thule.com 105 - 5760 9th Street SE Calgary (Alberta), T2H 1Z9 Canada 51100985 - A...
  • Page 45 Thule Coaster Anleitung 51100985...
  • Page 46 INHALT Einführung nuTzung und EigEnschafTEn Verwendungszweck des Handbuchs Betätigen der Feststellbremse Verwendungszweck des Transporters Einstellen des gepolsterten Schultergurts 1.3 Spezifikationen Verwendung des Zwei-in-Eins-Verdecks Verwendung des Sonnenschutzes Stauraum TEilEbEschrEibung Lieferumfang zusäTzlichE informaTionEn sichErhEiT Zubehör Symbole und Anweisungen 6.2 Wartung und Pflege Allgemeine Sicherheitshinweise Lagerung Verschleiß...
  • Page 47: Einführung

    EINFÜHRUNG Vielen Dank, dass Sie sich für einen Thule Coaster entschieden haben. Ihr neuer Carrier bietet ein hohes Maß an Qualität, Sicherheitstechnik und Komfort. BITTE BEACHTEN SIE: Thule Child Transport Systems Ltd. behält sich alle Rechte an dieser Bedienungsanleitung vor. Text, Details und Illustrationen aus dieser Bedienungsanleitung dürfen weder vervielfältigt oder verbreitet noch unberechtigt für kommerzielle Zwecke genutzt oder Dritten...
  • Page 48: Verwendungszweck Des Handbuchs

    Wartungsarbeiten durchführen. Für wen ist dieses Handbuch gedacht? Dieses Handbuch ist für den Käufer und Benutzer des Thule Kindertransporters gedacht, der auch für den Bestimmungswidrige Verwendung Erhalt des einwandfreien Zustands verantwortlich ist und Jegliche Nutzung, die nicht wie oben beschrieben erfolgt, Wartungsarbeiten sowie Reparaturen vorschriftsmäßig...
  • Page 49: Teilebeschreibung

    TEILEBESCHREIBUNG EnThalTEn Basis des Thule Coasters Fahrrad-Set Buggy-Set Schiebebügel Zwei 20-Zoll-Räder 51100985 - A...
  • Page 50: Symbole Und Anweisungen

    • Lassen Sie niemals ein Kind unbeaufsichtigt im Thule WARNUNG Kindertransporter zurück. • Aktivieren Sie stets die Feststellbremse, wenn Sie den Thule Kindertransporter parken. Warnungen enthalten Anweisungen, die für • Transportieren Sie keine zusätzlichen Kinder oder Taschen die sichere Verwendung und den Betrieb mit diesem Thule Kindertransporter.
  • Page 51 Wenn der Thule Kindertransporter als Fahrradanhänger • Verwenden Sie keine ätzenden Reinigungsmittel, sondern eingesetzt wird, darf das Buggyrad niemals in reinigen Sie den Thule Kindertransporter nur mit milder Seife Betriebsposition (Rad nach unten) angebracht werden, und Wasser. sondern muss in der Außer-Betrieb-Position (Rad nach oben) •...
  • Page 52: Erste Schritte

    ERSTE SCHRITTE EnThalTEnE komPonEnTEn Achten Sie darauf, dass die folgenden Gegenstände mit Ihrem Carrier mitgeliefert wurden: • Basis des Thule Coasters • Fahrradanhänger-Set • Buggy-Set • Schiebebügel • Zwei 20-Zoll-Räder • Bedienungsanleitung HINWEIS Lagern Sie den Carrier und seine Komponenten an einem sicheren, trockenen Ort, damit sie in bestmöglichem Zustand bleiben.
  • Page 53: Zusammenklappen Des Carriers

    Rahmen und der anderen Hand an der Achse des Carriers zusammen. WARNUNG Achten Sie beim Zusammenklappen und Aufklappen dieses Thule Kindertransporters darauf, dass Sie sich nicht die Finger einklemmen. Achten Sie darauf, dass sich Ihr Kind nicht in der Nähe befindet, wenn Sie dieses Produkt zusammen- und aufklappen, Ziehen Sie die beiden Hälften mit einer Hand am oberen...
  • Page 54: Montage Der Laufräder

    4.4 monTagE dEr laufrädEr Lösen Sie die Feststellbremse. Halten Sie den Schnellspannknopf zum Lösen der Räder 4.6 monTagE dEr radabwEisEr an einem Rad gedrückt. Führen Sie die Steckachse in die Achsaufnahme ein. (Siehe Bild 1) Lassen Sie den Knopf los. Drücken Sie das Rad vollständig in die Achsaufnahme hinein.
  • Page 55: Montage Des Schiebebügels

    Stecken Sie die Wimpelstange in die Metall- oder Kunststoffaufnahme am Sicherheitswimpel. Jede zusätzliche Last am Schiebebügel Stecken Sie die Wimpelstange durch die Schlaufe auf der wirkt sich auf die Stabilität des Thule linken Seite des Carriers. (Siehe Bild 3) Kindertransporters aus. 51100985 - A...
  • Page 56: Montage Der Ezhitch Tm Mit Einem Schnellspanner

    4.8.2 Montage der ezhitch Mit eineM schnellspanner Stellen Sie sicher, dass der Schnellspanner mit Ihrem Fahrrad kompatibel ist. Lösen Sie die Schnellspannmutter komplett und nehmen Sie sie vom Schnellspannbolzen ab. Nehmen Sie eine der Federn des Schnellspanners ab. Setzen Sie den Schnellspanner von der linken Seite in die ezHitch™...
  • Page 57: Montage Der Ezhitch

    Führen Sie den Sicherungsstift durch die Rückseite der Aufnahme und die Deichsel und schließen Sie den D-Clip. (Siehe Bild 2) Stellen Sie sicher, dass die Deichsel fest am Thule Kindertransporter befestigt ist, indem Sie sie kräftig vom Thule Kindertransporter wegziehen.
  • Page 58 Ziehen Sie die Gummilasche über das herausragende befestigen können. Wenn das Fangband nicht Ende des Sicherungsstifts, um sie an der ezHitch™ zu befestigt ist, kann der Thule Kindertransporter befestigen. (Siehe Bild 3) vom Rad getrennt werden. Legen Sie das Sicherungsband um den Fahrradrahmen und haken Sie den Clip am D-Ring ein.
  • Page 59: Spazierengehen

    Führen Sie den Sicherungsstift durch die Rückseite der Aufnahme und die Deichsel und schließen Sie den D-Clip. (Siehe Bild 3) Stellen Sie sicher, dass die Deichsel fest am Thule Kindertransporter befestigt ist, indem Sie sie kräftig vom Thule Kindertransporter wegziehen.
  • Page 60: Mitnahme Des Buggyrads Beim Radfahren

    4.9.2 einsetzen des buggyrads 4.9.3 MitnahMe des buggyrads beiM radFahren Setzen Sie das Buggyrad von unten auf die Deichsel. Nehmen Sie das Buggyrad ab, indem Sie den D-Clip (Siehe Bild 1) öffnen, den Stift herausziehen und das Rad abnehmen. Führen Sie den Stift durch die Befestigung des Buggyrads Setzen Sie das Buggyrad von oben auf die Deichsel.
  • Page 61: Betätigen Der Feststellbremse

    Prüfen Sie nach dem Einrasten der Bremse stets, ob Lassen Sie Ihr Kind nie unbeaufsichtigt in die Feststellbremse funktioniert – der Carrier darf nicht dem Thule Kindertransporter zurück. vorwärts oder rückwärts rollen. Die Feststellbremse muss immer angezogen Schieben Sie den roten Griff am Bremshebel nach oben, sein, während Kinder ein- und aussteigen.
  • Page 62: Einstellen Des Gepolsterten Schultergurts

    Schultern und neben dem Hals des Kindes befinden. WARNUNG Der Sitz ist nicht für Kinder unter 6 Monaten geeignet. Für Kinder unter 6 Monaten ist ein zugelassenes Thule Babyzubehör zu verwenden. HINWEIS Wenn Sie nur ein Kind in den Carrier setzen, setzen Sie es stets auf die rechte Seite.
  • Page 63: Verwendung Des Zwei-In-Eins-Verdecks

    Ziehen Sie zum Schließen des Verdecks den vorderen Teil des Verdecks nach unten und befestigen Sie die Ecken mit den Klettverschlüssen. (Siehe Bild 2) WARNUNG Der Benutzer dieses Thule Kinder- transporters muss sich regelmäßig davon überzeugen, dass die Kinder den Temperaturen entsprechend gekleidet sind (Hitze, Kälte) und sich wohl fühlen.
  • Page 64: Verwendung Des Sonnenschutzes

    5.4 VErwEndung dEs sonnEnschuTzEs sTauraum Um die Rückseite des Thule Kindertransporters zu verschließen, rollen Sie Klappe auf der Rückseite des Carriers herunter. Verwenden Sie den Klettverschluss an der Unterseite der rückseitigen Klappe, um sie geschlossen zu halten. Um den Innenbereich des Kinderabteils zu verdunkeln, rollen Sie die Heckklappe auf der Vorderseite des Carriers herunter.
  • Page 65: Zusätzliche Informationen

    ZUSÄTZLICHE INFOR- MATIONEN zubEhör 6.2 warTung und PflEgE Es gibt zahlreiches Zubehör, das mit Ihrem Thule Überprüfen Sie Ihren Thule Kindertransporter und Zubehör Kindertransporter kompatibel ist: regelmäßig auf Schäden und Abnutzungserscheinungen. Metallkomponenten • Thule Babysitz • Thule Sitzstütze Prüfen Sie alle Metallbauteile auf mögliche Brüche oder •...
  • Page 66: Lagerung

    Kindertransporters, dass er trocken ist, um die Ausbreitung von Schimmel und Bakterien zu vermeiden. Die Räder sollten während der Lagerung keinen Kontakt zu den Fenstern haben. Trennen Sie für eine Lagerung über längere Zeit den Thule Kindertransporter vom Fahrrad. 6.4 VErschlEiss Dieser Thule Kindertransporter ist sehr langlebig und ermöglicht...

Table des Matières