Publicité

Les langues disponibles
  • FR

Les langues disponibles

  • FRANÇAIS, page 21

Liens rapides

Wireless MAXg ADSL Gateway
Quick Installation Guide
Guide d'installation rapide
Installationsanleitung
Guida all'installazione rapida
Guía breve de instalación
Beknopte installatiegids
Kurulum Kõlavuzu
Οδη γός γρ ήγ ορ ης εγκατάστασης
Pokyny k instalaci naleznete v uživatelské prírucce na instalacním disku CD-ROM.
A telepítési utasításokat lásd a telepíto CD-ROM Felhasználói kézikönyvében.
Instrukcja instalacji jest dostepna w podreczniku uzytkownika na dysku instalacyjnym
CD-ROM.
Para obter instruções de instalação, consulte o Manual do Utilizador no CD-ROM de Instalação.
Инструкции по установке см. в руководстве пользователя на установочном компакт-
диске.
Installationsanvisningar finns i användarhandboken på installationsskivan.
R24.0705.00
rev 1.8 03/07
1

Publicité

Table des Matières
loading

Sommaire des Matières pour USRobotics USR9108

  • Page 1 Wireless MAXg ADSL Gateway Quick Installation Guide Guide d'installation rapide Installationsanleitung Guida all'installazione rapida Guía breve de instalación Beknopte installatiegids Kurulum Kõlavuzu Οδη γός γρ ήγ ορ ης εγκατάστασης Pokyny k instalaci naleznete v uživatelské prírucce na instalacním disku CD-ROM. A telepítési utasításokat lásd a telepíto CD-ROM Felhasználói kézikönyvében.
  • Page 3: Table Des Matières

    Wireless MAXg ADSL Gateway Installation ......3 Installation de la passerelle Wireless MAXg ADSL Gateway ... 19 Installation des Wireless MAXg ADSL Gateways ...... 35 Installazione di Wireless MAXg ADSL Gateway ......51 Instalación de Wireless MAXg ADSL Gateway ......67 Installatie van de Wireless MAXg ADSL Gateway .....
  • Page 5: Wireless Maxg Adsl Gateway Installation

    Wireless MAXg ADSL Gateway Installation Thank you for purchasing the USRobotics Wireless MAXg ADSL Gateway. For current product support and contact information, go to the following Web site: http://www.usr.com/support NOTE: It is important that you have your serial number written down for future reference.
  • Page 6 a microfilter on the cable that connects your ADSL gateway to the telephone jack unless your microfilter has a connection for both the gateway and the phone. Step 2. Connect the Antenna and Cables To configure the gateway, you will initially use the supplied yellow Ethernet cable to connect it to the computer.
  • Page 7 Step 3. Install EasyConfigurator Insert the USRobotics installation CD-ROM into your computer’s CD-ROM drive. The installation should start automatically. This process may take a few moments. If the installation does not start automatically, you can start it manually.
  • Page 8 Step 4. Configure the Gateway with EasyConfigurator This is the EasyConfigurator login window: If EasyConfigurator does not start up automatically, you can open it yourself. Windows Vista users: Click Start and select All Programs and U.S. Robotics EasyConfigurator. Windows users: Click Start and select Programs and U.S. Robotics EasyConfigurator.
  • Page 9 This window appears after you log in: Select your country and your Internet Service Provider (ISP) from the drop-down lists. If your country or ISP does not appear in the list, select Other and manually enter the settings provided by your ISP. You may need to enter your ISP-supplied user name and password after making your selections.
  • Page 10 At this point, the system attempts to access the Internet. This may take a few minutes, until the following status page appears. If the status is CONNECTED TO THE INTERNET, you have successfully configured your Internet connection. If it does not say CONNECTED TO THE INTERNET, go to the Troubleshooting section of this installation guide.
  • Page 11 You can now start up a Web browser. We suggest that you register your product and test your connection by going to the following Web site: www.usr.com/productreg See the User Guide on the USRobotics installation CD-ROM to learn about the gateway’s advanced features. You can use the gateway’s Web user interface to enable or disable wireless communications and to set the network name, broadcast status, and security options.
  • Page 12 There is no physical connection between the gateway and the computer through the Ethernet port. A printer is linked to the gateway. See the User Guide on the USRobotics installation CD-ROM for information on using a printer with the gateway. Solid NOTE: Do not connect any device other than a self- powered printer to the USB port.
  • Page 13 Gateway Back ADSL Digital subscriber line RJ-11 service jack Port that accepts a USB cable to a printer. 1 - 4 Ethernet ports 1 - 4 Reset A recessed button that resets the gateway (see note below) 9VDC Input jack that accepts a cable from supplied power adapter Power Rocker switch that turns the gateway on and off NOTE: To reset the gateway, insert a pin or paper clip to briefly push the Reset...
  • Page 14 Troubleshooting To help diagnose a problem, first use the following troubleshooting checklist. Confirm that you are using the AC power adapter that came with your gateway and that it is connected to the gateway and to an active wall outlet. Make sure the Power switch is switched to the on position.
  • Page 15 A number of devices have to work together for your computer to access the Internet. NOTE: For completeness, the following drawing shows both wired and wireless connections between your computer and your USRobotics Wireless MAXg ADSL Gateway. You’ll normally use only one type of connection on each computer.
  • Page 16 Windows users: You can check your connections automatically with the included utility program. Use Windows Explorer to navigate to the Troubleshooting folder on your USRobotics installation CD-ROM (for example, D:\Troubleshooting, if your CD drive is labeled D:). Double-click on Troubleshoot_Connection.
  • Page 17 USB adapter that does not support WPA encryption, you will not be able to connect to the gateway unless you use WEP encryption instead. Please refer to the configuration section of the User Guide on the USRobotics installation CD-ROM for information on changing the security settings.
  • Page 18 Try to access the gateway’s Web address at http://192.168.1.1 If the gateway’s Web user interface still does not appear, the gateway may have failed. Please contact USRobotics Customer Support. See the contact information later in this document. If the gateway’s Web user interface appears, please continue to Step 3.
  • Page 19: Additional Information

    User Guide See the on the USRobotics Installation CD-ROM. Go to the Support section of the USRobotics Web site at www.usr.com/support/. Many of the most common difficulties that customers experience have been addressed in the FAQ and Troubleshooting Web pages for your Wireless MAXg ADSL Gateway.
  • Page 21: Installation De La Passerelle Wireless Maxg Adsl Gateway

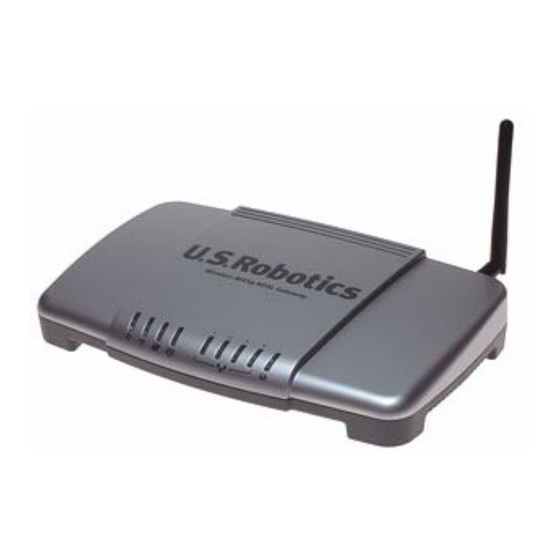
    Installation de la passerelle Wireless MAXg ADSL Gateway Nous vous remercions d'avoir choisi la passerelle USRobotics Wireless MAXg ADSL Gateway. Pour obtenir de l'aide sur ce produit ou nous contacter, visitez le site Web suivant : http://www.usr.com/support REMARQUE : nous vous recommandons vivement de noter votre numéro de série afin de pouvoir vous y référer par la suite.
  • Page 22 microfiltre sur le câble reliant votre passerelle ADSL à la prise téléphonique, à moins que le microfiltre ne dispose d'une prise pour la passerelle et pour le téléphone. Etape 2. Branchement de l'antenne et des câbles Pour configurer la passerelle, vous devez d'abord la connecter à votre ordinateur au moyen du câble Ethernet jaune fourni.
  • Page 23 Si ce n'est pas le cas, reportez-vous à la section Dépannage de ce guide. Etape 3. Installation d'EasyConfigurator Insérez le CD-ROM d'installation USRobotics dans le lecteur CD-ROM de votre ordinateur. L'installation devrait se lancer automatiquement. Cette opération peut durer quelques instants.
  • Page 24 Etape 4. Configuration de la passerelle avec EasyConfigurator Voici la fenêtre de connexion EasyConfigurator. Si EasyConfigurator ne démarre pas automatiquement, vous pouvez l'ouvrir manuellement. Utilisateurs de Windows Vista : cliquez sur Démarrer, sélectionnez Programmes et U.S. Robotics EasyConfigurator. Utilisateurs de Windows : cliquez sur Démarrer, puis sélectionnez Programmes et U.S.
  • Page 25 La fenêtre ci-dessous s'affiche une fois la connexion établie. Sélectionnez votre pays et votre fournisseur d'accès Internet (FAI) dans les listes déroulantes. Si votre pays ou votre FAI n'apparaissent pas dans les listes, sélectionnez Autre et saisissez les paramètres fournis par votre FAI. Après la saisie, vous devrez entrer le nom d'utilisateur et le mot de passe attribués par votre FAI.
  • Page 26 Le système essaye ensuite de se connecter à Internet. Cela peut prendre quelques minutes, jusqu'à ce que la page de statut ci-dessous s'affiche. Si le statut Connecté à Internet s'affiche, vous avez correctement configuré votre connexion Internet. Si le statut Connecté à Internet ne s'affiche pas, reportez-vous à la section Dépannage de ce guide d'installation.
  • Page 27 Web. USRobotics vous conseille vivement de suivre les informations contenues sur cette page pour sécuriser votre réseau. Suivez les instructions à l'écran pour configurer les paramètres de sécurité, puis cliquez sur Appliquer une fois la procédure terminée. La page de statut de l'interface utilisateur Web de la passerelle s'affiche alors automatiquement.
  • Page 28 Une imprimante est connectée à la passerelle. Pour plus d'informations sur l'utilisation d'une imprimante avec la passerelle, reportez-vous au guide de l'utilisateur sur le CD-ROM d'installation USRobotics. Allumé Attention : Le connecteur USB peut avoir une charge maximale de 0.11A.
  • Page 29: Arrière De La Passerelle

    Arrière de la passerelle ADSL Prise RJ-11 pour service DSL (Digital Subscriber Line) Port permettant de brancher un câble USB pour relier la passerelle à une imprimante 1 - 4 Ports Ethernet 1 - 4 Reset Un bouton renfoncé qui réinitialise la passerelle (voir remarque ci-dessous) Prise permettant de brancher un câble pour relier la passerelle à...
  • Page 30: Dépannage

    Dépannage Pour déterminer la nature d'un problème et le résoudre plus facilement, commencez par consulter la liste de dépannage ci-dessous. Vérifiez que vous utilisez l'adaptateur secteur AC fourni avec votre passerelle et qu'il est correctement branché à votre passerelle et à une prise murale active.
  • Page 31 Pour accéder à Internet, plusieurs périphériques doivent être connectés les uns aux autres. REMARQUE : le schéma ci-dessous montre toutes les connexions, câblées et sans fil, possibles entre votre ordinateur et votre passerelle USRobotics Wireless g ADSL Gateway. Généralement, vous n'utiliserez qu'un seul type de connexion pour chaque ordinateur.
  • Page 32 Utilisateurs de Windows : vous pouvez vérifier automatiquement vos connexions grâce à l'utilitaire fourni. Utilisez l'Explorateur Windows pour accéder au dossier Dépannage de votre CD-ROM d'installation USRobotics (par exemple, D:\Troubleshooting, si la lettre de votre lecteur CD est D:). Double-cliquez sur Troubleshoot_Connection.
  • Page 33 WEP. Pour plus d'informations sur le changement des paramètres de sécurité, veuillez consulter la section configuration du guide de l'utilisateur sur le CD-ROM d'installation USRobotics. Si vous avez activé le filtrage MAC sur la passerelle, cet ordinateur est-il autorisé à ce connecter à...
  • Page 34 Essayez d'accéder à l'adresse Web de la passerelle : http://192.168.1.1. Si l'interface utilisateur Web de la passerelle n'apparaît toujours pas, la passerelle ne fonctionne peut-être pas. Contactez le service d'assistance clientèle d'USRobotics. Reportez-vous à la liste des coordonnées de ce document.
  • Page 35: Informations Complémentaires

    Reportez-vous au le CD-ROM d’installation d’USRobotics. Accédez à la section Support du site Web d’USRobotics à l’adresse : www.usr.com/support/ Vous trouverez des réponses à la plupart des problèmes rencontrés par les clients dans les pages Web FAQ et Dépannage consacrées à votre Wireless MAXg ADSL Gateway.
  • Page 37: Installation Des Wireless Maxg Adsl Gateways

    Installation des Wireless MAXg ADSL Gateways Vielen Dank, dass Sie sich für das USRobotics Wireless MAXg ADSL Gateway entschieden haben. Aktuelle Produkt-Support- und Kontaktinformationen finden Sie auf der folgenden Website: http://www.usr.com/support HINWEIS: Es ist sehr wichtig, dass Sie sich die Seriennummer notieren. Diese Nummer benötigen Sie, wenn Sie sich an unsere Support-Abteilung wenden.
  • Page 38 Gateway mit der Telefonbuchse verbindet, sofern der Filter nicht mit einer entsprechenden Buchse für das Gateway und das Telefon ausgestattet ist. 2. Schritt: Anschließen der Antenne und der Kabel Zur Konfiguration des Gateways schließen Sie diesen zunächst über das mitgelieferte gelbe Ethernet-Kabel an den Computer an.
  • Page 39 Wenn dies nicht der Fall ist, schlagen Sie im Abschnitt "Fehlerbehebung" in dieser Anleitung nach. 3. Schritt: Installieren des EasyConfigurator Legen Sie die USRobotics Installations-CD-ROM in das CD-Laufwerk des Computers ein. Die Installation sollte automatisch starten. Dieser Vorgang kann etwas Zeit beanspruchen.
  • Page 40 4. Schritt: Konfiguration des Gateways mit dem EasyConfigurator Das Anmeldefenster für den EasyConfigurator sieht folgendermaßen aus: Wenn der EasyConfigurator nicht automatisch gestartet wird, können Sie ihn manuell öffnen. Benutzer von Windows Vista: Klicken Sie auf Start, wählen Sie Alle Programme und dann U.S.
  • Page 41 Nach dem Anmelden wird folgendes Fenster angezeigt: Wählen Sie Ihr Land und Ihren Internet Service Provider (ISP) aus den Dropdown- Listen aus. Wenn Ihr Land oder ISP in der Liste nicht angezeigt wird, wählen Sie Sonstige, und geben Sie die von Ihrem ISP angegebenen Einstellungen manuell ein. Möglicherweise müssen Sie die von Ihrem ISP angegebenen Informationen (Benutzername und Kennwort) eingeben, nachdem Sie Ihre Auswahl getroffen haben.
  • Page 42 Das System versucht zu diesem Zeitpunkt, eine Verbindung zum Internet herzustellen. Dies kann einige Minuten dauern. Anschließend wird folgende Statusseite angezeigt. Wenn der Status INTERNETVERBINDUNG HERGESTELLT angezeigt wird, wurde Ihre Internetverbindung erfolgreich hergestellt. Wenn die Meldung INTERNETVERBINDUNG HERGESTELLT nicht angezeigt wird, lesen Sie bitte den Abschnitt zur Fehlerbehebung in dieser Installationsanleitung.
  • Page 43 Nun können Sie einen Webbrowser starten. Wir empfehlen, dass Sie Ihr Produkt registrieren und Ihre Verbindung überprüfen. Besuchen Sie zu diesem Zweck die folgende Website: www.usr.com/productreg Informationen zu den erweiterten Funktionen des Gateways finden Sie in der Bedienungsanleitung auf der USRobotics Installations-CD-ROM.
  • Page 44: Status Leds

    Computer über den Ethernet-Anschluss aufgebaut. Ein Drucker ist mit dem Gateway verbunden. Informationen zur Verwendung eines Druckers mit dem Gateway finden Sie auf der USRobotics Installations-CD-ROM. Blinkt Das Gateway und der Drucker tauschen Daten aus. An den USB-Anschluss des Gateways ist kein Drucker angeschlossen.
  • Page 45 Rückseite des Gateways ADSL Digitaler Teilnehmeranschluss für RJ-11-Stecker Der Anschluss, an den ein USB-Druckerkabel angeschlossen werden kann 1 - 4 Ethernet-Anschlüsse 1 - 4 Eine vertieft angebrachte Taste, mit der das Gateway zurückgesetzt wird Reset (siehe Hinweis unten) 9VDC Eingangsbuchse für das Stromkabel des mitgelieferten Netzteils Power Kippschalter zum Ein- und Ausschalten des Gateways HINWEIS: Zum Zurücksetzen des Gateways drücken Sie die Reset-Taste kurz mit...
  • Page 46 Fehlerbehebung Verwenden Sie zunächst die folgende Checkliste zur Fehlerbehebung, um die Ursache des Problems festzustellen. Vergewissern Sie sich, dass Sie das Netzteil verwenden, das mit Ihrem Gateway geliefert wurde, und dass es ordnungsgemäß an das Gateway sowie an eine funktionierende Steckdose angeschlossen ist. Vergewissern Sie sich, dass der Power-Schalter eingeschaltet ist.
  • Page 47 Um dem Computer den Zugang zum Internet zu ermöglichen, müssen mehrere Geräte zusammenarbeiten. HINWEIS: Der Vollständigkeit halber werden in der folgenden Abbildung sowohl Kabel- als auch Wireless-Verbindungen zwischen dem Computer und dem USRobotics Wireless g ADSL Gateway dargestellt. Normalerweise verwenden Computer jedoch nur einen der beiden Verbindungstypen.
  • Page 48 Windows-Benutzer: Sie können Ihre Verbindungen mit dem beiliegenden Dienstprogramm automatisch überprüfen. 1. Navigieren Sie in Windows Explorer zum Ordner Troubleshooting auf der USRobotics Installations-CD-ROM (beispielsweise zum Ordner D:\Troubleshooting, wenn "D" die Laufwerksbezeichnung Ihres CD-Laufwerks ist). 2. Doppelklicken Sie auf Troubleshoot_Connection.
  • Page 49 Verbindung zum Gateway hergestellt werden. In diesem Fall müssen Daten per WEP verschlüsselt werden. Lesen Sie den Konfigurationsabschnitt in der Bedienungsanleitung (auf der USRobotics Installations-CD), um Informationen zum Anpassen Ihrer Konfigurationsangaben zu erhalten. Wenn Sie MAC-Filterung im Gateway aktiviert haben: Darf dieser Computer eine Verbindung zu Ihrem Gateway herstellen? Die MAC-Filterung bezieht sich auf spezielle Wireless-Adapter.
  • Page 50 Versuchen Sie, auf die URL http://192.168.1.1 des Gateways zuzugreifen. Wird die Web-Benutzeroberfläche des Gateways nicht geöffnet, ist das Gateway wahrscheinlich defekt. Wenden Sie sich an den Kundendienst von USRobotics. Kontaktinformationen finden Sie weiter hinten in dieser Anleitung. Wenn die Web-Benutzeroberfläche des Gateways angezeigt wird, fahren Sie mit dem 3.
  • Page 51: Weitere Informationen

    Informationen zur neuesten Firmware und evtl. Updates zu Dokumentationen. Senden Sie Ihre technischen Fragen über das entsprechende Online-Formular ein oder wenden Sie sich persönlich an den Kundendienst von USRobotics. Die Adresse für den Technischen Support finden Sie auf der letzten Seite dieser Anleitung.
  • Page 53: Installazione Di Wireless Maxg Adsl Gateway

    Installazione di Wireless MAXg ADSL Gateway Grazie per aver acquistato USRobotics Wireless MAXg ADSL Gateway. Per informazioni aggiornate sui prodotti e su come contattare l'assistenza tecnica, visitare il sito Web: http://www.usr.com/support NOTA: è molto importante annotare e conservare il numero di serie. Il numero di serie è...
  • Page 54 installare microfiltri sul cavo che collega il gateway ADSL alla presa del telefono, a meno che il microfiltro non sia dotato di una connessione sia per il telefono che per il gateway. Fase 2. Collegamento dei cavi e dell'antenna Per configurare il gateway, utilizzare il cavo Ethernet giallo in dotazione e collegarlo al computer.
  • Page 55 In caso contrario, consultare la sezione Risoluzione di problemi di questa guida. Fase 3. Installazione di EasyConfigurator Inserire il CD-ROM di installazione USRobotics nell'unità CD-ROM del computer. La procedura di installazione dovrebbe avviarsi automaticamente e potrebbe richiedere qualche minuto.
  • Page 56 Fase 4. Configurazione del gateway con EasyConfigurator Di seguito è mostrata la finestra di accesso di EasyConfigurator. Se la procedura di EasyConfigurator non si avvia automaticamente, seguire la procedura indicata qui sotto. Utenti Windows Vista: fare clic su Start, All Programs (Tutti i programmi) e selezionare U.S.
  • Page 57 Una volta eseguita la procedura d'accesso, viene visualizzata questa finestra. Selezionare il proprio Paese e il provider di servizi Internet (ISP) dagli elenchi a discesa. Se il proprio Paese o ISP non è presente negli elenchi a discesa, selezionare Altro e inserire manualmente le impostazioni fornite dall'ISP. Una volta effettuate le selezioni, potrebbe essere necessario inserire il nome utente e la password forniti dall'ISP.
  • Page 58 A questo punto, il sistema esegue un tentativo di accesso a Internet, che potrebbe richiedere qualche minuto, dopodiché viene visualizzata la seguente pagina di stato. Se viene visualizzato lo stato Connesso a Internet, la configurazione della connessione a Internet è riuscita. In caso contrario, consultare la sezione Risoluzione di problemi di questa guida.
  • Page 59 Web che consente di impostare la sicurezza della rete wireless. USRobotics consiglia di impostare le opzioni di sicurezza in questa pagina. Seguire le istruzioni a schermo per impostare le opzioni di sicurezza, quindi fare clic su Applica una volta terminato. Viene quindi visualizzata la pagina di stato dell'interfaccia utente Web del gateway.
  • Page 60 Acceso come utilizzare una stampante con il gateway, è inoltre possibile consultare la guida utente sul CD-ROM di installazione USRobotics. Lampeggiante Il gateway e la stampante si stanno scambiando dati. Non è stata rilevata alcuna stampante collegata alla porta USB del Spento gateway.
  • Page 61 Parte posteriore del gateway ADSL Presa RJ-11 per la linea DSL. Porta del cavo USB per il collegamento alla stampante. 1 - 4 Porte Ethernet 1 - 4. Reset Tasto nascosto che ripristina il gateway (vedere nota qui sotto). 9VDC Presa di ingresso dell'adattatore di alimentazione CA in dotazione.
  • Page 62: Risoluzione Di Problemi

    Risoluzione di problemi Per una più semplice individuazione dei problemi, consultare il seguente elenco. Verificare che si stia utilizzando l'adattatore di alimentazione CA fornito con il gateway e che esso sia collegato correttamente al gateway e a una presa a muro attiva.
  • Page 63 NOTA: nel seguente schema sono indicate sia le connessioni cablate sia quelle wireless tra il computer e USRobotics Wireless MAXg ADSL Gateway. Solitamente, viene utilizzata solo un tipo di connessione per ciascun computer. A. Il computer si collega a Wireless MAXg ADSL Gateway mediante connessione wireless o cablata.
  • Page 64 Utenti Windows: il programma di utilità in dotazione consente di controllare le connessioni automaticamente. Da Esplora risorse/Gestione risorse, accedere alla cartella Troubleshooting (Risoluzione di problemi) del CD-ROM di installazione USRobotics (ad esempio, D:\Troubleshooting, se l'unità CD-ROM è indicata con la lettera D:). Fare doppio clic su Troubleshoot_Connection.
  • Page 65 È possibile ripristinare tali impostazioni utilizzando un file di backup, nel caso questo sia stato precedentemente creato. Consultare la guida utente sul CD-ROM di installazione USRobotics per istruzioni più dettagliate.
  • Page 66 Tentare l'accesso all'indirizzo Web del gateway http://192.168.1.1 Se l'interfaccia utente Web del gateway non viene visualizzata, è possibile che il gateway non funzioni. Contattare il servizio assistenza di USRobotics. Consultare la sezione con i dati di contatto più avanti in questo documento.
  • Page 67: Informazioni Aggiuntive

    Consultare la sul CD-ROM di installazione USRobotics. Visitare la sezione relativa al supporto tecnico del sito Web di USRobotics all'indirizzo www.usr.com/support/. La maggior parte dei problemi riscontrati dai clienti è trattata nelle pagine del sito Web che riportano le domande frequenti (FAQ) e la risoluzione di problemi per Wireless MAXg ADSL Gateway.
  • Page 69: Instalación De Wireless Maxg Adsl Gateway

    Instalación de Wireless MAXg ADSL Gateway Gracias por adquirir USRobotics Wireless MAXg ADSL Gateway. Si desea recibir información actualizada sobre los servicios de asistencia, visite el sitio http://www.usr.com/support NOTA: No olvide anotar el número de serie y tenerlo a mano por si volviera a hacerle falta más adelante.
  • Page 70 enlace ADSL con el cajetín de la línea telefónica a menos que el microfiltro se conecte tanto con el teléfono como con la puerta de enlace. Paso 2. Conexión de la antena y los cables Para configurar la puerta de enlace, utilice el cable Ethernet de color amarillo incorporado para conectarla al ordenador.
  • Page 71 Solución de problemas que aparece en esta guía. Paso 3. Instalación de EasyConfigurator. Introduzca el CD de instalación de USRobotics en la unidad de CD-ROM de su ordenador. La instalación se iniciará automáticamente. Este proceso llevará unos segundos.
  • Page 72 Si está usando Windows, el programa de instalación ejecutará una prueba para comprobar si su sistema cumple los requisitos mínimos para la instalación. Cuando la prueba haya concluido, aparecerá una pantalla de Resultados que mostrará los componentes del sistema. Los que pasaron la prueba aparecerán con una bandera verde y los que no lo hicieron, con una bandera roja.
  • Page 73 Cuando se realice la conexión, aparecerá la siguiente ventana: Seleccione su país y su proveedor de acceso a Internet (ISP) en las listas desplegables. Si su país o su ISP no figuran en la lista, elija Otro e introduzca manualmente la configuración que le proporcionó su ISP. Es posible que, una vez realizada la selección, tenga que escribir el nombre de usuario y la contraseña que le haya proporcionado su ISP.
  • Page 74 A continuación, el sistema intentará conectarse a Internet. Puede que tarde unos minutos. Una vez realizada la conexión, aparecerá la siguiente página de estado: Si el estado es CONECTADO A INTERNET, significa que ha logrado configurar con éxito su conexión a Internet. Si la página no dice CONECTADO A INTERNET, acuda a la sección Solución de problemas de esta guía de instalación.
  • Page 75 Si lo desea, puede abrir un navegador de Internet. Le sugerimos que visite el siguiente sitio Web para probar su conexión y registrar el producto: www.usr.com/productreg Para obtener más información acerca de las funciones avanzadas de la puerta de enlace, consulte la guía del usuario que encontrará en el CD de instalación de USRobotics.
  • Page 76: Indicadores Led De Estado

    Puede utilizar la interfaz Web del usuario de la puerta de enlace para activar y desactivar la comunicación inalámbrica, así como para configurar el nombre de la red, el estado de la emisión y las opciones de seguridad. La interfaz Web del usuario es la principal herramienta para la configuración y el uso de la puerta de enlace.
  • Page 77 Parte trasera de la puerta de enlace ADSL Clavija de servicio de la línea de suscriptor digital RJ-11 Puerto conectado a la impresora mediante un cable USB 1 - 4 Puertos Ethernet 1 - 4 Botón de difícil acceso para reiniciar la puerta de enlace (ver nota más Reset (Reiniciar) adelante) 9VDC (9 V CC)
  • Page 78: Solución De Problemas

    Solución de problemas Cuando tenga un problema, utilice la lista de comprobación que aparece a continuación. Asegúrese de usar el adaptador de corriente que se incluía con la puerta de enlace y de que esté debidamente conectado a una toma de corriente y a la puerta de enlace.
  • Page 79 NOTA: Para mayor información, el siguiente diagrama muestra tanto una conexión inalámbrica como una conexión por cable entre el ordenador y USRobotics Wireless MAXg ADSL Gateway. Por lo general, usted empleará solo uno de estos tipos de conexión. A. Su equipo se conecta a Wireless MAXg ADSL Gateway a través de una conexión inalámbrica o de cable.
  • Page 80 Con el Explorador de Windows, acceda a la carpeta Troubleshooting (Solución de problemas) del CD de instalación de USRobotics (por ejemplo, D:\Troubleshooting, si la D es la letra correspondiente a su unidad de CD-ROM).
  • Page 81 WPA, no podrá conectarse a la puerta de enlace y deberá optar por el cifrado WEP en su lugar. Consulte el apartado de configuración en la guía del usuario del CD de instalación de USRobotics si necesita información sobre cómo cambiar los parámetros de seguridad.
  • Page 82 Si la interfaz Web del usuario de la puerta de enlace sigue sin aparecer, es posible que la puerta de enlace esté averiada. Llame al servicio de asistencia al cliente de USRobotics. Consulte la información de contacto que aparece al final de esta guía.
  • Page 83: Información Adicional

    Guí a del usuario del CD de instalació n de USRobotics. La sección de asistencia técnica del sitio Web de USRobotics: www.usr.com/support/ Las páginas de preguntas más frecuentes y solución de problemas de la Wireless MAXg ADSL Gateway, en las que se incluyen la mayoría de los problemas que experimentan los usuarios.
  • Page 85: Installatie Van De Wireless Maxg Adsl Gateway

    Installatie van de Wireless MAXg ADSL Gateway Hartelijk dank voor het aanschaffen van de USRobotics Wireless MAXg ADSL Gateway. Actuele contactgegevens en informatie over ondersteuning vindt u op de website http://www.usr.com/support OPMERKING: het is uiterst belangrijk om het serienummer te noteren voor toekomstig gebruik.
  • Page 86 gateway op de telefoonaansluiting is aangesloten tenzij uw microfilter zowel een aansluiting heeft voor de gateway als voor de telefoon. Stap 2. De antenne en kabels aansluiten Om de gateway te configureren, dient u eerst de bijgevoegde gele Ethernet-kabel op de computer aan te sluiten.
  • Page 87 Problemen oplossen in deze gids te raadplegen. Stap 3. EasyConfigurator installeren Plaats de installatie-cd van USRobotics in het cd-rom-station van uw computer. De installatie hoort automatisch te beginnen. Dit proces kan even duren. Indien de installatie niet automatisch begint, dient u deze handmatig te starten.
  • Page 88 Stap 4. Configureer de gateway met EasyConfigurator Dit is het loginvenster van de EasyConfigurator: Indien de EasyConfigurator niet automatisch start, kunt u het programma zelf starten. Gebruikers van Windows Vista: klik op Start en selecteer eerst Alle programma's en vervolgens U.S. Robotics EasyConfigurator. Windows-gebruikers: klik op Start, Programma's en selecteer U.S.
  • Page 89 Dit venster verschijnt nadat u zich hebt aangemeld: Selecteer uw land en uw Internet Service Provider (ISP) in de keuzelijsten. Indien uw land of ISP niet in de lijst voorkomt, kunt u Anders selecteren en de instellingen van uw ISP handmatig invoeren. Het kan zijn dat u de gebruikersnaam en het wachtwoord die uw ISP u heeft gegeven, moet invoeren nadat u uw keuze hebt gemaakt.
  • Page 90 Dit is het moment waarop het systeem verbinding met het internet tot stand zal proberen te brengen. Dit kan een paar minuten duren en vervolgens verschijnt de volgende statuspagina. Indien de status Verbonden met het internet verschijnt, hebt u uw internetverbinding juist geconfigureerd.
  • Page 91 USRobotics raadt aan dat u uw netwerk beveiligt volgens de aanwijzingen op deze pagina. Volg de aanwijzingen op het scherm om de beveiliging te configureren en klik op Toepassen zodra u klaar bent. De statuspagina van de webinterface van de gateway verschijnt automatisch nadat u dit hebt gedaan.
  • Page 92 Er is geen fysieke verbinding tussen de gateway en de computer via de Ethernet-poort. Er is een printer verbonden met de gateway. Raadpleeg de gebruikershandleiding op de installatie-cd van USRobotics voor informatie over het gebruik van een printer met de gateway. Knipperend De gateway en de printer communiceren.
  • Page 93 Achterzijde gateway ADSL Aansluiting voor de digital subscriber line RJ-11-service Poort waarmee een USB-kabel op een printer kan worden aangesloten. 1 - 4 Ethernet-poorten 1 - 4 Een verzonken knop waarmee de gateway opnieuw kan worden opgestart Reset (zie opmerking hieronder). 9VDC Invoeraansluiting voor een kabel van de bijgeleverde AC-voedingsadapter Power...
  • Page 94: Problemen Oplossen

    Problemen oplossen Om te helpen een diagnose te stellen, dient u eerst de nu volgende checklist voor het oplossen van problemen te gebruiken. Controleer of u de bij uw gateway geleverde AC-voedingsadapter gebruikt en of deze is aangesloten op de gateway en op een actief stopcontact. Controleer of de Power-schakelaar is ingeschakeld.
  • Page 95 OPMERKING: voor de volledigheid laat de volgende illustratie zowel kabelverbindingen als draadloze verbindingen tussen uw computer en uw USRobotics Wireless MAXg ADSL Gateway zien. Normaliter gebruikt u slechts één type verbinding op uw computer. A. Uw computer maakt verbinding met de Wireless MAXg ADSL Gateway via een draadloze verbinding of een kabelverbinding.
  • Page 96 Windows-gebruikers: u kunt uw verbindingen automatisch controleren met het bijgesloten hulpprogramma. Gebruik Windows Verkenner om naar de map Troubleshooting (Problemen oplossen) te bladeren op de installatie-cd van USRobotics (bijvoorbeeld D:\Troubleshooting als uw cd-rom-station wordt aangeduid met D:). Dubbelklik op Troubleshoot_Connection (Probleem met verbinding oplossen).
  • Page 97 USB Adapter zonder ondersteuning voor WPA-codering, kunt u geen verbinding maken met de gateway tenzij u WEP-codering gebruikt. Raadpleeg het gedeelte Configuratie in de gebruikershandleiding van de installatie-cd van USRobotics voor informatie over het wijzigen van uw beveiligingsinstellingen. Mag deze computer verbinding maken met de gateway als u MAC-filtering op de...
  • Page 98 Probeer toegang te krijgen tot het webadres van de gateway: http://192.168.1.1. Als de webinterface van de gateway niet verschijnt, is de gateway misschien defect. Neem contact op met de klantenservice van USRobotics. U vindt de contactgegevens verderop in dit document.
  • Page 99: Aanvullende Informatie

    Gebruikershandleiding Raadpleeg voor informatie over de werking en de configuratie de op de installatie-cd van USRobotics. In de gebruikershandleiding vindt u meer informatie over het gebruik en de configuratie van uw Wireless MAXg ADSL Gateway. Meer informatie over het oplossen van problemen en overige informatie:...
  • Page 101: Wireless Maxg Adsl Gateway Kurulumu

    Wireless MAXg ADSL Gateway Kurulumu USRobotics Wireless MAXg ADSL Gateway satõn aldõğõnõz için teşekkür ederiz. Güncel ürün desteği ve iletişim bilgileri için aşağõdaki Internet adresini ziyaret ediniz: http://www.usr.com/support NOT: Gelecekte yararlanabilmek amacõyla, seri numaranõzõ not etmeniz gerekir. Teknik Destek bölümünü aramanõz gerektiğinde, yardõm almak için bu numaraya ihtiyacõnõz olacaktõr.
  • Page 102 Mikrofiltrenizde hem ağ geçidi hem de telefon için bir bağlantõ yoksa, ADSL ağ geçidinizi telefon soketine bağlayan kabloya bir mikrofiltre takmayõn. Adõm 2. Anteni ve Kablolarõ bağlayõn Ağ geçidini yapõlandõrmak için, öncelikle birlikte gelen sarõ Ethernet kablosunu kullanarak ağ geçidini bilgisayara bağlayõn. Ağ geçidi, Internet iletişimi kurmaya başladõktan sonra, kurulum sürecinin ilerleyen aşamalarõnda kablosuz bağlantõ...
  • Page 103 Yanmõyorlarsa, bu kõlavuzun ilerleyen kõsõmlarõnda yer alan sorun giderme bölümüne başvurun. Adõm 3. EasyConfigurator Kurulumu USRobotics kurulum CD-ROM'unu, bilgisayarõnõzõn CD-ROM sürücüsüne yerleştirin. Kurulum otomatik olarak başlamalõdõr. Bu işlem birkaç dakika sürebilir. Kurulum otomatik olarak başlamazsa, manuel olarak da başlatabilirsiniz.
  • Page 104 Adõm 4. EasyConfigurator'ü kullanarak Ağ Geçidini konfigüre edin Bu, EasyConfigurator oturum açma penceresidir: Eğer EasyConfigurator otomatik olarak başlamazsa, bunu kendiniz açabilirsiniz. Windows Vista kullanõcõlarõ: Start (Başlat) düğmesini tõklatõn ve All Programs (Tüm Programlar) ve U.S. Robotics EasyConfigurator seçeneklerini seçin. Windows kullanõcõlarõ: Start (Başlat) düğmesini tõklatõn ve sõrasõyla Programs (Programlar) ve U.S.
  • Page 105 Oturum açtõktan sonra şu pencere görüntülenir: Açõlõr listelerden ülkenizi ve Internet Servis Sağlayõcõnõzõ (ISS) seçin. Ülkeniz ya da ISS'niz listede yoksa, Diğer seçeneğini seçin ve ISS'niz tarafõndan sağlanan ayarlarõ kendiniz girin. Seçimlerinizi yaptõktan sonra, ISS'niz tarafõndan sağlanan kullanõcõ adõ ve şifreyi girmeniz gerekebilir.
  • Page 106 Bu aşamada, sistem Internet erişimi kurmaya çalõşõr. Bu işlem, aşağõdaki durum sayfasõ görüntülenene kadar, birkaç dakika sürebilir. Eğer durum, INTERNET BAĞLANTISI KURULDU şeklindeyse, Internet bağlantõnõz başarõlõ bir biçimde kurulmuş demektir. Eğer, INTERNET BAĞLANTISI KURULDU mesajõ gösterilmiyorsa, kurulum kõlavuzunun Sorun Giderme bölümüne başvurun. Adõm 5.
  • Page 107 Artõk, bir Internet tarayõcõ açabilirsiniz. Aşağõdaki Internet sitesine giderek ürününüzü kaydetmenizi ve bağlantõyõ test etmenizi öneririz: www.usr.com/productreg Ağ geçidinin gelişmiş özellikleri hakkõnda bilgi edinmek için USRobotics kurulum CD- ROM'undaki Kullanõm Kõlavuzuna başvurun. Kablosuz iletişimi etkinleştirmek veya devre dõşõ bõrakmak ve ağ adõnõ, yayõn durumunu ve güvenlik seçeneklerini ayarlamak için ağ...
  • Page 108: Durum Led'leri

    Ağ geçidi ve bilgisayar arasõnda Ethernet portu Kapalõ üzerinden bir fiziksel bağlantõ yoktur. Ağ geçidine bir yazõcõ bağlanmõştõr. Ağ geçidinde yazõcõ kullanõmõ hakkõnda bilgi için USRobotics Yanõyor kurulum CD-ROM'undaki Kullanõm Kõlavuzuna Yanõp sönüyor Ağ geçidi ve yazõcõ veri alõşverişinde bulunuyor.
  • Page 109 Ağ Geçidinin Arkasõ ADSL Dijital abone hattõ RJ-11 servis soketi Yazõcõ için USB kablosunun takõldõğõ port. 1 - 4 Ethernet portlarõ 1 - 4 Reset Ağ geçidini sõfõrlayan girintili bir düğme (aşağõdaki açõklamaya bakõnõz) (Sõfõrla) 9VDC Birlikte verilen güç adaptöründen gelen kablonun takõldõğõ giriş soketi Power (Açma/ Ağ...
  • Page 110: Sorun Giderme

    Sorun Giderme Sorunun tespit edilmesine yardõmcõ olmak için öncelikle aşağõdaki sorun giderme kontrol listesini kullanõn. Ağ geçidinizle birlikte gelen AC adaptörü kullandõğõnõzdan, bu adaptörün ağ geçidi ve çalõşõr durumda bir prize bağlõ olduğundan emin olun. Power (Açma/Kapama) düğmesinin açõk konumda olduğundan emin olun. LED'i yanmalõdõr.
  • Page 111 Internet'e erişemiyorsanõz... Bilgisayarõnõzõn Internet'e erişebilmesi için çeşitli aygõtlarõn birlikte çalõşmasõ gerekir. NOT: Tam anlaşõlmasõ için, aşağõdaki çizimde, bilgisayarõnõz ve USRobotics Wireless MAXg ADSL Gateway arasõnda hem kablolu, hem de kablosuz bağlantõ gösterilmiştir. Normalde, bir bilgisayarda bu bağlantõ türlerinden biri kullanõlõr.
  • Page 112 Windows kullanõcõlarõ: Birlikte gelen yardõmcõ programõ kullanarak bağlantõlarõnõzõ otomatik olarak kontrol edebilirsiniz. Windows Explorer'õ kullanarak USRobotics kurulum CD-ROM'unda Troubleshooting (Sorun Giderme) klasörüne gelin (örneğin, D:\Troubleshooting, burada CD sürücünüz D: harfiyle gösterilmiştir). Troubleshoot_Connection (Bağlantõda Sorun Gider) üzerini çift tõklatõn. Bu yardõmcõ program bağlantõlarõnõzõ kontrol eder ve bir sorun varsa, bunun yerini gösterir.
  • Page 113 (Ağ geçidinin tüm kişisel ayarlarõnõ kaybedeceğinizi ve ilk kez kuruyormuş gibi tüm ayarlarõ yeniden yapmanõz gerekeceğini lütfen göz önüne alõn. Eğer ayarlarõn yedeğini aldõysanõz, bu ayarlara geri dönebilirsiniz. Daha fazla bilgi için lütfen USRobotics kurulum CD-ROM'undaki Kullanõm Kõlavuzuna başvurun.)
  • Page 114 Ağ geçidinin http://192.168.1.1 olan Internet adresine erişmeye çalõşõn. Eğer ağ geçidinin Internet kullanõcõ arayüzü hala görüntülenemiyorsa, ağ geçidi bozuk olabilir. Lütfen USRobotics Müşteri Destek departmanõna başvurun. Bu belgenin ilerleyen sayfalarõnda yer alan iletişim bilgilerine bakõn. Ağ geçidi Internet kullanõcõ arayüzü görüntülenirse, lütfen Adõm 3'e geçin.
  • Page 115 Ek Bilgiler Yasal ve garantiyle ilgili bilgiler için bkz. Kullanõm Kõlavuzu USRobotics Kurulum CD-ROM’unda. Çalõşma ve konfigürasyon hakkõnda bilgiler için, bkz. Kullanõm Kõlavuzu USRo- botics Kurulum CD-ROM’unda. Kullanõm Kõlavuzu, Wireless MAXg ADSL Gateway cihazõnõzõn kullanõmõ ve konfigürasyonu hakkõnda ayrõntõlõ bilgiler içerir.
  • Page 117: Εγκατάσταση Wireless Maxg Adsl Gateway

    Εγκατάσταση Wireless MAXg ADSL Gateway Σας ευχαριστούμε που αγοράσατε την πύλη USRobotics Wireless MAXg ADSL Gateway. Για τις πιο πρόσφατες πληροφορίες επικοινωνίας με προσωπικό υποστήριξης προϊόντων, πηγαίνετε στην παρακάτω ιστοσελίδα: http://www.usr.com/support ΣΗΜΕΙΩΣΗ: Για μελλοντική αναφορά, είναι σημαντικό να σημειώσετε τον...
  • Page 118 καλώδιο που συνδέει την πύλη ADSL με το βύσμα του τηλεφώνου παρά μόνον αν διαθέτει σύνδεση τόσο για την πύλη όσο και για το τηλέφωνο. Βήμα 2. Συνδέστε την κεραία και τα καλώδια Για να διαμορφώσετε τις ρυθμίσεις της πύλης, θα πρέπει πρώτα να χρησιμοποιήσετε το...
  • Page 119 είναι αναμμένη. Εάν δεν είναι, ανατρέξτε στην ενότητα αντιμετώπισης προβλημάτων, παρακάτω στον οδηγό αυτόν. Βήμα 3. Εγκατάσταση του EasyConfigurator. Εισαγάγετε το δίσκο CD-ROM εγκατάστασης της USRobotics στη μονάδα CD- ROM. Η εγκατάσταση, λογικά, θα εκκινήσει αυτόματα. Αυτή η διαδικασία ίσως χρειαστεί κάποιο χρόνο.
  • Page 120 Επιλέξτε τη γλώσσα της προτίμησής σας και κάντε κλικ στο OK. Εάν χρησιμοποιείτε Windows, το πρόγραμμα εγκατάστασης εκτελεί έναν διαγνωστικό έλεγχο για να πιστοποιήσει ότι το σύστημά σας ανταποκρίνεται στις ελάχιστες. Όταν ο έλεγχος αυτός ολοκληρωθεί, η οθόνη Results (Αποτελέσματα) απεικονίζει πράσινες επισημάνσεις δίπλα στα στοιχεία του συστήματος...
  • Page 121 Το όνομα χρήστη και ο κωδικός πρόσβασης, έχει ήδη εισαχθεί για λογαριασμό σας. Κάντε κλικ στο Log In (Σύνδεση/είσοδος χρήστη) και περιμένετε λίγο. Αφού συνδεθείτε ως χρήστης, εμφανίζεται το παρακάτω παράθυρο: Επιλέξτε τη χώρα που βρίσκεστε και τον πάροχο υπηρεσιών Διαδικτύου (ISP) από...
  • Page 122 Σε αυτό το σημείο, το σύστημα θα επιχειρήσει να προσπελάσει το Internet. Αυτό μπορεί να διαρκέσει μερικά λεπτά, έως ότου εμφανιστεί η ακόλουθη σελίδα κατάστασης. Εάν η κατάσταση είναι CONNECTED TO THE INTERNET (Υφίσταται σύνδεση με το Internet), αυτό σημαίνει ότι η σύνδεσή σας με το Internet ρυθμίστηκε επιτυχώς.
  • Page 123 Η USRobotics συνιστά ιδιαιτέρως να ασφαλίσετε το δίκτυό σας, όπως περιγράφεται στις οδηγίες αυτής της σελίδας. Ακολουθήστε τις οδηγίες που εμφανίζονται στην οθόνη για να διαμορφώσετε τις ρυθμίσεις ασφαλείας και κάντε κλικ στο Apply (Εφαρμογή) όταν ολοκληρώσετε. Αφού το κάνετε αυτό, εμφανίζεται αυτόματα η σελίδα κατάστασης του περιβάλλοντος...
  • Page 124 Σβηστή υπολογιστή μέσω της θύρας Ethernet. Υπάρχει εκτυπωτής συνδεδεμένος στην πύλη. Ανατρέξτε στον Οδηγό χρήσης στον δίσκο CD-ROM εγκατάστασης της USRobotics για πληροφορίες σχετικά με τη χρήση του εκτυπωτή με την πύλη. Σταθερή ΣΗΜΕΙΩΣΗ: Μη συνδέετε οποιαδήποτε συσκευή διαφορετική από έναν εκτυπωτή με αυτόνομη λειτουργία...
  • Page 125 Υποδοχή στο πίσω μέρος της πύλης ADSL Υποδοχή RJ-11 υπηρεσίας ψηφιακής συνδρομητικής γραμμής (DSL) Θύρα που δέχεται καλώδιο USB σε εκτυπωτή. 1 - 4 Θύρες Ethernet 1 - 4 Ένα κουμπί σε εσοχή που κάνει επαναφορά της πύλης (δείτε τη σημείωση Reset παρακάτω) 9 VDC...
  • Page 126: Αντιμετώπιση Προβλημάτων

    Αντιμετώπιση προβλημάτων Για να βοηθηθείτε στη διάγνωση κάποιου προβλήματος, συμβουλευθείτε πρώτα την παρακάτω λίστα αντιμετώπισης προβλημάτων. Βεβαιωθείτε ότι χρησιμοποιείτε το τροφοδοτικό που σας δόθηκε στη συσκευασία της πύλης, ότι είναι συνδεδεμένο στην πύλη και σε μια ενεργή πρίζα παροχής ηλ. ρεύματος. Βεβαιωθείτε ότι ο διακόπτης λειτουργίας της συσκευής...
  • Page 127 ΣΗΜΕΙΩΣΗ: Για λόγους πληρότητας, το ακόλουθο σχεδιάγραμμα απεικονίζει τόσο τις ενσύρματες όσο και τις ασύρματες συνδέσεις μεταξύ του υπολογιστή σας και της πύλης σας USRobotics Wireless MAXg ADSL Gateway. Φυσιολογικά, σε κάθε υπολογιστή θα χρησιμοποιείτε μόνον έναν από τους δύο τύπους σύνδεσης.
  • Page 128 Χρήστες Windows: Μπορείτε να ελέγξετε τις συνδέσεις σας αυτόματα με το συνοδευτικό βοηθητικό πρόγραμμα. Χρησιμοποιήστε την Εξερεύνηση των Windows για να μεταβείτε στο φάκελο Troubleshooting του δίσκου CD-ROM εγκατάστασης της U.S. Robotics (για παράδειγμα, D:\Troubleshooting, εάν στη μονάδα CD- ROM που διαθέτετε αντιστοιχεί το γράμμα D:). Κάντε...
  • Page 129 συνδεθείτε στην πύλη και θα χρειαστεί να χρησιμοποιήσετε κρυπτογράφηση WEP. Ανατρέξτε στην ενότητα "Διαμόρφωση" αυτού του Oδηγού χρήσης στο δίσκο CD-ROM εγκατάταστασης της USRobotics για να βρείτε πληροφορίες σχετικά με την τροποποίηση των ρυθμίσεων ασφαλείας. Εάν έχετε ενεργοποιήσει στην πύλη τη δυνατότητα φιλτραρίσματος MAC, έχει...
  • Page 130 Εάν το περιβάλλον χρήσης Web της πύλης εξακολουθεί να μην εμφανίζεται, η πύλη ενδέχεται να έχει υποστεί βλάβη. Επικοινωνήστε με το Τμήμα Εξυπηρέτησης Πελατών της USRobotics. Δείτε τα στοιχεία επικοινωνίας παρακάτω στο εγχειρίδιο αυτό. Εάν το περιβάλλον χρήσης Web της πύλης σας εμφανιστεί, μεταβείτε στο Βήμα 3.
  • Page 131: Πρόσθετες Πληροφορίες

    Πρόσθετες πληροφορίες Για πληροφορίες σχετικά με τα νομικά θέματα και την εγγύηση, ανατρέξτε στον Οδηγό χρήσης που υπάρχει στο δίσκο CD-ROM Εγκατάστασης της USRobotics. Για πληροφορίες σχετικά με τη λειτουργία και τη ρύθμιση παραμέτρων, ανατρέξτε στον Οδηγό χρήσης που υπάρχει στο δίσκο CD-ROM Εγκατάστασης της...
  • Page 133 S u p p o r t / A s s i s t a n c e / Se r vi z i o a s s i s t e n z a / A s i s t e n c i a t é c n i c a / Υποστήριξη...
  • Page 136 Printed in XXXXXX...

Ce manuel est également adapté pour:

Usr9108a

Table des Matières