Table des Matières
Publicité
Liens rapides
C-21
ENGLISH
Digital Camera Instructions
• Before using your camera, read this manual carefully to
ensure correct use.
• We recommend that you take test shots to get
accustomed to your camera before taking important
photographs.
FRANÇAIS
Mode d'emploi pour appareil photo
numérique
• Avant d'utiliser votre appareil photo, nous vous prions
de lire attentivement ce mode d'emploi, de manière à
obtenir les meilleurs résultats possibles.
• Avant d'effectuer des prises de vues importantes, nous
vous conseillons par ailleurs de faire quelques essais
afin de vous familiariser avec le maniement de
l'appareil photo.
DEUTSCH
Digital-Kamera Bedienungsanleitung
• Bitte lesen Sie vor Gebrauch dieser Kamera sorgfältig
diese Bedienungsanleitung, um optimale Ergebnisse
beim Fotografieren zu erzielen.
• Wir
empfehlen,
Probeaufnahmen durchzuführen, um sich mit der
Bedienung und den Funktionen der Kamera vertraut zu
machen.
vor
wichtigen
Aufnahmen
Publicité
Table des Matières

Manuels Connexes pour Olympia CAMEDIA C-21

Sommaire des Matières pour Olympia CAMEDIA C-21
- Page 1 ENGLISH Digital Camera Instructions • Before using your camera, read this manual carefully to ensure correct use. • We recommend that you take test shots to get accustomed to your camera before taking important photographs. C-21 FRANÇAIS Mode d’emploi pour appareil photo numérique •...
-
Page 2: Important Notice
contained in these written materials or software, or for damages resulting from the use of the information contained in these written materials or of the software. Olympus reserves the right to alter the features and contents of this publication or software •... -
Page 3: Precautions
• The camera can be cleaned by wiping with a soft cloth. To PRECAUTIONS remove stains, wipe with a soft cloth moistened with a mild detergent solution and wrung dry, then wipe with a dry soft cloth. • Do not use benzene, thinner, or any other chemical product on This camera is not recommended for commercial use or for use the camera, as it may have a corrosive effect. - Page 4 Points to verify before using the camera • If taking particularly important pictures or if you have not used the camera for a long period, first confirm that it functions Storage environment properly, or consult an Authorized Service Centre. • To avoid damage or mis-operation of the camera, only store it •...
-
Page 5: Precautions When Handling The Batteries
Do not use in an airtight device PRECAUTIONS WHEN HANDLING • If may cause the batteries to leak and/or the camera to be damaged. THE BATTERIES Do not recharge alkaline or lithium batteries • If you try to recharge them, it may cause the batteries to leak To prevent leakage, fire, or damage, please read the instructions and/or the camera to be damaged. -
Page 6: Remarque Importante
Note relative aux droits d’auteur Tous droits réservés. Toute reproduction partielle ou intégrale de cette documentation écrite ou du logiciel, par quelque procédé que ce soit ou sous quelque forme que ce soit, électronique ou • IBM est une marque déposée de la firme International Business mécanique, y compris par reproduction photographique ou Machines Corporation. -
Page 7: Precautions
Nettoyage PRECAUTIONS • Bien débrancher l’adaptateur d’alimentation secteur avant de procéder à l’entretien ou au nettoyage de votre appareil. • L’appareil peut être nettoyé en l’essuyant avec un chiffon doux. Il n’est pas conseillé de faire un usage commercial de cet appareil Pour retirer les taches tenaces, essuyer avec un chiffon doux photo ni de l’utiliser dans des conditions difficiles. - Page 8 • Ne pas brancher l’adaptateur d’alimentation secteur si l’appareil ne sert pas. Débrancher le cordon de l’adaptateur d’alimentation secteur si l’appareil n’est pas utilisé. Autrement, il y a risque Conditions de rangement d’accident ou d’endommagement. • Pour éviter des dommages ou mauvais fonctionnement de •...
-
Page 9: Precautions A Prendre Pendant La Manipulation Des Piles
Retirer les piles de l’appareil quand elles sont usées PRECAUTIONS A PRENDRE • Si des piles usées restent dans l’appareil, elle risquent de fuir. Retirer les piles de l’appareil si celui-ci est rangé pendant une PENDANT LA MANIPULATION longue période ou s’il n’est pas prévu de l’utiliser avant DES PILES longtemps. -
Page 10: Wichtige Hinweise
Urheberrechtshinweis Alle Rechte vorbehalten. Die schriftlichen Angaben und Software- Inhalte dürfen, auch auszugsweise, ohne ausdrückliche schriftliche Genehmigung der Firma Olympus in keiner Form • IBM ist ein eingetragenes Warenzeichen der International vervielfältigt oder verwendet werden. Dies gilt für alle Verfahren, Business Machines Corporation. - Page 11 Vor hohen Temperaturen schützen VORSICHTSMASSREGELN • Die Kamera niemals an Orten aufbewahren, die einer starken Erhitzung und/oder direkter Sonneneinstrahlung ausgesetzt sein können (geschlossenes Fahrzeug etc.). Die Einwirkung hoher Diese Kamera wird nicht für den kommerziellen Einsatz oder Temperaturen kann zu Geräteschäden führen. Einsatz unter erschwerten Bedingungen empfohlen.
- Page 12 Sicherheitshinweise zum Gebrauch von Zubehör • Ausschließlich das mitgelieferte oder vom Hersteller empfohlene Zubehör verwenden. Falls Fragen zur Eignung und Anwendung • Die Kamera niemals fallenlassen oder sonstigen heftigen bestehen, wenden Sie sich bitte an Ihren Fachhändler. Erschütterungen bzw. Vibrationen aussetzen. Andernfalls besteht die Gefahr von schweren Schäden (mit •...
- Page 13 Leere Batterien aus der Kamera herausnehmen SICHERHEITSHINWEISE BEI DER • Alte bzw. verbrauchte Batterien, die in der Kamera verbleiben, können auslaufen. Soll die Kamera für längere Zeit gelagert bzw. BATTERIE-HANDHABUNG nicht benutzt werden, die Batterien herausnehmen. Nicht in einem Vakuumbehälter verwenden Die folgenden Angaben sorgfältig beachten, um ein Auslaufen, •...
-
Page 14: Table Des Matières
SOPHISTICATED FUNCTIONS......89 CONTENTS Menu ...................90 Important notice................2 Record mode (1) ..............90 Precautions ...................3 Record mode (2) ..............92 Precautions when handling the batteries ........5 Display mode .................94 Main features................20 Print mode................96 How to scroll the menu ............98 Exposure compensation............100 PREPARATION .............. Using the flash................102 Checking the contents..............24 Auto-flash ..................104... - Page 15 PRINTING PICTURES.........155 CAMERA SETTINGS ..........205 Printing pictures.................156 Beep sound ................206 Print-reserve (card) ..............158 Rec view..................208 Print-all (card)................160 All reset ..................210 Date-print (card) ................162 File number ................212 Index-print (card) ...............164 Adjusting the date and time............214 Printing with the P-300E/P-150E..........166 Rec info ..................218 Index print (P-300E/P-150E) .............168 Picture data ................220 Close-up print (P-300E/P-150E)..........170...
- Page 16 FONCTIONS ÉLABORÉES ........89 TABLE DES MATIÈRES Menu ...................91 Remarque importante..............6 Mode d’enregistrement (1).............91 Precautions ...................7 Mode d’enregistrement (2).............93 Precautions a prendre pendant la manipulation des piles.....9 Mode d’affichage..............95 Caractéristiques principales ............21 Mode d’impression..............97 Déroulement du menu ............99 Réglage de l’exposition .............101 PRÉPARATIFS............23 Photographie au flash ...............103 Vérification des éléments constitutifs ..........24...
- Page 17 IMPRESSION DES VUES ........155 RÉGLAGES D’APPAREIL ........205 Impression des vues ..............157 Avertissement sonore..............207 Réservation d’impression (carte)..........159 Vue d’enregistrement ..............209 Impression complète (carte)............161 Remise à zéro compléte............211 Impression de la date (carte).............163 Numéro de fichier ..............213 Impression de l’index (carte) .............165 Réglage de la date et de l’heure ..........215 Impression avec l’imprimante P-300E/P-150E......167 Information d’enregistrement.............219...
- Page 18 WEITERE FUNKTIONEN ........89 INHALT Menü ...................91 Wichtige Hinweise ...............10 Aufnahmemodus (1) ..............91 Vorsichtsmaßregeln ..............11 Aufnahmemodus (2) ..............93 Sicherheitshinweise bei der Batterie-Handhabung .....13 Wiedergabemodus..............95 Besondere Merkmale ..............21 Druckmodus................97 Menü-Durchlauf ..............99 Belichtungseinstellung...............101 VORBEREITUNG ..........23 Fotografieren mit Blitz ...............103 Überprüfen des Inhaltes ..............25 Automatische Blitzzuschaltung..........105 Beschreibung der Bedienungselemente ........30 Blitzprogramm zur Reduktion des “Rote-Augen-Effekts”...
- Page 19 AUSDRUCKEN VON BILDERN......155 KAMERA-EINSTELLUNGEN......205 Ausdrucken ................157 Warnton..................207 Druckvorauswahl (Karte)............159 Aufnahmeanzeige ..............209 Gesamtausdruck (Karte) ............161 Gesamtrückstellung..............211 Datumsausdruck (Karte) ............163 Dateinummer................213 Index-Print (Karte) ..............165 Datum und Uhrzeit einstellen ............215 Druckbetrieb mit P-300E/P-150E ..........167 Aufnahmeinformation ..............219 Index-Print (P-300E/P-150E).............169 Wiedergabeinformation .............221 Ausdruck einer Ausschnittsvergrößerung (P-300E/P-150E) ..171 Kartenformatierung..............223 Vorauswahl zum Drucken (P-300E) ..........173 Indexwiedergabe-Einstellung ............227...
-
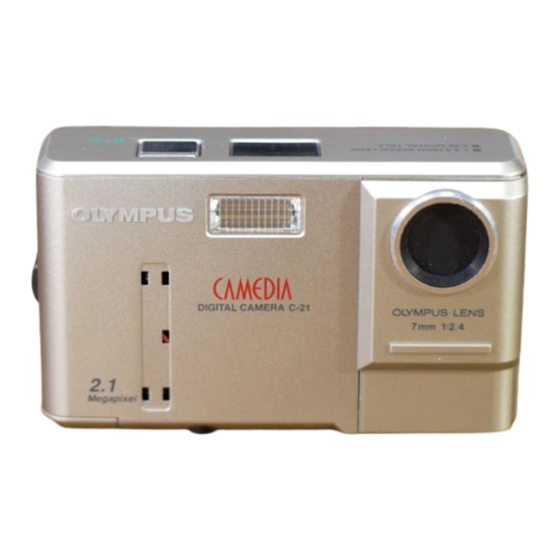
Page 20: Main Features
MAIN FEATURES • This camera’s 2,140,000-pixel CCD and Olympus high- resolution optical lens deliver the highest picture quality in its class. • With the Digital tele mode, the subject can be photographed (cropped to appear) 2.5 times as large.* • A removable SmartMedia (SSFDC) memory card (with Panorama function) is provided. -
Page 21: Caractéristiques Principales
CARACTÉRISTIQUES BESONDERE MERKMALE PRINCIPALES • Der CCD-Chip mit 2.140.000 Bildpunkten und das hoch auflösende Olympus Objektiv liefern eine ausgezeich-nete • Le capteur CCD de 2.140.000 pixels de cet appareil et Bildqualität. l’objectif optique haute résolution Olympus offrent la plus haute qualité d’image dans leurs catégories. •... -
Page 23: Preparation
PREPARATION PRÉPARATIFS VORBEREITUNG... -
Page 24: Checking The Contents
CHECKING THE CONTENTS VÉRIFICATION DES ÉLÉMENTS CONSTITUTIFS RS-232C PC serial cable Camera Câble de connexion série RS-232C pour PC (IBM) Appareil photo Serielles Anschlußkabel für PC (IBM) RS-232C Kamera Conversion connector for Macintosh Câble de connexion pour ordinateurs Macintosh Strap Anschlußkabel für Macintosh Computer Bandoulière Trageriemen... - Page 25 ÜBERPRÜFEN DES INHALTES Software CD’s SmartMedia (containing software) CD logiciel (avec programmes Index labels (2 pieces) d’application) SmartMedia 2 autocollants pour disquettes Software-CD-ROM (SSFDC-8MB) Diskettenaufkleber (2 Stück) Instructions Mode d’emploi Bedienungsanleitung Static-free case Étui antistatique Write-protect adhesive seals (4 pieces) Antistatische Hülle 4 autocollants verrouillage des images en mémoire...
-
Page 26: Names Of Parts
NAMES OF PARTS Camera Body Shutter release button Control panel (p. 32) (p. 60) Lens Flash (p. 102) Selftimer signal (p. 130) Lens barrier (p. 50) Computer connector (RS-232C) (p. 166/188) Video output connector (PAL) (p. 152) AC adaptor connector (p. 42) - Page 27 LCD monitor ON/OFF button (p. 76) Viewfinder (p. 33) LCD monitor (p. 33) Strap hole (p. 38) Jog dial (p. 78/98) OK button (p. 102/122) Info button (p. 218) (Bottom) Threaded mount Card compartment cover (p. 46) Battery compartment cover (p. 40)
-
Page 28: Nomenclature Des Pièces
NOMENCLATURE DES PIÈCES Corps de l’appareil Déclencheur (p. 61) Écran de commande (p. 34) Objectif Flash (p. 103) Voyant de retardateur (p. 131) Capot de protection de l’objectif (p. 51) Connecteur pour ordinateur (RS-232C) (p. 167/189) Prise de sortie vidéo (PAL) (p. - Page 29 Touche de marche/arrêt de l’écran ACL (p. 77) Viseur (p. 35) Écran ACL (p. 35) Oeillet de bandoulière (p. 39) Molette de défilement (p. 79/99) Touche OK (p. 103/123) Touche Info (p. 221) (Dessous) Couvercle de logement des cartes Embase filetée de trépied (p.
- Page 30 BESCHREIBUNG DER BEDIENUNGSELEMENTE Kameragehäuse Auslöser (S. 61) LCD-Feld (S. 36) Objektiv Blitz (S. 103) Selbstauslöser-LED (S. 131) Objektivschutz (S. 51) Computeranschlußbuchse (RS-232C) (S. 167/189) Video-Ausgangsbuchse (PAL) (S. 153) Anschlußbuchse für Netzteil (S. 43)
- Page 31 LCD-Monitor ON/OFF-Taste (S. 77) Sucher (S. 37) LCD-Monitor (S. 37) Tragriemenöse (S. 39) Jogregler (S. 79/99) OK-Taste (S. 103/123) Infotaste (S. 219) (Unterseite) Kartenfachabdeckung (S. 47) Stativgewinde Batteriefachdeckel (S. 41)
-
Page 32: Control Panel
NAMES OF PARTS Control Panel Manual white balance Flash mode Sequential shooting Spot metering mode Exposure compensation Card error Battery check Number of storable pictures Recording mode... - Page 33 Viewfinder Close-up correction marks (p. 74) Green lamp (focus) (p. 62) Autofocus mark (p. 62) / Backlighting correction mark (p. 104) LCD Monitor Random print Protect Battery check Recording mode Frame number Date Time...
-
Page 34: Nomenclature Des Pièces
NOMENCLATURE DES PIÈCES Écran de commande Balance des blancs manuelle Mode flash Fonction images en série Mode Spot (mesure ponctuelle) Commande d’exposition Erreur carte Contrôle des piles Nombre de vues enregistrables Mode d’enregistrement... -
Page 35: Écran Acl
Viseur Repère de correction de parallaxe en mode macro (proxiphotographie) (p. 75) Voyant vert (mise au point) (p. 63) Repère d’autofocus (p. 63) / Repère de correction de contre-jour (p. 105) Écran ACL Présélection d’impression Protection Contrôle des piles Mode d’enregistrement Numéro de vue Date Heure... -
Page 36: Beschreibung Der Bedienungselemente
BESCHREIBUNG DER BEDIENUNGSELEMENTE LCD-Feld Manuelle Weißbalance Blitzprogramme Serienbildfunktion Spotmessung Belichtungskorrektur Kartenfehler Batterieprüfung Bildzählwerk (RestbiIder) Aufnahmemodus... - Page 37 Sucheranzeigen Nahaufnahme-Korrekturmarkierungen (S. 75) Grüne LED (Scharfstellung) (S. 63) Autofocus-Meßfeld (S. 63) / Meßfeld für die Gegenlichtkorrektur (S. 105) LCD-Monitor Vorauswahl zum Drucken Löschschutz Batterieprüfung Aufnahmemodus Bildnummer Datum Uhrzeit...
-
Page 38: Attaching The Strap
ATTACHING THE STRAP • Attach the strap to the strap hole on the camera. Caution: • Attach the strap correctly as shown so that the camera does not fall off. If the strap is attached incorrectly and the camera comes loose and falls off, Olympus is not responsible for any damage. -
Page 39: Fixation De La Bandoulière
FIXATION DE LA BANDOULIÈRE ANBRINGEN DES TRAGERIEMENS • Fixer la bandoulière à l’oeillet de bandoulière sur l’appareil. • Den Trageriemen an der Trageriemenöse der Kamera anbringen. Achtung: Avertissement: • Den Trageriemen zur Absicherung der Kamera wie • Fixer correctement la bandoulière de la manière indiquée dargestellt korrekt anbringen, so daß... -
Page 40: Loading The Batteries
LOADING THE BATTERIES This camera uses one 3V lithium battery pack (CR-V3) or two R6 (AA) NiMH batteries. An Olympus brand 3V lithium battery is recommended. R6 (AA) alkaline, manganese or lithium batteries cannot be used. • Read “PRECAUTIONS WHEN HANDLING THE BATTERIES” on page 5. -
Page 41: Mise En Place Des Piles
MISE EN PLACE DES PILES EINLEGEN DER BATTERIEN Cet appareil utilise une pile au lithium de 3 V (CR-V3) ou deux Es können eine 3-V-Lithium-Batterie (CR-V3) oder zwei NiMH-R6- batteries NiMH. Il est recommandé d’utiliser une pile au lithium de Batterien (Mignon) eingelegt werden. -
Page 42: Using The Ac Adaptor (Optional)
USING THE AC ADAPTOR (Optional) An optional Olympus 3V AC adaptor allows you to power your digital camera from a common AC wall outlet. Make sure that the camera power is off (the lens barrier is closed and the control panel and the LCD monitor are off). -
Page 43: Utilisation De L'adaptateur Secteur (Option)
UTILISATION DE L’ADAPTATEUR VERWENDUNG DES NETZTEILS SECTEUR (Option) (Sonderzubehör) Cet appareil photo numérique peut être raccordé à une prise de Die Digitalkamera kann auch durch das als Sonderzubehör courant par l’intermédiaire d’un adaptateur secteur 3 V Olympus erhältliche Olympus-Netzteil direkt von einer normalen optionnel. - Page 44 Warning: Incorrect use may cause a fire or electric shock. • Be sure to use an Olympus 3V AC adaptor. Olympus is not responsible for any damage caused by the use of other kinds of AC adaptors. • Use an AC220V power source. •...
- Page 45 Avertissement: Achtung: Une utilisation incorrecte peut provoquer un incendie ou Unsachgemäße Verwendung des Netzteils kann Feuer une décharge électrique. oder Stromschlag verursachen. • Bien s’assurer d’utiliser un adaptateur secteur 3 V • Ausschließlich ein Olympus Netzteil mit 3 V verwenden. Olympus.
-
Page 46: Inserting Smartmedia
INSERTING SmartMedia Make sure that the camera power is off (the lens barrier is Insert SmartMedia. closed and the control panel and the LCD monitor are Insérer SmartMedia. off). SmartMedia-Karte einsetzen. Open the card compartment cover. Insert the SmartMedia card correctly as shown. Close the cover tightly. -
Page 47: Mise En Place De La Carte Smartmedia
MISE EN PLACE DE LA CARTE EINSETZEN DER SmartMedia- SmartMedia KARTE S’assurer que l’alimentation est coupée (le capot de Sicherstellen, daß die Kamera ausgeschaltet ist (der protection de l’objectif est fermé avec l’écran de Objektivschutzschieber muß geschlossen und das LCD- commande et l’écran ACL éteints). -
Page 49: Basic Functions
BASIC FUNCTIONS FONCTIONS DE BASE ALLGEMEINE HINWEISE... -
Page 50: Turning On The Power
TURNING ON THE POWER Slide open the lens barrier. To turn on the power in the Record mode, just slide open the lens Faire coulisser le capot de protection de l’objectif. barrier on the front of the camera. When it is turned on, it Den Objektivschutzschieber öffnen. -
Page 51: Mise En Marche
MISE EN MARCHE EINSCHALTEN Pour mettre l’appareil en marche en mode Enregistrement, il suffit Zum Einschalten der Kamera im Aufnahmenmodus einfach den de faire coulisser le capot de protection de l’objectif situé sur la Objektivschutzschieber öffnen. Nach der Einschaltung überprüft partie avant de l’appareil photo. -
Page 52: Checking The Batteries
CHECKING THE BATTERIES When the power is turned on, the remaining battery power will be displayed on the control panel. lights and turns off automatically. Batteries are OK. You can shoot. Control panel blinks and other indicators on the control panel are Écran de commande LCD-Feld displayed normally. -
Page 53: Vérification De L'état Des Piles
VÉRIFICATION DE L’ÉTAT DES ÜBERPRÜFEN DES PILES BATTERIEZUSTANDES Lorsque l’appareil est sous tension, l’état des piles est affiché sur Bei eingeschalteter Kamera wird der Batterie-Ladezustand auf dem l’écran de commande. LCD-Feld angezeigt. L’indicateur s’allume et s’éteint automatiquement. Die Anzeige leuchtet und erlischt automatisch. Les piles sont suffisamment chargées pour pouvoir prendre des Batterien sind für den Aufnahmebetrieb ausreichend geladen. -
Page 54: Checking The Number Of Storable Pictures
CHECKING THE NUMBER OF STORABLE PICTURES When the power is turned on in the Record mode, the number of storable pictures will appear on the control panel. Control panel • The Green lamp blinks and CARD FULL appears on the LCD Écran de commande LCD-Feld monitor when the number reaches 0. -
Page 55: Vérification Du Nombre De Vues Enregistrables
VÉRIFICATION DU NOMBRE DE ÜBERPRÜFEN DER VUES ENREGISTRABLES AUFNAHMEKAPAZITÄT Lorsque l’appareil est mis en marche dans le mode Bei Kamera-Einschaltung wird im Aufnahmemodus die Anzahl der Enregistrement, le nombre de vues enregistrables apparaît sur noch verfügbaren Aufnahmen auf dem LCD-Feld angezeigt. l’écran de commande. - Page 56 The Approximate Number of Storable Pictures Recording Standard High quality mode Number 640x480 1024x768 1600x1200 of pixels File JPEG TIFF (low- (non- JPEG JPEG compres- Memory compres- sion) sion) capacity 16MB 32MB • While HQ and SHQ images have the same number of pixels, SHQ uses lower compression allowing for better image quality when enlarged.
- Page 57 Nombre approximatif de vues enregistrables Anzahl der verbleibenden Aufnahmen (Annäherungswert) Mode Standard Haute qualité d’enregis- Aufnahme- Standard Hohe Qualität trement modus Nombre 640x480 1024x768 1600x1200 de pixels Anzahl der 640x480 1024x768 1600x1200 Bildpunkte Fichier JPEG TIFF (faible (sans Datei JPEG TIFF JPEG JPEG...
-
Page 58: Holding The Camera
HOLDING THE CAMERA Hold the camera firmly with both hands while keeping your elbows at your sides to prevent the camera from moving. Proper Proper Improper Note: • Do not subject the lens to physical shocks. • Keep your fingers and the strap away from the lens and flash. -
Page 59: Tenue De L'appareil
TENUE DE L’APPAREIL KORREKTE KAMERAHALTUNG Tenir l’appareil photo à deux mains et appuyer les coudes le long Die Kamera mit beiden Händen festhalten und zur Vermeidung du corps pour éviter de bouger. von Verwackelungen die Ellbogen an den Körper stützen. Manière correcte de tenir l’appareil pour la prise de vues Korrekte Kamerahaltung für Querformat-Aufnahmen. -
Page 60: Proper Shutter Release
PROPER SHUTTER RELEASE Press the Shutter release button halfway to lock the focus and exposure. • The Green lamp next to the viewfinder lights. • If the Green lamp blinks, the focus or exposure is not locked. Check the working distance. (p. 74) Press the Shutter release button fully to release the shutter and take the picture. -
Page 61: Déclenchement Correct
DÉCLENCHEMENT CORRECT RICHTIGES AUSLÖSEN Appuyer sur le déclencheur jusqu’à mi-course pour Den Auslöser halb hinunterdrücken, so daß Entfernungs- mémoriser la mise au point et l’exposition. und Belichtungswerte abgespeichert werden. • Le voyant vert situé près du viseur s’allume. • Die grüne LED neben dem Sucher leuchtet auf. •... -
Page 62: Taking Pictures Using The Optical Viewfinder
TAKING PICTURES USING THE OPTICAL VIEWFINDER Compose the picture by placing the subject within the autofocus marks in the viewfinder or using the focus lock. (p. 68) Press the Shutter release button halfway to lock the focus and exposure. • The Green lamp next to the viewfinder lights. •... -
Page 63: Prise De Vues À L'aide Du Viseur Optique
PRISE DE VUES À L’AIDE DU FOTOGRAFIEREN MIT DEM VISEUR OPTIQUE OPTISCHEN SUCHER Composer la photo en plaçant le sujet entre les Die Kamera so ausrichten, daß das Motiv repères d’autofocus dans le viseur ou en utilisant innerhalb des Autofocus-Meßfeldes des la mémorisation de la mise au point (p. -
Page 64: Taking Pictures Using The Lcd Monitor
TAKING PICTURES USING THE LCD MONITOR Open the lens barrier, and press the LCD monitor ON/OFF button. • The Menu will appear when the LCD monitor is turned on, but will disappear when the Shutter release button is pressed halfway. See page 90 for information about the Menu. Compose the picture using the LCD monitor. -
Page 65: Prise De Vues À L'aide De L'écran Acl
PRISE DE VUES À L’AIDE DE FOTOGRAFIEREN MIT DEM LCD- L’ÉCRAN ACL MONITOR Ouvrir le capot de protection de l’objectif, et appuyer sur Den Objektivschutzschieber öffnen und den LCD-Monitor la touche de marche/arrêt de l’écran ACL. mit der LCD-Monitor-ON/OFF-Taste einschalten. •... -
Page 66: Quick View
QUICK VIEW You can immediately shift from the Record mode to the Display mode, and check the picture you have just taken. Quickly press the LCD monitor ON/OFF button twice in the Record mode. • The LCD monitor will display the last picture taken. To return to the Record mode, press the LCD monitor ON/OFF button again. -
Page 67: Aperçu
APERÇU SOFORT-WIEDERGABE Vous pouvez basculer immédiatement du mode Enregistrement Sie können vom Aufnahmemodus auf den Wiedergabemodus au mode Affichage, et vérifier la vue que vous venez de prendre. umschalten, um eine Aufnahme zu überprüfen. Appuyer rapidement deux fois sur la touche de Im Aufnahmemodus die LCD-Monitor-ON/OFF-Taste marche/arrêt de l’écran ACL en mode Enregistrement. -
Page 68: Focus Lock
FOCUS LOCK If your main subject is not within the autofocus marks, follow the Viewfinder procedure below to obtain focus. This is called focus lock. Viseur Sucher Position your subject within the autofocus marks, and press the Shutter release button halfway. •... -
Page 69: Mise Au Point
MISE AU POINT SCHÄRFESPEICHER Si le sujet principal ne se trouve pas entre les repères de mise au Wenn sich das bildwichtige Motiv nicht in der Bildmitte (innerhalb point automatique, suivre la procédure ci-dessous pour effectuer des Autofocus-Meßfeldes) befindet, sollte wie hier nachfolgend la mise au point (mémorisation de la mise au point). -
Page 70: Autofocus
AUTOFOCUS There are certain conditions where the autofocus may not work properly even when the Green lamp lights when the Shutter release button is pressed halfway. When this happens, try the procedure below or use Preset focus. (p. 114) Subjects with low contrast Lock the focus on an object that is at the same distance from the camera as the subject, then aim at the subject to take the picture. -
Page 71: Autofocus
AUTOFOCUS AUTOFOCUS Il existe certaines situations dans lesquelles on ne parvient pas à In bestimmten Aufnahmesituationen kann mit dem Autofocus ggf. obtenir une mise au point correcte même si le voyant vert s’allume keine korrekte Scharfstellung erzielt werden, selbst wenn die quand le déclencheur est enfoncé... - Page 72 Subjects at different distances Lock the focus on an object that is at the same distance from the camera as the subject, then aim at the subject to take the picture. (p. 68) Fast-moving subjects at close distances Lock the focus on an object that is at the same distance from the camera as the subject, then aim at the subject to take the picture.
- Page 73 Sujets placés à des distances différentes Zwei Motive in unterschiedlichen Entfernungen Mémoriser la mise au point sur un objet qui se trouve à la même Zunächst auf einen Bildbereich, der sich in der gleichen distance de l’appareil que le sujet, puis recadrer l’image pour Entfernung befindet, scharfstellen.
-
Page 74: Working Range
WORKING RANGE The viewfinder’s picture frame shows the area that can be taken ∞ for subjects at . However, the image area will move lower in the viewfinder as you get closer to the subject. Take pictures at a distance between 0.15 m ~ Picture frame Cadre de l’image •... -
Page 75: Limite De Prise De Vues
LIMITE DE PRISE DE VUES AUFNAHMEBEREICH Le cadre du viseur matérialise la zone qui permet de Das normale Bildfeld des Suchers zeigt den Bereich für ∞ photographier les sujets à l’infini. Au fur et à mesure que vous Aufnahmen bei (unendlich). -
Page 76: Turning On The Lcd Monitor
TURNING ON THE LCD MONITOR To turn on the power in the Display mode, press the LCD monitor LCD monitor ON/OFF button ON/OFF button with the lens barrier closed. When it is turned on, Touche de marche/arrêt de l’écran ACL it automatically checks the card. -
Page 77: Mise En Marche De L'écran Acl
MISE EN MARCHE DE L’ÉCRAN EINSCHALTEN DES LCD- MONITORS Pour mettre en marche dans le mode d’affichage, appuyer sur la Den Objektivschutzschieber schließen und den LCD-Monitor mit touche de marche/arrêt de l’écran ACL avec le capot de der ON/OFF-Taste einschalten. Sobald der Monitor eingeschaltet protection de l’objectif fermé. -
Page 78: One-Frame Display
ONE-FRAME DISPLAY You can display the pictures you have taken on the LCD monitor. Turn on the LCD monitor in the Display mode. With each press of the right arrow on the Jog dial, you can view the succeeding picture. With each press of the left arrow, you can view the preceding picture. -
Page 79: Affichage D'une Vue
AFFICHAGE D’UNE VUE EINZELBILDWIEDERGABE Vous pouvez visionner immédiatement sur l’écran ACL les vues Aufgenommene Bilder können auf dem LCD-Monitor betrachtet que vous venez de prendre. werden. Mettre l’écran ACL en marche en mode Affichage. Im Wiedergabemodus den LCD-Monitor einschalten. À chaque pression sur la flèche droite de la molette de Zur Wiedergabe der nachfolgenden Aufnahmen den défilement, vous pouvez visionner la vue suivante. -
Page 80: Index-Display Mode
INDEX-DISPLAY MODE Multiple pictures can be displayed on the LCD monitor. Turn on the LCD monitor in the Display mode. Press the bottom arrow on the Jog dial. Several pictures will be displayed. Press the right arrow on the Jog dial to select succeeding pictures. -
Page 81: Affichage De L'index Des Images En Mémoire
AFFICHAGE DE L’INDEX DES INDEXBILDWIEDERGABE IMAGES EN MÉMOIRE Auf dem LCD-Monitor können gleichzeitig mehrere Bilder wiedergegeben werden. Plusieurs images peuvent être affichées sur l’écran ACL. Im Wiedergabemodus den LCD-Monitor einschalten. Mettre l’écran ACL en marche en mode Affichage. Den unteren Jogregler-Pfeil drücken, um eine Bildgruppe Appuyer sur la flèche vers le bas de la molette de wiederzugeben. -
Page 82: Close-Up Display Mode (3X Inspection)
CLOSE-UP DISPLAY MODE (3X INSPECTION) Enlarged pictures can be displayed on the LCD monitor. Turn on the LCD monitor in the Display mode and display the picture you want to enlarge. With each press of the top arrow on the Jog dial, the picture is enlarged 1.5X, 2X, 2.5X and 3X. -
Page 83: Affichage Gros Plan
AFFICHAGE GROS PLAN AUSSCHNITTSVERGRÖSSERUNG Des images agrandies peuvent être affichées sur l’écran ACL. Auf dem LCD-Monitor können Bildvergrößerungen gezeigt werden. Mettre l’écran ACL en marche en mode d’affichage et afficher la vue que vous voulez agrandir. Im Wiedergabemodus den LCD-Monitor einschalten und das zu vergrößernde Bild wiedergeben. -
Page 84: Protection
PROTECTION You can prevent accidental erasure of pictures you want to keep. Turn on the LCD monitor in the Display mode and display the picture you want to protect. Press the Shutter release button. • appears on the LCD monitor. •... -
Page 85: Verrouillage Des Images En Mémoire
VERROUILLAGE DES IMAGES EN SCHREIBSCHUTZ MÉMOIRE Wichtige Aufnahmen können vor versehentlichem Löschen geschützt werden. Vous pouvez préserver votre sélection d’images de tout effacement involontaire. Den LCD-Monitor im Wiedergabemodus einschalten und das zu schützende Bild wiedergeben. Mettre l’écran ACL en marche en mode d’affichage et afficher la vue que vous voulez protéger. -
Page 86: Turning Off The Power
TURNING OFF THE POWER When you are finished using the camera, turn off the power. Close the lens barrier. In the Display mode, turn off the LCD monitor. • When the power is turned off, indications on the control panel and the LCD monitor go off. -
Page 87: Coupure De L'alimentation
COUPURE DE L’ALIMENTATION AUSSCHALTEN DER KAMERA Lorsque vous avez fini d’utiliser l’appareil, couper l’alimentation. Nach dem Gebrauch muß die Kamera ausgeschaltet werden. Fermer le capot de protection de l’objectif. Den Objektivschutzschieber schließen. En mode Affichage, éteindre l’écran ACL. Im Wiedergabemodus den LCD-Monitor ausschalten. •... -
Page 89: Sophisticated Functions
SOPHISTICATED FUNCTIONS FONCTIONS ÉLABORÉES WEITERE FUNKTIONEN... -
Page 90: Menu
MENU You can select items to adjust using the menu. The menu is LCD monitor available in the Record mode, Display mode and Print mode. Écran ACL LCD-Monitor Record Mode (1) (With the lens barrier open) • • For compensating the exposure. (p. 100) •... -
Page 91: Menu
MENU MENÜ Vous pouvez sélectionner des postes de réglages en utilisant le Einstellungen können per Menü-Eingabe erfolgen. Die folgenden menu. Le menu est disponible dans les modes d’enregistrement, Menüs (für Aufnahme, Wiedergabe und Ausdrucken) sind d’affichage et d’impression. verfügbar. Mode d’enregistrement (1) Aufnahmemodus (1) (Avec le capot de protection de l’objectif ouvert) (Bei geöffnetem Objektivschutzschieber) -
Page 92: Record Mode (2)
Record Mode (2) (With the lens barrier open) • • • • • • For using the selftimer. (p. 130) • • • • • • For shooting sequentially (p. 122) or using a function card (p. 126). • • • • • • For selecting the recording mode (SQ/ HQ/SHQ). -
Page 93: Mode D'enregistrement (2)
Mode d’enregistrement (2) Aufnahmemodus (2) (Avec le capot de protection de l’objectif ouvert) (Bei geöffnetem Objektivschutzschieber) • • • • • • Pour utiliser le retardateur. (p. 131) • • • • • • Selbstauslöser (S. 131) • • • • • • Pour la prise de vues en série (p. 123) ou •... -
Page 94: Display Mode
Display Mode (With the lens barrier closed and printer disconnected) • • • • • • For performing One-Frame erase. (p. 148) • • • • • • For a slide-show display. (p. 146) • • • • • • For using with optional Olympus special function SmartMedia cards. -
Page 95: Mode D'affichage
Mode d’affichage Wiedergabemodus (Avec le capot de protection de l’objectif fermé et (Bei geschlossenem Objektivschutzschieber, wenn kein l’imprimante débranchée) Drucker angeschlossen ist) • • • • • • Pour effacer une vue. (p. 149) • • • • • • Löschen einer einzelnen Aufnahme (S. 149) •... -
Page 96: Print Mode
Print Mode (With the lens barrier closed and printer connected) • • • • • • For selecting the picture to be printed. (p. 172) • • • • • • For printing all the pictures in the card. (p. 174) •... -
Page 97: Mode D'impression
Mode d’impression Druckmodus (Avec le capot de protection de l’objectif fermé et (Bei geschlossenem Objektivschutzschieber, wenn ein l’imprimante raccordée) Drucker angeschlossen ist) • • • • • • Pour choisir la vue à imprimer. (p. 173) • • • • • • Wahl des auszudruckenden Bildes (S. 173) •... -
Page 98: How To Scroll The Menu
How To Scroll The Menu Press the top/bottom arrows on the Jog dial to select the item to adjust. • at the top of the menu means there are more items above. • at the bottom of the menu means there are more items below. Press the right/left arrows on the Jog dial to adjust the item. -
Page 99: Déroulement Du Menu
Déroulement du menu Menü-Durchlauf Appuyer sur les flèches haut/bas de la molette de Mit dem unteren/oberen Jogregler-Pfeil können die Menü- défilement pour sélectionner le poste de réglage. Einstellbereiche angewählt werden. • en haut du menu signifie qu’il y a des postes au-dessus. •... -
Page 100: Exposure Compensation
EXPOSURE COMPENSATION In addition to automatic exposure, you can also adjust it manually by +/– 2 (approx. 1/3 steps). Adjust + when the subject is mostly bright. Adjust – when the subject is mostly dark. Turn on the LCD monitor in the Record mode to select Press the right arrow on the Jog dial for + adjustment and the left arrow for –... -
Page 101: Réglage De L'exposition
RÉGLAGE DE L’EXPOSITION BELICHTUNGSEINSTELLUNG En plus du réglage automatique de l’exposition, il est possible de Über die automatische Belichtungseinstellung hinaus kann eine procéder à des corrections en utilisant le réglage +/–2 (pas de 1/3 manuelle Korrektur der Belichtung um +/– 2 (in ca. 1/3-Schritten) environ). -
Page 102: Using The Flash
USING THE FLASH Select the flash mode according to the shooting conditions. Turn on the LCD monitor in the Record mode, and press the bottom arrow on the Jog dial to select • When the LCD monitor is off, press the OK button and look at the control panel. -
Page 103: Photographie Au Flash
PHOTOGRAPHIE AU FLASH FOTOGRAFIEREN MIT BLITZ Sélectionner le mode en fonction des conditions de prise de vues. Die Blitzprogramme der Kamera können jeweils wie erforderlich eingesetzt werden. Mettre l’écran ACL en marche dans le mode Den LCD-Monitor im Aufnahmemodus einschalten und Enregistrement, et appuyer sur la flèche vers le bas de la mit dem unteren Jogregler-Pfeil wählen. -
Page 104: Auto-Flash
AUTO-FLASH In the Auto-Flash mode, the flash will fire automatically in low-light and backlight conditions. When you take a picture that is backlit, position the subject within the backlighting correction marks to fire the flash. Turn on the LCD monitor in the Record mode, and press the bottom arrow on the Jog dial to select •... -
Page 105: Mode Flash Automatique
MODE FLASH AUTOMATIQUE AUTOMATISCHE BLITZZUSCHALTUNG En mode flash automatique, le flash se déclenche automatiquement dans des conditions de faible éclairage et de In diesem Blitzprogramm wird der Blitz bei geringer Helligkeit und contre-jour. bei Gegenlicht automatisch zugeschaltet. Lorsqu’une photo est prise en contre-jour, placer le sujet sur le Zur Auslösung des Blitzes bei Gegenlicht das Meßfeld für repère de correction de contre-jour pour que le flash se Gegenlichtkorrektur auf das bildwichtige Motiv ausrichten. -
Page 106: Red-Eye Reducing Flash
RED-EYE REDUCING FLASH This mode significantly reduces the phenomenon of “red-eye”. Turn on the LCD monitor in the Record mode, and press the bottom arrow on the Jog dial to select • When the LCD monitor is off, press the OK button and look at the control panel. -
Page 107: Mode Flash Atténuant L'effet "Yeux Rouges
MODE FLASH ATTÉNUANT BLITZPROGRAMM ZUR L’EFFET “YEUX ROUGES” REDUKTION DES “ROTE-AUGEN- EFFEKTS” Atténue sensiblement l’effet “yeux rouges”. Der bei Blitzaufnahmen störende “Rote-Augen-Effekt” kann Mettre l’écran ACL en marche dans le mode weitgehend verringert werden. Enregistrement, et appuyer sur la flèche vers le bas de la molette de défilement pour sélectionner Den LCD-Monitor im Aufnahmemodus einschalten und •... -
Page 108: Fill-In Flash (Forced Activation)
FILL-IN FLASH (FORCED ACTIVATION) In the Fill-In Flash mode, the flash fires regardless of available light. For example, this mode can be used to brighten up the subject’s shaded face. Another use of this mode is to correct the color shift produced by artificial lights (eg. fluorescent light). Turn on the LCD monitor in the Record mode, and press the bottom arrow on the Jog dial to select •... -
Page 109: Mode Flash D'appoint (Déclenchement Forcé)
MODE FLASH D’APPOINT AUFHELLBLITZ (DÉCLENCHEMENT FORCÉ) Bei diesem Blitzprogramm arbeitet der Blitz unabhängig von den Lichtverhältnissen. So kann z.B. bei starkem Gegenlicht ein En mode flash d’appoint, le flash se déclenche quelles que soient abgeschattetes Gesicht o.ä. im Vordergrund aufgehellt werden. les conditions d’éclairage. -
Page 110: Off (Flash Override)
OFF (FLASH OVERRIDE) In the Off mode, the flash does not fire even in low-light conditions. Use this mode in situations where flash photography is not desired or is prohibited, or in twilight/night scenes. Turn on the LCD monitor in the Record mode, and press the bottom arrow on the Jog dial to select •... -
Page 111: Mode Flash Débrayé
MODE FLASH DÉBRAYÉ OHNE BLITZ En mode flash débrayé, le flash ne se déclenche pas, même si la In dieser Einstellung wird der Blitz - selbst bei schwacher lumière est très faible. Utiliser ce mode lorsque la photographie au Beleuchtung - nicht gezündet. Diese Einstellung empfiehlt sich, flash est indésirable ou interdite, ou encore pour faire des photos wenn Blitzaufnahmen stören würden oder verboten sind, sowie au crépuscule ou de nuit. -
Page 112: Macro Mode
MACRO MODE You can get as close as 15 cm to your subject. A 9 x 13 cm subject can be photographed fully within the frame. In the Record mode, turn on the LCD monitor and press the bottom arrow on the Jog dial to select Press the right/left arrows on the Jog dial to select •... -
Page 113: Gros Plan (Proxiphotographie)
GROS PLAN NAHAUFNAHMEN (PROXIPHOTOGRAPHIE) In der Nahaufnahmefunktion kann ein Objekt bei nur 15 cm Abstand in der Größe von ca. 9 x 13 cm formatfüllend abgebildet Vous pouvez vous approcher jusqu’à 15 cm de votre sujet. Un werden. sujet de 9 x 13 cm peut être photographié en remplissant complètement la vue. -
Page 114: Preset Focus
PRESET FOCUS With Preset focus, you can select a pre-adjusted focal length. It is especially useful when quick shooting is required. In the Record mode, turn on the LCD monitor and press the bottom arrow on the Jog dial to select Press the right/left arrows on the Jog dial to select ∞... -
Page 115: Mise Au Point Préréglée
MISE AU POINT PRÉRÉGLÉE FOCUS-VORWAHL Avec la mise au point préréglée, vous pouvez sélectionner une Mit der Focus-Vorwahl kann eine voreingestellte Brennweite longueur focale préréglée. C’est particulièrement utile quand il gewählt werden. Dies ist insbesondere bei Schnappschüssen faut prendre rapidement une photo. nützlich. - Page 116 Preset focus working range F2.4, ISO 100 Out of flash working range 0.2m 2.5m 0.18m 0.22m 1.15m 2.1m 4.4m...
- Page 117 Limite de la mise au point préréglée Aufnahmebereich bei Focus-Vorwahl F2,4, ISO 100 F2,4, ISO 100 Außerhalb der Blitzreichweite En dehors de la portée du flash 0,2m 0,2m 2,5m 2,5m 0,18m 0,22m 1,15m 2,1m 4,4m 0,18m 0,22m 1,15m 2,1m 4,4m...
-
Page 118: Digital Tele Mode
DIGITAL TELE MODE In the Digital tele mode, the subject can be photographed (cropped to appear) 2.5 times as large. In the Record mode, turn on the LCD monitor and press the bottom arrow on the Jog dial to select Press the right/left arrows on the Jog dial to select 1.0x, 1.6x, 2.0x or 2.5x. -
Page 119: Mode Téléobjectif Numérique
MODE TÉLÉOBJECTIF DIGITALZOOM-MODUS NUMÉRIQUE Im Digitalzoom-Modus kann das Motiv bei zweieinhalbfacher Vergrößerung (Ausschnittsvergrößerung) aufgenommen werden. Dans le mode téléobjectif numérique, le sujet peut être photographié (agrandi pour apparaître) 2,5 fois plus gros. Den LCD-Monitor im Aufnahmemodus einschalten und mit dem unteren Jogregler-Pfeil wählen. -
Page 120: Spot Metering Mode
SPOT METERING MODE The Spot metering mode is used to obtain the right exposure regardless of the backlight. Place the subject in the center of the autofocus marks. In the Record mode, turn on the LCD monitor and press the bottom arrow on the Jog dial to select •... -
Page 121: Mode Spot (Mesure Ponctuelle)
MODE SPOT SPOTMESSUNG (MESURE PONCTUELLE) Wenn sich das zu messende bildwichtige Motiv nicht in der Bildmitte befindet, wie folgt vorgehen: Das bildwichtige Motiv mit Le mode de mesure ponctuelle est utilisé pour obtenir la bonne der Autofocus-Meßfeldmitte anvisieren. exposition quel que soit l’éclairage à contre-jour. Placer le sujet dans le centre du repères de mise au point automatique. -
Page 122: Sequence Mode
SEQUENCE MODE In the Sequence mode, the camera takes approx. 45 separate pictures at approx. 1.5 frames per second in the SQ mode and approx. 5 pictures at approx. 1 frame per second in the HQ mode. This mode is best for shooting a moving subject. In the Record mode, turn on the LCD monitor and press the OK button. -
Page 123: Prise De Vues En Série
PRISE DE VUES EN SÉRIE SERIENAUFNAHMEN En mode prise de vues en série, l’appareil photo prend 45 clichés Bei der Serienaufnahme stellt die Kamera im SQ- environ à la vitesse de 1,5 images par seconde environ dans le Aufnahmemodus ca. 45 Aufnahmen (ca. 1,5 Bilder/Sek.) und im mode SQ et 5 clichés environ à... - Page 124 Note: • Neither the flash nor the Selftimer can be used in the Sequence mode. • The Sequence mode will remain even after a picture is taken, but will be canceled when the lens barrier is closed. • This mode can only be used in the SQ/HQ modes. •...
- Page 125 Remarque: Hinweis: • Ni le flash ni le retardateur ne peut être utilisé en mode prise • Im Serienaufnahmemodus können weder Blitzlicht noch de vues en série. Selbstauslöser verwendet werden. • La prise de vues en série restera même après la prise d’une •...
-
Page 126: Panorama Mode
PANORAMA MODE You can make panorama pictures. In the Record mode, turn on the LCD monitor and press the OK button. Press the bottom arrow on the Jog dial to select Press the right arrow on the Jog dial to select . -
Page 127: Mode Panorama
MODE PANORAMA PANORAMA-AUFNAHMEN Vous pouvez faire des vues de panorama. Sie können Panorama-Aufnahmen herstellen. En mode Enregistrement, mettre l’écran ACL en marche Den LCD-Monitor im Aufnahmemodus einschalten und et appuyer sur la touche OK. Appuyer sur la flèche vers die OK-Taste drücken. Dann mit dem unteren Jogregler- molette défilement pour... - Page 128 LCD Monitor Écran ACL Take pictures by overlapping the edges of the images. LCD-Monitor • A maximum of 10 images can be connected. Press the OK button to cancel the Panorama mode and Menu. Overlap the left end of the picture with the right end Note: of the previous picture (when shooting to the right).
- Page 129 Prendre les vues en faisant se chevaucher les bords des Die Aufnahmen durchführen, wobei sich die Bildränder in images. Anschlußrichtung überlappen müssen. • Un maximum de 10 vues peuvent être raccordées. • Es können maximal 10 Aufnahmen aneinandergefügt werden. Appuyer sur la touche OK pour annuler le mode Zum Annulieren des Panoramamodus und Schließen des Panorama et le menu.
-
Page 130: Selftimer
SELFTIMER Use a tripod to hold the camera securely. In the Record mode, turn on the LCD monitor and press the OK button to select Press the right arrow on the Jog dial to select ON. • Select OFF to cancel the mode, and press the OK button to cancel the Menu. -
Page 131: Retardateur
RETARDATEUR SELBSTAUSLÖSER Utiliser un trépied pour tenir fermement l’appareil. Die Kamera auf einem Stativ befestigen. En mode Enregistrement, mettre l’écran ACL en marche Den LCD-Monitor im Aufnahmemodus einschalten und et appuyer sur la touche OK pour sélectionner die OK-Taste drücken, um zu wählen. -
Page 132: Selecting The Recording Mode
SELECTING THE RECORDING MODE You can select the Standard Quality mode SQ or the High Quality modes HQ/SHQ. In the Record mode, turn on the LCD monitor and press the OK button. Press the bottom arrow on the Jog dial to select •... -
Page 133: Choix Du Mode D'enregistrement
CHOIX DU MODE D’ENREGISTREMENT EINSTELLEN DES AUFNAHMEMODUS Der Aufnahmemodus (Standard-Qualität (SQ) oder hohe Qualität Vous pouvez sélectionner le mode qualité standard SQ ou les (HQ/SHQ)) kann wie gewünscht eingestellt werden. modes haute qualité HQ/SHQ. Den LCD-Monitor im Aufnahmemodus einschalten und En mode Enregistrement, mettre l’écran ACL en marche die OK-Taste drücken. -
Page 134: Shq Setup
SHQ SETUP You can select non-compression for the SHQ mode. In the Record mode, turn on the LCD monitor and press the OK button. Press the bottom arrow on the Jog dial to select Press the right/left arrows on the Jog dial to select JPEG (compression) or TIFF (non-compression). -
Page 135: Réglage Shq
RÉGLAGE SHQ SHQ-EINSTELLUNG Vous pouvez sélectionner sans compression pour le mode SHQ. Im SHQ-Modus kann die Datenabspeicherung ohne Kompression gewählt werden. En mode Enregistrement, mettre l’écran ACL en marche et appuyer sur la touche OK. Appuyer sur la flèche vers Den LCD-Monitor im Aufnahmemodus einschalten und le bas de la molette de défilement pour sélectionner die OK-Taste drücken. -
Page 136: Sq Setup
SQ SETUP You can select the file size for the SQ mode. In the Record mode, turn on the LCD monitor and press the OK button. Press the bottom arrow on the Jog dial to select Press the right/left arrows on the Jog dial to select 640 x 480 (VGA) or 1024 x 768 (XGA). -
Page 137: Réglage Sq
RÉGLAGE SQ SQ-EINSTELLUNG Vous pouvez sélectionner la taille de fichier pour le mode SQ. Im SQ-Modus kann die Dateigröße gewählt werden. En mode Enregistrement, mettre l’écran ACL en marche Den LCD-Monitor im Aufnahmemodus einschalten und et appuyer sur la touche OK. Appuyer sur la flèche vers die OK-Taste drücken. -
Page 138: White Balance
WHITE BALANCE You can select the white balance according to the light source. In the Record mode, turn on the LCD monitor and press the OK button. Press the bottom arrow on the Jog dial to select Press the right arrow on the Jog dial to select AUTO, (Daylight), (Overcast), (Tungsten light) or... -
Page 139: Balance Des Blancs
BALANCE DES BLANCS WEISSBALANCE Vous pouvez choisir la balance des blancs en fonction de la Die Weißbalance kann entsprechend der Lichtquelle eingestellt source de lumière. werden. En mode Enregistrement, mettre l’écran ACL en marche Den LCD-Monitor im Aufnahmemodus einschalten und et appuyer sur la touche OK. -
Page 140: Iso
You can select the sensitivity. In the Record mode, turn on the LCD monitor and press the OK button. Press the bottom arrow on the Jog dial to select Press the right arrow on the Jog dial to select AUTO, 200 or 400. -
Page 141: Iso
FILMEMPFINDLICHKEIT (ISO) Vous pouvez choisir la sensibilité. Die Filmempfindlichkeit kann eingestellt werden. En mode Enregistrement, mettre l’écran ACL en marche Den LCD-Monitor im Aufnahmemodus einschalten und appuyer touche pour die OK-Taste drücken. Dann mit dem unteren Jogregler- sélectionner Pfeil wählen. Appuyer sur la flèche droite de la molette de défilement Den rechten Jogregler-Pfeil drücken, um AUTO, 200, oder pour choisir entre AUTO, 200 ou 400. -
Page 142: Sharpness
SHARPNESS You can select the image sharpness. In the Record mode, turn on the LCD monitor and press the OK button. Press the bottom arrow on the Jog dial to select Press the right/left arrows on the Jog dial to select NORMAL or SOFT. -
Page 143: Netteté
NETTETÉ BILDSCHÄRFE Vous pouvez sélectionner la netteté des images. Die Bildschärfe kann vorgewählt werden. En mode Enregistrement, mettre l’écran ACL en marche Den LCD-Monitor im Aufnahmemodus einschalten und et appuyer sur la touche OK. Appuyer sur la flèche vers die Menütaste drücken. Dann mit dem unteren Jogregler- molette défilement pour... -
Page 144: Slow Shutter Synchronization Flash Mode
SLOW SHUTTER SYNCHRONIZATION FLASH MODE You can set the flash to fire during the first or second half of a slow shutter speed’s release duration. It is especially great for taking photographs of night views. In the Record mode, turn on the LCD monitor and press the OK button. -
Page 145: Mode Flash Synchronisé Àvitesse Lente
MODE FLASH SYNCHRONISÉ À BLITZAUFNAHMEN MIT LANGER VITESSE LENTE SYNCHRONISATIONSZEIT Vous pouvez régler le flash pour qu’il se déclenche pendant la Die Blitzabgabe kann am Anfang oder Ende einer première ou la seconde partie de la durée d’ouverture de Langzeitbelichtung erfolgen. Dies ist insbesonders bei l’obturateur lent. -
Page 146: Slide-Show Mode
SLIDE-SHOW MODE You can run through all the stored pictures automatically. Press the OK button in the Display mode, and press the bottom arrow on the Jog dial to select Press the OK button to start the Slide-Show. Press again to stop it. -
Page 147: Mode Diaporama
MODE DIAPORAMA DIA-SHOW-WIEDERGABE Les vues enregistrées peuvent défiler automatiquement les unes Aufnahmen können in Folge automatisch, wie bei einer après les autres, selon le principe du diaporama. Diavorführung, gezeigt werden. Appuyer sur la touche OK en mode Affichage, et appuyer Den OK-Taste im Wiedergabemodus drücken und mit sur la flèche vers le bas de la molette de défilement pour dem unteren Jogregler-Pfeil... -
Page 148: One-Frame Erase
ONE-FRAME ERASE You can delete pictures you do not need. Display the picture you want to erase. Press the OK button to select Press the OK button with YES selected to erase the picture. • To cancel, press the OK button with NO selected. •... -
Page 149: Effacement D'une Vue
EFFACEMENT D’UNE VUE LÖSCHEN VON EINZELNEN AUFNAHMEN Vous pouvez effacer toutes les vues que vous ne désirez pas conserver. Nicht gewünschte Aufnahmen können wieder gelöscht werden. Afficher l’image que vous voulez effacer. Das zu löschende Bild wiedergeben. Appuyer sur la touche OK pour sélectionner Mit der OK-Taste anwählen. -
Page 150: All-Frame Erase
ALL-FRAME ERASE Press the OK button in the Display mode, then press the bottom arrow on the Jog dial to select Press the OK button with selected. Press the OK button with YES selected to erase all the pictures in the card. •... -
Page 151: Effacement De Toutes Les Vues
EFFACEMENT DE TOUTES LES LÖSCHEN ALLER AUFNAHMEN VUES Im Wiedergabemodus die OK-Taste drücken und mit dem unteren Jogregler-Pfeil wählen. Appuyer sur la touche OK en mode Affichage, puis appuyer sur la flèche vers le bas de la molette de Nach der Anwahl von die OK-Taste drücken. -
Page 152: Connecting To A Television
CONNECTING TO A TELEVISION Recorded images can be viewed on a TV (PAL only). Make sure that the power of the TV and the camera are off before connecting. Video cable Connect the cable by inserting it into the video output Câble vidéo connector of the camera and the input connector of the Videokabel... -
Page 153: Raccordement À Un Téléviseur
RACCORDEMENT À UN ANSCHLUSS AN EIN TÉLÉVISEUR FERNSEHGERÄT Les vues enregistrées peuvent être visionnées sur un téléviseur Aufnahmen können auf dem Bildschirm eines angeschlossenen (PAL uniquement). Fernsehgeräts (PAL-Farbsystem) gezeigt werden. Avant de procéder au raccordement, s’assurer que le Sicherstellen, daß Anschließen téléviseur et l’appareil photo sont tous deux hors Fernsehgerät und die Kamera ausgeschaltet sind. -
Page 155: Printing Pictures
PRINTING PICTURES IMPRESSION DES VUES AUSDRUCKEN VON BILDERN... -
Page 156: Printing Pictures
PRINTING PICTURES There are two types of printing available with this camera. One is Card-Print, which stores data conforming to the “Design rule for Camera File system” standard in the card for making prints using a printer or lab that supports this system. (p. 158 ~ 164) The other is Direct-Print, which is for use with the Olympus P-330E or P-300E printer. -
Page 157: Impression Des Vues
IMPRESSION DES VUES AUSDRUCKEN Deux types d’impression sont disponibles avec cet appareil. Diese Kamera ist für zwei grundsätzliche Druckverfahren L’un est une impression par carte, qui mémorise dans la carte des geeignet. données se conformant au standard du “Design rule for Camera 1) Ausdruck der Karten-Bilddaten, wobei druckbezogene Daten File system (système de fichier pour appareil photo)”... -
Page 158: Print-Reserve (Card)
PRINT-RESERVE (CARD) You can store data for making prints with a printer or at a lab that supports this system. (p. 156) Display the picture you want to print. Press the OK button, then press the bottom arrow on the Jog dial to select Press the right/left arrows on the Jog dial to select the number of pictures to be printed. -
Page 159: Réservation D'impression (Carte)
RÉSERVATION D’IMPRESSION DRUCKVORAUSWAHL (KARTE) (CARTE) Druckbezogene Daten können zusätzlich gespeichert werden, die dann von einem kompatibel arbeitenden Druckgerät oder Vous pouvez mémoriser des données pour faire des tirages avec Fotolabor berücksichtigt werden. (S. 157) une imprimante ou dans un laboratoire de traitement qui supporte ce système. -
Page 160: Print-All (Card)
PRINT-ALL (CARD) You can store data for printing all the pictures in the card. (p. 156) Press the OK button in the Display mode, then press the bottom arrow on the Jog dial to select Press the right arrow on the Jog dial to select ON. •... -
Page 161: Impression Complète (Carte)
IMPRESSION COMPLÈTE (CARTE) GESAMTAUSDRUCK (KARTE) Vous pouvez mémoriser des données pour l’impression de toutes Alle Bilder der Karte können zum Ausdruck vorgemerkt werden. les vues sur la carte. (p. 157) (S. 157) Appuyer sur la touche OK en mode Affichage, puis Im Wiedergabemodus die OK-Taste drücken. -
Page 162: Date-Print (Card)
DATE-PRINT (CARD) You can store data for printing the date with pictures. (p. 156) Press the OK button in the Display mode, then press the bottom arrow on the Jog dial to select Press the right/left arrows on the Jog dial to select OFF, DATE or TIME. -
Page 163: Impression De La Date (Carte)
IMPRESSION DE LA DATE DATUMSAUSDRUCK (KARTE) (CARTE) Das Datum kann zum Ausdruck zusammen mit dem Bild vorgemerkt werden. (S. 157) Vous pouvez mémoriser des données pour imprimer la date avec les vues. (p. 157) Im Wiedergabemodus die OK-Taste drücken. Dann mit dem unteren Jogregler-Pfeil ]anwählen. -
Page 164: Index-Print (Card)
INDEX-PRINT (CARD) You can store data for making index prints. (p. 156) Press the OK button in the Display mode, then press the bottom arrow on the Jog dial to select Press the right arrow on the Jog dial to select ON. Press the OK button to cancel the Menu. -
Page 165: Impression De L'index (Carte)
IMPRESSION DE L’INDEX INDEX-PRINT (KARTE) (CARTE) Bilder der Karte können zum Index-Ausdruck vorgemerkt werden. (S. 157) Vous pouvez mémoriser des données pour faire des impressions de l’index des images en mémoire. (p. 157) Im Wiedergabemodus die OK-Taste drücken. Dann mit dem unteren Jogregler-Pfeil anwählen. -
Page 166: Printing With The P-300E/P-150E
PRINTING WITH THE P-300E/ P-150E P-300E Make sure that the power of the printer and the camera are off before connecting. Connect the computer connector of the camera to the serial port of the printer using the cable provided with the printer. -
Page 167: Impression Avec L'imprimante P-300E/P-150E
IMPRESSION AVEC DRUCKBETRIEB MIT P-300E/ L’IMPRIMANTE P-300E/P-150E P-150E S’assurer au préalable que l’imprimante et l’appareil Sicherstellen, daß vor dem Anschließen Drucker und photo sont hors tension. Kamera ausgeschaltet sind. Raccorder l’appareil photo à l’imprimante au niveau du Die Computer-Buchse an den seriellen Eingang des port série en utilisant le câble fourni avec l’imprimante. -
Page 168: Index Print (P-300E/P-150E)
INDEX PRINT (P-300E/P-150E) Index prints can be made. Connect the camera to the printer, then turn on the LCD monitor. • See page 166 for connection to the printer. Select the Index-Display mode. (p. 80) Enter the number of copies to be printed on the printer (P-300E only), then press the DIRECT PRINT button to start printing. -
Page 169: Impression De L'index Des Images En Mémoire (P-300E/P-150E)
IMPRESSION DE L’INDEX DES INDEX-PRINT (P-300E/P-150E) IMAGES EN MÉMOIRE Der Ausdruck von Index-Print-Bildern ist möglich. (P-300E/P-150E) Die Kamera am Drucker anschließen. Dann den LCD- Des impressions de l’index peuvent être faites. Monitor einschalten. • Angaben zum Druckeranschluß siehe Seite 167. Raccorder l’appareil à... -
Page 170: Close-Up Print (P-300E/P-150E)
CLOSE-UP PRINT (P-300E/P-150E) You can print enlarged images. Connect the camera to the printer, then turn on the LCD monitor. • See page 166 for connection to the printer. Select the Close-Up display mode. (p. 82) Enter the number of copies to be printed on the printer (P-300E only), then press the DIRECT PRINT button to start printing. -
Page 171: Impression De Gros-Plan (P-300E/P-150E)
IMPRESSION DE GROS-PLAN AUSDRUCK EINER (P-300E/P-150E) AUSSCHNITTS-VERGRÖSSERUNG (P-300E/P-150E) Vous pouvez imprimer des images agrandies. Bildbereiche können vergrößert ausgedruckt werden. Raccorder l’appareil à l’imprimante, puis mettre l’écran ACL en marche. Die Kamera am Drucker anschließen. Dann den LCD- • Pour le raccordement à l’imprimante, se reporter à la page 167. Monitor einschalten. -
Page 172: Random Print (P-300E)
RANDOM PRINT (P-300E) You can select a series of pictures to be direct-printed to the P-300E printer. Connect the camera to the printer, then turn on the LCD monitor and display the picture you want to print. • See page 166 for connection to the printer. Press the OK button to select Press the right arrow on the Jog dial to select ON, then press the OK button. -
Page 173: Présélection D'impression (P-300E)
PRÉSÉLECTION D’IMPRESSION VORAUSWAHL ZUM DRUCKEN (P-300E) (P-300E) Vous pouvez présélectionner certaines vues pour l’impression Einzelne Aufnahmen können zum direkten Ausdruck mit Drucker directe sur l’imprimante P-300E. P-300E von der Kamera bereitgestellt werden. Raccorder l’appareil à l’imprimante, puis mettre l’écran Die Kamera am Drucker anschließen. Dann den LCD- ACL en marche et afficher la vue que vous voulez Monitor einschalten und das auszudruckende Bild imprimer. -
Page 174: All Print (P-300E)
ALL PRINT (P-300E) You can print all the pictures in the card using the P-300E printer. Connect the camera to the printer, then turn on the LCD monitor. • See page 166 for connection to the printer. Press the OK button, then press the bottom arrow on the Jog dial to select Press the right/left arrows on the Jog dial to select Enter the number of copies to be printed on the printer,... -
Page 175: Impression Complète (P-300E)
IMPRESSION COMPLÈTE GESAMTAUSDRUCK (P-300E) (P-300E) Alle auf der Karte gespeicherten Bilder können mit P-300E ausgedruckt werden. Vous pouvez imprimer toutes les vues sur la carte en utilisant l’imprimante P-300E. Die Kamera am Drucker anschließen. Dann den LCD- Monitor einschalten. Raccorder l’appareil à l’imprimante, puis mettre l’écran •... -
Page 176: Cut Print (P-300E/P-150E)
CUT PRINT (P-300E/P-150E) You can make 4/16-cut prints using the P-300E/P-150E printer. • In order to make sticker prints, the specialty paper must be set in the P-300E/P-150E printer’s paper feeder. Connect the camera to the printer, then turn on the LCD monitor and display the picture you want to print. -
Page 177: Impression De Vues (P-300E/P-150E)
IMPRESSION DE VUES MEHRFACHBILD-AUSDRUCK (P-300E/P-150E) (P-300E/P-150E) Vous pouvez imprimer des vues en 4/16 exemplaires en utilisant Mit Drucker P-300E/P-150E können Mehrfachbilder (4/16) l’imprimante P-300E/P-150E. ausgedruckt werden. • Placer dans la cassette à papier de l’imprimante P-300E/P-150E • Mehrfach-Bilder können auch auf selbstklebendem Papier des feuilles de vignettes autocollantes. -
Page 178: Mirror Print (P-300E/P-150E)
MIRROR PRINT (P-300E/P-150E) You can make mirror-image prints using the P-300E/P-150E printer. This mode is especially useful for making T-shirt prints. Connect the camera to the printer, then turn on the LCD monitor and display the picture you want to print. •... -
Page 179: Impression Mode Miroir (P-300E/P-150E)
IMPRESSION MODE MIROIR AUSDRUCK ALS SPIEGELBILD (P-300E/P-150E) (P-300E/P-150E) L’impression peut également être effectuée en mode miroir en Mit Drucker P-300E/P-150E können Aufnahmen als Spiegelbild utilisant l’imprimante P-300E/P-150E. ausgedruckt werden. Diese Funktion eignet sich besonders zum Cette fonction est tout particulièrement utile pour l’impression Herstellen von Vorlagen zum Bedrucken von T-Shirts. -
Page 180: Date Print (P-300E/P-150E)
DATE PRINT (P-300E/P-150E) You can print the date with pictures using the P-300E/P-150E printer. Connect the camera to the printer, then turn on the LCD monitor. • See page 166 for connection to the printer. Press the OK button, then press the bottom arrow on the Jog dial to select Press the right arrow on the Jog dial to select ON. -
Page 181: Impression De La Date (P-300E/P-150E)
IMPRESSION DE LA DATE DATUMS-AUSDRUCK (P-300E/P-150E) (P-300E/P-150E) Vous pouvez imprimer la date avec des vues en utilisant Mit Drucker P-300E/P-150E können Bild- und Datumsdaten l’imprimante P-300E/P-150E. ausgedruckt werden. Raccorder l’appareil à l’imprimante, puis mettre l’écran Die Kamera am Drucker anschließen. Dann den LCD- ACL en marche. -
Page 183: Using A Personal Computer
USING A PERSONAL COMPUTER UTILISATION D’UN MICRO-ORDINATEUR EINSATZ EINES COMPUTERS... -
Page 184: Computer System Requirements
COMPUTER SYSTEM REQUIREMENTS When using the provided utility software: Personal computers used with this camera must conform to the following minimum standards. IBM PC/AT compatible Windows 98 : 486DX CPU, 66MHz or greater Windows 95/NT 4.0 : 486SX CPU or later, 33MHz or greater (Pentium recommended) CD-ROM drive Windows 98/95 : 16MB RAM... -
Page 185: Besoins Système De L'ordinateur
BESOINS SYSTÈME DE COMPUTER- L’ORDINATEUR SYSTEMERFORDERNISSE Le micro-ordinateur utilisé en liaison avec cet appareil photo Bei Verwendung der mitgelieferten Computer-Software muß der devra répondre aux exigences suivantes : Computer in Verbindung mit dieser Kamera den folgenden Mindestanforderungen genügen: Compatibilité PC/AT IBM IBM PC/AT und kompatible Geräte Windows 98 : Unité... -
Page 186: Installing Provided Software
INSTALLING PROVIDED SOFTWARE By installing the provided software (CAMEDIA Master), you can download images to a computer via the serial cable and access the following functions. For installation and operation, refer to the software’s online manual. • Image download Image download via the RS-232C cable, as well as support for adding/canceling Protection, picture erase, date set, and others. -
Page 187: Installation Du Logiciel Fourni
INSTALLATION DU LOGICIEL INSTALLIEREN DER FOURNI MITGELIEFERTEN SOFTWARE En installant le logiciel fourni (CAMEDIA Master), vous pouvez Nach Installieren der mitgelieferten Software (CAMEDIA Master) transférer des images vers un ordinateur via le câble série et lassen sich Bilddaten über das serielle Kabel auf einen Computer accéder aux fonctions suivantes. -
Page 188: Connecting To A Personal Computer
CONNECTING TO A PERSONAL COMPUTER DOS/V Use the appropriate connector according to your computer’s platform. D-SUB 9-pin serial port IBM PC/AT compatible Port série à 9 ergots D-SUB Serielle Schnittstelle Connect the provided RS-232C PC serial cable to the D-SUB (9-pol. -
Page 189: Raccordement À Un Micro-Ordinateur
RACCORDEMENT À UN MICRO- ANSCHLUSS AN EINEN ORDINATEUR COMPUTER Utiliser le connecteur ou l’adaptateur approprié suivant les Den für das Computersystem geeigneten Anschlußstecker prises de l’ordinateur. bzw. -adapter verwenden. PC/AT IBM et compatibles IBM PC/AT und kompatible Geräte Raccorder le câble série RS-232C au port série (D-SUB 9 Das mitgelieferte RS-232C-Kabel mit der seriellen Schnittstelle broches, COM 1 ou COM 2) de l’ordinateur. -
Page 190: Using A Personal Computer
USING A PERSONAL COMPUTER Make sure that the power of the personal computer and the camera are OFF. Computer connector Connecteur pour ordinateur Connect the RS-232C PC serial cable to the computer’s Computeranschlußbuchse serial port. Connect the cable to the camera’s Computer connector. Open the lens barrier to turn on the power. -
Page 191: Utilisation D'un Micro-Ordinateur
UTILISATION D’UN MICRO- EINSATZ EINES COMPUTERS ORDINATEUR Sicherstellen, daß Kamera und Computer ausgeschaltet sind. Avant d’effectuer les branchements, s’assurer que l’appareil photo et l’ordinateur ne sont pas sous tension. Das RS-232C-Kabel an der seriellen Anschlußbuchse des Computers anschließen. Raccorder le câble série RS-232C au port série de l’ordinateur. -
Page 192: Transferring Data From Smartmedia
TRANSFERRING DATA FROM SmartMedia PC Card Adaptor The picture data in the SmartMedia can be directly transferred to a personal computer equipped with a PC card (PCMCIA) slot or an external PC card reader/writer, using the optional PC Card Adaptor. FlashPath Floppydisk Adaptor The picture data in the SmartMedia can be directly transferred to a personal computer equipped with a 3.5"... -
Page 193: Transfert De Données De La Carte Smartmedia
TRANSFERT DE DONNÉES DE LA DIREKTÜBERTRAGUNG VON DER CARTE SmartMedia SmartMedia-KARTE Adaptateur de carte PC PC-Kartenadapter Les données d’image dans la carte SmartMedia peuvent être Bei Verwendung des als Sonderzubehör erhältlichen PC- transférées directement sur un ordinateur personnel disposant Kartenadapters können die auf der SmartMedia-Karte enthaltenen d’une case carte PC (PCMCIA) ou d’un lecteur/enregistreur de Bilddaten direkt auf einen Computer heruntergeladen werden, carte PC externe, en utilisant l’adaptateur de carte PC en option. -
Page 194: Viewing Images Stored In The Card On Your Computer
VIEWING IMAGES STORED IN THE CARD ON YOUR COMPUTER You can view images stored in a SmartMedia card via CAMEDIA Master. Start CAMEDIA Master on the computer. Click on [My Camera]. A thumbnail index of stored images will be displayed. Place the cursor on the desired image and double-click on it. -
Page 195: Visionnement Des Images Mémorisées Sur La Carte Dans L'ordinateur
VISIONNEMENT DES IMAGES WIEDERGABE VON AUF DER MÉMORISÉES SUR LA CARTE KARTE GESPEICHERTEN DANS L’ORDINATEUR BILDERN AUF EINEM COMPUTER-BILDSCHIRM Il est possible de visionner les images stockées sur la carte SmartMedia via CAMEDIA Master. Die auf einer SmartMedia-Karte abgespeicherten Bilder können mittels der CAMEDIA Master-Software zur Wiedergabe Déclencher le CAMEDIA Master dans l’ordinateur. -
Page 196: Transferring Data Using Camedia Master
TRANSFERRING DATA USING CAMEDIA Master CAMEDIA Master transfers images stored in the card to your computer. Start CAMEDIA Master on the computer. Select [Camera] - [Download All Images] on the menu bar. The computer will start transferring images from the camera to the computer. -
Page 197: Transfert De Données Avec Camedia Master
TRANSFERT DE DONNÉES AVEC BILDDATENÜBERTRAGUNG MIT CAMEDIA Master DER CAMEDIA Master-SOFTWARE Le CAMEDIA Master transfère des images mémorisées de la Mittels der CAMEDIA Master-Software können auf der Karte carte sur un ordinateur. gespeicherte Bilder zum Computer übertragen werden. Déclencher le CAMEDIA Master dans l’ordinateur. Öffnen Sie das im Computer gespeicherte CAMEDIA Master-Programm. -
Page 198: Processing Images Using Camedia Master
PROCESSING IMAGES USING CAMEDIA Master You can process images (changing tones, composing, and so on) using the provided CAMEDIA Master or other application software. Making Dark Images Bright Some images may come out darker than expected. You can try taking pictures again right after shooting, but may often miss the right moment for a good picture. -
Page 199: Traitement Des Images Avec Camedia Master
TRAITEMENT DES IMAGES AVEC BILDBEARBEITUNG MIT DER CAMEDIA Master CAMEDIA Master-SOFTWARE On peut traiter les images (changement de tonalité, composition, Die nachträgliche Bildbearbeitung (Farbkorrektur, Bildkomposition etc.,) via le CAMEDIA Master fourni ou d’un autre logiciel etc.) kann mittels der CAMEDIA Master-Software oder einer d’application. - Page 200 Correcting Blurry Images Backlight sometimes make the whole image blurry, and an object which stands before the subject may be out-of-focus. Use CAMEDIA Master Sharpen when this happens to sharpen the whole image. However, you should note that it doesn’t wipe out image blur thoroughly.
-
Page 201: Correction D'images Floues
Correction d’images floues Erhöhung der Bildschärfe Parfois, le rétro-éclairage rend l’ensemble de l’image floue, et un Wenn Bildkonturen z.B. bei Gegenlichtaufnahmen zu weich objet qui se tient devant le sujet peut être imprécis ou défocalisé. abgebildet werden oder wenn sich ein Motivbereich außerhalb Lorsque cela se produit, utiliser le CAMEDIA Master “Sharpen”. - Page 202 Composing Images with Templates You can easily compose images with templates in CAMEDIA Master. Place the cursor on the image you want to compose and double-click on it. This will display the selected image. Select [Image] - [Template Superimpose] on the menu bar.
-
Page 203: Composition Avec Un Modèle
Composition avec un modèle Bildkomposition bei Verwendung von Rahmenvorlagen On peut aisément composer les images avec les modèles du CAMEDIA Master. Die CAMEDIA Master-Software gibt Ihnen die Möglichkeit, Bilder durch Rahmenvorlagen neu zu gestalten. Placer le curseur sur l’image que l’on désire composer et cliquer deux fois sur elle. -
Page 205: Camera Settings
CAMERA SETTINGS RÉGLAGES D’APPAREIL KAMERA-EINSTELLUNGEN... -
Page 206: Beep Sound
BEEP SOUND You can select whether to have the operating beep sound. In the Record mode, turn on the LCD monitor and press the OK button. Press the bottom arrow on the Jog dial to select Press the right/left arrows on the Jog dial to select ON or OFF. -
Page 207: Avertissement Sonore
AVERTISSEMENT SONORE WARNTON Vous pouvez sélectionner d’avoir l’avertissement sonore en Die Verfügbarkeit der Warntonfunktion kann vorgewählt werden. service. Den LCD-Monitor im Aufnahmemodus einschalten und En mode Enregistrement, mettre l’écran ACL en marche die OK-Taste drücken. Dann mit dem unteren Jogregler- et appuyer sur la touche OK. -
Page 208: Rec View
REC VIEW You can select whether to display the image while recording with the LCD monitor OFF. In the Record mode, turn on the LCD monitor and press the OK button. Press the bottom arrow on the Jog dial to select Press the right/left arrows on the Jog dial to select ON or OFF. -
Page 209: Vue D'enregistrement
VUE D’ENREGISTREMENT AUFNAHMEANZEIGE Vous pouvez sélectionner d’afficher l’image tout en enregistrant Sie können bestimmen, ob bei der Aufnahme das Aufnahmebild avec l’ecran ACL éteint. gezeigt wird, wenn der LCD-Monitor ausgeschaltet ist. En mode Enregistrement, mettre l’écran ACL en marche Den LCD-Monitor im Aufnahmemodus einschalten und et appuyer sur la touche OK. -
Page 210: All Reset
ALL RESET Clears adjustments and returns to the default settings. In the Record mode, turn on the LCD monitor and press the OK button. Press the bottom arrow on the Jog dial to select , then press the OK button. Press the OK button again with YES selected to reset the adjustments. -
Page 211: Remise À Zéro Complète
REMISE À ZÉRO COMPLÈTE GESAMTRÜCKSTELLUNG Efface les réglages et remet les réglages par défaut. Dient Rückstellung aller Parameter Anfangseinstellstatus. En mode Enregistrement, mettre l’écran ACL en marche et appuyer sur la touche OK. Den LCD-Monitor im Aufnahmemodus einschalten und die OK-Taste drücken. Appuyer sur la flèche vers le bas de la molette de défilement pour choisir , puis appuyer sur la... -
Page 212: File Number
FILE NUMBER You can select the file numbering system. It is especially useful when downloading data to a personal computer. In the Record mode, turn on the LCD monitor and press the OK button. Press the bottom arrow on the Jog dial to select Press the right/left arrows on the Jog dial to select AUTO FILE or NAME RESET. -
Page 213: Numéro De Fichier
NUMÉRO DE FICHIER DATEINUMMER Vous pouvez sélectionner le système de numérotation de fichier. Die Dateinumerierung ist besonders vorteilhaft, wenn Bilddaten C’est particulièrement utile en téléchargeant des données sur un auf einen Computer heruntergeladen werden sollen. ordinateur personnel. Den LCD-Monitor im Aufnahmemodus einschalten und En mode Enregistrement, mettre l’écran ACL en marche die OK-Taste drücken. -
Page 214: Adjusting The Date And Time
ADJUSTING THE DATE AND TIME You can adjust the date and time. In the Record mode, turn on the LCD monitor and press the OK button. Press the bottom arrow on the Jog dial to select Press the OK button and select the date order using the top/bottom arrows on the Jog dial. -
Page 215: Réglage De La Date Et De L'heure
RÉGLAGE DE LA DATE ET DE DATUM UND UHRZEIT L’HEURE EINSTELLEN Vous pouvez régler la date et l’heure. Datum und Uhrzeit können wie folgt eingestellt werden. En mode Enregistrement, mettre l’écran ACL en marche Den LCD-Monitor im Aufnahmemodus einschalten und et appuyer sur la touche OK. - Page 216 Press the top/bottom arrows on the Jog dial to adjust the LCD Monitor year, then press the right arrow on the Jog dial to adjust Écran ACL the month. Repeat until the minute is adjusted. LCD-Monitor Press the OK button to cancel the Menu. •...
- Page 217 Appuyer sur les flèches haut/bas de la molette de Mit dem oberen/unteren Jogregler-Pfeil die Jahreszahl défilement pour régler l’année, puis appuyer sur la flèche eingeben. Dann mit dem rechten Jogregler-Pfeil die droite de la molette de défilement pour régler le mois. Monatszahl anwählen.
-
Page 218: Rec Info
REC INFO You can select whether to display the Record Mode Menu when the LCD monitor is turned on in the Record mode. In the Record mode, turn on the LCD monitor. • The Menu will be displayed. Each press of the Info button switches it on and off. Note: •... -
Page 219: Information D'enregistrement
INFORMATION AUFNAHMEINFORMATION D’ENREGISTREMENT Wird der LCD-Monitor im Aufnahmemodus eingeschaltet, kann das Aufnahmemenü eingeblendet werden. Vous pouvez sélectionner d’afficher le menu mode Enregistrement quand l’écran ACL est allumé en mode Den LCD-Monitor im Aufnahmemodus einschalten. Enregistrement. • Das Menü wird gezeigt. En mode Enregistrement, mettre l’écran ACL en marche. -
Page 220: Picture Data
PICTURE DATA You can display picture information (settings, date, file number, etc.) on the LCD monitor. You can select standard display (frame number), picture data display and no display with each press of the Info button in the Display mode. Note: •... -
Page 221: Données D'image
DONNÉES D’IMAGE WIEDERGABEINFORMATION Vous pouvez afficher des informations d’image (réglages, date, Die zu einer Aufnahme zugehörigen Aufnahmedaten numéro de fichier, etc.) sur l’écran ACL. (Einstellungen, Datum, Dateinummer etc.) können auf dem LCD- Monitor eingeblendet werden. Vous pouvez sélectionner l’affichage standard (numéro de vue), l’affichage des informations d’image ou pas Im Wiedergabemodus kann mit der Infotaste der d’affichage à... -
Page 222: Card Format
CARD FORMAT You can format the card. Press the OK button in the Display mode, and press the bottom arrow on the Jog dial to select Press the right arrow on the Jog dial to select , then press the OK button. Press the OK button again with YES selected to format the card. -
Page 223: Formatage Des Cartes
FORMATAGE DES CARTES KARTENFORMATIERUNG Vous pouvez formater la carte. Eine Karte kann neu formatiert werden. Appuyer sur la touche OK en mode Affichage, et appuyer Im Aufnahmemodus die OK-Taste drücken und mit dem sur la flèche vers le bas de la molette de défilement pour unteren Jogregler-Pfeil wählen. - Page 224 Card Format In The Record Mode • You can format the card in the Record mode as well by turning LCD Monitor on the LCD monitor, then pressing the OK button and then the Écran ACL bottom arrow on the Jog dial to select .
-
Page 225: Formatage De Carte En Mode Enregistrement
Formatage de carte en mode Enregistrement Kartenformatierung im Aufnahmemodus • Vous pouvez également formater la carte en mode • Die Kartenformatierung kann auch im Aufnahmemodus erfolgen. Enregistrement en mettant l’écran ACL en marche, puis en Hierzu den LCD-Monitor einschalten und dann die OK-Taste appuyant sur la touche OK et sur la flèche vers le bas de la drücken und hierauf mit dem unteren Jogregler-Pfeil molette de défilement pour choisir... -
Page 226: Index-Display Adjustment
INDEX-DISPLAY ADJUSTMENT You can select the number of frames shown in the Index-Display mode. Press the OK button in the Display mode, and press the bottom arrow dial select Press the right/left arrows on the Jog dial to select 4-frame, 9-frame or 16-frame. Press the OK button to cancel the Menu. -
Page 227: Réglage De L'affichage D'index
RÉGLAGE DE L’AFFICHAGE INDEXWIEDERGABE- D’INDEX EINSTELLUNG Vous pouvez choisir le nombre d’images présentées en mode Die Anzahl der bei der Indexwiedergabe gezeigten Bilder kann Affichage d’index. voreingestellt werden. Appuyer sur la touche OK en mode Affichage, et appuyer Im Wiedergabemodus die OK-Taste drücken und mit dem sur la flèche vers le bas de la molette de défilement pour unteren Jogregler-Pfeil wählen. -
Page 228: Lcd Brightness
LCD BRIGHTNESS You can adjust the brightness of the LCD monitor. Press the OK button in the Display mode, and press the bottom arrow on the Jog dial to select Press the right/left arrows on the Jog dial to select the brightness. -
Page 229: Luminosité
LUMINOSITÉ LCD-MONITOR-HELLIGKEIT Vous pouvez régler la luminosité de l’écran LCD. Die LCD-Monitor-Helligkeit kann wie erforderlich eingestellt werden. Appuyer sur la touche OK en mode Affichage, et appuyer sur la flèche vers le bas de la molette de défilement pour Im Wiedergabemodus die OK-Taste drücken und mit dem choisir unteren Jogregler-Pfeil wählen. -
Page 231: Miscellaneous
MISCELLANEOUS DIVERS VERSCHIEDENES... -
Page 232: Questions And Answers
QUESTIONS AND ANSWERS How long will the batteries last? Battery life is affected by many variables such as the amount of LCD monitor use, the frequency of flash use, as well as by the kind of battery used and the environmental conditions under which the camera is used. -
Page 233: Questions Et Réponses
QUESTIONS ET RÉPONSES TECHNISCHE FRAGEN Combien de temps durent les piles ? Wie lange halten die Batterien? La durée de vie des piles est, dans la pratique, fonction de la Die Batterie-Lebensdauer hängt grundsätzlich von der fréquence d’utilisation de l’écran ACL, de celle du flash, ainsi Einsatzhäufigkeit des LCD-Monitors, der Blitzzuschaltung, que du type de piles employé... - Page 234 Why do the subjects’ eyes sometimes appear red in pictures? This “red-eye phenomenon” occurs with all cameras when a flash is used. It is caused by light from the flash reflecting off the retina at the back of the eye. Red-eye varies depending on the individual and the shooting conditions such as ambient lighting.
- Page 235 Pourquoi les yeux des personnes photographiées Warum erscheinen die Augen von fotografierten Personen apparaissent-ils parfois rouges sur les prises de vues ? manchmal rot? Le phénomène “yeux rouges” se produit avec n’importe quel Bei Blitzaufnahmen wird der “Rote Augen-Effekt” durch die appareil photo quand on utilise un flash.
-
Page 236: Troubleshooting
TROUBLESHOOTING Operating Problems The camera does not work. The power is OFF. - Open the lens barrier to turn on the power. (p. 50) The batteries are loaded incorrectly. - Reload the batteries correctly. (p. 40) The batteries are exhausted. - Replace the batteries with new ones. -
Page 237: En Cas De Difficultés
EN CAS DE DIFFICULTÉS FEHLERSUCHE Problèmes de fonctionnement Betriebsstörungen L’appareil photo ne fonctionne pas. Die Kamera funktioniert nicht. L’appareil n’est pas sous tension. Die Kamera ist ausgeschaltet. - Pour le mettre sous tension, ouvrir le capot de protection de - Die Kamera durch Öffnen des Objektivschutzschiebers l’objectif. - Page 238 The flash does not fire. The flash mode was set to the Off mode. - Check the flash mode before shooting. (p. 102) The subject is lighted. - Set the flash to Fill-In mode. (p. 108) The pictures already taken do not appear on the LCD monitor.
- Page 239 Le flash ne se déclenche pas. Der Blitz zündet nicht. Le mode flash était réglé sur arrêt. Der Blitz war ausgeschaltet (OFF). - Sélectionner un mode flash approprié avant de prendre la - Vor der Aufnahme ein geeignetes Blitzprogramm wählen. photo.
- Page 240 When the camera is connected to a computer, an error message appears while data is being transferred to the computer. The cable is not plugged in correctly. - Connect the cable correctly. (p. 188) The power is OFF. - Open the lens barrier to turn on the power. (p. 50) The batteries are exhausted.
- Page 241 Im Dialog mit dem Computer erscheint eine L’appareil étant raccordé à un micro-ordinateur, Fehlermeldung bei der Datenübertragung. un message d’erreur apparaît lors du transfert des données dans l’ordinateur. Der Kabelanschluß ist nicht einwandfrei. - Kabelanschluß korrekt herstellen. (S. 189) Le branchement du câble de connexion est incorrect. - Brancher le câble correctement.
- Page 242 Problems with Images The picture is out of focus. The camera moved when the shutter button was pressed. - Hold the camera correctly, and press the shutter button. (p. 58/60) The viewfinder’s autofocus mark was not positioned on the subject. - Position the autofocus frame on the subject, or use the focus lock.
-
Page 243: Problèmes Liés À L'image
Problèmes liés à l’image Aufnahmebeeinträchtigungen L’image obtenue n’est pas nette. Unscharfes Bild L’appareil photo a bougé au moment du déclenchement. Die Kamera wurde beim Auslösen bewegt. - Tenir l’appareil sans bouger et appuyer sur le déclencheur d’un - Die Kamera ruhig halten und den Auslöser gleichmäßig nach mouvement continu. - Page 244 The picture is too dark. The flash was blocked by a finger. - Hold the camera correctly, keeping your fingers away from the flash. (p. 58) The subject was out of the working range of the flash. - Shoot within the flash working range. (p. 102) The flash mode was set to the Off mode.
- Page 245 Sous-exposition Unterbelichtung Le flash a été obscurci par un doigt. Der Blitz wurde abgedeckt (Finger etc.). - Tenir l’appareil photo correctement, en évitant de couvrir le - Die Kamera richtig halten und den Blitz nicht abdecken. flash. (p. 59) (S. 59) Le sujet se trouvait au-delà...
- Page 246 The colors of pictures taken indoors look unnatural. The lighting fixture(s) affected the picture. - Set the flash mode to Fill-In. (p. 108) The subject is mostly dark. - Include white in the image or adjust the white balance. (p. 138) The white balance setting is wrong.
- Page 247 Les couleurs des images prises en intérieur ne Unnatürliche Farben sont pas naturelles. Dies ist auf die bei der Aufnahme vorherrschende Beleuchtung zurückzuführen. Ceci est dû à l’éclairage employé lors de la prise de vues. - Bei der Aufnahme den Aufhellblitz zuschalten. (S. 109) - Régler le flash sur le mode d’appoint.
-
Page 248: Notes On Display And Backlight
NOTES ON DISPLAY AND BACKLIGHT • The Control panel and the fluorescent lamps used in the LCD monitor have a limited service life. If they begin to darken or flicker, contact your nearest service center. • In cold conditions, the display backlight may be slow to come on or may change color suddenly. -
Page 249: Remarques Sur Le Rétro-Éclairage De L'écran Acl
REMARQUES SUR LE RÉTRO- HINWEISE ZUM LCD-FELD/LCD- ÉCLAIRAGE DE L’ÉCRAN ACL MONITOR • L’écran de commande et les lampes fluorescentes utilisées dans • Das für das LCD-Feld und den LCD-Monitor eingesetzte Display l’écran ACL ont une durée de vie limitée. Si l’un ou l’autre de ces hat eine begrenzte Lebensdauer. -
Page 250: Error Code
ERROR CODE LCD monitor Error There is no card in the camera. Insert a SmartMedia card. No more photographs can be taken. Replace the SmartMedia, erase unwanted pictures, or transfer the data to a personal computer and free up space in the SmartMedia. A write-protect adhesive seal is placed on the card or the card is for Display mode only. -
Page 251: Code D'erreurs
CODE D’ERREURS KARTENFEHLER Erreur LCD-Monitor Ecran ACL Fehler Il n’y a pas de carte dans l’appareil. Keine Karte in der Kamera. Eine Mettre en place une carte SmartMedia. SmartMedia-Karte einsetzen. Aufnahme ist nicht möglich. Der L’enregistrement ne peut pas être Kartenspeicher voll effectué... -
Page 252: Optional Items
OPTIONAL ITEMS • Photo Printers For Olympus Digital Cameras • AC Adaptor • Camera Case • Standard SmartMedia Card (8/16/32MB) • Special Function SmartMedia Cards Template Card (4MB) Calendar Card (4MB) Title Card (4MB) • FlashPath Floppy Disk Adaptor • PC Card Adaptor •... -
Page 253: Articles En Option
ARTICLES EN OPTION SONDERZUBEHÖR • Imprimantes photo pour appareils photo numériques Olympus • Fotodrucker für Olympus Digital-Kameras • Adaptateur secteur • Netzteil • Étui d’appareil • Kameratasche • Carte Smartmedia standard (8/16/32 Mo) • SmartMedia-Karte (8/16/32 MB) • Cartes SmartMedia de fonctions spéciales •... -
Page 254: Compatibility Of The Picture Data
COMPATIBILITY OF THE PICTURE DATA • Images taken by this camera may not be properly displayed or printed with other Olympus digital cameras. • Images taken by other Olympus digital cameras may not be properly displayed or printed with this camera. When taken with the C-21 and displayed/printed with other models Models... -
Page 255: Compatibilité Des Données D'image
COMPATIBILITÉ DES DONNÉES KOMPATIBILITÄT DER D’IMAGE BILDDATEN • Des vues prises par cet appareil photo peuvent ne pas être • Mit dieser Kamera hergestellte Aufnahmen können über eine affichées ni imprimées correctement avec d’autres appareils andere Olympus Digitalkamera ggf. nicht einwandfrei photos numériques Olympus. - Page 256 When taken with other models and displayed/printed with the C-21 Models Display Direct print C-920ZOOM C-2000ZOOM C-900ZOOM C-830L C-840L C-820L C-420L C-1400XL C-1400L C-1000L *1: Images taken in the TIFF mode cannot be printed. *2: When connected to the P-300E/P-150E printer.
- Page 257 Vues prises avec d’autres modèles et affichées/imprimées Aufnahme mit anderen Modellen und Wiedergabe/Ausdruck avec le C-21 mit C-21 Modèles Affichage Impression directe Modelle Wiedergabe Direktausdruck C-920ZOOM C-920ZOOM C-2000ZOOM C-2000ZOOM C-900ZOOM C-900ZOOM C-830L C-830L C-840L C-840L C-820L C-820L C-420L C-420L C-1400XL C-1400XL C-1400L C-1400L...
-
Page 258: System Chart
SYSTEM CHART A variety of capabilities are available when connected to optional equipment. Printer Imprimante Drucker Téléviseur Fernsehgerät Personal computer FlashPath Micro-ordinateur Personal-Computer SmartMedia MO drive Lecteur MO MO-Laufwerk Personal computer PC card adaptor Modem Adaptateur de carte PC Micro-ordinateur PC-Kartenadapter Personal-Computer Camera... -
Page 259: Tableau Synoptique Du Système
TABLEAU SYNOPTIQUE DU SYSTEMÜBERSICHT SYSTÈME Beim Anschluß an die externen Komponenten können vielseitige Möglichkeiten der Datenübertragung- und -bearbeitung genutzt Une variété de fonctions sont disponibles en raccordant du werden. matériel en option. -
Page 260: Specifications
SPECIFICATIONS Product type : Digital camera (for shooting and displaying) Recording System : Digital recording (JPEG/TIFF with “Design rule for Camera File system” support) Memory : 3.3V SmartMedia 2MB, 4MB, 8MB, 16MB, 32MB No. of storable pictures : Approx. 1 shot (TIFF, 8MB) : Approx. -
Page 261: Fiche Technique
FICHE TECHNIQUE TECHNISCHE DATEN Type d’appareil : Appareil photo numérique (prise de vues : Digital-Kamera (Bildaufzeichnung et affichage) und -wiedergabe) Système d’enregistrement Aufnahmesystem : Digitale Aufnahme (JGPEG/TIFF mit : Enregistrement numérique (JPEG/TIFF “Design rule for Camera File system”- avec support “Design rule for Camera Unterstützung) File system”) Speicher... - Page 262 Photometric system : Digital ESP metering system, Spot metering system Exposure control : Program auto Aperture* : F2.4, F8 Shutter* : 1/2 ~ 1/750 sec. (used with mechanical shutter) *Manual setting not available Working range : 0.15 ~ 0.6 m (Macro mode) ∞...
- Page 263 Posemètre : Système de mesure ESP numérique, Belichtungsmessung : Digitale ESP-Messung, Spotmessung Système de mesure ponctuelle Belichtungssteuerung Commande d’exposition : Programmautomatik : Automatique programmée Blendenvorgabe* : F2,4, F8 Ouverture* : F2,4, F8 Verschlußzeitenvorgabe* Obturateur* : 1/2 à 1/750 s (obturateur mécanique) : 1/2 - 1/750 Sek.
- Page 264 Autofocus : TTL system autofocus, Contrast detection system ∞ Focusing range : 0.15 m ~ Selftimer : Electronic Selftimer with 12-sec. delay Outer connectors : AC adaptor connector, Computer connector (RS-232C), Video output connector Date and time : Recorded with picture data simultaneously Automatic calendar system : Up to 2030...
- Page 265 Autofocus : Système de mise au point automatique Autofocus : TTL Autofocus-System, TTL, système de détection des Kontrastvergleichssystem contrastes / plage de mise au point de Scharfstellbereich von ∞ 0,15 m à l’infini. 0,15 m bis - Retardateur : Electronique, temps de retardement : Selbstauslöser : Elektronisch mit 12 Sek.
- Page 266 Power supply : This camera uses one 3V lithium battery pack (CR-V3) or two R6 (AA) NiMH batteries. R6 (AA) alkaline, manganese or lithium batteries cannot be used. AC adaptor (optional) Dimensions : 106.5 (W) x 62.3 (H) x 35.5 (D) mm Weight : 190 g (without batteries/card) SPECIFICATIONS ARE SUBJECT TO CHANGE WITHOUT ANY...
- Page 267 Alimentation : Cet appareil utilise une pile au lithium de Spannungsversorgung 3 V (CR-V3) ou deux batteries NiMH. : Eine 3-V-Lithium-Batterie (CR-V3), zwei Des piles alcalines, manganèse ou R6-(Mignon)-NiMH-Batterien. lithium R6 (AA) ne peuvent pas être R6-Alkali-, Mangan- oder Lithium- utilisées.
- Page 268 OLYMPUS OPTICAL CO., LTD. San-Ei Building, 22-2, Nishi Shinjuku 1-chome, Shinjuku-ku, Tokyo, Japan. Tel. 03-3340-2026 OLYMPUS AMERICA INC. Two Corporate Center Drive, Melville, NY 11747-3157, U.S.A. Tel. 516-844-5000 OLYMPUS OPTICAL CO. (EUROPA) GMBH. (Premises/Goods delivery) Wendenstraße 14-16, 20097 Hamburg, Germany. Tel. 040-237730 (Letters) Postfach 10 49 08, 20034 Hamburg, Germany.