Table des Matières
Publicité
Les langues disponibles
Les langues disponibles
Liens rapides
Publicité
Chapitres
Table des Matières

Manuels Connexes pour ABB Elos Série

Sommaire des Matières pour ABB Elos Série
- Page 1 Serie civile Èlos 2CSE1219EL Cronotermostato a relè da incasso Inset time-thermostat with relay Chronothermostat à relais, encastrable Cronotermostato de relé empotrado Relais-Zeitthermostat für Unterputzmontage...
- Page 2 ATTENZIONE - IMPORTANTE • Ci congratuliamo con Lei per la scelta di prodotti ABB. I prodotti ABB sono costruiti con attente cure dei dettagli impiegando solo materiali di qualità elevata. I prodotti ABB Le garantiranno nel tempo prestazioni ottimali. • Leggere attentamente le seguenti istruzioni in quanto forniscono importanti informazioni sulle modalità...
-
Page 3: Table Des Matières
INDICE ISTRUZIONI D’IMPIEGO pag. - Descrizione generale....................- Descrizione comandi ....................- Modalità di funzionamento ..................- Impostazione parametri................... - Personalizzazione del programma giornaliero............13 - Funzione Party/ Holiday ................... 15 - Funzionamento manuale ..................16 - Comando remoto..................... 17 - Funzionamento in caso di black out ................ -
Page 4: Istruzioni D'impiego
ISTRUZIONI D’IMPIEGO D E S C R I Z I O N E G E N E R A L E Il cronotermostato gestisce il controllo della temperatura ambiente ed il comando caldaie, valvole di zona, condizionatori, fan coil, ecc. , attraverso un’uscita a relè. Il cronotermostato è... -
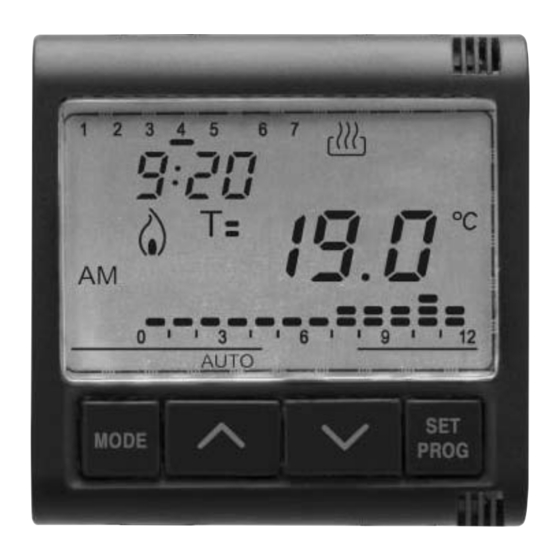
Page 5: Descrizione Comandi
ISTRUZIONI D’IMPIEGO D E S C R I Z I O N E C O M A N D I PULSANTI DI COMANDO Simbolo a MODE: selezione modalità MODE b Incremento/Selezione parametri c Decremento/Selezione parametri d SET/PROG: Impostazione programmi/Programmazione SET/PROG SEGNALAZIONI A DISPLAY e Profilo programma giornaliero f Temperatura ambiente misurata... -
Page 6: Modalità Di Funzionamento
ISTRUZIONI D’IMPIEGO M O D A L I TÀ D I F U N Z I O N A M E N T O Il cronotermostato prevede tre differenti modalità di funzionamento: - AUTOMATICO - MANUALE - OFF/ANTIGELO / PROTEZIONE ALTE TEMPERATURE Per commutare da una modalità... - Page 7 ISTRUZIONI D’IMPIEGO M O D A L I TÀ D I F U N Z I O N A M E N T O Durante il funzionamento la chiusura del contatto di uscita (attivazione del riscaldamento/ condizionamento) è segnalata nel modo seguente: Riscaldamento Il simbolo indica l’accensione del riscaldamento.
-
Page 8: Impostazione Parametri
ISTRUZIONI D’IMPIEGO I M P O S TA Z I O N E PA R A M E T R I Per eseguire l’impostazione dei parametri premere una volta il tasto SET/PROG. Sul display appare il simbolo SET. Contemporaneamente il simbolo comincia a lampeggiare. - Page 9 ISTRUZIONI D’IMPIEGO I M P O S TA Z I O N E PA R A M E T R I Selezione riscaldamento/condizionamento Quando il simbolo lampeggia è possibile sele- zionare il tipo di funzionamento con i tasti Per confermare premere il tasto MODE entro 30 secondi. Impostazione del giorno della settimana Quando la barra del giorno della settimana lampeggia, selezionare il giorno corrente con i tasti...
- Page 10 ISTRUZIONI D’IMPIEGO I M P O S TA Z I O N E PA R A M E T R I Impostazione dei minuti Quando le cifre dei minuti lampeggiano, impostare i mi- nuti con i tasti Per confermare i valori impostati premere il tasto MODE entro 30 secondi.
- Page 11 ISTRUZIONI D’IMPIEGO I M P O S TA Z I O N E PA R A M E T R I Impostazione set point T2 All’apparire del simbolo il valore di temperatura ini- zia a lampeggiare. Regolare il valore di T2 con i tasti Per confermare il valore impostato, premere il tasto MO- DE entro 30 secondi.
- Page 12 ISTRUZIONI D’IMPIEGO I M P O S TA Z I O N E PA R A M E T R I Attivazione autoapprendimento (solo tipo funziona- mento riscaldamento) All’apparire del simbolo attivare (ON) o disattivare (OFF) la funzione con i tasti Per confermare il valore impostato premere il tasto MODE entro 30 secondi.
-
Page 13: Personalizzazione Del Programma Giornaliero
ISTRUZIONI D’IMPIEGO PERSONALIZZAZIONE DEL PROGRAMMA GIORNALIERO Per eseguire la personalizzazione del programma giornaliero preimpostato, o apportare una modifica, premere due volte il tasto SET/PROG. Sul display appare la scritta PROG mentre la barra del primo giorno della settimana inizia a lampeggiare. Selezionare il giorno desiderato con i tasti Per confermare la selezione premere il tasto MODE entro 30 secondi. - Page 14 ISTRUZIONI D’IMPIEGO PERSONALIZZAZIONE DEL PROGRAMMA GIORNALIERO L’orario viene decrementato/incrementato a passi di 15 minuti ad ogni pressione dei tasti , è perciò possibile definire fino a 4 periodi di programmazione ogni ora. Per confermare la programmazione premere prolungatamente il tasto MODE, automatica- mente si passa alla programmazione del giorno successivo.
-
Page 15: Funzione Party/ Holiday
ISTRUZIONI D’IMPIEGO F U N Z I O N E PA R T Y / H O L I D AY La funzione party permette di escludere temporaneamente il programma impostato (modalità auto) o il set point manuale (modalità MAN) inserendo un set point di temperatura diverso per un periodo compreso tra 1 e 23 ore. -
Page 16: Funzionamento Manuale
ISTRUZIONI D’IMPIEGO F U N Z I O N E PA R T Y / H O L I D AY Per attivare la funzione premere prolungatamente il ta- sto MODE (funzione PARTY), quindi premere nuovamen- te il tasto MODE (funzione HOLIDAY). Sul display appa- re il simbolo . -
Page 17: Funzionamento In Caso Di Black Out
ISTRUZIONI D’IMPIEGO F U N Z I O N A M E N T O I N C A S O D I B L A C K O U T Il dispositivo è dotato di batteria di back up che garantisce l’aggiornamento, in caso di black-out, dell’ora e del giorno della settimana. -
Page 18: Programmi Preimpostati
ISTRUZIONI D’IMPIEGO P R O G R A M M I P R E I M P O S TAT I Il cronotermostato dispone di due programmi preimpostati, uno per il riscaldamento e uno per il condizionamento. PROGRAMMA RISCALDAMENTO Lunedì - Venerdì Sabato - Domenica... -
Page 19: Parametri Preimpostati
ISTRUZIONI D’IMPIEGO P R O G R A M M I P R E I M P O S TAT I PROGRAMMA CONDIZIONAMENTO Tutti i giorni della settimana Questi programmi preimpostati possono essere modificati e personalizzati secondo le pro- prie esigenze. Per eseguire le modifiche attenersi alle indicazioni contenute nel paragrafo “Personalizzazione del programma giornaliero”. -
Page 20: Reset E Ripristino Dei Valori Preimpostati
ISTRUZIONI D’IMPIEGO RESET E RIPRISTINO DEI VALORI PREIMPOSTATI Premendo contemporaneamente i 4 tasti con tensione di rete presente, si effettua un re- set completo del cronotermostato. Attenzione: tutti i parametri impostati ed i programmi personalizzati vengono can- cellati. Alla riaccensione, il cronotermostato utilizza i parametri ed i programmi preimpostati in fab- brica. -
Page 21: Descrizione Morsetti
ISTRUZIONI D’IMPIEGO D E S C R I Z I O N E M O R S E T T I Morsetti di cablaggio Alimentazione L - Fase N - Neutro Relè di uscita 1 - Contatto NA 2 - Contatto NC 3 - Comune Linea seriale 4 - TX (dati in uscita) -
Page 22: Caratteristiche Funzionali/Dati Tecnici
C A R AT T E R I S T I C H E F U N Z I O N A L I / DAT I T E C N I C I Tipo di funzionamento: riscaldamento e condizionamento Modalità... - Page 23 E N G L I S H Inset time-thermostat with relay...
-
Page 24: Attention - Important
• Congratulations for having chosen a ABB product. ABB products are constructed with careful attention to detail, using only high quality materials. ABB products assure you of peak perfor- mance over time. • Read these instructions carefully. They contain important information on how to install and operate the system. - Page 25 INDEX USER INSTRUCTIONS pag. - General description ....................26 - Control description ....................27 - Operating modes..................... 28 - Setting parameters....................30 - Personalising the daily program ................35 - The Party/Holiday function..................37 - Manual operation ....................38 - Remote control......................39 - Operating in the case of a blackout.................
-
Page 26: User Instructions
USER INSTRUCTIONS G E N E R A L D E S C R I P T I O N The time-thermostat manages ambient temperature control and control of the boilers, zone valves, conditioning units, fan-coils, etc. through a relay output. The time-thermostat is fitted with a backlighted LCD VDU and four control buttons. -
Page 27: Control Description
USER INSTRUCTIONS C O N T R O L D E S C R I P T I O N CONTROL BUTTONS Symbol a MODE: select mode MODE b Increment/Select parameters c Decrement/Select parameters d SET/PROG: Program setting/Programming SET/PROG VDU SIGNALS e Daily program profile f Measured ambient temperature g HOLIDAY and PARTY functions... -
Page 28: Operating Modes
USER INSTRUCTIONS O P E R AT I N G M O D E S The time-thermostat provides three different operating modes: - AUTOMATIC - MANUAL - OFF/ANTIFREEZE/HIGH TEMPERATURE PROTECTION Use the MODE key to switch from one mode to another. In automatic operation the time-thermostat uses a pro- gram that can be set by the user and which can also be different for each day of the week. - Page 29 USER INSTRUCTIONS O P E R AT I N G M O D E S During operation the closing of the output contact (heating/air conditioning activation) is signalled in the following way: Heating Symbol shows heating switch-on. Air conditioning Symbol shows air conditioning switch-on.
-
Page 30: Setting Parameters
USER INSTRUCTIONS S E T T I N G PA R A M E T E R S Press the SET/PROG key once to set the parameters. The message “SET” is displayed on the VDU. The symbol starts to blink at the same time. At this point the following can be modified in sequence: - air conditioning/heating operating type - the day of the week... - Page 31 USER INSTRUCTIONS S E T T I N G PA R A M E T E R S Selecting heating/air conditioning When the symbol blinks it is possible to select the operating type using the keys. Press the MODE key within 30 seconds to confirm. Setting the day of the week When the day of the week bar blinks, select the current day using the...
- Page 32 USER INSTRUCTIONS S E T T I N G PA R A M E T E R S Setting the minutes When the minutes figures blink, set the minutes using keys. Press the MODE key within 30 seconds to confirm the values set.
- Page 33 USER INSTRUCTIONS S E T T I N G PA R A M E T E R S Setting set point T2 The temperature value starts to blink when the sym- bol appears. Adjust the value of T2 using the keys.
- Page 34 USER INSTRUCTIONS S E T T I N G PA R A M E T E R S Activating self-learning (heating operating type only) When the symbol appears, activate (ON) or deacti- vate (OFF) the function using the keys. Press the MODE key within 30 seconds to confirm the value set.
-
Page 35: Personalising The Daily Program
USER INSTRUCTIONS P E R S O N A L I S I N G T H E D A I LY P R O G R A M Press the SET/PROG key twice to personalise the preset daily program or modify it. The message “PROG”... - Page 36 USER INSTRUCTIONS P E R S O N A L I S I N G T H E D A I LY P R O G R A M The time is decremented/incremented in steps of 15 minutes each time the keys are pressed, so it is possible to define up to 4 programming periods each hour.
- Page 37 USER INSTRUCTIONS PA R T Y / H O L I D AY F U N C T I O N The party function is used to temporarily exclude the set program (AUTO mode) or the manual set point (MAN mode) by inserting a different temperature set point for a period of between 1 and 23 hours.
-
Page 38: Manual Operation
USER INSTRUCTIONS PA R T Y / H O L I D AY F U N C T I O N The function is activated by pressing the MODE key for an extended period (PARTY function) and then pressing the MODE key again (HOLIDAY function). The symbol is displayed on the VDU. -
Page 39: Operating In The Case Of A Blackout
USER INSTRUCTIONS O P E R AT I N G I N T H E C A S E O F A B L A C K O U T The device is fitted with a backup battery that guarantees updating of the time and the day of the week in the case of a blackout. -
Page 40: Preset Program
USER INSTRUCTIONS P R E S E T P R O G R A M S The time-thermostat has two preset programs, one for heating and one for air condi- tioning. HEATING PROGRAM Monday - Friday Saturday - Sunday... -
Page 41: Preset Parameters
USER INSTRUCTIONS P R E S E T P R O G R A M S Preset programs Every day of the week These preset programs can be modified and personalised according to one’s own require- ments. Follow the instructions contained in the “Personalising the daily program” para- graph to make the modifications. -
Page 42: Assembly
USER INSTRUCTIONS R E S E T A N D R E S T O R E T H E P R E S E T VA L U E S Pressing the 4 keys simultaneously with mains power present performs a complete reset of the timer-thermostat. -
Page 43: Terminal Description
USER INSTRUCTIONS T E R M I N A L D E S C R I P T I O N Cabling terminals Power supply L - Phase N - Neutral Output relay 1 - NA contact 2 - NC contact 3 - Common Serial line 4 - TX (output data) -
Page 44: Functional Features/Technical Data
F U N C T I O N A L F E AT U R E S / T E C H N I C A L D ATA Type of operation: heating and air conditioning Operating modes: automatic, manual, antifreeze/high temperature protection Operating temperature: -5 °C ÷... - Page 45 F R A N Ç A I S Chronothermostat à relais, encastrable...
- Page 46 ATTENTION - IMPORTANT • Nous vous félicitons d’avoir choisi les produits ABB. Les produits ABB sont construits avec un grand soin des détails, en n’employant que des matériaux de grande qualité. Les produits ABB vous garantiront des performances optimales à longue échéance.
- Page 47 INDEX INSTRUCTIONS D’UTILISATION page - Description générale ....................- Description des commandes ................... 49 - Modalités de fonctionnement .................. 50 - Programmation paramètres..................52 - Personnalisation du programme journalier .............. 57 - Fonction Party/Holiday..................... 59 - Fonctionnement manuel ..................60 - Commande à...
-
Page 48: Instructions D'utilisation
INSTRUCTIONS D'UTILISATION D E S C R I P T I O N G É N É R A L E Le chronothermostat gère le contrôle de la température ambiante et la commande de chaudières, vannes de zone, climatiseurs, fan-coils, etc., grâce à une sortie à relais. Le chronothermostat est muni d’un afficheur LCD rétro éclairé... -
Page 49: Description Des Commandes
INSTRUCTIONS D'UTILISATION D E S C R I P T I O N D E S C O M M A N D E S POUSSOIRS DE COMMANDE Symbole a MODE : sélection de la modalité MODE b Incrément / Sélection des paramètres c Décrément / Sélection des paramètres d SET/PROG : Définition des programmes / Programmation SET/PROG... -
Page 50: Modalités De Fonctionnement
INSTRUCTIONS D'UTILISATION M O D A L I T É S D E F O N C T I O N N E M E N T Le chronothermostat prévoit trois modes de fonctionnement différents : - AUTOMATIQUE - MANUEL - OFF/ANTIGEL / PROTECTION HAUTES TEMPÉRATURES Pour commuter d’un mode à... - Page 51 INSTRUCTIONS D'UTILISATION M O D A L I T É S D E F O N C T I O N N E M E N T Pendant le fonctionnement, la fermeture du contact de sortie (activation chauffage / clima- tisation) est signalisée de la façon suivante: Chauffage Le symbole...
-
Page 52: Programmation Paramètres
INSTRUCTIONS D'UTILISATION P R O G R A M M AT I O N PA R A M È T R E S Pour exécuter la programmation des paramètres, appuyer une fois sur la touche SET/PROG. Le symbole SET apparaît sur l’afficheur. En même temps le symbole commence à... - Page 53 INSTRUCTIONS D'UTILISATION P R O G R A M M AT I O N PA R A M È T R E S Sélection chauffage/climatisation Lorsque le symbole clignote, il est possible de sélectionner le type de fonctionnement en agissant sur les touches Pour confirmer, appuyer sur la touche MODE dans les 30 secondes qui suivent.
- Page 54 INSTRUCTIONS D'UTILISATION P R O G R A M M AT I O N PA R A M È T R E S Programmation des minutes Quand les chiffres des minutes clignotent, programmer les minutes avec les touches Pour confirmer les valeurs programmées, appuyer sur la touche MODE dans les 30 secondes qui suivent.
- Page 55 INSTRUCTIONS D'UTILISATION P R O G R A M M AT I O N PA R A M È T R E S Programmation du set-point T2 Quand le symbole apparaît, la valeur de la tempé- rature commence à clignoter. Régler la valeur de T2 avec les touches Pour confirmer la valeur programmée, appuyer sur la touche MODE dans les 30 secondes qui suivent.
- Page 56 INSTRUCTIONS D'UTILISATION P R O G R A M M AT I O N PA R A M È T R E S Activation de l’autoapprentissage (disponible exclu- sivement pour le type de fonctionnement chauffage). Quand le symbole apparaît, activer (ON) ou désacti- ver (OFF) la fonction, avec les touches Pour confirmer la valeur programmée, appuyer sur la touche MODE dans les 30 secondes qui suivent.
-
Page 57: Personnalisation Du Programme Journalier
INSTRUCTIONS D'UTILISATION PERSONNALISATION DU PROGRAMME JOURNALIER Pour exécuter la personnalisation du programme journalier préprogrammé, ou pour faire une modification, appuyer deux fois sur la touche SET/PROG. Sur l’afficheur apparaît le symbole PROG, et la barre du premier jour de la semaine commence à clignoter. Sélec- tionner le jour désiré, avec les touches Pour confirmer la sélection, appuyer sur la touche MODE dans les 30 secondes qui suivent. - Page 58 INSTRUCTIONS D'UTILISATION PERSONNALISATION DU PROGRAMME JOURNALIER L’horaire diminue/augmente à pas de 15 minutes à chaque pression des touches par conséquent il est possible de définir jusqu’à 4 périodes de programmation pour chaque heure. Pour confirmer la programmation, appuyer sur la touche MODE de façon prolongée ; on passe automatiquement à...
-
Page 59: Fonction Party/Holiday
INSTRUCTIONS D'UTILISATION F O N C T I O N PA R T Y / H O L I D AY La fonction Party permet d’exclure temporairement le programme prédéfini (mode AUTO) ou bien le set point manuel (mode MAN), en insérant un set-point de température différent pour une période allant de 1 à... -
Page 60: Fonctionnement Manuel
INSTRUCTIONS D'UTILISATION F O N C T I O N PA R T Y / H O L I D AY Pour activer cette fonction, appuyer de façon prolongée sur la touche MODE (fonction PARTY), puis appuyer à nouveau sur la touche MODE (fonction HOLIDAY). Le symbole apparaît sur l’afficheur. -
Page 61: Fonctionnement En Cas De Black Out
INSTRUCTIONS D'UTILISATION F O N C T I O N N E M E N T E N C A S D E B L A C K O U T Le dispositif est muni d’une batterie de back up qui garantit la sauvegarde, en cas de black- out, de l’heure et du jour de la semaine. -
Page 62: Programmes Prédéfinis
INSTRUCTIONS D'UTILISATION P R O G R A M M E S P R É D É F I N I S Le chronothermostat dispose de 2 programmes prédéfinis, un pour le chauffage et un pour la climatisation. PROGRAMME CHAUFFAGE Lundi - Vendredi Samedi - Dimanche... - Page 63 INSTRUCTIONS D'UTILISATION P R O G R A M M E S P R É D É F I N I S PROGRAMME CLIMATISATION Tous les jours de la semaine Ces programmes prédéfinis peuvent être modifiés et personnalisés, suivant ses exigences. Pour exécuter les modifications, suivre les indications contenues au paragraphe “...
-
Page 64: Montage
INSTRUCTIONS D'UTILISATION R E S E T E T R É TA B L I S S E M E N T D E S VA L E U R S P R É P R O G R A M M É E S Si on appuie en même temps sur les 4 touches, avec la tension de secteur alimentée, on effectue le reset complet du chronothermostat. -
Page 65: Description Des Bornes
INSTRUCTIONS D'UTILISATION D E S C R I P T I O N B O R N E S Bornes de câblage Alimentation L - Phase N - Neutre Relais de sortie 1 - Contact NA 2 - Contact NC 3 - Commun Ligne sérielle 4 - TX (données en sortie) -
Page 66: Caractéristiques Fonctionnelles / Données Techniques
C A R A C T É R I S T I Q U E S F O N C T I O N N E L L E S / D O N N É E S T E C H N I Q U E S Type de fonctionnement : chauffage et climatisation Modalités de fonctionnement :... - Page 67 E S P A Ñ O L Cronotermostato de relé empotrado...
- Page 68 ATENCIÓN - IMPORTANTE • Ante todo, le felicitamos por haber elegido un producto ABB. Los productos ABB -fabricados con la máxima atención a los detalles y usando materiales de alta calidad- le asegurarán prestaciones ópti- mas por mucho tiempo. • Lea atentamente las instrucciones que se encuentran a conti- nuación y que contienen informaciones importantes para instalar y us-...
- Page 69 INDICE ISTRUCCIONES DE EMPLEO pág. - Descripción general ....................70 - Descripción mandos....................71 - Modalidad de funcionamiento ................72 - Programación parámetros..................74 - Personalización del programa diario............... 79 - Función Party/ Holiday.................... 81 - Funcionamiento manual..................82 - Control remoto .......................
-
Page 70: Istrucciones De Empleo
ISTRUCCIONES DE EMPLEO D E S C R I P C I Ó N G E N E R A L El cronotermostato controla la temperatura ambiente y el mando calderas, válvulas de zona, acondicionadores, fan coil, etc, mediante una salida de relé. El cronotermostato está... -
Page 71: Descripción Mandos
ISTRUCCIONES DE EMPLEO D E S C R I P C I Ó N M A N D O S PULSADORES DE MANDO Símbolo a MODE: selección modalidad MODE b Aumento/Selección parámetros c Disminución/Selección parámetros d SET/PROG: Control de programas/Programación SET/PROG SEÑALIZACIONES EN LA PANTALLA e Perfil programa diario... -
Page 72: Modalidad De Funcionamiento
ISTRUCCIONES DE EMPLEO M O D A L I D A D D E F U N C I O N A M I E N T O El cronotermostato prevé tres diferentes modalidades de funcionamiento: - AUTOMÁTICO - MANUAL - OFF/ANTICONGELANTE / PROTECCIÓN ALTAS TEMPERATURAS Para conmutar de una modalidad a otra se usa la tecla MODE. - Page 73 ISTRUCCIONES DE EMPLEO M O D A L I D A D D E F U N C I O N A M I E N T O Durante el funcionamiento el cierre del contacto de salida (activación de la calefacción/ acondicionamiento) está...
-
Page 74: Programación Parámetros
ISTRUCCIONES DE EMPLEO P R O G R A M A C I Ó N PA R Á M E T R O S Para efectuar la programación de los parámetros presionar una vez la tecla SET/PROG. En la pantalla aparece el símbolo SET. Al mismo tiempo el símbolo empieza a parpadear. - Page 75 ISTRUCCIONES DE EMPLEO P R O G R A M A C I Ó N PA R Á M E T R O S Selección calefacción/acondicionamiento Cuando el símbolo parpadea es posible selec- cionar el tipo de funcionamiento con las teclas Para confirmar presionar la tecla MODE antes de 30 se- gundos.
- Page 76 ISTRUCCIONES DE EMPLEO P R O G R A M A C I Ó N PA R Á M E T R O S Programación de los minutos Cuando las cifras de los minutos parpadean, programar los minutos con las teclas Para confirmar los valores presionar la tecla MODE antes de 30 segundos.
- Page 77 ISTRUCCIONES DE EMPLEO P R O G R A M A C I Ó N PA R Á M E T R O S Programación set point T2 Cuando aparezca el símbolo el valor de temperatura empezará a parpadear. Regular el valor de T2 con las teclas Para confirmar el valor programado, presionar la tecla MODE antes de 30 segundos.
- Page 78 ISTRUCCIONES DE EMPLEO P R O G R A M A C I Ó N PA R Á M E T R O S Activación autoaprendizaje (solo tipo de funciona- miento calefacción) Cuando aparece el símbolo activar (ON) o desactivar (OFF) la función con las teclas Para confirmar el valor programado presionar la tecla MODE antes de 30 segundos.
-
Page 79: Personalización Del Programa Diario
ISTRUCCIONES DE EMPLEO P E R S O N A L I Z A C I Ó N D E L P R O G R A M A D I A R I O Para efectuar la personalización del programa diario preprogramado o efectuar un cambio, presionar dos veces la tecla SET/PROG. - Page 80 ISTRUCCIONES DE EMPLEO P E R S O N A L I Z A C I Ó N D E L P R O G R A M A D I A R I O El horario disminuye/aumenta a pasos de 15 minutos cuando se presionan las teclas , es por esto posible definir hasta 4 periodos de programación cada hora.
-
Page 81: Función Party/ Holiday
ISTRUCCIONES DE EMPLEO F U N C I Ó N PA R T Y / H O L I D AY La función party permite excluir temporalmente el programa programado (modalidad au- to) o el set point manual (modalidad MAN) introduciendo un set point de temperatura dife- rente durante un periodo incluido entre 1 y 23 horas. -
Page 82: Funcionamiento Manual
ISTRUCCIONES DE EMPLEO F U N C I Ó N PA R T Y / H O L I D AY Para activar la función presionar prolongadamente la tecla MODE (función PARTY), a continuación presionar de nuevo la tecla MODE (función HOLIDAY). En la pan- talla aparece el símbolo . -
Page 83: Funcionamiento En Caso De Black Out
ISTRUCCIONES DE EMPLEO F U N C I O N A M I E N T O E N C A S O D E B L A C K O U T El dispositivo está dotado de batería de back up que garantiza la actualización, en caso de black-out, de la hora y del día de la semana. -
Page 84: Programas Preprogramados
ISTRUCCIONES DE EMPLEO P R O G R A M A S P R E P R O G R A M A D O S El cronotermostato dispone de dos programas preprogramados, uno para la calefacción y uno para el acondicionamiento. PROGRAMA CALEFACCIÓN Lunes - Viernes Sábado - Domingo... -
Page 85: Parámetros Preprogramados
ISTRUCCIONES DE EMPLEO P R O G R A M A S P R E P R O G R A M A D O S PROGRAMA ACONDICIONAMIENTO Todos los días de la semana Estos programas preprogramados pueden modificarse y personalizarse según las propias exigencias. -
Page 86: Montaje
ISTRUCCIONES DE EMPLEO R E S E T Y R E A J U S T E D E L O S VA L O R E S P R E V I A M E N T E P R O G R A M A D O S Presionando contemporáneamente las 4 teclas con tensión de red presente, se efectúa un reset completo del cronotermostato. -
Page 87: Descripción Bornas
ISTRUCCIONES DE EMPLEO D E S C R I P C I Ó N B O R N A S Bornas de cableado Alimentación L - Fase N - Neutro Relé de salida 1 - Contacto NA 2 - Contacto NC 3 - Común Línea de serie 4 - TX (datos en salida) -
Page 88: Características Funcionales/Datos Técnicos
C A R A C T E R Í S T I C A S F U N C I O N A L E S / D AT O S T É C N I C O S Tipo de funcionamiento: calefacción y acondicionamiento Modalidad de funcionamiento: automático, manual,... - Page 89 D E U T S C H Relais-Zeitthermostat für Unterputzmontage...
- Page 90 ACHTUNG - WICHTIG • Wir gratulieren Ihnen zur Wahl der ABB-Produkte. Die ABB-Produkte werden bis ins kleinste Detail sorgfältig und unter ausschließlicher Verwendung von Materialien höchster Qual- ität hergestellt. Deshalb garantieren ABB-Produkte auch auf lange Dauer optimale Leistungen. • Lesen Sie die folgenden Anweisungen aufmerksam durch, denn sie enthalten wichtige Informationen für die Installation und den Be-...
- Page 91 INHALTSVERZEICHNIS BEDIENUNGSANWEISUNG Seite - Allgemeine Beschreibung ..................92 - Steuerungsbeschreibung..................93 - Funktionsmodus...................... 94 - Parametereinstellung....................96 - Anpassung des Tagesprogramms ................101 - Funktion Party/ Holiday.................... 103 - Handbetrieb......................104 - Fernbedienung ......................105 - Funktion bei Stromausfall..................105 - Voreingestellte Programme..................
-
Page 92: Bedienungsanweisung
BEDIENUNGSANWEISUNG A L L G E M E I N E B E S C H R E I B U N G Das Zeitthermostat steuert über einen Relaisausgang die Überwachung der Umgebung- stemperatur und die Heizkesselsteuerung, Zonenventile, Klimageräte, Fan-Coil, usw. Das Zeitthermostat ist mit einem rückbeleuchteten LCD-Display und vier Steuertasten ausgestattet. -
Page 93: Steuerungsbeschreibung
BEDIENUNGSANWEISUNG S T E U E R U N G S B E S C H R E I B U N G STEUERTASTEN Symbol a MODE: Modusauswahl MODE b Erhöhung / Auswahl Parameter c Absenkung / Auswahl Parameter d SET/PROG: Einstellung Programme / Programmierung SET/PROG DISPLAYANZEIGEN e Profil Tagesprogramm... -
Page 94: Funktionsmodus
BEDIENUNGSANWEISUNG F U N K T I O N S M O D U S Das Zeitthermostat sieht drei verschiedene Funktionsmodi vor: - AUTOMATIK - HANDBETRIEB - AUS / FROSTSCHUTZ / ÜBERTEMPERATURSCHUTZ Zum Umschalten zwischen den Funktionsmodi wird die Taste MODE verwendet. Beim Automatikbetrieb verwendet das Zeitthermostat ein Programm, das vom Anwender eingestellt wird, und für jeden Wochentag unterschiedlich sein kann. - Page 95 BEDIENUNGSANWEISUNG F U N K T I O N S M O D U S Während des Betriebs wird das Schließen des Ausgangskontakts (Aktivierung Heizung / Kli- matisierung) auf die folgende Weise angezeigt: Heizung Das Symbol zeigt das Einschalten der Heizung an. Klimatisierung Das Symbol zeigt das Einschalten der Klimatisierung...
-
Page 96: Parametereinstellung
BEDIENUNGSANWEISUNG PA R A M E T E R E I N S T E L L U N G Für die Parametereinstellung ein Mal die Taste SET/PROG drücken. Auf dem Display erscheint das Symbol SET. Gleichzeitig beginnt das Symbol oder zu blinken. - Page 97 BEDIENUNGSANWEISUNG PA R A M E T E R E I N S T E L L U N G Auswahl Heizung / Klimatisierung Wenn das Symbol oder blinkt kann der Funk- tionsmodus mit den Tasten gewählt werden. Zur Bestätigung die Taste MODE innerhalb von 30 Sekunden drücken.
- Page 98 BEDIENUNGSANWEISUNG PA R A M E T E R E I N S T E L L U N G Einstellung der Minuten Wenn die Minutenziffern blinken, diese mit den Tasten einstellen. Zur Bestätigung der eingestellten Werte die Taste MODE innerhalb von 30 Sekunden drücken.
- Page 99 BEDIENUNGSANWEISUNG PA R A M E T E R E I N S T E L L U N G Einstellung Sollwert T2 Bei der Anzeige des Symbols beginnt der Tempera- turwert zu blinken. Den Wert T2 mit den Tasten einstellen.
- Page 100 BEDIENUNGSANWEISUNG PA R A M E T E R E I N S T E L L U N G Aktivierung Selbstlernfunktion (nur in der Funktions- art Heizung) Bei der Anzeige des Symbols die Funktion mit den Tasten aktivieren (ON) oder deaktivieren (OFF). Zur Bestätigung des eingestellten Werts die Taste MODE innerhalb von 30 Sekunden drücken.
-
Page 101: Anpassung Des Tagesprogramms
BEDIENUNGSANWEISUNG A N PA S S U N G D E S TA G E S P R O G R A M M S Um die Anpassung des voreingestellten Tagesprogramms auszuführen, oder eine Änderung auszuführen muss die Taste SET/PROG zwei Mal gedrückt werden. Auf dem Display erscheint die Anzeige PROG, und die Spalte des ersten Wochentags beginnt zu blinken. - Page 102 BEDIENUNGSANWEISUNG A N PA S S U N G D E S TA G E S P R O G R A M M S Bei jedem Drücken der Tasten wird die Uhrzeit in 15 Minuten Schritten vor oder zurück bewegt, daher können 4 Programmierperioden für jede Stunde definiert werden. Zur Bestätigung der Programmierung muss die Taste MODE lange gedrückt werden, der Wechsel zur Programmierung des nächsten Tages erfolgt automatisch.
-
Page 103: Funktion Party/ Holiday
BEDIENUNGSANWEISUNG F U N K T I O N PA R T Y / H O L I D AY Die Funktion Party ermöglicht die vorübergehende Deaktivierung des eingestellten Pro- gramms (Modus Auto) oder des manuellen Sollwerts (Modus MAN), indem ein anderer Tem- peratursollwert für einen Zeitraum zwischen 1 und 23 Stunden eingestellt wird. -
Page 104: Handbetrieb
BEDIENUNGSANWEISUNG F U N K T I O N PA R T Y / H O L I D AY Zur Aktivierung der Funktion die Taste MODE (Funktion PARTY) lange drücken, anschließend erneut die Taste MODE (Funktion HOLIDAY) drücken. Auf dem Display er- scheint das Symbol . -
Page 105: Funktion Bei Stromausfall
BEDIENUNGSANWEISUNG F U N K T I O N B E I S T R O M A U S FA L L Das Gerät ist mit einer Pufferbatterie ausgestattet, mit der bei einem Stromausfall die Uhr- zeit und der Wochentag aktualisiert wird. Mit reinem Batteriebetrieb steht unter den folgen- den Bedingungen eine Autonomie von 48 Stunden zur Verfügung: •... -
Page 106: Voreingestellte Programme
BEDIENUNGSANWEISUNG V O R E I N G E S T E L LT E P R O G R A M M E Das Zeitthermostat verfügt über zwei voreingestellte Programme, eines für die Heizung und eines für die Klimatisierung. HEIZUNGSPROGRAMM Montag - Freitag Samstag - Sonntag... -
Page 107: Voreingestellte Parameter
BEDIENUNGSANWEISUNG V O R E I N G E S T E L LT E P R O G R A M M E KLIMATISIERUNGSPROGRAMM Alle Wochentage Diese voreingestellten Programme können entsprechend der persönlichen Anforderungen geändert und angepasst werden. Für die Ausführung der Änderungen wird auf die Anwei- sungen des Abschnitts „Anpassung des Tagesprogramms“... -
Page 108: Montage
BEDIENUNGSANWEISUNG R E S E T U N D R Ü C K S T E L L U N G D E R V O R E I N G E S T E L LT E N W E R T E Wenn man die 4 Tasten bei anliegender Netzspannung gleichzeitig betätigt, führt man eine vollständige Nullstellung des Chronothermostats durch. -
Page 109: Klemmenbeschreibung
BEDIENUNGSANWEISUNG K L E M M E N B E S C H R E I B U N G Verkabelungsklemmen Stromversorgung L - Phase N - Nullleiter Ausgangsrelais 1 - Kontakt NA 2 - Kontakt NC 3 - Allgemein Serielle Leitung 4 - TX (ausgehende Daten) 5 - GND (allgemein) -
Page 110: Betriebseigenschaften / Technische Daten
B E T R I E B S E I G E N S C H A F T E N / T E C H N I S C H E D AT E N Funktionsart: Heizung und Klimatisierung Funktionsmodus: Automatik, Handbetrieb Frostschutz / Übertemperaturschutz... - Page 111 ABB participa activamente en las operaciones que favorecen el correcto empleo, reciclaje y recuperación de los aparatos eléctricos y electrónicos.
- Page 112 ABB SACE S.p.A. Apparecchi Modulari Viale dell’Industria,18 20010 Vittuone (MI) - Italy Tel.: 02.9034.1 - Telefax: 02.9034.7609...