Publicité

Les langues disponibles
  • FR

Les langues disponibles

  • FRANÇAIS, page 3

Liens rapides

SOFIA M2V5 Kit portier vidéo couleur 2 fils intégral
SOFIA M2V5 Video-Türsprechanlage mit Farbbildschirm – 2-Draht-Technologie
SOFIA M2V5 Colour video door entry kit – 2 wires built-in
SOFIA M2V5 Equipo de portero con vídeo en color de 2 cables integral
SOFIA M2V5 Kit videocitofono a colori – Integrale a 2 fili
SOFIA M2V5 Zestaw wideodomofonowy kolor – 2-przewodowy
Manuel d'installation et d'utilisation
Montage- und Bedienungsanleitung
Installation and user manual
Manual de instalación y uso
Manuale di installazione e d'uso
Instrukcja montażu i użytkowania
V.04-2012

Publicité

Table des Matières
loading

Sommaire des Matières pour SCS SOFIA M2V5

  • Page 1 SOFIA M2V5 Video-Türsprechanlage mit Farbbildschirm – 2-Draht-Technologie SOFIA M2V5 Colour video door entry kit – 2 wires built-in SOFIA M2V5 Equipo de portero con vídeo en color de 2 cables integral SOFIA M2V5 Kit videocitofono a colori – Integrale a 2 fili SOFIA M2V5 Zestaw wideodomofonowy kolor –...
  • Page 2: Outillage Necessaire

    FRANçAIS Important : Avant toute installation lire attentivement ce manuel. Cette notice fait partie intégrante de votre produit. Conservez-la soigneusement en vue de toute consultation ultérieure. Avertissements généraux : La mise en œuvre, les connections électriques et les réglages doivent être effectués dans les règles de l’art par une personne qualifiée et spécialisée.
  • Page 3: Caractéristiques Du Produit

    FRANçAIS SOMMAIRE 1. Caractéristiques du produit 2. Description des éléments 3. Fixation et connexion des éléments 4. Utilisation des éléments 5. Avertissements à respecter CARACTÉRISTIQUES DU PRODUIT Ce kit vidéo couleur extrêmement facile à installer dispose d’une excellente qualité d’image et vous permet de voir et de discuter avec vos visiteurs. Equipé...
  • Page 4: Description Des Éléments

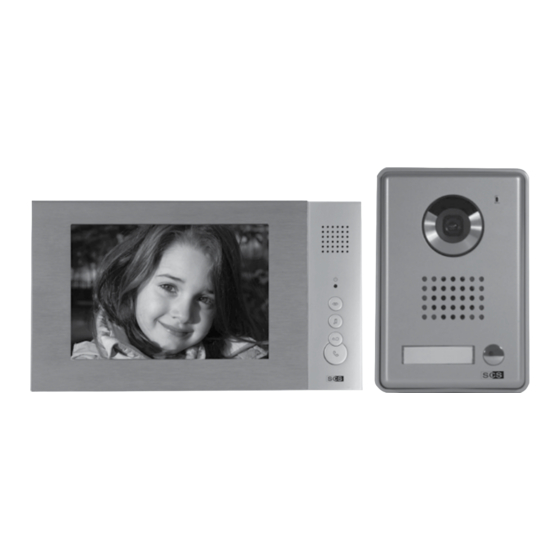
    FRANçAIS DESCRIPTION DES ÉLÉMENTS LE MONITEUR Signal de mise sous tension Bouton d’activation vidéo Sonneries Bouton d’ouverture Bouton de réponse Réglages (vue de profil) Ecran Réglages (vue arrière) Réglage couleur MONITEUR V5 Réglage luminosité PLATINE DE RUE TRANSFORMATEUR Réglage volume voix Réglage volume sonnerie LA PLATINE DE RUE Réglages (vue arrière)
  • Page 5: Fixation Et Connexion Des Éléments

    FRANçAIS FIXATION ET CONNEXION DES ÉLÉMENTS Fixation de la platine 1) Fixer la caméra extérieure à 1.5 mètre de hauteur en applique sur un mur plat. 2) Fixer d’abord le support arrière. Terminer en vissant la vis en bas de la platine. 3) Connecter les fils de la caméra (comme indiqué...
  • Page 6: Utilisation Des Éléments

    FRANçAIS UTILISATION DES ÉLÉMENTS COMMUNIQUER AVEC SON VISITEUR Lorsque le visiteur appuie sur le bouton d’appel de la caméra, le moniteur intérieur sonne, la vidéo s’allume. Pour décrocher, appuyer sur et vous pourrez communiquer avec votre visiteur. Le temps de communication est de 60 secondes maximum.
  • Page 7 FRANçAIS • La prise du réseau d’alimentation doit demeurer aisément accessible. Elle est utilisée comme dispositif de déconnexion. • Le moniteur et l’adaptateur doivent être utilisés en intérieur • Effectuer tous les branchements entre les éléments avant d’alimenter le kit. •...
  • Page 8 à votre disposition par votre commune ou votre distributeur. HOTLINE Hotline assistance technique au 0 892 350 490 (0.34 € / min) Lundi, mercredi, vendredi et samedi de 9h00 à 12h00 et de 14h00 à 18h00 Mardi et Jeudi de 9h00 à 12h00 www.scs-sentinel.com...
  • Page 9 DEUTSCH INHALT 1. Produkteigenschaften 2. Beschreibung der Komponenten 3. Befestigung und Anschluss der Komponenten 4. Bedienung der Komponenten 5. Warnhinweise PRODUKTEIGENSCHAFTEN Diese Video-Türsprechanlage ist kinderleicht zu montieren, bietet eine ausgezei- chnete Bildqualität und ermöglicht Ihnen somit Ihre Besucher zu sehen und mit diesen zu sprechen.
  • Page 10: Beschreibung Der Komponenten

    DEUTSCH BESCHREIBUNG DER KOMPONENTEN DER BILDSCHIRM Piepton beim Einschalten Aktivierungsknopf Video Klingeltöne Öffnungsknopf Verbindungsknopf Einstellungen Seitenansicht Bildschirm Einstellungen (Rückansicht) Einstellung MONITEUR V5 Sprachlautstärke Einstellung Helligkeit TÜRSTATION TRANSFORMATOR Einstellung Kontrast Einstellung Klingeltonlautstärke DIE TÜRSTATION Einstellungen (Rückansicht) Mikrofon ADAPTATEUR 18 VOLTS Objektiv VOL T I M E S E T Lautsprecher...
  • Page 11 DEUTSCH BEFESTIGUNG UND ANSCHLUSS DER KOMPONENTEN Befestigung 1) Die Außenkamera auf 1,5 Meter Höhe an einer glatten Wand befestigen. 2) Zuerst den hinteren Halter anbringen. Zuletzt die Schraube unterhalb der Türsprechanlage anziehen. 3) Die Drähte der Kamera anschließen (wie auf der unteren Abbildung gezeigt) und die Kamera auf dem Halter positionieren.
  • Page 12 DEUTSCH BEDIENUNG DER KOMPONENTEN MIT DEM BESUCHER SPRECHEN Wenn der Besucher auf den Klingelknopf der Kamera drückt, ertönt am Innenbildschirm der Klingelton und die Übertragung wird angezeigt. Drücken Sie auf , um abzuheben und mit Ihrem Besucher zu reden. Die maximale Gesprächsdauer beträgt Sekunden.
  • Page 13: Product Characteristics

    ENGLISH CONTENTS 1. Product characteristics 2. Description of the elements 3. Attaching and connecting the elements 4. Using the elements 5. Warnings to be respected PRODUCT CHARACTERISTICS This extremely easy to install colour video kit has excellent image quality and lets you see and talk to your visitors.
  • Page 14: Description Of The Elements

    ENGLISH DESCRIPTION OF THE ELEMENTS THE MONITOR Power-up signal Video activation button Ring tones Opening button Response button Profile view setting Screen Settings (rear view) Voice volume setting MONITEUR V5 Brightness setting STREET PANEL TRANSFORMER Contrast setting Ringing volume setting THE STREET PANEL Settings (rear view) Microphone...
  • Page 15: Attaching And Connecting The Elements

    ENGLISH ATTACHING AND CONNECTING THE ELEMENTS Attaching 1) Attach the exterior camera at a height of 1.5 metres mounted on a flat wall. 2) First fit the rear support. Finish by tightening the screw at the bottom of the panel. 3) Connect the camera wire (as shown in the diagram below) and insert the camera onto its support.
  • Page 16: Warnings To Be Respected

    ENGLISH USING THE ELEMENT COMMUNICATING WITH YOUR VISITOR When the visitor presses the camera call button, the interior monitor rings and the video switches on. To pick up press and you may communicate with your visitor. Communication time is a maximum of seconds.
  • Page 17: Caracteristicas Del Producto

    ESPAñOL ÍNDICE 1. Características del producto 2. Descripción de los elementos 3. Fijación y conexión de los elementos 4. Uso de los elementos 5. Advertencias que hay que respetar CARACTERISTICAS DEL PRODUCTO Este equipo de vídeo a color es muy fácil de instalar y ofrece una excelente cali- dad de imagen, lo que permite ver y hablar con los visitantes.
  • Page 18: La Placa De Calle

    ESPAñOL DESCRIPCION DE LOS ELEMENTOS EL MONITOR Indicador de alimentación Botón de activación de vídeo Melodías Botón de apertura Botón de respuesta Reglaje de la vista de perfil Pantalla Reglajes (vista trasera) Reglaje del volumen MONITEUR V5 de voz Reglaje de la PLACA DE CALLE luminosidad TRANSFORMADOR...
  • Page 19: Diagrama De Cableado

    ESPAñOL FIJACION Y CONEXION DE LOS ELEMENTOS Fijación 1) Fijar la cámara exterior a 1,5 metros de altura en un muro plano. 2) En primer lugar, fijar el soporte posterior. Terminar atornillando el tornillo inferior de la placa. 3) Conectar los cables de la cámara (como se indica en el diagrama que sigue) y unir la cámara a su soporte.
  • Page 20 ESPAñOL USO DE LOS ELEMENTOS COMUNICACIÓN CON LA VISITA Cuando la visita pulsa el botón de llamada de la cámara, el monitor interior suena y el vídeo se enciende. Para descolgar, pulse y podrá comunicarse con la visita. La duración máxima de la comunicación es de segundos.
  • Page 21: Caratteristiche Del Prodotto

    ITALIANO INDICE 1. Caratteristiche del prodotto 2. Descrizione degli elementi 3. Fissaggio e collegamento degli elementi 4. Uso degli elementi 5. Avvertenze da rispettare CARATTERISTICHE DEL PRODOTTO Questo kit videocitofono a colori, estremamente facile da installare, dispone di un’eccellente qualità di immagine e vi permette di vedere e di parlare con i vostri visitatori.
  • Page 22: Descrizione Degli Elementi

    ITALIANO DESCRIZIONE DEGLI ELEMENTI IL MONITOR Segnale di presenza di alimentazione Pulsante di attivazione video Suonerie Pulsante di apertura Pulsante di risposta Regolazioni (vista di profilo) Display Regolazioni (vista posteriore) Regolazione volume MONITEUR V5 voce Regolazione PIASTRA ESTERNA luminosità TRANSFORMATORE Regolazione contrasto Regolazione volume suoneria...
  • Page 23: Schema Di Cablaggio

    ITALIANO FISSAGGIO E COLLEGAMENTO DEGLI ELEMENTI Fissaggio 1) Fissare la telecamera esterna 1,5 metri di altezza su una parete piana. 2) Fissare innanzitutto il supporto posteriore. Terminare avvitando la vite inferiore della piastra. 3) Collegare i fili della telecamera (come indicato nello schema sottostante) e inserire la telecamera nel suo supporto.
  • Page 24 ITALIANO USO DEGLI ELEMENTI COMUNICARE CON I VISITATORI Quando il visitatore preme il pulsante di chiamata della telecamera, il monitor interno suona e il video si accende. Per rispondere, premere il pulsante ; questo consentirà di comunicare con il visitatore. Il tempo di comunica- zione è...
  • Page 25 POLSKI SPIS TREśCI 1. Parametry produktu 2. Opis elementów 3. Mocowanie i łączenie elementów 4. Zastosowanie elementów 5. Ostrzeżenia PARAMETRY PRODUKTU Ten zaskakująco łatwy w montażu zestaw wideodomofonowy charakteryzuje się doskonałą jakością obrazu. Dzięki niemu można zobaczyć gości i porozmawiać z nimi.
  • Page 26: Opis Elementów

    POLSKI OPIS ELEMENTÓW MONITOR Sygnalizacja napięcia Przycisk uruchamiający przekaz wideo Dzwonki Przycisk otwierający Przycisk odpowiedzi Regulacja (widok z przodu) Ekran Regulacja (widok z tyłu) Regulacja głośności MONITEUR V5 Regulacja jasności PANEL ZEWNĘTRZNY TRANSFORMATOR Regulacja kontrastu Regulacja głośności dzwonka PANEL ZEWNĘTRZNY Regulacja (widok z tyłu) Mikrofon ADAPTATEUR...
  • Page 27: Schemat Okablowania

    POLSKI MOCOWANIE I ŁĄCZENIE ELEMENTÓW Mocowanie 1) Przymocować kamerę zewnętrzną na wysokości 1,5 metra, montaż natynkowy na płaskiej ścianie. 2) Najpierw należy przymocować tylną podstawę. Na końcu należy przykręcić wkręty w dolnej części panelu. 3) Połączyć przewody kamery (zgodnie z poniższym schematem) i umieścić kamerę na podstawie. Nie należy montować...
  • Page 28 POLSKI ZASTOSOWANIE ELEMENTÓW ROZMOWA Z GOŚCIEM Po naciśnięciu przez gościa przycisku wywołania w kamerze, uruchamia się dzwonek w monitorze wewnętrznym, włącza się przekaz wideo. Aby odebrać należy nacisnąć na i można rozmawiać z gościem. Maksymalny czas rozmowy wynosi sekund. Można regulować głośność w panelu zewnętrznym przy pomocy przycisku do regulacji głośności znajdującego się...

Table des Matières