Table des Matières

Publicité

Les langues disponibles

Les langues disponibles

Liens rapides

PR3094
PR3093
User manual

Publicité

Table des Matières
loading

Sommaire des Matières pour Philips PR3094

  • Page 1 PR3094 PR3093 User manual...
  • Page 3 ENGLISH 4 DEUTSCH 57 ITALIANO 118 FRANÇAIS 176...
  • Page 4: Intended Use

    Read this user manual carefully before you use the Wireless TENS (PR3093) or the Wireless TENS Pro (PR3094) and save it for future reference. The Wireless TENS (PR3093) and the Wireless TENS Pro (PR3094) are available without prescription. To achieve optimal treatment success with your Wireless TENS device, you have to use it according to the treatment instructions in this user manual.
  • Page 5 - determining individual treatment and adapting settings of the TENS device by means of the Wireless TENS Pro PC Application (PR3094 only) The Wireless TENS Pro PC Application is only for use by a healthcare professional in combination with the...
  • Page 6 Pain Toolkit booklet included in the packaging.* * Note:Only the German version of the Pain Toolkit is included in the package. If you want to have the English, French or Italian version, please go to www.philips.com/pain-management to download your preferred version.
  • Page 7 ENGLISH Information for the healthcare professional (PR3094 only) The Wireless TENS Pro (PR3094) can be used in combination with the Wireless TENS Pro PC Application, which is designed for use by medically trained healthcare professionals who are responsible for using the TENS device according to the user...
  • Page 8: Important

    ENGLISH If you received a trial kit from our sales force, this kit should contain the mini USB cable. If you have other questions regarding the availability of the Wireless TENS Pro PC Application or the mini USB cable, please contact the Consumer Care Centre in your country.
  • Page 9: Important Safety Information

    ENGLISH Important safety information Warning - This is a medical device. Keep the device out of the reach of children. - Read this user manual carefully and always adhere to the treatment instructions. - This appliance is not intended for use by adults with reduced sensory or mental capabilities.
  • Page 10 ENGLISH - Do not apply stimulation over open wounds or rashes, or over swollen, red, infected or thrombophlebitis and varicose veins). - Do not apply stimulation on areas of skin that lack normal sensation. - Only apply stimulation to normal, intact, clean and healthy skin.
  • Page 11 0 mA on the remote control before you remove the TENS units, the extension cable (if used, PR3094 only), or the electrodes. If you do not end the treatment, you may experience an is not harmful, but can be unpleasant.
  • Page 12: Compliance With Standards

    - The device meets the relevant standards for this type of Class IIa electrical medical appliance and appliances using electrical stimulation for home use. - This Philips appliance complies with all applicable standards and regulations regarding exposure to Preset programs...
  • Page 13 TENS control control ment program PR3093 PR3094 time Conven- May give you a continu- No limit tional ous tingling stimulation Thorough May give you a more No limit stimulus thorough stimulating sensation...
  • Page 14 Burst no.on remote treat- TENS remote control ment pro- control PR3094 time gram PR3093 Con- May give you a pulsing burst tinu- stimulation to release endor- min.* phins in your body Burst Slow May give you a slower and...
  • Page 15 PR3093 PR3094 Mixed frequency stimulation sensation min.* Pulsing May give you a more puls- massage ing stimulation sensation min.* Deep May give you a slower and massage min.*...
  • Page 16 ENGLISH Program Pro- Pro- Pro- Fre- Pulse Preset name gram gram no. gram quency width time PR3094 type PR3093 Conven- Con- 100 Hz 200µs contin- tional ven- uous tional Thorough Con- 40 Hz 200µs contin- stimulus ven- uous tional Pre- Con- 100 Hz 150µs...
  • Page 17: Product Overview (Fig. 1)

    150µs 30 min. massage Mod. Note: With the Wireless TENS Pro (PR3094), healthcare professionals can use the Wireless TENS Pro PC application to create and install additional programs tailored to their patient’s needs as part of a pain- management regimen.
  • Page 18: Preparing For Use

    Removable belt clip Battery compartment cover Extension channel connectors for third and fourth electrode (PR3094 only) 10 Extension channel cable (PR3094 only) 11 Plug to connect extension channel cable to TENS units (PR3094 only) 12 On/off button of TENS units...
  • Page 19 ENGLISH Note: If the rechargeable battery of the TENS units is not fully charged when you start a treatment, the batteries may run out during the treatment. We advise you to always fully charge the TENS units before you start a treatment. Note: Treatment is not possible when the TENS units are charging.
  • Page 20: Preparing For Treatment

    ENGLISH Preparing for treatment with two channels and four electrodes (PR3094 only) The Wireless TENS pro (PR3094) comes with an extension cable that allows you to connect two extra electrodes. Because the Wireless TENS pro (PR3094) has two channels, its remote control has two intensity buttons, one for each channel.
  • Page 21 ENGLISH Put the two AAA 1.5-volt alkaline batteries in the remote control. Note: Make sure that the - and + poles point in the direction indicated in the battery compartment. Note: Remove the batteries if you are not going to use the device for a month or more to prevent battery leakage.
  • Page 22 ENGLISH , The screen prompts you to press the up arrow. Press the up arrow on the selector. , When you unlock the remote control, you can use the control panel again. , When you have inserted new batteries and the TENS units are switched off, the ‘no connection’...
  • Page 23 ENGLISH Setting the date and time If you want to use activity monitoring to keep track of your activity and treatment pattern, you have to set the date and time on your remote control. The date and time setting screen opens highlighted.
  • Page 24 ENGLISH Use the down arrow to go to the time setting Press the OK button to be able to change the time set. , The time setting screen opens. Use the up or down arrow to choose the hour and press the right arrow to go to the minutes Use the up or down arrow to choose the the time.
  • Page 25: Using The Device

    ENGLISH Using the device Attaching the electrodes and TENS units Make sure the skin you want to place the electrodes on looks healthy and is free from wounds or rashes. skin and skin with open wounds, cancerous lesions or rashes. Clean the skin with a moist cloth and dry it.
  • Page 26 ENGLISH Place the second electrode on the body part you want to treat. In the case of PR3094, you can also place a third and fourth electrode on the body part you want to treat. Note: Always place the electrodes on the skin before...
  • Page 27: Electrode Placement

    ENGLISH , If you do not start the treatment within 5 minutes, the TENS units switch off automatically. button again to start a treatment. Electrode placement To receive maximum results from your stimulation, it is important to place the electrodes correctly. Always make sure that you have normal skin sensation in the place you want to treat before you attach the electrodes.
  • Page 28: Selecting A Program

    ENGLISH - The home screen symbol: This symbol is highlighted when the home screen is displayed. - The program screen symbol: Select this symbol to choose a treatment program. - The timer screen symbol: Select this symbol to set the treatment duration. - Battery symbol: Select this symbol to check the battery status.
  • Page 29 If you want to change the program follow steps 1 to 3 above. Note: The same program applies to both channels of the Wireless Tens Pro (PR3094). Setting the duration of a program On the home screen you see the duration that is selected as default.
  • Page 30 ENGLISH Note: The same duration applies to both channels of the Wireless TENS Pro (PR3094). Starting and stopping a treatment (PR3093) TENS units with the on/off button and then you press the + side of the intensity button to increase the intensity.
  • Page 31 TENS units. In that case, treatment on both channels stops immediately. Starting and stopping a treatment (PR3094) TENS units with the on/off button and then you press the + sides of the intensity buttons to increase the intensity.
  • Page 32 ENGLISH , The intensity level is shown in numbers above the left intensity button. The intensity level is also shown by the intensity level bar on the left side of the screen. , Hold down the + side of the intensity button on the right side of the remote control to increase the intensity of the extension channel.
  • Page 33 ENGLISH Activity monitoring This additional feature available on the remote control allows you to check your activity pattern over a day, a week or a month. Since activity and pacing are important elements in pain management, the activity monitor included in the remote control provides you with a tool to check how well you pace your activities.
  • Page 34 If you are managing your pain with the Wireless TENS Pro in consultation with a healthcare professional who uses the Wireless TENS Pro PC Application (PR3094), the activity monitor will give your healthcare professional more insight into your activity and treatment patterns. The PC application also allows your healthcare professional to set an activity target.
  • Page 35: After Use

    0 mA on the remote control before you remove the TENS units, the extension cable (if used, PR3094 only), or the electrodes. If you do not end the treatment, you may experience an is not harmful, but can be unpleasant.
  • Page 36: Storage Of The Electrodes

    ENGLISH Peel the electrodes off the skin by pulling at the edge. Note: Do not leave the electrodes on the skin overnight. If you develop skin irritation, try attaching the electrodes in a different spot. Make sure that you move the electrodes to a different spot regularly so that you do apply stimulation at the same spot every day.
  • Page 37 Do not immerse the electrodes in water. Clean the remote control, the charger, the TENS units and the extension cable (PR3094 only) with a damp cloth and a mild cleaning agent, e.g. dishwashing liquid.
  • Page 38 Open the battery compartment and are not place the batteries correctly (see correctly chapter ‘Preparing for use’). placed. The remote Contact the Philips Consumer Care control may Centre. be broken. The battery of Charge the TENS units (see chapter The battery...
  • Page 39 The remote Bring the remote control closer to the control is too TENS units. far from the TENS units. The TENS Contact the Philips Consumer Care units may be Centre. broken.
  • Page 40 Check if the TENS units are placed on The ‘channel interrupted’ the electrodes correctly. Wireless TENS symbol may Pro (PR3094) only: If the ‘channel indicate that interrupted’ symbol is above the left the TENS unit intensity button, check if the TENS units or units are are connected properly.
  • Page 41 ENGLISH Problem Possible cause Solution The electrodes The electrodes have lost their adhesive have become power because they are dirty or detached from because they have been used for a the skin. long time. You can try to clean the electrodes (see chapter ‘Cleaning’).
  • Page 42 ENGLISH Problem Possible cause Solution You did not Always decrease the intensity to 0 experienced decrease the mA before you remove the TENS intensity to units. In this way you avoid the unpleasant 0 to end the unpleasant sensation when you touch sensation treatment the connectors of the TENS units...
  • Page 43 ENGLISH Signals on the device Battery status indications on the remote control To check the battery level of the remote control or the TENS units, use the left or right arrow to highlight the battery icon on the menu bar. The battery screen opens and shows the charge level of the rechargeable battery of the TENS units on the left and the charge level of the batteries of the remote control on...
  • Page 44 ENGLISH No connection with the TENS units - This ‘no connection’ symbol on the screen indicates that there is no connection between the remote control and the TENS units. This may have several causes: The rechargeable battery of the TENS units is empty.
  • Page 45: Battery Status Indicator

    ENGLISH Indicator signals on the TENS units Battery status indicator - The battery status indicator on the TENS units and then the TENS units switch off. the TENS units are charging. - The battery status indicator is burning solid: The battery status indicator is solid orange when the rechargeable battery of the TENS units is low.
  • Page 46 Note: Always replace the electrodes with electrodes recommended for this device by the manufacturer. New electrodes can be ordered at www.philips.com/ tens-electrodes. Batteries of the remote control Replace the batteries of the remote control when replace them with two AAA 1.5-volt alkaline...
  • Page 47: Ordering Accessories

    ENGLISH Ordering accessories To buy accessories or spare parts, visit www.shop.philips.com/service or go to your Philips dealer. You can also contact the Philips Consumer Care Centre in your country. Electrodes You can order new electrodes on www.philips.com/tens-electrodes. Caution: Only use this device with the charger, cables, electrodes and accessories recommended by the manufacturer.
  • Page 48 The electrodes are not covered by the terms of the guarantee because they are subject to wear and have to be replaced regularly. Manufacturer’s legal address Philips Consumer Lifestyle B.V. Tussendiepen 4 9206 AD Drachten The Netherlands Recycling - This crossed-out wheeled bin symbol on a product means that the product is covered by European Directive 2012/19/EU.
  • Page 49 ENGLISH - All plastic parts are marked with recycle symbols. Model PR3094, PR3093 Rated voltage(V) - adapter 100-240 ~ 150mA Rated frequency (Hz) - adapter 50-60 Rated output - adapter 5V , 500 mA Class Medical device Class IIa Ingress of water - device except...
  • Page 50 ENGLISH Pulse output parameters Current pulse shape Biphase symmetrical (net current 0dc) Operating conditions Temperature from 5°C to +40°C Relative humidity from 15% to 93% (non-condensing) Atmospheric pressure from 700hPa to 1060hPa Storage and transport conditions Temperature - electrodes from 0°C to +40°C Temperature - device from -10°C to 50°C Relative humidity...
  • Page 51: Explanation Of Symbols

    ENGLISH Explanation of symbols Symbols on the device - This is the symbol for reference number. This symbol is followed by the manufacturer’s reference number, which is the type number of the device. The type plates on the remote control and the TENS units show the same type number.
  • Page 52 ENGLISH - This symbol on the charger means: protected against vertically falling water drops. - This symbol means that this device emits non- ionising radiation. All devices and systems that include RF transmitters or that intentionally apply RF electromagnetic energy must be labelled with this symbol.
  • Page 53 ENGLISH - This symbol means: Conforms to EC Directives. CE stands for ‘Conformité Européenne’. 0344 is - This symbol means: Do not throw away with the normal household waste. For further instructions, see chapter ‘Recycling’. - This symbol indicates that the adapter is double insulated (Class II).
  • Page 54 ENGLISH - This symbol means: Keep dry. button. - This is the TENS pulse symbol. It is shown next to the treatment status indicator. - This is the battery symbol. It is shown next to the battery status indicator. device complies with both Canadian and US requirements.
  • Page 55 ENGLISH Symbols on electrode bag - This symbol means: Do not use while driving, operating machines or performing other activities that may present a risk of injury. - This symbol means: Do not use damaged or worn electrodes or electrodes that have lost their adhesive power.
  • Page 56: Electromagnetic Emissions And Immunity

    Electromagnetic emissions and immunity Electromagnetic Compatibility (EMC) The Wireless TENS (PR3093) and the Wireless TENS Pro (PR3094) are approved according to EMC safety standard EN 60601-1-2. They are designed to be used in typical domestic or clinical environments. Electrode placement guide (Fig. 101)
  • Page 57 DEUTSCH Einführung Herzlichen Glückwunsch zu Ihrem Kauf und willkommen bei Philips! Um das Kundendienstangebot von Philips vollständig nutzen zu können, sollten Sie Ihr Produkt unter www.philips.com/ pain-management/register registrieren. Lesen Sie diese Bedienungsanleitung sorgfältig durch, bevor Sie das kabellose TENS-Gerät (PR3093) oder das kabellose TENS-Gerät Pro (PR3094) verwenden,...
  • Page 58 Die PC-Anwendung für das Gerät TENS Pro ist nur für den Gebrauch durch medizinisches Fachpersonal in Kombination mit dem kabellosen TENS-Gerät Pro (PR3094) bestimmt. Sie ermöglicht es dem Therapeuten, genauere TENS- Behandlungsprogramme anzubieten und die Bewegungsabläufe des Patienten hinsichtlich der Anwendung des Geräts aufzuzeichnen und zu...
  • Page 59 DEUTSCH Die Impulse werden von den akkubetriebenen TENS-Komponenten erzeugt, die mit den selbsthaftenden Hydrogel-Elektroden verbunden werden müssen. Sie können aus voreingestellten TENS-Programmen mit verschiedenen Impulseinstellungen auswählen und die Intensität der Impulse nach Ihren Vorlieben anpassen. Diese Broschüre beinhaltet Informationen zum Positionieren der Elektroden und zu den Programmen, die zur Behandlung verwendet werden.
  • Page 60 Sie diese unter www.philips.com/ pain-management herunterladen. Informationen für den Therapeuten (nur PR3094) Das kabellose Gerät TENS Pro (PR3094) kann in Kombination mit der dazugehörenden PC- Anwendung verwendet werden. Diese wurde zur Anwendung durch medizinische Fachkräfte entwickelt, die für die richtige Anwendung des TENS-Geräts gemäß...
  • Page 61 Die PC-Anwendung für das kabellose Gerät TENS Pro ist nicht im Lieferumfang enthalten, kann aber auf Wunsch heruntergeladen werden. Hinterlassen Sie dazu unter www.philips.com/tens-download Ihre Kontaktdaten. Sie erhalten einen Link, über den Sie die PC-Anwendung für das kabellose Gerät TENS Pro herunterladen können. Über diesen Link steht ebenfalls die Bedienungsanleitung dieser PC- Anwendung zum Herunterladen bereit.
  • Page 62 DEUTSCH Wichtig Gegenanzeigen Verwenden Sie das Gerät nicht, wenn Folgendes zutrifft: - Sie haben einen Herzschrittmacher, einen implantierte Metall- oder Elektronikgeräte (z. B. Systeme zur Verabreichung von Arzneimitteln), da der Gebrauch in diesen Fällen zu Stromschlag, Verbrennungen, elektrischen Interferenzen oder sogar zum Tod führen könnte.
  • Page 63 DEUTSCH Wichtige Sicherheitshinweise Warnhinweis - Dies ist ein medizinisches Gerät. Halten Sie das Gerät außerhalb der Reichweite von Kindern. - Lesen Sie diese Bedienungsanleitung sorgfältig durch, und halten Sie sich stets an die Anwendungsanweisungen. - Dieses Gerät ist nicht für Erwachsene mit verringerten sensorischen oder psychischen Fähigkeiten geeignet.
  • Page 64 DEUTSCH - Gehen Sie besonders vorsichtig vor, wenn Sie ein erhöhtes Risiko für innere Blutungen aufgrund einer Prellung oder einer Verletzung haben. - Konsultieren Sie Ihren Arzt, wenn Sie kürzlich operiert wurden, da sich die Stimulation negativ auf den Heilungsprozess auswirken kann. - Wenden Sie die Stimulation nicht auf oder nahe Krebsläsionen an.
  • Page 65 Betriebsbedingungen in Kapitel “Technische Daten”. - Der USB-Anschluss darf nur von einem Gesundheitsexperten in Verbindung mit der von Philips bereitgestellten PC-Anwendung für das kabellose Gerät TENS Pro (PR3094) verwendet werden. - Die Elektroden haben eine begrenzte Haltbarkeit. Bitte überprüfen Sie vor dem Gebrauch das Haltbarkeitsdatum auf der Verpackung.
  • Page 66: Voreingestellte Programme

    Einstellen der Intensität auf 0 mA auf der Fernbedienung beenden, bevor Sie die TENS-Komponenten, das Verlängerungskabel (falls verwendet, nur PR3094) oder die Elektroden abnehmen. Wenn Sie die Behandlung nicht beenden, kann ein unangenehmes Gefühl in Ihren Fingern auftreten. Dieses Gefühl ist nicht schädlich, kann jedoch unangenehm sein.
  • Page 67 TENS-Pro- Fernbe- Fernbe- Behand- gramms dienung dienung lungs- PR3093 PR3094 dauer Konventi- Sorgt für eine dauerhaft Keine onell kribbelnde Stimulation Begren- zung Starker Sorgt für eine stärkere Keine Reiz Begren- zung Vor einer Sorgt für eine lokalere...
  • Page 68 TENS-Pro- Fernbe- Fernbe- Behand- gramms dienung dienung lungs- PR3093 PR3094 dauer Milder Reiz - Sorgt für eine mildere Keine Begren- zung Körperpartien Tiefge- Sorgt für eine tiefere Keine hender Begren- Reiz zung Ausstrah- Sorgt für eine Stimu-...
  • Page 69 TENS- gene Pro- Fernbe- Fernbe- Behand- gramms dienung dienung lungs- PR3093 PR3094 dauer Kontinu- Bewirkt eine pulsieren- 30 Minu- ierliche de Impulsstimulation, ten* Impuls- um Endorphine in Ihrem folge Körper auszuschütten Langsames Bewirkt eine langsamere 30 Minu-...
  • Page 70 TENS- gene Pro- Fernbe- Fernbe- Behand- gramms dienung dienung lungs- PR3093 PR3094 dauer Diffuse Bewirkt eine diffusere 30 Minu- Impuls- Impulsstimulation, um ten* folge Endorphine in Ihrem Körper auszuschütten * optional mehrmals am Tag Frequenz-modulierte TENS-Programme Frequenz-modulierte TENS-Programme wechseln den Impuls zwischen hoch und niedrig.
  • Page 71 Programm- nr. auf nr. auf gene name Fernbe- Fernbe- Behand- dienung dienung lungs- PR3093 PR3094 dauer Tiefenmas- Sorgt für eine lang- 30 Minu- sage samere und tiefer ten* gehende Stimulations- Sanfte Sorgt für eine sanft 30 Minu- Massage ten*...
  • Page 72 Pro- Pro- Pro- Pro- Fre- Impuls- Vor- gramm- grammnr. gramm- gramm- quenz breite einge- name PR3093 stellte PR3094 Zeit Konven- 100 Hz 150 µs stu- einer tionell fenlos Aktivität Milder Konven- 80 Hz 60 µs stu- Reiz tionell fenlos Tiefge-...
  • Page 73: Produktübersicht (Abb. 1)

    30 Mi- Massage q.-mod. nuten Hinweis: Mit dem kabellosen Gerät TENS Pro (PR3094) können Gesundheitsexperten die dazugehörige PC- Anwendung im Rahmen einer Schmerztherapie nutzen, um zusätzliche Programme zu erstellen und zu installieren, die speziell auf die Bedürfnisse ihres Patienten abgestimmt sind.
  • Page 74: Für Den Gebrauch Vorbereiten

    Nach-rechts- und Nach-links-Pfeilen Abnehmbarer Gürtel-Clip Batteriefachabdeckung Erweiterungskanal-Anschlüsse für die dritte und vierte Elektrode (nur PR3094) 10 Kabel für Erweiterungskanal (nur PR3094) 11 Stecker zum Anschließen des Kabels für den Erweiterungskanal an die TENS-Komponenten (nur PR3094) 12 Ein-/Ausschalter der TENS-Komponenten 13 TENS-Komponenten 14 Abnehmbares Eckstück (nur PR3094)
  • Page 75 DEUTSCH Hinweis: Wenn der Akku der TENS-Komponenten zu Beginn der Behandlung nicht vollständig aufgeladen ist, kann der Energievorrat des Akkus während der Behandlung erschöpfen. Wir empfehlen Ihnen, die TENS-Komponenten immer vollständig aufzuladen, bevor Sie eine Behandlung beginnen. Hinweis: Es ist keine Behandlung möglich, während die TENS-Komponenten aufgeladen werden.
  • Page 76 DEUTSCH Behandlungsvorbereitung mit zwei Kanälen und vier Elektroden (nur PR3094) Das kabellose TENS-Gerät Pro (PR3094) wird mit einem Erweiterungskabel geliefert, über das Sie zwei weitere Elektroden verbinden können. Weil das kabellose TENS-Gerät Pro (PR3094) zwei Kanäle aufweist, hat die zugehörige Fernbedienung zwei Intensitätstasten, eine für jeden Kanal.
  • Page 77 DEUTSCH Setzen Sie zwei AAA 1,5-Volt-Alkalibatterien in die Fernbedienung ein. Hinweis: Vergewissern Sie sich, dass die Plus- und Minuspole im Batteriefach in die richtige Richtung zeigen. Hinweis: Nehmen Sie die Batterien heraus, wenn Sie das Gerät einen Monat oder länger nicht verwenden, um ein Auslaufen der Batterien zu verhindern.
  • Page 78 DEUTSCH , Sie werden aufgefordert, den Nach-oben-Pfeil zu oben-Pfeil. , Wenn Sie die Fernbedienung entsperren, können Sie das Bedienfeld erneut verwenden. , Wenn Sie neue Batterien eingesetzt haben und die TENS-Komponenten ausgeschaltet sind, wird der “Keine Verbindung”-Bildschirm angezeigt. Hinweis: Der “Keine Verbindung”-Bildschirm kann auch aus anderen Gründen angezeigt werden (siehe “Fehlersignale auf der Fernbedienung”...
  • Page 79 DEUTSCH Datum und Uhrzeit festlegen Wenn Sie die Aktivitätsüberwachung verwenden möchten, um den Verlauf Ihrer Aktivität und das Behandlungsmuster zu verfolgen, müssen Sie das Datum und die Uhrzeit auf Ihrer Fernbedienung einstellen. Uhrzeit wird automatisch angezeigt, wobei das Datumsfeld hervorgehoben ist. Hinweis: Dieser Bildschirm öffnet sich nur bei der ersten Verwendung automatisch und wenn Sie die Batterien mehr als 24 Stunden, nachdem der...
  • Page 80 DEUTSCH Wählen Sie das Jahr mithilfe der Nach-oben- OK-Taste, um das Datum zu bestätigen. Verwenden Sie den Nach-unten-Pfeil, um zum Zeiteinstellungsfeld zu wechseln. Zeiteinstellung zu ändern. , Der Bildschirm zur Zeiteinstellung wird geöffnet. , Das Stundenfeld ist hervorgehoben. Wählen Sie die Stunde mithilfe der Nach-oben- den Nach-rechts-Pfeil, um zum Minutenfeld zu wechseln.
  • Page 81: Gerät Verwenden

    DEUTSCH Gerät verwenden Elektroden und TENS-Komponenten befestigen Vergewissern Sie sich, dass die Haut, auf der Sie die Elektroden platzieren möchten, gesund ist und keine Verletzungen oder Ausschläge aufweist. Hinweis: Platzieren Sie die Elektroden nicht auf roter oder entzündeter Haut oder auf Haut mit offenen Wunden, Krebsläsionen oder Ausschlägen.
  • Page 82 Positionierungsanleitung am Ende dieser Bedienungsanleitung. Positionieren Sie die zweite Elektrode auf der zu behandelnden Körperpartie. Wenn Sie das PR3094 verwenden, können Sie auch eine dritte und vierte Elektrode auf der zu behandelnden Körperpartie positionieren. Hinweis: Positionieren Sie immer zuerst die Elektroden auf der Haut, bevor Sie die TENS-Komponenten anschließen.
  • Page 83 DEUTSCH Hinweis: Wenn Sie eine Behandlung mit vier Elektroden (nur PR3094) durchführen möchten, müssen Sie zuerst die TENS-Komponenten an den beiden Elektroden und dann die Stecker des Erweiterungskabels an die beiden anderen Elektroden anschließen. TENS-Komponenten in den Standby-Modus zu schalten.
  • Page 84 DEUTSCH möglicherweise Hilfe benötigen, um die Elektroden an bestimmten Körperstellen anzubringen. In der Regel sollten die Elektroden auf oder nahe der schmerzhaften Stelle positioniert werden. Die Stimulation kann im Stimulationsbereich zu sichtbaren Muskelkontraktionen führen. Dies ist nicht schädlich. Wenn Sie diese Kontraktionen jedoch als an einer anderen Stelle an.
  • Page 85: Programm Auswählen

    DEUTSCH - Das Symbol für den Einstellungsbildschirm: Wählen Sie dieses Symbol aus, um das Datum oder die Uhrzeit zu ändern (weitere Informationen zum Einstellen von Datum und Uhrzeit erhalten Sie in Kapitel “Für den Gebrauch vorbereiten”). Hinweis: Die Menüleiste auf dem Startbildschirm und andere Bildschirme werden nach einer Weile ausgeblendet, bei Tastendruck jedoch wieder eingeblendet.
  • Page 86 DEUTSCH Hinweis: Das gleiche Programm gilt für beide Kanäle des kabellosen TENS-Geräts Pro (PR3094). Dauer eines Programms einstellen Auf dem Startbildschirm sehen Sie die Dauer, die als Standardwert ausgewählt wurde. Wenn Sie die Standarddauer der Behandlung ändern möchten, verwenden Sie den Nach-links- oder Nach-rechts-Pfeil, um das Timersymbol in der Hinweis: Wenn Sie das Programm ändern, wird die...
  • Page 87 DEUTSCH Hinweis: Dieselbe Dauer gilt für beide Kanäle des kabellosen TENS-Geräts Pro (PR3094). Behandlung beginnen und beenden (PR3093) Um eine Behandlung zu beginnen, müssen Sie zuerst die TENS-Komponenten mit dem Ein-/ Ausschalter einschalten und dann die Plus-Seite der Intensitätstaste drücken, um die Intensität zu erhöhen.
  • Page 88 DEUTSCH , Die Intensitätseinstellung wird in Zahlen Intensität liegt zwischen 0 mA und 60 mA. Die Intensitätseinstellung wird vom Intensitätsbalken auf der rechten Seite des Bildschirms verdeutlicht. Je höher der Balken, desto höher die Intensität. , Wenn die Behandlung beginnt, blinkt die Behandlungsstatusanzeige auf den TENS- Komponenten gelb.
  • Page 89 DEUTSCH Behandlung beginnen und beenden (PR3094) Um eine Behandlung zu beginnen, müssen Sie zuerst die TENS-Komponenten mit dem Ein-/ Ausschalter einschalten und dann die Plus-Seiten der Intensitätstasten drücken, um die Intensität zu erhöhen. Erweiterungskanal separat einzustellen, und beginnen Sie die Behandlung.
  • Page 90 DEUTSCH Um die Behandlung auf einem oder auf beiden Kanälen vor Ablauf der festgelegten Behandlungsdauer zu beenden, oder wenn Sie die Behandlungsdauer auf “Kontinuierlich” eingestellt haben, halten Sie die Minus-Seite der die Intensität auf 0 mA zu verringern. Wenn die Intensität bei 0 mA liegt, wird von den TENS- Komponenten kein Impuls ausgesendet.
  • Page 91 DEUTSCH Hinweis: Um die Wirksamkeit der Aktivitätsüberwachung sicherzustellen, müssen Sie die Fernbedienung den ganzen Tag an oder in der Nähe der Hüfte tragen. Sie können sie am Gürtel oder Bund mit dem Gürtel-Clip befestigen oder in Ihrer Hosen- bzw. Rocktasche tragen. Ergebnisse ablesen hervorzuheben.
  • Page 92 Wenn Sie Ihren Schmerz mit dem kabellosen Gerät TENS Pro unter Absprache mit einem Gesundheitsexperten behandeln, der die PC- Anwendung für das kabellose Gerät TENS Pro (PR3094) verwendet, übermittelt der Aktivitätsmonitor Ihrem Gesundheitsexperten weitere Informationen zu Ihrer Aktivität und Ihrem Behandlungsmuster. Mit der PC-Anwendung kann Ihr Gesundheitsexperte zudem ein Aktivitätsziel...
  • Page 93: Nach Dem Gebrauch

    Komponenten oder durch Einstellen der Intensität auf 0 mA auf der Fernbedienung beenden, bevor Sie die TENS-Komponenten, das Verlängerungskabel (falls verwendet, nur PR3094) oder die Elektroden abnehmen. Wenn Sie die Behandlung nicht beenden, jedoch unangenehm sein. Schalten Sie die TENS-Komponenten durch...
  • Page 94 DEUTSCH Ziehen Sie die TENS-Komponenten von den Elektroden ab. Hinweis: Wenn Sie vergessen haben, die TENS- Komponenten auszuschalten, werden sie 5 Minuten nach dem Abziehen automatisch ausgeschaltet. Laden Sie die TENS-Komponenten auf, um sie Nehmen Sie die Elektroden durch Ziehen an der Kante von der Haut ab.
  • Page 95 Tauchen Sie die Fernbedienung und die TENS- Tauchen Sie die Elektroden nicht in Wasser. Reinigen Sie die Fernbedienung, das Ladegerät, die TENS-Komponenten und das Erweiterungskabel (nur PR3094) mit einem feuchten Tuch und einem milden Hinweis: Sie können zur Reinigung auch 70-prozentiges Isopropanol (IPA) verwenden.
  • Page 96 Die Batterien Öffnen Sie das Batteriefach, und legen sind nicht rich- Sie die Batterien richtig ein (siehe Kapi- tig eingelegt. tel “Für den Gebrauch vorbereiten”). Die Fernbe- Setzen Sie sich mit einem Philips Ser- dienung kann vice-Center in Verbindung. defekt sein.
  • Page 97 DEUTSCH Problem Mögliche Lösung Ursache Der Akku der Laden Sie die TENS-Komponenten auf Akkustand- TENS-Kompo- (siehe “Für den Gebrauch vorberei- anzeige der nenten ist leer. ten”). TENS-Kom- ponenten blinkt orange, und das Gerät hat sich ausgeschal- tet. Dies bedeutet, dass die Kapazität Der Lade- Akkustand- stand des...
  • Page 98 Schadens- oder Verlet- zungsrisiko besteht. Die Fernbe- Führen Sie die TENS-Komponenten dienung ist zu näher an die Fernbedienung heran. weit von den TENS-Kom- ponenten entfernt. Setzen Sie sich mit einem Philips Ser- TENS-Kom- vice-Center in Verbindung. ponenten können defekt sein.
  • Page 99 Prüfen Sie, ob die TENS-Komponenten unterbro- richtig an die Elektroden angeschlossen chen”-Symbol sind. Gilt nur für das kabellose Gerät kann bedeu- TENS Pro (PR3094): Wenn sich das ten, dass die “Kanal unterbrochen”-Symbol über der TENS-Kompo- nenten nicht Sie prüfen, ob die TENS-Komponenten ordnungsgemäß...
  • Page 100 DEUTSCH Problem Mögliche Lösung Ursache Die Elektro- Die Elektroden haben ihre Haftfähigkeit den haben sich verloren, weil sie schmutzig sind oder von der Haut weil sie über einen längeren Zeitraum gelöst. hinweg verwendet wurden. Sie können versuchen, die Elektroden zu reinigen nicht hilft, müssen Sie die Elektroden ersetzen.
  • Page 101 DEUTSCH Problem Mögliche Lösung Ursache Die Be- Wenn sich die TENS-Komponenten handlungs- TENS-Kompo- im Inneren überhitzen, entfernen Sie statusanzei- nenten haben sie von den Elektroden und lassen ge auf den sich im Inne- sie abkühlen. Sobald sie ausreichend TENS-Kom- ren überhitzt. abgekühlt sind, können Sie sie wieder ponenten an den Elektroden befestigen und den...
  • Page 102 DEUTSCH Problem Mögliche Lösung Ursache Die Sti- Die Intensität Drücken Sie die Plus- oder Minus-Seite mulation ist entweder der Intensitätstaste, um die Intensität zu fühlt sich zu hoch oder erhöhen oder zu verringern. anders oder zu niedrig. weniger an- genehm an als üblich.
  • Page 103 DEUTSCH Signale auf dem Gerät Akkustandanzeigen auf der Fernbedienung Um den Ladestand der Batterien in der Fernbedienung oder des Akkus in den TENS- Sie mit dem Nach-links- oder Nach-rechts- Der Akkubildschirm wird geöffnet, und der Ladestand des Akkus in den TENS- Komponenten wird links und der Ladestand der Batterien in der Fernbedienung wird rechts angezeigt.
  • Page 104 DEUTSCH Hinweis: Das Akkusymbol blinkt, wenn in den Batterien der Fernbedienung oder dem Akku der TENS- Komponenten weniger als 30 % Kapazität verbleibt. Keine Verbindung mit den TENS- Komponenten - Das auf dem Bildschirm angezeigte “Keine Verbindung”-Symbol gibt an, dass zwischen der Fernbedienung und den TENS-Komponenten keine Verbindung besteht.
  • Page 105 DEUTSCH Anzeigesignale auf den TENS-Komponenten Akkustandanzeige - Die Akkustandanzeige auf den TENS- Komponenten blinkt: Die Akkustandanzeige blinkt in kurzen Abständen orange, wenn der Akku leer ist. Die TENS- Komponenten schalten sich anschließend aus. Die Akkustandanzeige blinkt grün, wenn die TENS-Komponenten aufgeladen werden. - Die Akkustandanzeige leuchtet dauerhaft: Die Akkustandanzeige leuchtet dauerhaft orange, wenn der Ladestand des Akkus in den TENS-...
  • Page 106 Gefühl auftritt. Hinweis: Ersetzen Sie die Elektroden immer mit Elektroden, die für dieses Gerät vom Hersteller empfohlen werden. Neue Elektroden können unter www.philips.com/tens-electrodes bestellt werden. Batterien in der Fernbedienung Ersetzen Sie die Batterien in der Fernbedienung, wenn das Akkusymbol auf dem Display blinkt.
  • Page 107: Zubehör Bestellen

    DEUTSCH Zubehör bestellen Um Zubehör oder Ersatzteile zu kaufen, gehen Sie auf www.shop.philips.com/service oder zu Ihrem Philips Händler. Sie können auch ein Philips Service-Center in Ihrem Land kontaktieren. Elektroden Sie können neue Elektroden unter www.philips.com/tens-electrodes bestellen. Achtung: Verwenden Sie dieses Gerät mit dem Ladegerät, den Kabeln, den Elektroden und den...
  • Page 108 Garantieeinschränkungen Die Elektroden werden nicht von den Garantiebedingungen abgedeckt, weil sie der Abnutzung unterliegen und regelmäßig ersetzt werden müssen. Philips Consumer Lifestyle B.V. Tussendiepen 4 9206 AD Drachten Niederlande Recycling Abfalltonne auf Rädern) auf einem Gerät, gilt für dieses Gerät die Europäische Richtlinie 2012/19/EU.
  • Page 109: Technische Daten

    Bringen Sie die Komponenten zu einer den Akku herausnehmen zu lassen. - Alle Kunststoffelemente sind mit Recycling- Symbolen markiert. Technische Daten Modell PR3094, PR3093 Nennspannung (V) – Adapter 100-240 ~ 150 mA Nennfrequenz (Hz) – Adapter 50 - 60 Nennausgabe – Adapter...
  • Page 110 DEUTSCH Betrieb Temperatur Von 5 °C bis 40 °C Relative Luftfeuchtigkeit Von 15 % bis 93 % (nicht kondensierend) Atmosphärischer Druck Von 700 hPa bis 1060 hPa Aufbewahrungs- und Transportbedingungen Temperatur – Elektroden Von 0 °C bis 40 °C Temperatur – Gerät Von -10 °C bis 50 °C Relative Luftfeuchtigkeit Weniger als 93 % (nicht...
  • Page 111: Erklärung Der Symbole

    DEUTSCH Erklärung der Symbole Symbole auf dem Gerät - Dies ist das Symbol für die Referenznummer. Auf dieses Symbol folgt die Referenznummer des Herstellers, wobei es sich um die Typennummer des Geräts handelt. Die Typenschilder auf der Fernbedienung und den TENS-Komponenten weisen die gleiche Typennummer auf.
  • Page 112 DEUTSCH - Dieses Symbol auf der Fernbedienung, den TENS-Komponenten und dem Erweiterungskabel bedeutet, falls vorhanden: Geschützt gegen den Zugang zu gefährlichen Teilen mit einem Finger und gegen vertikal auftreffende Wassertropfen bei einer Neigung bis 15 Grad. - Dieses Symbol auf dem Ladegerät bedeutet: Geschützt gegen den Zugang zu gefährlichen Teilen mit einem Finger und gegen vertikal auftreffende Wassertropfen.
  • Page 113 DEUTSCH - Dieses Symbol bedeutet: Achtung, TENS-Ausgang. Es ist an allen Elektrodenanschlüssen angebracht. - Dieses Symbol bedeutet: Entspricht den EC- Richtlinien. CE steht für “Conformité Européenne”; 0344 ist die Nummer der gemeldeten Stelle. - Dieses Symbol bedeutet: Nicht mit dem normalen Hausmüll entsorgen.
  • Page 114 DEUTSCH - Dieses Symbol bedeutet: Lesen Sie vor dem Gebrauch des Geräts die Bedienungsanleitung durch. - Dieses Symbol bedeutet: Vor Nässe schützen. - Dieses Symbol ist die Markierung für den Ein-/ Ausschalter. neben der Behandlungsstatusanzeige. der Akkustandanzeige.
  • Page 115 DEUTSCH sowohl den kanadischen als auch den US-ameri- kanischen Bedingungen entspricht. MEDIZINISCH ANGEWANDTES STROM-/ENERGIEGERÄT BEZÜGLICH RISIKO VON ELEKTROSCHOCKS, FEUER UND MECHANISCHER GEFAHREN NUR GEMÄSS ANSI/AAMI ES60601-1 (2005, C1:09, A2:10), IEC 60601-1 (2005), DOSE/CSA C22.2 Nr. 60601.1 (2008, R:2011), IEC 60601-2-10 (2012), DOSE/CSA C22.2 Nr.
  • Page 116 DEUTSCH - Dieses Symbol bedeutet: Positionieren Sie die Elektroden nicht im Gesicht oder am Hals. - Dieses Symbol bedeutet: Positionieren Sie die Elektroden nicht auf Ihrer Brust. - Dieses Symbol bedeutet: Legen Sie die Elektroden nicht auf offene Wunden, Krebsläsionen, - Dieses Symbol gibt die minimale und maximale Aufbewahrungstemperatur für die Elektroden an, wenn sie mehr als einen Monat nicht verwendet...
  • Page 117 DEUTSCH Elektromagnetische Emissionen und Immunität Elektromagnetische Kompatibilität (EMC) Das kabellose TENS-Gerät (PR3093) und das kabellose Gerät TENS Pro (PR3094) erfüllen die EMC-Sicherheitsnorm EN 60601-1-2. Die Geräte wurden zur Verwendung in typisch privater oder klinischer Umgebung entwickelt. Anleitung zur Elektrodenpositionierung (Abb. 101)
  • Page 118 Assistenza Clienti Philips del vostro paese. Uso previsto Wireless TENS (PR3093) e Wireless TENS Pro (PR3094) sono destinati all’uso da parte di adulti per alleviare dolore cronico muscolo-scheletrico da lieve a moderato. I dispositivi sono destinati all’uso per la stimolazione elettrica transcutanea dei nervi (TENS) allo scopo di alleviare il dolore e per monitorare l’attività...
  • Page 119 L’applicazione per PC Wireless TENS Pro è destinata all’uso esclusivo da parte di medici professionisti in combinazione con il dispositivo Wireless TENS Pro (PR3094) e consente al medico di offrire trattamenti paziente e di analizzare le modalità di trattamento in relazione all’uso del dispositivo.
  • Page 120 Pain Toolkit incluso nella confezione.* * Nota:la confezione include solo la versione in tedesco dell’opuscolo Pain Toolkit. Se desiderate la versione in inglese, francese o italiano, visitate il sito www.philips.com/pain-management per scaricare la versione desiderata.
  • Page 121 ITALIANO Informazioni per i professionisti (solo PR3094) Il dispositivo Wireless TENS Pro (PR3094) può essere usato in combinazione con l’applicazione per PC Wireless TENS Pro, destinata all’uso da parte responsabili per l’uso del dispositivo TENS come da manuale dell’utente e che sono in grado di: - analizzare l’attività...
  • Page 122 USB. Per altre domande relative alla disponibilità dell’applicazione per PC Wireless TENS Pro o al cavo mini USB, vi preghiamo di contattare il centro assistenza clienti Philips del vostro paese. Importante Controindicazioni Non usate il dispositivo se: - siete portatori di stimolatore cardiaco, elettronico sottocutaneo (ad esempio un dispositivo di somministrazione di farmaci), poiché...
  • Page 123: Effetti Collaterali

    ITALIANO Effetti collaterali Interrompete l’utilizzo del dispositivo e consultate il vostro medico in caso di effetti collaterali provocati dal dispositivo. I possibili effetti collaterali possono includere: - irritazione della pelle sotto gli elettrodi, sebbene il gel usato sugli elettrodi in genere non causi reazioni allergiche - ustioni sotto gli elettrodi - mal di testa o altre sensazioni dolorose...
  • Page 124 ITALIANO - Non applicate la stimolazione sul torace, poiché la corrente elettrica potrebbe causare alterazioni del ritmo cardiaco che potrebbero rivelarsi letali. - Poiché gli effetti della stimolazione sul cervello non sono noti, gli elettrodi non devono essere applicati sulla sommità né sui lati della testa. - Prestate attenzione nel caso in cui abbiate la tendenza ad emorragie interne dovute a incidenti o traumi.
  • Page 125 - Il dispositivo non è adatto alle temperature - La porta di connessione USB può essere usata solo da un medico insieme all’applicazione per PC Wireless TENS Pro (PR3094) fornita da Philips. - Gli elettrodi hanno una durata limitata. Prima di utilizzarli, controllate la data di scadenza sull’imballaggio.
  • Page 126: Conformità Agli Standard

    ITALIANO telecomando su 0 mA prima di rimuovere l’unità TENS, la prolunga (se utilizzata, solo PR3094) o gli elettrodi. Se non concludete il trattamento potreste provare una sensazione sgradevole nelle dita. Non si tratta di una sensazione dannosa, ma può essere sgradevole.
  • Page 127 TENS con- ma sul ma sul venzionale teleco- teleco- gliata mando mando PR3093 PR3094 tratta- mento Conventional Può causare una sti- Nes- (Convenzio- molazione continua limite nale) con sensazione di formicolio Thorough Causa una sensazio- Nes-...
  • Page 128 TENS con- ma sul ma sul consi- venzionale teleco- teleco- gliata mando mando PR3093 PR3094 tratta- mento Pre-activity Produce una stimo- Nes- (Attività pre- lazione più localizza- paratoria) ta e lieve limite Soft stimulus Produce una sti- Nes- (Stimolazione molazione più...
  • Page 129 TENS burst gramma ma sul con- teleco- siglia- teleco- mando ta del mando PR3094 trat- PR3093 men- Continuo- Produce una stimola- us Burst zione burst pulsata per minu- (Stimola- favorire il rilascio di zione burst continua) Slow Produce una stimolazio- ne burst più...
  • Page 130 TENS burst gramma ma sul con- teleco- siglia- teleco- mando ta del mando PR3094 trat- PR3093 men- Deep Produce una stimolazio- kneading ne burst più localizzata e minu- (Impasto profonda per favorire il profondo) corpo Diffuse...
  • Page 131 PR3093 PR3094 Mixed frequen- Produce una sensa- 30 mi- cy (Frequenza zione di stimolazione nuti* mista) Pulsing massage Produce una stimola- 30 mi- (Massaggio zione più pulsata...
  • Page 132 Pro- Tipo di Fre- Tempo program- gram- gram- pro- quenza piezza prede- ma n. ma n. gramma dell’im- PR3093 PR3094 pulso Conven- Conven- 100 Hz 200 µs conti- tional tional (Conven- (Conven- zionale) zionale) Thorough Conven- 40 Hz 200 µs...
  • Page 133 Pro- Tipo di Fre- Tempo program- gram- gram- pro- quenza piezza prede- ma n. ma n. gramma dell’im- PR3093 PR3094 pulso Conti- Burst 100 Hz, 250 µs 30 min. nuous 2 Hz Burst (Stimo- lazione burst continua) Slow Burst 80 Hz, 200 µs...
  • Page 134 (Mas- saggio gentile) Nota: con Wireless TENS Pro (PR3094), i medici professionisti possono utilizzare l’applicazione per PC Wireless TENS Pro per creare e installare programmi aggiuntivi che si basano sulle esigenze dei loro pazienti come parte di un regime di gestione del dolore.
  • Page 135 Coperchio del vano batterie Connettori del canale di estensione per il terzo e il quarto elettrodo (solo PR3094) 10 Cavo del canale di estensione (solo PR3094) 11 Spinotto per collegare il canale di estensione all’unità TENS (solo PR3094) 12 Pulsante on/off delle unità TENS 13 Unità...
  • Page 136: Predisposizione Dell'apparecchio

    ITALIANO Predisposizione dell’apparecchio Ricarica delle unità TENS Per poter usare il dispositivo, è necessario innanzitutto caricare le unità TENS. La ricarica richiede circa 3 ore, se il dispositivo è a temperatura ambiente. Quando la batteria ricaricabile è circa 8 ore di uso continuo in condizioni normali. Nota: se la batteria ricaricabile dell’unità...
  • Page 137: Preparazione Per Il Trattamento

    Il dispositivo Wireless TENS pro (PR3094) è dotato di una prolunga che consente di collegare due elettrodi aggiuntivi. Poiché Wireless TENS pro (PR3094) dispone di due canali, il suo telecomando ha due pulsanti di regolazione dell’intensità, uno per ciascun canale.
  • Page 138 ITALIANO Preparazione del telecomando Inserimento delle batterie nel telecomando Nel caso sia presente, rimuovete la clip per cintura dal telecomando. Rimuovete il coperchio del vano batterie del telecomando facendolo scorrere. Inserite due batterie alcaline AAA da 1,5 volt nel telecomando. Nota: assicuratevi che i poli - e + seguano quanto indicato nel vano batterie.
  • Page 139 ITALIANO Blocco e sblocco del telecomando Il pannello di controllo del telecomando si blocca automaticamente dopo un periodo di inattività per evitare l’utilizzo accidentale. Se premete un tasto sul telecomando, lo schermo richiede di premere il pulsante OK e quindi la freccia rivolta verso l’alto. Premete il pulsante OK per sbloccare il telecomando.
  • Page 140: Impostazione Di Data E Ora

    ITALIANO Se desiderate bloccare il telecomando, tenete premuto il pulsante OK per 2 secondi. Nota: sul display non compare niente quando il telecomando è bloccato. Consiglio: bloccate il telecomando quando avete cominciato il trattamento. In questo modo potete indossare il telecomando sulla cintura, in vita o in una tasca senza il Impostazione di data e ora Se desiderate usare il controllo dell’attività...
  • Page 141 ITALIANO , Viene evidenziato il campo dell’anno. Usate la freccia verso l’alto o verso il basso per scegliere l’anno e premete il pulsante OK per confermare la data. Usate la freccia verso il basso per passare al campo di impostazione dell’ora. l’ora.
  • Page 142: Utilizzo Del Dispositivo

    ITALIANO Usate la freccia verso l’alto o verso il basso per alternare tra l’orologio con formato a 24 ore e l’orologio con formato a 12 ore. Premete il pulsante OK per confermare la vostra scelta. Utilizzo del dispositivo Collegamento degli elettrodi e delle unità TENS Assicuratevi che la pelle su cui desiderate posizionare gli elettrodi sia sana e priva di...
  • Page 143 Posizionate il secondo elettrodo sulla parte del corpo che volete trattare. Nel caso del dispositivo PR3094, potete posizionare anche un terzo e un quarto elettrodo sulla parte del corpo che volete trattare.
  • Page 144: Posizionamento Degli Elettrodi

    ITALIANO Nota: se desiderate effettuare un trattamento con quattro elettrodi (solo PR3094), collegate prima le unità TENS a due elettrodi e quindi i connettori della prolunga agli altri due elettrodi. Premete il pulsante on/off per commutare le unità TENS sullo standby.
  • Page 145 ITALIANO non posizionate gli elettrodi sul collo o sul torace. Non posizionate gli elettrodi su pelle arrossata o irritazioni. Avvio e conclusione del trattamento Questa è la schermata principale. In questa schermata è indicato il programma, la durata del trattamento e l’intensità selezionata. Sulla barra del menu nella parte inferiore della schermata potete vedere, da sinistra a destra: - Il simbolo della schermata principale: questo...
  • Page 146 1 a 3 indicati in precedenza. Nota: lo stesso programma viene applicato a entrambi i canali del dispositivo Wireless Tens Pro (PR3094). Impostazione della durata di un programma Sulla schermata principale viene visualizzata trattamento, utilizzate la freccia verso sinistra o destra per evidenziare l’icona del timer sulla...
  • Page 147 4 a 6 indicati in precedenza. Nota: la stessa durata viene applicata a entrambi i canali del dispositivo Wireless Tens Pro (PR3094) Avvio e conclusione del trattamento (PR3093) Per avviare un trattamento, è necessario innanzitutto accendere le unità...
  • Page 148 ITALIANO Premete il simbolo + del pulsante dell’intensità per impostare l’intensità. L’intensità comincia ad aumentare da 0 mA. Il trattamento viene avviato e il timer procede con il conto alla rovescia non appena l’intensità supera 0 mA. Gli impulsi nell’area in cui sono applicati gli elettrodi diventano più...
  • Page 149 TENS. In tal caso, il trattamento viene interrotto subito su entrambi i canali. Avvio e conclusione del trattamento(PR3094) Per avviare un trattamento, è necessario innanzitutto accendere le unità TENS con il pulsante on/ off e quindi premere il simbolo + del pulsante dell’intensità...
  • Page 150 ITALIANO , Il livello di intensità viene visualizzato in cifre sopra il pulsante dell’intensità a sinistra. Il livello di intensità è indicato anche dalla relativa barra sul lato sinistro della schermata. , Tenete premuto il simbolo + sul pulsante dell’intensità sul lato destro del telecomando per aumentare l’intensità...
  • Page 151: Controllo Dell'attività

    ITALIANO Controllo dell’attività Questa funzionalità aggiuntiva disponibile sul telecomando consente di controllare l’andamento della vostra attività nel corso di un giorno, una settimana o un mese. Poiché saper dosare l’attività è importante nella gestione del dolore, il monitor dell’attività presente sul telecomando vi offre la possibilità...
  • Page 152 Inoltre vi consente di stabilire in quali giorni il vostro livello di attività è stato superiore o inferiore alla media. Obiettivo per il livello di attività (PR3094) Se effettuate la gestione del dolore con Wireless TENS Pro consultandovi con un professionista che utilizza l’applicazione per PC Wireless TENS...
  • Page 153 TENS oppure di impostare il telecomando su 0 mA prima di rimuovere l’unità TENS, la prolunga (se utilizzata, solo PR3094) o gli elettrodi. Se non concludete il trattamento potreste provare una sensazione sgradevole nelle dita. Non si tratta di una sensazione dannosa, ma può...
  • Page 154 ITALIANO Staccate gli elettrodi dalle unità TENS scollegandoli. Nota: se avete dimenticato di spegnere le unità TENS, esse si spegneranno automaticamente entro 5 minuti quando gli elettrodi sono staccati. Ricaricate le unità TENS per assicurarvi che siano pronte per il trattamento successivo. Rimuovete gli elettrodi dalla pelle sollevandoli dai bordi.
  • Page 155 Pulite il telecomando, il caricabatterie, le unità TENS e la prolunga (solo PR3094) con un panno umido ed un detergente delicato, ad esempio il detersivo per piatti. Nota: potete pulire le varie parti anche con alcol isopropilico al 70% (IPA).
  • Page 156: Risoluzione Dei Problemi

    Wireless TENS e Wireless TENS Pro. Se non riuscite a risolvere il problema con le informazioni riportate sotto, visitate il sito www.philips.com/support per un elenco di domande frequenti o contattate il centro assistenza clienti del vostro paese.
  • Page 157 ITALIANO Problema Possibile causa Soluzione L’indicatore La batteria delle di stato della unità TENS si ha un’autonomia residua del batteria sulle sta scaricando. 30%. Ricaricate le unità TENS al unità TENS è L’icona della più presto possibile (consultare batteria sul il capitolo “Predisposizione telecomando dell’apparecchio”).
  • Page 158 Avvicinate il telecomando alle è troppo unità TENS. lontano dalle unità TENS. Le unità TENS Contattate il Centro Assistenza potrebbero Clienti Philips. essere rotte. Sul display Il simbolo a Assicuratevi che gli elettrodi siano appare un croce indica posizionati correttamente sulla simbolo a un’interruzione...
  • Page 159 Controllate che le unità TENS croce che indica siano posizionate correttamente un’interruzione sugli elettrodi. Solo Wireless TENS della Pro (PR3094): se il simbolo a comunicazione croce che indica un’interruzione con il canale della comunicazione con il potrebbe canale si trova sopra il pulsante di intensità...
  • Page 160 ITALIANO Problema Possibile causa Soluzione Il simbolo Questo Potete continuare il trattamento della batteria a patto che il dispositivo fornisca sulla barra la batteria del la normale stimolazione. Quando del menu del telecomando si premete il pulsante on/off delle telecomando sta scaricando.
  • Page 161 ITALIANO Problema Possibile causa Soluzione La stimolazione L’intensità è Premete il simbolo + o - sul sembra diversa troppo alta o pulsante dell’intensità per o meno troppo bassa. aumentarla o diminuirla. piacevole del solito. Gli elettrodi Spegnete le unità TENS e non sono scollegatele dagli elettrodi.
  • Page 162 ITALIANO batteria e viene visualizzato il livello di carica della batteria ricaricabile delle unità TENS sulla sinistra e il livello di ricarica della batteria del telecomando sulla destra. Il simbolo della batteria può indicare quattro livelli di carica: carica completa, carica a due terzi, carica a un terzo e scarica.
  • Page 163 ITALIANO La batteria ricaricabile delle unità TENS è scarica. Le unità TENS sono spente. Il telecomando è distante dalle unità TENS. Se nessuna di queste cause è applicabile, c’è un malfunzionamento nelle unità TENS. Interruzione del canale - Il simbolo a croce che indica un’interruzione della comunicazione con il canale sullo schermo indica che il canale corrispondente è...
  • Page 164 ITALIANO l’indicatore di stato della batteria è arancione TENS si sta scaricando. La batteria ricaricabile ha un’autonomia residua del 30%. L’indicatore di stato della batteria diventa arancione anche quando le batterie del telecomando si stanno scaricando. quando la batteria ricaricabile è completamente carica.
  • Page 165: Batterie Del Telecomando

    “Predisposizione dell’apparecchio”). Ordinazione degli accessori Per acquistare accessori o parti di ricambio, visitate il sito www.shop.philips.com/service oppure recatevi presso il vostro rivenditore Philips. Potete contattare anche il centro assistenza Philips del vostro paese. Elettrodi Potete ordinare nuovi elettrodi su...
  • Page 166: Garanzia E Assistenza

    Per assistenza, informazioni o in caso di problemi visitate il sito Web Philips all’indirizzo www.philips.com/support. Potete anche contattare il Centro Assistenza Clienti Philips nel vostro paese. I suoi numeri di telefono sono: - Germania: 0800 0007522 (numero gratuito per le chiamate all’interno della Germania)
  • Page 167 Recatevi presso un centro di rimuovere la batteria ricaricabile. - Tutte le parti in plastica sono contrassegnate con simboli per il riciclaggio. Modello PR3094, PR3093 Tensione nominale (V) - adattatore 100-240 ~ 150 mA Frequenza nominale (Hz) - adattatore 50-60...
  • Page 168 ITALIANO Modello PR3094, PR3093 Classe Classe di dispositivo medico IIa Ingresso di acqua - dispositivo ad IP22 eccezione del caricabatterie Ingresso di acqua - caricabatterie IP21 Tipo di batteria - unità TENS Ioni di litio Tipo di batteria - telecomando...
  • Page 169: Spiegazione Dei Simboli

    ITALIANO Condizioni di stoccaggio e trasporto Temperatura - elettrodi da 0 °C a + 40 °C Temperatura - dispositivo da -10 °C a 50 °C Umidità relativa meno di 93% (senza condensa) Pressione atmosferica da 700 hPA a 1060 hPA Nota: Se prevedete di non utilizzare gli elettrodi per più...
  • Page 170 ITALIANO - Questo simbolo sul telecomando, sulle unità TENS e sulla prolunga, se fornita, indica la protezione dall’accesso con le mani alle parti pericolose e da a 15 gradi. - Questo simbolo sul caricabatterie indica la protezione la protezione dall’accesso con le mani alle parti pericolose e da gocce d’acqua in caduta verticale.
  • Page 171 ITALIANO - Questo simbolo indica che le parti applicate BF (Body Floating) (ad esempio gli elettrodi) sono conformi a IEC 60601-1. accanto all’indirizzo del produttore legittimo. posto accanto a tutti i collegamenti degli elettrodi. - Questo simbolo indica la conformità alle direttive Européenne”.
  • Page 172 ITALIANO - Questo simbolo indica che l’adattatore è dotato di doppio isolamento (Classe II). - Questo simbolo indica che l’adattatore può essere utilizzato solo in interni. dell’utente prima di cominciare ad utilizzare il dispositivo.
  • Page 173 ITALIANO - Questo è il simbolo degli impulsi TENS. È visualizzato accanto all’indicatore di stato del trattamento. - Questo è il simbolo della batteria. È visualizzato accanto all’indicatore di stato della batteria. questo dispositivo è conforme ai requisiti sia canadesi sia americani. APPARECCHIATURA AD USO DI CORRENTE/ENERGIA PER APPLICAZIONE MEDICA PER QUANTO RIGUARDA SCOSSE ELETTRICHE, INCENDI...
  • Page 174 ITALIANO - Questo simbolo indica che non si devono essere utilizzati elettrodi o danneggiati o usurati che hanno perso il loro potere adesivo. - Questo simbolo indica che gli elettrodi devono essere usati da una sola persona e non condivisi con altri.
  • Page 175 Emissioni elettromagnetiche e immunità Electromagnetic Compatibility (EMC) I dispositivi Wireless TENS (PR3093) e Wireless TENS Pro (PR3094) sono approvati in base allo standard di sicurezza EMC EN 60601-1-2. Sono destinati all’uso in ambienti domestici o clinici. Guida al posizionamento degli...
  • Page 176 Service Consommateurs Philips de votre pays. Application Les appareils Wireless TENS (PR3093) et Wireless TENS Pro (PR3094) sont destinés à être utilisés par des consommateurs adultes qui éprouvent des douleurs musculo-squelettiques chroniques faibles à modérées. Les appareils sont conçus pour être utilisés pour la neurostimulation transcutanée dans...
  • Page 177: Neurostimulation Transcutanée Et Gestion De La Douleur

    - analyse des traitements et des activités du patient - détermination d’un traitement individuel et adaptation des paramètres de l’appareil grâce à l’application Wireless TENS Pro PC (PR3094 uniquement) L’application PC Wireless TENS Pro ne doit être utilisée que par un professionnel de la santé...
  • Page 178 FRANÇAIS de programmes de neurostimulation transcutanée préréglés avec différents paramètres d’impulsion et vous pouvez régler l’intensité de l’impulsion en fonction de vos préférences. Ce livret contient des informations sur le placement des électrodes et les programmes utilisés pour le traitement. Suivi des activités et gestion de la douleur quotidiennes.
  • Page 179: Informations Destinées Aux Professionnels De La Santé (Pr3094 Uniquement)

    Informations destinées aux professionnels de la santé (PR3094 uniquement) L’appareil Wireless TENS Pro (PR3094) peut être utilisé avec l’application PC Wireless TENS Pro, conçue pour une utilisation par les professionnels de la santé responsables d’une utilisation de l’appareil conformément aux instructions du mode d’emploi...
  • Page 180: Contre-Indications

    USB. Si vous avez d’autres questions quant à la disponibilité de l’application PC Wireless TENS Pro ou du mini-câble USB, veuillez contacter le Service Consommateurs Philips de votre pays. Important Contre-indications N’utilisez pas l’appareil si : - vous portez un stimulateur cardiaque, un implanté...
  • Page 181: Effets Indésirables

    FRANÇAIS Effets indésirables Vous devez arrêter d’utiliser l’appareil et consulter votre médecin si vous éprouvez des effets indésirables lors de l’utilisation de l’appareil. Les effets indésirables possibles peuvent inclure ce qui suit : - irritation de la peau au niveau des électrodes, bien que le gel utilisé...
  • Page 182 FRANÇAIS respiratoires qui pourraient également avoir un effet défavorable sur votre rythme cardiaque ou votre tension artérielle. - N’appliquez pas de stimulation sur votre torse car le courant électrique qui circule dans le torse peut provoquer des troubles du rythme cardiaque, pouvant s’avérer mortels.
  • Page 183 FRANÇAIS - N’appliquez pas de stimulation pendant votre sommeil. Si l’appareil est utilisé à l’heure du coucher, réglez le programmateur pour qu’il s’éteigne automatiquement. - L’appareil et les électrodes sont conçus pour un usage externe. - N’appliquez pas de stimulation près d’appareils de surveillance électronique (moniteurs cardiaques ou alarmes d’électrocardiogramme par exemple) car ces appareils peuvent ne pas fonctionner...
  • Page 184 - Assurez-vous de terminer le traitement en intensité de 0 mA sur la télécommande avant de retirer les unités TENS, la rallonge (si utilisée, PR3094 uniquement) ou les électrodes. Si vous ne terminez pas le traitement, vous pouvez éprouver une sensation désagréable dans vos doigts. Cette sensation n’est pas nuisible, mais elle peut être...
  • Page 185: Présélection De Programmes

    Présélection de programmes Présentation des programmes L’appareil est livré avec 8 programmes préréglés (PR3093) ou 15 programmes préréglés (PR3094). Il existe trois types de neurostimulation transcutanée : classique, en rafale et en modulation de fréquence. Pour plus de détails, voir ci-dessous.
  • Page 186 PR3094 trans- mande cutanée PR3093 classique Classique Peut vous donner une Aucune stimulation de picotement limite en continu Stimulus Peut vous donner une Aucune...
  • Page 187: Programmes De Neurostimulation Transcutanée En Rafale

    PR3093 PR3094 Rafale en Peut vous donner une continu stimulation en rafale min.* d’impulsions pour libérer des endorphines dans votre corps...
  • Page 188 PR3093 PR3094 Pétrissage Peut vous donner une lent stimulation en rafale min.* plus lente par massage pour libérer des en- dorphines Pétrissage Peut vous donner une doux stimulation en rafale min.*...
  • Page 189: Programmes De Neurostimulation Transcutanée En Modulation De Fréquence

    PR3094 PR3093 Fré- Peut vous donner une 30 min.* quence sensation de circulation mixte de la stimulation Massage Peut vous donner une 30 min.*...
  • Page 190 N° de Type Fré- Largeur Durée pro- pro- pro- d’émis- quence de l’im- gramme gramme gramme sion pulsion PR3093 PR3094 Clas- Clas- 100 Hz 200 µs continu sique sique Stimulus Clas- 40 Hz 200 µs continu en pro- sique fondeur Pré-acti-...
  • Page 191 Fré- Largeur Durée pro- pro- pro- d’émis- quence de l’im- gramme gramme gramme sion pulsion PR3093 PR3094 Pétris- Rafale 80 Hz, 200 µs 30 min sage 1 Hz lent Pétris- Rafale 80 Hz, 200 µs 30 min sage 3 Hz doux Pétris-...
  • Page 192 FRANÇAIS Remarque : Avec les appareils Wireless TENS Pro (PR3094), les professionnels de la santé peuvent utiliser l’application PC Wireless TENS Pro pour créer et installer des programmes supplémentaires adaptés aux besoins de leurs patients dans le cadre d’un programme de gestion de la douleur.
  • Page 193: Avant Utilisation

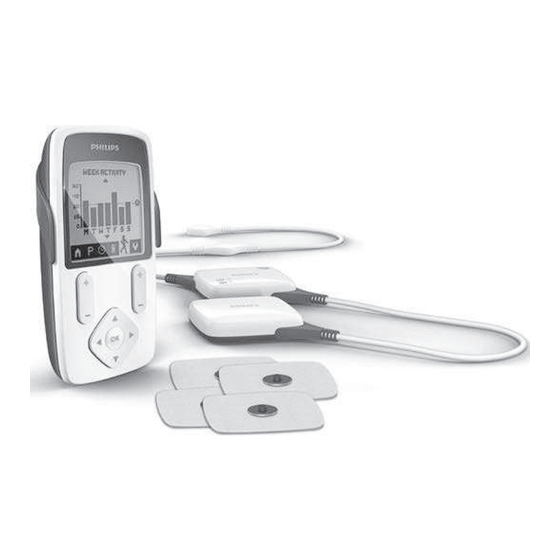
    FRANÇAIS 15 Voyant d’état de la batterie des unités TENS 16 Voyant d’état de traitement des unités TENS 17 Adaptateur 18 Chargeur 19 Électrode à hydrogel auto-adhésive Remarque : Vous trouverez l’image associée à l’intérieur du capot avant. Avant utilisation Charge des unités TENS Pour pouvoir utiliser l’appareil, vous devez d’abord charger les unités TENS.
  • Page 194: Préparation Au Traitement Avec Deux Canaux Et Quatre Électrodes (Pr3094 Uniquement)

    Préparation au traitement avec deux canaux et quatre électrodes (PR3094 uniquement) L’appareil Wireless TENS Pro (PR3094) est livré avec un câble d’extension qui permet de connecter deux électrodes supplémentaires. Cet appareil possède deux canaux. Sa télécommande dispose de deux boutons d’intensité, un pour chaque canal.
  • Page 195: Préparation De La Télécommande

    FRANÇAIS prise. Préparation de la télécommande Insertion des piles dans la télécommande Retirez le clip ceinture de la télécommande, s’il Ôtez le couvercle du compartiment des piles de la télécommande. Insérez deux piles alcalines AAA 1,5 V neuves dans la télécommande. Remarque : Veillez à...
  • Page 196 FRANÇAIS Si vous voulez porter la télécommande à votre ceinture ou à la taille, rattachez le clip ceinture sur la télécommande. Vous pouvez également utiliser la télécommande sans le clip ceinture. Verrouillage et déverrouillage de la télécommande Le panneau de commande de la télécommande se verrouille automatiquement après un certain temps d’inactivité...
  • Page 197 FRANÇAIS , Lorsque vous avez inséré des piles neuves et que les unités TENS sont éteintes, l’écran « aucune connexion » apparaît. Remarque : Cet écran peut également apparaître pour d’autres raisons (voir « Signaux d’erreur de la télécommande » dans le chapitre « Signaux de l’appareil »).
  • Page 198 FRANÇAIS réglage de la date. , Le champ Jour est mis en surbrillance. vers la droite pour accéder au champ Mois. , Le champ Mois est mis en surbrillance. vers la droite pour accéder au champ Année. , Le champ Année est mis en surbrillance. bas pour choisir l’année et appuyez sur la champ de réglage de l’heure.
  • Page 199: Utilisation De L'appareil

    FRANÇAIS pour choisir les minutes et appuyez sur la champ de format de l’heure. format de l’heure. pour passer de l’horloge 24 heures à l’horloge 12 heures. Appuyez sur la touche OK pour Utilisation de l’appareil Fixation des électrodes et des unités TENS Assurez-vous que la peau est saine et sans blessures ou rougeurs avant d’y placer les électrodes.
  • Page 200 Placez la deuxième électrode sur la partie du corps que vous allez traiter. Dans le cas du PR3094, vous pouvez placer également une troisième et une quatrième électrodes sur la partie du corps que vous allez traiter.
  • Page 201 Vous pouvez également continuer à porter les unités TENS sur votre corps entre les séances. Remarque : Si vous souhaitez effectuer une séance avec quatre électrodes (PR3094 uniquement), attachez les connecteurs du câble d’extension aux deux autres électrodes.
  • Page 202 FRANÇAIS Mise en place des électrodes Pour obtenir un résultat de stimulation optimal, il est essentiel de placer les électrodes correctement. Veillez à toujours avoir une sensation de peau normale dans la zone de traitement avant de poser les électrodes. La zone optimale peut varier légèrement d’une personne à...
  • Page 203: Sélection D'un Programme

    FRANÇAIS - Le symbole de l’écran d’accueil : ce symbole est mis en surbrillance lorsque l’écran d’accueil est - Le symbole de l’écran Programme : sélectionnez ce symbole pour choisir un programme de traitement. - Le symbole de l’écran Programmation : la séance.
  • Page 204 étapes 1 à 3 ci-dessus. Remarque : Le même programme s’applique aux deux canaux de l’appareil Wireless Tens Pro (PR3094). Réglage de la durée d’un programme Vous pouvoir voir la durée sélectionnée par défaut sur l’écran d’accueil.
  • Page 205 Si vous ci-dessus. Remarque : La même durée s’applique aux deux canaux de l’appareil Wireless TENS Pro (PR3094). Démarrage et arrêt d’une séance (PR3093) Pour commencer une séance, vous devez d’abord mettre les unités TENS sous tension avec le bouton marche/arrêt avant d’appuyer sur le côté...
  • Page 206 FRANÇAIS , Maintenez enfoncé le côté + du bouton d’intensité pour augmenter l’intensité lentement et de façon constante. Relâchez le bouton d’intensité lorsque vous avez trouvé le niveau de stimulation voulu. Remarque : Pour les programmes de neurostimulation transcutanée classique et en modulation de fréquence, vous devez sentir nettement la stimulation, mais celle-ci ne doit pas vous procurer de sensation désagréable, ni être douloureuse.
  • Page 207 TENS. Dans ce cas, le traitement sur les deux canaux s’arrête immédiatement. Démarrage et arrêt d’une séance (PR3094) Pour commencer une séance, vous devez d’abord mettre les unités TENS sous tension avec le bouton marche/arrêt avant d’appuyer sur les côtés + des...
  • Page 208 FRANÇAIS , Le niveau d’intensité est indiqué par des chiffres situés au-dessus du bouton d’intensité. Le niveau d’intensité est également représenté par la barre de l’écran. , Maintenez enfoncé le côté + du bouton d’intensité sur le côté droit de la télécommande pour augmenter l’intensité...
  • Page 209: Lecture Des Résultats

    FRANÇAIS Suivi des activités Cette fonctionnalité supplémentaire disponible sur d’activité sur une journée, une semaine ou un mois. Puisque l’activité et le rythme sont des éléments importants dans la gestion de la douleur, le moniteur d’activité inclus dans la télécommande vous fournit Si vous voulez en savoir plus sur l’auto-gestion de la douleur et l’importance du rythme, veuillez lire le livret du kit de formation à...
  • Page 210 FRANÇAIS d’activité au cours des 7 derniers jours, y compris aujourd’hui. Les lettres sous le graphique indiquent les jours de la semaine. La hauteur des barres représente le nombre d’heures par jour pendant lesquelles vous avez été actif au cours de la semaine écoulée. La ligne horizontale (A) illustre votre niveau d’activité...
  • Page 211: Objectif D'activité (Pr3094)

    Si vous gérez votre douleur avec l’appareil Wireless TENS Pro en collaboration avec un professionnel de la santé qui utilise l’application PC Wireless TENS Pro (PR3094), le moniteur d’activité lui permettra d’en savoir plus sur vos modes d’activité et de traitements. L’application PC lui permet également la ligne horizontale indique un (T) au lieu d’un (A).
  • Page 212: Après Utilisation

    0 mA sur la télécommande avant de retirer les unités TENS, la rallonge (si utilisée, PR3094 uniquement) ou les électrodes. Si vous ne terminez pas le traitement, vous pouvez éprouver une sensation désagréable dans vos doigts. Cette sensation n’est pas nuisible, mais elle peut être...
  • Page 213: Stockage Des Électrodes

    FRANÇAIS Stockage des électrodes Remettez les électrodes dans leur sac de protection. Insérez le sac de protection avec les électrodes dans le sac. Refermez bien le sac pour le protéger de la poussière pendant le stockage. Remarque : Pour maintenir les électrodes en bon état et empêcher la couche d’hydrogel de se dessécher, conservez-les toujours dans le sac refermable quand un stockage sans poussière.
  • Page 214: Dépannage

    FRANÇAIS Ne plongez jamais les électrodes dans l’eau. Nettoyez la télécommande, le chargeur, les unités TENS et le câble d’extension (PR3094 uniquement) avec un chiffon humide et un détergent doux, du liquide vaisselle par exemple. Remarque : Vous pouvez également les nettoyer avec de l’alcool isopropylique à...
  • Page 215 (reportez-vous au chapitre « Avant placées. utilisation »). Contactez le télécommande Service Consommateurs Philips. est peut-être cassée. Le voyant La batterie des Chargez les unités TENS d’état de la unités TENS est (reportez-vous au chapitre «...
  • Page 216 FRANÇAIS Problème Cause possible Solution Le symbole Il n’y a pas de « aucune connexion allumées. Le voyant d’état de connexion » car les unités traitement clignote en vert lorsque apparaît TENS sont hors les unités TENS sont allumées sur l’écran tension.
  • Page 217 Le symbole « canal placées correctement sur les interrompu » électrodes. Wireless TENS Pro peut indiquer (PR3094) uniquement : si le que l’unité symbole « canal interrompu » ou les unités se situe au-dessus du bouton TENS ne sont pas placées unités TENS sont connectées...
  • Page 218 FRANÇAIS Problème Cause possible Solution Les électrodes Les électrodes ont perdu leur se sont pouvoir adhésif car elles sont sales détachées de la ou utilisées depuis longtemps. peau. Vous pouvez essayer de nettoyer les électrodes (reportez-vous au chapitre « Nettoyage »). Si le problème persiste, remplacez les électrodes.
  • Page 219 FRANÇAIS Problème Cause possible Solution Le voyant Les unités TENS Si les unités TENS ont surchauffé d’état de ont surchauffé à à l’intérieur, retirez-les des traitement des l’intérieur. électrodes et laissez-les refroidir. unités TENS clignote en refroidi, vous pouvez les rattacher rouge et le aux électrodes et appuyer sur le traitement s’est...
  • Page 220: Signaux De L'appareil

    FRANÇAIS Problème Cause possible Solution Les électrodes Éteignez les unités TENS et ne sont détachez-les des électrodes. correctement. Les électrodes Vous pouvez essayer de nettoyer sont trop sales. les électrodes (reportez-vous au chapitre « Nettoyage »). Si le problème persiste, remplacez les électrodes.
  • Page 221: Aucune Connexion Avec Les Unités Tens

    FRANÇAIS Lorsque la batterie des unités TENS est vide, la connexion est perdue et le symbole « aucune connexion » apparaît sur la gauche. Signaux d’erreur sur la télécommande Piles faibles la télécommande clignote lorsque les piles de celle- ci sont faibles. Lorsque qu’elles sont complètement déchargées, la télécommande s’éteint.
  • Page 222: Indicateur D'état De La Batterie

    FRANÇAIS Canal interrompu - Le symbole « canal interrompu » (croix) sur l’écran indique une interruption du canal correspondant. - Si un canal est interrompu, plusieurs causes sont possibles : Il n’y a pas de contact entre les unités TENS et les électrodes.
  • Page 223: Voyant D'état De Traitement

    FRANÇAIS L’indicateur d’état de la batterie reste allumé en vert lorsque la batterie rechargeable est complètement chargée. Voyant d’état de traitement - Le voyant d’état de traitement des unités TENS clignote : Le voyant d’état de traitement clignote en vert lorsque les unités TENS sont allumées et en mode veille.
  • Page 224: Commande D'accessoires

    » dans le chapitre « Avant utilisation »). Commande d’accessoires Pour acheter des accessoires ou des pièces détachées, visitez le site Web www.shop.philips.com/service ou rendez-vous chez votre revendeur Philips. Vous pouvez également contacter le Service Consommateurs Philips de votre pays.
  • Page 225: Garantie Et Assistance

    5 ans. Si vous souhaitez obtenir des informations supplémentaires ou faire réparer l’appareil, rendez- vous sur le site Web de Philips à l’adresse www.philips.com/support. Vous pouvez également contacter le Service Consommateurs Philips de votre pays. Son numéro de téléphone est...
  • Page 226: Limites De La Garantie

    Les électrodes ne sont pas couvertes par les termes de la garantie, car elles sont sujettes à l’usure et doivent être remplacées régulièrement. Adresse légale du fabricant Philips Consumer Lifestyle B.V. Tussendiepen 4 9206 AD Drachten Pays-Bas Recyclage - La présence du symbole représentant une poubelle barrée sur un produit indique que ce...
  • Page 227 FRANÇAIS - Toutes les pièces en plastique sont marquées d’un symbole de recyclage. Modèle PR3094, PR3093 Tension nominale (V) - adaptateur 100-240 ~ 150 mA Fréquence nominale (Hz) - 50-60 adaptateur Sortie nominale - adaptateur 5 V , 500 mA Classe Appareil médical de classe IIa...
  • Page 228: Conditions De Fonctionnement

    FRANÇAIS Paramètres de sortie d’impulsion Forme de l’impulsion de Biphase symétrique (courant net courant 0 c.c.) Conditions de fonctionnement Température de 5 °C à 40 °C Taux d’humidité relative de 15 % à 93 % (sans condensation) Pression atmosphérique de 700 hPa à 1 060 hPa Conditions de stockage et transport Température - électrodes...
  • Page 229: Explication Des Symboles

    FRANÇAIS Explication des symboles Symboles de l’appareil - Ce symbole représente le numéro de référence. Il est suivi du numéro de référence du fabricant, qui est la référence de l’appareil. Les plaques signalétiques de la télécommande et des unités TENS indiquent la même référence. Sur celle de la télécommande, la référence est suivie des lettres RC.
  • Page 230 FRANÇAIS - Ce symbole sur le chargeur indique : Protection contre le toucher des parties dangereuses et protection contre les dommages occasionnés par la pénétration de gouttes d’eau tombant verticalement. rayonnements non ionisants. Tous les appareils et systèmes qui incluent des émetteurs RF ou qui appliquent intentionnellement de l’énergie électromagnétique RF doivent porter ce symbole.
  • Page 231 FRANÇAIS CE correspond à « Conformité Européenne ». avec les ordures ménagères normales. Pour de plus amples instructions, consultez le chapitre « Recyclage ». d’une double isolation (classe II). - Ce symbole indique que l’adaptateur ne peut être utilisé qu’à l’intérieur. de commencer à...
  • Page 232 FRANÇAIS marche/arrêt. - Il s’agit du symbole d’impulsion de du voyant d’état de traitement. du voyant de niveau de la batterie. appareil est conforme aux exigences canadiennes et américaines. MATÉRIEL MÉDICAL EN CONFORMITÉ AVEC LES NORMES ANSI/AAMI ES60601-1 (2005, C1:09, A2:10), IEC 60601-1 (2005), CAN/CSA C22.2 No.60601.1 (2008, R:2011), IEC 60601-2-10 (2012), CAN/CSA C22.2 No.60601-1-11 (2010) CONCERNANT...
  • Page 233 FRANÇAIS Symboles sur le sachet des électrodes en utilisant des machines ou en effectuant d’autres activités qui peuvent présenter un risque de blessure. endommagées, usées ou ayant perdu leur pouvoir adhésif. - Ce symbole indique que les électrodes doivent être utilisées par une seule personne et qu’elles ne doivent pas être partagées avec d’autres.
  • Page 234: Émissions Électromagnétiques Et Immunité

    Émissions électromagnétiques et immunité Compatibilité électromagnétique (EMC) Les appareils Wireless TENS (PR3093) et Wireless TENS Pro (PR3094) sont conformes aux normes de sécurité EMC EN 60601-1-2. Ils sont conçus pour être utilisés à domicile ou en milieu hospitalier. Guide de positionnement des...
  • Page 236 4222.100.0803.1 (05/2013)

Ce manuel est également adapté pour:

Pr3093Wireless tensWireless tens pro

Table des Matières