
Manuels Connexes pour EcoNet RETST600SYS


Sommaire des Matières pour EcoNet RETST600SYS
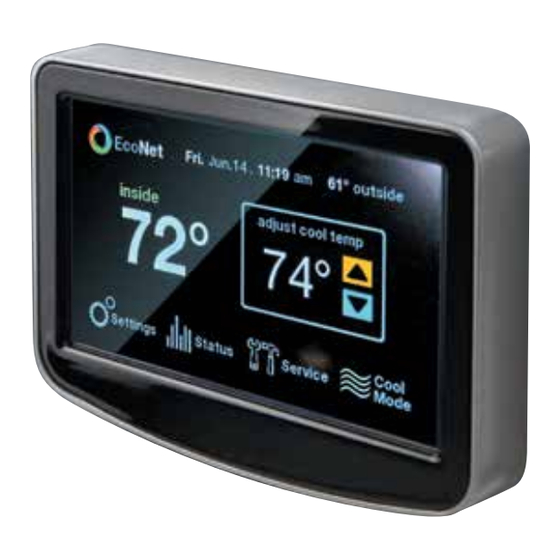
- Page 1 Models/Modelos/Modèles RETST600SYS UETST600SYS Control Center Centro de control Centre de commande User Guide & Installation Guía del usuario e instalación Guide d’utilisation et d’installation...
- Page 2 System Operation Operación del sistema Utilisation du système Installation Instalación Installation EcoNet Control Center Location Ubicación del Centro de control EcoNet Emplacement du centre de commande EcoNet 25-26 27-29 Wiring Considerations Consideraciones sobre el cableado Remarques sur le câblage Mounting EcoNet Control Center Instalación del Centro de control EcoNet...
- Page 3 El Centro de control EcoNet fue diseñado para darle a tu familia la comodidad interior que deseas. Es fácil de usar, fiable y ahorra energía. Se comunica con tu equipo EcoNet para garantizar que tu comodidad esté donde lo necesitas. Tu Centro de control EcoNet fue diseñado para controlar y comunicarse con tu sistema de control climático, incluyendo tu bomba de calor o aire acondicionado, calefactor...
- Page 4 PRIMARY NAVIGATION | NAVEGACIÓN PRINCIPAL | NAVIGATION PRINCIPALE 1. EcoNet Logo | Logotipo de EcoNet | Muestra la temperatura 5. Mode | Modo | Mode Logo EcoNet exterior actual Press to change current Press to access and control Affiche la température...
- Page 5 7. Status | Estatus | État Press to view current operating EcoNet Sat. Jan, 1, 6:00 71º outside status as well as runtime and cycle records heat cool 77° inside Presiona para ver el estado actual de funcionamiento, así como los 72 °...
-
Page 6: Main Screen
Touch the Date/Time on the main screen. Date and time can then be adjusted. Toca Fecha/Hora en la pantalla para ajustar la fecha y la hora. Cancel Accept Touchez la date/heure sur l’écran principal. La date et l’heure peuvent alors être réglées. Mode Setting EcoNet Sat. Jan, 1, 6:00 71º outside Configuración de modalidad... - Page 7 MAIN SCREEN | PANTALLA PRINCIPAL | ÉCRAN PRINCIPAL Heating/Cooling Set Temp EcoNet Sat. Jan, 1, 6:00 71º outside Configuración de temperatura de calefacción/enfriamiento heat cool 77° inside Temp. fixée de chauffage/refroidissement 79 ° Press the up/down arrows next to the set temp. If Auto mode is selected, press the Heat...
- Page 8 MAIN SCREEN | PANTALLA PRINCIPAL | ÉCRAN PRINCIPAL Fan Only Setting Configuración sólo ventilador EcoNet Sat. Jan, 1, 6:00 71º outside Réglage de ventilateur uniquement 77° inside fan speed adjust Press the mode icon to select Fan Only, then press the up/down buttons to select fan speed.
-
Page 9: Basic Settings
72 ° If EcoNet water heaters are connected to the system, pressing the EcoNet logo will bring up a menu to control this equipment. Si los calentadores de agua EcoNet están conectados al sistema, al presionar el logotipo de Heat EcoNet aparecerá... - Page 10 BASIC SETTINGS | CONFIGURACIÓN BÁSICA | RÉGLAGES DE BASE If a programmed schedule is not desired, select this item to be off. Si no se desea seguir una programación, selecciona apagar esta opción. Si un horaire programmé n’est pas souhaité, choisissez d’éteindre cet article. Schedule override time basic settings Anulación de horario programado...
- Page 11 BASIC SETTINGS | CONFIGURACIÓN BÁSICA | RÉGLAGES DE BASE Para bloquear la pantalla principal y evitar cambios, activa el bloqueo. Aparecerá un icono de candado en la pantalla principal cuando esté bloqueada. Para desbloquearla, ingresa al menú de Configuración básica y selecciona Desbloquear. Pour empêcher les modifications de l’écran principal, activez le verrou.
- Page 12 BASIC SETTINGS | CONFIGURACIÓN BÁSICA | RÉGLAGES DE BASE Mientras la modalidad automática está seleccionada, esta es la cantidad de tiempo que debe existir en la modalidad opuesta de manera que el sistema cambie a dicha modalidad. Pendant que le mode Auto est sélectionné, il s’agit de la durée de temps pendant laquelle une demande doit exister dans le mode opposé...
- Page 13 BASIC SETTINGS | CONFIGURACIÓN BÁSICA | RÉGLAGES DE BASE Celsius/Fahrenheit display basic settings Follow Schedules ? Muestra en Celsius o Fahrenheit Schedule Override Time 2 hours Main Screen Locked ? Affichage Celsius/Fahrenheit Alarm Beep Enable ? Auto-Changeover Time 5 min. Set Point Deadband 2˚...
-
Page 14: Humidity Settings
HUMIDITY SETTINGS | CONFIGURACIÓN DE HUMEDAD | RÉGLAGES DE L’HUMIDITÉ Dehumidification de-humidification: Enable Dehumidification? Deshumidificación Dehumidify Set Point Over-Cooling Amount 2˚ F Déshumidification Dehumidify Drain Timer 15 min. humidification: Enable Humidification? Humidify Set Point Humidity During... Heat On/off Smart Control Encendido/apagado Marche/arrêt de-humidification:... - Page 15 HUMIDITY SETTINGS | CONFIGURACIÓN DE HUMEDAD | RÉGLAGES DE L’HUMIDITÉ Over-cooling amount set point de-humidification: Enable Dehumidification? Establecer rango de enfriamiento extremo Dehumidify Set Point Over-Cooling Amount 2˚ F Point de consigne de climatisation excessive Dehumidify Drain Timer 15 min. humidification: Enable Humidification? Humidify Set Point...
-
Page 16: Smart Control
HUMIDITY SETTINGS | CONFIGURACIÓN DE HUMEDAD | RÉGLAGES DE L’HUMIDITÉ Humidification de-humidification: Enable Dehumidification? Humidificación Dehumidify Set Point Over-Cooling Amount 2˚ F Humidification Dehumidify Drain Timer 15 min. humidification: Enable Humidification? Humidify Set Point Humidity During... Heat On/off Smart Control Encendido/apagado Marche/arrêt Smart control... - Page 17 HUMIDITY SETTINGS | CONFIGURACIÓN DE HUMEDAD | RÉGLAGES DE L’HUMIDITÉ Humidify during… de-humidification: Enable Dehumidification? Humidificar durante... Dehumidify Set Point Over-Cooling Amount 2˚ F Humidifiez pendant... Dehumidify Drain Timer 15 min. humidification: Enable Humidification? Humidify Set Point Select the modes in which humidification will be performed. Humidification can occur Humidity During...
- Page 18 SCHEDULES | PROGRAMACIÓN DE HORARIOS | HORAIRES To edit the schedule for a day, select the day, and then touch the time, heat set point, cool set basic settings Time Heat Cool point or fan setting to highlight, then press up/down buttons to change. Morning: 06:00 70˚...
- Page 19 Début sans problèmes – Le thermostat commencera la récupération au moment optimal pour assurer que le point de consigne est atteint à l’heure programmée. EcoNet Enable – enables the Vacation mode to be sent to all EcoNet devices, such as water heaters.
- Page 20 2014 la hora, el rango de calefacción, el rango de enfriamiento o la configuración del ventilador para resaltarlo, a continuación presiona los botones hacia arriba o hacia abajo para hacer Vacation EcoNet Disabled Enabled los cambios. Pour programmer un horaire de vacances, sélectionnez le bouton Vacation (vacances), puis touchez la date, l’heure, le point de consigne du chauffage, le point de consigne de...
- Page 21 COLORS | COLORES | COULEURS background theme color To change the display background color, select the desired color then press the back arrow to return to the menu. Para cambiar el color del fondo de la pantalla, selecciona el color deseado y presiona la flecha hacia atrás para regresar al menú.
-
Page 22: System Operation
SYSTEM OPERATION | OPERACIÓN DEL SISTEMA | UTILISATION DU SYSTÈME The EcoNet Control Center will not allow cooling or heat pump heating to occur for four minutes after power is applied, or when the outdoor unit has turned its compressor off. - Page 23 órdenes, condiciones de operación y otros datos. Todos los componentes son controlados a través del Centro de control EcoNet instalado en la pared, el cual reemplaza al termostato convencional y le proporciona al dueño de vivienda un control único en la pared para todas las funciones del sistema.
-
Page 24: Safety Considerations
SAFETY CONSIDERATIONS | MEDIDAS DE SEGURIDAD | REMARQUES DE SÉCURITÉ Failure to read and follow all instructions carefully before installing or operating this control and system could cause personal injury and/or property damage. No leer ni seguir todas las instrucciones cuidadosamente antes de instalar u operar este control puede causar lesiones personales y/o daños a la propiedad. - Page 25 EMPLACEMENT DU CENTRE DE COMMANDE ECONET The EcoNet Control Center is the command center for the EcoNet System as well as the control for the heating and cooling equipment. It should be located where it is easily accessible and visible to the homeowner or end user. For accurate zone temperature and humidity measurement, the following guidelines should be followed: El Centro de control EcoNet es el centro de mando para el sistema EcoNet, así...
- Page 26 • En áreas en las que haya mala circulación de aire, como detrás de una puerta o en un dormitorio. • En una sección de pared con tuberías o ductos. Le centre de commande EcoNet NE doit PAS être installé : • À proximité d’une fenêtre, sur un mur extérieur ou à proximité d’une porte qui mène à l’extérieur.
-
Page 27: Wiring Considerations
Les dispositifs aux extrémités ne doivent comporter qu’un seul ensemble de fils. L’ordre des dispositifs dans le réseau n’est pas précisé si ce n’est que le centre de commande EcoNet doit se trouver à une extrémité du réseau. - Page 28 The EcoNet Control Center has a four-terminal connector labeled R, C, E1, E2. El Centro de control EcoNet tiene un conector de cuatro terminales denominados R, C, E1, E2. Le centre de commande EcoNet a un connecteur à quatre bornes étiquetées R, C, E1 et E2.
- Page 29 R —24VAC (hot) R —24VAC (vivo) R —24 V c.a. (sous tension) C —24VAC (Common) C —24VAC (común) C —24 V c.a. (commun) E1 —Data 1 E1 —Datos 1 E1 —Données 1 E2 —Data 2 E2 —Datos 2 E2 —Données 2 (OPTIONAL) Shielded Wire (OPCIONAL) Cable protegido (FACULTATIF) Fil blindé...
- Page 30 MOUNTING ECONET CONTROL CENTER | INSTALACIÓN DEL CENTRO DE CONTROL ECONET | MONTAGE DU CENTRE DE COMMANDE ECONET A backplate is supplied (see Fig. 1). Attach backplate using only a small hole in the wall allowing a four wire connection to pass through. A large backplate trim ring is available as an accessory to help cover gaps with paint color or wallpaper.
- Page 31 NOTE: Mercury is a hazardous waste, if existing control contains any mercury, it MUST be disposed of properly. The EcoNet Control Center does not contain mercury. NOTA: El mercurio es un desecho peligroso, si el control existente contiene mercurio, DEBE desecharse de manera apropiada. El Centro de control EcoNet no contiene mercurio.
- Page 32 Asegura el Centro de control Fixez le centre de commande to the mounting plastic by lining EcoNet al montaje plástico, EcoNet sur le plastique de up the holes on the back of the alineando los orificios posteriores montage en alignant les orifices control with the plastic guides on del control con las guías plásticas...
- Page 33 Perform installation of all other Realiza la instalación de los demás Effectuez l’installation de tout system equipment. equipos del sistema. le reste de l’équipement des systèmes. Turn on power to equipment. Conecta la corriente a Mettez l’équipement los equipos. sous tension.
- Page 34 Uso del humidificador Utilisation de l’humidificateur It is recommended to not install a traditional humidistat in this communicating system. If a humidifier is installed, let the EcoNet Control Center control humidification. Se recomienda no instalar un regulador de humedad tradicional en este sistema de comunicación. Si hay uno instalado, permite que el Centro de control EcoNet controle la humidificación.
- Page 35 à l’équipement attaché (Type, niveaux, taille). If an EcoNet outdoor unit is installed, it will be automatically recognized and used with the appropriate settings. Si está instalada una unidad EcoNet exterior, será reconocida automáticamente y utilizada con las opciones de configuración adecuadas.
-
Page 36: Furnace Settings
FURNACE SETTINGS | OPCIONES DE CONFIGURACIÓN DEL CALEFACTOR | RÉGLAGES DU SYSTÈME DE CHAUFFAGE LED Display Orientation – Upflow, Downflow: flips the furnace’s LED diagnostic display so it is readable in furnace settings LED Display Orientation Upflow the upflow or downflow position. Furnace Blower Off Delay 90 secs. - Page 37 Lo Heat Airflow Adjust – None (default), Higher (less rise), Lower (more rise), Lowest (most rise). Airflow furnace settings Upflow adjustment for the low heating stage. LED Display Orientation 90 secs. Furnace Blower Off Delay Control de entrada G del ventilador – Apagado (predeterminado), Más alto (menor elevación), Más Hi Heat Airflow Adjust None Lo Heat Airflow Adjust...
- Page 38 Remarque : Deux entrées auxiliaires (AUX1 et AUX2) sont fournies sur la commande du système de chauffage à gaz communicante pour la commande externe du système (voir les instructions d’installation du système de chauffage pour les détails supplémentaires). Ces entrées peuvent être configurées comme étant normalement fermées ou normalement ouvertes lorsqu’elles sont utilisées avec l’Aux commun.
- Page 39 etc.), les actions sélectionnées par l’utilisateur auront lieu. - Si normalement fermée est sélectionnée alors que l’entrée Aux. n°1 est déconnectée de l’entrée Aux. com. par un commutateur ouvert, les actions sélectionnées par l’utilisateur auront lieu. User Selected Action: • Off (This is the default setting, these inputs are turned off) •...
- Page 40 Dual Fuel Heat Source Furnace Locked Out Above Disabled Selección de la unidad exterior: Si se utiliza una unidad exterior “que no se comunica”, toca “EcoNet” Heat Pump Locked Out Below Disabled y presiona la flecha hacia arriba/abajo hasta que se muestre “sin comunicación”. Si se selecciona una unidad exterior “que no se comunica”, cambia el tipo (AC o HP), la cantidad de etapas (1 ó...
- Page 41 EcoNet (locked) – if a communicating EcoNet outdoor unit is discovered, the menu will automatically display “EcoNet” and the selection cannot be changed (locked). If no outdoor unit is present, select “none”. EcoNet (bloqueado) – si se descubre una unidad EcoNet comunicada, el menú mostrará automáticamente “EcoNet”...
- Page 42 Furnace Locked Out Above: Disabled (default), 0-55 F – Outside temperature above which the ac/hp settings EcoNet furnace will not run. Outside Unit Selection Cool/Heat Airlfow Adjust Calefactor bloqueado por encima: Desactivada (predeterminado), 0-55 F – La temperatura None exterior sobre la cual no funcionará el calefactor.
- Page 43 SERVICE | MANTENIMIENTO | ENTRETIEN If the Service icon on the main screen is blinking with a beeping sound, this means an equipment alarm is present. Si el icono Mantenimiento parpadea en la pantalla principal con un sonido, esto quiere decir que hay una alarma del equipo. Si l’icône d’entretien clignote sur l’écran principal avec un signal sonore, ceci signifie qu’une alarme d’équipement est présente.
- Page 44 Part RETST600SYS Rheem.com/EcoNet Part UETST600SYS Ruud.com/EcoNet RCPN-ALT01-0013080201-0001...