ION Audio iED01 Guide D'utilisation Simplifié

Sommaire des Matières pour ION Audio iED01
- Page 1 QUICKSTART MANUAL MANUAL DE INICIO RÁPIDO GUIDE D'UTILISATION SIMPLIFIÉ BEDIENUNGSANLEITUNG MANUALE RAPIDO...
- Page 3 BOX CONTENTS CONTENIDO DE LA CAJA | CONTENUE DE LA BOÎTE | INHALT DER VERPACKUNG | CONTENUTI DELLA CONFEZIONE RIGHT BASE TUBE RACK TUBE LEFT BASE TUBE TOP RACK TUBE LEFT RACK TUBE RIGHT RACK TUBE DRUM PAD SHORT ROD 1/8”...
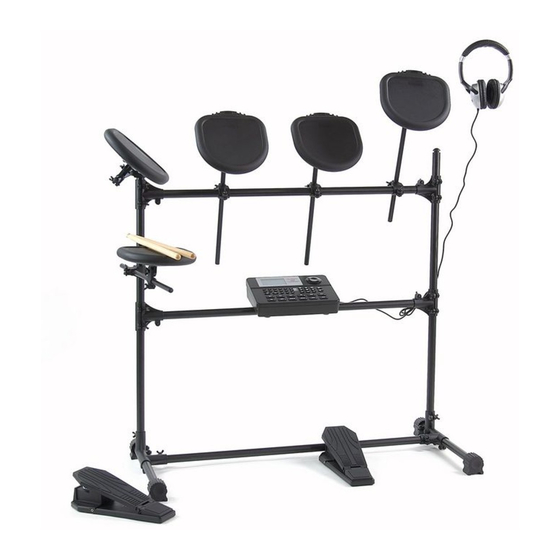
- Page 5 ASSEMBLY INSTRUCTIONS INSTRUCCIONES DE ARMADO | INSTRUCTIONS D’ASSEMBLAGE | AUFBAUANLEITUNG | ISTRUZIONI DI MONTAGGIO Please follow the instructions below to assemble the drum kit. When mounting the pads, do not over-tighten the thumb-screws. Once you have assembled the kit, adjust the pads to a suitable level and angle and then tighten the screws to secure the frame. READ SAFETY INSTRUCTION BOOKLET BEFORE USING THIS PRODUCT! Siga las instrucciones que se incluyen a continuación para armar el kit de batería.
- Page 6 3 :::::: • Insert the left rack tube (D) into the remaining connector on the left base tube (A). Now insert the right rack tube (E) into the remaining connector on the right base tube (B). Tighten the thumb screws to secure the connections. •...
- Page 7 5 :::::: • Take one of the short rods (H) and insert it into the clamp located on the left side rack tube (D). Tighten the thumb screw slightly to secure it. • Tome una de las varillas cortas (H) e insértela en la abrazadera que se encuentra en el tubo izquierdo del bastidor (D).
- Page 8 7 :::::: • Now it’s time to mount the drum pads. Please refer to the picture and illustrations on the right to properly assemble the pads. Note that you can swivel the pad connectors (J) before tightening the thumb screws (K) in order to achieve the desired mounting angle. Mount a pad connector (J) to each of the five pads (i) and loosely secure them together using the thumb screws (K).
- Page 9 9 :::::: • Mount all five drum pads (i) to the drum kit. You can swivel the pad connectors and the short rods to achieve a desired angle and position of the pads. • Monte los cinco pads (i) en el kit de batería. Puede girar los conectores de los pads y las varillas cortas para lograr el ángulo y posición deseados de los pads.
- Page 10 11 :::::: • Finally, place the two pedals (O) on the ground as shown in the picture on the right. These will be your hi-hat and kick drum pedals. The pedals are identical so it doesn’t matter which one you use for a kick drum and which one you use for a hi-hat.
-
Page 11: Connection Diagram
CONNECTION DIAGRAM DIAGRAMA DE CONEXIÓN | SCHÉMA DE CONNEXION | ANSCHLUSSÜBERSICHT | SCHEMA DEI COLLEGAMENTI Now that you have assembled the kit, please follow the connection diagram. Ahora que armó el kit, siga el diagrama de conexión. Maintenant vous avez monté... -
Page 12: Getting Started
GETTING STARTED This section explains how to quickly begin using the drum machine module. For more information on the module, please read the iDM02 Drum Machine Reference Manual. • While the drum machine is powered on, turn the volume up on the headphones half way. -
Page 13: Utilisation
UTILISATION Cette section vous explique les fonctionnements de base du module de percussion. Pour de plus amples renseignements sur le module, veuillez consulter le Guide de référence pour la boîte à rythmes iDM02. • Avec la boîte à rythmes sous tension, augmentez le volume du casque d'écoute à... -
Page 14: Primi Passi
PRIMI PASSI Questo paragrafo spiega come iniziare rapidamente a usare il modulo drum machine. Per maggiori informazioni sul modulo, leggere il Manuale di Riferimento dell’iDM02 Drum Machine. • Una volta accesa la drum machine, alzare il volume delle cuffie a metà. - Page 16 www.ion-audio.com MANUAL VERSION 1.1...