BBB BCP-15W Guide Rapide
Compteur vélo
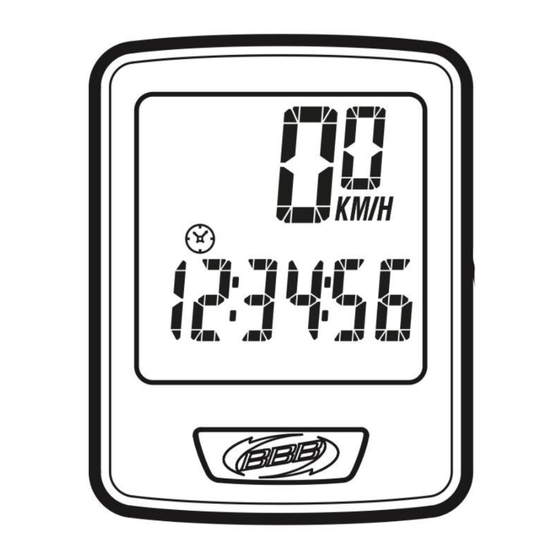
BCP-15W
BCP-16W
1. All Clear 2. Unit Selection 3. Circumference Setting
LCD
auto test
3s
+
(bcp-16w only)
6. TRT Setting
Mode
SET
000000~999999
2s
8. Data setting mode
9. Data reset
Circumference
Setting
2s
RESET OPERATION
(AS =0, DS =0, RT =0, MS =0)
BCP-15W 10 Functions
BCP-16W 12 Functions
: Current Speed
The current speed is always displayed on the upper set when riding.
DS : Trip Distance
The DS function accumulates the distance data from the last RESET operation as long as
the bike is being ridden.
ODO : Odometer
The ODO accumulates total distance as long as the bicycle is in motion, the ODO data can
be cleared by the RESET operation only.
: Clock
: Auto SCAN
1. Auto-Scanning Display Mode.
Press the MODE button
till the
symbol is displayed. The computer will change the
display modes in a loop sequence automatically every 5 seconds.
2. Fixed Display Mode.
Press the MODE button
to turn off the
symbol and select a desired display mode;
the computer will stop the auto-scanning display operation.
AS : Average Speed
1. Is calculated from the DS divided by the RT. The average data counted is from the last
RESET to current point.
2. Is updated every second when RT is over 4 seconds.
MS : Maximum Speed
Shows the highest speed from the last RESET operation.
RT : Riding Time
Shows the total riding time from the last RESET operation.
Automatic Start/Stop
: Low Battery indicator
TRT : Total Riding Time
The TRT totals the riding time from the last RESET operation.
: Speed Pacer
/
It flashes the
speed pacer arrow while the current speed is higher than the average
speed and the down arrow
flickers conversely.
BCP-15W 10 Funktionen
BCP-16W 12 Funktionen
Aktuelle Geschwindigkeit
Die aktuelle Geschwindigkeit wird während dem Radfahren immer in der oberen Zeile
angezeigt.
DS: Tagesdistanz
Die DS Funktion rechnet die Distanz zusammen, die seit dem letzten RESET zurückgelegt
wurde.
ODO: Odometer (Gesamtstrecke)
Das ODO rechnet die Distanz zusammen, so lange wie das Fahrrad in Bewegung ist. Die
ODO Daten können nur durch die ODO RESET Operation durchgeführt werden.
: Uhr
: Auto SCAN
1. Auto-Scanning Display Modus.
Drücken Sie die Taste MODE
bis das Symbold
angezeigt wird. Der Computer wird
den Displaymodus automatisch alle 5 Sekunden anhand einer Loop-Sequenz ändern.
2. Fixer Display Modus
Drücken Sie die MODE Taste
um das Symbol
auszuschalten und wählen Sie einen
gewünschten Displaymodus; der Computer wird dadurch den Auto-Scanning-Modus stoppen.
AS: Durchschnittliche Geschwindigkeit
1. Ist anhand den Daten DS dividiert/geteilt durch RT. Der Durchschnittswert wird gezählt
vom letzten RESET bis zum aktuellen Punkt.
2. Ist aktualisiert jede Sekunde, wenn RT ist über 4 Sekunden.
MS: Maximalgeschwindigkeit
Zeigt die höchste Geschwindigkeit seit dem letzten RESET.
RT: Fahrzeit
Zeigt die totale Fahrzeit seit dem letzten RESET an.
Automatischer Start/Stop
: Niedriger Batteriestand
TRT : Gesamtfahrzeit
TRT summier die Gesamtfahrzeit seit dem letzten RESET.
: Speed Pacer
/
Der Speed-Pacer-Pfeil
blinkt, wenn die aktuelle Geschwindigkeit höher ist als die
Durchschnittsgeschwindigkeit. Ist sie niedriger, blinkt der Preil nach unten
BCP-15W 10 Fonctions
BCP-16W 12 Fonctions
: Vitesse actuelle
La vitesse actuelle est toujours indiqué lorsque le vélo roule.
DS: Distance parcourue
La fonction DS permet de calculer la distance parcourue depuis la dernière réinitialisation à
condition que le vélo roule.
ODO: Odomètre
La fonction ODO permet de calculer la distance totale parcourue. Les données de l'odomètre
peuvent uniquement être effacées en effectuant un effacement complet.
: Horloge
: SCAN
1. Scan automatique du mode d'affichage. Appuyer sur le bouton MODE
s'affiche. Le compteur passera automatiquement d'un mode d'affichage au suivant toutes
les 5 secondes.
2. Mode d'affichage fixe. Appuyer sur le bouton MODE
pour désactiver le
sélectionner le mode d'affichage souhaité; le compteur arrêtera automatiquement la fonction
scan autmatique de l'affichage.
AS: Vitesse moyenne
1. Calculée par la DS divisée par la RT. La moyenne est calculée depuis la dernière
réinitialisation.
2. Mis à jour toutes les secondes lorsque le RT dépasse 4 secondes.
MS: Vitesse maximum
Indique la vitesse maximum depuis la dernière réinitialisation.
RT: Temps de la sortie
Indique le temps depuis la dernière réinitialisation.
Arrêt/Marche automatique
: Indicateur de pile usée
TRT : Temps écoulé totale
La fonction TRT calcule le temps écoulé depuis le dernier effacement complet.
: Moniteur d'allure
/
La flèche
clignote lorsque la vitesse actuelle est supérieure a la vitesse moyenne, et la
flèche
clignote dans le cas contraire.
BCP-15W 10 Functies
BCP-16W 12 Functies
Nederlands
: Huidige snelheid
De huidige snelheid wordt tijdens het fietsen altijd bovenin getoond.
DS: Ritafstand
De DS functie berekend de totale ritafstand terwijl de fiets rijdt, vanaf de laatste RESET.
ODO Odometer
De ODO berekent de totale afstand terwijl de fiets rijdt. De ODO data kan alleen worden
gewist door een complete RESET uit te voeren.
: Klok
: Auto SCAN
1. Schermmodus Auto-scannen
Druk op de MODE knop
totdat het
symbool wordt weergegeven. De computer zal
automatiscg door de verschillende schermmodi heen gaan lopen (de modus wijzigt elke 5
seconden).
2. Vaste schermmodus
Druk op de MODE knop
om het
symbool te wissen en de gewenste schermmodus
te selecteren; de computer zal stoppen met auto-scannen.
AS: Gemiddelde snelheid
1. Wordt berekend door de DST door de RMT te delen. Hiervoor worden de gegevsn
gebruikt vanaf de laatste RESET.
2. Wordt elke seconde bijgewerkt, vanaf het moment dat de rijtijd meer dan 4 seconden
bedraagt.
MS: Maximale snelheid
Laat de hoogste gereden snelheid zien sinds de laatse RESET.
RT: Rijtijd
De totale rijtijd berekend vanaf de laatste RESET.
Automatische Start/Stop
: Batterij leeg indicator
TRT : Total Riding Time
De TRT is de totale rijtijd berekent vanaf de laatste keer dat de RESET functie is gebruikt.
: Speed Pacer
/
Als de huidige snelheid boven de gemiddelde snelheid ligt zal de snelheidspacer-pijl
gaan knipperen; als de huidige snelheid onder de gemiddelde snelheid ligt zal de
neerwaartse pijl
gaan knipperen.
BCP-15W 10 Funciones
BCP-16W 12 Funciones
: Velocidad actual
La velocidad actual es la que siempre se muestra en el display mientras se pedalea.
DS: Distancia de ruta
La función DS acumula la distancia recorrida desde la última operación de RESET
realizada, tanta como rutas se han realizado.
ODO: Odómetro
The ODO acumula la distancia total recorrida de todas las rutas realizadas con tu
bicicleta.Los datos de la función ODO sólo pueden borrarse realizando la operación
RESET.
: Reloj
: Auto SCAN
1. Display en modo "Auto-Scan".
Presione el botón MODE
hasta que icono
aparezca.Los modos del display
cambiarán de manera cíclica automáticamente cada 5 segundos.
2. Display en modo fijo.
Presione el botón MODE
hasta que icono
desaparezca y seleccione el modo de
display deseado. El ciclocomputador dejará de tener activa la opción de "auto-scan".
AS: Velocidad media
1. Se calcula dividiendo DS entre el RT. El resultado medio se obtiene desde el último
RESET hasta el momento actual.
2. Se actualiza cada segundo mientras que el RT sea superior a 4sg.
MS: Velocidad Máxima
M estra la velocidad máxima desde la última operación de RESET.
RT: Riding Time
Muestra el tiempo de pedaleo desde la última operación de RESET.
Inicio/parada automático
: Indicador de batería baja
TRT : Tiempo total de recorrido
La fonción TRT indica los totales del tiempo de recorrido desde la última operación
RESET(Borrar todo).
: Control de velocidad
/
La flecha de control de velocidad parpadea
mientras la velocidad actual es superior a
la velocidad media, y la flecha hacia abajo
parpadea a la inversa.
BCP-15W 10 Funções
BCP-16W 12 Funções
Portuguesa
: Velocidade atual
A velocidade atual é sempre mostrada na parte superior durante a utilização.
DS: Distância da jornada
A função DS acumula a distância desde a última operação de RESET, enquanto a
bicicleta estiver a ser utilizada.
ODO: Odómetro
A função ODO acumula a distância total, desde que a bicicleta esteja em movimento; esta
informação só pode ser eliminada através da operação de RESET.
: Relógio
: Auto SCAN
1. Modo de visualização Auto-SCAN.
Prima a tecla MODE
até que seja mostrado o símbolo
. O ciclómetro mudará
ciclicamente a sequência de informação a cada 5 segundos.
2. Modo de visualização fixo.
Prima a tecla MODE
até apagar o símbolo
e selecionar o modo pretendido; O
ciclómetro parará a operação de visualização no modo Auto-SCAN.
AS: Velocidade Média
1. É calculada dividindo a DS pelo RT. A informação média é contabilizada desde a última
operação de RESET até ao momento atual.
2. É atualizada a cada segundo se o RT for superior a 4 segundos.
MS: Velocidade Máxima
Mostra a velocidade mais elevada desde a última operação de RESET.
RT: Duração da jornada
Mostra o tempo total de utilização desde a última operação de RESET.
Arranque/Paragem automática
: Indicador de bateria fraca
TRT : Tempo de percurso total
O indicador TRT apresenta o tempo de percusrso desde a última operação RESET.
: Indicador de velocidade
/
O cursor do indicador de velocidade pisca
enquanto a velocidade actual for superior a
velocidade média, ao passo que a seta para baixo
pisca inversamente.
BCP-15W 10 Функции
BCP-16W 12 Функции
: Текущая Скорость
Текущая скорость всегда отображается на дисплее во время движения.
DS : Дистанция поездки
Функция DS считает весь пробег который проехал велосипедист пока его не обнулят.
ODO : Одометр
Функция ODO(одометр) считает весь пробег велосипеда. Можно обнулить только
обнулением всего компьютера, через RESET.
: Часы
: Автопереход по функциям
1. Автопереход по функциям. Нажмите кнопку MODE
до появления значка
дисплее. И велокомпьютер будет переходить по функциям каждые 5 секунд
автоматически.
2. Отображение Одной Функции. Нажмите кнопку MODE
на дисплее. И велокомпьютер перестанет переходить по функциям.
AS : Средняя Скорость
1. Вычисляется из дистанции поездки и времени поездки. Среднее значение
показывается после последнего RESET.
2. Обновляется каждую секунду, если время поездки более 4 секунд.
MS : Максимальная Скорость
Показывает максимально достигнутую скорость, после последнего RESET.
RT : Время Поездки
Показывает общее время поездки, после последнего RESET.
Автоматический Старт/Стоп
: Индикатор разряда батареи
TRT : Суммарное Время Поездок
Функция TRT показывает суммарное время поездок, после последнего RESET.
: Указатель Темпа
/
Мерцающий символ
означает, что текущая скорость выше, чем средняя и символ
'
означает наоборот.
0000~3999
2s
End Setting
7. Function Screen
Current Speed
2s
(
Speed Pacer 16W only)
10. Sleep mode
DS
AS
RT
MS
"Power auto off" after 15 min
MAIN UNIT SETUP
INITIATE THE COMPUTER (ALL CLEAR) (Fig. 1)
1. A battery is already loaded in the main unit when purchased.
English
2. Press the MODE button
and SET button
seconds to initiate the computer and clear all data.
IMPORTANT: Be sure to initiate the computer before it is be used, otherwise the
computer may run errors.
3. The LCD segments will be tested automatically after the unit is initiated.
4. Press MODE button
to stop LCD test. The flickering "KM/H" appears.
UNIT SELECTION (Fig. 2)
Press MODE button
to choose KM/H or M/H. Then press the SET button
store the selection.
WHEEL CIRCUMFERENCE (Fig. 3)
1. Roll the wheel until the valve stem is at its lowest point close to the ground, then
mark this first point on the ground. (Fig. a)
2. Get on the bike and have a helper push you until the valve stem returns to its
lowest point. Mark the second point on the ground. (Sitting on the bike achieves a
more accurate reading since the weight of the rider slightly changes the wheel
circumference).
3. Measure the distance between the marks in milimeters. Enter this value to set the
wheel circumference. Option: Get the suitable circumference value
from the table. (Fig. b)
4. A quick press of the MODE button
5. To change the flickering digit, hold down the MODE button
flickering digit moves to the next digit.
CLOCK SETTING (Fig. 4)
1. Press the SET button
to enter the clock adjusting screen to setting the clock.
2. A quick press of the MODE button
3. Adjust the clock data as the data setting proces shows ( Fig 4. )
ODO AND TRT DATA SETTING
The function is designed to re-key the former data of ODO and TRT when battery is
replaced. A new user does not need to set this data. Each press of the SET button
skips one setting data process.
BUTTON AND OPERATIONS
MODE BUTTON
(Fig. 7)
Quickly press this button to move in a loop sequence from one function screen to
another.
SET BUTTON
(Fig. 8)
1.Press this button to get in the setting screens when you want to reset the bike
computer, or the current time of the CLK
HAUPTEINTSTELLUNGS S
STARTEN DES COMPUTERS (alles löschen) (Abb. 1)
1. Legen Sie eine Batterie nach dem Kauf in das Hauptgerät ein.
Deutsch
2. Drücken Sie gleichzeitig die Tasten MODE
Sekunden um den Computer zu initialisieren und alle Daten zu löschen.
WICHTIG : Initialisieren Sie den Computer zwingend vor dem Gebrauch, damit das
Gerät Fehler frei funktioniert.
3. Die LCD Segmente werden automatisch getestet, sobald das Gerät gemäss
Anleitung gestartet wird.
4. Drücken Sie die Taste MODE
um den LCD Test zu stoppen. Dadurch erscheint
und flackert "KM/H" im Display.
EINHEITAUSWAHL (Abb. 2)
Drücken Sie die Taste MODE
um zwischen KM/H und M/H zu wählen. Dann
drücken Sie die Taste SET
um die Auswahl zu speichern.
RADUMFANG (Abb. 3)
1. Drehen Sie das Vorderrad so, dass das Ventil so nahe wie möglich am Boden ist.
Dann markieren Sie diesen ersten Punkt am Boden. (Abb.a)
2. Sitzen auf das Bike und nehmen Sie eine Hilfsperson dazu, welche Sie anschiebt
bis das Rad eine ein Mal gedreht wurde (Ventil wieder am Boden). Markieren Sie
den zweiten Punkt am Boden. (Durch Sitzen auf dem Fahrrad erreichen Sie ein
genaueres Messresultat, da das Gewicht des Fahrers den Radumfang leicht
beeinflussen kann.
3. Messen Sie die Distanz zwischen den zwei auf dem Boden markierten Punkten in
Millimeter. Geben Sie diesen Wert in Millimeter als Radumfang im Computer ein.
OPTION: Entnehmen Sie einen passenden Wert für den Radumfang von der
Tabelle. (Abb. b)
4. Ein kurzes Drücken der MODE
Taste erhöht die flackernde Ziffer um ein Zähler.
5. Um die flackernde Ziffer zu ändern, halten Sie die MODE Taste
gedrückt bis die flackernde Stelle zur nächsten Ziffer wechselt.
UHR EINSTELLUNGEN (Abb. 4)
1. Drücken Sie die Taste SET
um die Einstellungen der Uhr auf dem Bildschirm
anzuzeigen.
2. Durch ein kurzses drücken der Taste MODE
24HR.
3. Stellen Sie die Daten der Uhr ein, wie es der Einstellungsprozess zeigt (Abb. 4)
ODO UND TRT DATEN EINSTELLUNG (Fig. 5,
6)(nur TRT 16W)
Diese Funktion ist um Werte wie ODO und TRT wieder einzugeben, wenn eine Batterie
ausgetauscht werden muss. Ein neuer Benutzer benötigt diese Einstellung nicht
vorzunehmen. Jeder Tastendruck auf die Taste SET
Dateneinstellungsprozess.
TASTEN UND FUNKTIONEN
.
MODE TASTE (Abb. 7)
Durch kurzes antippen dieser Taste wechseln Sie innerhalb dieser Loop-Sequenz
von der einen zur anderen Bildschirmfunktion.
EINSTELLUNGS TASTE
1. Drücken Sie diese Taste um zum Einstellungsbildschirm zu gelangen, wenn Sie
Ihren Computer oder die aktuelle Zeit
CONFIGURATION DE L'APPAREIL
Initialisation de l'ordinateur (effacement complet)
(Fig.1)
Français
1. La pile est déjà installé dans l'appareil au moment de l'achat.
2. Maintenez le bouton de MODE
et "SET"
plus de 3 secondes pour initialiser le compteur et effacer toutes les données en
mémoire. IMPORTANT: assurez vous d'initialiser le compteur avant la première
utilisation pour éviter les erreurs.
3. Les segments LCD seront automatiquement testés après l'initialisation de
l'appareil.
4. Appuyez sur le bouton MODE
pour arrêter le test LCD. Le symbole "km/h"
clignotera à l'écran.
SELECTION DE L'UNITE DE MESURE (Fig.2)
Appuyez sur le bouton de MODE
le bouton "SET"
pour valider votre choix.
CIRCONFERENCE DE LA ROUE (Fig. 3)
jusqu'à ce que le
1. Faites tourner la roue jusqu'à ce que la valve soit le plus près possible du sol, puis
tracez un répère sur le sol (Fig. a)
2. Placez vous sur le vélo et avancez jusqu'à ce que la valve retourne à son point le
plus bas. Tracez un second repère sur le sol. (Votre poids, en restant sur le vélo,
et
permet de mesurer avec plus de précision la circonférence.)
3. Mesurez ensuite la distance entre les deux repères en millimètres. Saisissez cette
valeur afin de configurer la circonférence de la roue. OPTION: relevez la mesure
appropriée sur le tableau. (Fig.b).
4. Appuyez d'un coup rapide sur le bouton MODE
d'une unité.
5. Pour passer d'un chiffre à l'autre, maintenez le bouton de MODE
pour 2 secondes pour que le chiffre clignotant avance d'une unité.
CONFIGURATION DE L'HORLOGE (Fig.4)
1. Appuyez sur le bouton SET
pour afficher l'horloge à l'écran.
2. Une pression rapide sur le bouton MODE
24HR.
3. Modifiez l'affichage de l'horloge selon procédé (Fig 4.)
CONFIGURATION DES DONNEES ODO ET TRT (Fig.
5,6) (TRT 16W seulement)
Cette fonction permet de reconfigurer les informations ODO et TRT lors du
remplacement de a pile. Un nouvel utilisateur n'a pas besoin de configurer ces
données. Chaque fois que vous appuyez sur le bouton SET
de la configuration.
BOUTON ET OPERATIONS
MODE BOUTON
(Fig. 7)
Appuyez rapidement sur ce bouton pour passer d'une fonction à une autre.
BOUTON SET
(Fig. 8)
1. Appuyez sur ce bouton pour accéder aux écrans de réglage pour configurer de
nouveau le compteur, ou l'heure
INSTALLATIE COMPUTER
DE COMPUTER INSTALLEREN (alles wissen) (fig. 1)
1. De batterij is al in gecomputer geplaatst bij aanschaf.
2. Druk de MODE knop
en de SET knop
de computer te herstarten en alle gegevens te wissen.
BELANGRIJK: Als je de computer voor gebruik niet herstart, kan de computer
foutmeldingen gaan geven.
3. Na de herstart worden de LCD-segmenten van de display automitisch getest.
4. Druk op de MODE knop
om de LCD test te stoppen. Het "KM/H" symbool zal
gaan knipperen.
EENHEIDSKEUZE
(Fig. 2)
Druk op de MODE knop
op te kiezen voor KM/H of M/H. Druk op de SET knop
om de keuze vast te leggen.
WIELOMTREK
(Fig. 3)
1. Draai het wiel totdat het ventiel op zijn laagste punt staat en markeer dit punt op de
grond. (Fig. a)
2. Ga op de fiets zitten en laat iemand je in een rechte lijn vooruit duwen totdat je
ventiel opnieuw de grond raakt. Markeer het tweede punt op de grond. (Zittend op
de fiets geeft een nauwkeurige meting, omdat het gewicht van de derijder de
wielomtrek minimaal beinvloed.)
3. Meet de afstand tussen de twee markeringen in milimeters. Gebruik deze waarde
om de wielomtrek in te voeren. OPTIE: Gebruik de passende wielomtrek uit de
tabel. (Fig. b)
4. Een korte druk op de MODE knop
5. Om te wisselen tussen de getallen, houdt de MODE knop
Het volgende getal zal gaan knipperen.
INSTELLEN KLOK
(Fig. 4)
1. Druk op de SET knop
om naar het scherm te gaan om de klok in te stellen.
2. Met een korte druk op de MODE knop
modus.
3. Stel de tijd in zoals wordt getoond in het figuur 4.
Instellen ODO en TRT gegevens (Fig. 5, 6) (TRT
alleen 16W)
Met deze functie kun je de ODO en TRT gegevens opnieuw invoeren na het vervangen
van de batterij. Een nieuwe gebruiker hoeft deze gegevens niet in te voeren. Met elke
druk op de SET knop
sla je een stap over in het installatie proces.
KNOPPEN EN FUNCTIES
MODE-knop
(Fig. 7)
Druk kort op deze knop om in een vaste volgorde door de functies heen te lopen.
SET-KNOP
(Fig. 8)
1. Druk deze knop in om in de installatieschermen te komen om de computer te
resetten of het instellen van de tijd
AJUSTE DE LA UNIDAD PRINCIPAL
INICIO DE CICLOCOMPUTADOR (instalación
limpia) (Fig. 1)
Español
1. Una batería está "montada" al adquirir el ciclocomputador.
2. Presione el botón MODE
y el botón SET
segundos para iniciar el ciclocomputador y limpiar todos los datos. IMPORTANTE:
asegúrese de iniciar correctamente el ciclocomputador antes de su uso. De otra
forma, el ciclocomputador puede dar errores.
3. Los segmentos del display LCD se testean automáticamente al al iniciar la unidad.
4. Presione el botón MODE
para para el test del display LCD. Las siglas "KM/H"
aparecerán.
SELECCIÓN DE UNIDADES (Fig. 2)
Presione el botón MODE
para elegir KM/H o M/H. Posteriormente presione el
botón SET
para fijar su elección.
TAMAÑO DE RUEDA (Fig. 3)
1. Gire la rueda hasta que la válvula se situe en el punto más cercano al suelo,
perpendicularmente a él. Realice una marca en el suelo justo en ese punto. (Fig.
a)
2. Mueva la bicicleta en LINEA RECTA desde ese punto, con mucho cuidado, hasta
que la rueda de una vuelta completa hasta que la válvula vuelva a situarse en el
punto más cercano al suelo, perpendicular a él. Marque ese nuevo punto en el
suelo.Si realiza este proceso con ayuda de otra persona y montado en la bicicleta,
conseguirá una medida más precisa.
3. Mida la distancia entre las marcas en milímetros. Introduzca este valor en la
unidad. Opción: puede usar el valor de la longitud de la circunferencia que aparece
en la tabla adjunta. (Fig. b)
4. Una rápida presión del botón MODE
5. Para cambiar el dígito que parpadea, mantenga pulsado el botón MODE
realiza durante 2sg. hasta que el dígito que parpadea pasa al siguiente.
AJUSTE DEL RELOJ (Fig. 4)
1. Presione el botón SET
para ir a la pantalla de ajuste del reloj y empezar con
dicho ajuste.
2. Una rápida presión del botón MODE
24HR.
3. Ajuste el reloj tal y como se muestra en el proceso de la fig. 4.
AJUSTE DE LOS DATOS ODO Y TRT (fig 5, 6)
(TRT 16 only)
Esta función está ideada para reintroducir los datos del ODO y TRT cuando
reemplazamos la batería. Un nuevo usuario no necesita ajustar este dato. Cada
presión del botón SET
salta uno de los pasos de la introducción de datos.
BOTONES Y OPERACIONES
BOTÓN
MODE
(Fig. 7)
Presione rápidamente este botón para pasar rápidamente de una pantalla a otra.
BOTÓN SET
(Fig. 8)
1. Presione este botón para entrar en cada pantalla de ajustes si quiere resetear la
unidad, o el la hora actual del
CONFIGURAÇÃO DA UNIDADE
INICIAR O CICLÓMETRO (LIMPAR TUDO)
1. A unidade principal já tem uma bateria instalada aquando da aquisição.
2. Prima a tecla MODE
e a tecla SET
segundos, para iniciar o ciclómetro e limpar toda a informação.
IMPORTANTE: Assegure-se que inicia o ciclómetro antes de o usar ou poderão
ocorrer erros de funcionamento.
3 . Os segmentos do LCD serão testados automaticamente depois da unidade ser
iniciada.
4. Prima a tecla MODE
para parar o teste do LCD. Ficará intermitente a
indicação "KM/H".
SELEÇÃO DE UNIDADE
Prima a tecla MODE
para escolher KM/H ou M/H. Depois, prima a tecla SET
para memorizar a opção.
PERÍMETRO DA RODA
(Fig. 3)
1. Gire a roda até a válvula estar no ponto mais próximo do solo e, depois, faça a
marcação desse mesmo ponto no solo. (Fig.a)
2. Coloque-se em cima da bicicleta e, com o auxílio de alguém, faça a bicicleta rolar
até que a válvula volte a estar no ponto mais próximo do solo. Marque este
segundo ponto. (O facto de estar sentado na bicicleta permite obter uma medida
mais precisa, já que o peso do ciclista alterá ligeiramente o perímetro da roda).
3. Meça em milímetros a distância entre os dois pontos assinalados no solo. Insira
este valor para configurar o perímetro da roda. Opção: consulte o valor adequado
na tabela (Fig. b)
4. Se premir rapidamente a tecla MODE
intermitente.
5. Para mudar o dígito intermitente, mantenha premida a tecla MODE
até que o dígito intermitente mude para a casa seguinte.
ACERTAR RELÓGIO
(Fig. 4)
1. Prima a tecla SET
para entrar no ecrã de acerto do relógio.
2. Prima rapidamente a tecla MODE
3. Ajuste a hora de acordo com o processo mostrado. ( Fig 4. )
CONFIGURAR ODO E TRT (Fig. 5, 6) (Apenas 16W)
Esta função é usada para repor a informação do ODO e TRT quando substituir a
bateria. No caso de um novo utilizador, não necessitará de repor esta informação.
Cada vez que premir a tecla SET
saltará um passo no processo de configuração.
TECLAS E OPERAÇÕES
TECLA MODE
(Fig. 7)
Prima esta tecla rapidamente para mudar sequencialmente de um ecrã para o
seguinte.
TECLA SET
(Fig. 8)
1. Prima esta tecla para entrar nos ecrã de caerto quando quiser restabelecer o
ciclómetro ou a hora atual
.
ОСНОВНЫЕ НАСТРОЙКИ УСТРОЙСТВА
ВКЛЮЧЕНИЕ КОМПЬЮТЕРА (ВСЕ ЧИСТО) (Рис. 1)
1. Аккумуляторы уже установлены в устройство.
Pусский
2. Нажмите кнопку MODE
и кнопку SET
настройки и сброса всех показаний.
3. Дисплей LCD автоматически пройдёт диагностику.
4. Нажмите кнопку MODE
для остановки диагностики дисплея. Начнет мигать
индикатор "KM/H".
ВЫБОР ЕДЕНИЦ ИЗМЕРЕНИЯ (Рис. 2)
Нажмите кнопку MODE
чтобы выбрать измерение скорости в KM/H или
M/H. Потом нажмите SET
для подтверждения.
РАЗМЕР КОЛЕСА (Рис. 3)
1. Помернуть колесо велосипеда, чтобы нипель оказался в нижней точке, ближе
всего к земле. Потом отметьте на это место на земле.
на
2. Проехать вперед один оборот колеса. И отметить вторую точку, где нипель
дошел до земли. (Нужно сидеть на велосипеде, т.к. вес велосипедиста влияет
на замер).
до исчезновения значка
3. Измерьте расстояние между отметками в милиметрах. И введите это
значение в велокомпьютер. Или возьмите это значение из таблицы. (Рис. б)
4. Быстро нажимайте кнопку MODE
5. Для перехода на следующую цифру нажмите MODE
НАСТРОЙКИ ЧАСОВ (Рис. 4)
1. Нажмите кномпу SET
для входа в режим настройки часов.
2. Быстро нажмите кнопку MODE
3. Настройте показания часов. (Рис. 4)
НАСТРОЙКА ODO И TRT
Функция предназначена для установки общего пробега велосипеда при замене
батарейки. Новому пользователю не нужно устанавливать эти данные. Нажатие
кнопки SET
пропускает один этап настройки.
КНОПКА И ФУНКЦИИ
КНОПКА ВЫБОРА РЕЖИМА
Нажмите один раз эту кнопку для перехода на следующую функцию.
КНОПКА УСТАНОВКИ
1. Нажмите эту кнопку, чтобы сбросить показания велокомпьютера или
времени
.
DATA SETTING
4. Clock Setting
2s
DS
RT
CLK
SCAN
5s
CLK
DS
RT
Auto scan
MS
AS
48hr..
15m
15m
2m
2m
"Power auto on" in 2 min
2. Each press of the SET button
3. Press this button 2 seconds to get out the setting
RESET OPERATION (Fig. 9)
simultaneously for more than 3
1. Press the MODE button
will reset AS, DS, RT and MS data from stored values to zero.
2. It will not reset ODO,CLK
AUTOMATIC START/STOP (Fig. 10)
The computer will automatically begin counting data upon riding and stop counting
data when riding is stopped. The flickering symbol "
computer is active.
to
POWER AUTO ON/OFF
To preserve battery, this computer will automatically switch off and just displays the
CLK data when it has not been used for about 15 minutes. The power will be turned
on automatically by riding the bike or by pressing the button
*If the computer is not used for more than 15 minutes but less than 48 hours,
it will be automatically turned on in 30 seconds after it is used again.
If the computer enters the power-saving mode for more than 48 hours,
it will be automatically turned on in 2 minutes after it is used again.
LOW BATTERY INDICATOR
1. The symbol "
2. Replace battery with a new one within a few days after the symbol was appeared,
otherwise the stored data may be lost when the battery voltage is too low.
BATTERY CHANGE (Fig.11)
advances the flickering digit by 1.
1. All data will be cleared when battery is replaced.
2 seconds till the
2. The computer allows you to re-key The ODO and TRT data, which you have had
rode after replacing battery.
3. Remember the ODO and TRT data before you remove the old battery.
4. Replace with a new CR2032 battery in the compartment on the back of the
to select 12HR or 24HR.
computer with the positive (+) pole toward the battery cap.
(Fig. 5, 6)(TRT 16W Only)
5. Initiate the main unit again.
PRECAUTIONS
1. This computer can be used in the rain but should not be used under water.
2. Don't leave the main unit exposed to direct sunlight when not riding the bike.
3. Don't disassemble the main unit or it's accessories.
4. Check the position and gap between sensor and magnet periodically.
5. Clean the contacts of the bracket and the bottom of the main unit periodically.
6. Don't use thinner, alcohol or benzine to clean the main unit or its accessories when
they become dirty.
7. Remember to pay attention to the road while riding you bicycle.
.
2. Jedes antippen der Taste SET
3. Drücken Sie diese Taste für 2 Sekunden um den Einstellungsbereich zu verlassen.
RESET OPERATION (Abb. 9)
und SET
für mehr als 3
1. Drücken Sie die MODE Taste
Taste los. Der Computer wird die gespeicherten Daten AS, DS, RT und MS auf Null
zurücksetzen.
2. Dies wird weder den Wert ODO, CLK
AUTOMATISCHER START/STOP (Abb. 10)
Der Computer startet/stoppt die Datenaufzeichnung automatisch beim
Start/Unterbruch der Fahrt. Das flackernde Symbol
Computer aktiv ist.
HAUPTSCHALTER (POWER) ON/OFF
Um den Batterieverbrauch zu schonen stellt dieser Computer automatisch aus
(OFF) und es erscheint im Display nur noch die Anzeige CLK, wenn der Computer
während 15 Minuten nicht benutzt wurde. Der Computer schaltet automatisch ein,
wenn entweder die Taste
*Ist der Computer aktuell nicht in Gebrauch (mehr als 15 Minuten, aber weniger als
48 Stunden), der Computer startet automatisch innert 30 Sekunden. Wurde der
Computer für mehr als 48 Stunden nicht eingeschaltet, benötigt der automatische
Start 2 Minuten.
INDIKATOR NIEDRIGER BATTERIESTAND
1. Das Symbol
erscheint, um niedrigen Batteriestand anzuzeigen.
2. Tauschen Sie danach die Batterie innerhalb der nächsten Tage aus. Ansonsten
besteht die Gefahr, dass Sie alle gespeicherten Daten verlieren, sollte der
Batteriestand zu niedrieg sein.
BATTERIEWECHSEL (Abb. 11)
1. Alle Daten werden gelöscht wenn die Batterie entfernt wird.
für 2 Sekunden
2. Der Computer erlaubt Ihnen die Werte ODO und TRT wieder einzugeben, nachdem
Sie die Batterie ersetzt haben.
3. Merken Sie sich den ODO- und TRT-Wert bevor Sie die Batterie wechseln.
4. Tauschen Sie die Batterie CR2032 an der vorgegebenen Stellte auf der Rückseite
des Computers. Achten Sie darauf, dass der Pluspol (+) nach oben, in Richtung
wählen Sie zwischen 12HR oder
Batteriedeckel eingesetzt wird.
5. Starten Sie erneut mit dem Haupteinstellungs-Setup.
SCHUTZMASSNAHMEN
1. Dieser Computer kann bei Regen, aber nicht unter Wasser benutzt werden.
2. Setzen Sie das Hauptgerät mit dem Display nicht dem Sonnenlicht aus, wenn dieser
nicht zum Radfahren benutzt wird.
3. Bauen Sie das Hauptgerät mit Display oder das dazugehörende Accessoire nicht
überspringt einen
auseinander.
4. Prüfen Sie regelmässig die korrekte Position und die Distanz zwischen Sensor und
Magnet.
5. Reinigen Sie regelmässig die Kontaktstellen zwischen Lenkerhalter und Unterseite
des Hauptgerätes.
6. Verwenden Sie keine Lösungsmittel, Alkohol oder Benzin um das Hauptgerät oder
(Abb. 8)
das Zubehör zu reinigen, wenn diese verschmutzt sind.
7. Denken Sie daran, beim Radfahren auf die Strasse zu achten.
zurücksetzen wollen.
2. Chaque pression du bouton SET
3. Appuyez sur ce bouton pour 2 secondes pour quitter cette fonction.
REINITIALISATION (Fig. 9)
1. Appuyez sur le bouton MODE
simultanément enfoncés pendant
compteur réinitialisera l'information AS, DS, RT et MS.
2.
Le compteur ne réinitialisera pas ODO et CLK TRT (16W seulement).
DEMARRAGE / ARRET AUTOMATIQUE (Fig. 10)
Le compteur commencera automatiquemet à calculer les informations dès que vous
utilisz le vélo. Le symbole clignotant
MISE SOUS TENSION / HORS TENSION
Pour économiser la pile, le compteur s'éteindra automatiquement et indiquera
seulement l'heure lorsqu'il n'est pas utilisé pendant environ 15 minutes. Il suffit de
rouler ou d'appuyer sur le bouton
puis choisir KM/H ou M/H. Puis appuyez sur
* si le compteur nest pas utilisé pour plus de 15 minutes mais moins de 4 heures il
sera automatiquement déclenché. Si le compteur est dans le mode économie
d'énergie pour plus de 48 heures, il sera automatiquement déclenché après 2
minutes lors d'une ré-utilisation.
INDICATEUR DE PILE USEE
1. Le symbole
ndiquera que la pile est usée.
2. Remplacez la pile dans les jours qui suivent l'apparition du symbole, sinon
l'information en mémoire sera peut-être perdu.
REMPLACEMENT DE LA PILE (Fig.11)
1. Toutes les informations seront effacées lors du remplacement de a pile.
2. Le compteur vous permet de ré-introduire les informations ODO et TRT après le
et le chiffre clignotant avancera
remplacement de la pile.
3. Bien noter les informations ODO et TRT avant de retirer la pile usée.
4. Remplacez avec une pile CR2032 neuve dans le compartiment prévu avec le pôle
positif (+) vers le couvercle.
5. Réinitialisez le compteur.
PRECAUTIONS D'EMPLOI
permet de sélectionner 12HR ou
1. Vous pouvez utiliser le compteur sous la pluie mais pas sous l'eau.
2. Ne laissez pas le compteur en plein soleil lorsque vous ne roulez pas.
3. Ne pas démonter le compteur ou les accessoires.
4. Vérifiez régulièrement l'espace entre l'aimant et le capteur.
5. Nettoyez régulièrement les contacts de support ainsi que la partie inférieure de
l'appareil.
6. N'utilisez pas de diluant, d'alcool ou d'essence pour nettoyer le compteur ou ses
vous sautez une étape
accessoires.
7. N'oubliez pas de regarder la route en roulant.
.
2. Met elke druk op de SET knop
3. Druk de SET knop 2 seconden in, om het installatieproces te verlaten.
RESET (Fig. 9)
meer dan 3 seconden tegelijk in, om
1. Druk de MODE knop
knop los. De computer zal de waarden van AS, DS, RT en MS terugzetten op nul.
2. De ODO, CLK
AUTOMATISCHE START/STOP (Fig. 10)
De computer zal automatisch gegevens verzamelen zodra je begint met fietsen en
stoppen wanneer je stopt met fietsen. Het knipperende symbool
dat de computer een signaal ontvangt en gegevens verzamelt.
AUTO AAN/UIT
Om de batterij te sparen, schakelt de computer automatisch in slaap modus en
toont alleen nog de klok, als de computer 15 minuten niet wordt gebruikt. De
computer schakelt automatisch weer in als je gaat fietsen of de MODE knop
indrukt.
* Als de computer meer dan 15 minuten maar minder dan 48 uur niet is gebruikt, zal
deze binnen 30 seconden na gebruik weer inschakelen. Als de computer meer dan
48 uur in de slaap modus staat, wordt deze automisch ingeschakeld binnen 2
minuten na gebruik.
BATTERIJ LEEG INDICATOR
1. Als de batterij bijna leeg is zal de symbool
2. Vervang de battterij binnen een paar dagen nadat dit symbool is verschenen, anders
gaat de opgeslagen data verloren.
verhoogt het knipperde getal met 1.
BATTERIJ VERVANGEN (Fig.11)
2 seconden ingedrukt.
1. Alle data wordt gewist bij het vervangen van de batterij.
2. De computer heeft de mogelijkheid om de ODO en TRT data opnieuw in te voeren
na het vervangen van de batterij.
3. Onthoudt de ODO en TRT stand voordat je de oude batterij verwijdert.
kun je kiezen tussen 12-uurs of 24-uurs
4. Plaats een nieuwe CR2032 batterij in het compartiment aan de achterkant van de
computer met de positieve (+) pool richting de batterijdeksel.
5. Installeer de computer opnieuw.
VOORZORGSMAATREGELEN
1. Deze computer kan in de regen worden gebruikt, maar niet onder water.
2. Stel de computer niet bloot aan direct zonlicht, als je de fiets niet gebruikt.
3. Haal de computer of de accessoires niet uit elkaar.
4. Controleer regelmatig de positie en de afstand tussen de sensor en de mangeet.
5. Maakt regelmatig de contacten van de bracket en de onderkant van de computer
schoon.
6. Gebruik bij het schoonmaken van de computer of accessoires geen verdunner,
alcohol of bezine.
7. Blijf tijdens het rijden op de weg letten!
.
2. Cada presión del botón SET
3. Presione este botón durante 2 segundos para salir de los ajustes.
OPERACIÓN RESET (Fig. 9)
1. Presione el botón MODE
simultáneamente durante más de 3
luego suéltelo. El ciclocomputador pondrá a cero los datos de AS, DS, RT y MS.
2. Esto no reseteará los datos de ODO, CLK
INCIO/PARADA AUTOMÁTICOS (Fig. 10)
El ciclocomputador empezará automáticamente a contar datos en cuanto empiece
el movimiento de la rueda y se parará cuando detenga su marcha. El logotipo
parpadeante
FUNCIÓN AUTO APAGADO ON/OFF
Para preserar la batería, el ciclocomputador se apagará automáticamente y sólo
montrará los datos del CLK si este no se usa durante 15min.Se encenderá de
nuevo al empezar a rodar de nuevo o presionado el botón
*si el ciclocomputador no se usa más de 15 min. pero menos de 48 horas, se
mantendrá encendido automáticamente 30sg después de usarlo de nuevo.Si el
ciclocomputador entra en modo de ahorro de energía más de 48h. , se mantendrá
encendido 2min. después de usarlo de nuevo.
INDICADOR DE BATERÍA BAJA
1. El símbolo
aparecerá para indicar que la carga de la pila/batería está baja.
2. Sustituya la batería por una nueva lo antes posible tras la aparición del indicador de
batería.De otra forma, todos los datos guardados pueden perderse si la unidad llega
apagarse por descarga de la batería.
CAMBIO DE LA BATERÍA (Fig.11)
1. Todos los datos de la unidad se perderán al hacer el cambio de batería.
2. El ciclocomputador permite reintroducir los datos del ODO y TRT después de
hará el cambio de dígitos de uno a uno.
cambiar la batería.
si lo
3. Recuerde o apunte los datos del ODO y TRT antes de cambiar la batería.
4. Sustituya la batería con una nueva del modelo CR2032 en el compartimento
posterior del ciclocomputador con el polo positivo (+) apuntado a la tapa de la
batería.
5. Inicie la unidad principal de nuevo.
para elegir entre el formato de 12HR o
PRECAUCIONES
1. Este ciclocomputador puede usarse bajo la lluvia, pero NO bajo el agua.
2. No deje la unidad principal expuesta directamente a la luz solar cuando no lo use.
3. No desmonte la unidad principal o sus accesorios.
4. Verifique la posición , espacio y sujección del sensor y del imán de la rueda
periódicamente.
5. Limpie los contactos de la unidad principal y del soporte de la misma de forma
periódica.
6. No use ningún producto abrasivo, como alcohol, disolventes , etc...para limpiar la
unidad principal o sus accesorios cuando se ensucien.
7. Recuerde mantener la atención en la carretera o camino cuando conduzca su
bicicleta.
.
2. Cada vez que premir a tecla SET
configuração.
(Fig. 1)
3. Prima esta tecla durante 2 segundos para sair da configuração.
OPERAÇÃO DE RESTABELECIMENTO (Fig. 9)
simultaneamente durante mais de 3
1. Prima a tecla MODE
tecla. O ciclómetro restabelecerá para zero a informação de AS, DS, RT, e MS.
2. Não será restabelecida a informação de ODO, CLK
ARRANQUE/PARAGEM AUTOMÁTICA (Fig. 10)
O ciclómetro começará a contar automaticamente sempre que a roda iniciar o
movimento e parará a contagem quando estiver parada. O símbolo
intermitente indica que o ciclómetro está ativo.
LIGAR/DESLIGAR AUTOMÁTICO
(Fig. 2)
Para preservar a bateria, o ciclómetro desliga-se automaticamente, mostrando
apenas a hora, se não for usado durante 15 minutos. O funcionamento será
retomado se a bicicleta for usada ou se for premida a tecla
*Se o ciclómetro não for usado durante mais de 15 minutos, mas menos de 48
horas, será ligado automaticamente 30 segundos após ser de novo usado.
Se o ciclómetro entrar no modo de poupança de energia após mais de 48 horas,
será ligado automaticamente 2 minutos após ser de novo usado.
INDICADOR DE BATERIA FRACA
1. O símbolo
aparecerá para indicar que a bateria está fraca.
2. Substitua a bateria no espaço de dias, após aparecer o símbolo; caso contrário, a
informação memorizada poderá perder-se se a bateria ficar muito fraca.
MUDAR A BATERIA (Fig.11)
avançará 1 unidade no dígito
1. Quando a bateria for substituída, toda a informação será perdida.
2. O ciclómetro permite-lhe reintroduzir a informação de ODO e TRT depois de
2 segundos
substituir a bateria.
3. Antes de retirar a bateria velha, anote a informação de ODO e TRT.
4. Instale uma bateria nova CR2032 no compartimento existente na retaguarda do
ciclómetro com o polo positivo (+) virado para a tampa da bateria.
para selecionar 12HR ou 24HR.
5. Inicie uma vez mais a unidade.
CUIDADOS
1. Este ciclómetro pode ser usado à chuva mas não deve ser submergido.
2. Quando não estiver a usar a bicicleta, não deixe o ciclómetro exposto à luz solar
direta.
3. Não desmonte a unidade principal ou os seus acessórios.
4. Verifique periodicamente o intervalo entre o sensor e o magneto.
5. Limpe periodicamente os contactos do suporte e da retaguarda da undiade.
6. Não use diluente, álcool, ou benzina, para limpar a unidde principal ou os
acessórios, se estes ficarem sujos.
7. Lembre-se de prestar atenção à estrada, quando andar de bicicleta.
2. Каждое нажатие на кнопку SET
3. Нажмите эту кнопку на 2 секунды, чтобы выйти из настройки.
ФУНКЦИЯ СБРОСА (Рис. 9)
одновременно более 3 секунд для
1. Нажмите кнопку MODE
показания AS, DS, RT и MS.
2. Будут сброшены показания ODO, CLK
АВТОМАТИЧЕСКИЙ СТАРТ/СТОП (Рис. 10)
Компьютер автоматически начинает отсчет данных, во время движения и
остановить подсчет данных при остановке. Мерцающий логотип
означает, что компьютер включен.
АВТОМАТИЧЕСКОЕ ВКЛ/ВЫКЛ
Для экономии заряда батареи, этот компьютер автоматически выключится и
выведет данные CLK, когда он не используется в течение 15 минут. Будет
включаться автоматически при поездке на велосипеде или нажав на кнопку .
* Если компьютер не используется в течение более 15 минут, но менее 48
часов,
он будет автоматически включен в течение 30 секунд после того, как он
используется снова.
Если компьютер переходит в энергосберегающий режим после 48 часов,
он будет автоматически включаться через 2 минуты после того, как он
для изменения значения.
используется снова.
на 2 секунды.
ИНДИКАТОР НИЗКОГО ЗАРЯДА БАТАРЕИ
1. Если появляется индикатор
2. Замените батарею на новую в течение нескольких дней после того, как
для выбора режима часов 12Ч или 24Ч.
появился символ, в противном случае сохраненные данные могут быть
потеряны, когда напряжение батареи слишком низкое.
(Рис. 5,6)(TRT ДЛЯ 16W)
ЗАМЕНА БАТАРЕИ (Рис.11)
1. Все данные будут удалены при замене батареи.
2. Компьютер позволяет повторно повторно ввести данные ODO и TRT после
замены батареи.
3. Запомните значение ODO и TRT, прежде чем заменить старую батарею.
(Рис. 7)
4. Замените батарею CR2032 на новую в отсек на задней панели компьютера с
положительным (+) полюсом в сторону крышку батарейного отсека.
(Рис. 8)
5. Включите велокомпьютер снова.
УСЛОВИЯ ИСПОЛЬЗОВАНИЯ
1. Этот компьютер может быть использован в дождь, но не должна быть
использована под водой.
2. Не оставляйте велокомпьютер под воздействием прямых солнечных лучей,
когда не катаетесь на велосипеде.
3. Не разбирайте велокомпьютер или его аксессуары.
4. Проверяйте периодически положение и зазор между датчиком и магнитом.
5. Очистите контакты велокомпьютера и крепежную платформу.
6. Не используйте растворитель, спирт или бензин для очистки велокомпьютера
или его частей, когда они становятся грязными.
7. Не забывайте смотреть на дорогу во время езды на велосипеде.
2s
2s
2s
BCP-15W : CLK, DS, RT, AS, MS, ODO, SCAN
BCP-16W : CLK, DS, RT, AS, MS, ODO, TRT, SCAN
AS
CLK
MS
5s
CLK
Auto scan
TRT ODO
11. Battery change
a.
Wheel Circumference
3V battery
CR2032
2nd
skips one setting data process.
TROUBLE SHOOTING
Check the following before taking the unit in for repairs.
Problem
till the LCD digit is blanked, then release it. The computer
No
display
, TRT(16W Only).
No
current
" indicates that the
speed or
Incorrect
data
.
Irregular
display
" will appear to indicate the battery power is low.
LCD is
black
Display
is slow
AS
MS
DS
ODO
RT
TRT
Wireless Sensing Distance:
Operation Temperature:
Storage Temperature:
Main Unit Battery Power:
Dimensions and Weight:
*Specifications and designsmay be changed without notice.
FEHLERSUCHE / PROBLEMBEHANDLUNG
überspringt einen Dateneinstellungsprozess.
Prüfen Sie folgendes bevor Sie ein Gerät zur Reparatur beanstanden:
Problem
Kein
bis die LCD-Ziffer markiert ist, dann lassen Sie die
Display
Keine
noch TRT löschen (nur bei Modell 16W).
aktuelle
Gesch-
windigkeit
erscheint, dass der
oder
falscher
Wert
gedrückt wird oder die nächste Fahrt gestartet wird.
Unge-
wöhnlicher
Display
LCD ist
schwarz
Display ist
langsam
Funktionen: Einheitangaben
AS
MS
DS
ODO
RT
TRT
Reichweite kabellose Verbindung:z
Betriebstemperatur:
Speichertemperatur:
Batterieleistung Hauptgerät:
Dimensionen und Gewicht:
* Spezifikationen und Designs können ohne Ankündigung
geändert werden.
fait avancer d'une fonction.
DEPANNAGE
Eléments à vérifier avant de s'adresser à son vélociste
Problème
pour effacer le chiffre LCD puis relachez. Le
Aucun
affichage
Aucune
vitesse
actuelle
indique que le compteur est actif.
ou
données
incor-
rectes
pour faire redémarrer le compteur.
Affichage
irrégulier
L'affichage
LCD
est noir
L'affichage
est lent
Fonctions: Spécifications
AS
MS
DS
ODO
RT
TRT
Distance capteur sans fil:
Mode température:
Température en mémoire:
Puissance de la pile:
Dimensions et poids:
* Les spécifications et le design peuvent être modifiés
sans préavis.
sla je een stap over in het installatie proces.
PROBLEMEN
Controleer onderstaande voordat u de computer aanbiedt ter reparatie.
Probleem Controleer het volgende
totdat de LCD-cijfers worden gewist en laat vervolgens de
Geen
beeld
en TRT (alleen 16W) gegevens worden niet op nul gezet.
Geen
huidige
snelheid
geeft aan
of
onjuiste
gegevens
Onregelma-
tigheden op
verschijnen.
het scherm
Zwart
LCD
scherm
Scherm
reageert
traag
AS
MS
DS
ODO
RT
TRT
Bereik draadloss signaal:
Operationele temperatuur:
Bewaar temperatuur:
Batterij computer:
Afmetingen en gewicht:
*De specificaties en het ontwerp kunnen zonder
voorafgaande kennisgeving worden gewijzigd.
salta un paso de la introducción de datos.
RESOLUCIÓN DE PROBLEMAS
Revise las siguientes indicaciones antes de enviar su unidad a reparar.
Problema
hasta que la pantalla de LCD se quede en blanco y
No
funciona
, TRT (16W sólo).
el display
No
aparece
la
indica que el computador está activo.
velociada
actual
o los
datos
.
son
incorrec-
tos
Display
irregular
Pantalla
LCD
negra
Los datos
del display
van lentos
Funciones: Especificaciones
AS
MS
DS
ODO
RT
TRT
Distancia efectiva de la unidad wireless:
Temperatura de funcionamiento:
Temperatura de almacenamiento:
Batería empleada:
Peso y dimensiones:
* Las especificaciones pueden variar sin previo aviso.
saltará um passo no processo de
RESOLUÇÃO DE PROBLEMAS
Verifique os seguintes itens antes de levar a unidade para reparar.
Problema
Sem
até os dígitos do LCD ficarem limpos e, depois, solte a
indicações
, TRT (apenas 16W).
Sem
indicação
da
velocidade
ou
informação
incorreta
.
Indicações
irregulares
LCD
escuro
Indicações
lentas
AS
MS
DS
ODO
RT
TRT
Distância de Deteção Sem Fios:
Temperatura de Funcionamento:
Temperatura de armazenamento:
Energia da Bateria da
Unidade Principal:
Dimensões e Peso:
*Especificações sujeitas a alteração sem aviso prévio.
пропускает одну настройку.
УСТРАНЕНИЕ НЕИСПРАВНОСТЕЙ
Проверьте следующее, прежде чем отдавать устройство в ремонт.
Проблема
пока цифры не обнуляться. Будут сброшены
Нет
изображ
ения
, TRT (только 16W)
Нет
текущей
скорости
или
неправльные
показания
Неисправности
дисплея
, значит уровень заряда низкий.
Дисплей
весь
черный
Дисплей
медленно
выводит
показания
AS
MS
DS
ODO
RT
TRT
* Технические характеристики и дизайн могут быть
изменены без предварительного уведомления.
5. ODO Setting
000000~999999
2s
MS
DS
RT
AS
TRT
ODO
SCAN
DS
RT
AS
MS
Popular Tires Circumference Reference Table
b.
Circumference
Circumference
Tire Size
Number
Tire Size
Number
18 Inch
1436 mm
700C Tubular
2117
20 Inch
1596
700x20C
2092
22 Inch
1759
700x23C
2112
24x1.75
1888
700x25C
2124
24 Inch
1916
700x28C
2136
24x 1 3/8
1942
700x32C
2155
26x1.40
1995
700x35C
2164
26x1.50
2030
700x38C
2174
26x1.75
2045
27.5 Inch
2193
1st
26x1.95
2099
28 Inch (700B)
2234
26x2.1
2133
29 Inch
2297
Check Item
Remedy
1. Is the battery empty?
1. Replace the battery.
2. Is there incorrect battery installation?
2. Be sure that the positive pole of the
battery is facing the battery cap.
1. Is it at the MAIN UNIT SETUP or
1. Refer to the data setting procedure
another setting screen?
and complete the adjustment.
2. Are the relative positions and gap
2. Refer to Installations and readjust
between sensor and magnet correct?
position and gap correctly.
3. Is the circumference correct?
3. Refer to "Circumference Setting"
4. Is the sensing distance too long or
and enter correct value.
the installation angle of the sensor
4. Refer to Installations to adjust
incorrect?
distance or angle between the main
5. Is the sensor battery nearly
unit and the sensor.
exhausted?
5. Replace with a new battery.
6. Is any strong interference source
6. Move away from the source of
interference.
nearby?
Refer to the "Main Unit Setup" and
initiate the computer again.
Did you leave main unit under direct
Place main unit in the shade to return
sunlight when not riding the bike for a
to normal state. No adverse effect on
long period of time?
data.
Is the temperature below 0 C (32 F)?
Unit will return to normal state when
the temperature rises.
Functions
Specification
Current speed
0-199.9km/h 0-120.0m/h +/- 1%
Average speed
0-199.9km/h 0-120.0m/h
+/- 1%
Maximum speed
0-199.9km/h 0-120.0m/h
+/- 1%
Trip distance
0-999.99km/mile +/- 0.1%
Odometer
0-999999km/mile +/- 0.1%
Riding time
0H:00M:00S-99H:59M:59S +/- 0.003%
Total riding time
00H:00M-9999H:59M +/- 0.003%
12/24H clock
1H:00M:00S-12H:59M:59S0H:00M:00S-23H:59M:59S +/- 0.03%
70cm between the transmitter and the main unit.
0 C ~ 50 C (32 F ~ 122 F)
- 10 C ~ 60 C (14 F ~ 140 F)
3V battery x 1 (CR2032), battery operating life is about 1
years. (Based on an average of 1.5 hours use per day)
Main Unit: 40.7 x 52.3 x 15.2mm/ 27g
Überprüfung
Abhilfe
1. Tauschen Sie die Batterie aus.
1. Ist die Batterie leer?
2. Ist die Batterie korrekt
2. Stellen Sie sicher, dass der
eingelegt?
Plus-Pol nach oben in Richtung
Batteriedeckel eingelegt ist.
1. Beachten sie die Dateneinstel-
1. Befindet sich der Computer
gerade im HAUPTEINSTELLUNGS
lungsprozedur und beenden Sie die
SETUP oder in einer anderen
Anpassungen.
Einstellung?
2. Beachten Sie die Installations-
anweisung und stellen Sie die
2. Sind die Positionen und die
Distanz des Sensors zum Magnet
Position und Distanz korrekt ein.
korrekt?
3. Beachten Sie die "Einstellung des
3. Ist der Radumfang korrekt?
Radumfangs" und geben Sie den
korrekten Wert ein.
4. Ist die Sendedistanz zu lange
oder der Installationswinkel des
4. Beachten Sie die Installation
Sensors nicht korrekt?
betreffend Distanz und Winkel
5. Ist die Sensorbatterie beinahe
zwischen Hauptgerät und Sensor.
5. Tauschen Sie die Batterie mit
leer?
6. Befindet sich eine starke
einer neuen Batterie.
Störquelle in der Nähe?
6. Entfernen Sie sich von der
störenden Quelle.
Beachten Sie das
"HAUPTEINSTELLUNGS SETUP"
und starten Sie den Computer
nochmals von Anfang an.
Haben Sie das Hauptgerät mit
Platzieren Sie den Fahrradcomputer
Bildschirm lange direkter Sonnen-
im Schatten um zum normalen
ausstrahlung ausgesetzt, ohne
Zustand zurück zu gelangen.
dabe den Computer während der
Fahrt zu verwenden?
Das Hauptgerät wir in den normalen
Ist die Temperatur unter 0°C?
Status zurückkehren, sobald die
Temperatur steigt.
Aktuelle Geschwindigkeit: 0-199.9km/h 0-120.0m/h +/- 1%
Durchschnittliche Geschwindigkeit: 0-199.9km/h 0-120.0m/h +/- 1%
Maximale Geschwindigkeit: 0-199.9km/h 0-120.0m/h
+/- 1%
Tagesstrecke: 0-999.99km/mile +/- 0.1%
Gesamtstrecke: 0-999999km/mile +/- 0.1%
Fahrzeit: 0H:00M:00S-99H:59M:59S +/- 0.003%
Gesamtfahrzeit: 00H:00M-9999H:59M +/- 0.003%
12/24H Uhr: 1H:00M:00S-12H:59M:59S0H:00M:00S-23H:59M:59S +/- 0.03%
70 cm zwischen Sendegerät und Hauptgerät
0 C ~ 50 C (32 F ~ 122 F)
- 10 C ~ 60 C (14 F ~ 140 F)
3V Batterie x 1 (CR2032), Batterielebensdauer ist
ca. 1 Jahr. (Basis dafür ist eine Nutzung von 1.5
Stunden pro Tag)
Hauptgerät: 40.7 x 52.3 x 15.2 mm/ 27 gramm
Eléments à érifier
Solution
1. La pile est-elle usée?
1. Remplacer la pile.
2. Est-ce que la pile est
2. Vérifiez que le pôle positif de la pile
correcement installée?
fait bien face au couvercle de a pile.
1. Est-ce que vous êtes à
1. Reportez-vous à la procédure de
l'affichage MAIN UNIT SETUP
configuration des données puis effectuez
ou sur un autre écran?
le réglage requis.
2. Les positions relatives et le
2. Reportez-vous à la procédure de
jeu du capteur sont-ils
configuration puis vérifiez le
correctes?
positionnement du apteur et le compteur.
3. La circonférence est-elle
3.Reportez-vous à "Circumference
correcte?
Setting" puis saisissez la bonne valeur.
4. Est-ce que la distance du
4. Reportez-vous à la procédure de
compteur est trop long ou
configuration des données pour
l'angle d'installation du capteur
ajuster la distance ou l'angle entre le
incorrecte?
compteur et l'émetteur.
5.La pile du capteur est-elle
5. Remplacez l'ancienne avec une
usée?
pile neuve.
6. Y-a-t-il une source
6. Eloignez-vous de la source
d'interférence à proximité?
d'interférence.
Reportez-vous à "MAIN UNIT SETUP"
puis réinitialisez de nouveau le compteur.
Avez-vous laissé l'appareil à
Placez votre vélo à l'ombre pour
la lumière directe du soleil
revenir à une température nomale.
sans utliser votre vélo
Il n'y a pas d'effets négatifs sur les
pendant une longue période?
informations en mémoire.
Le compteur reviendra à son état normal
La température est-elle en
dès que la température augmente.
desous de 0°C (32°F) (32°F)?
Vitesse instantanée: 0-199.9km/h 0-120.0m/h +/- 1%
Vitesse moyenne: 0-199.9km/h 0-120.0m/h
+/- 1%
Vitesse maximum: 0-199.9km/h 0-120.0m/h
+/- 1%
Distance parcourue: 0-999.99km/mile +/- 0.1%
Odomètre: 0-999999km/mile +/- 0.1%
Temps écoulé de la sortie: 0H:00M:00S-99H:59M:59S +/- 0.003%
Temps écoulé totale: 00H:00M-9999H:59M +/- 0.003%
Horloge 12/24H: 1H:00M:00S-12H:59M:59S0H:00M:00S-23H:59M:59S +/- 0.03%
70cm entre l'émetteur et le compteur
0 C ~ 50 C (32 F ~ 122 F)
- 10 C ~ 60 C (14 F ~ 140 F)
3V battery x 1 (CR2032), la durée d'une pile est de l'ordre
d'un an. (En utilisant le compteur 1,5 heures par jour )
Dimension du boîtier: 40.7 x 52.3 x 15.2mm/ 27g
Oplossing
1. Is de batterij leeg?
1. Vervang de batterij.
2. Is de batterij verkeerd
2. Zorg dat de + kant van de
geïnstalleerd?
batterij naar de deksel is gericht.
1. Staat de computer in een
1. Lees de installatieprocedure en
installatie- of klok instelscherm?
voor de benodigde aanpassingen uit.
2. Is de positie van de scensor en
2. Zie "Installatie" en pas de correcte
de magneet of de ruimte er
positie en de afstand toe.
tussen goed?
3 Lees "Instellen Wielomtrek"en voer
3. Is de wielomtrek correct?
de juiste waarde in.
4. Is de afstand tussen de zender
4. Zie "Installatie" en pas de afstand
en de computer te groot of is de
en de hoek tussen de computer en
sensor onder een verkeerde hoek
sensor aan.
geïnstalleerd?
5. Vervang de batterij met een
5. Is de batterij van de sensor
nieuwe.
bijna leeg?
6. Ga bij de interfererende bron
6. Is er een sterk interfererend
vandaan.
apparaat in de buurt?
Lees de installatieprocedure en stel
de computer opnieuw in.
Heeft de computer lange tijd in
De computer zal weer normaal
direct zonlicht gestaan?
functioneren als de temperatuur
stijgt.
Is de temperatuur onder 0°C
Plaats de computer in de schaduw
(32°F)?
om het probleem te verhelpen. Dit
heeft geen effect op de gegevens.
Specificatie
Functies
Huidige snelheid
0-199.9km/h 0-120.0m/h +/- 1%
Gemiddelde snelheid 0-199.9km/h 0-120.0m/h
+/- 1%
Maximale snelheid
0-199.9km/h 0-120.0m/h
+/- 1%
Dagafstand
0-999.99km/mile +/- 0.1%
Totaal afstand
0-999999km/mile +/- 0.1%
Rijtijd
0H:00M:00S-99H:59M:59S +/- 0.003%
Totale rijtijd
00H:00M-9999H:59M +/- 0.003%
12/24u klok
1H:00M:00S-12H:59M:59S0H:00M:00S-23H:59M:59S +/- 0.03%
70 cm tussen de zender en de computer
0 C ~ 50 C (32 F ~ 122 F)
- 10 C ~ 60 C (14 F ~ 140 F)
3V batterij x 1 (CR2032), batterij gaat ongeveer 1 jaar mee.
(gebaseerd op een gemiddeld gebruik van 1,5 uur per dag)
Computer: 40.7 x 52.3 x 15.2mm/ 27g
A revisar
Solución
1. Está agotada la batería?
1. Sustituya la batería
2. Está correctamente instalada la
2. Asegúrese que el polo positivo
batería?
de la batería apunta a la tapa de la
misma.
1.Mire las indicaciones de los
1. Se encuentra en la pantalla de
SET UP de la unidad principal, o
ajustes de la unidad y complete el
ajuste completo de los mismos.
en alguna otra pantalla de ajuste?
2. Revise las indicaciones de
2. Están buen sujetos y alineados
instalación y realinee o recoloque
el sensor y el imán de la rueda?
3. Es correcta la medida de la
si fuera necesario.
3. Revise el "Ajuste de
cricunferencia?
circunferencia" e introduzca el
4. Es la distancia entre el sensor
valor correcto.
y la unidad principal correcta?
5. Está la batería del agotada?
4. Revise las indicaciones de
instalación y revise la distancia
6. Hay alguna fuente de
entre la unidad principal y el sensor.
interferencias cercana?
5. Cambie la batería.
6. Aléjese de la fuente de
interferencia.
Revise las indicaciones del "SET
UP DE LA UNIDAD PRINCIPAL" y
reinicie el computador de nuevo.
Ha dejado la unidad principal bajo
Coloque la unidad principal en la
la luz solar directa o no lo ha usado
sombra para que vuelva a su
durante mucho tiempo?
estado normal. Los datos no se
verán afectados.
Es la temperatura inferior a 0°C
La unidad volverá a su estado
(32°F)?
normal cuando suba la temperatura.
Velocidad actual: 0-199.9km/h 0-120.0m/h +/- 1%
Velocidad media: 0-199.9km/h 0-120.0m/h
+/- 1%
Velocidad máxima: 0-199.9km/h 0-120.0m/h
+/- 1%
Distancia del recorrido: 0-999.99km/mile +/- 0.1%
Odómetros-Distancia TOTAL de la unidad: 0-999999km/mile +/- 0.1%
Tiempo de ruta: 0H:00M:00S-99H:59M:59S +/- 0.003%
Tiempo TOTAL de rutas: 00H:00M-9999H:59M +/- 0.003%
Reloj 12/24h: 1H:00M:00S-12H:59M:59S0H:00M:00S-23H:59M:59S +/- 0.03%
70cm entre el transmisor y la unidad principal
0 C ~ 50 C (32 F ~ 122 F)
- 10 C ~ 60 C (14 F ~ 140 F)
3V batería x 1 (CR2032), la duración media de la
batería es de aproximadamente 1 año.
(Basada en un uso medio de 1,5h diarias)
Unidad principal: 40.7 x 52.3 x 15.2mm/ 27g
Verifique
Solução
1. A bateria está gasta?
1. Substitua a bateria.
2. A bateria está instalada de
2. Assegure-se que o polo positivo
forma incorreta?
da bateria está virado para a tampa
do compartimento.
1. Está no ecrã MAIN UNIT
1. Consulte o procedimento de
configuração e complete o ajuste.
SETUP ou noutro ecrã de
configuração?
2. Consulte Instalação e reajuste
2. A posição relativa do sensor e
aposição e intervalo corretamente.
do magneto está correta?
3. Consulte "PERÍMETRO DA
RODA" e insira o valor correto.
3. O perímetro da roda está certo?
4. A distância de deteção é longa
4. Consulte Instalação e ajuste a
ou o ângulo de instalação
distância e ângulo entre a unidade
incorreto?
principal e o sensor .
5. A bateria do sensor está gasta?
5. Substitua a bateria.
6. Existe alguma interferência
6. Afaste-se da fonte de interferência.
forte nas proximidades?
Consulte "CONFIGURAÇÃO DA
UNIDADE" e inicie o ciclómetro de
novo.
Deixou a unidade principal
Coloque a unidade à sombra até
que volte à situação normal. Sem
durante muito tempo sob luz solar
efeito adverso sobre a informação.
direta sem utilizar a bicicleta?
A temperatura é inferior a 0ºC
A unidade regressará ao estado
(32ºF)?
normal quando a temperatura subir.
Funções
Especificações
Velocidade atual
0-199.9km/h 0-120.0m/h +/- 1%
Velocidade média
0-199.9km/h 0-120.0m/h
+/- 1%
Velocidade máxima
0-199.9km/h 0-120.0m/h
+/- 1%
Distância da jornada
0-999.99km/milhas +/- 0.1%
Odómetro
0-999999km/milhas +/- 0.1%
Duração da jornada
0H:00M:00S-99H:59M:59S +/- 0.003%
Tempo total de utilização 00H:00M-9999H:59M +/- 0.003%
Relógio 12/24h
1H:00M:00S-12H:59M:59S0H:00M:00S-23H:59M:59S +/- 0.03%
70cm entre o transmissor e a unidade principal
0 C ~ 50 C (32 F ~ 122 F)
- 10 C ~ 60 C (14 F ~ 140 F)
Bateria de 3V x 1 (CR2032), duração da bateria
cerca de 1 ano. (Baseado num uso diário médio
de 1,5 horas)
Unidade principal: 40.7 x 52.3 x 15.2mm/ 27g
Проверьте
Решение
1. Заменить батарейку
1. Села батарейка?
2. Убедитесь, что батарейка
2. Батарея установлена
установлена " " к верху и
неверно?
прилегает к крышке.
1. Находится ли в режиме
1. Закончите настройку
настройки экрана или другой
велокомпьютера.
настройки?
2. Установите датчик и магнит как в
2. Правильно ли установлен
инструкции.
датчик и магнит?
3. Обратитесь к разделу
3. Введено ли верное значение
"Настройка" и введите
окружности?
правильное значение окружности
4. Не превышен радиус
колеса.
действия или угол установки
4. См. Установки для регулировки
датчика?
расстояния или угол между
5. Разряжена ли батарейка
велокомпьютером и датчиком.
датчика?
5. Установите новую батарейку.
6. Есть рядом источник радио
6. Отойдите от источника помех.
помех?
Войдите в режим настройки
велокомпьютера и заново
установите все параметры и
включите.
Оставляли ли вы
Уберите велокопьютер в тень для
велокомпьютер под действием
возврат его в рабочее состояние.
прямых солнечных лучей
Не влияет на сохраненные данные.
надолго, пока не катались?
Возможно температура
Устройство вернется к
ниже 0 C ?
нормальному состоянию, когда
температура поднимется.
Функции
Спецификация
Текущая скорость
0-199.9км/ч 0-120.0м/ч +/- 1%
Средняя скорость
0-199.9км/ч 0-120.0м/ч +/- 1%
Максимальная скорость 0-199.9км/ч 0-120.0м/ч +/- 1%
Дистанция поездки
0-999.99км/миль +/- 0.1%
Одометр
0-999.99км/миль +/- 0.1%
Время поездки
00Ч:00М:00С-99Ч:59M:59С +/- 0.003%
Общее время поездки
00Ч:00M-9999Ч:59M +/- 0.003%
12/24-часовой формат часов 1Ч:00M:00С-12Ч:59M:59С 0H:00M:00S-23Ч:59M:59С +/- 0.03%
Дальность действия
безпроводного датчика:
70см между датчиком и велокомпьютером
Рабочая температура:
0 C ~ 50 C (32 F ~ 122 F)
Температура хранения:
- 10 C ~ 60 C (14 F ~ 140 F)
Батарейка:
Батарейка CR2032, срок работы 1 год. (В среднем при
работе 1.5 часа в день)
Размер и вес::
Велокомпьютер: 40.7 x 52.3 x 15.2мм/ 27гр

Manuels Connexes pour BBB BCP-15W


Sommaire des Matières pour BBB BCP-15W
- Page 1 (bcp-16w only) End Setting 6. TRT Setting 7. Function Screen Mode BCP-15W : CLK, DS, RT, AS, MS, ODO, SCAN BCP-16W : CLK, DS, RT, AS, MS, ODO, TRT, SCAN Current Speed 000000~999999 SCAN SCAN ...
- Page 2 Mode 6. TRT Setting (bcp-16w only) End Setting 7. Function Screen BCP-15W : CLK, DS, RT, AS, MS, ODO, SCAN BCP-16W : CLK, DS, RT, AS, MS, ODO, TRT, SCAN Current Speed 000000~999999 SCAN SCAN ...