Table des Matières
Publicité
Les langues disponibles
Les langues disponibles
Liens rapides
BEDIENUNGSANLEITUNG
USER'S MANUAL
MODE D'EMPLOI
MANUAL DEL USUARIO
UHF-215
Wireless Microphone Set
©
Für weiteren Gebrauch aufbewahren!
Copyright
Keep this manual for future needs!
Nachdruck verboten!
Gardez ce mode d'emploi pour des
Reproduction prohibited!
utilisations ultérieures!
Réproduction interdit!
Guarde este manual para posteriores usos.
Prohibida toda reproducción.
Publicité
Table des Matières

Manuels Connexes pour Omnitronic UHF-215

Sommaire des Matières pour Omnitronic UHF-215
- Page 1 BEDIENUNGSANLEITUNG USER'S MANUAL MODE D'EMPLOI MANUAL DEL USUARIO UHF-215 Wireless Microphone Set © Für weiteren Gebrauch aufbewahren! Copyright Keep this manual for future needs! Nachdruck verboten! Gardez ce mode d’emploi pour des Reproduction prohibited! utilisations ultérieures! Réproduction interdit! Guarde este manual para posteriores usos.
-
Page 2: Table Des Matières
You can find the latest update of this user manual in the Internet under: Vous pouvez trouvez la dernière version de ce mode d'emploi dans l'Internet sous: Vd. puede encontrar la versión más reciente de este manual en el Internet bajo: www.omnitronic.com... -
Page 3: Einführung
- sich die letzte Version der Anleitung im Internet herunter laden 1. EINFÜHRUNG Wir freuen uns, dass Sie sich für eine OMNITRONIC UHF-215 Drahtlos-Mikrofonanlage entschieden haben. Wenn Sie nachfolgende Hinweise beachten, sind wir sicher, dass Sie lange Zeit Freude an Ihrem Kauf haben werden. -
Page 4: Sicherheitshinweise
2. SICHERHEITSHINWEISE Dieses Gerät hat das Werk in sicherheitstechnisch einwandfreiem Zustand verlassen. Um diesen Zustand zu erhalten und einen gefahrlosen Betrieb sicherzustellen, muss der Anwender unbedingt die Sicherheits- hinweise und die Warnvermerke beachten, die in dieser Gebrauchsanweisung enthalten sind. Unbedingt lesen: Bei Schäden, die durch Nichtbeachtung dieser Bedienungsanleitung verursacht werden, erlischt der Garantieanspruch. - Page 5 Servicetechniker prüfen, bevor es erneut benutzt wird. Beschädigungen, die durch Flüssigkeiten im Gerät hervorgerufen wurden, sind von der Garantie ausgeschlossen. Vermeiden Sie Erschütterungen und jegliche Gewaltanwendung bei der Inbetriebnahme des Gerätes. Achten Sie bei der Wahl des Installationsortes darauf, dass das Gerät nicht zu großer Hitze, Feuchtigkeit und Staub ausgesetzt wird.
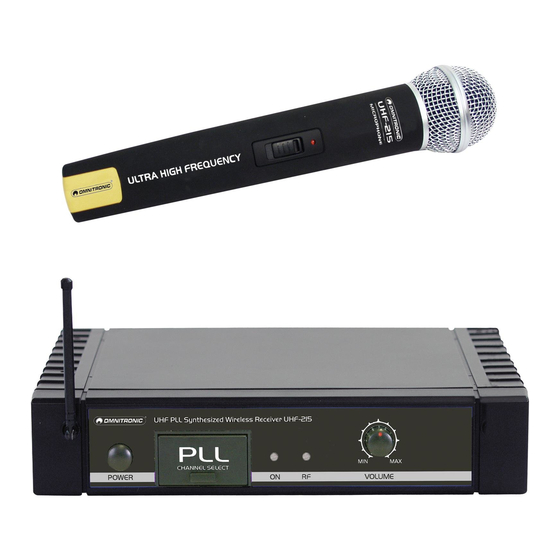
- Page 6 1. Netzschalter Über den Power-Schalter lässt sich das Gerät ein- bzw. ausschalten. 2. Abdeckung Klappen Sie die Abdeckung nach oben und wählen Sie den gewünschten Kanal über die Dip-Schalter aus. 3. Betriebsanzeige Die Power ON-LED leuchtet, wenn der Empfänger eingeschaltet ist. 4.
-
Page 7: Anschlüsse
1. Mikrofongitter Schützt die Mikrofonkapsel und trägt zur Verringerung von Atem- und Windgeräuschen bei. 2. Antenne 3. Batterie-Anzeige Zeigt die verfügbare Batteriekapazität an. Wenn diese Anzeige permanent aufleuchtet, sollte die Batterie gewechselt werden, bevor sie ganz aufgebraucht ist. 4. ON / MUTE / OFF-Schalter Schalten Sie das Mikrofon stumm um „Schaltgeräusche“... -
Page 8: Einlegen/Wechseln Der Batterien
Einlegen/Wechseln der Batterien Bitte beachten Sie auch die Hinweise unter Bestimmungsgemäße Verwendung. Schieben Sie den Batteriefachdeckel an der Geräteunterseite auf und entfernen Sie ihn. Werden verbrauchte Batterien ausgetauscht, entfernen Sie zunächst die verbrauchten Batterien aus dem Batteriefach. Ersetzen Sie immer nur den kompletten Batteriesatz. ACHTUNG! Explosionsgefahr bei unsachgemäßem Auswechseln der Batterie. -
Page 9: Problembehebung
• Wenn möglich, zwischen den Sender- und Empfängerantennen eine Sichtlinie aufrechterhalten. Aufstellung von Sender und Empfänger in der Nähe von Objekten aus Metall oder anderen dichten Werkstoffen vermeiden. • Aufstellung des Empfängers in der Nähe von Computern oder anderen HF-erzeugenden Geräten vermeiden. -
Page 10: Reinigung Und Wartung
verrauscht oder enthält Möglicherweise werden zwei Sender auf der gleichen Frequenz betrieben. Ist Nebentöne. dies der Fall, einen der Sender abschalten. Möglicherweise ist das Signal zu schwach. Wenn möglich, Empfänger näher beim Sender aufstellen. Empfängerrauschsperre einstellen. Der Empfänger rauscht Empfängerrauschsperre einstellen. bei ausgeschaltetem HF-Interferenzquellen, wie z.B. -
Page 11: Technische Daten
9. TECHNISCHE DATEN System: Non-diversity, Einkanal Trägerfrequenz: UHF 842,000-862,600 MHz (16 K.) 842,000 MHz, 842,400 MHz, 844,800 MHz, 846,800 MHz, 850,000 MHz, 854,000 MHz, 859,600 MHz, 845,000 MHz, 845,400 MHz, 847,800 MHz, 849,800 MHz, 853,000 MHz, 857,000 MHz, 862,600 MHz, 855,800 MHz, 856,200 MHz Frequenzstabilität: ±... -
Page 12: Introduction
- download the latest version of the user manual from the Internet 1. INTRODUCTION Thank you for having chosen an OMNITRONIC UHF-215. If you follow the instructions given in this manual, we can assure you that you will enjoy this device for many years. -
Page 13: Safety Instructions
2. SAFETY INSTRUCTIONS This device has left our premises in absolutely perfect condition. In order to maintain this condition and to ensure a safe operation, it is absolutely necessary for the user to follow the safety instructions and warning notes written in this user manual. Important: Damages caused by the disregard of this user manual are not subject to warranty. - Page 14 When choosing the installation-spot, please make sure that the device is not exposed to extreme heat, moisture or dust. There should not be any cables lying around. You endanger your own and the safety of others! Do not operate the device in extremely hot (more than 30° C) or extremely cold (less than 5° C) surroundings.
-
Page 15: Rear Panel
3. Power-LED Glows when the receiver is on. 4. RF-LED Glows when microphone signals are being received. 5. Volume-Control Controls the output level to mixer or amplifier. Rear panel 1. Audio-output sockets For 6,3 mm stereo jacks, unbalanced and 3-pin XLR-connectors, balanced. 2. -
Page 16: Connections
Microphone 1. Microphone Grille Protects capsule and prevents „pop“ noise. 2. Antenna 3. Battery Indicator When this light glows permanently, change the battery. 4. ON / MUTE / OFF-Switch Mute the microphone to prevent sounds from being transmitted to the receiver To conserve the battery, turn off the microphone when not in use. -
Page 17: Inserting/Replacing The Batteries
Inserting/Replacing the batteries Please refer to the explanations under Operating Determinations. Open the battery cover on the bottom and remove it. If replacing the batteries, remove the old batteries from the battery compartment. Only replace complete battery-sets. Caution! Danger of explosion when battery is replaced improperly. Only replace by the same type or similar types recommended by the manufacturer. -
Page 18: Squelch Adjustment
For optimum receiving please follow these instructions: • Maintain a line-of-sight between the transmitter and receiver antennas, if possible. Avoid placing transmitter and receiver where metal or other dense materials may be present. • Avoid placing the receiver near computers or other RF generating equipment. Adjust the signal output level via the Volume-control. -
Page 19: Cleaning And Maintenance
8. CLEANING AND MAINTENANCE DANGER TO LIFE! Disconnect from mains before starting maintenance operation! We recommend a frequent cleaning of the device. Please use a soft lint-free and moistened cloth. Never use alcohol or solvents! There are no servicable parts inside the device except for the batteries. Maintenance and service operations are only to be carried out by authorized dealers. -
Page 20: Technical Specifications
9. TECHNICAL SPECIFICATIONS System: Non-diversity, one channel Carrier frequency: UHF 842.000-862.600 MHz (16 ch) 842.000 MHz, 842.400 MHz, 844.800 MHz, 846.800 MHz, 850.000 MHz, 854.000 MHz, 859.600 MHz, 845.000 MHz, 845.400 MHz, 847.800 MHz, 849.800 MHz, 853.000 MHz, 857.000 MHz, 862.600 MHz, 855.800 MHz, 856.200 MHz Frequency stability: ±... -
Page 21: Introduction
- télécharger la version ultérieure du mode d'emploi d'Internet 1. INTRODUCTION Nous vous remercions d'avoir choisi un OMNITRONIC UHF-215. Si vous respectez les instructions de service suivantes, vous allez profiter longtemps de votre achat. Sortez l'OMNITRONIC UHF-215 de son emballage. -
Page 22: Instructions De Sécurité
2. INSTRUCTIONS DE SECURITE Cet appareil a quitté les ateliers dans un état irréprochable. Pour assurer un bon fonctionnement, sans danger, l'utilisateur doit suivre les instructions contenues dans ce mode d'emploi. Attention: Tout dommage occasionné par la non observation des instructions de montage ou d'utilisation n'est pas couvert par la garantie. - Page 23 Ne déposez jamais de liquide sur l'appareil. Si toutefois, du liquide devait s'infiltrer dans l'appareil, quiter les piles immédiatement, puis le faire vérifier par un technicien compétent avant de le réutiliser. Les dommages causés par l'infiltration de liquides ne sont pas couverts par la garantie. Eviter les secousses et l'emploi de force lors de l’installation ou l'utilisation de l'appareil.
- Page 24 3. Indicateur ON Le témoin s'allume lorsque le récepteur est en marche. 4. Indicateur RF Le témoin's allume lorsque lea liaison RF est établie. 5. Régulateur Volume Permet de régler le niveau en entrée du mélangeur ou l'amplificateur. 1. Douilles de sortie XLR tripolaire, symétrique et jack 6,35 mm, asymétrique.
-
Page 25: Connexions
Microphone 1. Grille de microphone 2. Antenne 3. Indicateur de charge insuffisante de la pile 4. Interrupteur marche / coupre audio / arrêt d'alimentation Pour économiser la pile, mettre l'appareil hors tension lorsu'il n'est pas utiliseé. 5. Couverture des piles 6. -
Page 26: Maniement
Ouvriez le couverle des piles sur la face inférieure et retirez-le. Quand vous remplacez les piles, retirez les piles du compartement des piles avant. Attention! Risque d'explosion quand remplacer les piles incompétentement. Seuelement remplacer avec le même type ou un type recommandé par le fabricant. Écarter les piles usées après les instructions du fabricant. -
Page 27: Problemes
7. PROBLEMES PROBLEME: SOLUTION: L'alimentation ne Contrôler le câble de connexion et les rallonges. s'enclenche pas. Aucun son. Le DEL RF du S’assurer que l’émetteur et le récepteur sont sous tension (interrupteurs récepteur est éteinte. d’alimentation sur “Marche”) Vérifier l’indicateur de charge de l’émetteur pour s’assurer que la pile n’est pas épuisée. -
Page 28: Charactéristiques Téchniques
9. CHARACTERISTIQUES TECHNIQUES Système: Monocanal Fréquence porteuse: UHF 842,000-862,600 MHz (16 c.) 842,000 MHz, 842,400 MHz, 844,800 MHz, 846,800 MHz, 850,000 MHz, 854,000 MHz, 859,600 MHz, 845,000 MHz, 845,400 MHz, 847,800 MHz, 849,800 MHz, 853,000 MHz, 857,000 MHz, 862,600 MHz, 855,800 MHz, 856,200 MHz Stabilité... -
Page 29: Introducción
-pasar el manual a cada sucesivo poseedor o usuario del producto -descargar la última versión del manual del Internet 1. INTRODUCCIÓN Gracias por haber elegido un OMNITRONIC UHF-215. Desembale su UHF-215. Antes de la puesta en marcha inicial, por favor asegúrese de que no hay daños causados durante el transporte. -
Page 30: Instrucciones De Seguridad
2. INSTRUCCIONES DE SEGURIDAD Este aparato ha salido de nuestro establecimiento en absolutas perfectas condiciones. Para mantener esta condición y asegurar un manejo seguro, es absolutamente necesario para el usuario seguir las instrucciones de seguridad y notas de advertencia escritas en este manual del usuario. Importante: Los daños causados por no hacer caso de las instrucciones de este manual del usuario no están sujetos a garantía. - Page 31 en funcionamiento. ¡Cualquier desperfecto ocasionado por líquido que haya entrado en el aparato no está sujeto a garantía! No agite el aparato. Evite hacer excésiva fuerza durante la instalación y el manejo del aparato. Cuando buscar el sitio de instalación, por favor asegúrese de que el aparato no está expuesto a calor extremo, humedad o polvo.
-
Page 32: Panel Posterior
3. Indicator ON Cuando poner en marcha, del LED ON radia. 4. Indicator RF Cuando el receptor recibe de señales del micrófono, el RF indicador radia. 5. Regulador Volume Ajusta el volumen de salida del receptor. Panel posterior 1. Casquillos de salida Admite un conector XLR macho y un cable de ¼... -
Page 33: Conexiones
Se ilumina en rojo cuando a la batería le queda carga para una hora o menos, por lo que debe cambiarse. 4. Interruptor ON / MUTE / OFF Póngalo en la posición ON para que el emisor fucione normalmente. Póngalo en la posición MUTE para evitar que se transmitan sonidos hacia el receptor 5. -
Page 34: Operación
Las pilas no pueden ser arrojadas a los residuos domésticos. Por favor depositarlas en vertedero especial cercano. 6. OPERACIÓN Puede apagar o desapagar el aparato mediante el interruptor ON/OFF. Cuando el receptor recibe de señales del micrófono, el RF indicador radia. Para una recepción optimale sigue los instrucciones siguientes: •... -
Page 35: Solución De Problemas
7. SOLUCIÓN DE PROBLEMAS PROBLEMA: SOLUCION: La alimentación no se conecta. Compruebe el cable de conexión y cables de extension. Ningún sonido; el LED RF está Asegurarse que los interruptores ON/OFF están conectados en el apagado. emisor y en el receptor. Observar el DEL Power del emisor para determinar si la batería está... -
Page 36: Especificaciones Técnicas
9. ESPECIFICACIONES TÉCNICAS Sistema: Un canal Frecuencia portadora: UHF 842,000-862,600 MHz (16 c.) 842,000 MHz, 842,400 MHz, 844,800 MHz, 846,800 MHz, 850,000 MHz, 854,000 MHz, 859,600 MHz, 845,000 MHz, 845,400 MHz, 847,800 MHz, 849,800 MHz, 853,000 MHz, 857,000 MHz, 862,600 MHz, 855,800 MHz, 856,200 MHz Stabilidad de frecuencia: ±0,005 %...