Table des Matières
Publicité
Les langues disponibles
Les langues disponibles
Liens rapides
Turntable
Cher Client,
Merci d'avoir choisi la platine Elipson.
Prenez le temps de lire attentivement ce mode d'emploi avant d'installer votre platine.
Il contient des conseils pour en tirer le meilleur profit et des instructions pour l'utiliser sans risque.
Nous vous recommandons vivement de conserver l'emballage et ce mode d'emploi
pour d'éventuels usages ultérieurs.
Publicité
Table des Matières

Manuels Connexes pour Elipson Alpha 100


Sommaire des Matières pour Elipson Alpha 100
- Page 1 Turntable Cher Client, Merci d’avoir choisi la platine Elipson. Prenez le temps de lire attentivement ce mode d’emploi avant d’installer votre platine. Il contient des conseils pour en tirer le meilleur profit et des instructions pour l’utiliser sans risque. Nous vous recommandons vivement de conserver l’emballage et ce mode d’emploi...
- Page 2 AVERTISSEMENT VOTRE PLATINE VINYLE N’EST PAS PRÊTE POUR UN USAGE IMMÉDIAT. VOUS DEVEZ IMPÉRATIVEMENT SUIVRE LES INSTRUCTIONS D’INSTALLATION AVANT TOUTE UTILISATION.
- Page 3 II. CONTENU Avant utilisation, vérifier la présence des éléments ci-dessous : Notice Alimentation Câble RCA + masse Câble RCA d’installation secteur (Alpha 50, Alpha 100 (autres modèles) et Omega 100) OM10 35,27 mm 34,0 mm Gabarit Courroie Feutrine Centreur de réglage...
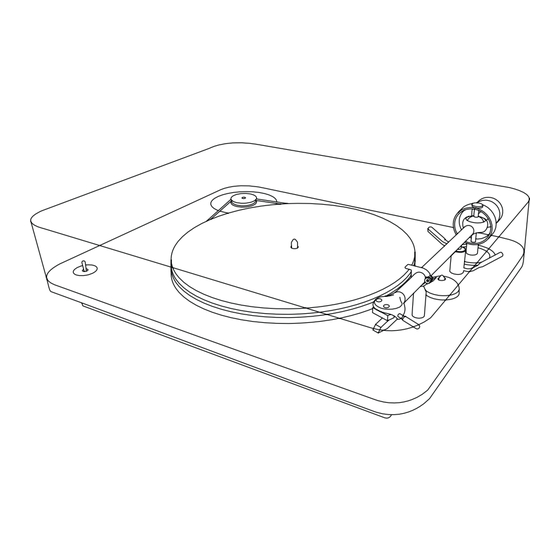
- Page 4 III. DESCRIPTION 1. Couvercle 2. Poulie 3. Courroie 4. Bras 5. Plateau 6. Châssis...
- Page 5 7. Sélecteur 33 tours / 0 (off) / 45 tours 8. Feutrine 9. Molette de réglage anti-skating 10. Contre-poids 11. Lève-bras* 12. Centreur 13. Support bras 14. Porte-cellule 15. Cellule * Omega 100 RIAA BT Carbon Black uniquement...
-
Page 6: Préparation
IV. INSTALLATION 1. PRÉPARATION Durant le transport, le couvercle amovible et les différents éléments de la platine sont bloqués par des cales. • Retirer délicatement les mousses protectrices du plateau (1 et 2), du bras (3 et 4), et de la poulie moteur (5). - Page 7 • Mise en place de la courroie : - de la main gauche, maintenir doucement la courroie dans la rainure de la poulie prévue à cet effet - avec la main droite, tendre la courroie de la poulie vers le plateau en évitant de l’étirer - enrouler délicatement la courroie autour du plateau sans faire de plis.
- Page 8 2. RÉGLAGE DU CONTRE-POIDS VOTRE PLATINE ELIPSON A ÉTÉ RÉGLÉE EN USINE AFIN DE GARANTIR UNE UTILISATION OPTIMALE. CES RÉGLAGES SONT UNIQUEMENT DESTINÉS AUX UTILISATEURS AVERTIS. Le contre-poids permet d’équilibrer le bras en fonction du poids de la cellule. Chaque modèle de cellule ayant un poids différent, il convient de régler le poids en fonction.
- Page 9 • Pour une cellule Ortofon 2M Red, le poids idéal est de 1,8g (force d’appui : 1,6g-2,0g). L’ENSEMBLE DES OPÉRATIONS D’INSTALLATION DE VOTRE PLATINE EST TERMINÉ. L’ÉCOUTE DE VOTRE PREMIER DISQUE VINYLE SUR LA PLATINE ELIPSON EST DÉSORMAIS POSSIBLE. PENSEZ AU DISQUE ELIPSON POUR LE RODAGE DE VOS APPAREILS HIFI. EN CAS DE DOUTE, VEUILLEZ CONTACTER...
-
Page 10: Connexion Analogique
V. BRANCHEMENTS MODÈLES : 1. CONNEXION ANALOGIQUE NÉCESSITE UN AMPLIFICATEUR HIFI AVEC ENTRÉE PHONO OU UN MODULE RIAA EXTERNE. • Connecter la platine à l’entrée phono d’un ampli via le câble RCA fourni muni d’un fil de masse en respectant les polarités (droite) et (gauche). - Page 11 MODÈLES : 1. CONNEXION ANALOGIQUE CONNECTER DIRECTEMENT À L’ENTRÉE DE LIGNE D’UN AMPLI HIFI. NE PAS CONNECTER À UNE ENTRÉE PHONO. • Sélectionner le type de cellule dont votre platine est équipée (MM par défaut) : MC : moving coil (bobine mobile) MM : moving magnet (aimant mobile) •...
- Page 12 • Le jumelage entre les deux appareils est automatique. La LED bleue de la platine devient fixe. Votre récepteur Bluetooth est maintenant connecté à la platine. * modèles disposant de la connexion Bluetooth : Alpha 100 RIAA BT, Omega 100 RIAA BT...
-
Page 13: Remarques
Si vous rencontrez des difficultés pour l’appairage, vérifiez qu’il n’y a pas d’autre appareil connecté en Bluetooth. Si les difficultés persistent, il peut être nécessaire de réinitialiser la mémoire de la platine. • Brancher la platine. Attendre 5 secondes. La LED bleue de la platine clignote lentement. •... -
Page 14: Réglages Optionnels
VII. RÉGLAGES OPTIONNELS VOTRE PLATINE ELIPSON A ÉTÉ RÉGLÉE EN USINE AFIN DE GARANTIR UNE UTILISATION OPTIMALE. CES RÉGLAGES SONT UNIQUEMENT DESTINÉS AUX UTILISATEURS AVERTIS. 1. ANTI-SKATING (OU ANTI-DÉRAPAGE) Lorsque la platine tourne, le frottement du diamant dans le sillon du vinyle crée une force qui attire le bras vers le centre de la platine. -
Page 15: Enregistrement Usb (Selon Les Modèles*)
• Lancer le logiciel spécialisé (non fourni). • Démarrer la lecture du disque et procéder à l’enregistrement. * modèles disposant du port USB : Alpha 100 RIAA BT, Omega 100 RIAA BT. ** nécessite un logiciel spécialisé non fourni. Il en existe de nombreux téléchargeables gratuitement. - Page 16 COMMENT RÉEMBALLER VOTRE PLATINE POUR LE TRANSPORT L’EMBALLAGE ET LES MOUSSES DE PROTECTION ONT ÉTÉ SPÉCIALEMENT DÉVELOPPÉS POUR PROTÉGER VOTRE PLATINE DURANT LE TRANSPORT. NOUS VOUS RECOMMANDONS FORTEMENT DE SUIVRE LES INSTRUCTIONS SUIVANTES SI VOUS SOUHAITEZ TRANSPORTER VOTRE PLATINE, AFIN D’ÉVITER TOUS DOMMAGES ET DÉGÂTS MATÉRIELS.
- Page 17 Alimentation secteur...
-
Page 18: Caractéristiques
GARANTIE La platine Elipson est conçue et fabriquée suivant les meilleurs standards de qualité. Si votre platine Elipson présente un défaut, Elipson ou un revendeur agréé pourra prendre en charge la réparation dans les limites de cette garantie. - Page 19 The Bluetooth word mark and logos are owned by the Bluetooth SIG, Inc. and any use of such marks by Elipson is under license. Other trademarks and trade names are those of their respective owners.
- Page 21 Dear Customer, Thank you for choosing Elipson turntable. Take time to read this manual carefully before installing your turntable. It contains all the safety and operating instructions that should be followed to optimize the performances of your turntable. We highly recommend you to retain both...
- Page 22 WARNING YOUR TURNTABLE IS NOT READY FOR IMMEDIATE USE. YOU MUST FOLLOW THESE INSTRUCTIONS OF INSTALLATION BEFORE ANY USE.
- Page 23 II. CONTENT Before use, confirm that the following items are included : User manual Power source RCA cable + ground wire RCA cable adaptator (Alpha 50, Alpha 100 (other models) and Omega 100) OM10 35,27 mm 34,0 mm Setting gauge...
- Page 24 III. DESCRIPTION 1. Lid 2. Pulley 3. Belt 4. Tonearm 5. Plate 6. Chassis...
- Page 25 7. 33 rpm / 0 (off) / 45 rpm Switch 8. Felt 9. Anti-skating trackwheel 10. Counterweight 11. Cue control lever* 12. Centralizer 13. Tonearm support 14. Cartridge-holder 15. Cartridge * Omega 100 RIAA BT Carbon Black only...
- Page 26 IV. SET UP 1. PREPARATION During transport, the removable lid and the various elements of the turntable are secured by foam wedges. • Carefully remove the protective foams of the plate (1 & 2), the tonearm (3 & 4), and the motor pulley (5).
- Page 27 • Setting up the belt : - with the left hand, gently hold the belt in the slot of the pulley. - with the right hand, tension the belt from the pulley to the plate avoiding stretching. - carefully wrap the belt around the plate avoiding folds. Check out our video tutorial on Youtube : https://youtu.be/PtjOU4I1WAU Or scan the code with a smartphone to go...
- Page 28 2. COUNTERWEIGHT SETUP YOUR ELIPSON TURNTABLE WAS SET IN FACTORY TO ENSURE OPTIMUM UTILISATION. THESE ADJUSTMENTS ARE FOR ADVISED USERS ONLY. The counterweight balances the tonearm depending on the weight of the cartridge. Each cartridge model having a different weight, you should set the weight accordingly.
- Page 29 YOU CAN NOW LISTEN TO YOUR FIRST VINYL DISC ON ELIPSON’S TURNTABLE. FOR THE RUNNING-IN PHASE OF YOUR HI-FI DEVICES, ELIPSON DEVELOPED A DISC SUITABLE TO YOUR SYSTEM. CONTACT US FOR MORE INFORMATIONS. IF IN DOUBT, PLEASE CONTACT AN ELIPSON PROFESSIONAL.
- Page 30 V. CONNECTING MODELS : 1. ANALOG CONNECTION REQUIRES HIFI AMPLIFIER WITH PHONO INPUT OR EXTERNAL RIAA MODULE. • Connect the turntable to the phono input of your amplifier using the provided RCA cable respecting the polarity : (right) and (left). •...
- Page 31 MODELS : 1. ANALOG CONNECTION CONNECT DIRECTLY TO THE AUDIO AMPLIFIER LINE-IN. DO NOT CONNECT TO A PHONO INPUT. • Select the type of cartridge equipping your turntable (MM by default) : MC : moving coil MM : moving magnet •...
- Page 32 The turntable’s blue LED flashes slowly. • The pairing between both devices is automatic. The turntable’s blue LED remains on. Your Bluetooth receiver is now connected to the turntable. * models with Bluetooth connection : Alpha 100 RIAA BT, Omega 100 RIAA BT...
-
Page 33: Operating
If you have trouble pairing, check that there is no other device connected via Bluetooth. If there is still trouble, you may need to reset the memory of the turntable. • Plug in the turntable. Wait for 5 seconds. The turntable’s blue LED flashes slowly. •... -
Page 34: Optional Setup
VII. OPTIONAL SETUP YOUR ELIPSON TURNTABLE WAS SET IN FACTORY TO ENSURE OPTIMUM UTILISATION. THESE ADJUSTMENTS ARE FOR ADVISED USERS ONLY. 1. ANTI-SKATING When the turntable is operating, the friction of the diamond in the vinyl furrow creates a force that pulls the tonearm towards the center of the turntable. - Page 35 • Select “Hardware and Sound” • Click on “Sound” then “Recording” • Select “Elipson” in the list of available devices then click “by default” to save your choice. • Check the input volume, increase it if needed. • Run the software (not provided).
- Page 36 HOW TO REPACK YOUR TURNTABLE FOR TRANSPORT THE PACKAGING AND PROTECTIVE FOAMS HAVE BEEN SPECIALLY DEVELOPED TO PROTECT YOUR TURNTABLE DURING TRANSPORT. WE HIGHLY RECOMMEND YOU TO FOLLOW THESE INSTRUCTIONS IF YOU WISH TO MOVE YOUR TURNTABLE, IN ORDER TO AVOID ANY DAMAGE. Check out our video tutorial on Youtube : https://youtu.be/sXAt7Vz3mgg Or scan the code with a smartphone to go...
- Page 37 Power source adaptator...
- Page 38 Elipson turntable has been designed and manufactured to the highest quality standards. If something goes wrong with your product, Elipson or its authorized distributor / dealer will handle the service and repair under these limited warranty terms. This limited warranty is...
- Page 39 Elipson equipment. If you cannot contact your original dealer, or if you are using your Elipson product outside the purchase country, you should contact Elipson national distributor in the residence country, who will advise where the equipment can be serviced.
- Page 40 www.elipson.com...