Table des Matières
Publicité
Les langues disponibles
Les langues disponibles
Liens rapides
Publicité
Chapitres
Table des Matières

Manuels Connexes pour Elipson Chroma 200


Sommaire des Matières pour Elipson Chroma 200
- Page 1 Platine vinyle...
-
Page 2: Table Des Matières
Cher Client, Merci d’avoir choisi notre platine Elipson. Prenez le temps de lire attentivement ce mode d’emploi avant d’installer votre platine. Il contient des conseils pour en tirer le meilleur profit et des instructions pour l’utiliser sans risque. Nous vous recommandons vivement de conserver l’emballage et ce mode d’emploi pour d’éventuels usages ultérieurs. -
Page 3: Déballage
I. DÉBALLAGE Poser le carton dans une Repérer le sens Ouvrir le carton avec zone claire et dégagée. d’ouverture du carton. précaution et retirer la mousse protectrice. Dégager le couvercle du carton, sortir la platine et la déposer sur une surface plane et dégagée. II. -
Page 4: Description
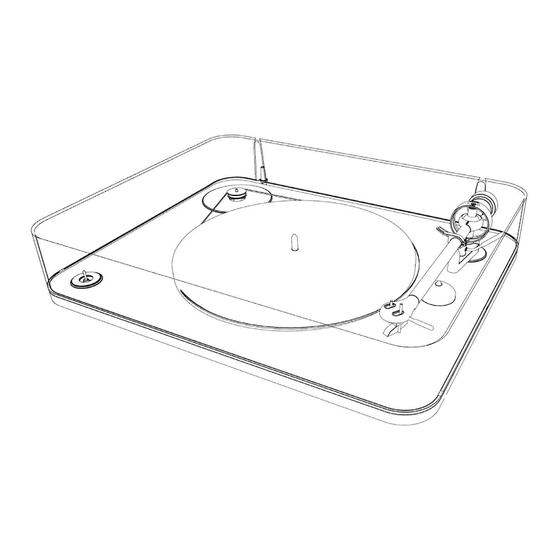
III. DESCRIPTION 1. Couvercle 2. Poulie 3. Courroie 4. Bras 5. Plateau 6. Châssis 7. Sélecteur 33 tours / 0 (off) / 45 tours 8. Feutrine 9. Molette de réglage anti-skating 10. Contre-poids 11. Lève-bras 12. Centreur 13. Support bras 14. -
Page 5: Installation
IV. INSTALLATION 1. PRÉPARATION Durant le transport, le couvercle amovible et les différents éléments de la platine sont bloqués par des cales. • Retirer délicatement les mousses protectrices du plateau (1 et 2), du bras (3) et de la rotule (4). - Page 6 • Vérifier le niveau de planéité de la platine, l’ajuster grâce aux pieds réglables si besoin. 2. RÉGLAGE DU CONTRE-POIDS VOTRE PLATINE ELIPSON A ÉTÉ RÉGLÉE EN USINE AFIN DE GARANTIR UNE UTILISATION OPTIMALE. CES RÉGLAGES SONT UNIQUEMENT DESTINÉS AUX UTILISATEURS AVERTIS.
- Page 7 • Régler le contre-poids afin d’obtenir la force d’appui optimale pour chaque cellule. Balance digitale Elipson (en option) Précision : 0,01g ** si vous utilisez une cellule différente de celle fournie avec la platine Elipson, ne tenez pas compte de ces informations, et référez-vous au modèle de cellule choisi. * données constructeur...
- Page 8 L’ENSEMBLE DES OPÉRATIONS D’INSTALLATION DE VOTRE PLATINE EST TERMINÉE. L’ÉCOUTE DE VOTRE PREMIER DISQUE VINYLE SUR LA PLATINE ELIPSON EST DÉSORMAIS POSSIBLE.
-
Page 9: Branchements
V. BRANCHEMENTS MODÈLES NON PRÉ-AMPLIFIÉS CONNEXION ANALOGIQUE NÉCESSITE UN AMPLIFICATEUR HIFI AVEC UNE ENTRÉE PHONO OU UN MODULE RIAA EXTERNE. • Connecter la platine à l’entrée phono d’un ampli via le câble RCA fourni muni d’un fil de masse en respectant les canaux (droite) et (gauche). - Page 10 MODÈLES PRÉ-AMPLIFIÉS ET MODÈLES BLUETOOTH 1. CONNEXION ANALOGIQUE CONNECTER DIRECTEMENT À L’ENTRÉE DE LIGNE D’UN AMPLI HIFI. NE PAS CONNECTER À UNE ENTRÉE PHONO. • Sélectionner le type de cellule dont votre platine est équipée (MM par défaut) : MC : moving coil (bobine mobile) MM : moving magnet (aimant mobile) •...
- Page 11 2. CONNEXION NUMÉRIQUE SANS-FIL BLUETOOTH (SELON LES MODÈLES*) Certains modèles de platine vinyle Elipson sont munis d’un émetteur Bluetooth aptX pour vos récepteurs sans-fil. Le signal Bluetooth sera renvoyé vers votre système hifi sans-fil. Votre récepteur doit être muni d’un contrôle du volume, que vous devrez ajuster à un volume faible avant toute utilisation.
-
Page 12: Fonctionnement
Si vous rencontrez des difficultés pour l’appairage, vérifiez qu’il n’y ait pas d’autres appareils connectés en Bluetooth. Si les difficultés persistent, il peut être nécessaire de réinitialiser la mémoire de la platine. • Brancher la platine. Attendre 5 secondes. La LED bleue de la platine clignote lentement (après un délai d’initialisation d’environ 25 secondes). -
Page 13: Réglages Optionnels
• La platine va progressivement se stabiliser à 78 tours. • Répéter la procédure pour revenir à 45 tours. VII. RÉGLAGES OPTIONNELS VOTRE PLATINE ELIPSON A ÉTÉ RÉGLÉE EN USINE AFIN DE GARANTIR UNE UTILISATION OPTIMALE. CES RÉGLAGES SONT UNIQUEMENT DESTINÉS AUX UTILISATEURS AVERTIS. 1. ANTI-SKATING (OU ANTI-DÉRAPAGE) Lorsque la platine tourne, le frottement du diamant dans le sillon du vinyle crée une force... -
Page 14: Enregistrement Usb
• Ouvrir le Panneau de configuration (menu Démarrer) • Sélectionner "Matériel et Audio" • Cliquer sur "Son" puis "Enregistrement" • Sélectionner "Elipson" dans la liste des périphériques proposés puis cliquer sur "par défaut" pour valider. • Vérifier le volume d’entrée, l’augmenter si besoin. - Page 15 COMMENT RÉEMBALLER VOTRE PLATINE POUR LE TRANSPORT L’EMBALLAGE ET LES MOUSSES DE PROTECTION ONT ÉTÉ SPÉCIALEMENT DÉVELOPPÉS POUR PROTÉGER VOTRE PLATINE DURANT LE TRANSPORT. NOUS VOUS RECOMMANDONS FORTEMENT DE SUIVRE LES INSTRUCTIONS SUIVANTES SI VOUS SOUHAITEZ TRANSPORTER VOTRE PLATINE, AFIN D’ÉVITER TOUS DOMMAGES ET DÉGÂTS MATÉRIELS.
- Page 17 Aliment ation secteu r LES PIÈCES J ET K NE SONT PAS INTERCHANGEABLES. VEUILLEZ VÉRIFIER QU’ELLES SOIENT BIEN POSITIONNÉES.
-
Page 18: Caractéristiques
CARACTÉRISTIQUES Chroma Chroma 200 Chroma 200 Chroma 400 200 RIAA RIAA BT Châssis PMMA laqué Plateau Acier embouti Acier embouti Acier embouti Acier embouti Bras Aluminium Aluminium Aluminium Carbone Cellule Ortofon OM10 Ortofon OM10 Ortofon OM10 Ortofon OM10 Centreur Polyamide... - Page 19 La garantie est de 2 ans à partir de la date d’achat chez un revendeur agréé. Définition de la garantie La garantie est limitée à la réparation de l’équipement Elipson. En aucun cas, le transport, les coûts associés ainsi que l’installation ne sont couverts par la garantie.
- Page 21 Turntable...
- Page 22 Dear Customer, Thank you for choosing Elipson turntable. Take time to read this manual carefully before installing your turntable. It contains all the safety and operating instructions that should be followed to optimize the performances of your turntable. We highly recommend you to retain both packaging and user’s manual for future use.
-
Page 23: Unpacking
I. UNPACKING Place the cardboard Identify the direction of Open the box carefully in a clear and the opening of the box. and remove the unobstructed area. protective foam. Remove the lid of the carton, take out the turntable and place it on a flat and clear surface. II. -
Page 24: Description
III. DESCRIPTION 1. Lid 2. Pulley 3. Belt 4. Tonearm 5. Plate 6. Chassis 7. 33 rpm / 0 (off) / 45 rpm Switch 8. Felt 9. Anti-skating trackwheel 10. Counter-weight 11. Cue control lever 12. 33/45 rpm Adapter 13. Tonearm support 14. -
Page 25: Setup
IV. SETUP 1. PREPARATION During transport, the removable lid and the various elements of the turntable are secured by foam wedges. • Carefully remove the protective foams of the plate (1 & 2), the tonearm (3), and the counter weight. (4). - Page 26 • Check the level of flatness of the plate, adjust it using the adjustable feet if necessary. 2. COUNTER WEIGHT SETUP YOUR ELIPSON TURNTABLE WAS SET IN FACTORY TO ENSURE OPTIMUM UTILISATION. THESE ADJUSTMENTS ARE FOR ADVISED USERS ONLY. The counter weight balances the tonearm depending on the tracking force of the cartridge.
- Page 27 • Adjust the counterweight to the optimal tracking weight for each cartridge* : Elipson digital scale (optional) Accuracy : 0,01g * if you use a different cartridge from the one provided with Elipson turntable, ignore this information, and refer to the chosen cartridge model. ** manufacturer’s data...
- Page 28 ALL THE SETUP OPERATIONS OF YOUR TURNTABLE ARE DONE. YOU CAN NOW LISTEN TO YOUR FIRST VINYL DISC ON ELIPSON’S TURNTABLE.
-
Page 29: Connections
V. CONNECTIONS NON PRE-AMPLIFIED MODELS : ANALOG CONNECTION REQUIRES HIFI AMPLIFIER WITH PHONO INPUT OR EXTERNAL RIAA MODULE. • Connect the turntable to the phono input of your amplifier using the provided RCA cable respecting the chanels : (right) and (left). - Page 30 PRE-AMPLIFIED AND BLUETOOTH MODELS : 1. ANALOG CONNECTION CONNECT DIRECTLY TO THE AUDIO AMPLIFIER LINE-IN. DO NOT CONNECT TO A PHONO INPUT. • Select the type of cartridge equipping your turntable (MM by default) : MC : moving coil MM : moving magnet •...
- Page 31 2. BLUETOOTH WIRELESS DIGITAL CONNECTION (DEPENDING ON THE MODEL) Some Elipson’s turntable are equipped with an aptX Bluetooth transmitter for your wireless receivers. The Bluetooth signal will be sent to your wireless hi-fi system. Your receiver must be equipped with a volume control, that you will need to adjust to a low volume before use.
-
Page 32: Operating
If you have trouble pairing, check that there is no other device connected via Bluetooth. If there is still trouble, you may need to reset the memory of the turntable. • Plug in the turntable. Wait for 5 seconds. The turntable’s blue LED flashes slowly (after a delay of 25 seconds). •... -
Page 33: Optional Setup
Elipson’s turntable also allows you to play old 78 rpm discs : • Turn on the turntable at 45 rpm. • Briefly put the speed switch on "0" and go back immediately on "45". • The turntable will gradually stabilize at 78 rpm. -
Page 34: Usb Recording
• Select “Hardware and Sound” • Click on “Sound” then “Recording” • Select “Elipson” in the list of available devices then click “by default” to save your choice. • Check the input volume, increase it if needed. • Run the software (not provided). - Page 35 HOW TO REPACK YOUR TURNTABLE FOR TRANSPORT THE PACKAGING AND PROTECTIVE FOAMS HAVE BEEN SPECIALLY DEVELOPED TO PROTECT YOUR TURNTABLE DURING TRANSPORT. WE HIGHLY RECOMMEND YOU TO FOLLOW THESE INSTRUCTIONS IF YOU WISH TO MOVE YOUR TURNTABLE, IN ORDER TO AVOID ANY DAMAGE.
- Page 37 Aliment ation secteu r J AND K PARTS ARE NOT INTERCHANGEABLE. PLEASE CHECK THEY ARE CORRECTLY POSITIONED.
-
Page 38: Specifications
SPECIFICATIONS Chroma 200 Chroma 200 Chroma 200 Chroma 400 RIAA RIAA BT Chassis Lacquered PMMA Plate Pressed steel Pressed steel Pressed steel Pressed steel Tonearm Aluminium Aluminium Aluminium Carbon Cartridge Ortofon OM10 Ortofon OM10 Ortofon OM10 Ortofon OM10 Adapter Polyamid... - Page 39 To claim repair under warranty To claim repair or service under warranty you simply have to contact your local Elipson dealer, from whom your equipment has been purchased. To ensure that you will be able to ship your damaged product in correct manner, always retain the original packaging of your Elipson equipment.
- Page 40 www.elipson.com...