Monster IS 21 HS Notice D'utilisation
Masquer les pouces Voir aussi pour IS 21 HS:

Publicité

Les langues disponibles
  • FR

Les langues disponibles

Liens rapides

• Manuale d'istruzione
• Instruction Manual
• Gebrauchsanleitung
• Notice d'utilisation
• Manual de Instrucciones
IS 21 HS
IS 21 HST

Publicité

Table des Matières
loading

Sommaire des Matières pour Monster IS 21 HS

  • Page 1 • Manuale d’istruzione • Instruction Manual • Gebrauchsanleitung • Notice d’utilisation • Manual de Instrucciones IS 21 HS IS 21 HST...
  • Page 3: Table Des Matières

    INDICE PAGINA Avvertenze di sicurezza ................ 4 Indicazioni in merito alle istruzioni ............6 Disimballaggio ..................6 Elenco delle parti e degli elementi di comando ......7 Istruzioni d’uso ..................8 Messa in funzione .................. 9 Guida alle temperature ............... 9 Pulizia .....................
  • Page 4: Avvertenze Di Sicurezza

    AVVERTENZE DI SICUREZZA Prima dell’uso • Leggere attentamente tutte le informazioni riportate di seguito. Contengono utili indicazioni riguardo all’utilizzo, la sicurezza e la manutenzione dell’appa- recchio. Conservate con cura queste istruzioni ed eventualmente consegna- tele ai futuri proprietari. • Questi apparecchi soddisfano le condizioni delle direttive europee 89/336/ CEE “compatibilità...
  • Page 5 AVVERTENZE DI SICUREZZA Indicazioni sulla sicurezza • Il vapore fuoriesce dall’apparecchio a temperature molto elevate. L’appa- recchio e gli accessori possono scottare. Evitare di toccarli. Il simbolo del va- pore (simbolo 5597 della IEC 60417-1) indica: Attenzione pericolo di scotta- ture! •...
  • Page 6: Indicazioni In Merito Alle Istruzioni

    INDICAZIONI IN MERITO ALLE ISTRUZIONI Queste istruzioni d’uso non possono te- ner conto di ogni possibile impiego. Per ulteriori informazioni o nel caso di eventuali problemi che non vengono approfonditi o trattati in queste istruzioni, rivolgersi al Centro di assistenza tecnica più...
  • Page 7: Elenco Delle Parti E Degli Elementi Di Comando

    ELENCO DELLE PARTI E DEGLI ELEMENTI DI COMANDO IS 21 HS IS 21 HST EF 9 1. Interruttore generale ON/OFF 2. Tappo di sicurezza 3. Tappetino appoggiaferro 4. Spia pronto vapore EF 8 5. Spia fi ne acqua 6. Manopola regolazione vapore 7.
  • Page 8: Istruzioni D'uso

    ISTRUZIONI D’USO 1. Posizionamento 3. Messa in funzione – Collocare l’apparecchio sul tappeti- – Inserire la spina nella presa di corrente. no appoggia ferro. – Accendere la macchina tramite il ta- Scegliere una superfi cie asciutta, sta- sto ON/OFF e la spia dell’interruttore si bile e piana vicino a una presa di cor- illumina.
  • Page 9: Messa In Funzione

    MESSA IN FUNZIONE 5. Stirare a secco Preparare l’apparecchio Stirare a secco − Appoggiare il ferro da stiro sul tappe- – Stirare senza premere il tasto vapore. tino appoggia ferro Posizione del ferro da stiro − Separare i capi da stirare in base al tipo di tessuto, rispettivamente alla –...
  • Page 10: Pulizia

    PULIZIA CUSTODIA Attenzione: Quando l’apparecchio non viene uti- – Prima di pulire l’apparecchio, toglie- lizzato, estrarre la spina dalla presa di re sempre la spina dalla presa di cor- corrente. Conservare il ferro da stiro in rente. Pulire l’apparecchio soltanto un luogo asciutto, fuori dalla portata dei quando si è...
  • Page 11: Problemi E Soluzioni

    PROBLEMI E SOLUZIONI Problema Possibile causa Soluzione Non viene generato va- Manca acqua nella cal- Rabbocco con acqua pore daia Il ferro da stiro non è pron- Attendere che la spia to all’uso dell’interruttore si spenga La piastra è fredda Il ferro da stiro non è...
  • Page 12 INDEX PAGE Electrical connection (UK only) ............13 Safety instruction ................... 14 About the instructions ................16 Unpacking the appliance ..............16 List of parts and control elements ............17 Instructions for use ................. 18 Starting the appliance ................. 19 Temperature guide ................
  • Page 13: Electrical Connection (Uk Only)

    ELECTRICAL CONNECTION (UK ONLY) For your safety please read the following information. Warning: This appliance must be earthed. The appliance must be connected to a 220-240 volts 50 cycle AC supply by means of a three pin socket, suitably earthed and should be protected by a 13 amp fuse in the plug.
  • Page 14: Safety Instruction

    SAFETY INSTRUCTION Before use • Read carefully all information set forth herein. It contains useful indications re- garding the use, safety and maintenance/care of the appliance. Save these instructions for future reference and, if possible, hand them over to the future owners of the appliance.
  • Page 15 SAFETY INSTRUCTION Safety instructions • The steam produced by the appliance can reach very high temperatures. The appliance and the accessories may scorch. Avoid touching them. The steam symbol (symbol 5597 of IEC 60417-1) has the following signification: Attention danger of scalding! •...
  • Page 16: About The Instructions

    ABOUT THE INSTRUCTIONS These instructions cannot encompass every possible use. For further information or if you have any problem not covered or covered only unsatisfactorily in this handbook, please contact the nearest Service Center. Save these instructions for future referen- ce and, if possible, hand them over to the future owners of the appliance.
  • Page 17: List Of Parts And Control Elements

    LIST OF PARTS AND CONTROL ELEMENTS IS 21 HS IS 21 HST EF 9 1. ON/OFF power switch 2. Safety cap 3. Iron-rest mat 4. Steam ready light EF 8 5. No water tank light 6. Handle grip regulation steam Power indicator light / steam ready 8.
  • Page 18: Instructions For Use

    INSTRUCTIONS FOR USE 1. Preparations 3. Starting the appliance - place the iron on the iron-rest mat. - Insert the plug into the mains socket. Choose a fl at, even, dry surface, near - Turn the appliance on [mains switch a socket.
  • Page 19: Starting The Appliance

    STARTING THE APPLIANCE 5. Dry ironing Dry ironing - Do not press the steam button. Getting the appliance ready: Position of the iron - Put the iron on the iron-rest mat. - During working breaks put the iron on - Divide the garments to iron according the iron-rest mat.
  • Page 20: Cleaning The Appliance

    CLEANING THE APPLIANCE STORAGE Attention: When the appliance is not in use, pull the - Before cleaning the appliance, always plug out of the mains socket. Store the pull the plug out of the mains socket. iron in a dry place, away from the reach Clean the appliance only when is has of children.
  • Page 21 PROBLEMI E SOLUZIONI Problem Possibile causa Soluzione No steam is generated No water in the boiler Fill it with water The iron is not ready to Wait until the switch indi- cator light comes off The iron soleplate is cold The iron is not on Set the temperature con- trol on the wished posi-...
  • Page 22 INHALTSVERZEICHNIS SEITE Sicherheitsvorschriften ................23 Hinweise bezüglich der gebrauchsanleitung ........25 Auspacken ..................... 25 Übersicht über die einzelteile und die bedienungselemente ..26 Gebrauchsanweisung ................27 Inbetriebnahme ..................28 Temperaturvorgaben ................28 Reinigung ....................29 Aufbewahrung ..................29 Wartung ....................29 Funktionsstörungen ................
  • Page 23: Sicherheitsvorschriften

    SICHERHEITSVORSCHRIFTEN Vor dem Gebrauch • Bitte lesen Sie alle im folgenden aufgeführten Informationen aufmerksam durch. Sie geben wichtige Hinweise für den Einsatz, die Sicherheit sowie die Wartung/Pflege der Geräte. Bewahren Sie die Gebrauchsanleitung sorgfältig auf und geben Sie diese gegebenenfalls an den Nachbesitzer weiter.
  • Page 24 SICHERHEITSVORSCHRIFTEN Sicherheitshinweise • Das Gerät produziert Dampf mit sehr hoher Austrittstemperatur. Geräte- und Zubehörteile können heiß werden. Vermeiden Sie direkten Hautkontakt. Dieses Dampfsymbol (Symbol 5597 der IEC 60417-1) bedeutet Achtung: Verbrühungsgefahr! • Es ist besondere Vorsicht geboten, wenn das Gerät von Kindern oder Behin- derten benutzt wird.
  • Page 25: Hinweise Bezüglich Der Gebrauchsanleitung

    HINWEISE BEZÜGLICH DER GEBRAUCHSANLEITUNG Diese Gebrauchsanweisung kann nicht jede mögliche Verwendung des Gerätes berücksichtigen. Bitte wenden Sie sich für weitere Infor- mationen oder im Falle von in dieser Ge- brauchsanweisung unzureichend oder gar nicht angeführten Schwierigkeiten an den technischen Kundendienst in Ihrer Nähe.
  • Page 26: Übersicht Über Die Einzelteile Und Die Bedienungselemente

    ÜBERSICHT ÜBER DIE EINZELTEILE UND DIE BEDIENUNGSELEMENTE IS 21 HS IS 21 HST EF 9 1. Hauptschalter EIN/AUS 2. Sicherheitsverschluss 3. Abstellmatte für das Bügeleisen 4. Controllanzeige Dampf EF 8 5. Wassermangellicht 6. Dampfmengenregler 7. Betriebsleuchte 8. Temperaturregler...
  • Page 27: Gebrauchsanweisung

    GEBRAUCHSANWEISUNG 1. Aufstellen des Gerätes 3. Inbetriebnahme – Stecken Sie den Stecker in die Strom – Stellen Sie das Gerät auf die Silikonun- – Stellen Sie das Gerät an mit Hilfe des terlage. Wählen Sie eine trockene, Ein/Aus-Schalters. Die Kontrolllampe stabile und ebene Oberfl...
  • Page 28: Inbetriebnahme

    INBETRIEBNAHME 5. Trockenbügeln Die Vorbereitung des Geräts Trockenbügeln - Stellen Sie das Bügeleisen auf der – Bügeln Sie ohne die Dampftaste zu stellmatte für das Bügeleisen. drücken - Sortieren Sie die Bügelwäsche nach Abstellen des Bügeleisens der Art des Stoffes, je nach der Tem- –...
  • Page 29: Reinigung

    REINIGUNG AUFBEWAHRUNG Achtung: Ziehen Sie den Stecker aus der Steckdo- – Ziehen Sie den Stecker aus der Ste- se, wenn das Gerät nicht benutzt wird. ckdose, bevor Sie das Gerät reinigen. Bewahren Sie das Gerät an einem troc- Reinigen Sie das Gerät nur, wenn es kenen Ort und außerhalb der Reichweite vollkommen abgekühlt ist.
  • Page 30: Problem Und Lösung

    PROBLEM UND LÖSUNG Problem Mögliche Ursache Lösung Es wird kein Dampf Es befindet sich kein Was- Füllen Sie Wasser nach. erzeugt ser im Dampfkessel Das Bügeleisen ist nicht Warten Sie bis die Kon- betriebsbereit trolllampe erlischt. Das Bügeleisen ist nicht Drehen Sie den Tempera- Die Bügelsohle bleibt kalt angeschaltet...
  • Page 31 INDICE PAGE Instructions de sécurité ................. 32 Indications sur le mode d’emploi ............34 Déballage ....................34 Liste des parties et des éléments de commande ......35 Mode d’emploi ..................36 Mise en marche ..................37 Guide des températures ..............37 Nettoyage .....................
  • Page 32: Instructions De Sécurité

    INSTRUCTIONS DE SÉCURITÉ Avant l’emploi • Lire attentivement toutes les informations indiquées ci-après. Ils contien- nent d’utiles indications concernant l’emploi, la sécurité et l’entretien de l’appareil. Conservez soigneusement ces instructions et éventuellement livrez-les aux futurs propriétaires. • L’appareil est conforme aux normes de sécurité CE et aux lois en vigueur en matière de sécurité...
  • Page 33 INSTRUCTIONS DE SÉCURITÉ Indications sur la sécurité • La vapeur sort de l’appareil à des températures très élevées. L’appareil et les accessoires peuvent brûler. Eviter de les toucher. Le symbole de la vapeur (symbole 5597 de la IEC 60417-1) indique: Attention danger de brûlures! •...
  • Page 34: Indications Sur Le Mode D'emploi

    INDICATIONS SUR LE MODE D’EMPLOI Ce mode d’emploi ne peut pas prendre en compte tout emploi possible. Pour de renseignements ultérieurs ou en cas d’éventuels problèmes qui ne sont pas approfondis ou traités dans ce mode d’emploi, adressez-vous au Cen- tre après-vente plus proche de chez vous.
  • Page 35: Liste Des Parties Et Des Éléments De Commande

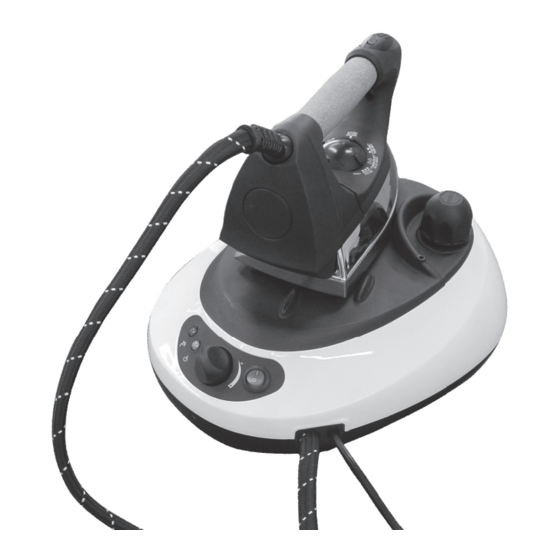
    LISTE DES PARTIES ET DES ÉLÉMENTS DE COMMANDE IS 21 HS IS 21 HST EF 9 1. Interrupteur général marche/arrêt 2. Bouchon de sécurité 3. Tapis repose-fer 4. Voyant vapeur prête 5. Voyant fi n eau EF 8 6. Molette de réglage vapeur 7.
  • Page 36: Mode D'emploi

    MODE D’EMPLOI 1. Disposition 3. Mise en marche – Insérer la fi che dans la prise de courant. – Placer l’appareil sur le tapis repose- – Allumer l’appareil au moyen du bou- fer. Choisir une surface sèche, stable ton marche/arrêt (1), le voyant de et plate près d’une prise de courant l’interrupteur s’allume.
  • Page 37: Mise En Marche

    MISE EN MARCHE 5. Repasser à sec Repasser à sec Préparer l’appareil - Repasser sans appuyer sur le bouton - Poser le fer à repasser sur le tapis repo- vapeur se-fer Position du fer à repasser - Séparer les vêtements à repasser sur la base du type de textile, respective- - Pendant les pauses de travail poser le ment à...
  • Page 38: Nettoyage

    NETTOYAGE RANGEMENT Attention: Quand l’appareil n’est pas utilisé, dé- - Avant de nettoyer l’appareil toujours brancher la fi che de la prise de courant. débrancher la fi che de la prise de Conserver le fer à repasser dans un en- courant.
  • Page 39: Problèm Et Solution

    PROBLÈM ET SOLUTION Problème Cause possible Solution La vapeur n’est pas pro- Il n’y a pas d’eau dans la Remplir avec de l’eau duite chaudière Le fer à repasser n’est pas Attendre que le voyant prêt à l’emploi de l’interrupteur s’éteint Tourner le sélecteur de La semelle est froide Le fer à...
  • Page 40 PÁGINA INDICE Normas de seguridad ................41 Informaciones sobre las instrucciones ..........43 Desembalaje ..................43 Lista de las partes y de los eleméntos de mando ......44 Istrucciones para el uso ................ 45 Puesta en marcha ................46 Guía de temperaturas ................. 46 Limpieza ....................
  • Page 41: Normas De Seguridad

    NORMAS DE SEGURIDAD Antes de utilizar el aparato. • Lea atentamente las informaciones incluidas en el presente manual. Encontrará indicaciones útiles sobre el uso, la seguridad y el mantenimiento del aparato. Guarde con cuidado las instrucciones y entréguelas a los posibles futuros propie- tarios.
  • Page 42 NORMAS DE SEGURIDAD Normas de seguridad • El vapor sale del aparato a una temperatura muy elevada. El aparato y los ac- cesorios pueden quemar. Evitar tocarlos. El símbolo del vapor (símbolo 5597 de la IEC 60417-1) significa: ¡Atención peligro de quemaduras! •...
  • Page 43: Informaciones Sobre Las Instrucciones

    INFORMACIONES SOBRE LAS INSTRUCCIONES Las presentes instrucciones para el uso no pueden comprender todos los posi- bles empleos. Para ulteriores informaciones o en el caso de problemas no incluidos o no descritos por completo en estas instruc- ciones, dirígase al Centro de asistencia técnica más cercano.
  • Page 44: Lista De Las Partes Y De Los Eleméntos De Mando

    LISTA DE LAS PARTES Y DE LOS ELEMÉNTOS DE MANDO IS 21 HS IS 21 HST EF 9 1. Interruptor general ON/OFF 2. Tapón de seguridad 3. Suela apoya-plancha vapore Indicador luminoso listo EF 8 5. Señal falta de agua 6.
  • Page 45: Istrucciones Para El Uso

    ISTRUCCIONES PARA EL USO 1. Colocación 3. Poner en función - Coloque el aparato sobre la suela - Inserte el enchufe en la toma de cor- apoya-plancha. riente. Elija una superfi cie seca, estable y lla- - Ponga en función el aparato con el na cerca de una toma de corriente interruptor ON/OFF (1), el indicador eléctrica...
  • Page 46: Puesta En Marcha

    PUESTA EN MARCHA 5. Planchar en seco Preparar el aparato Planchar en seco - Apoye la plancha sobre la suela apo- - Planche sin presionar el pulsador del ya-plancha vapor Posición de la plancha - Separe las prendas que tiene que planchar según el tipo de tejido y - Durante las pausas del trabajo apoye según la temperatura indicada en la...
  • Page 47: Limpieza

    LIMPIEZA GUARDAR EL APARATO Atención: Cuando no utiliza el aparato, extraiga el - Antes de limpiar el aparato, siempre enchufe de la toma de corriente. Guar- desconecte el enchufe de la toma de la plancha en un lugar seco, fuera de corriente.
  • Page 48 PROBLEMAS Y SOLUCIONES Problema Posible causa Solución La plancha no produce Falta de agua en la cal- Añadir agua vapor dera La plancha no está lista Esperar hasta que el indi- para el uso cador luminoso del inter- ruptor se apague La plancha está...
  • Page 49 Smaltimento delle apparecchiature obsolete Disposal of your old appliance Entsorgung von Altgeräten Élimination des appareillages obsolètes Como deshacerse de aparatos eléctricos y electrónicos viejos Eliminação do seu antigo aparelho Smaltimento delle apparecchiatu- Disposal of your old appliance Entsorgung von Altgeräten. re obsolete 1.
  • Page 50 NOTE ..........................................................................................................................................................................................................................................................................................................................................................................................................................................................................................................................................................................................................................................................................................
  • Page 52 EUROFLEX srl via dei Colli, 59 31058 Susegana (TV) Italy Tel. ++39.0438.661711 ++39.0438.661712 http: www.euroflex.tv E-mail: euroflex@euroflex.tv...

Ce manuel est également adapté pour:

Is 21 hst

Table des Matières