Atlantic TELIA Notice D'utilisation Et D'installation

Manuels Connexes pour Atlantic TELIA


Sommaire des Matières pour Atlantic TELIA
- Page 1 TELIA Soufflant NOTICE D’UTILISATION ET D’INSTALLATION À conserver par l’utilisateur La sérénité s’installe chez vous ATLANTIC EST UNE MARQUE FRANÇAISE...
-
Page 3: Table Des Matières
Sommaire Mise en garde ............2 Installation. -
Page 4: Mise En Garde
Mise en garde Attention surface très chaude. Caution hot surface. ATTENTION : Certaines parties de ce produit peuvent devenir très chaudes et provoquer des brû- Attention : Surface très lures. Il faut prêter une attention particulière en pré- chaude sence d’enfants et de personnes vulnérables. Caution hot surface Il convient de maintenir à... -
Page 5: Installation
A la première mise en chauffe, une légère odeur peut apparaître correspondant à l’évacuation des éventuelles traces liées à la fabrication de l’appareil. La notice d’utilisation de cet appareil est disponible en vous connec- tant sur le site Internet du fabricant indiqué sur le bon de garantie présent dans cette notice. -
Page 6: Préparer L'installation Des Barres
Volume 1 Pas d’appareil électrique Appareil électrique IPX4 (Norme Volume 2 60335-2-43 : 2003/A2 : 2008) min 60 cm Respectez les distances minimales min 15 cm avec le mobilier pour l’emplacement min 15 cm min 15 cm de l’appareil. min 60 cm PRéPARER l’INSTAllATION dES bARRES Pour les modèles avec barres... -
Page 8: Fixer L'appareil
FIxER l’APPAREIl 196mm Ø 6 mm / L : 35 mm Insérez les 2 vis supérieures en prenant soin de laisser une distance de 8 mm entre la tête des vis et le mur; Si l’appareil est équipé de barres porte-serviettes, veuillez l’assembler avant de suspendre l’appareil au mur. -
Page 9: Raccorder L'appareil
RACCORdER l’APPAREIl Règles de raccordement L’appareil doit être alimenté en 230 V Monophasé 50Hz. L’alimentation de l’appareil doit être directement raccordée au réseau après le disjoncteur et sans interrupteur intermédiaire. Le raccordement au secteur se fera à l’aide du câble de l’appareil par l’intermédiaire d’un boîtier de raccordement. -
Page 10: Utilisation
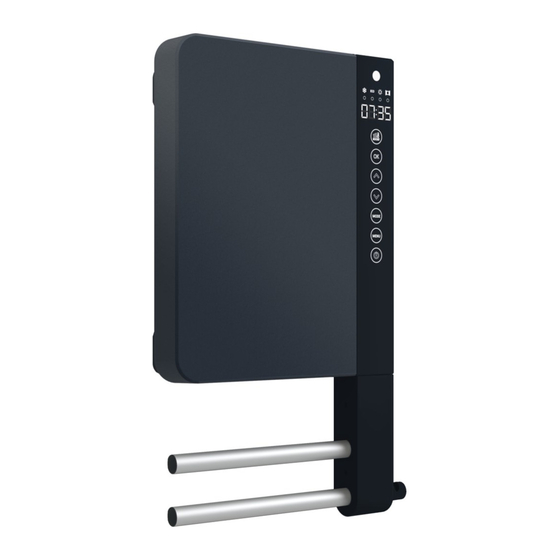
Utilisation dESCRIPTION dU PANNEAU dE COMMANdE Détecteur de présence Indicateur à led Hors Gel Indicateur à led Eco Indicateur à led Confort Indicateur à led de fonction de fenêtre ouverte Affichage Fonction Boost OK / Confirmer Monter et augmenter Baisser et diminuer Mode Menu Stand-by / veille... -
Page 11: Description Des Modes
dESCRIPTION dES MOdES 4 modes de fonctionnement sont proposés : AUTO PROG Hors Gel BASE L’appareil fonctionne pour atteindre et maintenir la température de consigne Confort et passe automatiquement en Eco (Confort -3.5°C) si aucune présence n’est détectée après 10 minutes, puis en Hors Gel (7°C) si aucune présence n’est détectée dans la pièce pendant 36 heures. -
Page 12: Description Du Menu
dESCRIPTION dU MENU A partir de la touche MENU vous pouvez régler l’heure, le jour, la programmation et la détection de fenêtre ouverte : HEURE JOUR Reportez vous au Chapitre «utilisation de la programmation interne» PROG FENETRE UTIlISER lA PROgRAMMATION INTERNE Vous pouvez choisir votre programmation entre les 5 programmes prédéfinis. -
Page 13: Fonctionnement Du Boost
Procédez comme suit pour affecter les programmes : PROG et ainsi pour tous les autres jours de la semaine FONCTIONNEMENT dU bOOST La fonction Boost permet d’activer le fonctionnement du chauffage pendant 15 minutes à la puissance maximale. Pendant cette période, l’écran affiche alternativement le texte «Boost» et le temps restant. -
Page 14: En Cas De Problème
En cas de problème Problème rencontré Vérifications à faire L’écran du boîtier Vérifiez que l’interrupteur situé sur le côté gauche de l’appareil de commande ne est bien sur ON (bouton enfoncé). s’allume pas. Vérifiez que l’appareil est bien alimenté électriquement. température Il est nécessaire d’attendre 6 heures au minimum pour que la tem- d’ambiance... - Page 15 Problème rencontré Vérifications à faire code Défaut Err6 apparaît à l’écran : il y a un problème avec la sonde de tem- apparaît à l’écran pérature : contactez votre installateur. code Défaut Err7 apparaît à l’écran : il y a un problème avec la régulation élec- apparaît à...
-
Page 16: Caractéristiques
Caractéristiques Références du modèle TELIA Caractéristique Symbole Valeur Unité Puissance thermique Puissance thermique nominale P nom 1800 Puissance thermique minimale P min 1000 Puissance thermique maximale continue P max,c 1800 Consommation d’électricité auxiliaire A la puissance thermique nominale el max... - Page 30 U0628854-A Apr 18...
- Page 31 TELIA Soufflant Nous vous remercions de votre choix et de votre confiance. Le radiateur soufflant TELIA a été soumis à de nombreux tests et contrôles afin d’en assurer la qualité et ainsi vous apporter une entière satisfaction.
-
Page 32: Garantie
La durée de garantie est de 2 ans à compter de la date d’installation ou d’achat et ne saurait excéder 30 mois à partir de la date de fabrication en l’absence de justificatif. Atlantic assure l’échange ou la fourniture des pièces reconnues défectueuses à l’exclusion de tous dommages et intérêts.