Table des Matières

Publicité

Les langues disponibles

Les langues disponibles

Liens rapides

KOMPAKT-AUDIO-SYSTEM
CHAÎNE AUDIO COMPACTE
CADENAS MICRO COMPACTAS
KOMPAKT AUDIOSYSTEM
SISTEMA COMPATTO AUDIO
COMPACT AUDIOSYSTEEM
COMPACT AUDIO SYSTEM
MODELL
MODELLO
MODÈLE
MODEL
MODELO
MODEL
MODELL
XL-1000H
XL-1100H
BEDIENUNGSANLEITUNG
MODE D'EMPLOI
MANUAL DE MANEJO
BRUKSANVISNING
MANUALE DI ISTRUZIONI
GEBRUIKSAANWIJZING
OPERATION MANUAL
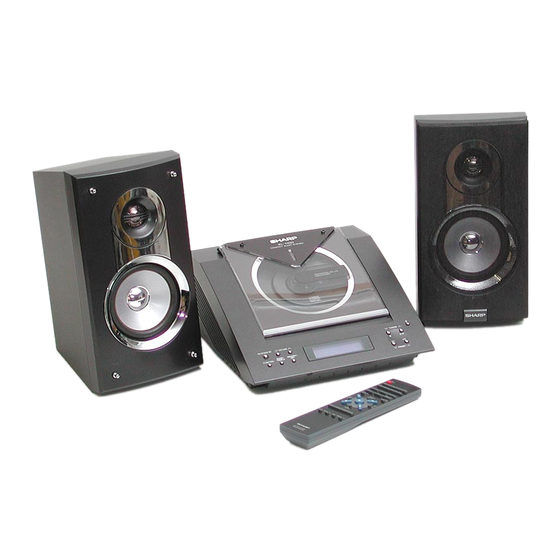
Kompakt-Audio-System XL-1000H/XL-1100H besteht aus XL-1000H/XL-
1100H (Hauptgerät) und CP-XL1000H/CP-XL1100H (Lautsprechersystem).
Chaîne Audio Compacte XL-1000H/XL-1100H composé de XL-1000H/XL-
1100H (appareil principal) et de CP-XL1000H/CP-XL1100H (enceintes
acoustiques).
Cadenas Micro Compactas XL-1000H/XL-1100H que consta de XL-1000H/
XL-1100H (aparato principal) y CP-XL1000H/CP-XL1100H (sistema de
altavoces).
XL-1000H/XL-1100H Kompakt Audiosystem bestående av XL-1000H/XL-
1100H (huvudenhet) och CP-XL1000H/CP-XL1100H (högtalarsystem).
Sistema compatto audio XL-1000H/XL-1100H consiste di XL-1000H/XL-
1100H (apparecchio principale) e CP-XL1000H/CP-XL1100H (diffusori).
XL-1000H/XL-1100H Compact Audiosysteem bestaande uit XL-1000H/XL-
1100H (hoofdtoestel) en CP-XL1000H/CP-XL1100H (luidsprekersysteem).
XL-1000H/XL-1100H Compact Audio System consisting of XL-1000H/XL-
1100H (main unit) and CP-XL1000H/CP-XL1100H (speaker system).
DEUTSCH
Siehe Seiten i bis v und D-1 bis D-24.
FRANÇAIS
Se reporter aux pages i à v et F-1 à F-24.
Consulte las páginas i al v y S-1 al S-24.
ESPAÑOL
SVENSKA
Hänvisa till sidorna i till v och V-1 till V-24.
ITALIANO
Leggere le pagine i a v e I-1 a I-24.
NEDERLANDS
Raadpleeg de bladzijden i t/m v en N-1 t/m N-24.
ENGLISH
Please refer to pages i to v and E-1 to E-24.

Publicité

Table des Matières
loading

Sommaire des Matières pour Sharp XL-1000H

  • Page 1 1100H (Hauptgerät) und CP-XL1000H/CP-XL1100H (Lautsprechersystem). Chaîne Audio Compacte XL-1000H/XL-1100H composé de XL-1000H/XL- 1100H (appareil principal) et de CP-XL1000H/CP-XL1100H (enceintes KOMPAKT-AUDIO-SYSTEM acoustiques). Cadenas Micro Compactas XL-1000H/XL-1100H que consta de XL-1000H/ CHAÎNE AUDIO COMPACTE XL-1100H (aparato principal) y CP-XL1000H/CP-XL1100H (sistema de CADENAS MICRO COMPACTAS altavoces).
  • Page 2 Quest’apparecchio è conforme ai requisiti delle direttive 89/ 336/EEC e 73/23/EEC, come emendata dalla direttiva 93/ 68/EEC. Dichiarazione di conformità La società SHARP ELECTRONICS EUROPE GmbH dichiara SISTEMA COMPATTO AUDIO XL- che il prodotto SHARP SISTEMA COMPATTO AUDIO XL- 1000H/XL-1100H è...
  • Page 3 Bei Einstellung der ON/STAND-BY-Taste auf STAND-BY ist die Quando il tasto ON/STAND-BY si trova in posizione STAND-BY, Netzspannung immer noch im Gerät vorhanden. all’interno dell’apparecchio c’è ancora la corrente. Wenn die ON/STAND-BY-Taste auf STAND-BY eingestellt wird, Se il tasto ON/STAND-BY si trova nella posizione STAND-BY, kann das Gerät unter Verwendung der Timer-Betriebsart oder l’unità...
  • Page 4 Vorsicht: Warning: Das Gerät weder Tropf- noch Spritzwasser aussetzen. To prevent fire or shock hazard, do not expose this appli- Ansonsten besteht die Gefahr eines Brandes oder ance to dripping or splashing. No objects filled with liquids, elektrischen Schlages. Es sollten keine mit Flüssigkeiten such as vases, shall be placed on the apparatus.
  • Page 5 VORSICHT CAUTION Verwendung von Regelungen oder Einstellungen bzw. Use of controls, adjustments or performance of procedures other than Durchführung von anderen Verfahren als die hierin angegebenen those specified herein may result in hazardous radiation exposure. kann zum Aussetzen gefährlicher Strahlung führen. As the laser beam used in this compact disc player is harmful to Da der in diesem Compact Disc Player verwendete Laserstrahl the eyes, do not attempt to disassemble the cabinet.
  • Page 6 Eigenschaften der Laserdiode Material: GaAIAs Wellenlänge: 780 nm Emissionsdauer: kontinuierlich Laser-Ausgang: max. 0,6 mW Caractéristiques de la diode laser Matière: GaAIAs Longueur d’onde: 780 nm Durée d’émission: ininterrompue Puissance de sortie laser maximale: 0,6 mW Características del diodo láser Material: GaAIAs Longitud de onda: 780 nm Duración de emisión : continua Salida de láser: máx.
  • Page 7: Table Des Matières

    DEUTSCH Inhalt Zubehör Seite Prüfen Sie, ob die folgenden Zubehörteile vorhanden sind. „ Allgemeine Informationen Zubehör ..........1 Zur Beachtung .
  • Page 8: Zur Beachtung

    Der Betrieb des Produktes mit einer Spannung, die höher ist als die angegebene, ist gefährlich und kann zu Brand 10 cm 10 cm oder anderem Unfall durch Beschädigung führen. SHARP kann nicht für Schäden verantwortlich gemacht werden, die aus Betrieb mit einer unvorschriftsmäßigen Spannung resultieren. 30 cm z CD-Spieler arbeiten mit einem Laser-Abtaster, der bei direk- tem Ansehen zu Augenschäden führen kann.
  • Page 9: Bedienungselemente Und Anzeigen

    Bedienungselemente und Anzeigen „ Frontplatte Bezugsseite 1. CD-Fach ......... 12 2.
  • Page 10 2. Tieftöner <Der Boden des Gerätes> 3. Baßreflex-Öffnung 4. Lautsprecherklemmen (XL-1000H) (XL-1100H) Lautsprecher-Frontverkleidungen sind abnehmbar: MODEL NO. XL-1000H MODEL NO. XL-1100H Es ist sicherzustellen, daß nichts beim Abneh- COMPACT AUDIO SYSTEM COMPACT AUDIO SYSTEM 230 V 50 Hz 30 W...
  • Page 11 „ Fernbedienung Bezugsseite 1. Fernbedienungssender ......8 2. Netz-/Bereitschaftstaste ......9 3.
  • Page 12: Anschluß Des Systems

    Anschluß des Systems UKW-Antenne Rechter Linker MW-Rahmenantenne MD-Recorder Lautsprecher Lautsprecher nicht mitgeliefert Videorecorder, DVD-Player usw. nicht mitgeliefert Wandsteckdose (Wechselspannung 230 V, 50 Hz) Rechter Linker Lautsprecher Lautsprecher Weißer Streifen Schwarz DEUTSCH...
  • Page 13: Anschluß Der Antennen

    „ Anschluß der Antennen Hinweise: z Wenn eine UKW-Außenantenne benutzt wird, den mitgelieferten Mitgelieferte UKW-Antenne: UKW-Antennendraht von der Buchse FM 75 OHMS trennen. Den UKW-Antennendraht an die Buchse z Beim Verwenden einer MW-Außenantenne unbedingt den Draht FM 75 OHMS anschließen und danach in der MW-Rahmenantenne angeschlossen halten.
  • Page 14: Fernbedienung

    Fernbedienung „ Einsetzen der Batterien „ Test der Fernbedienung Die Fernbedienung direkt auf den Fernbedienungssensor am Gerät Den Batteriefachdeckel entfernen. richten. Die Batterien entsprechend der im Batteriefach angegebe- nen Polarität einsetzen. Die Fernbedienung kann im unten gezeigten Bereich verwen- Beim Einsetzen oder Entnehmen der Batterien nach den Bat- det werden: terieklemmen hin drücken.
  • Page 15: Allgemeine Regelung

    Allgemeine Regelung „ Einschalten der Stromversorgung Zum Einschalten der Stromversorgung die ON/STAND-BY-Taste drücken. Einstellen des Gerätes auf Bereitschafts-Betriebsart: Die ON/STAND-BY-Taste erneut drücken. „ Ändern der Helligkeit des Displays (2 Stu- fen) Per Druck auf die DIMMER-Taste auf der Fernbedienung können Sie die Helligkeit des Displays schalten.
  • Page 16: Klangregelung

    Klangregelung „ Lautstärkeregelung Zum Erhöhen der Lautstärke die VOLUME -Taste drücken; zum Vermindern die VOLUME -Taste drücken..28 29 MAX „ Baßregelung Bedienung durch das Hauptgerät: Die BASS/TREBLE-Taste drücken, bis "BASS" auf dem Display erscheint. Zur Baßregelung innerhalb von 5 Sekunden die Taste VOLUME oder ) drücken.
  • Page 17: Einstellen Der Uhr

    Einstellen der Uhr Innerhalb von 1 Minute die PRESET ( oder ) drücken, um die Stunde einzustellen, und dann die MEMORY-Taste betätigen. z Wenn die 12-Stunden-Anzeige gewählt wird, schaltet "AM" auto- matisch auf "PM". Innerhalb von 1 Minute die PRESET ( oder ) drücken, um die Minuten einzustellen, und dann die MEMORY-Taste...
  • Page 18: Abspielen Einer Cd

    Abspielen einer CD Zum Einschalten des Gerätes die ON/STAND-BY-Taste drücken. Die FUNCTION-Taste drücken, bis "CD STOP" oder "NO DISC" auf dem Display erscheint. Bei der Bedienung durch die Fernbedienung die CD-Taste drücken. (OPEN/CLOSE)-Taste drücken, um das CD-Fach zu öffnen. Eine CD mit der Etikettenseite nach oben auf die Achse setzen.
  • Page 19: Pflege Der Compact Discs

    Vorsicht: Unterbrechen der Wiedergabe: z Den CD-Fachdeckel von der Hand nicht stoppen oder bewegen. Bedienung durch das Hauptgerät: Es kann zu Störungen des Geräts führen. -Taste drücken. z Darauf achten, daß sich Sie die Finger im CD-Fachdeckel nicht Um die Wiedergabe von derselben Stelle an fortzusetzen, die klemmen.
  • Page 20: Wiederholte Wiedergabe Und Zufallswiedergabe

    Wiederholte Wiedergabe und Abspielen einer CD (Fortsetzung) Zufallswiedergabe „ Auffinden des Titelanfangs Sie können eine der CD-Wiedergabe-Betriebsarten auswählen: Weitergehen zum Anfang des nächsten Titels: "Wiederholte Wiedergabe", "Zufallswiedergabe" und "Normale Wie- Während der Wiedergabe die -Taste weniger als 0,5 Sekunden dergabe". drücken.
  • Page 21: Programmierte Wiedergabe

    Programmierte Wiedergabe Durch Bestimmen von Titeln von 1 bis 99 können Sie bis zu 20 Titel Die MEMORY/SET(MEMORY)-Taste drücken, um die Titel- zur Wiedergabe in gewünschter Reihenfolge auswählen. nummer zu sichern. Wiedergabefolge Gesamte Spielzeit Für weitere Titel die Schritte 2 - 3 wiederholen. Bis zu 20 Ti- tel können programmiert werden.
  • Page 22: Rundfunkempfang

    Rundfunkempfang Zum Einschalten des Gerätes die ON/STAND-BY-Taste drücken. Die FUNCTION-Taste drücken, bis "FM" oder "AM" auf dem Display erscheint. Bei der Bedienung durch die Fernbedienung die TUNER- und dann die BAND-Taste drücken, um "FM" oder "AM" zu wählen. Die TUNING-Taste ( oder ) drücken, um den ge- wünschten Sender einzustellen.
  • Page 23 Empfangen einer UKW-Stereosendung: Die FUNCTION (BAND)-Taste drücken, so daß die "ST"-Anzeige aufleuchtet. z " " erscheint, wenn eine UKW-Sendung in Stereo ist. UKW-Stereo-Betriebsartenanzeige UKW-Stereo-Empfangsanzeige z Bei schwachem UKW-Empfang die FUNCTION (BAND)-Taste drücken, so daß die "ST"-Anzeige erlischt. Der Empfang schaltet auf Mono, und der Klang wird klarer.
  • Page 24: Empfangen Des Gespeicherten Senders

    Empfangen des gespeicherten Senders „ Abspeichern eines Senders „ Abrufen eines gespeicherten Senders Sie können 30 MW- und UKW-Sender abspeichern und per Tasten- Die PRESET ( oder )-Taste weniger als 0,5 Sekunden drük- druck abrufen. (Vorabstimmung) ken, um den gewünschten Sender zu wählen. Die Schritte 1 - 3 im Abschnitt "Rundfunkempfang"...
  • Page 25: Timer- Und Sleep-Funktion

    Timer- und Sleep-Funktion Dies kann nur mit der Fernbedienung betätigt werden. Zum Einschalten der Stromversorgung die ON/STAND- Timer-Wiedergabe: Zu der voreingestellten Zeit schaltet sich das Gerät ein und gibt die BY-Taste drücken. gewünschte Tonquelle (CD, Tuner) wieder. Die Taste CD oder TUNER drücken, um die gewünschte Sleep-Funktion: Funktion zu wählen.
  • Page 26 Timer- und Sleep-Funktion (Fortsetzung) Hinweise: z Wenn der Timer einmal eingestellt wird, wird die Einstellung Innerhalb von 1 Minute die Taste PRESET ( oder gehalten, bis eine neue Zeit eingegeben wird. drücken, um die zu startenden Minuten zu bestimmen, z Bei der Timer-Wiedergabe mit Hilfe eines anderen Geräts, das und dann die MEMORY-Taste betätigen.
  • Page 27: Sleep-Funktion

    „ Sleep-Funktion „ Gleichzeitiges Benutzen der Timer- und Sleep-Funktion Die gewünschte Tonquelle wiedergeben. Beispiel: Einschlafen und Erwachen über denselben Rundfunksen- Die SLEEP-Taste drücken. Sie können nur dieselbe Tonquelle wiedergeben (die Funktion kann nicht umgeschaltet werden). Die Einschlafzeit einstellen (siehe links, Schritte 1 - 2). Während der Sleep-Timer eingestellt ist, die gewünsch- Ändern der Einschlafzeit: te Abspielzeit einstellen (Schritte 4 - 6 auf Seiten 19 -...
  • Page 28: Erhöhen Des Systems

    Erhöhen des Systems „ Wiedergabe der Töne vom Videorecorder, Das Anschlußkabel gehört nicht zum Lieferumfang. Kaufen Sie ein im Handel erhältliches Kabel wie unten dargestellt. DVD-Player usw. Mit Hilfe eines Anschlußkabels den Videorecorder, DVD-Player Videorecorder, usw. an die Buchsen VIDEO/AUX IN anschließen. DVD-Player usw.
  • Page 29: Fehlersuche

    Fehlersuche Wartung „ Wenn Störung auftritt „ Reinigen der CD-Abtasterlinse Wenn dieses Produkt von starker externer Interferenz (mechani- Den Abtaster nicht berühren. Falls Fingerabdrücke auf den Abtaster scher Stoß, übermäßige statische Elektrizität, anormale Speise- geraten oder sich Staub darauf ablagert, ihn vorsichtig mit einem spannung infolge von Blitz usw.) beeinflußt oder falsch betrieben Wattestäbchen reinigen.
  • Page 30: Technische Daten

    Technische Daten „ CD-Player Bedingt durch fortlaufende technische Verbesserungen behält sich SHARP das Recht vor, das Design und die Spezifikationen ohne vorherige Ankündigung ändern zu können. Die angegebenen Lei- Compact Disc Player stungswerte stellen die Nennwerte einer in Serienherstellung produ-...
  • Page 31: Accessoires

    FRANÇAIS Table des matières Accessoires Page Vérifier que les accessoires ci-dessous sont présents dans l'embal- „ Informations générales lage. Accessoires ......... 1 Précautions .
  • Page 32: Précautions

    10 cm 10 cm sur une tension plus élevée est dangereux et risque de provo- quer un incendie ou tout autre type d'accident. SHARP ne sera 30 cm pas tenu pour responsable des dommages causés par le non- respect de la tension spécifiée.
  • Page 33: Commandes Et Voyants

    Commandes et voyants „ Façade Page de référence 1. Compartiment CD ....... . 12 2.
  • Page 34: Commandes Et Voyants (Suite)

    8. Prise d'entrée CA ....... . 6, 7 „ Enceinte acoustique <Fond de l'appareil> 1. Tweeter (XL-1000H) (XL-1100H) 2. Woofer MODÈLE N˚ XL-1000H MODÈLE N˚ XL-1100H 3. Évent de baffle réflex CHAÎNE AUDIO COMPACTE CHAÎNE AUDIO COMPACTE 230 V 50 Hz 30 W...
  • Page 35 „ Télécommande Page de référence 1. Émetteur de télécommande ......8 2. Touche marche/attente ....... 9 3.
  • Page 36: Raccordement Du Système

    Raccordement du système Antenne FM Cadre-antenne PO Enregistreur de MD Enceinte droite Enceinte gauche non fourni Magnétoscope, lecteur de DVD, etc. non fourni Prise murale (230 V CA, 50 Hz) Enceinte droite Enceinte gauche Ligne blanche Noir FRANÇAIS...
  • Page 37: Raccordement Des Antennes

    „ Raccordement des antennes Notes: z Pour utiliser une antenne extérieure FM, débrancher l'antenne Antenne FM fournie: FM de la prise FM 75 OHMS. Raccorder l'antenne FM à la prise FM 75 z Pour utiliser une antenne extérieure PO, laisser le cadre-antenne OHMS et diriger l'antenne FM vers la di- PO branché...
  • Page 38: Télécommande

    Télécommande „ Mise en place des piles „ Essai de la télécommande Diriger la télécommande vers le capteur placé sur l'appareil. 1 Retirer le couvercle. Installer les piles en respectant les polarités indiquées dans La télécommande peut être utilisée dans le rayon illustré ci- le logement de piles.
  • Page 39: Commande Générale

    Commande générale „ Pour allumer l'appareil Appuyer sur la touche ON/STAND-BY pour allumer l'appareil. Pour mettre l'appareil en attente: Réappuyer sur la touche ON/STAND-BY. „ Pour modifier la luminosité de l'affichage (2 niveaux) On peut assombrir ou éclaircir l'afficheur en pressant la touche DIM- MER de la télécommande.
  • Page 40: Réglage Du Son

    Réglage du son „ Réglage du volume Appuyer sur la touche VOLUME pour augmenter le volume et la touche VOLUME pour l'effet contraire..28 29 MAX „ Réglage des graves Appareil principal: Agir sur la touche BASS/TREBLE pour afficher "BASS". 2 Avant 5 secondes, appuyer sur la touche VOLUME ( pour régler les graves.
  • Page 41: Réglage De L'horloge

    Réglage de l'horloge Avant 1 minute, appuyer sur la touche PRESET ( ) pour régler les heures et puis appuyer sur la touche MEMORY. z S'il s'agit de l'affichage 12 heures, "AM" passe automatique- ment à "PM". Avant 1 minute, appuyer sur la touche PRESET ( ) pour régler les minutes et puis appuyer sur la touche Cette opération ne se fait que par la télécommande.
  • Page 42: Écoute De Cd

    Écoute de CD Appuyer sur la touche ON/STAND-BY pour allumer l'ap- pareil. Appuyer sur la touche FUNCTION jusqu'à ce que l'ap- pareil affiche "CD STOP" ou "NO DISC". Pour télécommander l'opération, appuyer sur la touche CD. Appuyer sur la touche (OPEN/CLOSE) pour ouvrir le compartiment CD.
  • Page 43: Entretien Des Compact Discs

    Attention: Interruption de la lecture: z Ne pas arrêter ou toucher le couvercle CD à la main. L'appareil Appareil principal: peut mal fonctionner. Appuyer sur la touche z Veiller à ne pas se pincer le doigt dans le compartiment CD. Pour relancer la lecture, réappuyer sur la touche z S'il se produit une panne de courant alors que le compartiment est Télécommande:...
  • Page 44: Écoute De Cd (Suite)

    Répétition et lecture au hasard Écoute de CD (suite) „ Pour localiser un morceau On peut sélectionner l'un des modes de lecture CD: "répétition", "lecture au hasard" et "lecture normale". Pour passer au morceau suivant: En mode CD, agir sur la touche RANDOM/REPEAT de la Appuyer, en cours de lecture, sur la touche (moins de 0,5 se- télécommande pour sélectionner un mode de lecture.
  • Page 45: Lecture Des Morceaux Programmés

    Lecture des morceaux programmés On peut sélectionner 20 morceaux (maxi) en spécifiant des numé- Appuyer sur la touche MEMORY/SET(MEMORY) pour ros entre 1 et 99 pour la lecture dans un ordre souhaité. stocker le numéro de morceau. Ordre de lecture Temps de lecture total Renouveler les étapes 2 - 3 pour d'autres morceaux.
  • Page 46: Écoute De La Radio

    Écoute de la radio Appuyer sur la touche ON/STAND-BY pour allumer l'ap- pareil. Agir sur la touche FUNCTION pour afficher "FM" ou "AM". Pour télécommander l'opération, appuyer sur la touche TUNER et puis sur la touche BAND afin de sélectionner "FM" ou "AM". Appuyer sur la touche TUNING ( ) pour faire l'ac- cord sur la station souhaitée.
  • Page 47 Pour recevoir une émission FM stéréo: Appuyer sur la touche FUNCTION (BAND) pour allumer le voyant "ST". z " " apparaît lorsque l'émission FM captée est en stéréo. Voyant de mode FM stéréo Voyant de réception FM stéréo z Si la réception en FM n'est pas bonne, appuyer sur la touche FUNCTION (BAND) pour éteindre "ST".
  • Page 48: Écoute D'une Station Mise En Mémoire

    Écoute d'une station mise en mémoire „ Mise en mémoire d'une station „ Rappel d'une station mémorisée Il est possible de stocker 30 stations en PO et en FM et de les rap- Sélectionner la station souhaitée en appuyant sur la touche peler par une simple pression d'une touche (accord de présélec- PRESET ( ) moins de 0,5 seconde.
  • Page 49: Opérations Programmées Et Mise En Arrêt Différée

    Opérations programmées et mise en arrêt différée Cette opération ne se fait que par la télécommande. Appuyer sur la touche ON/STAND-BY pour allumer l'ap- Lecture programmée: pareil. L'appareil s'allume et reproduit une source souhaitée (CD, tuner). Mise en arrêt différée: Appuyer sur la touche CD ou TUNER pour sélectionner Le tuner et le CD peuvent être éteint automatiquement.
  • Page 50: Opérations Programmées Et Mise En Arrêt Différée (Suite)

    Opérations programmées et mise en arrêt différée (suite) Notes: z L'heure d'opération une fois programmée, l'appareil la conser- Avant 1 minute, appuyer sur la touche PRESET ( vera à moins qu'on ne la modifie. ) pour déclarer les minutes de départ, puis appuyer z Pour effectuer la lecture programmée avec un élément raccordé...
  • Page 51: Mise En Arrêt Différée

    „ Mise en arrêt différée „ Pour utiliser l'opération programmée et la mise en arrêt différée Allumer la source souhaitée. Exemple: s'endormir et se réveiller en écoutant la radio Appuyer sur la touche SLEEP. Il n'est pas possible d'utiliser deux sources différentes pour s'endor- mir et se réveiller.
  • Page 52: Enrichissement Du Système

    Enrichissement du système „ Écoute du son en provenance d'un magné- Le câble de raccordement n'est pas fourni. Se procurer un câble vendu dans le commerce. toscope, un lecteur DVD, etc. Utiliser un câble de raccordement pour brancher un magnétosco- Magnétoscope, pe, un lecteur de DVD, etc.
  • Page 53: Dépannage

    Dépannage Entretien „ En cas de dérangement „ Nettoyage de la cellule porte-laser CD Si l'appareil a subi une force extérieure (chocs, électricité statique, Ne pas toucher la cellule porte-laser. S'il y a une trace de doigt ou surtension due à un foudre, etc.) ou une mauvaise manipulation, il de la poussière dessus, nettoyer doucement la cellule porte-laser peut mal fonctionner.
  • Page 54: Fiche Technique

    Fiche technique „ Lecteur CD SHARP se réserve le droit d'apporter des modifications à la présen- tation et aux caractéristiques des appareils à fin d'amélioration. Les valeurs indiquées dans ce document sont les valeurs nominales des Type Lecteur de disque compact appareils de série mais de légères différences peuvent être consta-...
  • Page 55: Accessories

    ENGLISH Contents Accessories Page Please confirm that the following accessories are included. „ General Information Accessories ......... 1 Precautions .
  • Page 56: Precautions

    30 cm (12") accident causing damage. SHARP will not be held responsible for any damage resulting from use of this unit with a voltage other than that which is specified.
  • Page 57: Controls And Indicators

    Controls and Indicators „ Front panel Reference page 1. CD Compartment ....... . . 12 2.
  • Page 58: Rear Panel

    1. Tweeter 2. Woofer <The bottom of the unit> 3. Bass Reflex Duct (XL-1000H) (XL-1100H) 4. Speaker Terminals MODEL NO. XL-1000H MODEL NO. XL-1100H COMPACT AUDIO SYSTEM COMPACT AUDIO SYSTEM Speaker grilles are removable: 230 V 50 Hz 30 W...
  • Page 59 „ Remote control Reference page 1. Remote Control Transmitter ......8 2. On/Stand-by Button ....... . . 9 3.
  • Page 60: System Connections

    System Connections FM aerial AM loop aerial MD recorder Right speaker Left speaker not supplied VCR, DVD, etc. not supplied Wall socket (AC 230 V, 50 Hz) Right speaker Left speaker White line Black ENGLISH...
  • Page 61: Aerial Connection

    „ Aerial connection Notes: z When an external FM aerial is used, disconnect the supplied FM Supplied FM aerial: aerial wire from the FM 75 OHMS socket. Connect the FM aerial wire to the FM z When using an external AM aerial, be sure to keep the wire of the 75 OHMS socket and position the FM AM loop aerial connected.
  • Page 62: Remote Control

    Remote Control „ Battery installation „ Test of the remote control Face the remote control directly to the remote sensor on the unit. 1 Remove the battery cover. Insert the batteries according to the direction indicated in The remote control can be used within the range shown below: the battery compartment.
  • Page 63: General Control

    General Control „ To turn the power on Press the ON/STAND-BY button to turn the power on. To set the unit to stand-by mode: Press the ON/STAND-BY button again. „ To change the display brightness (2 levels) You can switch the display brightness by pressing the DIMMER but- ton on the remote control.
  • Page 64: Sound Control

    Sound Control „ Adjusting the volume Press the VOLUME button to increase the volume and the VOL- button for decreasing..28 29 MAX „ Adjusting the bass Main unit operation: Press the BASS/TREBLE button until "BASS" appears on the display.
  • Page 65: Setting The Clock

    Setting the Clock Within 1 minute, press the PRESET ( ) button to adjust the hour and then press the MEMORY button. z When the 12-hour display is selected, "AM" will change auto- matically to "PM". Within 1 minute, press the PRESET ( ) button to adjust the minutes and then press the MEMORY button.
  • Page 66: Listening To A Cd

    Listening to a CD Press the ON/STAND-BY button to turn the power on. Press the FUNCTION button until "CD STOP" or "NO DISC" appears on the display. When operating with the remote control, press the CD button. Press the (OPEN/CLOSE) button to open the CD com- partment.
  • Page 67: Care Of Compact Discs

    To interrupt playback: Caution: z Do not stop or move the CD compartment cover manually. It Main unit operation: may cause malfunctions to the unit. Press the button. z Be careful not to jam your fingers in the CD compartment To resume playback from the same point, press the button again.
  • Page 68: Repeat Or Random Play

    Repeat or Random Play Listening to a CD (continued) „ To locate the beginning of a track You can select one of the CD playback mode; "Repeat play", "Ran- dom play" and "Normal play". To move to the beginning of the next track: When in the CD mode, press the RANDOM/REPEAT Press the button for less than 0.5 seconds during playback.
  • Page 69: Programmed Play

    Programmed Play By specifying tracks from 1 to 99, you can choose up to 20 selec- Press the MEMORY/SET(MEMORY) button to save the tions for playback in the order you like. track number. Playback order Total playback time Repeat steps 2 - 3 for other tracks. Up to 20 tracks can be programmed.
  • Page 70: Listening To The Radio

    Listening to the Radio Press the ON/STAND-BY button to turn the power on. Press the FUNCTION button until "FM" or "AM" ap- pears on the display. When operating with the remote control, press the TUNER but- ton, and then the BAND button to select "FM" or "AM". Press the TUNING ( ) button to tune in to the de- sired station.
  • Page 71 To receive an FM stereo transmission: Press the FUNCTION (BAND) button to display the "ST" indicator. z " " will appear when an FM broadcast is in stereo. FM stereo mode indicator FM stereo receiving indicator z If the FM reception is weak, press the FUNCTION (BAND) button to extinguish the "ST"...
  • Page 72: Listening To The Memorised Station

    Listening to the memorised station „ Memorising a station „ To recall a memorised station You can store 30 AM and FM stations in memory and recall them at Press the PRESET ( ) button for less than 0.5 seconds to the push of a button.
  • Page 73: Timer And Sleep Operation

    Timer and Sleep Operation This may be operated only with the remote control. Press the ON/STAND-BY button to turn the power on. Timer playback: The unit turns on and plays the desired source (CD, tuner) at the Press the CD or TUNER button to select the desired preset time.
  • Page 74 Timer and Sleep Operation (continued) Notes: z Once the time is set, the setting will be retained until a new time Within 1 minute, press the PRESET ( ) button to is entered. specify the minutes to start, then press the MEMORY z When performing timer playback using another unit connected to button.
  • Page 75: Sleep Operation

    „ Sleep operation „ To use timer and sleep operation together Example: To fall asleep and wake to the same radio station Play back the desired sound source. You can play back the same source only (the function cannot be switched).
  • Page 76: Enhancing Your System

    Enhancing Your System „ Listening to the playback sounds from The connection lead is not included. Purchase a commercially avail- able lead as shown below. VCR, DVD, etc. Use a connection lead to connect the VCR, DVD, etc. to the VID- VCR, DVD, etc.
  • Page 77: Troubleshooting

    Troubleshooting Maintenance „ If trouble occurs „ Cleaning the CD pickup lens When this product is subjected to strong external interference Do not touch the laser pickup lens. If fingerprints or dust accumulate (mechanical shock, excessive static electricity, abnormal supply on the pickup, clean it gently with a dry cotton swab.
  • Page 78: Specifications

    Specifications „ CD player As part of our policy of continuous improvement, SHARP reserves the right to make design and specification changes for product improvement without prior notice. The performance specification fig- Type Compact disc player ures indicated are nominal values of production units. There may be...
  • Page 79 MEMORANDUM/MÉMORANDUM/MEMORÁNDUM/ANTECKNINGAR/ANNOTAZIONI/MEMORANDUM/MEMO...
  • Page 80 SHARP CORPORATION 9906 TINSZ0091SJZZ C0103.HK...

Ce manuel est également adapté pour:

Xl-1100h

Table des Matières